
Tutorials
Red Hat OpenShift Service on AWS tutorials
Abstract
Chapter 1. Tutorials overview
Step-by-step tutorials from Red Hat experts to help you get the most out of your Managed OpenShift cluster.
In an effort to make this Cloud Expert tutorial content available quickly, it may not yet be tested on every supported configuration.
Chapter 2. Tutorial: ROSA with HCP activation and account linking
This tutorial describes the process for activating Red Hat OpenShift Service on AWS (ROSA) with hosted control planes (HCP) and linking to an AWS account, before deploying the first cluster.
If you have received a private offer for the product, make sure to proceed according to the instructions provided with the private offer before following this tutorial. The private offer is designed either for a case when the product is already activated, which replaces an active subscription, or for first time activations.
2.1. Prerequisites
- Make sure to log into the Red Hat account that you plan to associate with the AWS account where you have activated ROSA with HCP in previous steps.
- Only a single AWS account that will be used for service billing can be associated with a Red Hat account. Typically an organizational AWS account that has other AWS accounts, such as developer accounts, linked would be the one that is to be billed, rather than individual AWS end user accounts.
- Red Hat accounts belonging to the same Red Hat organization will be linked with the same AWS account. Therefore, you can manage who has access to creating ROSA with HCP clusters on the Red Hat organization account level.
2.2. Subscription enablement and AWS account setup
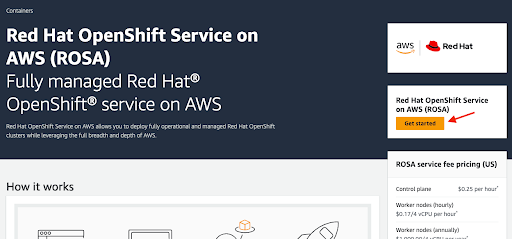
Activate the ROSA with HCP product at the AWS console page by clicking the Get started button:
If you have activated ROSA before but did not complete the process, you can click the button and complete the account linking as described in the following steps.
Confirm that you want your contact information to be shared with Red Hat and enable the service:
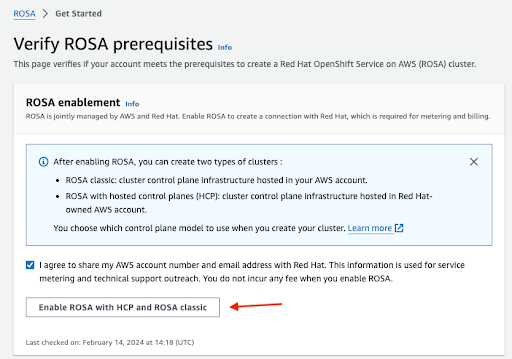
- You will not be charged by enabling the service in this step. The connection is made for billing and metering that will take place only after you deploy your first cluster. This could take a few minutes.
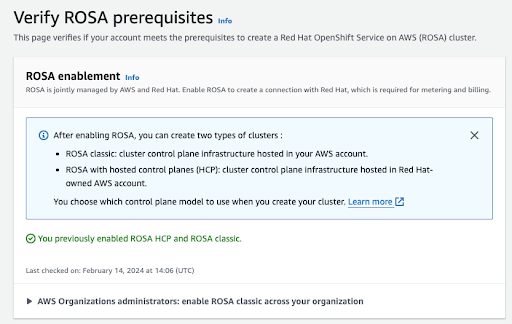
After the process is completed, you will see a confirmation:
Other sections on this verification page show the status of additional prerequisites. In case any of these prerequisites are not met, a respective message is shown. Here is an example of insufficient quotas in the selected region:
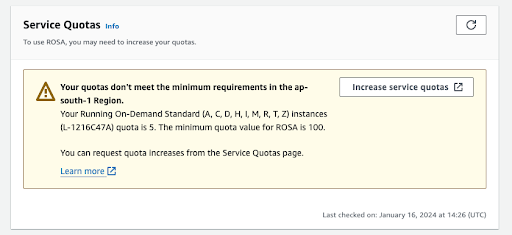
- Click the Increase service quotas button or use the Learn more link to get more information about the about how to manage service quotas. In the case of insufficient quotas, note that quotas are region-specific. You can use the region switcher in the upper right corner of the web console to re-run the quota check for any region you are interested in and then submit service quota increase requests as needed.
If all the prerequisites are met, the page will look like this:
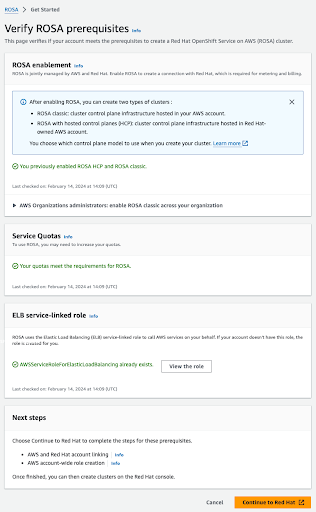
The ELB service-linked role is created for you automatically. You can click any of the small Info blue links to get contextual help and resources.
2.3. AWS and Red Hat account and subscription linking
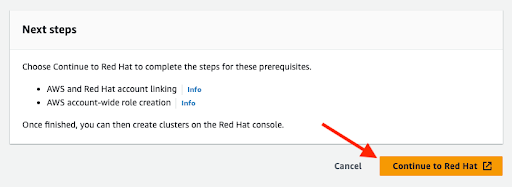
Click the orange Continue to Red Hat button to proceed with account linking:
If you are not already logged in to your Red Hat account in your current browser’s session, you will be asked to log in to your account:
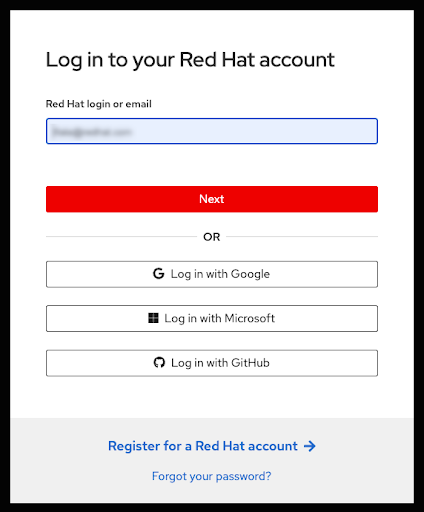
- You can also register for a new Red Hat account or reset your password on this page.
- Make sure to log into the Red Hat account that you plan to associate with the AWS account where you have activated ROSA with HCP in previous steps.
- Only a single AWS account that will be used for service billing can be associated with a Red Hat account. Typically an organizational AWS account that has other AWS accounts, such as developer accounts, linked would be the one that is to be billed, rather than individual AWS end user accounts.
- Red Hat accounts belonging to the same Red Hat organization will be linked with the same AWS account. Therefore, you can manage who has access to creating ROSA with HCP clusters on the Red Hat organization account level.
Complete the Red Hat account linking after reviewing the terms and conditions:
NoteThis step is available only if the logged-in Red Hat account, or the Red Hat organization managing the Red Hat account, was not linked to an AWS account before.
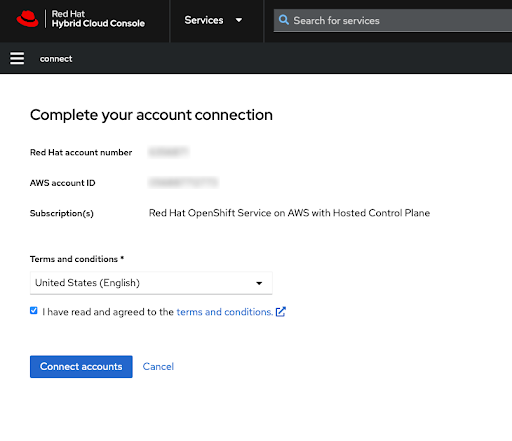
Both the Red Hat and AWS account numbers are shown on this screen.
Click the Connect accounts button if you agree with the service terms.
If this is the first time you are using the Red Hat Hybrid Cloud Console, you will be asked to agree with the general managed services terms and conditions before being able to create the first ROSA cluster:
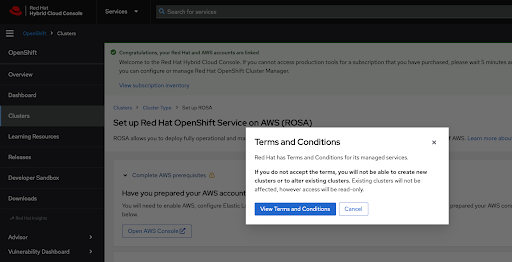
Additional terms that need to be reviewed and accepted will be shown after clicking the View Terms and Conditions button:
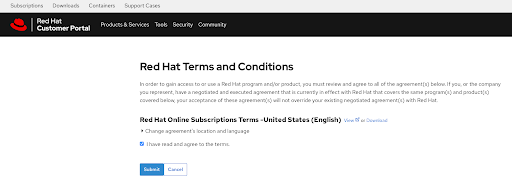
Submit your agreement once you have reviewed any additional terms when prompted at this time.
The Hybrid Cloud Console provides a confirmation that AWS prerequisites were completed and lists the first steps needed for cluster deployment:
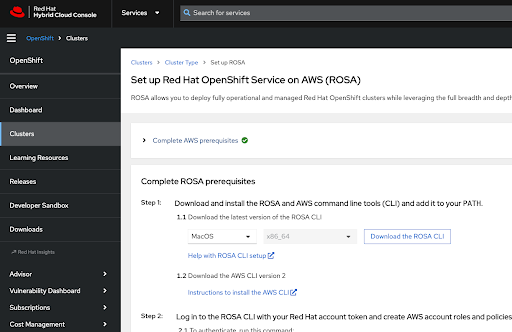
The following steps pertain to technical deployment of the cluster:
- It is possible that these steps will be performed on a different machine than where the service enablement and account linking were completed.
As mentioned previously, any Red Hat account belonging to the Red Hat organization that was linked with the AWS account that activated the ROSA service will have access to creating a cluster and will be able to select the billing AWS account that was linked under this Red Hat organization previously.
The last section of this page shows cluster deployment options, either using the
rosaCLI or through the web console: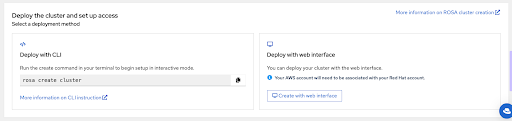
-
The following steps describe cluster deployment using the
rosaCLI. -
If you are interested in deployment using the web console only, you can skip to the ROSA with HCP cluster deployment using the web console section. However, note that the
rosaCLI is required for certain tasks, such as creating the account roles. If you are deploying ROSA for the first time, follow this the CLI steps until running therosa whoamicommand, before skipping to the web console deployment steps.
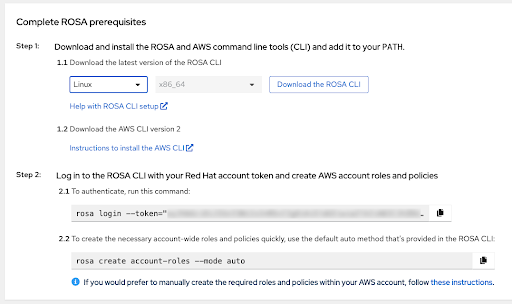
2.4. ROSA with HCP cluster deployment using the CLI
Click the Download the ROSA CLI button to download the ROSA command line interface (CLI) for your operating system and set it up as described in the Help with ROSA CLI setup.
ImportantMake sure that you have the most recent AWS CLI installed. See Instructions to install the AWS CLI for more information.
-
After the previous steps are completed, you can verify that both CLI are available by running the
rosa version. This command shows an update notification if you are using an older version andaws –versioncommands in your terminal. The prerequisite for creating a ROSA with HCP cluster is to log in using the
rosacli by the personalized command with your unique token shown under step 2.1. To authenticate, run this command on the web console. Use the copy button for easy copy and pasting of the command with full token into your terminal: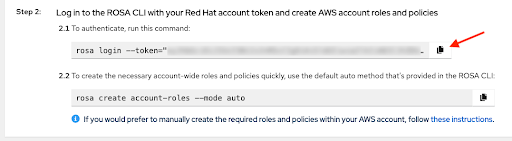
Do not share your unique token.
-
The final prerequisite before your first cluster deployment is making sure the necessary account-wide roles and policies are created. The
rosaCLI can help with that by using the command shown under step 2.2. To create the necessary account-wide roles and policies quickly… on the web console. The alternative to that is manual creation of these roles and policies. After logging in, creating the account roles, and verifying your identity using the
rosa whoamicommand, your terminal will look similar to this: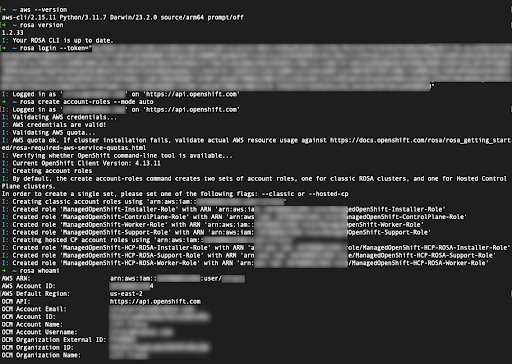
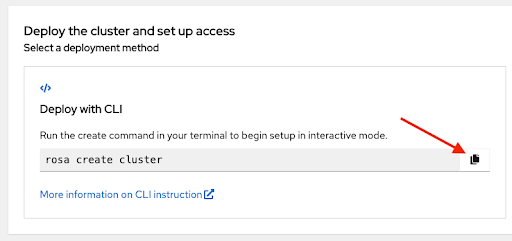
Initiate the cluster deployment using the presented command. You can click the copy button again and paste the command in your terminal:
-
To use a custom AWS profile, one of the non-default profiles specified in your
~/.aws/credentials, you can add the–profile <profile_name>selector to the rosa create cluster command so that the command looks like rosa create cluster–profile stage. If no AWS CLI profile is specified using this option, the default AWS CLI profile will determine the AWS infrastructure profile into which the cluster is deployed. The billing AWS profile is selected in one of the following steps. After entering a cluster name, you will be asked whether to use the hosted control plane. Select yes:

When deploying a ROSA with HCP cluster, the billing AWS account needs to be specified:
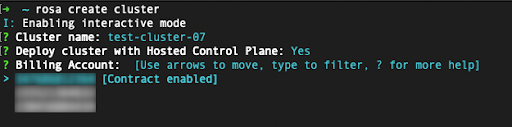
- Only AWS accounts that were linked to the Red Hat organization that is currently used will be shown.
- The specified AWS account will be charged for using the ROSA service, regardless of whether the infrastructure AWS account is linked to it in the same AWS organization.
- You can see an indicator of whether the ROSA contract is enabled for a given AWS billing account or not.
- To select an AWS account that does not have the contract enabled, refer to the first few steps in this tutorial to enable the contract and allow the service charging, which is required for a successful cluster deployment.
In the following steps, you will specify technical details of the cluster that is to be deployed:

- These steps are beyond the scope of this tutorial. See Creating ROSA with HCP clusters using the default options for more details about how to complete the ROSA with HCP cluster deployment using the CLI.
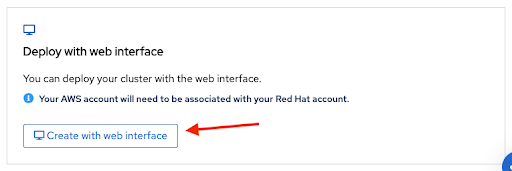
2.5. ROSA with HCP cluster deployment using the web console
A cluster can be created using the web console by selecting the second option in the bottom section of the introductory Set up ROSA page:
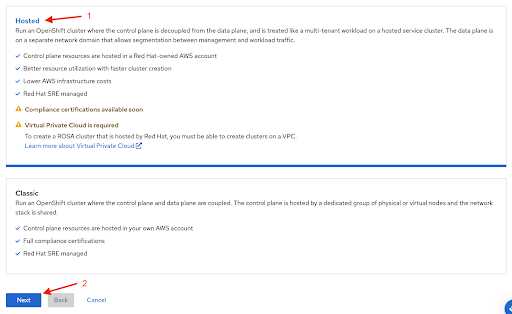
The first step when creating a ROSA cluster using the web console is the control plane selection. Make sure the Hosted option is selected before clicking the Next button:
The next step Accounts and roles allows you specifying the infrastructure AWS account, into which the the ROSA cluster will be deployed and where the resources will be consumed and managed:
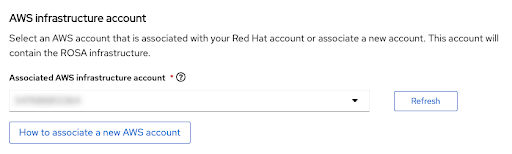
- Click the How to associate a new AWS account, if you don not see the account into which you want to deploy the ROSA cluster for detailed information on how to create or link account roles for this association.
-
The
rosaCLI is used for this. -
If you are using multiple AWS accounts and have their profiles configured for the AWS CLI, you can use the
--profileselector to specify the AWS profile when working with therosaCLI commands.
The billing AWS account is selected in the immediately following section:
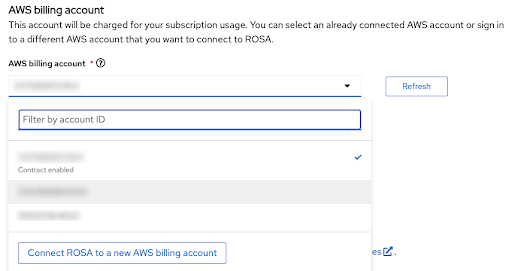
- Only AWS accounts that were linked to the Red Hat organization that is currently used will be shown.
- The specified AWS account will be charged for using the ROSA service, regardless of whether the infrastructure AWS account is linked to it in the same AWS organization.
- You can see an indicator whether the ROSA contract is enabled for a given AWS billing account or not.
- In case you would like to use an AWS account that does not have a contract enabled yet, you can either use the Connect ROSA to a new AWS billing account to reach the ROSA AWS console page, where you can activate it after logging in using the respective AWS account by following steps described earlier in this tutorial, or ask the administrator of the AWS account to do that for you.
The following steps past the billing AWS account selection are beyond the scope of this tutorial.
Additional resources
- For information on using the CLI to create a cluster, see Creating a ROSA with HCP cluster using the CLI.
- See this learning path for more details on how to complete ROSA cluster deployment using the web console.
Chapter 3. Tutorial: Verifying Permissions for a ROSA STS Deployment
To proceed with the deployment of a ROSA cluster, an account must support the required roles and permissions. AWS Service Control Policies (SCPs) cannot block the API calls made by the installer or operator roles.
Details about the IAM resources required for an STS-enabled installation of ROSA can be found here: About IAM resources for ROSA clusters that use STS
This guide is validated for ROSA v4.11.X.
3.1. Prerequisites
3.2. Verifying ROSA permissions
To verify the permissions required for ROSA, we can run the script included in the following section without ever creating any AWS resources.
The script uses the rosa, aws, and jq CLI commands to create files in the working directory that will be used to verify permissions in the account connected to the current AWS configuration.
The AWS Policy Simulator is used to verify the permissions of each role policy against the API calls extracted by jq; results are then stored in a text file appended with .results.
This script is designed to verify the permissions for the current account and region.
3.3. Usage Instructions
To use the script, run the following commands in a
bashterminal (the -p option defines a prefix for the roles):$ mkdir scratch $ cd scratch $ cat << 'EOF' > verify-permissions.sh #!/bin/bash while getopts 'p:' OPTION; do case "$OPTION" in p) PREFIX="$OPTARG" ;; ?) echo "script usage: $(basename \$0) [-p PREFIX]" >&2 exit 1 ;; esac done shift "$(($OPTIND -1))" rosa create account-roles --mode manual --prefix $PREFIX INSTALLER_POLICY=$(cat sts_installer_permission_policy.json | jq ) CONTROL_PLANE_POLICY=$(cat sts_instance_controlplane_permission_policy.json | jq) WORKER_POLICY=$(cat sts_instance_worker_permission_policy.json | jq) SUPPORT_POLICY=$(cat sts_support_permission_policy.json | jq) simulatePolicy () { outputFile="${2}.results" echo $2 aws iam simulate-custom-policy --policy-input-list "$1" --action-names $(jq '.Statement | map(select(.Effect == "Allow"))[].Action | if type == "string" then . else .[] end' "$2" -r) --output text > $outputFile } simulatePolicy "$INSTALLER_POLICY" "sts_installer_permission_policy.json" simulatePolicy "$CONTROL_PLANE_POLICY" "sts_instance_controlplane_permission_policy.json" simulatePolicy "$WORKER_POLICY" "sts_instance_worker_permission_policy.json" simulatePolicy "$SUPPORT_POLICY" "sts_support_permission_policy.json" EOF $ chmod +x verify-permissions.sh $ ./verify-permissions.sh -p SimPolTestAfter the script completes, review each results file to ensure that none of the required API calls are blocked:
$ for file in $(ls *.results); do echo $file; cat $file; done
The output will look similar to the following:
sts_installer_permission_policy.json.results
EVALUATIONRESULTS       autoscaling:DescribeAutoScalingGroups   allowed *
MATCHEDSTATEMENTS       PolicyInputList.1       IAM Policy
ENDPOSITION     6       195
STARTPOSITION   17      3
EVALUATIONRESULTS       ec2:AllocateAddress     allowed *
MATCHEDSTATEMENTS       PolicyInputList.1       IAM Policy
ENDPOSITION     6       195
STARTPOSITION   17      3
EVALUATIONRESULTS       ec2:AssociateAddress    allowed *
MATCHEDSTATEMENTS       PolicyInputList.1       IAM Policy
...
NoteIf any actions are blocked, review the error provided by AWS and consult with your Administrator to determine if SCPs are blocking the required API calls.
Chapter 4. Configuring log forwarding for CloudWatch logs and STS
Use this tutorial to deploy the Red Hat OpenShift Logging Operator and configure it to use Security Token Services (STS) authentication to forward logs to CloudWatch.
Prerequisites
- A Red Hat OpenShift Service on AWS (ROSA) Classic cluster
-
The
jqcommand-line interface (CLI) -
The Amazon Web Services (AWS) CLI (
aws)
4.1. Setting up your environment
Configure the following environment variables, changing the cluster name to suit your cluster:
NoteYou must be logged in as an administrator.
$ export ROSA_CLUSTER_NAME=$(oc get infrastructure cluster -o=jsonpath="{.status.infrastructureName}"  | sed 's/-[a-z0-9]\{5\}$//')
$ export REGION=$(rosa describe cluster -c ${ROSA_CLUSTER_NAME} --output json | jq -r .region.id)
$ export OIDC_ENDPOINT=$(oc get authentication.config.openshift.io cluster -o json | jq -r .spec.serviceAccountIssuer | sed  's|^https://||')
$ export AWS_ACCOUNT_ID=`aws sts get-caller-identity --query Account --output text`
$ export AWS_PAGER=""
$ export SCRATCH="/tmp/${ROSA_CLUSTER_NAME}/clf-cloudwatch-sts"
$ mkdir -p ${SCRATCH}
Ensure all fields output correctly before moving to the next section:
$ echo "Cluster: ${ROSA_CLUSTER_NAME}, Region: ${REGION}, OIDC Endpoint: ${OIDC_ENDPOINT}, AWS Account ID: ${AWS_ACCOUNT_ID}"
4.2. Preparing your AWS account
Create an Identity Access Management (IAM) policy for logging:
$ POLICY_ARN=$(aws iam list-policies --query "Policies[?PolicyName=='RosaCloudWatch'].{ARN:Arn}" --output text)
$ if [[ -z "${POLICY_ARN}" ]]; then
cat << EOF > ${SCRATCH}/policy.json
{
  "Version": "2012-10-17",
  "Statement": [
     {
           "Effect": "Allow",
           "Action": [
              "logs:CreateLogGroup",
              "logs:CreateLogStream",
              "logs:DescribeLogGroups",
              "logs:DescribeLogStreams",
              "logs:PutLogEvents",
              "logs:PutRetentionPolicy"
           ],
           "Resource": "arn:aws:logs:*:*:*"
     }
]
}
EOF
POLICY_ARN=$(aws iam create-policy --policy-name "RosaCloudWatch" \
--policy-document file:///${SCRATCH}/policy.json --query Policy.Arn --output text)
fi
$ echo ${POLICY_ARN}
Create an IAM role trust policy for the cluster:
$ cat <<EOF > ${SCRATCH}/trust-policy.json
{
   "Version": "2012-10-17",
   "Statement": [{
     "Effect": "Allow",
     "Principal": {
       "Federated": "arn:aws:iam::${AWS_ACCOUNT_ID}:oidc-provider/${OIDC_ENDPOINT}"
     },
     "Action": "sts:AssumeRoleWithWebIdentity",
     "Condition": {
       "StringEquals": {
         "${OIDC_ENDPOINT}:sub": "system:serviceaccount:openshift-logging:logcollector"
       }
     }
   }]
}
EOF
$ ROLE_ARN=$(aws iam create-role --role-name "${ROSA_CLUSTER_NAME}-RosaCloudWatch" \
      --assume-role-policy-document file://${SCRATCH}/trust-policy.json \
      --query Role.Arn --output text)
$ echo ${ROLE_ARN}
Attach the IAM policy to the IAM role:
$ aws iam attach-role-policy --role-name "${ROSA_CLUSTER_NAME}-RosaCloudWatch" \
   --policy-arn ${POLICY_ARN}
4.3. Deploying Operators
Deploy the Red Hat OpenShift Logging Operator:
$  cat << EOF | oc apply -f -
   apiVersion: operators.coreos.com/v1alpha1
   kind: Subscription
   metadata:
     labels:
      operators.coreos.com/cluster-logging.openshift-logging: ""
     name: cluster-logging
     namespace: openshift-logging
   spec:
     channel: stable
     installPlanApproval: Automatic
     name: cluster-logging
     source: redhat-operators
     sourceNamespace: openshift-marketplace
EOF
Create a secret:
$  cat << EOF | oc apply -f -
  apiVersion: v1
  kind: Secret
  metadata:
    name: cloudwatch-credentials
    namespace: openshift-logging
  stringData:
    role_arn: $ROLE_ARN
EOF
4.4. Configuring cluster logging
Create a
ClusterLogForwardercustom resource (CR):$ cat << EOF | oc apply -f - apiVersion: "logging.openshift.io/v1" kind: ClusterLogForwarder metadata: name: instance namespace: openshift-logging spec: outputs: - name: cw type: cloudwatch cloudwatch: groupBy: namespaceName groupPrefix: rosa-${ROSA_CLUSTER_NAME} region: ${REGION} secret: name: cloudwatch-credentials pipelines: - name: to-cloudwatch inputRefs: - infrastructure - audit - application outputRefs: - cw EOFCreate a
ClusterLoggingCR:$ cat << EOF | oc apply -f - apiVersion: logging.openshift.io/v1 kind: ClusterLogging metadata: name: instance namespace: openshift-logging spec: collection: logs: type: vector managementState: Managed EOF
4.5. Checking CloudWatch for logs
Use either the AWS console or the AWS CLI to validate that there are log streams from the cluster.
To validate the logs in the AWS CLI, run the following command:
$ aws logs describe-log-groups --log-group-name-prefix rosa-${ROSA_CLUSTER_NAME}Sample output
{ "logGroups": [ { "logGroupName": "rosa-xxxx.audit", "creationTime": 1661286368369, "metricFilterCount": 0, "arn": "arn:aws:logs:us-east-2:xxxx:log-group:rosa-xxxx.audit:*", "storedBytes": 0 }, { "logGroupName": "rosa-xxxx.infrastructure", "creationTime": 1661286369821, "metricFilterCount": 0, "arn": "arn:aws:logs:us-east-2:xxxx:log-group:rosa-xxxx.infrastructure:*", "storedBytes": 0 } ] }NoteIf this is a new cluster, you might not see a log group for
applicationlogs as applications are not yet running.
4.6. Cleaning up your resources
Delete the
ClusterLogForwarderCR:$ oc delete -n openshift-logging clusterlogforwarder instance
Delete the
ClusterLoggingCR:$ oc delete -n openshift-logging clusterlogging instance
Detach the IAM policy to the IAM role:
$ aws iam detach-role-policy --role-name "${ROSA_CLUSTER_NAME}-RosaCloudWatch" \
   --policy-arn "${POLICY_ARN}"
Delete the IAM role:
$ aws iam delete-role --role-name "${ROSA_CLUSTER_NAME}-RosaCloudWatch"Delete the IAM policy:
ImportantOnly delete the IAM policy if there are no other resources using the policy.
$ aws iam delete-policy --policy-arn "${POLICY_ARN}"Delete the CloudWatch log groups:
$ aws logs delete-log-group --log-group-name "rosa-${ROSA_CLUSTER_NAME}.audit"
$ aws logs delete-log-group --log-group-name "rosa-${ROSA_CLUSTER_NAME}.infrastructure"
Chapter 5. Tutorial: Using AWS WAF and Amazon CloudFront to protect ROSA workloads
AWS WAF is a web application firewall that lets you monitor the HTTP and HTTPS requests that are forwarded to your protected web application resources.
You can use an Amazon CloudFront to add a Web Application Firewall (WAF) to your Red Hat OpenShift Service on AWS (ROSA) workloads. Using an external solution protects ROSA resources from experiencing denial of service due to handling the WAF.
5.1. Prerequisites
- A ROSA Classic cluster.
-
You have access to the OpenShift CLI (
oc). -
You have access to the AWS CLI (
aws).
5.1.1. Environment setup
Prepare the environment variables:
$ export AWS_PAGER=""
$ export CLUSTER_NAME=$(oc get infrastructure cluster -o=jsonpath="{.status.infrastructureName}"  | sed 's/-[a-z0-9]\{5\}$//')
$ export REGION=$(oc get infrastructure cluster -o=jsonpath="{.status.platformStatus.aws.region}")
$ export AWS_ACCOUNT_ID=$(aws sts get-caller-identity --query Account --output text)
$ export SCRATCH="/tmp/${CLUSTER_NAME}/cloudfront-waf"
$ mkdir -p ${SCRATCH}
$ echo "Cluster: ${CLUSTER_NAME}, Region: ${REGION}, AWS Account ID: ${AWS_ACCOUNT_ID}"
5.2. Custom domain setup
It is necessary to configure a secondary ingress controller to segment your external WAF-protected traffic from your standard (and default) cluster ingress controller. In ROSA, we do this using the Custom Domain Operator.
Prerequisites
-
A unique domain, such as
*.apps.<company_name>.io -
A custom SAN or wildcard certificate, such as
CN=*.apps.<company_name>.io
Procedure
Create a new project
$ oc new-project waf-demo
Create a new TLS secret from a private key and a public certificate, where
fullchain.pemis your full wildcard certificate chain (including any intermediaries) andprivkey.pemis your wildcard certificate’s private key.Example
$ oc -n waf-demo create secret tls waf-tls --cert=fullchain.pem --key=privkey.pem
Create a new
CustomDomaincustom resource (CR):Example
waf-custom-domain.yamlapiVersion: managed.openshift.io/v1alpha1 kind: CustomDomain metadata: name: cloudfront-waf spec: domain: apps.<company_name>.io 1 scope: External loadBalancerType: NLB certificate: name: waf-tls namespace: waf-demo routeSelector: 2 matchLabels: route: waf
Apply the CR:
Example
$ oc apply -f waf-custom-domain.yaml
Verify that your custom domain ingress controller has been deployed and is
Ready:$ oc get customdomains
Example output
NAME               ENDPOINT                                                    DOMAIN                       STATUS
cloudfront-waf     xxrywp.<company_name>.cluster-01.opln.s1.openshiftapps.com  *.apps.<company_name>.io     Ready
5.2.1. Configure the AWS WAF
The AWS WAF service is a web application firewall that lets you monitor, protect, and control the HTTP and HTTPS requests that are forwarded to your protected web application resources, like ROSA.
Create a AWS WAF rules file to apply to our web ACL:
$ cat << EOF > ${SCRATCH}/waf-rules.json
[
    {
      "Name": "AWS-AWSManagedRulesCommonRuleSet",
      "Priority": 0,
      "Statement": {
        "ManagedRuleGroupStatement": {
          "VendorName": "AWS",
          "Name": "AWSManagedRulesCommonRuleSet"
        }
      },
      "OverrideAction": {
        "None": {}
      },
      "VisibilityConfig": {
        "SampledRequestsEnabled": true,
        "CloudWatchMetricsEnabled": true,
        "MetricName": "AWS-AWSManagedRulesCommonRuleSet"
      }
    },
    {
      "Name": "AWS-AWSManagedRulesSQLiRuleSet",
      "Priority": 1,
      "Statement": {
        "ManagedRuleGroupStatement": {
          "VendorName": "AWS",
          "Name": "AWSManagedRulesSQLiRuleSet"
        }
      },
      "OverrideAction": {
        "None": {}
      },
      "VisibilityConfig": {
        "SampledRequestsEnabled": true,
        "CloudWatchMetricsEnabled": true,
        "MetricName": "AWS-AWSManagedRulesSQLiRuleSet"
      }
    }
]
EOF
This will enable the Core (Common) and SQL AWS Managed Rule Sets.
Create an AWS WAF Web ACL using the rules we specified above:
$ WAF_WACL=$(aws wafv2 create-web-acl \
  --name cloudfront-waf \
  --region ${REGION} \
  --default-action Allow={} \
  --scope CLOUDFRONT \
  --visibility-config SampledRequestsEnabled=true,CloudWatchMetricsEnabled=true,MetricName=${CLUSTER_NAME}-waf-metrics \
  --rules file://${SCRATCH}/waf-rules.json \
  --query 'Summary.Name' \
  --output text)
5.3. Configure Amazon CloudFront
Retrieve the newly created custom domain ingress controller’s NLB hostname:
$ NLB=$(oc -n openshift-ingress get service router-cloudfront-waf \
  -o jsonpath='{.status.loadBalancer.ingress[0].hostname}')
$ echo "Origin domain: ${NLB}"
Import your certificate into Amazon Certificate Manager, where
cert.pemis your wildcard certificate,fullchain.pemis your wildcard certificate’s chain andprivkey.pemis your wildcard certificate’s private key.NoteRegardless of what region your cluster is deployed, you must import this certificate to
us-east-1as Amazon CloudFront is a global AWS service.Example
$ aws acm import-certificate --certificate file://cert.pem \
  --certificate-chain file://fullchain.pem \
  --private-key file://privkey.pem \
  --region us-east-1
- Log into the AWS console to create a CloudFront distribution.
Configure the CloudFront distribution by using the following information:
NoteIf an option is not specified in the table below, leave them the default (which may be blank).
Option Value Origin domain
Output from the command above [1]
Name
rosa-waf-ingress [2]
Viewer protocol policy
Redirect HTTP to HTTPS
Allowed HTTP methods
GET, HEAD, OPTIONS, PUT, POST, PATCH, DELETE
Cache policy
CachingDisabled
Origin request policy
AllViewer
Web Application Firewall (WAF)
Enable security protections
Use existing WAF configuration
true
Choose a web ACL
cloudfront-wafAlternate domain name (CNAME)
*.apps.<company_name>.io [3]
Custom SSL certificate
Select the certificate you imported from the step above [4]
-
Run
echo ${NLB}to get the origin domain. - If you have multiple clusters, ensure the origin name is unique.
- This should match the wildcard domain you used to create the custom domain ingress controller.
- This should match the alternate domain name entered above.
-
Run
Retrieve the Amazon CloudFront Distribution endpoint:
$ aws cloudfront list-distributions --query "DistributionList.Items[?Origins.Items[?DomainName=='${NLB}']].DomainName" --output textUpdate the DNS of your custom wildcard domain with a CNAME to the Amazon CloudFront Distribution endpoint from the step above.
Example
*.apps.<company_name>.io CNAME d1b2c3d4e5f6g7.cloudfront.net
5.4. Deploy a sample application
Deploy a hello world application:
$ oc -n waf-demo new-app --image=docker.io/openshift/hello-openshift
Create a route for the application specifying your custom domain name:
Example
$ oc -n waf-demo create route edge --service=hello-openshift hello-openshift-tls \
--hostname hello-openshift.apps.<company_name>.io
Label the route to admit it to your custom domain ingress controller:
$ oc -n waf-demo label route.route.openshift.io/hello-openshift-tls route=waf
5.5. Test the WAF
Test that the app is accessible behind Amazon CloudFront:
Example
$ curl "https://hello-openshift.apps.<company_name>.io"
Example output
Hello OpenShift!
Test that the WAF denies a bad request:
Example
$ curl -X POST "https://hello-openshift.apps.<company_name>.io" \
  -F "user='<script><alert>Hello></alert></script>'"
Example output
<html>
<head><title>403 Forbidden</title></head>
<body>
<center><h1>403 Forbidden</h1></center>
</body>
</html
The expected result is a
403 Forbiddenerror, which means the AWS WAF is protecting your application.
5.6. Additional resources
- Custom domains for applications in the Red Hat documentation
- Adding Extra Security with AWS WAF, CloudFront and ROSA | Amazon Web Services on YouTube
Chapter 6. Tutorial: Using AWS WAF and AWS ALBs to protect ROSA workloads
AWS WAF is a web application firewall that lets you monitor the HTTP and HTTPS requests that are forwarded to your protected web application resources.
You can use an AWS Application Load Balancer (ALB) to add a Web Application Firewall (WAF) to your Red Hat OpenShift Service on AWS (ROSA) workloads. Using an external solution protects ROSA resources from experiencing denial of service due to handling the WAF.
It is recommended that you use the CloudFront method unless you absolutely must use an ALB based solution.
6.1. Prerequisites
AWS ALBs require a multi-AZ cluster, as well as three public subnets split across three AZs in the same VPC as the cluster.
- A multi-AZ ROSA Classic cluster.
-
You have access to the OpenShift CLI (
oc). -
You have access to the AWS CLI (
aws).
6.1.1. Environment setup
Prepare the environment variables:
$ export AWS_PAGER=""
$ export CLUSTER_NAME=$(oc get infrastructure cluster -o=jsonpath="{.status.infrastructureName}"  | sed 's/-[a-z0-9]\{5\}$//')
$ export REGION=$(oc get infrastructure cluster -o=jsonpath="{.status.platformStatus.aws.region}")
$ export OIDC_ENDPOINT=$(oc get authentication.config.openshift.io cluster -o jsonpath='{.spec.serviceAccountIssuer}' | sed  's|^https://||')
$ export AWS_ACCOUNT_ID=$(aws sts get-caller-identity --query Account --output text)
$ export SCRATCH="/tmp/${CLUSTER_NAME}/alb-waf"
$ mkdir -p ${SCRATCH}
$ echo "Cluster: ${CLUSTER_NAME}, Region: ${REGION}, OIDC Endpoint: ${OIDC_ENDPOINT}, AWS Account ID: ${AWS_ACCOUNT_ID}"
6.1.2. AWS VPC and subnets
This section only applies to clusters that were deployed into existing VPCs. If you did not deploy your cluster into an existing VPC, skip this section and proceed to the installation section below.
Set the below variables to the proper values for your ROSA deployment:
$ export VPC_ID=<vpc-id>
$ export PUBLIC_SUBNET_IDS=<public-subnets>
$ export PRIVATE_SUBNET_IDS=<private-subnets>
Add a tag to your cluster’s VPC with the cluster name:
$ aws ec2 create-tags --resources ${VPC_ID} --tags Key=kubernetes.io/cluster/${CLUSTER_NAME},Value=owned --region ${REGION}Add a tag to your public subnets:
$ aws ec2 create-tags \
     --resources ${PUBLIC_SUBNET_IDS} \
     --tags Key=kubernetes.io/role/elb,Value='' \
     --region ${REGION}
Add a tag to your private subnets:
$ aws ec2 create-tags \
     --resources "${PRIVATE_SUBNET_IDS}" \
     --tags Key=kubernetes.io/role/internal-elb,Value='' \
     --region ${REGION}
6.2. Deploy the AWS Load Balancer Operator
The AWS Load Balancer Operator is used to used to install, manage and configure an instance of aws-load-balancer-controller in a ROSA cluster. To deploy ALBs in ROSA, we need to first deploy the AWS Load Balancer Operator.
Create an AWS IAM policy for the AWS Load Balancer Controller:
NoteThe policy is sourced from the upstream AWS Load Balancer Controller policy plus permission to create tags on subnets. This is required by the operator to function.
$ oc new-project aws-load-balancer-operator
$ POLICY_ARN=$(aws iam list-policies --query \
     "Policies[?PolicyName=='aws-load-balancer-operator-policy'].{ARN:Arn}" \
     --output text)
$ if [[ -z "${POLICY_ARN}" ]]; then
    wget -O "${SCRATCH}/load-balancer-operator-policy.json" \
       https://raw.githubusercontent.com/rh-mobb/documentation/main/content/docs/rosa/aws-load-balancer-operator/load-balancer-operator-policy.json
     POLICY_ARN=$(aws --region "$REGION" --query Policy.Arn \
     --output text iam create-policy \
     --policy-name aws-load-balancer-operator-policy \
     --policy-document "file://${SCRATCH}/load-balancer-operator-policy.json")
fi
$ echo $POLICY_ARN
Create an AWS IAM trust policy for AWS Load Balancer Operator:
$ cat <<EOF > "${SCRATCH}/trust-policy.json"
{
 "Version": "2012-10-17",
 "Statement": [
 {
 "Effect": "Allow",
 "Condition": {
   "StringEquals" : {
     "${OIDC_ENDPOINT}:sub": ["system:serviceaccount:aws-load-balancer-operator:aws-load-balancer-operator-controller-manager", "system:serviceaccount:aws-load-balancer-operator:aws-load-balancer-controller-cluster"]
   }
 },
 "Principal": {
   "Federated": "arn:aws:iam::$AWS_ACCOUNT_ID:oidc-provider/${OIDC_ENDPOINT}"
 },
 "Action": "sts:AssumeRoleWithWebIdentity"
 }
 ]
}
EOF
Create an AWS IAM role for the AWS Load Balancer Operator:
$ ROLE_ARN=$(aws iam create-role --role-name "${CLUSTER_NAME}-alb-operator" \
   --assume-role-policy-document "file://${SCRATCH}/trust-policy.json" \
   --query Role.Arn --output text)
$ echo $ROLE_ARN

$ aws iam attach-role-policy --role-name "${CLUSTER_NAME}-alb-operator" \
     --policy-arn $POLICY_ARN
Create a secret for the AWS Load Balancer Operator to assume our newly created AWS IAM role:
$ cat << EOF | oc apply -f -
apiVersion: v1
kind: Secret
metadata:
  name: aws-load-balancer-operator
  namespace: aws-load-balancer-operator
stringData:
  credentials: |
    [default]
    role_arn = $ROLE_ARN
    web_identity_token_file = /var/run/secrets/openshift/serviceaccount/token
EOF
Install the Red Hat AWS Load Balancer Operator:
$ cat << EOF | oc apply -f -
apiVersion: operators.coreos.com/v1
kind: OperatorGroup
metadata:
  name: aws-load-balancer-operator
  namespace: aws-load-balancer-operator
spec:
  upgradeStrategy: Default
---
apiVersion: operators.coreos.com/v1alpha1
kind: Subscription
metadata:
  name: aws-load-balancer-operator
  namespace: aws-load-balancer-operator
spec:
  channel: stable-v1.0
  installPlanApproval: Automatic
  name: aws-load-balancer-operator
  source: redhat-operators
  sourceNamespace: openshift-marketplace
  startingCSV: aws-load-balancer-operator.v1.0.0
EOF
Deploy an instance of the AWS Load Balancer Controller using the operator:
NoteIf you get an error here wait a minute and try again, it means the Operator has not completed installing yet.
$ cat << EOF | oc apply -f -
apiVersion: networking.olm.openshift.io/v1
kind: AWSLoadBalancerController
metadata:
  name: cluster
spec:
  credentials:
    name: aws-load-balancer-operator
  enabledAddons:
    - AWSWAFv2
EOF
Check the that the operator and controller pods are both running:
$ oc -n aws-load-balancer-operator get pods
You should see the following, if not wait a moment and retry:
NAME                                                             READY   STATUS    RESTARTS   AGE
aws-load-balancer-controller-cluster-6ddf658785-pdp5d            1/1     Running   0          99s
aws-load-balancer-operator-controller-manager-577d9ffcb9-w6zqn   2/2     Running   0          2m4s
6.3. Deploy a sample application
Create a new project for our sample application:
$ oc new-project hello-world
Deploy a hello world application:
$ oc new-app -n hello-world --image=docker.io/openshift/hello-openshift
Convert the pre-created service resource to a NodePort service type:
$ oc -n hello-world patch service hello-openshift -p '{"spec":{"type":"NodePort"}}'Deploy an AWS ALB using the AWS Load Balancer Operator:
$ cat << EOF | oc apply -f -
apiVersion: networking.k8s.io/v1
kind: Ingress
metadata:
  name: hello-openshift-alb
  namespace: hello-world
  annotations:
    alb.ingress.kubernetes.io/scheme: internet-facing
spec:
  ingressClassName: alb
  rules:
    - http:
        paths:
          - path: /
            pathType: Exact
            backend:
              service:
                name: hello-openshift
                port:
                  number: 8080
EOF
Curl the AWS ALB Ingress endpoint to verify the hello world application is accessible:
NoteAWS ALB provisioning takes a few minutes. If you receive an error that says
curl: (6) Could not resolve host, please wait and try again.$ INGRESS=$(oc -n hello-world get ingress hello-openshift-alb -o jsonpath='{.status.loadBalancer.ingress[0].hostname}') $ curl "http://${INGRESS}"Example output
Hello OpenShift!
6.3.1. Configure the AWS WAF
The AWS WAF service is a web application firewall that lets you monitor, protect, and control the HTTP and HTTPS requests that are forwarded to your protected web application resources, like ROSA.
Create a AWS WAF rules file to apply to our web ACL:
$ cat << EOF > ${SCRATCH}/waf-rules.json
[
    {
      "Name": "AWS-AWSManagedRulesCommonRuleSet",
      "Priority": 0,
      "Statement": {
        "ManagedRuleGroupStatement": {
          "VendorName": "AWS",
          "Name": "AWSManagedRulesCommonRuleSet"
        }
      },
      "OverrideAction": {
        "None": {}
      },
      "VisibilityConfig": {
        "SampledRequestsEnabled": true,
        "CloudWatchMetricsEnabled": true,
        "MetricName": "AWS-AWSManagedRulesCommonRuleSet"
      }
    },
    {
      "Name": "AWS-AWSManagedRulesSQLiRuleSet",
      "Priority": 1,
      "Statement": {
        "ManagedRuleGroupStatement": {
          "VendorName": "AWS",
          "Name": "AWSManagedRulesSQLiRuleSet"
        }
      },
      "OverrideAction": {
        "None": {}
      },
      "VisibilityConfig": {
        "SampledRequestsEnabled": true,
        "CloudWatchMetricsEnabled": true,
        "MetricName": "AWS-AWSManagedRulesSQLiRuleSet"
      }
    }
]
EOF
This will enable the Core (Common) and SQL AWS Managed Rule Sets.
Create an AWS WAF Web ACL using the rules we specified above:
$ WAF_ARN=$(aws wafv2 create-web-acl \
  --name ${CLUSTER_NAME}-waf \
  --region ${REGION} \
  --default-action Allow={} \
  --scope REGIONAL \
  --visibility-config SampledRequestsEnabled=true,CloudWatchMetricsEnabled=true,MetricName=${CLUSTER_NAME}-waf-metrics \
  --rules file://${SCRATCH}/waf-rules.json \
  --query 'Summary.ARN' \
  --output text)
Annotate the Ingress resource with the AWS WAF Web ACL ARN:
$ oc annotate -n hello-world ingress.networking.k8s.io/hello-openshift-alb \
  alb.ingress.kubernetes.io/wafv2-acl-arn=${WAF_ARN}
Wait for 10 seconds for the rules to propagate and test that the app still works:
$ curl "http://${INGRESS}"Example output
Hello OpenShift!
Test that the WAF denies a bad request:
$ curl -X POST "http://${INGRESS}" \
  -F "user='<script><alert>Hello></alert></script>'"
Example output
<html>
<head><title>403 Forbidden</title></head>
<body>
<center><h1>403 Forbidden</h1></center>
</body>
</html
The expected result is a
403 Forbiddenerror, which means the AWS WAF is protecting your application.
6.4. Additional resources
- Custom domains for applications in the Red Hat documentation
- Adding Extra Security with AWS WAF, CloudFront and ROSA | Amazon Web Services on YouTube
Chapter 7. Tutorial: Deploying OpenShift API for Data Protection on a ROSA cluster
This content is authored by Red Hat experts, but has not yet been tested on every supported configuration.
Prerequisites
Environment
Prepare the environment variables:
NoteChange the cluster name to match your ROSA cluster and ensure you are logged into the cluster as an Administrator. Ensure all fields are outputted correctly before moving on.
$ export CLUSTER_NAME=$(oc get infrastructure cluster -o=jsonpath="{.status.infrastructureName}"  | sed 's/-[a-z0-9]\{5\}$//')
$ export ROSA_CLUSTER_ID=$(rosa describe cluster -c ${CLUSTER_NAME} --output json | jq -r .id)
$ export REGION=$(rosa describe cluster -c ${CLUSTER_NAME} --output json | jq -r .region.id)
$ export OIDC_ENDPOINT=$(oc get authentication.config.openshift.io cluster -o jsonpath='{.spec.serviceAccountIssuer}' | sed  's|^https://||')
$ export AWS_ACCOUNT_ID=`aws sts get-caller-identity --query Account --output text`
$ export CLUSTER_VERSION=`rosa describe cluster -c ${CLUSTER_NAME} -o json | jq -r .version.raw_id | cut -f -2 -d '.'`
$ export ROLE_NAME="${CLUSTER_NAME}-openshift-oadp-aws-cloud-credentials"
$ export AWS_PAGER=""
$ export SCRATCH="/tmp/${CLUSTER_NAME}/oadp"
$ mkdir -p ${SCRATCH}
$ echo "Cluster ID: ${ROSA_CLUSTER_ID}, Region: ${REGION}, OIDC Endpoint: ${OIDC_ENDPOINT}, AWS Account ID: ${AWS_ACCOUNT_ID}"
7.1. Prepare AWS Account
Create an IAM Policy to allow for S3 Access:
$ POLICY_ARN=$(aws iam list-policies --query "Policies[?PolicyName=='RosaOadpVer1'].{ARN:Arn}" --output text)
if [[ -z "${POLICY_ARN}" ]]; then
$ cat << EOF > ${SCRATCH}/policy.json
{
"Version": "2012-10-17",
"Statement": [
 {
   "Effect": "Allow",
   "Action": [
     "s3:CreateBucket",
     "s3:DeleteBucket",
     "s3:PutBucketTagging",
     "s3:GetBucketTagging",
     "s3:PutEncryptionConfiguration",
     "s3:GetEncryptionConfiguration",
     "s3:PutLifecycleConfiguration",
     "s3:GetLifecycleConfiguration",
     "s3:GetBucketLocation",
     "s3:ListBucket",
     "s3:GetObject",
     "s3:PutObject",
     "s3:DeleteObject",
     "s3:ListBucketMultipartUploads",
     "s3:AbortMultipartUpload",
     "s3:ListMultipartUploadParts",
     "ec2:DescribeSnapshots",
     "ec2:DescribeVolumes",
     "ec2:DescribeVolumeAttribute",
     "ec2:DescribeVolumesModifications",
     "ec2:DescribeVolumeStatus",
     "ec2:CreateTags",
     "ec2:CreateVolume",
     "ec2:CreateSnapshot",
     "ec2:DeleteSnapshot"
   ],
   "Resource": "*"
 }
]}
EOF
$ POLICY_ARN=$(aws iam create-policy --policy-name "RosaOadpVer1" \
--policy-document file:///${SCRATCH}/policy.json --query Policy.Arn \
--tags Key=rosa_openshift_version,Value=${CLUSTER_VERSION} Key=rosa_role_prefix,Value=ManagedOpenShift Key=operator_namespace,Value=openshift-oadp Key=operator_name,Value=openshift-oadp \
--output text)
fi
$ echo ${POLICY_ARN}
Create an IAM Role trust policy for the cluster:
$ cat <<EOF > ${SCRATCH}/trust-policy.json
{
  "Version": "2012-10-17",
  "Statement": [{
    "Effect": "Allow",
    "Principal": {
      "Federated": "arn:aws:iam::${AWS_ACCOUNT_ID}:oidc-provider/${OIDC_ENDPOINT}"
    },
    "Action": "sts:AssumeRoleWithWebIdentity",
    "Condition": {
      "StringEquals": {
         "${OIDC_ENDPOINT}:sub": [
           "system:serviceaccount:openshift-adp:openshift-adp-controller-manager",
           "system:serviceaccount:openshift-adp:velero"]
      }
    }
  }]
}
EOF
$ ROLE_ARN=$(aws iam create-role --role-name \
 "${ROLE_NAME}" \
  --assume-role-policy-document file://${SCRATCH}/trust-policy.json \
  --tags Key=rosa_cluster_id,Value=${ROSA_CLUSTER_ID} Key=rosa_openshift_version,Value=${CLUSTER_VERSION} Key=rosa_role_prefix,Value=ManagedOpenShift Key=operator_namespace,Value=openshift-adp Key=operator_name,Value=openshift-oadp \
  --query Role.Arn --output text)

$ echo ${ROLE_ARN}
Attach the IAM Policy to the IAM Role:
$ aws iam attach-role-policy --role-name "${ROLE_NAME}" \
 --policy-arn ${POLICY_ARN}
7.2. Deploy OADP on the cluster
Create a namespace for OADP:
$ oc create namespace openshift-adp
Create a credentials secret:
$ cat <<EOF > ${SCRATCH}/credentials
[default]
role_arn = ${ROLE_ARN}
web_identity_token_file = /var/run/secrets/openshift/serviceaccount/token
EOF
$ oc -n openshift-adp create secret generic cloud-credentials \
 --from-file=${SCRATCH}/credentials
Deploy the OADP Operator:
NoteThere is currently an issue with version 1.1 of the Operator with backups that have a
PartiallyFailedstatus. This does not seem to affect the backup and restore process, but it should be noted as there are issues with it.$ cat << EOF | oc create -f - apiVersion: operators.coreos.com/v1 kind: OperatorGroup metadata: generateName: openshift-adp- namespace: openshift-adp name: oadp spec: targetNamespaces: - openshift-adp --- apiVersion: operators.coreos.com/v1alpha1 kind: Subscription metadata: name: redhat-oadp-operator namespace: openshift-adp spec: channel: stable-1.2 installPlanApproval: Automatic name: redhat-oadp-operator source: redhat-operators sourceNamespace: openshift-marketplace EOF
Wait for the Operator to be ready:
$ watch oc -n openshift-adp get pods
Example output
NAME                                                READY   STATUS    RESTARTS   AGE
openshift-adp-controller-manager-546684844f-qqjhn   1/1     Running   0          22s
Create Cloud Storage:
$ cat << EOF | oc create -f -
apiVersion: oadp.openshift.io/v1alpha1
kind: CloudStorage
metadata:
 name: ${CLUSTER_NAME}-oadp
 namespace: openshift-adp
spec:
 creationSecret:
   key: credentials
   name: cloud-credentials
 enableSharedConfig: true
 name: ${CLUSTER_NAME}-oadp
 provider: aws
 region: $REGION
EOF
Check your application’s storage default storage class:
$ oc get pvc -n <namespace> 1- 1
- Enter your application’s namespace.
Example output
NAME     STATUS   VOLUME                                     CAPACITY   ACCESS MODES   STORAGECLASS   AGE
applog   Bound    pvc-351791ae-b6ab-4e8b-88a4-30f73caf5ef8   1Gi        RWO            gp3-csi        4d19h
mysql    Bound    pvc-16b8e009-a20a-4379-accc-bc81fedd0621   1Gi        RWO            gp3-csi        4d19h
$ oc get storageclass
Example output
NAME                PROVISIONER             RECLAIMPOLICY   VOLUMEBINDINGMODE      ALLOWVOLUMEEXPANSION   AGE
gp2                 kubernetes.io/aws-ebs   Delete          WaitForFirstConsumer   true                   4d21h
gp2-csi             ebs.csi.aws.com         Delete          WaitForFirstConsumer   true                   4d21h
gp3                 ebs.csi.aws.com         Delete          WaitForFirstConsumer   true                   4d21h
gp3-csi (default)   ebs.csi.aws.com         Delete          WaitForFirstConsumer   true                   4d21h
Using either gp3-csi, gp2-csi, gp3 or gp2 will work. If the application(s) that are being backed up are all using PV’s with CSI, include the CSI plugin in the OADP DPA configuration.
CSI only: Deploy a Data Protection Application:
$ cat << EOF | oc create -f - apiVersion: oadp.openshift.io/v1alpha1 kind: DataProtectionApplication metadata: name: ${CLUSTER_NAME}-dpa namespace: openshift-adp spec: backupImages: true features: dataMover: enable: false backupLocations: - bucket: cloudStorageRef: name: ${CLUSTER_NAME}-oadp credential: key: credentials name: cloud-credentials prefix: velero default: true config: region: ${REGION} configuration: velero: defaultPlugins: - openshift - aws - csi restic: enable: false EOFNoteIf you run this command for CSI volumes, you can skip the next step.
Non-CSI volumes: Deploy a Data Protection Application:
$ cat << EOF | oc create -f -
apiVersion: oadp.openshift.io/v1alpha1
kind: DataProtectionApplication
metadata:
 name: ${CLUSTER_NAME}-dpa
 namespace: openshift-adp
spec:
 backupImages: true
 features:
   dataMover:
     enable: false
 backupLocations:
 - bucket:
     cloudStorageRef:
       name: ${CLUSTER_NAME}-oadp
     credential:
       key: credentials
       name: cloud-credentials
     prefix: velero
     default: true
     config:
       region: ${REGION}
 configuration:
   velero:
     defaultPlugins:
     - openshift
     - aws
   restic:
     enable: false
 snapshotLocations:
   - velero:
       config:
         credentialsFile: /tmp/credentials/openshift-adp/cloud-credentials-credentials
         enableSharedConfig: 'true'
         profile: default
         region: ${REGION}
       provider: aws
EOF
-
In OADP 1.1.x ROSA STS environments, the container image backup and restore (
spec.backupImages) value must be set tofalseas it is not supported. -
The Restic feature (
restic.enable=false) is disabled and not supported in ROSA STS environments. -
The DataMover feature (
dataMover.enable=false) is disabled and not supported in ROSA STS environments.
7.3. Perform a backup
The following sample hello-world application has no attached persistent volumes. Either DPA configuration will work.
Create a workload to back up:
$ oc create namespace hello-world
$ oc new-app -n hello-world --image=docker.io/openshift/hello-openshift
Expose the route:
$ oc expose service/hello-openshift -n hello-world
Check that the application is working:
$ curl `oc get route/hello-openshift -n hello-world -o jsonpath='{.spec.host}'`Example output
Hello OpenShift!
Back up the workload:
$ cat << EOF | oc create -f -
apiVersion: velero.io/v1
kind: Backup
metadata:
 name: hello-world
 namespace: openshift-adp
spec:
 includedNamespaces:
 - hello-world
 storageLocation: ${CLUSTER_NAME}-dpa-1
 ttl: 720h0m0s
EOF
Wait until the backup is done:
$ watch "oc -n openshift-adp get backup hello-world -o json | jq .status"
Example output
{
 "completionTimestamp": "2022-09-07T22:20:44Z",
 "expiration": "2022-10-07T22:20:22Z",
 "formatVersion": "1.1.0",
 "phase": "Completed",
 "progress": {
   "itemsBackedUp": 58,
   "totalItems": 58
 },
 "startTimestamp": "2022-09-07T22:20:22Z",
 "version": 1
}
Delete the demo workload:
$ oc delete ns hello-world
Restore from the backup:
$ cat << EOF | oc create -f -
apiVersion: velero.io/v1
kind: Restore
metadata:
 name: hello-world
 namespace: openshift-adp
spec:
 backupName: hello-world
EOF
Wait for the Restore to finish:
$ watch "oc -n openshift-adp get restore hello-world -o json | jq .status"
Example output
{
 "completionTimestamp": "2022-09-07T22:25:47Z",
 "phase": "Completed",
 "progress": {
   "itemsRestored": 38,
   "totalItems": 38
 },
 "startTimestamp": "2022-09-07T22:25:28Z",
 "warnings": 9
}
Check that the workload is restored:
$ oc -n hello-world get pods
Example output
NAME                              READY   STATUS    RESTARTS   AGE
hello-openshift-9f885f7c6-kdjpj   1/1     Running   0          90s
$ curl `oc get route/hello-openshift -n hello-world -o jsonpath='{.spec.host}'`Example output
Hello OpenShift!
- For troubleshooting tips please refer to the OADP team’s troubleshooting documentation
- Additional sample applications can be found in the OADP team’s sample applications directory
7.4. Cleanup
Delete the workload:
$ oc delete ns hello-world
Remove the backup and restore resources from the cluster if they are no longer required:
$ oc delete backup hello-world
$ oc delete restore hello-world
To delete the backup/restore and remote objects in s3:
$ velero backup delete hello-world
$ velero restore delete hello-world
Delete the Data Protection Application:
$ oc -n openshift-adp delete dpa ${CLUSTER_NAME}-dpaDelete the Cloud Storage:
$ oc -n openshift-adp delete cloudstorage ${CLUSTER_NAME}-oadpWarningIf this command hangs, you might need to delete the finalizer:
$ oc -n openshift-adp patch cloudstorage ${CLUSTER_NAME}-oadp -p '{"metadata":{"finalizers":null}}' --type=mergeRemove the Operator if it is no longer required:
$ oc -n openshift-adp delete subscription oadp-operator
Remove the namespace for the Operator:
$ oc delete ns redhat-openshift-adp
Remove the Custom Resource Definitions from the cluster if you no longer wish to have them:
$ for CRD in `oc get crds | grep velero | awk '{print $1}'`; do oc delete crd $CRD; done
$ for CRD in `oc get crds | grep -i oadp | awk '{print $1}'`; do oc delete crd $CRD; done
Delete the AWS S3 Bucket:
$ aws s3 rm s3://${CLUSTER_NAME}-oadp --recursive
$ aws s3api delete-bucket --bucket ${CLUSTER_NAME}-oadp
Detach the Policy from the role:
$ aws iam detach-role-policy --role-name "${ROLE_NAME}" \
 --policy-arn "${POLICY_ARN}"
Delete the role:
$ aws iam delete-role --role-name "${ROLE_NAME}"
Chapter 8. Tutorial: AWS Load Balancer Operator on ROSA
This content is authored by Red Hat experts, but has not yet been tested on every supported configuration.
Load Balancers created by the AWS Load Balancer Operator cannot be used for OpenShift Routes, and should only be used for individual services or ingress resources that do not need the full layer 7 capabilities of an OpenShift Route.
The AWS Load Balancer Controller manages AWS Elastic Load Balancers for a Red Hat OpenShift Service on AWS (ROSA) cluster. The controller provisions AWS Application Load Balancers (ALB) when you create Kubernetes Ingress resources and AWS Network Load Balancers (NLB) when implementing Kubernetes Service resources with a type of LoadBalancer.
Compared with the default AWS in-tree load balancer provider, this controller is developed with advanced annotations for both ALBs and NLBs. Some advanced use cases are:
- Using native Kubernetes Ingress objects with ALBs
- Integrate ALBs with the AWS Web Application Firewall (WAF) service
- Specify custom NLB source IP ranges
- Specify custom NLB internal IP addresses
The AWS Load Balancer Operator is used to used to install, manage and configure an instance of aws-load-balancer-controller in a ROSA cluster.
8.1. Prerequisites
AWS ALBs require a multi-AZ cluster, as well as three public subnets split across three AZs in the same VPC as the cluster. This makes ALBs unsuitable for many PrivateLink clusters. AWS NLBs do not have this restriction.
- A multi-AZ ROSA classic cluster
- BYO VPC cluster
- AWS CLI
- OC CLI
8.1.1. Environment
Prepare the environment variables:
$ export AWS_PAGER=""
$ export ROSA_CLUSTER_NAME=$(oc get infrastructure cluster -o=jsonpath="{.status.infrastructureName}"  | sed 's/-[a-z0-9]\{5\}$//')
$ export REGION=$(oc get infrastructure cluster -o=jsonpath="{.status.platformStatus.aws.region}")
$ export OIDC_ENDPOINT=$(oc get authentication.config.openshift.io cluster -o jsonpath='{.spec.serviceAccountIssuer}' | sed  's|^https://||')
$ export AWS_ACCOUNT_ID=$(aws sts get-caller-identity --query Account --output text)
$ export SCRATCH="/tmp/${ROSA_CLUSTER_NAME}/alb-operator"
$ mkdir -p ${SCRATCH}
$ echo "Cluster: ${ROSA_CLUSTER_NAME}, Region: ${REGION}, OIDC Endpoint: ${OIDC_ENDPOINT}, AWS Account ID: ${AWS_ACCOUNT_ID}"
8.1.2. AWS VPC and subnets
This section only applies to clusters that were deployed into existing VPCs. If you did not deploy your cluster into an existing VPC, skip this section and proceed to the installation section below.
Set the below variables to the proper values for your ROSA deployment:
$ export VPC_ID=<vpc-id>
$ export PUBLIC_SUBNET_IDS=<public-subnets>
$ export PRIVATE_SUBNET_IDS=<private-subnets>
$ export CLUSTER_NAME=$(oc get infrastructure cluster -o=jsonpath="{.status.infrastructureName}")
Add a tag to your cluster’s VPC with the cluster name:
$ aws ec2 create-tags --resources ${VPC_ID} --tags Key=kubernetes.io/cluster/${CLUSTER_NAME},Value=owned --region ${REGION}Add a tag to your public subnets:
$ aws ec2 create-tags \
     --resources ${PUBLIC_SUBNET_IDS} \
     --tags Key=kubernetes.io/role/elb,Value='' \
     --region ${REGION}
Add a tag to your private subnets:
$ aws ec2 create-tags \
     --resources "${PRIVATE_SUBNET_IDS}" \
     --tags Key=kubernetes.io/role/internal-elb,Value='' \
     --region ${REGION}
8.2. Installation
Create an AWS IAM policy for the AWS Load Balancer Controller:
NoteThe policy is sourced from the upstream AWS Load Balancer Controller policy plus permission to create tags on subnets. This is required by the operator to function.
$ oc new-project aws-load-balancer-operator
$ POLICY_ARN=$(aws iam list-policies --query \
     "Policies[?PolicyName=='aws-load-balancer-operator-policy'].{ARN:Arn}" \
     --output text)
$ if [[ -z "${POLICY_ARN}" ]]; then
    wget -O "${SCRATCH}/load-balancer-operator-policy.json" \
       https://raw.githubusercontent.com/rh-mobb/documentation/main/content/docs/rosa/aws-load-balancer-operator/load-balancer-operator-policy.json
     POLICY_ARN=$(aws --region "$REGION" --query Policy.Arn \
     --output text iam create-policy \
     --policy-name aws-load-balancer-operator-policy \
     --policy-document "file://${SCRATCH}/load-balancer-operator-policy.json")
fi
$ echo $POLICY_ARN
Create an AWS IAM trust policy for AWS Load Balancer Operator:
$ cat <<EOF > "${SCRATCH}/trust-policy.json"
{
 "Version": "2012-10-17",
 "Statement": [
 {
 "Effect": "Allow",
 "Condition": {
   "StringEquals" : {
     "${OIDC_ENDPOINT}:sub": ["system:serviceaccount:aws-load-balancer-operator:aws-load-balancer-operator-controller-manager", "system:serviceaccount:aws-load-balancer-operator:aws-load-balancer-controller-cluster"]
   }
 },
 "Principal": {
   "Federated": "arn:aws:iam::$AWS_ACCOUNT_ID:oidc-provider/${OIDC_ENDPOINT}"
 },
 "Action": "sts:AssumeRoleWithWebIdentity"
 }
 ]
}
EOF
Create an AWS IAM role for the AWS Load Balancer Operator:
$ ROLE_ARN=$(aws iam create-role --role-name "${ROSA_CLUSTER_NAME}-alb-operator" \
   --assume-role-policy-document "file://${SCRATCH}/trust-policy.json" \
   --query Role.Arn --output text)
$ echo $ROLE_ARN

$ aws iam attach-role-policy --role-name "${ROSA_CLUSTER_NAME}-alb-operator" \
     --policy-arn $POLICY_ARN
Create a secret for the AWS Load Balancer Operator to assume our newly created AWS IAM role:
$ cat << EOF | oc apply -f -
apiVersion: v1
kind: Secret
metadata:
  name: aws-load-balancer-operator
  namespace: aws-load-balancer-operator
stringData:
  credentials: |
    [default]
    role_arn = $ROLE_ARN
    web_identity_token_file = /var/run/secrets/openshift/serviceaccount/token
EOF
Install the Red Hat AWS Load Balancer Operator:
$ cat << EOF | oc apply -f -
apiVersion: operators.coreos.com/v1
kind: OperatorGroup
metadata:
  name: aws-load-balancer-operator
  namespace: aws-load-balancer-operator
spec:
  upgradeStrategy: Default
---
apiVersion: operators.coreos.com/v1alpha1
kind: Subscription
metadata:
  name: aws-load-balancer-operator
  namespace: aws-load-balancer-operator
spec:
  channel: stable-v1.0
  installPlanApproval: Automatic
  name: aws-load-balancer-operator
  source: redhat-operators
  sourceNamespace: openshift-marketplace
  startingCSV: aws-load-balancer-operator.v1.0.0
EOF
Deploy an instance of the AWS Load Balancer Controller using the operator:
NoteIf you get an error here wait a minute and try again, it means the Operator has not completed installing yet.
$ cat << EOF | oc apply -f -
apiVersion: networking.olm.openshift.io/v1
kind: AWSLoadBalancerController
metadata:
  name: cluster
spec:
  credentials:
    name: aws-load-balancer-operator
EOF
Check the that the operator and controller pods are both running:
$ oc -n aws-load-balancer-operator get pods
You should see the following, if not wait a moment and retry:
NAME                                                             READY   STATUS    RESTARTS   AGE
aws-load-balancer-controller-cluster-6ddf658785-pdp5d            1/1     Running   0          99s
aws-load-balancer-operator-controller-manager-577d9ffcb9-w6zqn   2/2     Running   0          2m4s
8.3. Validating the deployment
Create a new project:
$ oc new-project hello-world
Deploy a hello world application:
$ oc new-app -n hello-world --image=docker.io/openshift/hello-openshift
Configure a NodePort service for the AWS ALB to connect to:
$ cat << EOF | oc apply -f -
apiVersion: v1
kind: Service
metadata:
  name: hello-openshift-nodeport
  namespace: hello-world
spec:
  ports:
    - port: 80
      targetPort: 8080
      protocol: TCP
  type: NodePort
  selector:
    deployment: hello-openshift
EOF
Deploy an AWS ALB using the AWS Load Balancer Operator:
$ cat << EOF | oc apply -f -
apiVersion: networking.k8s.io/v1
kind: Ingress
metadata:
  name: hello-openshift-alb
  namespace: hello-world
  annotations:
    alb.ingress.kubernetes.io/scheme: internet-facing
spec:
  ingressClassName: alb
  rules:
    - http:
        paths:
          - path: /
            pathType: Exact
            backend:
              service:
                name: hello-openshift-nodeport
                port:
                  number: 80
EOF
Curl the AWS ALB Ingress endpoint to verify the hello world application is accessible:
NoteAWS ALB provisioning takes a few minutes. If you receive an error that says
curl: (6) Could not resolve host, please wait and try again.$ INGRESS=$(oc -n hello-world get ingress hello-openshift-alb \ -o jsonpath='{.status.loadBalancer.ingress[0].hostname}') $ curl "http://${INGRESS}"Example output
Hello OpenShift!
Deploy an AWS NLB for your hello world application:
$ cat << EOF | oc apply -f -
apiVersion: v1
kind: Service
metadata:
  name: hello-openshift-nlb
  namespace: hello-world
  annotations:
    service.beta.kubernetes.io/aws-load-balancer-type: external
    service.beta.kubernetes.io/aws-load-balancer-nlb-target-type: instance
    service.beta.kubernetes.io/aws-load-balancer-scheme: internet-facing
spec:
  ports:
    - port: 80
      targetPort: 8080
      protocol: TCP
  type: LoadBalancer
  selector:
    deployment: hello-openshift
EOF
Test the AWS NLB endpoint:
NoteNLB provisioning takes a few minutes. If you receive an error that says
curl: (6) Could not resolve host, please wait and try again.$ NLB=$(oc -n hello-world get service hello-openshift-nlb \ -o jsonpath='{.status.loadBalancer.ingress[0].hostname}') $ curl "http://${NLB}"Example output
Hello OpenShift!
8.4. Cleaning up
Delete the hello world application namespace (and all the resources in the namespace):
$ oc delete project hello-world
Delete the AWS Load Balancer Operator and the AWS IAM roles:
$ oc delete subscription aws-load-balancer-operator -n aws-load-balancer-operator
$ aws iam detach-role-policy \
  --role-name "${ROSA_CLUSTER_NAME}-alb-operator" \
  --policy-arn $POLICY_ARN
$ aws iam delete-role \
  --role-name "${ROSA_CLUSTER_NAME}-alb-operator"
Delete the AWS IAM policy:
$ aws iam delete-policy --policy-arn $POLICY_ARN
Chapter 9. Tutorial: Configuring ROSA/OSD to use custom TLS ciphers on the Ingress Controller
This content is authored by Red Hat experts, but has not yet been tested on every supported configuration.
This guide demonstrates how to properly patch the cluster Ingress Controllers, as well as Ingress Controllers created by the Custom Domain Operator. This functionality allows customers to modify the tlsSecurityProfile value on cluster Ingress Controllers. This guide demonstrates how to apply a custom tlsSecurityProfile, a scoped service account with the associated role and role binding, and a CronJob that the cipher changes are reapplied with 60 minutes in the event that an Ingress Controller is recreated or modified.
Prerequisites
-
Review the OpenShift Documentation that explains the options for the
tlsSecurityProfile. By default, Ingress Controllers are configured to use theIntermediateprofile, which corresponds to the Intermediate Mozilla profile.
Procedure
Create a service account for the CronJob to use.
A service account allows our CronJob to directly access the cluster API, without using a regular user’s credentials. To create a service account, run the following command:
$ oc create sa cron-ingress-patch-sa -n openshift-ingress-operator
Create a role and role binding that allows limited access to patch the Ingress Controllers.
Role-based access control (RBAC) is critical to ensuring security inside your cluster. Creating a role allows us to provide scoped access to only the API resources needed within the cluster. To create the role, run the following command:
$ oc create role cron-ingress-patch-role --verb=get,patch,update --resource=ingresscontroller.operator.openshift.io -n openshift-ingress-operator
Once the role has been created, you must bind the role to the service account using a role binding. To create the role binding, run the following command:
$ oc create rolebinding cron-ingress-patch-rolebinding --role=cron-ingress-patch-role --serviceaccount=openshift-ingress-operator:cron-ingress-patch-sa -n openshift-ingress-operator
Patch the Ingress Controllers.
ImportantThe examples provided below add an additional cipher to the Ingress Controller’s
tlsSecurityProfileto allow IE 11 access from Windows Server 2008 R2. Modify this command to meet your specific business requirements.Before creating the CronJob, apply the
tlsSecurityProfileconfiguration to validate changes. This process depends on if you are using the Custom Domain Operator.Clusters not using the Custom Domain Operator:
If you are only using the default Ingress Controller, and not using the Custom Domain Operator, run the following command to patch the Ingress Controller:
$ oc patch ingresscontroller/default -n openshift-ingress-operator --type=merge -p '{"spec":{"tlsSecurityProfile":{"type":"Custom","custom":{"ciphers":["TLS_AES_128_GCM_SHA256","TLS_AES_256_GCM_SHA384","ECDHE-ECDSA-AES128-GCM-SHA256","ECDHE-RSA-AES128-GCM-SHA256","ECDHE-ECDSA-AES256-GCM-SHA384","ECDHE-RSA-AES256-GCM-SHA384","ECDHE-ECDSA-CHACHA20-POLY1305","ECDHE-RSA-CHACHA20-POLY1305","DHE-RSA-AES128-GCM-SHA256","DHE-RSA-AES256-GCM-SHA384","TLS_CHACHA20_POLY1305_SHA256","TLS_ECDHE_RSA_WITH_AES_128_CBC_SHA"],"minTLSVersion":"VersionTLS12"}}}}'This patch adds the
TLS_ECDHE_RSA_WITH_AES_128_CBC_SHAcipher which allows access from IE 11 on Windows Server 2008 R2 when using RSA certificates.Once you run the command, you will receive a response that looks like this:
Example output
ingresscontroller.operator.openshift.io/default patched
Clusters using the Custom Domain Operator:
Customers who are using the Custom Domain Operator need to loop through each of their Ingress Controllers to patch each one. To patch all of your cluster’s Ingress Controllers, run the following command:
$ for ic in $(oc get ingresscontroller -o name -n openshift-ingress-operator); do oc patch ${ic} -n openshift-ingress-operator --type=merge -p '{"spec":{"tlsSecurityProfile":{"type":"Custom","custom":{"ciphers":["TLS_AES_128_GCM_SHA256","TLS_AES_256_GCM_SHA384","ECDHE-ECDSA-AES128-GCM-SHA256","ECDHE-RSA-AES128-GCM-SHA256","ECDHE-ECDSA-AES256-GCM-SHA384","ECDHE-RSA-AES256-GCM-SHA384","ECDHE-ECDSA-CHACHA20-POLY1305","ECDHE-RSA-CHACHA20-POLY1305","DHE-RSA-AES128-GCM-SHA256","DHE-RSA-AES256-GCM-SHA384","TLS_CHACHA20_POLY1305_SHA256","TLS_ECDHE_RSA_WITH_AES_128_CBC_SHA"],"minTLSVersion":"VersionTLS12"}}}}'; doneOnce you run the command, you will receive a response that looks like this:
Example output
ingresscontroller.operator.openshift.io/default patched
ingresscontroller.operator.openshift.io/custom1 patched
ingresscontroller.operator.openshift.io/custom2 patched
Create the CronJob to ensure that the TLS configuration is not overwritten.
Occasionally, the cluster’s Ingress Controllers can get recreated. In these cases, the Ingress Controller will likely not retain the
tlsSecurityProfilechanges that were applied. To ensure this does not happen, create a CronJob that goes through and updates the cluster’s Ingress Controllers. This process depends on if you are using the Custom Domain Operator.Clusters not using the Custom Domain Operator:
If you are not using the Custom Domain Operator, create the CronJob by running the following command:
$ cat << EOF | oc apply -f - apiVersion: batch/v1 kind: CronJob metadata: name: tls-patch namespace: openshift-ingress-operator spec: schedule: '@hourly' jobTemplate: spec: template: spec: containers: - name: tls-patch image: registry.redhat.io/openshift4/ose-tools-rhel8:latest args: - /bin/sh - '-c' - oc patch ingresscontroller/default -n openshift-ingress-operator --type=merge -p '{"spec":{"tlsSecurityProfile":{"type":"Custom","custom":{"ciphers":["TLS_AES_128_GCM_SHA256","TLS_AES_256_GCM_SHA384","ECDHE-ECDSA-AES128-GCM-SHA256","ECDHE-RSA-AES128-GCM-SHA256","ECDHE-ECDSA-AES256-GCM-SHA384","ECDHE-RSA-AES256-GCM-SHA384","ECDHE-ECDSA-CHACHA20-POLY1305","ECDHE-RSA-CHACHA20-POLY1305","DHE-RSA-AES128-GCM-SHA256","DHE-RSA-AES256-GCM-SHA384","TLS_CHACHA20_POLY1305_SHA256","TLS_ECDHE_RSA_WITH_AES_128_CBC_SHA"],"minTLSVersion":"VersionTLS12"}}}}' restartPolicy: Never serviceAccountName: cron-ingress-patch-sa EOFNoteThis CronJob runs every hour and patches the Ingress Controllers, if necessary. It is important that this CronJob does not run constantly, as it can trigger reconciles that could overload the OpenShift Ingress Operator. Most of the time, the logs of the CronJob pod looks like the following example, as it will not be changing anything:
Example output
ingresscontroller.operator.openshift.io/default patched (no change)
Clusters using the Custom Domain Operator:
If you are using the Custom Domain Operator, the CronJob needs to loop through and patch each Ingress Controller. To create this CronJob, run the following command:
$ cat << EOF | oc apply -f - apiVersion: batch/v1 kind: CronJob metadata: name: tls-patch namespace: openshift-ingress-operator spec: schedule: '@hourly' jobTemplate: spec: template: spec: containers: - name: tls-patch image: registry.redhat.io/openshift4/ose-tools-rhel8:latest args: - /bin/sh - '-c' - for ic in $(oc get ingresscontroller -o name -n openshift-ingress-operator); do oc patch ${ic} -n openshift-ingress-operator --type=merge -p '{"spec":{"tlsSecurityProfile":{"type":"Custom","custom":{"ciphers":["TLS_AES_128_GCM_SHA256","TLS_AES_256_GCM_SHA384","ECDHE-ECDSA-AES128-GCM-SHA256","ECDHE-RSA-AES128-GCM-SHA256","ECDHE-ECDSA-AES256-GCM-SHA384","ECDHE-RSA-AES256-GCM-SHA384","ECDHE-ECDSA-CHACHA20-POLY1305","ECDHE-RSA-CHACHA20-POLY1305","DHE-RSA-AES128-GCM-SHA256","DHE-RSA-AES256-GCM-SHA384","TLS_CHACHA20_POLY1305_SHA256","TLS_ECDHE_RSA_WITH_AES_128_CBC_SHA"],"minTLSVersion":"VersionTLS12"}}}}'; done restartPolicy: Never serviceAccountName: cron-ingress-patch-sa EOFNoteThis CronJob runs every hour and patches the Ingress Controllers, if necessary. It is important that this CronJob does not run constantly, as it can trigger reconciles that could overload the OpenShift Ingress Operator. Most of the time, the logs of the CronJob pod will look something like this, as it will not be changing anything:
Example output
ingresscontroller.operator.openshift.io/default patched (no change)
ingresscontroller.operator.openshift.io/custom1 patched (no change)
ingresscontroller.operator.openshift.io/custom2 patched (no change)
Chapter 10. Tutorial: Configuring Microsoft Entra ID (formerly Azure Active Directory) as an identity provider
You can configure Microsoft Entra ID (formerly Azure Active Directory) as the cluster identity provider in Red Hat OpenShift Service on AWS (ROSA).
This tutorial guides you to complete the following tasks:
- Register a new application in Entra ID for authentication.
- Configure the application registration in Entra ID to include optional and group claims in tokens.
- Configure the Red Hat OpenShift Service on AWS cluster to use Entra ID as the identity provider.
- Grant additional permissions to individual groups.
10.1. Prerequisites
- You created a set of security groups and assigned users by following the Microsoft documentation.
10.2. Registering a new application in Entra ID for authentication
To register your application in Entra ID, first create the OAuth callback URL, then register your application.
Procedure
Create the cluster’s OAuth callback URL by changing the specified variables and running the following command:
NoteRemember to save this callback URL; it will be required later in the process.
$ domain=$(rosa describe cluster -c <cluster_name> | grep "DNS" | grep -oE '\S+.openshiftapps.com')
$ echo "OAuth callback URL: https://oauth-openshift.apps.$domain/oauth2callback/AAD"
The "AAD" directory at the end of the OAuth callback URL must match the OAuth identity provider name that you will set up later in this process.
Create the Entra ID application by logging in to the Azure portal, and select the App registrations blade. Then, select New registration to create a new application.
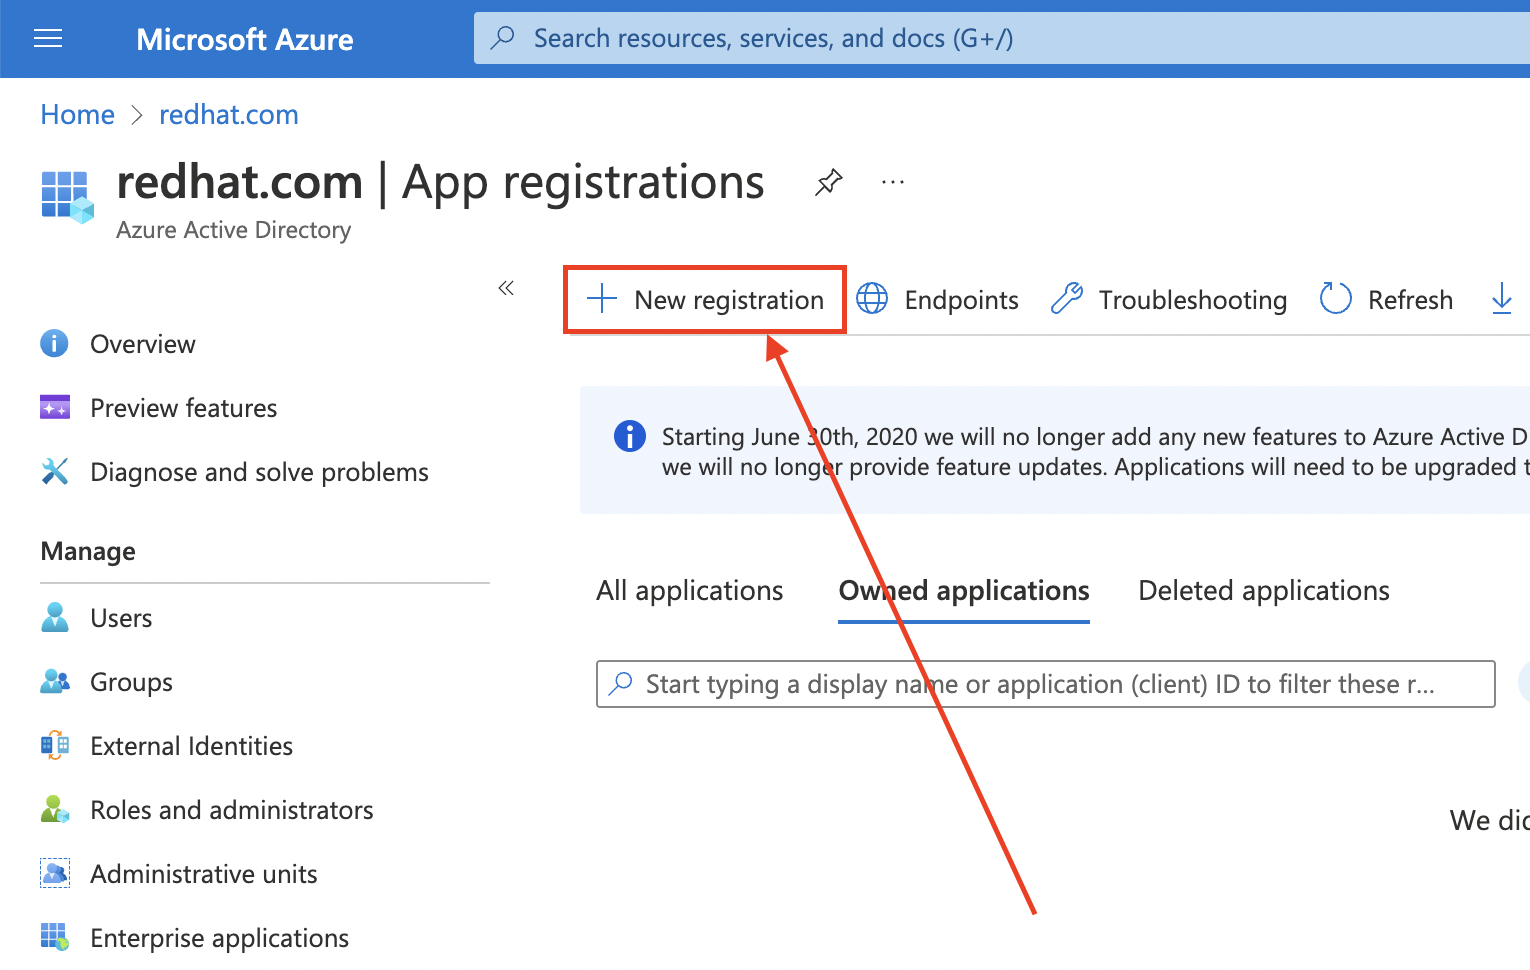
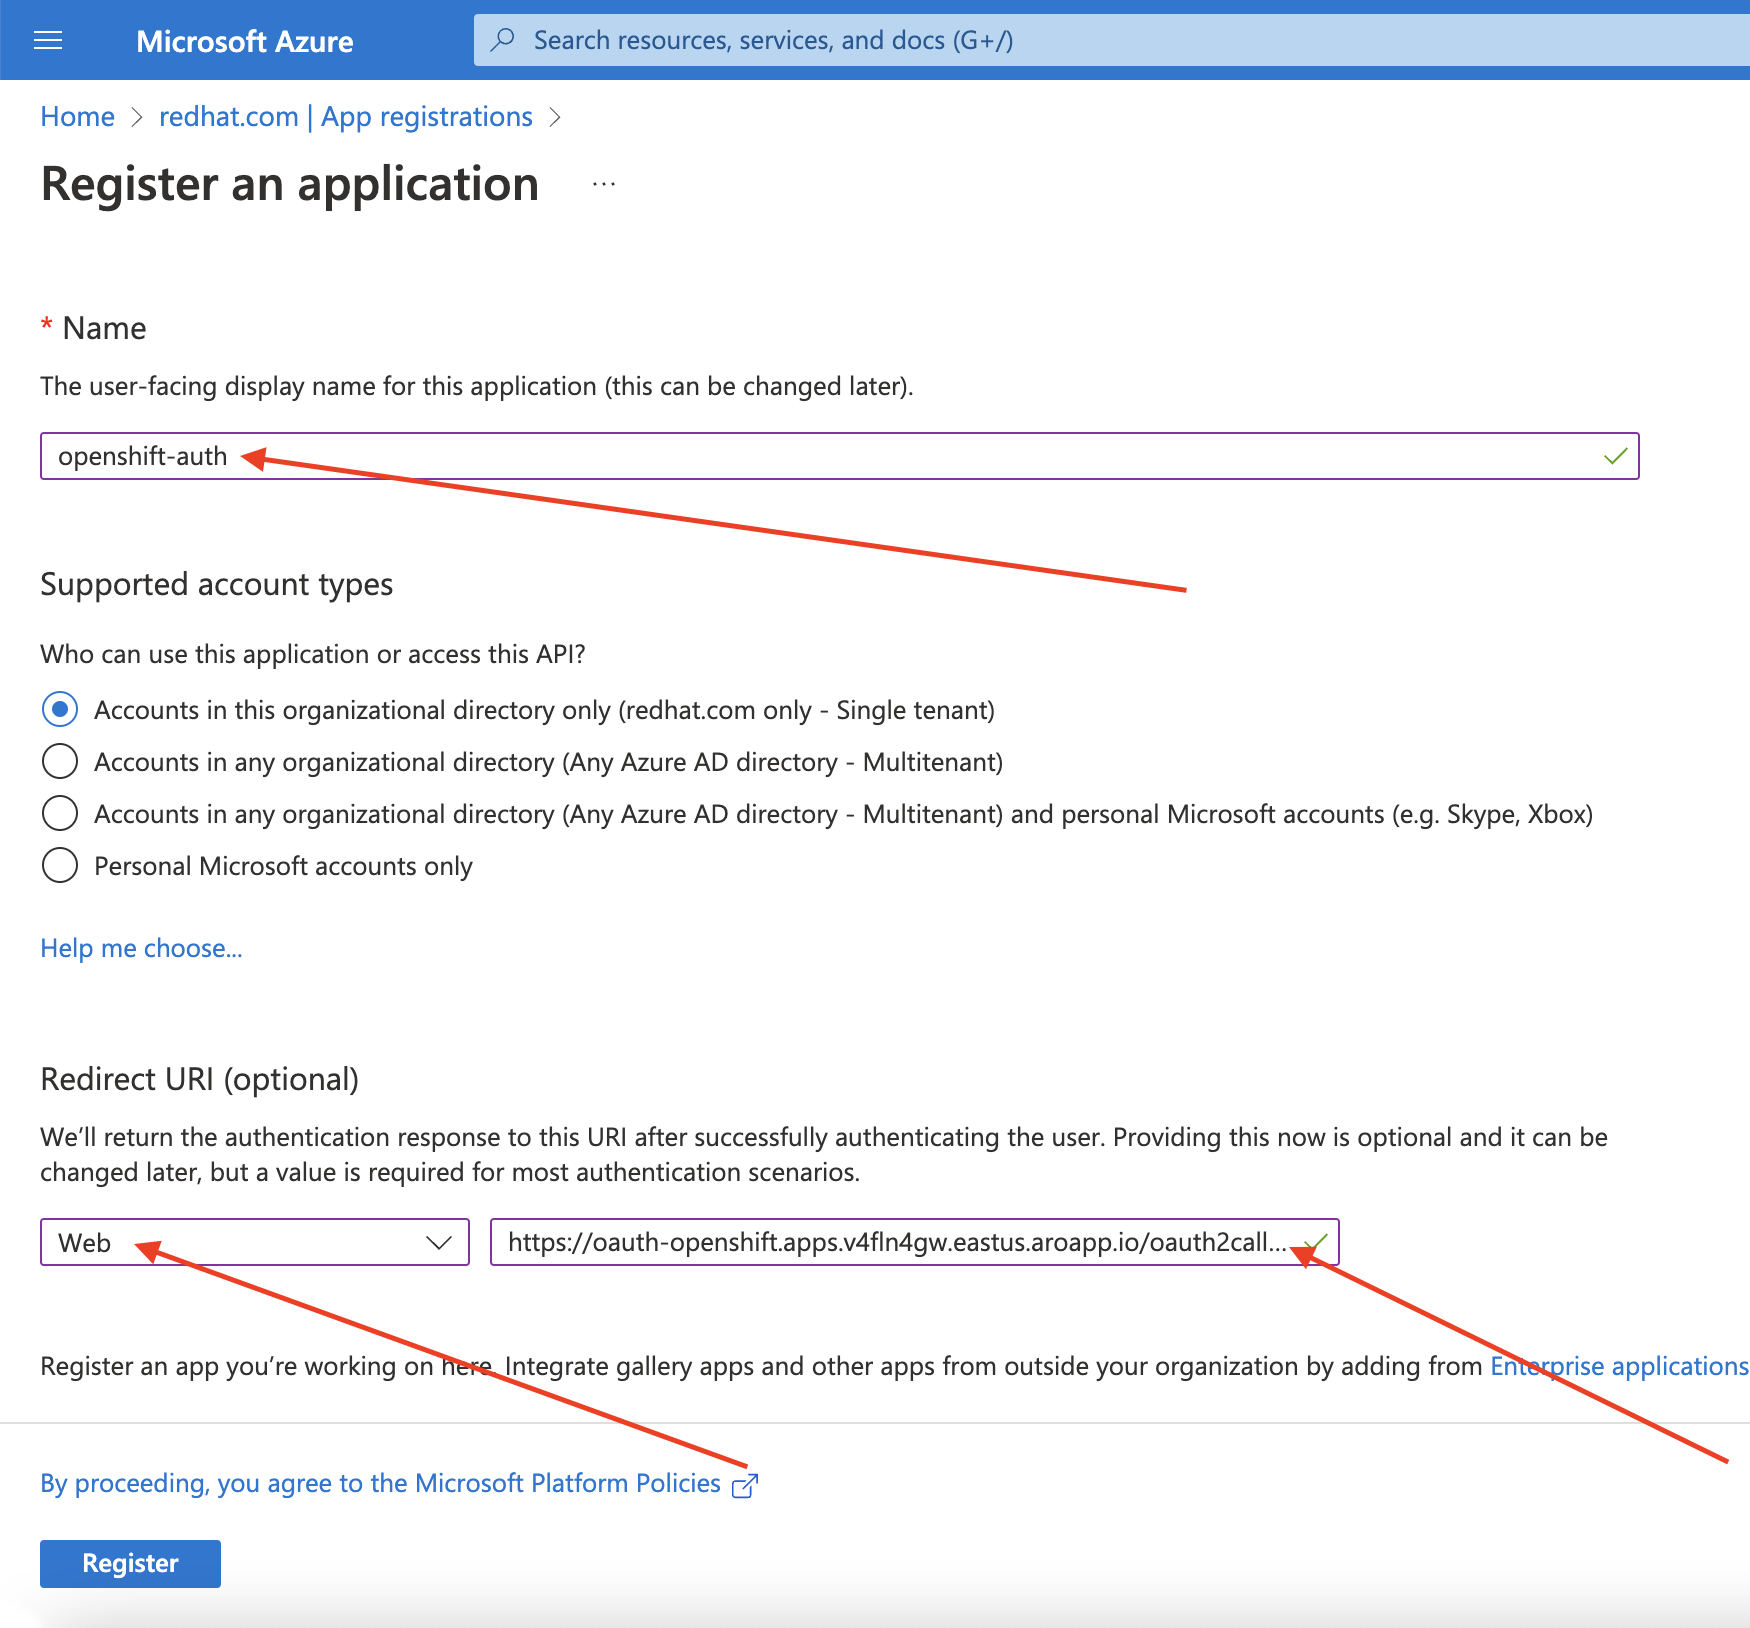
-
Name the application, for example
openshift-auth. - Select Web from the Redirect URI dropdown and enter the value of the OAuth callback URL you retrieved in the previous step.
After providing the required information, click Register to create the application.
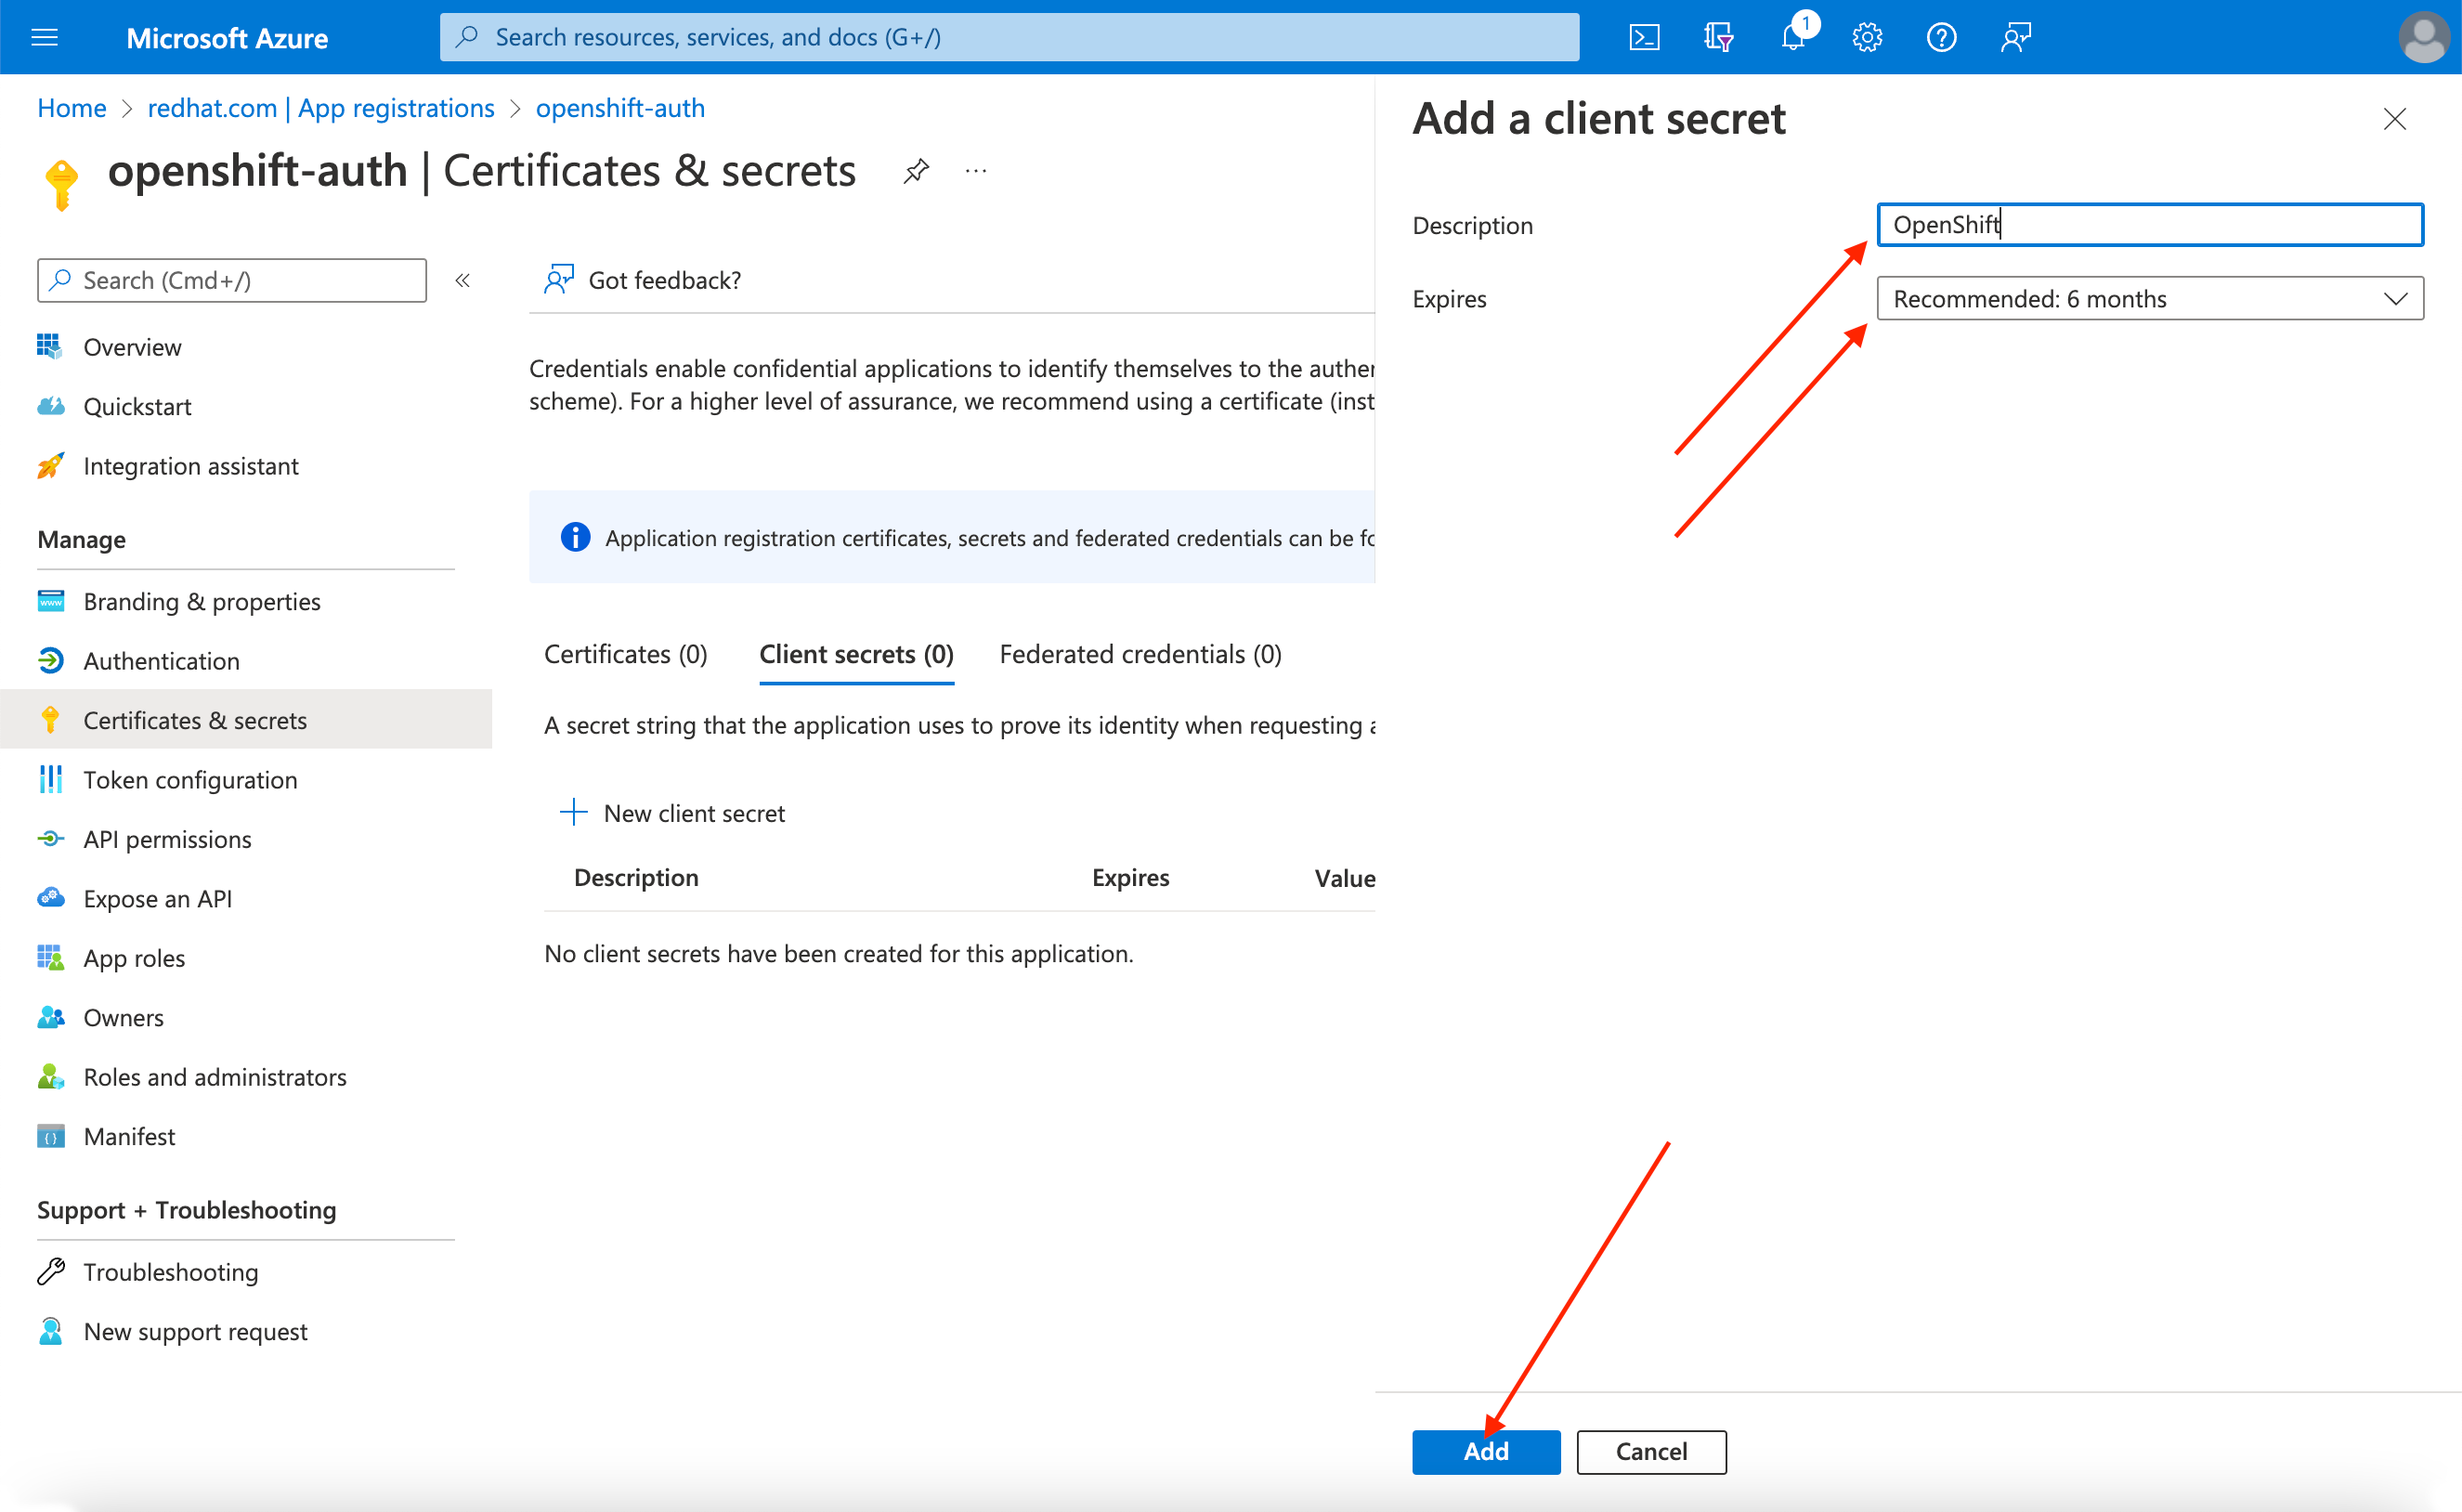
Select the Certificates & secrets sub-blade and select New client secret.

Complete the requested details and store the generated client secret value. This secret is required later in this process.
ImportantAfter initial setup, you cannot see the client secret. If you did not record the client secret, you must generate a new one.
Select the Overview sub-blade and note the
Application (client) IDandDirectory (tenant) ID. You will need these values in a future step.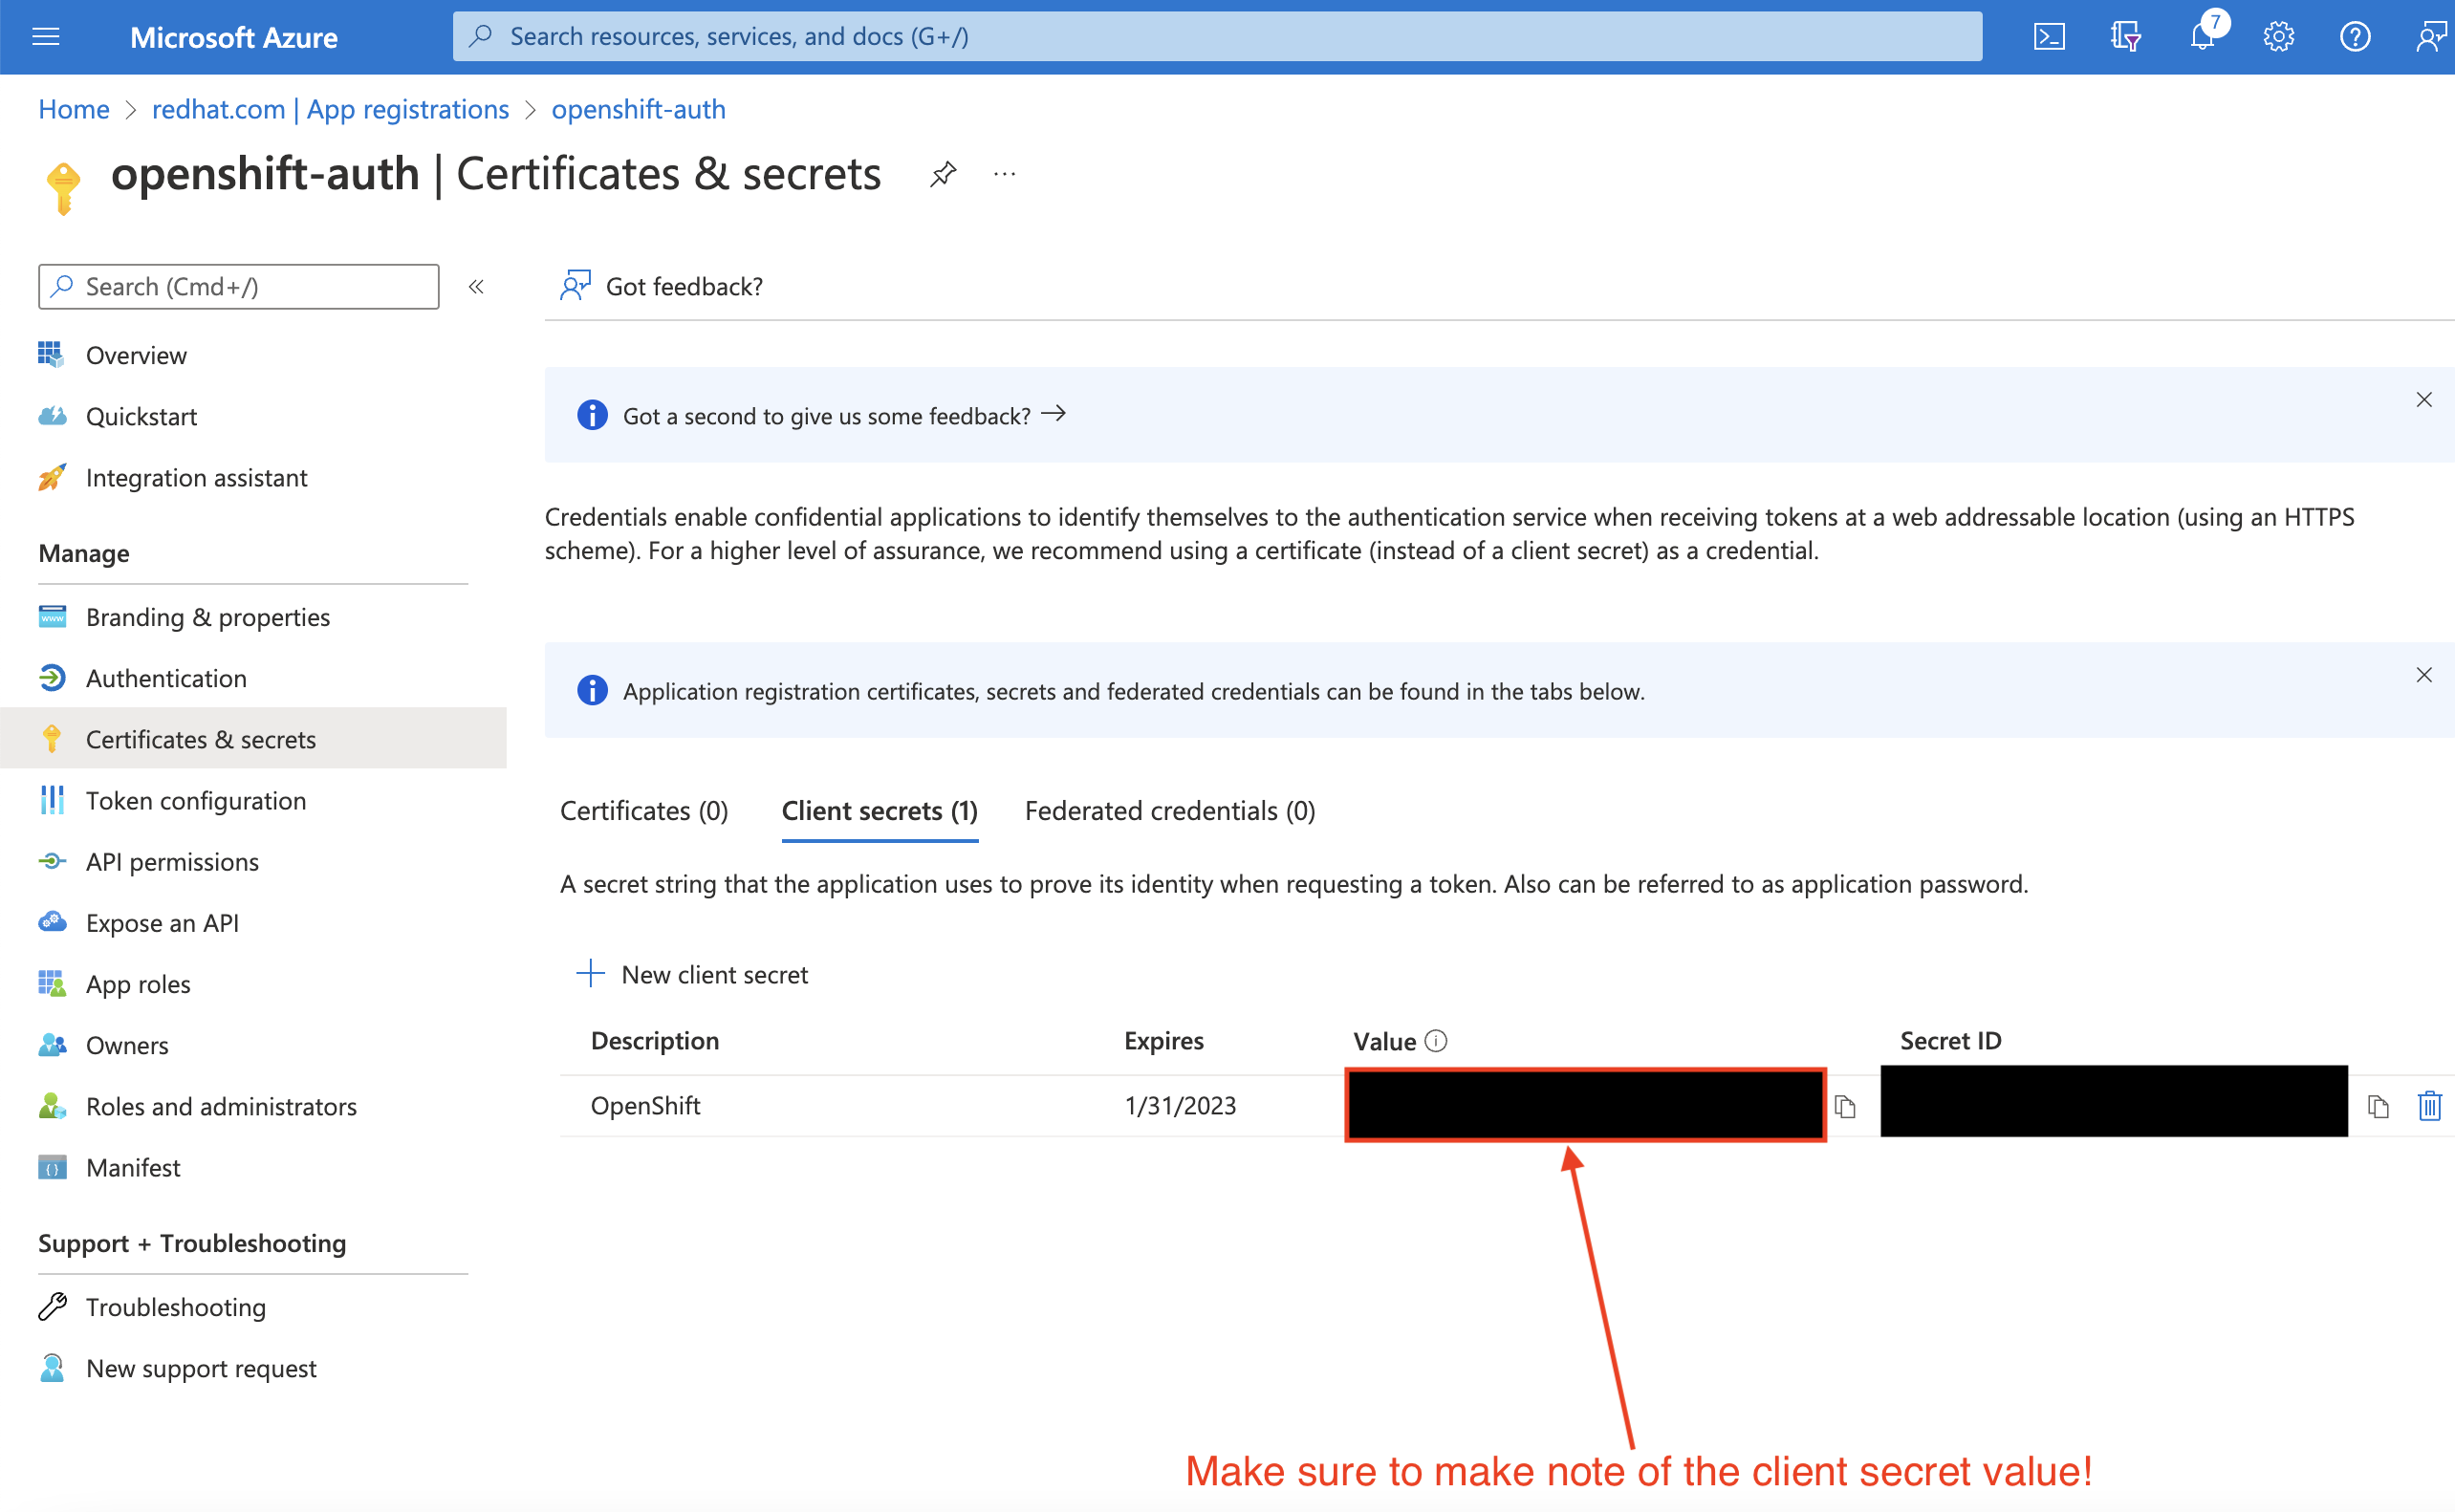
10.3. Configuring the application registration in Entra ID to include optional and group claims
So that Red Hat OpenShift Service on AWS has enough information to create the user’s account, you must configure Entra ID to give two optional claims: email and preferred_username. For more information about optional claims in Entra ID, see the Microsoft documentation.
In addition to individual user authentication, Red Hat OpenShift Service on AWS provides group claim functionality. This functionality allows an OpenID Connect (OIDC) identity provider, such as Entra ID, to offer a user’s group membership for use within Red Hat OpenShift Service on AWS.
Configuring optional claims
You can configure the optional claims in Entra ID.
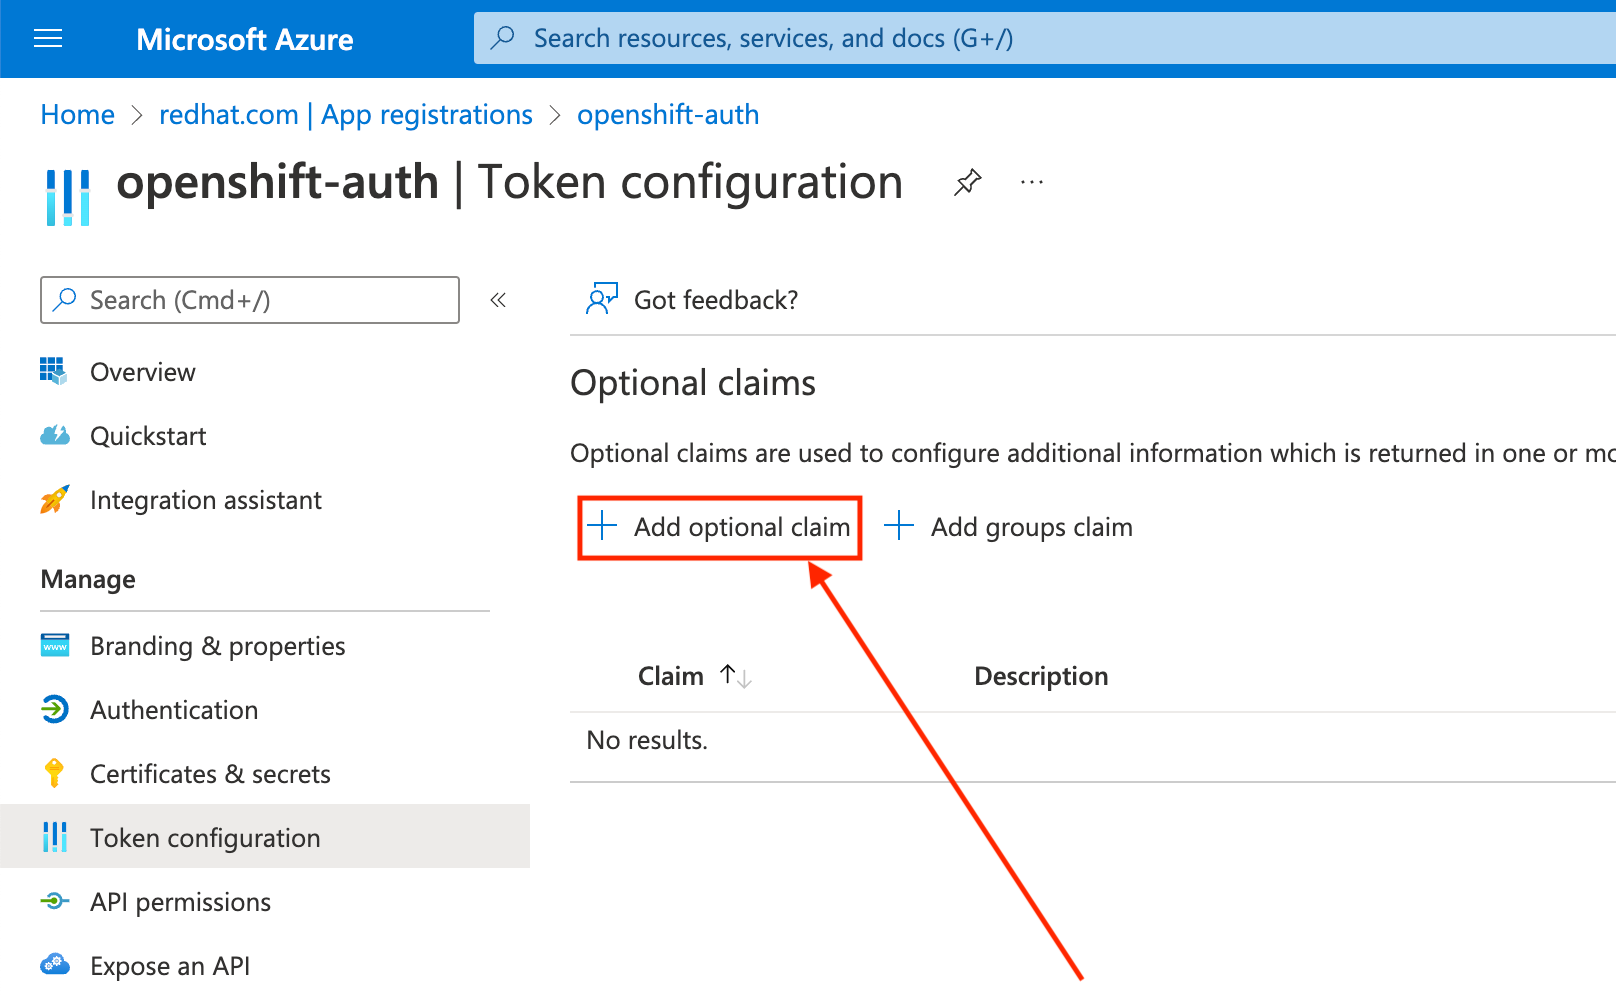
Click the Token configuration sub-blade and select the Add optional claim button.
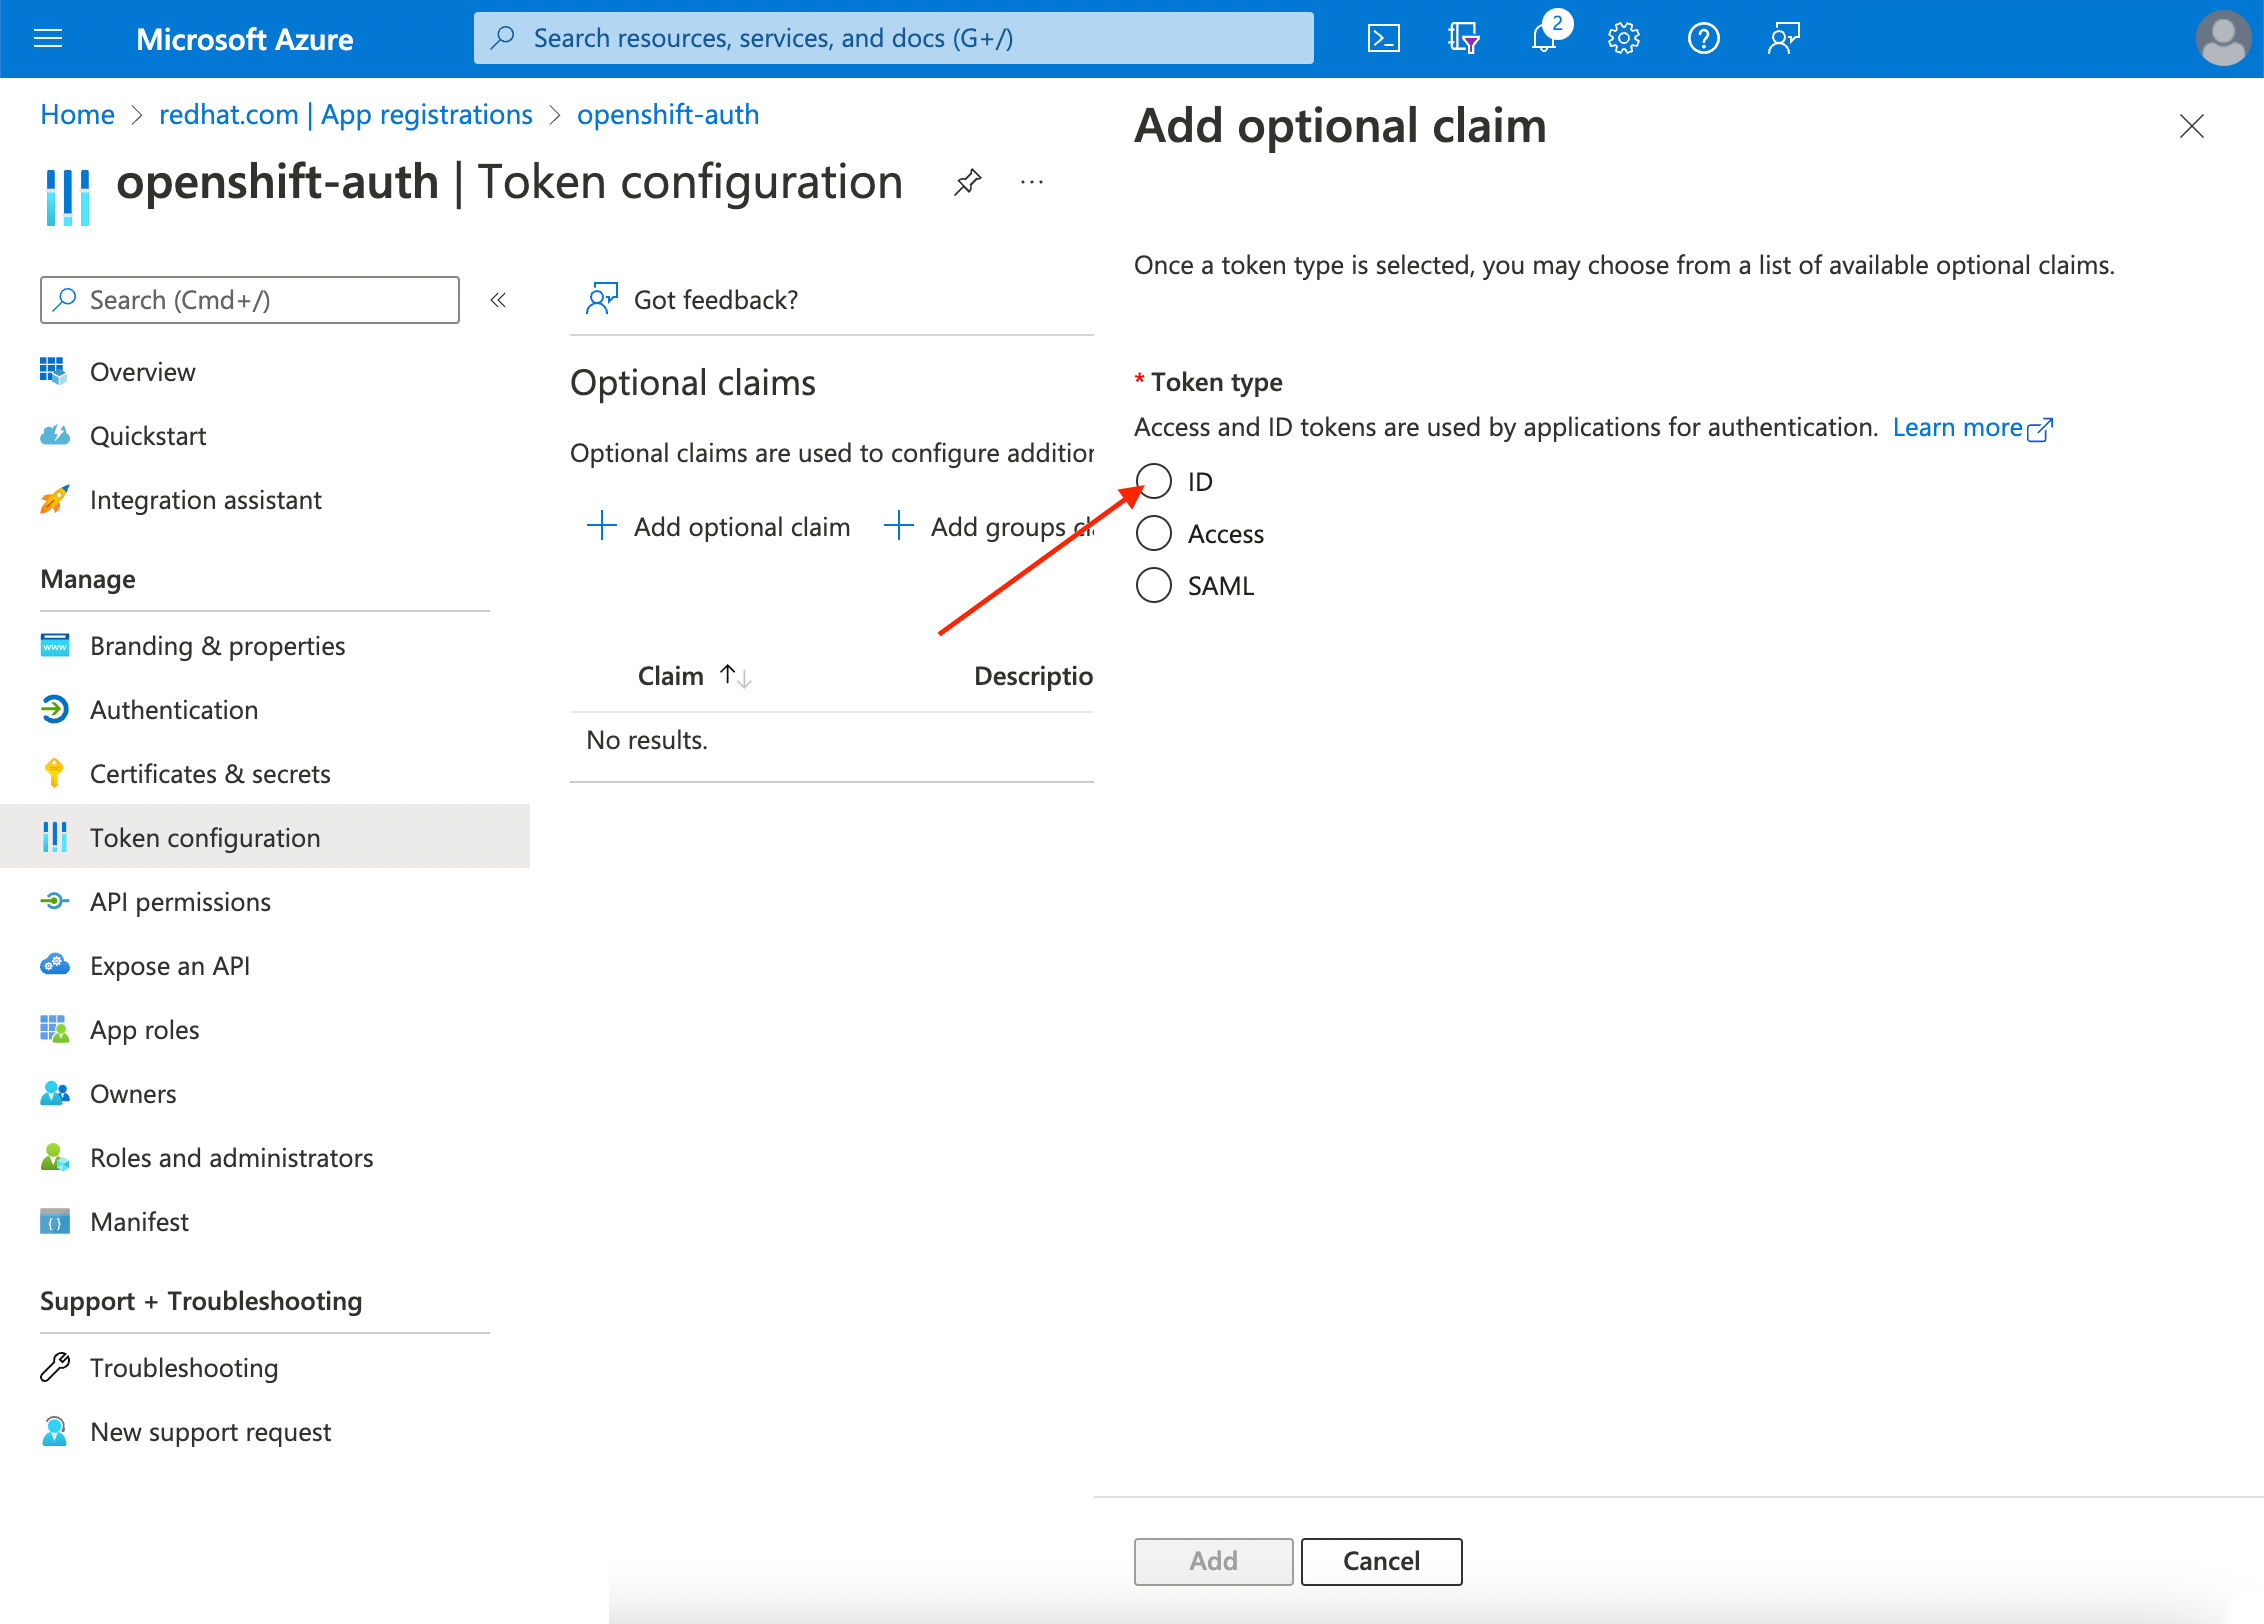
Select the ID radio button.
Select the email claim checkbox.
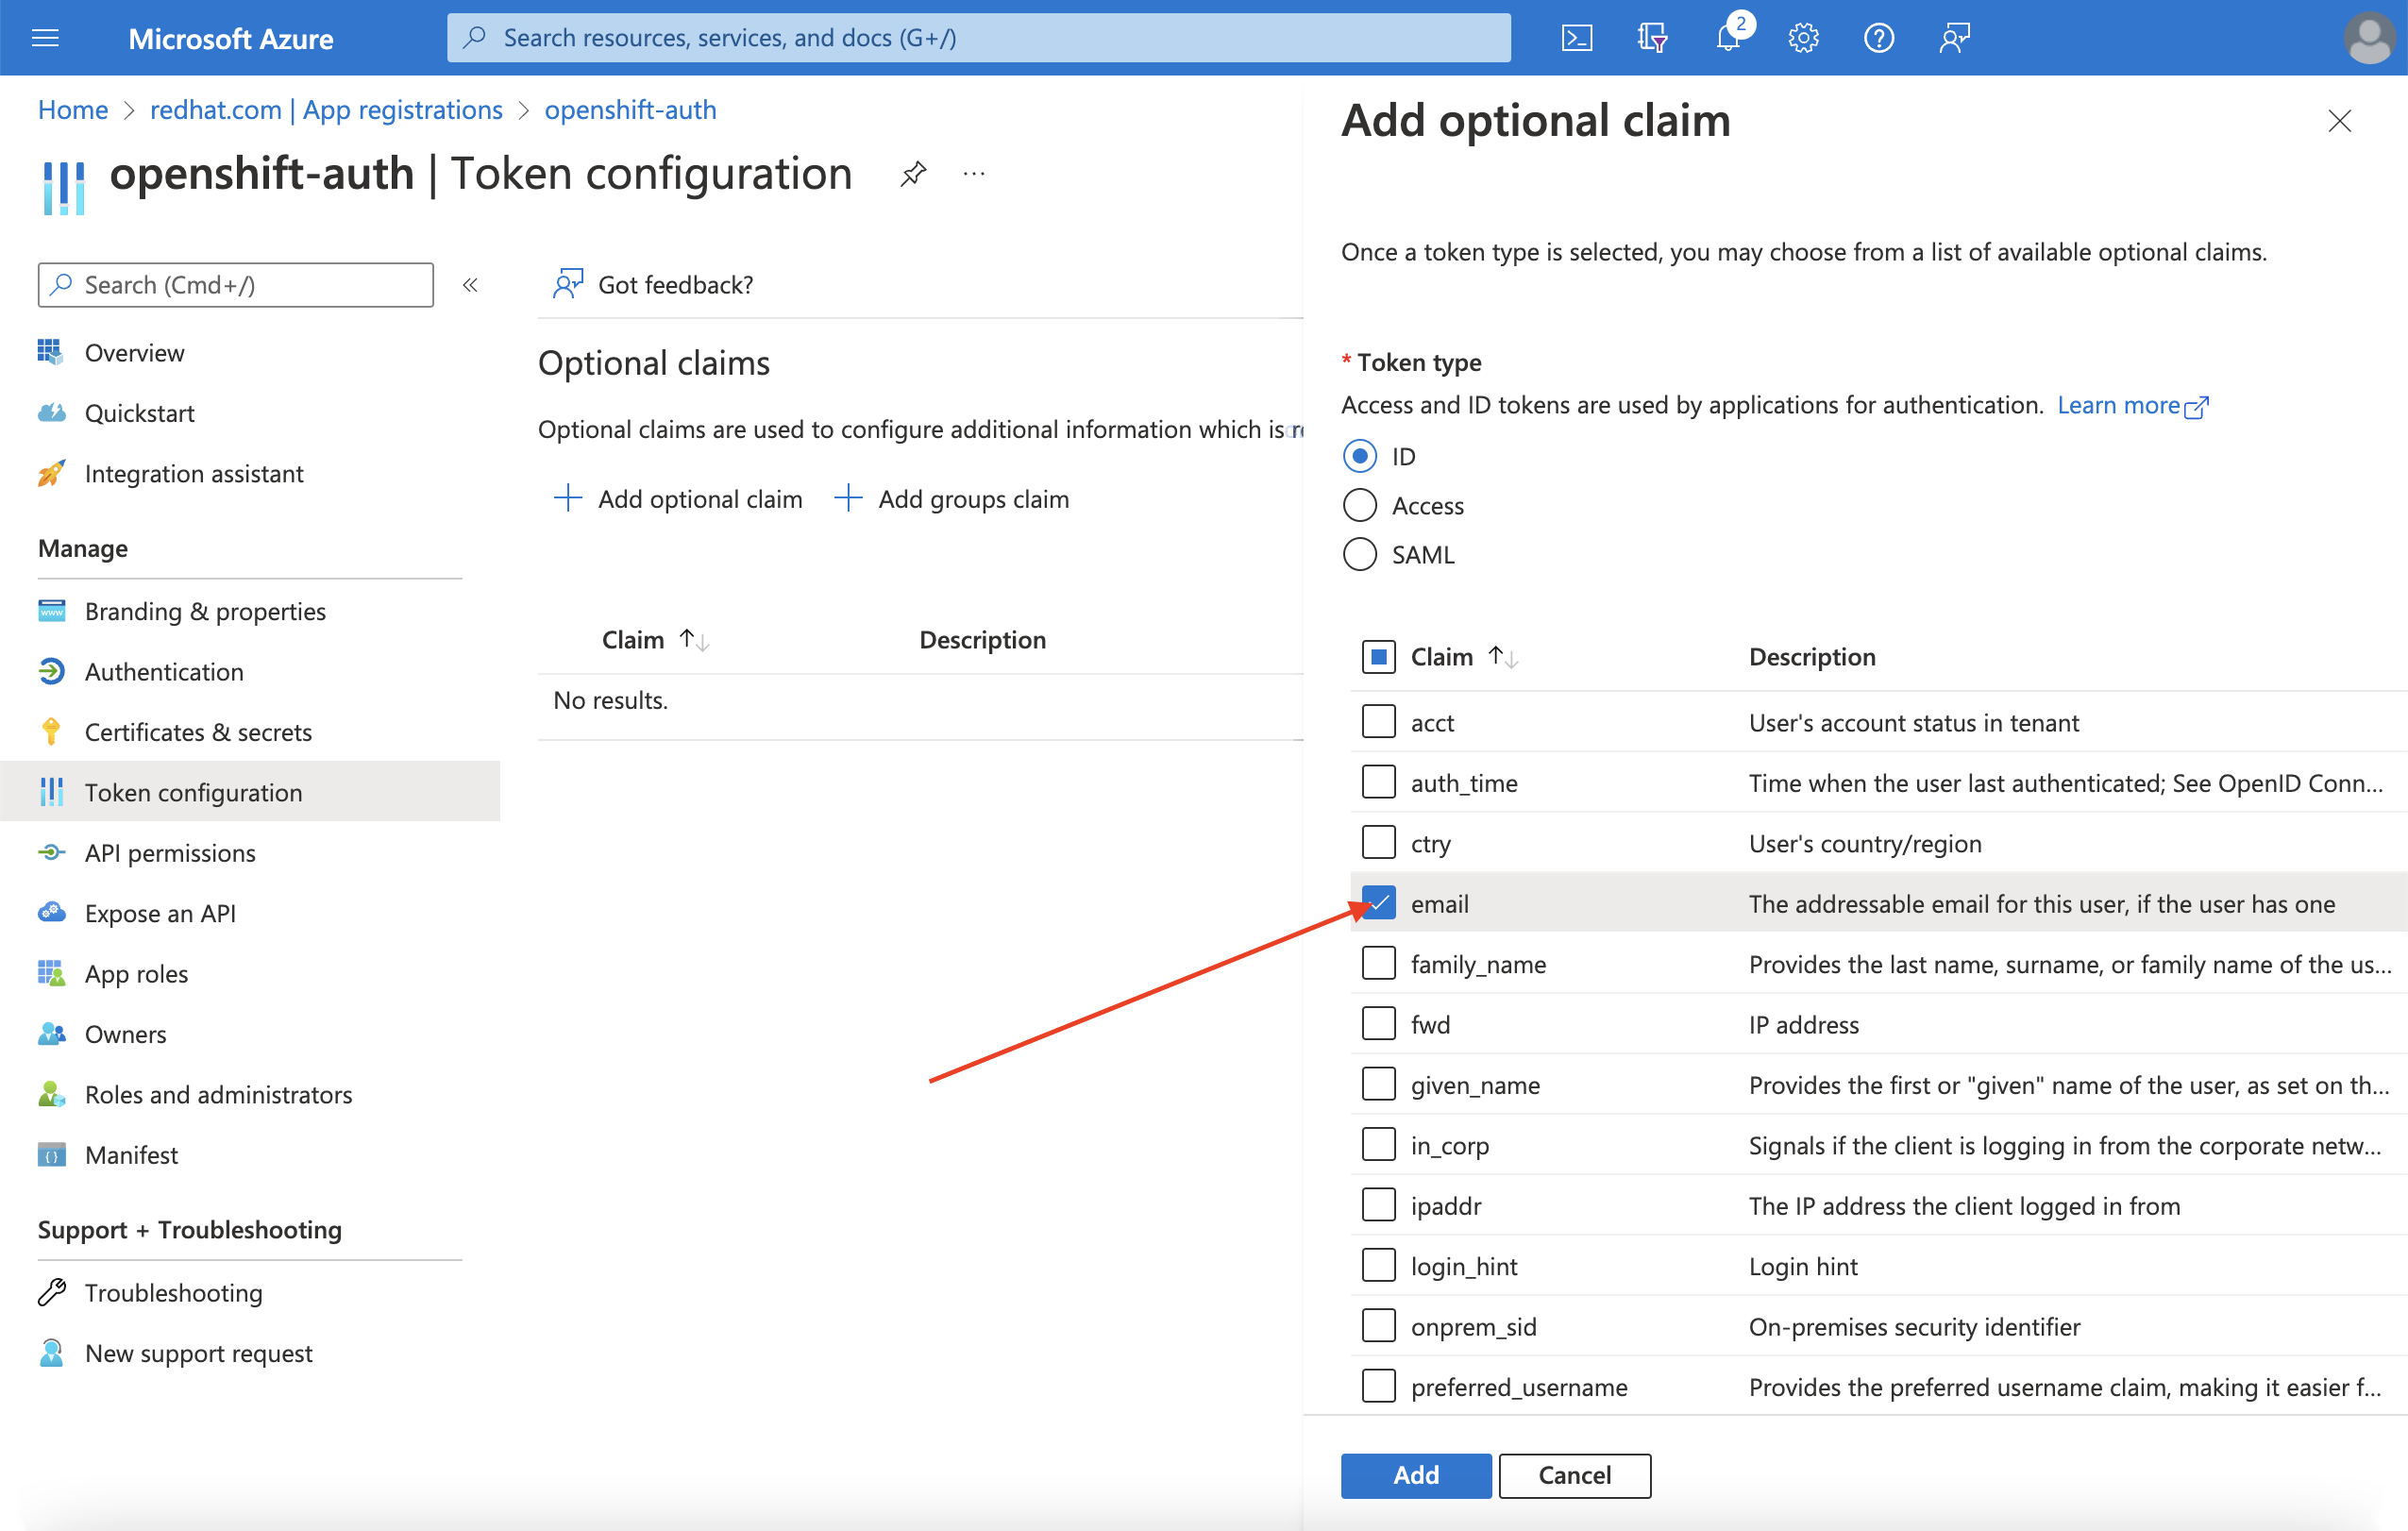
Select the
preferred_usernameclaim checkbox. Then, click Add to configure the email and preferred_username claims your Entra ID application.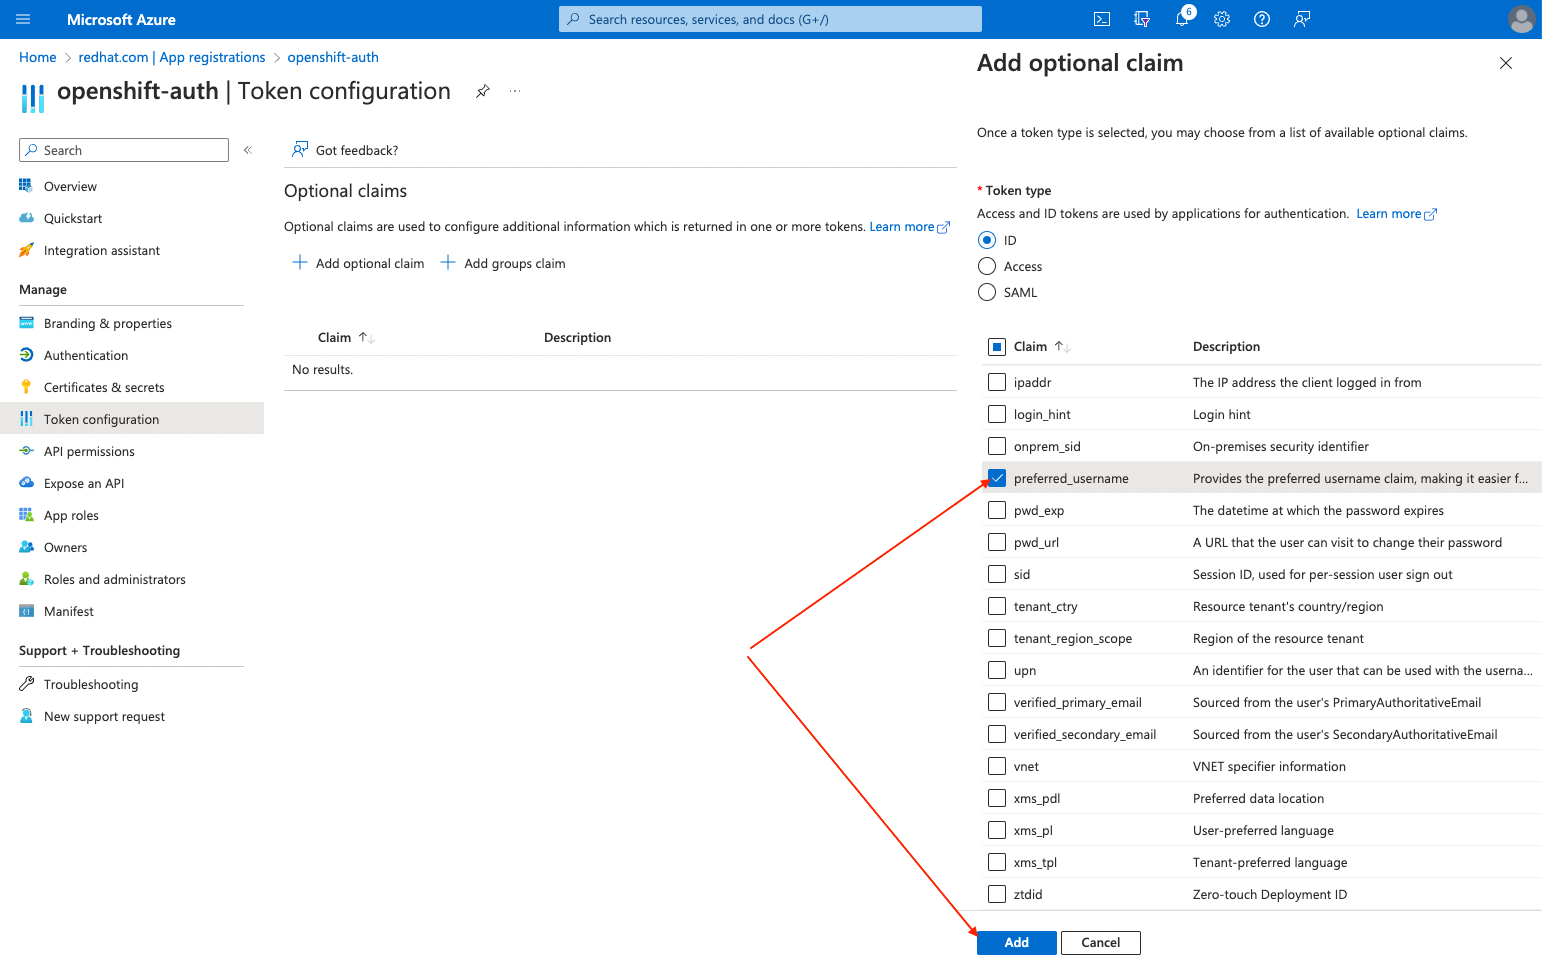
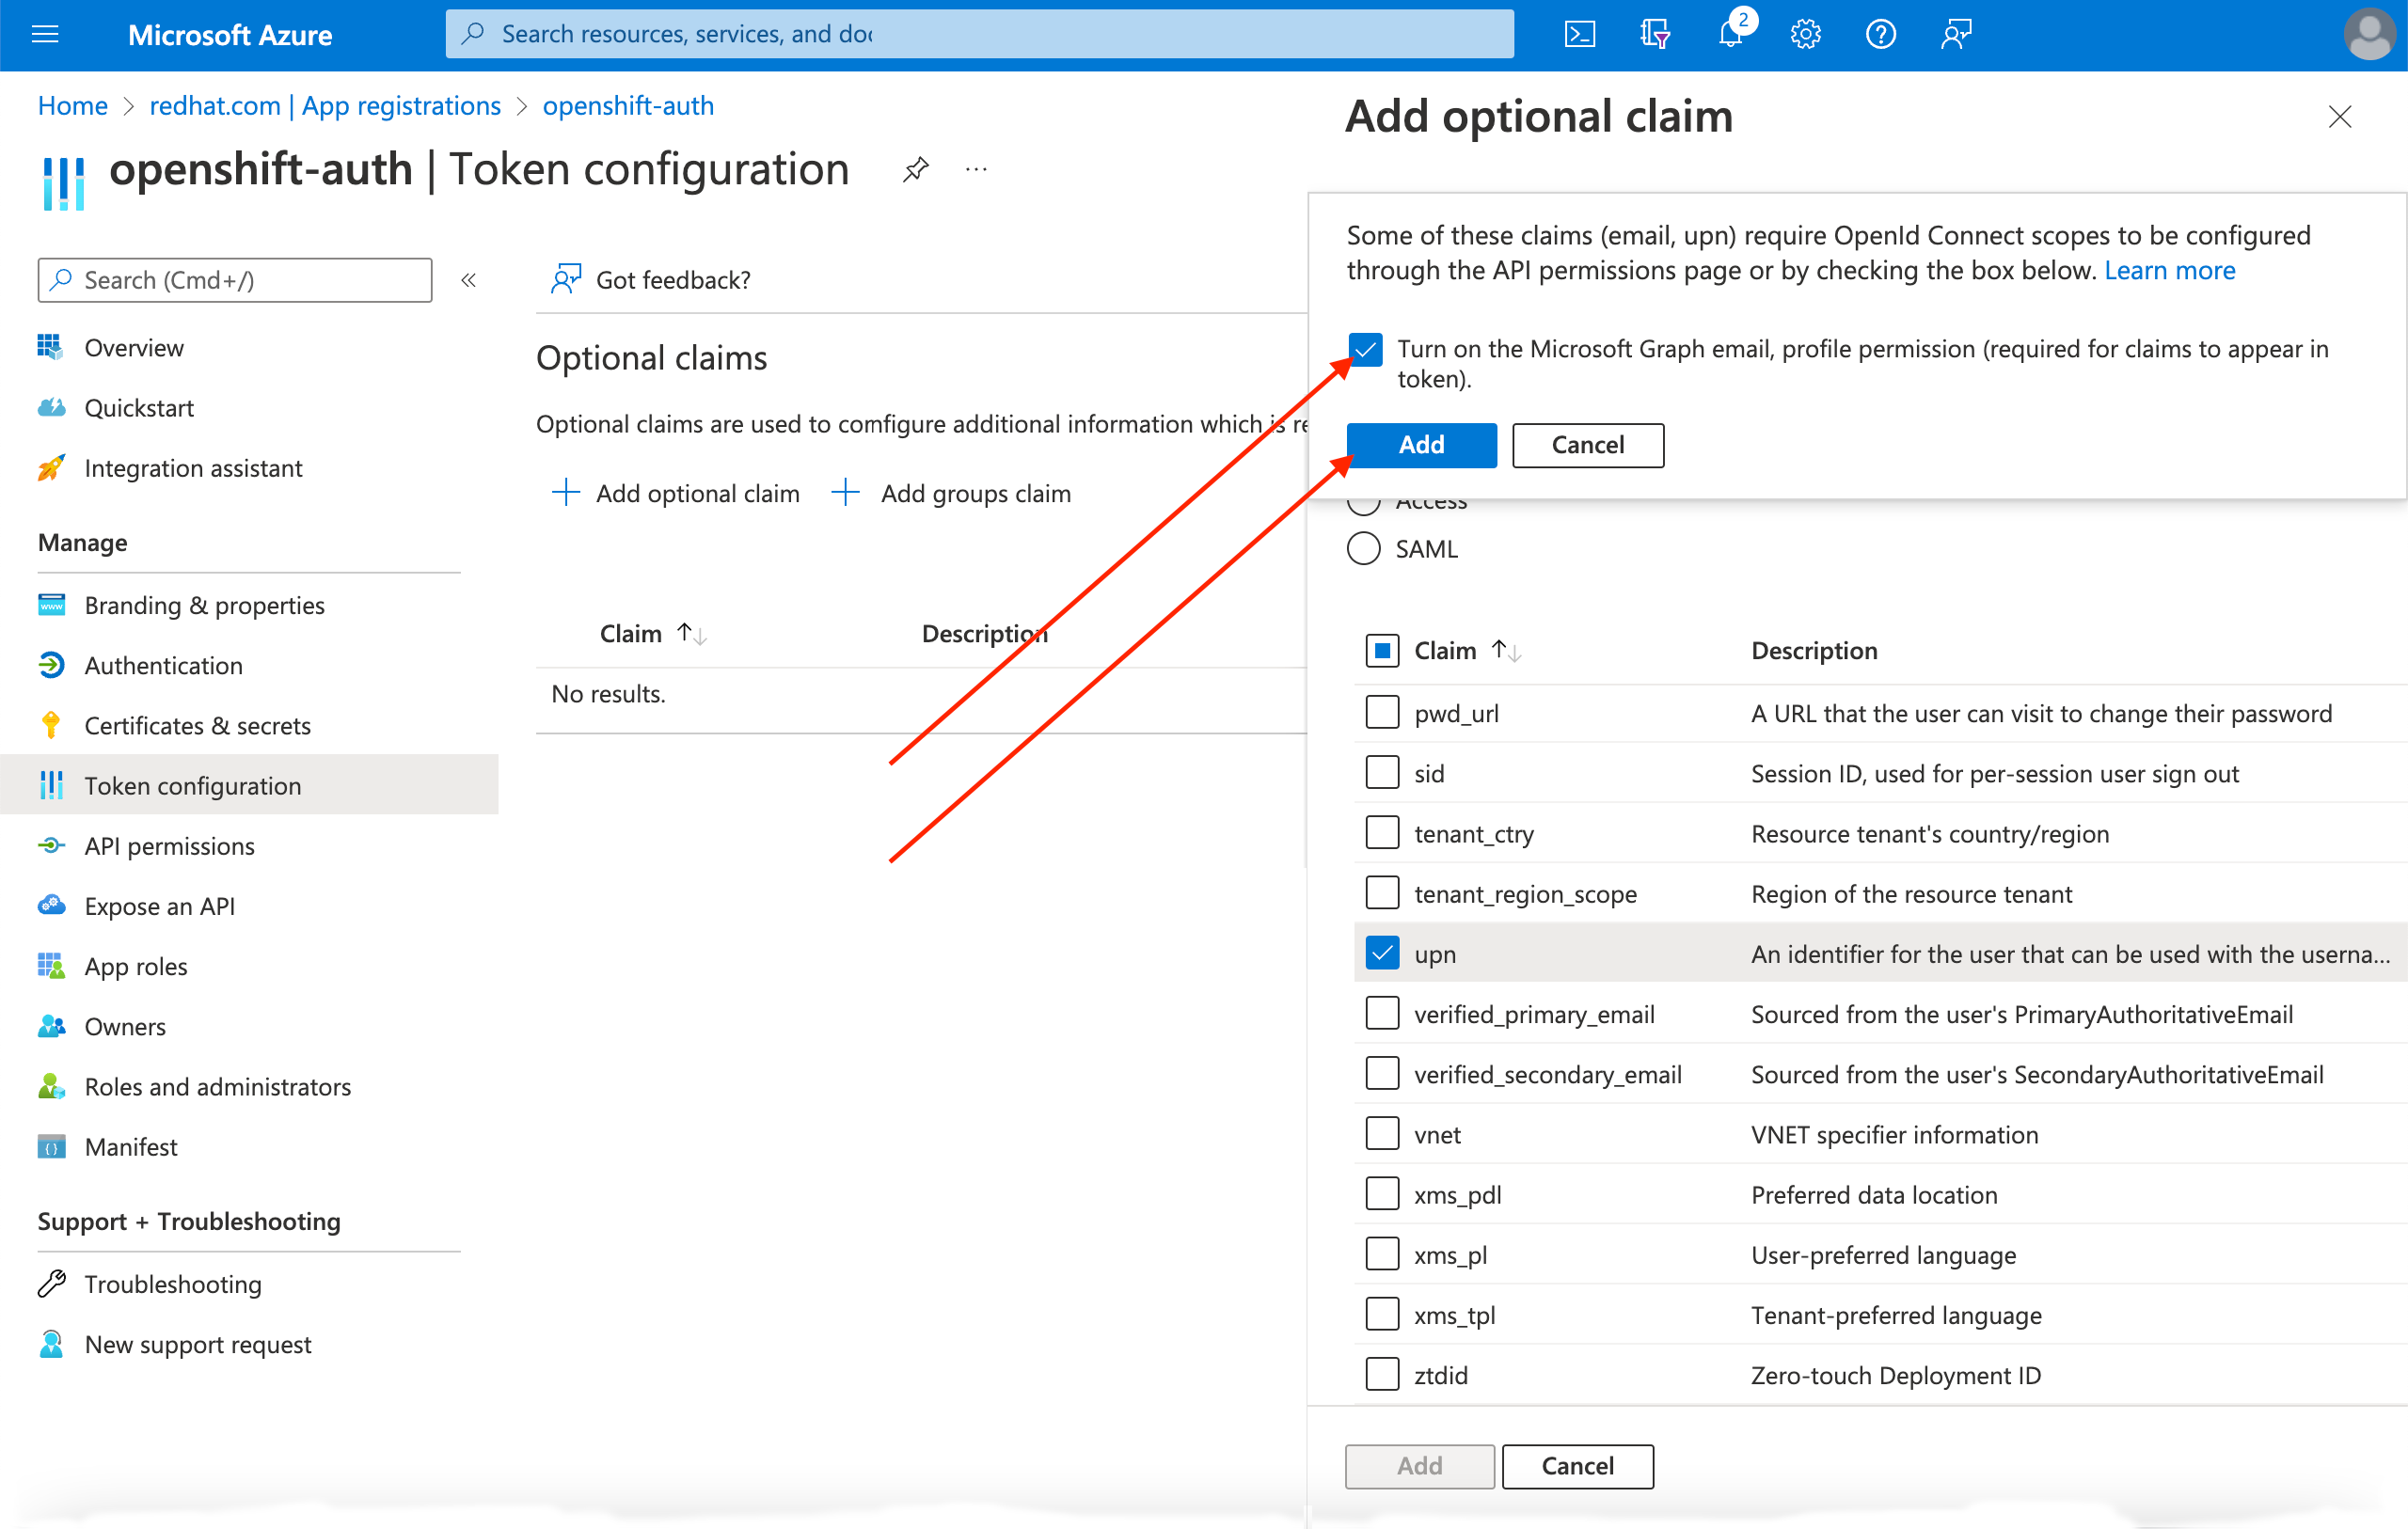
A dialog box appears at the top of the page. Follow the prompt to enable the necessary Microsoft Graph permissions.
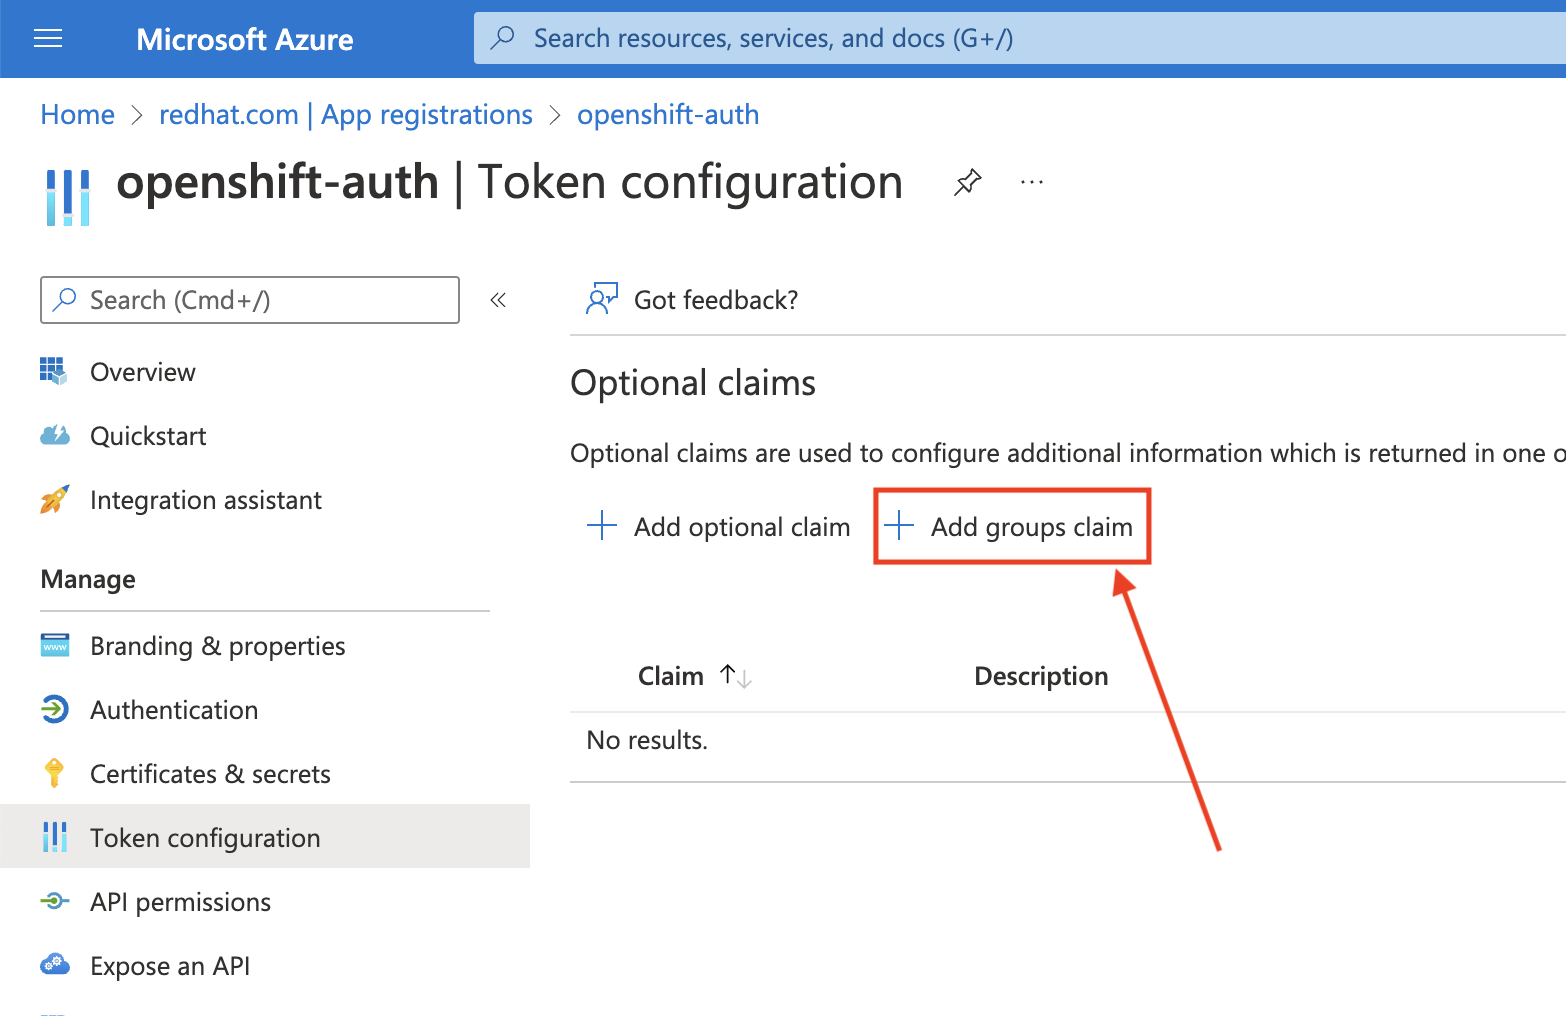
Configuring group claims (optional)
Configure Entra ID to offer a groups claim.
Procedure
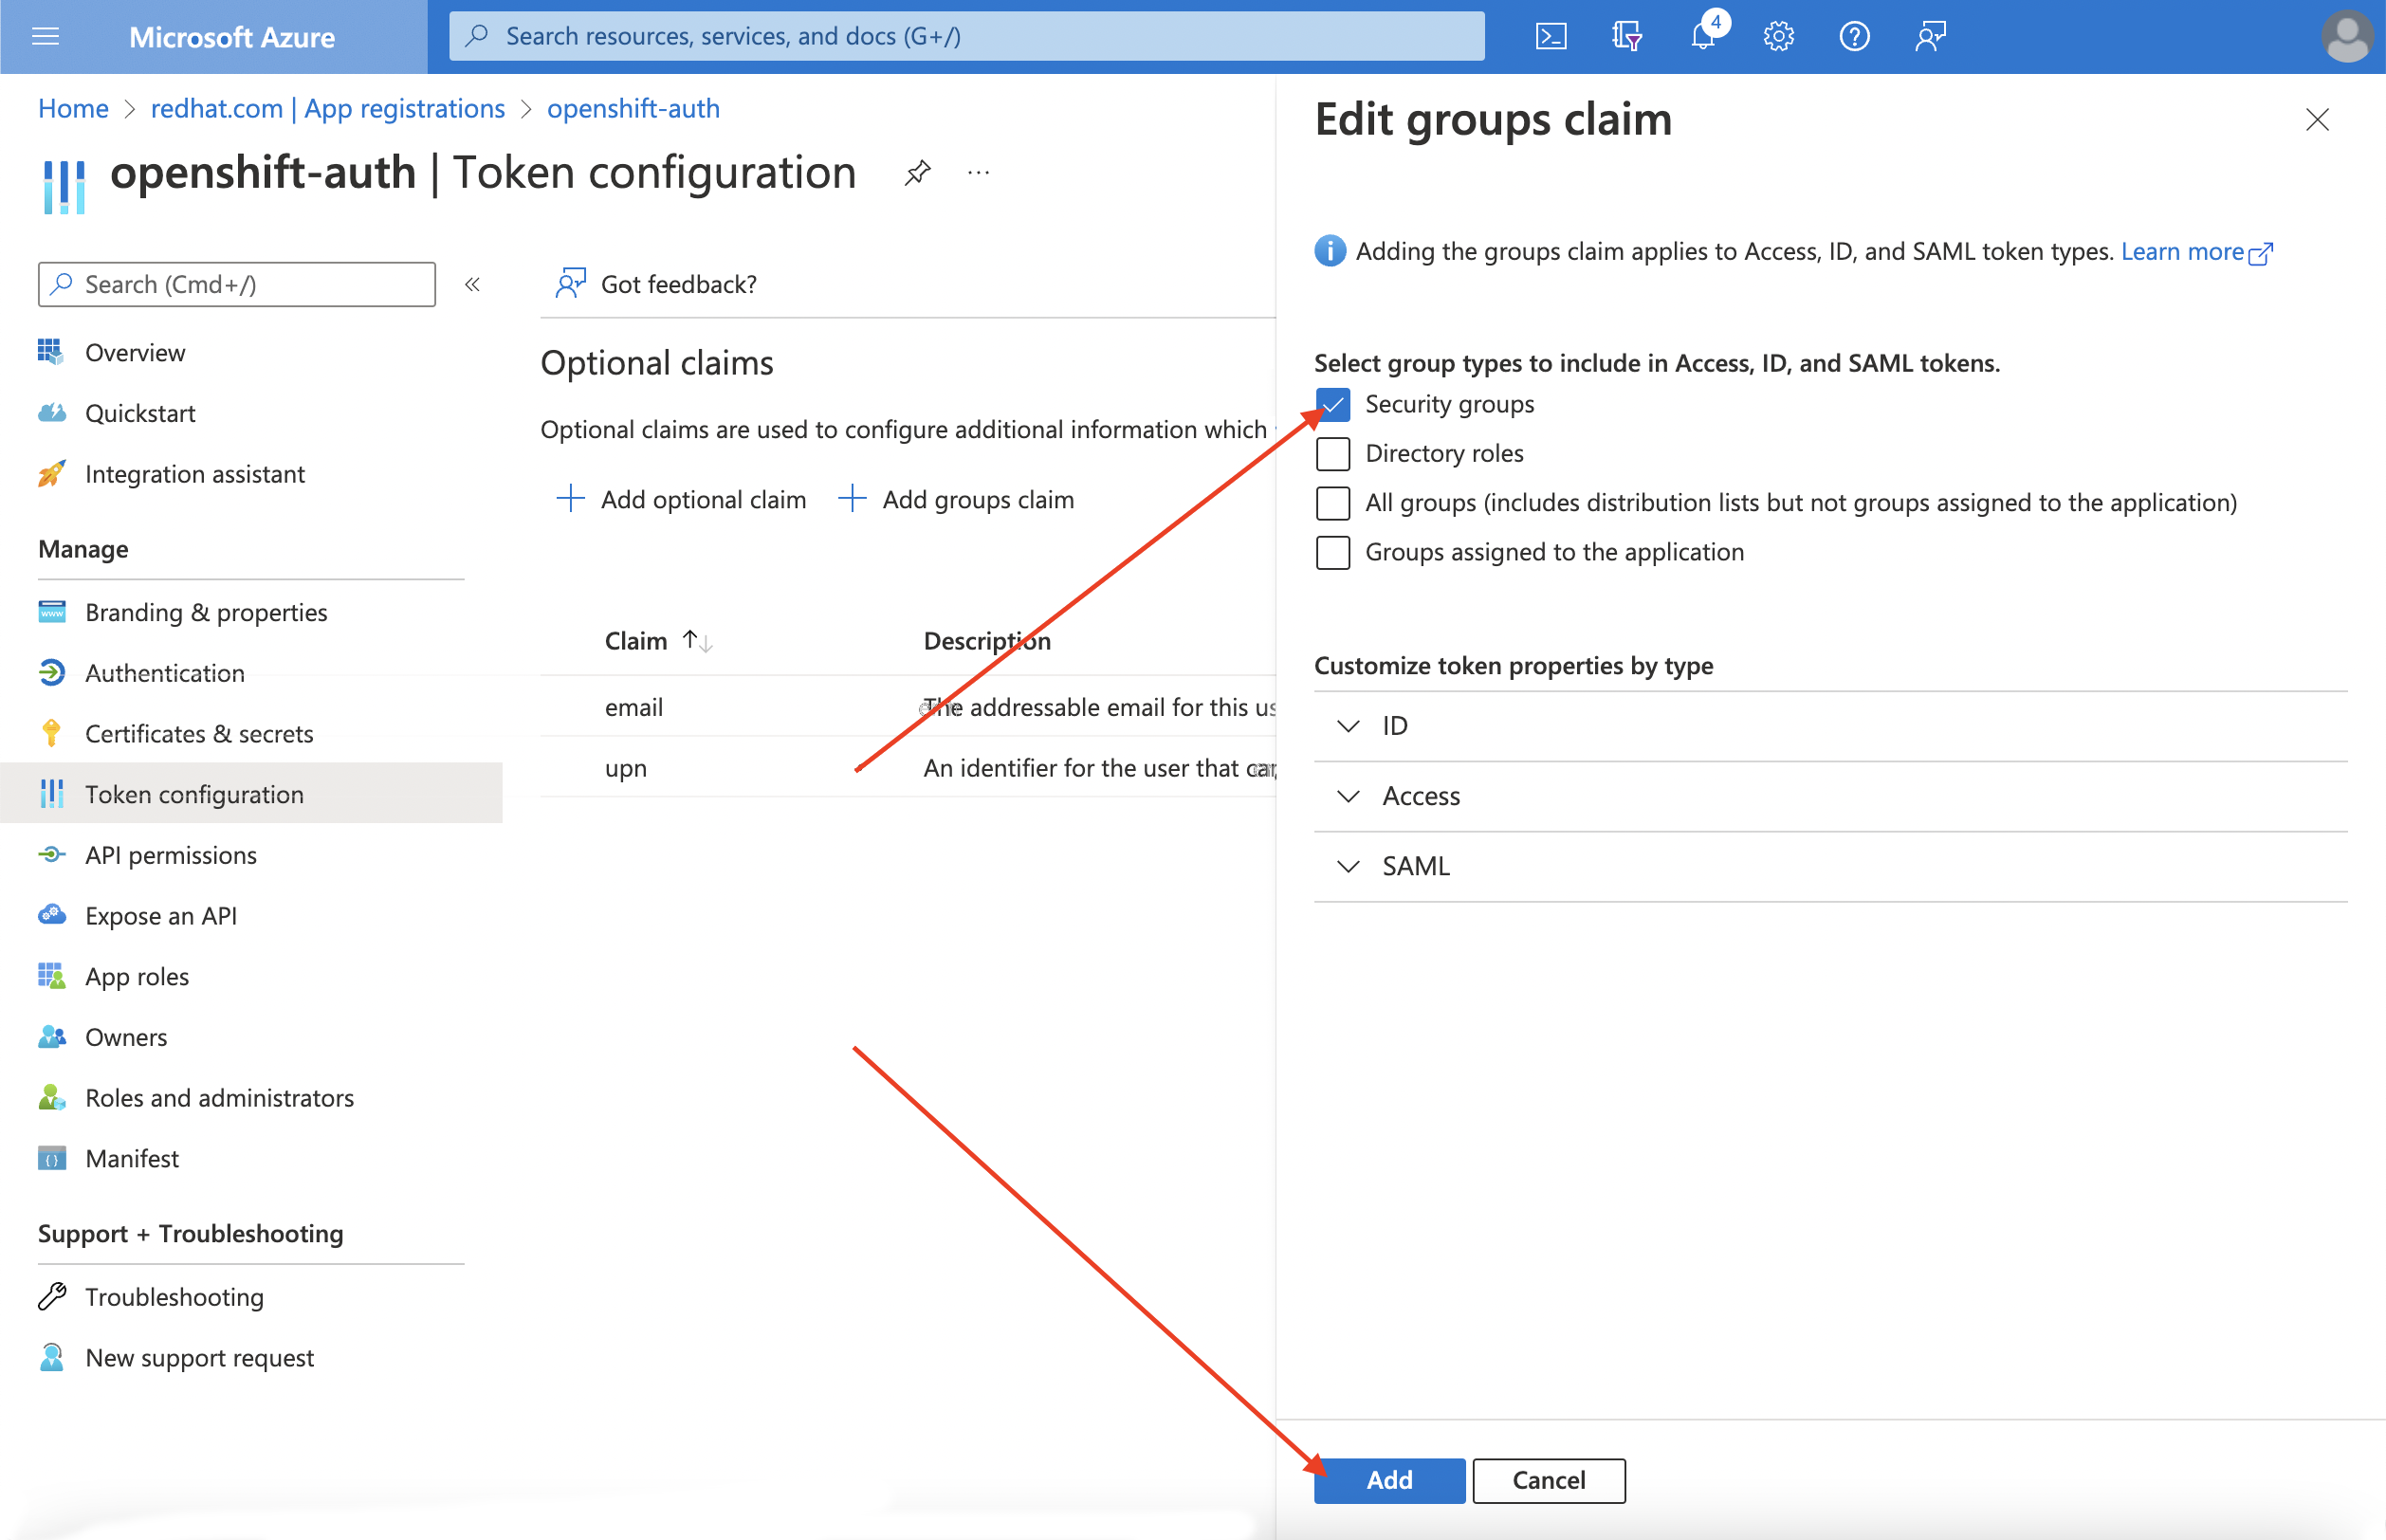
From the Token configuration sub-blade, click Add groups claim.
To configure group claims for your Entra ID application, select Security groups and then click the Add.
NoteIn this example, the group claim includes all of the security groups that a user is a member of. In a real production environment, ensure that the groups that the group claim only includes groups that apply to Red Hat OpenShift Service on AWS.
10.4. Configuring the Red Hat OpenShift Service on AWS cluster to use Entra ID as the identity provider
You must configure Red Hat OpenShift Service on AWS to use Entra ID as its identity provider.
Although ROSA offers the ability to configure identity providers by using OpenShift Cluster Manager, use the ROSA CLI to configure the cluster’s OAuth provider to use Entra ID as its identity provider. Before configuring the identity provider, set the necessary variables for the identity provider configuration.
Procedure
Create the variables by running the following command:
$ CLUSTER_NAME=example-cluster 1
$ IDP_NAME=AAD 2
$ APP_ID=yyyyyyyy-yyyy-yyyy-yyyy-yyyyyyyyyyyy 3
$ CLIENT_SECRET=xxxxxxxx-xxxx-xxxx-xxxx-xxxxxxxxxxxx 4
$ TENANT_ID=zzzzzzzz-zzzz-zzzz-zzzz-zzzzzzzzzzzz 5
Configure the cluster’s OAuth provider by running the following command. If you enabled group claims, ensure that you use the
--group-claims groupsargument.If you enabled group claims, run the following command:
$ rosa create idp \
--cluster ${CLUSTER_NAME} \
--type openid \
--name ${IDP_NAME} \
--client-id ${APP_ID} \
--client-secret ${CLIENT_SECRET} \
--issuer-url https://login.microsoftonline.com/${TENANT_ID}/v2.0 \
--email-claims email \
--name-claims name \
--username-claims preferred_username \
--extra-scopes email,profile \
--groups-claims groups
If you did not enable group claims, run the following command:
$ rosa create idp \
--cluster ${CLUSTER_NAME} \
--type openid \
--name ${IDP_NAME} \
--client-id ${APP_ID} \
--client-secret ${CLIENT_SECRET} \
--issuer-url https://login.microsoftonline.com/${TENANT_ID}/v2.0 \
--email-claims email \
--name-claims name \
--username-claims preferred_username \
--extra-scopes email,profile
After a few minutes, the cluster authentication Operator reconciles your changes, and you can log in to the cluster by using Entra ID.
10.5. Granting additional permissions to individual users and groups
When your first log in, you might notice that you have very limited permissions. By default, Red Hat OpenShift Service on AWS only grants you the ability to create new projects, or namespaces, in the cluster. Other projects are restricted from view.
You must grant these additional abilities to individual users and groups.
Granting additional permissions to individual users
Red Hat OpenShift Service on AWS includes a significant number of preconfigured roles, including the cluster-admin role that grants full access and control over the cluster.
Procedure
Grant a user access to the
cluster-adminrole by running the following command:$ rosa grant user cluster-admin \ --user=<USERNAME> 1 --cluster=${CLUSTER_NAME}- 1
- Provide the Entra ID username that you want to have cluster admin permissions.
Granting additional permissions to individual groups
If you opted to enable group claims, the cluster OAuth provider automatically creates or updates the user’s group memberships by using the group ID. The cluster OAuth provider does not automatically create RoleBindings and ClusterRoleBindings for the groups that are created; you are responsible for creating those bindings by using your own processes.
To grant an automatically generated group access to the cluster-admin role, you must create a ClusterRoleBinding to the group ID.
Procedure
Create the
ClusterRoleBindingby running the following command:$ oc create clusterrolebinding cluster-admin-group \ --clusterrole=cluster-admin \ --group=<GROUP_ID> 1- 1
- Provide the Entra ID group ID that you want to have cluster admin permissions.
Now, any user in the specified group automatically receives
cluster-adminaccess.
10.6. Additional resources
For more information about how to use RBAC to define and apply permissions in Red Hat OpenShift Service on AWS, see the Red Hat OpenShift Service on AWS documentation.
Chapter 11. Tutorial: Using AWS Secrets Manager CSI on ROSA with STS
The AWS Secrets and Configuration Provider (ASCP) provides a way to expose AWS Secrets as Kubernetes storage volumes. With the ASCP, you can store and manage your secrets in Secrets Manager and then retrieve them through your workloads running on Red Hat OpenShift Service on AWS (ROSA).
11.1. Prerequisites
Ensure that you have the following resources and tools before starting this process:
- A ROSA cluster deployed with STS
- Helm 3
-
awsCLI -
ocCLI -
jqCLI
Additional environment requirements
Log in to your ROSA cluster by running the following command:
$ oc login --token=<your-token> --server=<your-server-url>
You can find your login token by accessing your cluster in pull secret from Red Hat OpenShift Cluster Manager.
Validate that your cluster has STS by running the following command:
$ oc get authentication.config.openshift.io cluster -o json \
  | jq .spec.serviceAccountIssuer
Example output
"https://xxxxx.cloudfront.net/xxxxx"
If your output is different, do not proceed. See Red Hat documentation on creating an STS cluster before continuing this process.
Set the
SecurityContextConstraintspermission to allow the CSI driver to run by running the following command:$ oc new-project csi-secrets-store $ oc adm policy add-scc-to-user privileged \ system:serviceaccount:csi-secrets-store:secrets-store-csi-driver $ oc adm policy add-scc-to-user privileged \ system:serviceaccount:csi-secrets-store:csi-secrets-store-provider-awsCreate environment variables to use later in this process by running the following command:
$ export REGION=$(oc get infrastructure cluster -o=jsonpath="{.status.platformStatus.aws.region}")
$ export OIDC_ENDPOINT=$(oc get authentication.config.openshift.io cluster \
   -o jsonpath='{.spec.serviceAccountIssuer}' | sed  's|^https://||')
$ export AWS_ACCOUNT_ID=`aws sts get-caller-identity --query Account --output text`
$ export AWS_PAGER=""
11.2. Deploying the AWS Secrets and Configuration Provider
Use Helm to register the secrets store CSI driver by running the following command:
$ helm repo add secrets-store-csi-driver \
    https://kubernetes-sigs.github.io/secrets-store-csi-driver/charts
Update your Helm repositories by running the following command:
$ helm repo update
Install the secrets store CSI driver by running the following command:
$ helm upgrade --install -n csi-secrets-store \
    csi-secrets-store-driver secrets-store-csi-driver/secrets-store-csi-driver
Deploy the AWS provider by running the following command:
$ oc -n csi-secrets-store apply -f \
    https://raw.githubusercontent.com/rh-mobb/documentation/main/content/misc/secrets-store-csi/aws-provider-installer.yaml
Check that both Daemonsets are running by running the following command:
$ oc -n csi-secrets-store get ds \
    csi-secrets-store-provider-aws \
    csi-secrets-store-driver-secrets-store-csi-driver
Label the Secrets Store CSI Driver to allow use with the restricted pod security profile by running the following command:
$ oc label csidriver.storage.k8s.io/secrets-store.csi.k8s.io security.openshift.io/csi-ephemeral-volume-profile=restricted
11.3. Creating a Secret and IAM Access Policies
Create a secret in Secrets Manager by running the following command:
$ SECRET_ARN=$(aws --region "$REGION" secretsmanager create-secret \
    --name MySecret --secret-string \
    '{"username":"shadowman", "password":"hunter2"}' \
    --query ARN --output text)
$ echo $SECRET_ARN
Create an IAM Access Policy document by running the following command:
$ cat << EOF > policy.json
{
   "Version": "2012-10-17",
   "Statement": [{
      "Effect": "Allow",
      "Action": [
        "secretsmanager:GetSecretValue",
        "secretsmanager:DescribeSecret"
      ],
      "Resource": ["$SECRET_ARN"]
      }]
}
EOF
Create an IAM Access Policy by running the following command:
$ POLICY_ARN=$(aws --region "$REGION" --query Policy.Arn \
--output text iam create-policy \
--policy-name openshift-access-to-mysecret-policy \
--policy-document file://policy.json)
$ echo $POLICY_ARN
Create an IAM Role trust policy document by running the following command:
NoteThe trust policy is locked down to the default service account of a namespace you create later in this process.
$ cat <<EOF > trust-policy.json
{
   "Version": "2012-10-17",
   "Statement": [
   {
   "Effect": "Allow",
   "Condition": {
     "StringEquals" : {
       "${OIDC_ENDPOINT}:sub": ["system:serviceaccount:my-application:default"]
      }
    },
    "Principal": {
       "Federated": "arn:aws:iam::$AWS_ACCOUNT_ID:oidc-provider/${OIDC_ENDPOINT}"
    },
    "Action": "sts:AssumeRoleWithWebIdentity"
    }
    ]
}
EOF
Create an IAM role by running the following command:
$ ROLE_ARN=$(aws iam create-role --role-name openshift-access-to-mysecret \
--assume-role-policy-document file://trust-policy.json \
--query Role.Arn --output text)
$ echo $ROLE_ARN
Attach the role to the policy by running the following command:
$ aws iam attach-role-policy --role-name openshift-access-to-mysecret \
    --policy-arn $POLICY_ARN
11.4. Create an Application to use this secret
Create an OpenShift project by running the following command:
$ oc new-project my-application
Annotate the default service account to use the STS Role by running the following command:
$ oc annotate -n my-application serviceaccount default \
    eks.amazonaws.com/role-arn=$ROLE_ARN
Create a secret provider class to access our secret by running the following command:
$ cat << EOF | oc apply -f -
apiVersion: secrets-store.csi.x-k8s.io/v1
kind: SecretProviderClass
metadata:
  name: my-application-aws-secrets
spec:
  provider: aws
  parameters:
    objects: |
      - objectName: "MySecret"
        objectType: "secretsmanager"
EOF
Create a Deployment by using our secret in the following command:
$ cat << EOF | oc apply -f -
apiVersion: v1
kind: Pod
metadata:
  name: my-application
  labels:
    app: my-application
spec:
  volumes:
  - name: secrets-store-inline
    csi:
      driver: secrets-store.csi.k8s.io
      readOnly: true
      volumeAttributes:
        secretProviderClass: "my-application-aws-secrets"
  containers:
  - name: my-application-deployment
    image: k8s.gcr.io/e2e-test-images/busybox:1.29
    command:
      - "/bin/sleep"
      - "10000"
    volumeMounts:
    - name: secrets-store-inline
      mountPath: "/mnt/secrets-store"
      readOnly: true
EOF
Verify the Pod has the secret mounted by running the following commandv:
$ oc exec -it my-application -- cat /mnt/secrets-store/MySecret
11.5. Clean up
Delete the application by running the following command:
$ oc delete project my-application
Delete the secrets store csi driver by running the following command:
$ helm delete -n csi-secrets-store csi-secrets-store-driver
Delete Security Context Constraints by running the following command:
$ oc adm policy remove-scc-from-user privileged \
    system:serviceaccount:csi-secrets-store:secrets-store-csi-driver
$ oc adm policy remove-scc-from-user privileged \
    system:serviceaccount:csi-secrets-store:csi-secrets-store-provider-aws
Delete the AWS provider by running the following command:
$ oc -n csi-secrets-store delete -f \
https://raw.githubusercontent.com/rh-mobb/documentation/main/content/misc/secrets-store-csi/aws-provider-installer.yaml
Delete AWS Roles and Policies by running the following command:
$ aws iam detach-role-policy --role-name openshift-access-to-mysecret \
    --policy-arn $POLICY_ARN
$ aws iam delete-role --role-name openshift-access-to-mysecret
$ aws iam delete-policy --policy-arn $POLICY_ARN
Delete the Secrets Manager secret by running the following command:
$ aws secretsmanager --region $REGION delete-secret --secret-id $SECRET_ARN
Chapter 12. Tutorial: Using AWS Controllers for Kubernetes on ROSA
AWS Controllers for Kubernetes (ACK) lets you define and use AWS service resources directly from Red Hat OpenShift Service on AWS (ROSA). With ACK, you can take advantage of AWS-managed services for your applications without needing to define resources outside of the cluster or run services that provide supporting capabilities such as databases or message queues within the cluster.
You can install various ACK Operators directly from OperatorHub. This makes it easy to get started and use the Operators with your applications. This controller is a component of the AWS Controller for Kubernetes project, which is currently in developer preview.
Use this tutorial to deploy the ACK S3 Operator. You can also adapt it for any other ACK Operator in the OperatorHub of your cluster.
12.1. Prerequisites
- A ROSA cluster
-
A user account with
cluster-adminprivileges -
The OpenShift CLI (
oc) -
The Amazon Web Services (AWS) CLI (
aws)
12.2. Setting up your environment
Configure the following environment variables, changing the cluster name to suit your cluster:
$ export CLUSTER_NAME=$(oc get infrastructure cluster -o=jsonpath="{.status.infrastructureName}"  | sed 's/-[a-z0-9]\{5\}$//')
$ export REGION=$(rosa describe cluster -c ${ROSA_CLUSTER_NAME} --output json | jq -r .region.id)
$ export OIDC_ENDPOINT=$(oc get authentication.config.openshift.io cluster -o json | jq -r .spec.serviceAccountIssuer | sed  's|^https://||')
$ export AWS_ACCOUNT_ID=`aws sts get-caller-identity --query Account --output text`
$ export ACK_SERVICE=s3
$ export ACK_SERVICE_ACCOUNT=ack-${ACK_SERVICE}-controller
$ export POLICY_ARN=arn:aws:iam::aws:policy/AmazonS3FullAccess
$ export AWS_PAGER=""
$ export SCRATCH="/tmp/${ROSA_CLUSTER_NAME}/ack"
$ mkdir -p ${SCRATCH}
Ensure all fields output correctly before moving to the next section:
$ echo "Cluster: ${ROSA_CLUSTER_NAME}, Region: ${REGION}, OIDC Endpoint: ${OIDC_ENDPOINT}, AWS Account ID: ${AWS_ACCOUNT_ID}"
12.3. Preparing your AWS Account
Create an AWS Identity Access Management (IAM) trust policy for the ACK Operator:
$ cat <<EOF > "${SCRATCH}/trust-policy.json"
{
 "Version": "2012-10-17",
 "Statement": [
 {
 "Effect": "Allow",
 "Condition": {
   "StringEquals" : {
     "${OIDC_ENDPOINT}:sub": "system:serviceaccount:ack-system:${ACK_SERVICE_ACCOUNT}"
   }
 },
 "Principal": {
   "Federated": "arn:aws:iam::$AWS_ACCOUNT_ID:oidc-provider/${OIDC_ENDPOINT}"
 },
 "Action": "sts:AssumeRoleWithWebIdentity"
 }
 ]
}
EOF
Create an AWS IAM role for the ACK Operator to assume with the
AmazonS3FullAccesspolicy attached:NoteYou can find the recommended policy in each project’s GitHub repository, for example https://github.com/aws-controllers-k8s/s3-controller/blob/main/config/iam/recommended-policy-arn.
$ ROLE_ARN=$(aws iam create-role --role-name "ack-${ACK_SERVICE}-controller" \
   --assume-role-policy-document "file://${SCRATCH}/trust-policy.json" \
   --query Role.Arn --output text)
$ echo $ROLE_ARN

$ aws iam attach-role-policy --role-name "ack-${ACK_SERVICE}-controller" \
     --policy-arn ${POLICY_ARN}
12.4. Installing the ACK S3 Controller
Create a project to install the ACK S3 Operator into:
$ oc new-project ack-system
Create a file with the ACK S3 Operator configuration:
NoteACK_WATCH_NAMESPACEis purposefully left blank so the controller can properly watch all namespaces in the cluster.$ cat <<EOF > "${SCRATCH}/config.txt" ACK_ENABLE_DEVELOPMENT_LOGGING=true ACK_LOG_LEVEL=debug ACK_WATCH_NAMESPACE= AWS_REGION=${REGION} AWS_ENDPOINT_URL= ACK_RESOURCE_TAGS=${CLUSTER_NAME} ENABLE_LEADER_ELECTION=true LEADER_ELECTION_NAMESPACE= EOFUse the file from the previous step to create a ConfigMap:
$ oc -n ack-system create configmap \
  --from-env-file=${SCRATCH}/config.txt ack-${ACK_SERVICE}-user-config
Install the ACK S3 Operator from OperatorHub:
$ cat << EOF | oc apply -f -
apiVersion: operators.coreos.com/v1
kind: OperatorGroup
metadata:
  name: ack-${ACK_SERVICE}-controller
  namespace: ack-system
spec:
  upgradeStrategy: Default
---
apiVersion: operators.coreos.com/v1alpha1
kind: Subscription
metadata:
  name: ack-${ACK_SERVICE}-controller
  namespace: ack-system
spec:
  channel: alpha
  installPlanApproval: Automatic
  name: ack-${ACK_SERVICE}-controller
  source: community-operators
  sourceNamespace: openshift-marketplace
EOF
Annotate the ACK S3 Operator service account with the AWS IAM role to assume and restart the deployment:
$ oc -n ack-system annotate serviceaccount ${ACK_SERVICE_ACCOUNT} \
  eks.amazonaws.com/role-arn=${ROLE_ARN} && \
  oc -n ack-system rollout restart deployment ack-${ACK_SERVICE}-controller
Verify that the ACK S3 Operator is running:
$ oc -n ack-system get pods
Example output
NAME                                 READY   STATUS    RESTARTS   AGE
ack-s3-controller-585f6775db-s4lfz   1/1     Running   0          51s
12.5. Validating the deployment
Deploy an S3 bucket resource:
$ cat << EOF | oc apply -f -
apiVersion: s3.services.k8s.aws/v1alpha1
kind: Bucket
metadata:
   name: ${CLUSTER-NAME}-bucket
   namespace: ack-system
spec:
   name: ${CLUSTER-NAME}-bucket
EOF
Verify the S3 bucket was created in AWS:
$ aws s3 ls | grep ${CLUSTER_NAME}-bucketExample output
2023-10-04 14:51:45 mrmc-test-maz-bucket
12.6. Cleaning up
Delete the S3 bucket resource:
$ oc -n ack-system delete bucket.s3.services.k8s.aws/${CLUSTER-NAME}-bucketDelete the ACK S3 Operator and the AWS IAM roles:
$ oc -n ack-system delete subscription ack-${ACK_SERVICE}-controller
$ aws iam detach-role-policy \
  --role-name "ack-${ACK_SERVICE}-controller" \
  --policy-arn ${POLICY_ARN}
$ aws iam delete-role \
  --role-name "ack-${ACK_SERVICE}-controller"
Delete the
ack-systemproject:$ oc delete project ack-system
Chapter 13. Tutorial: Deploying the External DNS Operator on ROSA
Starting with Red Hat OpenShift Service on AWS 4.14, the Custom Domain Operator is deprecated. To manage Ingress in Red Hat OpenShift Service on AWS 4.14, use the Ingress Operator. The functionality is unchanged for Red Hat OpenShift Service on AWS 4.13 and earlier versions.
Configuring the Custom Domain Operator requires a wildcard CNAME DNS record in your Amazon Route 53 hosted zone. If you do not want to use a wildcard record, you can use the External DNS Operator to create individual entries for routes.
Use this tutorial to deploy and configure the External DNS Operator with a custom domain in Red Hat OpenShift Service on AWS (ROSA).
The External DNS Operator does not support STS using IAM Roles for Service Accounts (IRSA) and uses long-lived Identity Access Management (IAM) credentials instead. This tutorial will be updated when the Operator supports STS.
13.1. Prerequisites
- A ROSA cluster
-
A user account with
dedicated-adminprivileges -
The OpenShift CLI (
oc) -
The Amazon Web Services (AWS) CLI (
aws) -
A unique domain, such as
*.apps.<company_name>.io - An Amazon Route 53 public hosted zone for the above domain
13.2. Setting up your environment
Configure the following environment variables, replacing
CLUSTER_NAMEwith the name of your cluster:$ export DOMAIN=apps.<company_name>.io 1 $ export AWS_PAGER="" $ export CLUSTER_NAME=$(oc get infrastructure cluster -o=jsonpath="{.status.infrastructureName}" | sed 's/-[a-z0-9]\{5\}$//') $ export REGION=$(oc get infrastructure cluster -o=jsonpath="{.status.platformStatus.aws.region}") $ export AWS_ACCOUNT_ID=$(aws sts get-caller-identity --query Account --output text) $ export SCRATCH="/tmp/${CLUSTER_NAME}/external-dns" $ mkdir -p ${SCRATCH}- 1
- The custom domain.
Ensure all fields output correctly before moving to the next section:
$ echo "Cluster: ${CLUSTER_NAME}, Region: ${REGION}, AWS Account ID: ${AWS_ACCOUNT_ID}"
13.3. Setting up your custom domain
ROSA manages secondary Ingress Controllers using the Custom Domain Operator. Use the following procedure to deploy a secondary Ingress Controller using a custom domain.
Prerequisites
-
A unique domain, such as
*.apps.<company_name>.io -
A custom SAN or wildcard certificate, such as
CN=*.apps.<company_name>.io
Procedure
Create a new project:
$ oc new-project external-dns-operator
Create a new TLS secret from a private key and a public certificate, where
fullchain.pemis your full wildcard certificate chain (including any intermediaries) andprivkey.pemis your wildcard certificate’s private key:$ oc -n external-dns-operator create secret tls external-dns-tls --cert=fullchain.pem --key=privkey.pem
Create a new
CustomDomaincustom resource (CR):Example
external-dns-custom-domain.yamlapiVersion: managed.openshift.io/v1alpha1 kind: CustomDomain metadata: name: external-dns spec: domain: apps.<company_name>.io 1 scope: External loadBalancerType: NLB certificate: name: external-dns-tls namespace: external-dns-operator- 1
- The custom domain.
Apply the CR:
$ oc apply -f external-dns-custom-domain.yaml
Verify that your custom domain Ingress Controller has been deployed and has a
Readystatus:$ oc get customdomains
Example output
NAME               ENDPOINT                                                    DOMAIN                       STATUS
external-dns       xxrywp.<company_name>.cluster-01.opln.s1.openshiftapps.com  *.apps.<company_name>.io     Ready
13.4. Preparing your AWS account
Retrieve the Amazon Route 53 public hosted zone ID:
$ export ZONE_ID=$(aws route53 list-hosted-zones-by-name --output json \
  --dns-name "${DOMAIN}." --query 'HostedZones[0]'.Id --out text | sed 's/\/hostedzone\///')
Create an AWS IAM Policy document that allows the
External DNSOperator to update only the custom domain public hosted zone:$ cat << EOF > "${SCRATCH}/external-dns-policy.json" { "Version": "2012-10-17", "Statement": [ { "Effect": "Allow", "Action": [ "route53:ChangeResourceRecordSets" ], "Resource": [ "arn:aws:route53:::hostedzone/${ZONE_ID}" ] }, { "Effect": "Allow", "Action": [ "route53:ListHostedZones", "route53:ListResourceRecordSets" ], "Resource": [ "*" ] } ] } EOFCreate an AWS IAM policy:
$ export POLICY_ARN=$(aws iam create-policy --policy-name "${CLUSTER_NAME}-AllowExternalDNSUpdates" \
  --policy-document file://${SCRATCH}/external-dns-policy.json \
  --query 'Policy.Arn' --output text)
Create an AWS IAM user:
$ aws iam create-user --user-name "${CLUSTER_NAME}-external-dns-operator"Attach the policy:
$ aws iam attach-user-policy --user-name "${CLUSTER_NAME}-external-dns-operator" --policy-arn $POLICY_ARNNoteThis will be changed to STS using IRSA in the future.
Create AWS keys for the IAM user:
$ SECRET_ACCESS_KEY=$(aws iam create-access-key --user-name "${CLUSTER_NAME}-external-dns-operator")Create static credentials:
$ cat << EOF > "${SCRATCH}/credentials"
[default]
aws_access_key_id = $(echo $SECRET_ACCESS_KEY | jq -r '.AccessKey.AccessKeyId')
aws_secret_access_key = $(echo $SECRET_ACCESS_KEY | jq -r '.AccessKey.SecretAccessKey')
EOF
13.5. Installing the External DNS Operator
Install the
External DNSOperator from OperatorHub:$ cat << EOF | oc apply -f - apiVersion: operators.coreos.com/v1 kind: OperatorGroup metadata: name: external-dns-group namespace: external-dns-operator spec: targetNamespaces: - external-dns-operator --- apiVersion: operators.coreos.com/v1alpha1 kind: Subscription metadata: name: external-dns-operator namespace: external-dns-operator spec: channel: stable-v1.1 installPlanApproval: Automatic name: external-dns-operator source: redhat-operators sourceNamespace: openshift-marketplace EOF
Wait until the
External DNSOperator is running:$ oc rollout status deploy external-dns-operator --timeout=300s
Create a secret from the AWS IAM user credentials:
$ oc -n external-dns-operator create secret generic external-dns \
  --from-file "${SCRATCH}/credentials"
Deploy the
ExternalDNScontroller:$ cat << EOF | oc apply -f - apiVersion: externaldns.olm.openshift.io/v1beta1 kind: ExternalDNS metadata: name: ${DOMAIN} spec: domains: - filterType: Include matchType: Exact name: ${DOMAIN} provider: aws: credentials: name: external-dns type: AWS source: openshiftRouteOptions: routerName: external-dns type: OpenShiftRoute zones: - ${ZONE_ID} EOFWait until the controller is running:
$ oc rollout status deploy external-dns-${DOMAIN} --timeout=300s
13.6. Deploying a sample application
Now that the ExternalDNS controller is running, you can deploy a sample application to confirm that the custom domain is configured and trusted when you expose a new route.
Create a new project for your sample application:
$ oc new-project hello-world
Deploy a hello world application:
$ oc new-app -n hello-world --image=docker.io/openshift/hello-openshift
Create a route for the application specifying your custom domain name:
$ oc -n hello-world create route edge --service=hello-openshift hello-openshift-tls \
--hostname hello-openshift.${DOMAIN}
Check if the DNS record was created automatically by ExternalDNS:
NoteIt can take a few minutes for the record to appear in Amazon Route 53.
$ aws route53 list-resource-record-sets --hosted-zone-id ${ZONE_ID} \
   --query "ResourceRecordSets[?Type == 'CNAME']" | grep hello-openshift
Optional: You can also view the TXT records that indicate they were created by ExternalDNS:
$ aws route53 list-resource-record-sets --hosted-zone-id ${ZONE_ID} \
   --query "ResourceRecordSets[?Type == 'TXT']" | grep ${DOMAIN}
Navigate to your custom console domain in the browser where you see the OpenShift login:
$ echo console.${DOMAIN}
Chapter 14. Tutorial: Dynamically issuing certificates using the cert-manager Operator on ROSA
While wildcard certificates provide simplicity by securing all first-level subdomains of a given domain with a single certificate, other use cases can require the use of individual certificates per domain.
Learn how to use the cert-manager Operator for Red Hat OpenShift and Let’s Encrypt to dynamically issue certificates for routes created using a custom domain.
14.1. Prerequisites
- A ROSA cluster
-
A user account with
cluster-adminprivileges -
The OpenShift CLI (
oc) -
The Amazon Web Services (AWS) CLI (
aws) -
A unique domain, such as
*.apps.<company_name>.io - An Amazon Route 53 public hosted zone for the above domain
14.2. Setting up your environment
Configure the following environment variables:
$ export DOMAIN=apps.<company_name>.io 1
$ export EMAIL=<youremail@company_name.io> 2
$ export AWS_PAGER=""
$ export CLUSTER_NAME=$(oc get infrastructure cluster -o=jsonpath="{.status.infrastructureName}"  | sed 's/-[a-z0-9]\{5\}$//')
$ export OIDC_ENDPOINT=$(oc get authentication.config.openshift.io cluster -o json | jq -r .spec.serviceAccountIssuer | sed  's|^https://||')
$ export REGION=$(oc get infrastructure cluster -o=jsonpath="{.status.platformStatus.aws.region}")
$ export AWS_ACCOUNT_ID=$(aws sts get-caller-identity --query Account --output text)
$ export SCRATCH="/tmp/${CLUSTER_NAME}/dynamic-certs"
$ mkdir -p ${SCRATCH}
Ensure all fields output correctly before moving to the next section:
$ echo "Cluster: ${CLUSTER_NAME}, Region: ${REGION}, OIDC Endpoint: ${OIDC_ENDPOINT}, AWS Account ID: ${AWS_ACCOUNT_ID}"
14.3. Preparing your AWS account
When cert-manager requests a certificate from Let’s Encrypt (or another ACME certificate issuer), Let’s Encrypt servers validate that you control the domain name in that certificate using challenges. For this tutorial, you are using a DNS-01 challenge that proves that you control the DNS for your domain name by putting a specific value in a TXT record under that domain name. This is all done automatically by cert-manager. To allow cert-manager permission to modify the Amazon Route 53 public hosted zone for your domain, you need to create an Identity Access Management (IAM) role with specific policy permissions and a trust relationship to allow access to the pod.
The public hosted zone that is used in this tutorial is in the same AWS account as the ROSA cluster. If your public hosted zone is in a different account, a few additional steps for Cross Account Access are required.
Retrieve the Amazon Route 53 public hosted zone ID:
NoteThis command looks for a public hosted zone that matches the custom domain you specified earlier as the
DOMAINenvironment variable. You can manually specify the Amazon Route 53 public hosted zone by runningexport ZONE_ID=<zone_ID>, replacing<zone_ID>with your specific Amazon Route 53 public hosted zone ID.$ export ZONE_ID=$(aws route53 list-hosted-zones-by-name --output json \ --dns-name "${DOMAIN}." --query 'HostedZones[0]'.Id --out text | sed 's/\/hostedzone\///')Create an AWS IAM policy document for the
cert-managerOperator that provides the ability to update only the specified public hosted zone:$ cat <<EOF > "${SCRATCH}/cert-manager-policy.json" { "Version": "2012-10-17", "Statement": [ { "Effect": "Allow", "Action": "route53:GetChange", "Resource": "arn:aws:route53:::change/*" }, { "Effect": "Allow", "Action": [ "route53:ChangeResourceRecordSets", "route53:ListResourceRecordSets" ], "Resource": "arn:aws:route53:::hostedzone/${ZONE_ID}" }, { "Effect": "Allow", "Action": "route53:ListHostedZonesByName", "Resource": "*" } ] } EOFCreate the IAM policy using the file you created in the previous step:
$ POLICY_ARN=$(aws iam create-policy --policy-name "${CLUSTER_NAME}-cert-manager-policy" \
  --policy-document file://${SCRATCH}/cert-manager-policy.json \
  --query 'Policy.Arn' --output text)
Create an AWS IAM trust policy for the
cert-managerOperator:$ cat <<EOF > "${SCRATCH}/trust-policy.json" { "Version": "2012-10-17", "Statement": [ { "Effect": "Allow", "Condition": { "StringEquals" : { "${OIDC_ENDPOINT}:sub": "system:serviceaccount:cert-manager:cert-manager" } }, "Principal": { "Federated": "arn:aws:iam::$AWS_ACCOUNT_ID:oidc-provider/${OIDC_ENDPOINT}" }, "Action": "sts:AssumeRoleWithWebIdentity" } ] } EOFCreate an IAM role for the
cert-managerOperator using the trust policy you created in the previous step:$ ROLE_ARN=$(aws iam create-role --role-name "${CLUSTER_NAME}-cert-manager-operator" \ --assume-role-policy-document "file://${SCRATCH}/trust-policy.json" \ --query Role.Arn --output text)Attach the permissions policy to the role:
$ aws iam attach-role-policy --role-name "${CLUSTER_NAME}-cert-manager-operator" \
  --policy-arn ${POLICY_ARN}
14.4. Installing the cert-manager Operator
Create a project to install the
cert-managerOperator into:$ oc new-project cert-manager-operator
ImportantDo not attempt to use more than one
cert-managerOperator in your cluster. If you have a communitycert-managerOperator installed in your cluster, you must uninstall it before installing thecert-managerOperator for Red Hat OpenShift.Install the
cert-managerOperator for Red Hat OpenShift:$ cat << EOF | oc apply -f - apiVersion: operators.coreos.com/v1 kind: OperatorGroup metadata: name: openshift-cert-manager-operator-group namespace: cert-manager-operator spec: targetNamespaces: - cert-manager-operator --- apiVersion: operators.coreos.com/v1alpha1 kind: Subscription metadata: name: openshift-cert-manager-operator namespace: cert-manager-operator spec: channel: stable-v1 installPlanApproval: Automatic name: openshift-cert-manager-operator source: redhat-operators sourceNamespace: openshift-marketplace EOF
NoteIt takes a few minutes for this Operator to install and complete its set up.
Verify that the
cert-managerOperator is running:$ oc -n cert-manager-operator get pods
Example output
NAME                                                        READY   STATUS    RESTARTS   AGE
cert-manager-operator-controller-manager-84b8799db5-gv8mx   2/2     Running   0          12s
Annotate the service account used by the
cert-managerpods with the AWS IAM role you created earlier:$ oc -n cert-manager annotate serviceaccount cert-manager eks.amazonaws.com/role-arn=${ROLE_ARN}Restart the existing
cert-managercontroller pod by running the following command:$ oc -n cert-manager delete pods -l app.kubernetes.io/name=cert-manager
Patch the Operator’s configuration to use external nameservers to prevent DNS-01 challenge resolution issues:
$ oc patch certmanager.operator.openshift.io/cluster --type merge \
  -p '{"spec":{"controllerConfig":{"overrideArgs":["--dns01-recursive-nameservers-only","--dns01-recursive-nameservers=1.1.1.1:53"]}}}'
Create a
ClusterIssuerresource to use Let’s Encrypt by running the following command:$ cat << EOF | oc apply -f - apiVersion: cert-manager.io/v1 kind: ClusterIssuer metadata: name: letsencrypt-production spec: acme: server: https://acme-v02.api.letsencrypt.org/directory email: ${EMAIL} # This key doesn't exist, cert-manager creates it privateKeySecretRef: name: prod-letsencrypt-issuer-account-key solvers: - dns01: route53: hostedZoneID: ${ZONE_ID} region: ${REGION} secretAccessKeySecretRef: name: '' EOFVerify the
ClusterIssuerresource is ready:$ oc get clusterissuer.cert-manager.io/letsencrypt-production
Example output
NAME                     READY   AGE
letsencrypt-production   True    47s
14.5. Creating a custom domain Ingress Controller
Create a new project:
$ oc new-project custom-domain-ingress
Create and configure a certificate resource to provision a certificate for the custom domain Ingress Controller:
NoteThe following example uses a single domain certificate. SAN and wildcard certificates are also supported.
$ cat << EOF | oc apply -f -
apiVersion: cert-manager.io/v1
kind: Certificate
metadata:
  name: custom-domain-ingress-cert
  namespace: custom-domain-ingress
spec:
  secretName: custom-domain-ingress-cert-tls
  issuerRef:
     name: letsencrypt-production
     kind: ClusterIssuer
  commonName: "${DOMAIN}"
  dnsNames:
  - "${DOMAIN}"
EOF
Verify the certificate has been issued:
NoteIt takes a few minutes for this certificate to be issued by Let’s Encrypt. If it takes longer than 5 minutes, run
oc -n custom-domain-ingress describe certificate.cert-manager.io/custom-domain-ingress-certto see any issues reported by cert-manager.$ oc -n custom-domain-ingress get certificate.cert-manager.io/custom-domain-ingress-cert
Example output
NAME                         READY   SECRET                           AGE
custom-domain-ingress-cert   True    custom-domain-ingress-cert-tls   9m53s
Create a new
CustomDomaincustom resource (CR):$ cat << EOF | oc apply -f - apiVersion: managed.openshift.io/v1alpha1 kind: CustomDomain metadata: name: custom-domain-ingress spec: domain: ${DOMAIN} scope: External loadBalancerType: NLB certificate: name: custom-domain-ingress-cert-tls namespace: custom-domain-ingress EOFVerify that your custom domain Ingress Controller has been deployed and has a
Readystatus:$ oc get customdomains
Example output
NAME                    ENDPOINT                                                               DOMAIN            STATUS
custom-domain-ingress   tfoxdx.custom-domain-ingress.cluster.1234.p1.openshiftapps.com         example.com       Ready
Prepare a document with the necessary DNS changes to enable DNS resolution for your custom domain Ingress Controller:
$ INGRESS=$(oc get customdomain.managed.openshift.io/custom-domain-ingress --template={{.status.endpoint}})
$ cat << EOF > "${SCRATCH}/create-cname.json"
{
  "Comment":"Add CNAME to custom domain endpoint",
  "Changes":[{
      "Action":"CREATE",
      "ResourceRecordSet":{
        "Name": "*.${DOMAIN}",
      "Type":"CNAME",
      "TTL":30,
      "ResourceRecords":[{
        "Value": "${INGRESS}"
      }]
    }
  }]
}
EOF
Submit your changes to Amazon Route 53 for propagation:
$ aws route53 change-resource-record-sets \ --hosted-zone-id ${ZONE_ID} \ --change-batch file://${SCRATCH}/create-cname.jsonNoteWhile the wildcard CNAME record avoids the need to create a new record for every new application you deploy using the custom domain Ingress Controller, the certificate that each of these applications use is not a wildcard certificate.
14.6. Configuring dynamic certificates for custom domain routes
Now you can expose cluster applications on any first-level subdomains of the specified domain, but the connection will not be secured with a TLS certificate that matches the domain of the application. To ensure these cluster applications have valid certificates for each domain name, configure cert-manager to dynamically issue a certificate to every new route created under this domain.
Create the necessary OpenShift resources cert-manager requires to manage certificates for OpenShift routes.
This step creates a new deployment (and therefore a pod) that specifically monitors annotated routes in the cluster. If the
issuer-kindandissuer-nameannotations are found in a new route, it requests the Issuer (ClusterIssuer in this case) for a new certificate that is unique to this route and which will honor the hostname that was specified while creating the route.NoteIf the cluster does not have access to GitHub, you can save the raw contents locally and run
oc apply -f localfilename.yaml -n cert-manager.$ oc -n cert-manager apply -f https://github.com/cert-manager/openshift-routes/releases/latest/download/cert-manager-openshift-routes.yaml
The following additional OpenShift resources are also created in this step:
-
ClusterRole- grants permissions to watch and update the routes across the cluster -
ServiceAccount- uses permissions to run the newly created pod -
ClusterRoleBinding- binds these two resources
-
Ensure that the new
cert-manager-openshift-routespod is running successfully:$ oc -n cert-manager get pods
Example result
NAME                                             READY   STATUS    RESTARTS   AGE
cert-manager-866d8f788c-9kspc                    1/1     Running   0          4h21m
cert-manager-cainjector-6885c585bd-znws8         1/1     Running   0          4h41m
cert-manager-openshift-routes-75b6bb44cd-f8kd5   1/1     Running   0          6s
cert-manager-webhook-8498785dd9-bvfdf            1/1     Running   0          4h41m
14.7. Deploying a sample application
Now that dynamic certificates are configured, you can deploy a sample application to confirm that certificates are provisioned and trusted when you expose a new route.
Create a new project for your sample application:
$ oc new-project hello-world
Deploy a hello world application:
$ oc -n hello-world new-app --image=docker.io/openshift/hello-openshift
Create a route to expose the application from outside the cluster:
$ oc -n hello-world create route edge --service=hello-openshift hello-openshift-tls --hostname hello.${DOMAIN}Verify the certificate for the route is untrusted:
$ curl -I https://hello.${DOMAIN}Example output
curl: (60) SSL: no alternative certificate subject name matches target host name 'hello.example.com'
More details here: https://curl.se/docs/sslcerts.html

curl failed to verify the legitimacy of the server and therefore could not
establish a secure connection to it. To learn more about this situation and
how to fix it, please visit the web page mentioned above.
Annotate the route to trigger cert-manager to provision a certificate for the custom domain:
$ oc -n hello-world annotate route hello-openshift-tls cert-manager.io/issuer-kind=ClusterIssuer cert-manager.io/issuer-name=letsencrypt-production
NoteIt takes 2-3 minutes for the certificate to be created. The renewal of the certificate will automatically be managed by the
cert-managerOperator as it approaches expiration.Verify the certificate for the route is now trusted:
$ curl -I https://hello.${DOMAIN}Example output
HTTP/2 200
date: Thu, 05 Oct 2023 23:45:33 GMT
content-length: 17
content-type: text/plain; charset=utf-8
set-cookie: 52e4465485b6fb4f8a1b1bed128d0f3b=68676068bb32d24f0f558f094ed8e4d7; path=/; HttpOnly; Secure; SameSite=None
cache-control: private
14.8. Troubleshooting dynamic certificate provisioning
The validation process usually takes 2-3 minutes to complete while creating certificates.
If annotating your route does not trigger certificate creation during the certificate create step, run oc describe against each of the certificate,certificaterequest,order, and challenge resources to view the events or reasons that can help identify the cause of the issue.
$ oc get certificate,certificaterequest,order,challenge
For troubleshooting, you can refer to this helpful guide in debugging certificates.
You can also use the cmctl CLI tool for various certificate management activities, such as checking the status of certificates and testing renewals.
Chapter 15. Tutorial: Assigning consistent egress IP for external traffic
It might be desirable to assign a consistent IP address for traffic that leaves the cluster when configuring items such as security groups or other sorts of security controls which require an IP-based configuration. By default, Red Hat OpenShift Service on AWS (ROSA) (using the OVN-Kubernetes CNI) assigns random IP addresses from a pool which makes configuring security lockdowns unpredictable or unnecessarily open. This guide shows you how to configure a set of predictable IP addresses for egress cluster traffic to meet common security standards and guidance and other potential use cases.
See the OpenShift documentation on this topic for more information.
15.1. Prerequisites
- ROSA cluster deployed with OVN-Kubernetes
-
OpenShift CLI (
oc) -
ROSA CLI (
rosa) -
jq
15.1.1. Environment
This sets environment variables for the tutorial so that you do not need to copy/paste in your own. Be sure to replace the ROSA_MACHINE_POOL_NAME variable if you wish to target a different Machine Pool.:
$ export ROSA_CLUSTER_NAME=$(oc get infrastructure cluster -o=jsonpath="{.status.infrastructureName}"  | sed 's/-[a-z0-9]\{5\}$//')
$ export ROSA_MACHINE_POOL_NAME=Default
15.2. Ensure capacity
For each public cloud provider, there is a limit on the number of IP addresses that may be assigned per node. This can affect the ability to assign an egress IP address. To verify sufficient capacity, you can run the following command to print out the currently assigned IP addresses versus the total capacity in order to identify any nodes which may affected:
$ oc get node -o json | \
    jq '.items[] |
        {
            "name": .metadata.name,
            "ips": (.status.addresses | map(select(.type == "InternalIP") | .address)),
            "capacity": (.metadata.annotations."cloud.network.openshift.io/egress-ipconfig" | fromjson[] | .capacity.ipv4)
        }'
Example output
---
{
  "name": "ip-10-10-145-88.ec2.internal",
  "ips": [
    "10.10.145.88"
  ],
  "capacity": 14
}
{
  "name": "ip-10-10-154-175.ec2.internal",
  "ips": [
    "10.10.154.175"
  ],
  "capacity": 14
}
---
The above example uses jq as a friendly filter. If you do not have jq installed, you can review the metadata.annotations['cloud.network.openshift.io/egress-ipconfig'] field of each node manually to verify node capacity.
15.3. Create the egress IP rule(s)
15.3.1. Identify the egress IPs
Before creating the rules, we should identify which egress IPs that we will use. It should be noted that the egress IPs that you select should exist as a part of the subnets in which the worker nodes are provisioned into.
15.3.2. Reserve the egress IPs
It is recommended, but not required, to reserve the egress IPs that you have requested to avoid conflicts with the AWS VPC DHCP service. To do so, you can request explicit IP reservations by following the AWS documentation for CIDR reservations.
15.4. Deploy an egress IP to a namespace
Create a project to demonstrate assigning egress IP addresses based on a namespace selection:
$ oc create -f demo-egress-pod.yaml
Create the egress rule. This rule will ensure that egress traffic will be applied to all pods within the namespace that we just created using the spec.namespaceSelector field:
$ cat <<EOF | oc apply -f -
apiVersion: k8s.ovn.org/v1
kind: EgressIP
metadata:
  name: demo-egress-ns
spec:
  # NOTE: these egress IPs are within the subnet range(s) in which my worker nodes
  #       are deployed.
  egressIPs:
    - 10.10.100.253
    - 10.10.150.253
    - 10.10.200.253
  namespaceSelector:
    matchLabels:
      kubernetes.io/metadata.name: demo-egress-ns
EOF
15.4.1. Assign an egress IP to a pod
Create a project to demonstrate assigning egress IP addresses based on a pod selection:
$ oc new-project demo-egress-pod
Create the egress rule. This rule will ensure that egress traffic will be applied to the pod which we just created using the spec.podSelector field. It should be noted that spec.namespaceSelector is a mandatory field:
$ cat <<EOF | oc apply -f -
apiVersion: k8s.ovn.org/v1
kind: EgressIP
metadata:
  name: demo-egress-pod
spec:
  # NOTE: these egress IPs are within the subnet range(s) in which my worker nodes
  #       are deployed.
  egressIPs:
    - 10.10.100.254
    - 10.10.150.254
    - 10.10.200.254
  namespaceSelector:
    matchLabels:
      kubernetes.io/metadata.name: demo-egress-pod
  podSelector:
    matchLabels:
      run: demo-egress-pod
EOF
15.4.2. Label the nodes
You can run oc get egressips and see that the egress IP assignments are pending.
Example output
NAME              EGRESSIPS       ASSIGNED NODE   ASSIGNED EGRESSIPS
demo-egress-ns    10.10.100.253
demo-egress-pod   10.10.100.254
To complete the egress IP assignment, we need to assign a specific label to the nodes. The egress IP rule that you created in a previous step only applies to nodes with the k8s.ovn.org/egress-assignable label. We want to ensure that label exists on only a specific machinepool as set using an environment variable in the set environment variables step.
Assign the necessary label to your machine pool using the following command:
If you are reliant upon any node labels for your machinepool, this command will replace those labels. Be sure to input your desired labels into the --labels field to ensure your node labels persist.
$ rosa update machinepool ${ROSA_MACHINE_POOL_NAME} \
  --cluster="${ROSA_CLUSTER_NAME}" \
  --labels "k8s.ovn.org/egress-assignable="
15.4.3. Review the egress IPs
You can review the egress IP assignments by running oc get egressips which will produce output as follows:
Example output
NAME              EGRESSIPS       ASSIGNED NODE                   ASSIGNED EGRESSIPS
demo-egress-ns    10.10.100.253   ip-10-10-156-122.ec2.internal   10.10.150.253
demo-egress-pod   10.10.100.254   ip-10-10-156-122.ec2.internal   10.10.150.254
15.5. Test the egress IP rule
15.5.1. Deploy a sample application
To test the rule, we will create a service which is locked down only to the egress IP addresses in which we have specified. This will simulate an external service which is expecting a small subset of IP addresses.
Run the echoserver which gives us some helpful information:
$ oc -n default run demo-service --image=gcr.io/google_containers/echoserver:1.4
Expose the pod as a service, limiting the ingress (via the .spec.loadBalancerSourceRanges field) to the service to only the egress IP addresses in which we specified our pods should be using:
$ cat <<EOF | oc apply -f -
apiVersion: v1
kind: Service
metadata:
  name: demo-service
  namespace: default
  annotations:
    service.beta.kubernetes.io/aws-load-balancer-scheme: "internal"
    service.beta.kubernetes.io/aws-load-balancer-internal: "true"
spec:
  selector:
    run: demo-service
  ports:
    - port: 80
      targetPort: 8080
  type: LoadBalancer
  externalTrafficPolicy: Local
  # NOTE: this limits the source IPs that are allowed to connect to our service.  It
  #       is being used as part of this demo, restricting connectivity to our egress
  #       IP addresses only.
  # NOTE: these egress IPs are within the subnet range(s) in which my worker nodes
  #       are deployed.
  loadBalancerSourceRanges:
    - 10.10.100.254/32
    - 10.10.150.254/32
    - 10.10.200.254/32
    - 10.10.100.253/32
    - 10.10.150.253/32
    - 10.10.200.253/32
EOF
Retrieve the load balancer hostname as the LOAD_BALANCER_HOSTNAME environment variable which you can copy and use for following steps:
$ export LOAD_BALANCER_HOSTNAME=$(oc get svc -n default demo-service -o json | jq -r '.status.loadBalancer.ingress[].hostname')
15.5.2. Test namespace egress
Test the namespace egress rule which was created previously. The following starts an interactive shell which allows you to run curl against the demo service:
$ oc run \
  demo-egress-ns \
  -it \
  --namespace=demo-egress-ns \
  --env=LOAD_BALANCER_HOSTNAME=$LOAD_BALANCER_HOSTNAME \
  --image=registry.access.redhat.com/ubi9/ubi -- \
  bash
Once inside the pod, you can send a request to the load balancer, ensuring that you can successfully connect:
$ curl -s http://$LOAD_BALANCER_HOSTNAME
You should see output similar to the following, indicating a successful connection. It should be noted that the client_address below is the internal IP address of the load balancer rather than our egress IP. Successful connectivity (by limiting the service to .spec.loadBalancerSourceRanges) is what provides a successful demonstration:
Example output
CLIENT VALUES:
client_address=10.10.207.247
command=GET
real path=/
query=nil
request_version=1.1
request_uri=http://internal-a3e61de18bfca4a53a94a208752b7263-148284314.us-east-1.elb.amazonaws.com:8080/

SERVER VALUES:
server_version=nginx: 1.10.0 - lua: 10001

HEADERS RECEIVED:
accept=*/*
host=internal-a3e61de18bfca4a53a94a208752b7263-148284314.us-east-1.elb.amazonaws.com
user-agent=curl/7.76.1
BODY:
-no body in request-
You can safely exit the pod once you are done:
$ exit
15.5.3. Test pod egress
Test the pod egress rule which was created previously. The following starts an interactive shell which allows you to run curl against the demo service:
$ oc run \
  demo-egress-pod \
  -it \
  --namespace=demo-egress-pod \
  --env=LOAD_BALANCER_HOSTNAME=$LOAD_BALANCER_HOSTNAME \
  --image=registry.access.redhat.com/ubi9/ubi -- \
  bash
Once inside the pod, you can send a request to the load balancer, ensuring that you can successfully connect:
$ curl -s http://$LOAD_BALANCER_HOSTNAME
You should see output similar to the following, indicating a successful connection. It should be noted that the client_address below is the internal IP address of the load balancer rather than our egress IP. Successful connectivity (by limiting the service to .spec.loadBalancerSourceRanges) is what provides a successful demonstration:
Example output
CLIENT VALUES:
client_address=10.10.207.247
command=GET
real path=/
query=nil
request_version=1.1
request_uri=http://internal-a3e61de18bfca4a53a94a208752b7263-148284314.us-east-1.elb.amazonaws.com:8080/

SERVER VALUES:
server_version=nginx: 1.10.0 - lua: 10001

HEADERS RECEIVED:
accept=*/*
host=internal-a3e61de18bfca4a53a94a208752b7263-148284314.us-east-1.elb.amazonaws.com
user-agent=curl/7.76.1
BODY:
-no body in request-
You can safely exit the pod once you are done:
$ exit
15.5.4. Test blocked egress
Alternatively to a successful connection, you can see that the traffic is successfully blocked when the egress rules do not apply. Unsuccessful connectivity (by limiting the service to .spec.loadBalancerSourceRanges) is what provides a successful demonstration in this scenario:
$ oc run \
  demo-egress-pod-fail \
  -it \
  --namespace=demo-egress-pod \
  --env=LOAD_BALANCER_HOSTNAME=$LOAD_BALANCER_HOSTNAME \
  --image=registry.access.redhat.com/ubi9/ubi -- \
  bash
Once inside the pod, you can send a request to the load balancer:
$ curl -s http://$LOAD_BALANCER_HOSTNAME
The above command should hang. You can safely exit the pod once you are done:
$ exit
15.6. Clean up
You can cleanup your cluster by running the following commands:
$ oc delete svc demo-service -n default; \
$ oc delete pod demo-service -n default; \
$ oc delete project demo-egress-ns; \
$ oc delete project demo-egress-pod; \
$ oc delete egressip demo-egress-ns; \
$ oc delete egressip demo-egress-pod
You can cleanup the assigned node labels by running the following commands:
If you are reliant upon any node labels for your machinepool, this command will replace those labels. Be sure to input your desired labels into the --labels field to ensure your node labels persist.
$ rosa update machinepool ${ROSA_MACHINE_POOL_NAME} \
  --cluster="${ROSA_CLUSTER_NAME}" \
  --labels ""
Chapter 16. Getting started with ROSA
16.1. Tutorial: What is ROSA
Red Hat OpenShift Service on AWS (ROSA) is a fully-managed turnkey application platform that allows you to focus on what matters most, delivering value to your customers by building and deploying applications. Red Hat and AWS SRE experts manage the underlying platform so you do not have to worry about infrastructure management. ROSA provides seamless integration with a wide range of AWS compute, database, analytics, machine learning, networking, mobile, and other services to further accelerate the building and delivering of differentiating experiences to your customers.
ROSA makes use of AWS Security Token Service (STS) to obtain credentials to manage infrastructure in your AWS account. AWS STS is a global web service that creates temporary credentials for IAM users or federated users. ROSA uses this to assign short-term, limited-privilege, security credentials. These credentials are associated with IAM roles that are specific to each component that makes AWS API calls. This method aligns with the principals of least privilege and secure practices in cloud service resource management. The ROSA command line interface (CLI) tool manages the STS credentials that are assigned for unique tasks and takes action on AWS resources as part of OpenShift functionality.
16.1.1. Key features of ROSA
- Native AWS service: Access and use Red Hat OpenShift on-demand with a self-service onboarding experience through the AWS management console.
- Flexible, consumption-based pricing: Scale to your business needs and pay as you go with flexible pricing and an on-demand hourly or annual billing model.
- Single bill for Red Hat OpenShift and AWS usage: Customers will receive a single bill from AWS for both Red Hat OpenShift and AWS consumption.
- Fully integrated support experience: Installation, management, maintenance, and upgrades are performed by Red Hat site reliability engineers (SREs) with joint Red Hat and Amazon support and a 99.95% service-level agreement (SLA).
- AWS service integration: AWS has a robust portfolio of cloud services, such as compute, storage, networking, database, analytics, and machine learning. All of these services are directly accessible through ROSA. This makes it easier to build, operate, and scale globally and on-demand through a familiar management interface.
- Maximum Availability: Deploy clusters across multiple availability zones in supported regions to maximize availability and maintain high availability for your most demanding mission-critical applications and data.
- Cluster node scaling: Easily add or remove compute nodes to match resource demand.
- Optimized clusters: Choose from memory-optimized, compute-optimized, or general purpose EC2 instance types with clusters sized to meet your needs.
- Global availability: Refer to the product regional availability page to see where ROSA is available globally.
16.1.2. ROSA and Kubernetes
In ROSA, everything you need to deploy and manage containers is bundled, including container management, Operators, networking, load balancing, service mesh, CI/CD, firewall, monitoring, registry, authentication, and authorization capabilities. These components are tested together for unified operations as a complete platform. Automated cluster operations, including over-the-air platform upgrades, further enhance your Kubernetes experience.
16.1.3. Basic responsibilities
In general, cluster deployment and upkeep is Red Hat’s or AWS’s responsibility, while applications, users, and data is the customer’s responsibility. For a more detailed breakdown of responsibilities, see the responsibility matrix.
16.1.4. Roadmap and feature requests
Visit the ROSA roadmap to stay up-to-date with the status of features currently in development. Open a new issue if you have any suggestions for the product team.
16.1.5. AWS region availability
Refer to the product regional availability page for an up-to-date view of where ROSA is available.
16.1.6. Compliance certifications
ROSA is currently compliant with SOC-2 type 2, SOC 3, ISO-27001, ISO 27017, ISO 27018, HIPAA, GDPR, and PCI-DSS. We are also currently working towards FedRAMP High.
16.1.7. Nodes
16.1.7.1. Worker nodes across multiple AWS regions
All nodes in a ROSA cluster must be located in the same AWS region. For clusters configured for multiple availability zones, control plane nodes and worker nodes will be distributed across the availability zones.
16.1.7.2. Minimum number of worker nodes
For a ROSA cluster, the minimum is 2 worker nodes for single availability zone and 3 worker nodes for multiple availability zones.
16.1.7.3. Underlying node operating system
As with all OpenShift v4.x offerings, the control plane, infra and worker nodes run Red Hat Enterprise Linux CoreOS (RHCOS).
16.1.7.4. Node hibernation or shut-down
At this time, ROSA does not have a hibernation or shut-down feature for nodes. The shutdown and hibernation feature is an OpenShift platform feature that is not yet mature enough for widespread cloud services use.
16.1.7.5. Supported instances for worker nodes
For a complete list of supported instances for worker nodes see AWS instance types. Spot instances are also supported.
16.1.7.6. Node autoscaling
Autoscaling allows you to automatically adjust the size of the cluster based on the current workload. See About autoscaling nodes on a cluster for more details.
16.1.7.7. Maximum number of worker nodes
The maximum number of worker nodes is 180 worker nodes for each ROSA cluster. See limits and scalability for more details on node counts.
A list of the account-wide and per-cluster roles is provided in the ROSA documentation.
16.1.8. Administrators
A ROSA customer’s administrator can manage users and quotas in addition to accessing all user-created projects.
16.1.9. OpenShift versions and upgrades
ROSA is a managed service which is based on OpenShift Container Platform. You can view the current version and life cycle dates in the ROSA documentation.
Customers can upgrade to the newest version of OpenShift and use the features from that version of OpenShift. For more information, see life cycle dates. Not all OpenShift features are be available on ROSA. Review the Service Definition for more information.
16.1.10. Support
You can open a ticket directly from the OpenShift Cluster Manager. See the ROSA support documentation for more details about obtaining support.
You can also visit the Red Hat Customer Portal to search or browse through the Red Hat knowledge base of articles and solutions relating to Red Hat products or submit a support case to Red Hat Support.
16.1.10.1. Limited support
If a ROSA cluster is not upgraded before the "end of life" date, the cluster continues to operate in a limited support status. The SLA for that cluster will no longer be applicable, but you can still get support for that cluster. See the limited support status documentation for more details.
Additional support resources
- Red Hat Support
AWS support customers must have a valid AWS support contract
16.1.11. Service-level agreement (SLA)
Refer to the ROSA SLA page for details.
16.1.12. Notifications and communication
Red Hat will provide notifications regarding new Red Hat and AWS features, updates, and scheduled maintenance through email and the Hybrid Cloud Console service log.
16.1.13. Open Service Broker for AWS (OBSA)
You can use OSBA with ROSA. However, the preferred method is the more recent AWS Controller for Kubernetes. See Open Service Broker for AWS for more information on OSBA.
16.1.14. Offboarding
Customers can stop using ROSA at any time and move their applications to on-premise, a private cloud, or other cloud providers. Standard reserved instances (RI) policy applies for unused RI.
16.1.15. Authentication
ROSA supports the following authentication mechanisms: OpenID Connect (a profile of OAuth2), Google OAuth, GitHub OAuth, GitLab, and LDAP.
16.1.16. SRE cluster access
All SRE cluster access is secured by MFA. See SRE access for more details.
16.1.17. Encryption
16.1.17.1. Encryption keys
ROSA uses a key stored in KMS to encrypt EBS volumes. Customers also have the option to provide their own KMS keys at cluster creation.
16.1.17.2. KMS keys
If you specify a KMS key, the control plane, infrastructure and worker node root volumes and the persistent volumes are encrypted with the key.
16.1.17.3. Data encryption
By default, there is encryption at rest. The AWS Storage platform automatically encrypts your data before persisting it and decrypts the data before retrieval. See AWS EBS Encryption for more details.
You can also encrypt etcd in the cluster, combining it with AWS storage encryption. This results in double the encryption which adds up to a 20% performance hit. For more details see the etcd encryption documentation.
16.1.17.4. etcd encryption
etcd encryption can only be enabled at cluster creation.
etcd encryption incurs additional overhead with negligible security risk mitigation.
16.1.17.5. etcd encryption configuration
etcd encryption is configured the same as in OpenShift Container Platform. The aescbc cypher is used and the setting is patched during cluster deployment. For more details, see the Kubernetes documentation.
16.1.17.6. Multi-region KMS keys for EBS encryption
Currently, the ROSA CLI does not accept multi-region KMS keys for EBS encryption. This feature is in our backlog for product updates. The ROSA CLI accepts single region KMS keys for EBS encryption if it is defined at cluster creation.
16.1.18. Infrastructure
ROSA uses several different cloud services such as virtual machines, storage, and load balancers. You can see a defined list in the AWS prerequisites.
16.1.19. Credential methods
There are two credential methods to grant Red Hat the permissions needed to perform the required actions in your AWS account: AWS with STS or an IAM user with admin permissions. AWS with STS is the preferred method, and the IAM user method will eventually be deprecated. AWS with STS better aligns with the principles of least privilege and secure practices in cloud service resource management.
16.1.20. Prerequisite permission or failure errors
Check for a newer version of the ROSA CLI. Every release of the ROSA CLI is located in two places: Github and the Red Hat signed binary releases.
16.1.21. Storage
Refer to the storage section of the service definition.
OpenShift includes the CSI driver for AWS EFS. For more information, see Setting up AWS EFS for Red Hat OpenShift Service on AWS.
16.1.22. Using a VPC
At installation you can select to deploy to an existing VPC or bring your own VPC. You can then select the required subnets and provide a valid CIDR range that encompasses the subnets for the installation program when using those subnets.
ROSA allows multiple clusters to share the same VPC. The number of clusters on one VPC is limited by the remaining AWS resource quota and CIDR ranges that cannot overlap. See CIDR Range Definitions for more information.
16.1.23. Network plugin
ROSA uses the OpenShift OVN-Kubernetes default CNI network provider.
16.1.24. Cross-namespace networking
Cluster admins can customize, and deny, cross-namespace on a project basis using NetworkPolicy objects. Refer to Configuring multitenant isolation with network policy for more information.
16.1.25. Using Prometheus and Grafana
You can use Prometheus and Grafana to monitor containers and manage capacity using OpenShift User Workload Monitoring. This is a check-box option in the OpenShift Cluster Manager.
16.1.26. Audit logs output from the cluster control-plane
If the Cluster Logging Operator Add-on has been added to the cluster then audit logs are available through CloudWatch. If it has not, then a support request would allow you to request some audit logs. Small targeted and time-boxed logs can be requested for export and sent to a customer. The selection of audit logs available are at the discretion of SRE in the category of platform security and compliance. Requests for exports of a cluster’s entirety of logs will be rejected.
16.1.27. AWS Permissions Boundary
You can use an AWS Permissions Boundary around the policies for your cluster.
16.1.28. AMI
ROSA worker nodes use a different AMI from OSD and OpenShift Container Platform. Control Plane and Infra node AMIs are common across products in the same version.
16.1.29. Cluster backups
ROSA STS clusters do not have backups. Users must have their own backup policies for applications and data. See our backup policy for more information.
16.1.30. Custom domain
You can define a custom domain for your applications. See Configuring custom domains for applications for more information.
16.1.31. ROSA domain certificates
Red Hat infrastructure (Hive) manages certificate rotation for default application ingress.
16.1.32. Disconnected environments
ROSA does not support an air-gapped, disconnected environment. The ROSA cluster must have egress to the internet to access our registry, S3, and send metrics. The service requires a number of egress endpoints. Ingress can be limited to a PrivateLink for Red Hat SREs and a VPN for customer access.
Additional Resources
ROSA product pages:
ROSA specific resources
- Learn about OpenShift
- OpenShift Cluster Manager
- Red Hat Support
16.2. Tutorial: ROSA with AWS STS explained
This tutorial outlines the two options for allowing Red Hat OpenShift Service on AWS (ROSA) to interact with resources in a user’s Amazon Web Service (AWS) account. It details the components and processes that ROSA with Security Token Service (STS) uses to obtain the necessary credentials. It also reviews why ROSA with STS is the more secure, preferred method.
This content currently covers ROSA Classic with AWS STS and not does yet account for ROSA with hosted control planes (HCP) with AWS STS.
This tutorial will:
Enumerate two of the deployment options:
- ROSA with IAM Users
- ROSA with STS
- Explain the differences between the two options
- Explain why ROSA with STS is more secure and the preferred option
- Explain how ROSA with STS works
16.2.1. Different credential methods to deploy ROSA
As part of ROSA, Red Hat manages infrastructure resources in your AWS account and must be granted the necessary permissions. There are currently two supported methods for granting those permissions:
Using static IAM user credentials with an
AdministratorAccesspolicyThis is referred to as "ROSA with IAM Users" in this tutorial. It is not the preferred credential method.
Using AWS STS with short-lived, dynamic tokens
This is referred to as “ROSA with STS” in this tutorial. It is the preferred credential method.
16.2.1.1. Rosa with IAM Users
When ROSA was first released, the only credential method was ROSA with IAM Users. This method grants IAM users with an AdministratorAccess policy full access to create the necessary resources in the AWS account that uses ROSA. The cluster can then create and expand its credentials as needed.
16.2.1.2. ROSA with STS
ROSA with STS grants users limited, short-term access to resources in your AWS account. The STS method uses predefined roles and policies to grant temporary, least-privilege permissions to IAM users or authenticated federated users. The credentials typically expire an hour after being requested. Once expired, they are no longer recognized by AWS and no longer have account access from API requests made with them. For more information, see the AWS documentation. While both ROSA with IAM Users and ROSA with STS are currently enabled, ROSA with STS is the preferred and recommended option.
16.2.2. ROSA with STS security
Several crucial components make ROSA with STS more secure than ROSA with IAM Users:
- An explicit and limited set of roles and policies that the user creates ahead of time. The user knows every requested permission and every role used.
- The service cannot do anything outside of those permissions.
- Whenever the service needs to perform an action, it obtains credentials that expire in one hour or less. This means that there is no need to rotate or revoke credentials. Additionally, credential expiration reduces the risks of credentials leaking and being reused.
16.2.3. AWS STS explained
ROSA uses AWS STS to grant least-privilege permissions with short-term security credentials to specific and segregated IAM roles. The credentials are associated with IAM roles specific to each component and cluster that makes AWS API calls. This method aligns with principles of least-privilege and secure practices in cloud service resource management. The ROSA command line interface (CLI) tool manages the STS roles and policies that are assigned for unique tasks and takes action upon AWS resources as part of OpenShift functionality.
STS roles and policies must be created for each ROSA cluster. To make this easier, the installation tools provide all the commands and files needed to create the roles as policies and an option to allow the CLI to automatically create the roles and policies. See Creating a ROSA cluster with STS using customizations for more information about the different --mode options.
16.2.4. Components specific to ROSA with STS
- AWS infrastructure - This provides the infrastructure required for the cluster. It contains the actual EC2 instances, storage, and networking components. See AWS compute types to see supported instance types for compute nodes and provisioned AWS infrastructure for control plane and infrastructure node configuration.
- AWS STS - See the credential method section above.
- OpenID Connect (OIDC) - This provides a mechanism for cluster Operators to authenticate with AWS, assume the cluster roles through a trust policy, and obtain temporary credentials from STS to make the required API calls.
Roles and policies - The roles and policies are one of the main differences between ROSA with STS and ROSA with IAM Users. For ROSA with STS, the roles and policies used by ROSA are broken into account-wide roles and policies and Operator roles and policies.
The policies determine the allowed actions for each of the roles. See About IAM resources for ROSA clusters that use STS for more details about the individual roles and policies.
The account-wide roles are:
- ManagedOpenShift-Installer-Role
- ManagedOpenShift-ControlPlane-Role
- ManagedOpenShift-Worker-Role
- ManagedOpenShift-Support-Role
The account-wide policies are:
- ManagedOpenShift-Installer-Role-Policy
- ManagedOpenShift-ControlPlane-Role-Policy
- ManagedOpenShift-Worker-Role-Policy
- ManagedOpenShift-Support-Role-Policy
- ManagedOpenShift-openshift-ingress-operator-cloud-credentials [1]
- ManagedOpenShift-openshift-cluster-csi-drivers-ebs-cloud-credent [1]
- ManagedOpenShift-openshift-cloud-network-config-controller-cloud [1]
- ManagedOpenShift-openshift-machine-api-aws-cloud-credentials [1]
- ManagedOpenShift-openshift-cloud-credential-operator-cloud-crede [1]
ManagedOpenShift-openshift-image-registry-installer-cloud-creden [1]
- This policy is used by the cluster Operator roles, listed below. The Operator roles are created in a second step because they are dependent on an existing cluster name and cannot be created at the same time as the account-wide roles.
The Operator roles are:
- <cluster-name\>-xxxx-openshift-cluster-csi-drivers-ebs-cloud-credent
- <cluster-name\>-xxxx-openshift-cloud-network-config-controller-cloud
- <cluster-name\>-xxxx-openshift-machine-api-aws-cloud-credentials
- <cluster-name\>-xxxx-openshift-cloud-credential-operator-cloud-crede
- <cluster-name\>-xxxx-openshift-image-registry-installer-cloud-creden
- <cluster-name\>-xxxx-openshift-ingress-operator-cloud-credentials
- Trust policies are created for each account-wide and Operator role.
16.2.5. Deploying a ROSA STS cluster
You are not expected to create the resources listed in the below steps from scratch. The ROSA CLI creates the required JSON files for you and outputs the commands you need. The ROSA CLI can also take this a step further and run the commands for you, if desired.
Steps to deploy a ROSA with STS cluster
- Create the account-wide roles and policies.
- Assign the permissions policy to the corresponding account-wide role.
- Create the cluster.
- Create the Operator roles and policies.
- Assign the permission policy to the corresponding Operator role.
- Create the OIDC provider.
The roles and policies can be created automatically by the ROSA CLI, or they can be manually created by utilizing the --mode manual or --mode auto flags in the ROSA CLI. For further details about deployment, see Creating a cluster with customizations or the Deploying the cluster tutorial.
16.2.6. ROSA with STS workflow
The user creates the required account-wide roles and account-wide policies. For more information, see the components section in this tutorial. During role creation, a trust policy, known as a cross-account trust policy, is created which allows a Red Hat-owned role to assume the roles. Trust policies are also created for the EC2 service, which allows workloads on EC2 instances to assume roles and obtain credentials. The user can then assign a corresponding permissions policy to each role.
After the account-wide roles and policies are created, the user can create a cluster. Once cluster creation is initiated, the Operator roles are created so that cluster Operators can make AWS API calls. These roles are then assigned to the corresponding permission policies that were created earlier and a trust policy with an OIDC provider. The Operator roles differ from the account-wide roles in that they ultimately represent the pods that need access to AWS resources. Because a user cannot attach IAM roles to pods, they must create a trust policy with an OIDC provider so that the Operator, and therefore the pods, can access the roles they need.
Once the user assigns the roles to the corresponding policy permissions, the final step is creating the OIDC provider.
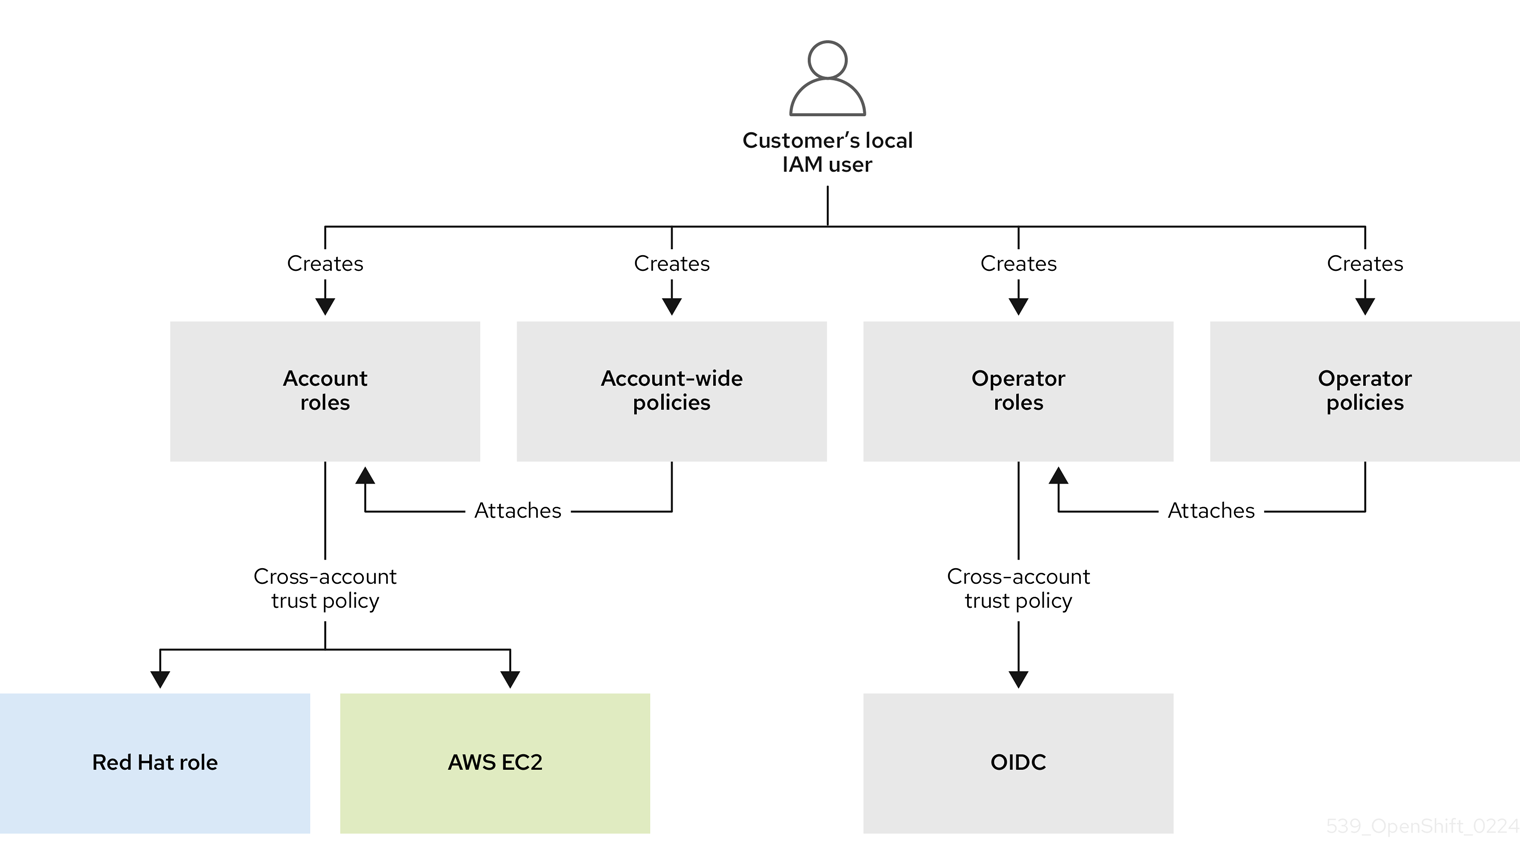
When a new role is needed, the workload currently using the Red Hat role will assume the role in the AWS account, obtain temporary credentials from AWS STS, and begin performing the actions using API calls within the customer’s AWS account as permitted by the assumed role’s permissions policy. The credentials are temporary and have a maximum duration of one hour.
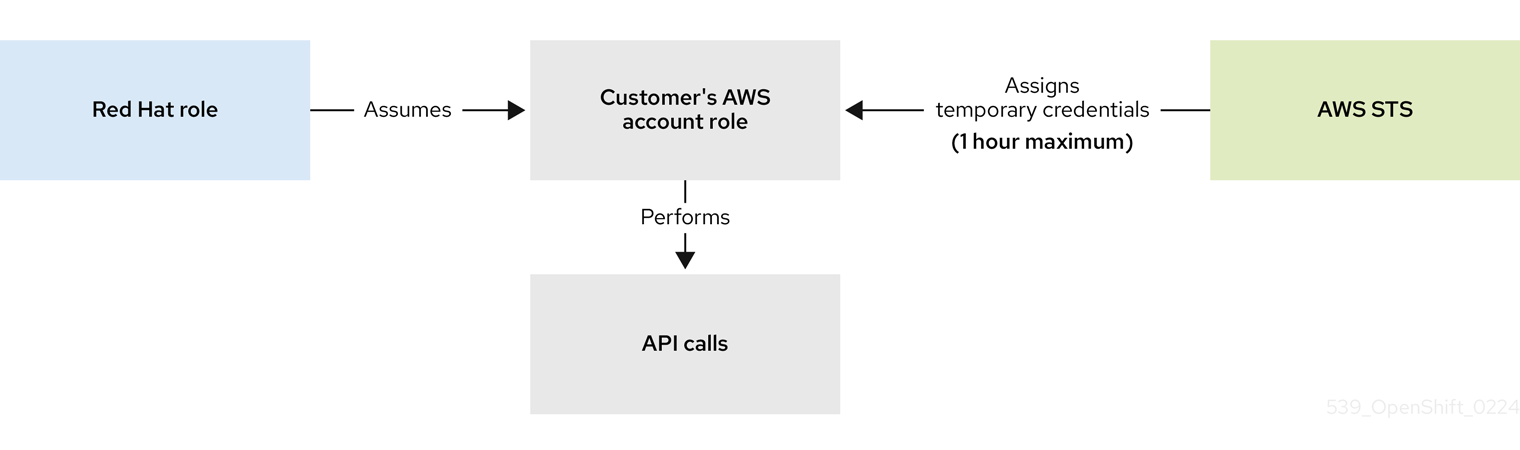
The entire workflow is depicted in the following graphic:
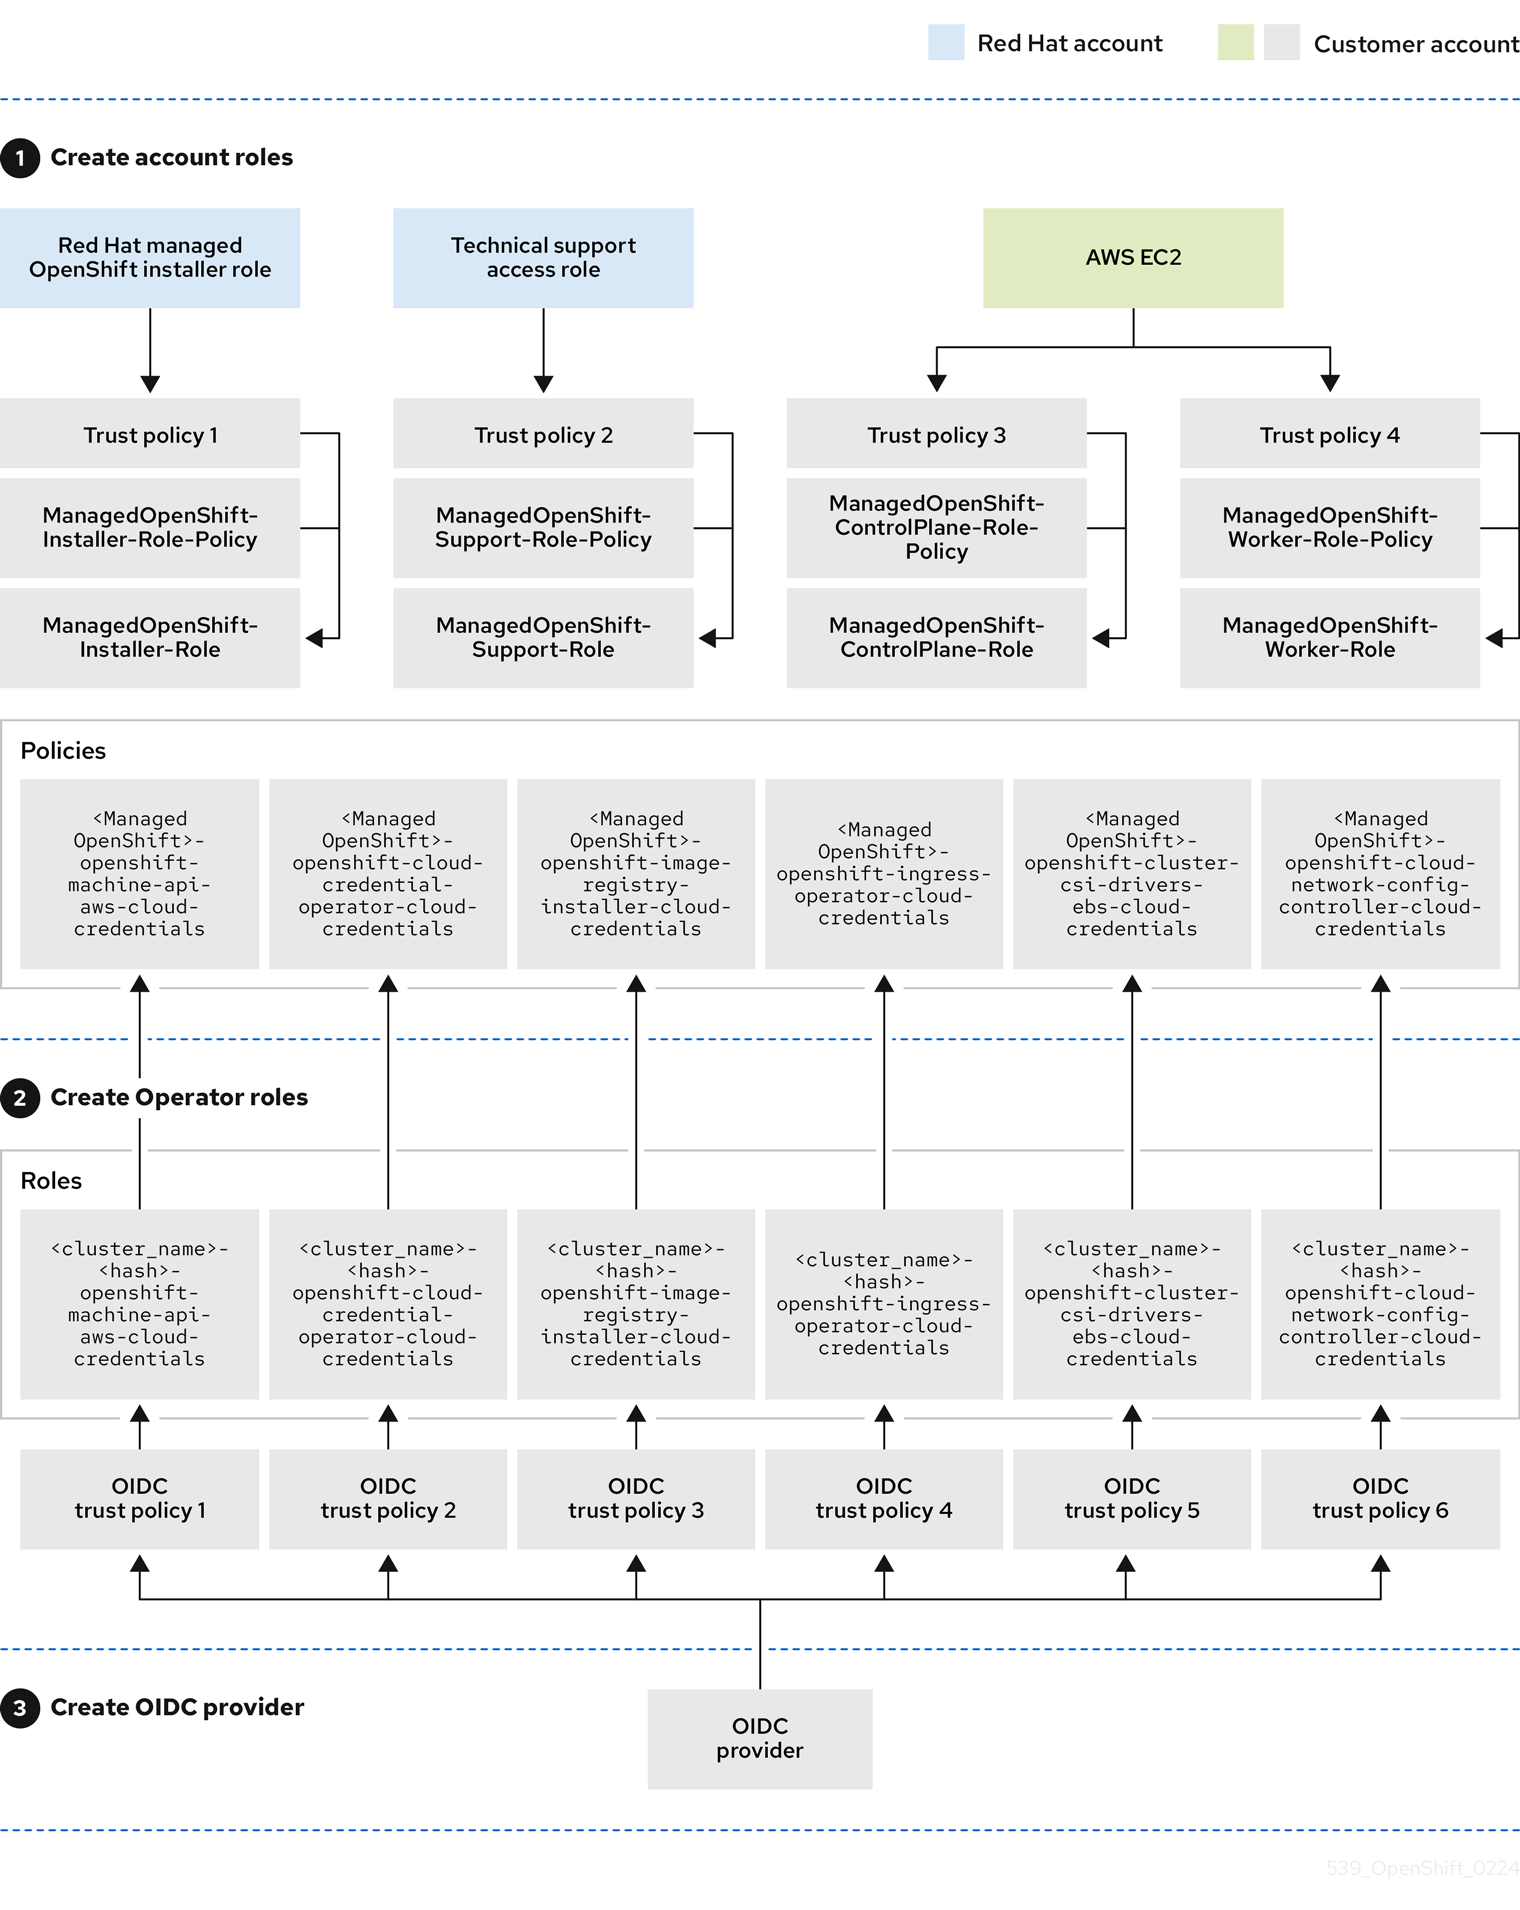
Operators use the following process to obtain the requisite credentials to perform their tasks. Each Operator is assigned an Operator role, a permissions policy, and a trust policy with an OIDC provider. The Operator will assume the role by passing a JSON web token that contains the role and a token file (web_identity_token_file) to the OIDC provider, which then authenticates the signed key with a public key. The public key is created during cluster creation and stored in an S3 bucket. The Operator then confirms that the subject in the signed token file matches the role in the role trust policy which ensures that the OIDC provider can only obtain the allowed role. The OIDC provider then returns the temporary credentials to the Operator so that the Operator can make AWS API calls. For a visual representation, see below:
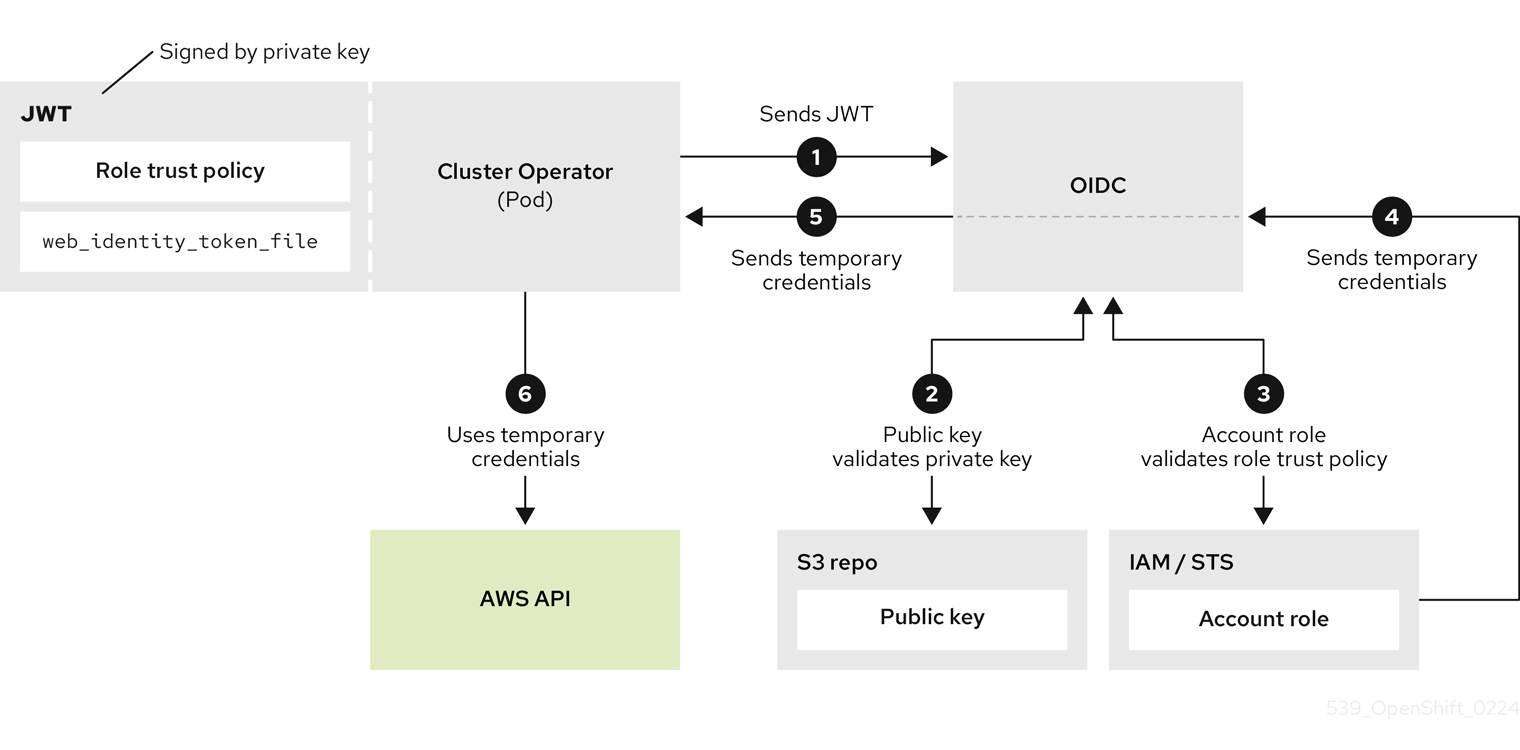
16.2.7. ROSA with STS use cases
Creating nodes at cluster install
The Red Hat installation program uses the RH-Managed-OpenShift-Installer role and a trust policy to assume the Managed-OpenShift-Installer-Role role in the customer’s account. This process returns temporary credentials from AWS STS. The installation program begins making the required API calls with the temporary credentials just received from STS. The installation program creates the required infrastructure in AWS. The credentials expire within an hour and the installation program no longer has access to the customer’s account.
The same process also applies for support cases. In support cases, a Red Hat site reliability engineer (SRE) replaces the installation program.
Scaling the cluster
The machine-api-operator uses AssumeRoleWithWebIdentity to assume the machine-api-aws-cloud-credentials role. This launches the sequence for the cluster Operators to receive the credentials. The machine-api-operator role can now make the relevant API calls to add more EC2 instances to the cluster.
16.3. Deploying a cluster
16.3.1. Tutorial: Choosing a deployment method
This tutorial outlines the different ways to deploy a cluster. Choose the deployment method that best fits your preferences and needs.
16.3.1.1. Deployment options
If you want:
- Only the necessary CLI commands - Simple CLI guide
- A user interface - Simple UI guide
- The CLI commands with details - Detailed CLI guide
- A user interface with details - Detailed UI guide
- To experiment with the newest ROSA technologies - ROSA with HCP
All of the above deployment options work well for this tutorial. If you are doing this tutorial for the first time, the Simple CLI guide is the simplest and recommended method.
16.3.2. Tutorial: Simple CLI guide
This page outlines the minimum list of commands to deploy a Red Hat OpenShift Service on AWS (ROSA) cluster using the command line interface (CLI).
While this simple deployment works well for a tutorial setting, clusters used in production should be deployed with a more detailed method.
16.3.2.1. Prerequisites
- You have completed the prerequisites in the Setup tutorial.
16.3.2.2. Creating account roles
Run the following command once for each AWS account and y-stream OpenShift version:
rosa create account-roles --mode auto --yes
16.3.2.3. Deploying the cluster
Create the cluster with the default configuration by running the following command substituting your own cluster name:
rosa create cluster --cluster-name <cluster-name> --sts --mode auto --yes
Check the status of your cluster by running the following command:
rosa list clusters
16.3.3. Tutorial: Detailed CLI guide
This tutorial outlines the detailed steps to deploy a ROSA cluster using the ROSA CLI.
16.3.3.1. CLI deployment modes
There are two modes with which to deploy a ROSA cluster. One is automatic, which is quicker and performs the manual work for you. The other is manual, requires you to run extra commands, and allows you to inspect the roles and policies being created. This tutorial documents both options.
If you want to create a cluster quickly, use the automatic option. If you prefer exploring the roles and policies being created, use the manual option.
Choose the deployment mode by using the --mode flag in the relevant commands.
Valid options for --mode are:
-
manual: Role and policies are created and saved in the current directory. You must manually run the provided commands as the next step. This option allows you to review the policy and roles before creating them. -
auto: Roles and policies are created and applied automatically using the current AWS account.
You can use either deployment method for this tutorial. The auto mode is faster and has less steps.
16.3.3.2. Deployment workflow
The overall deployment workflow follows these steps:
-
rosa create account-roles- This is executed only once for each account. Once created, the account roles do not need to be created again for more clusters of the same y-stream version. -
rosa create cluster -
rosa create operator-roles- For manual mode only. -
rosa create oidc-provider- For manual mode only.
For each additional cluster in the same account for the same y-stream version, only step 2 is needed for automatic mode. Steps 2 through 4 are needed for manual mode.
16.3.3.3. Automatic mode
Use this method if you want the ROSA CLI to automate the creation of the roles and policies to create your cluster quickly.
16.3.3.3.1. Creating account roles
If this is the first time you are deploying ROSA in this account and you have not yet created the account roles, then create the account-wide roles and policies, including Operator policies.
Run the following command to create the account-wide roles:
rosa create account-roles --mode auto --yes
Example output
I: Creating roles using 'arn:aws:iam::000000000000:user/rosa-user'
I: Created role 'ManagedOpenShift-ControlPlane-Role' with ARN 'arn:aws:iam::000000000000:role/ManagedOpenShift-ControlPlane-Role'
I: Created role 'ManagedOpenShift-Worker-Role' with ARN 'arn:aws:iam::000000000000:role/ManagedOpenShift-Worker-Role'
I: Created role 'ManagedOpenShift-Support-Role' with ARN 'arn:aws:iam::000000000000:role/ManagedOpenShift-Support-Role'
I: Created role 'ManagedOpenShift-Installer-Role' with ARN 'arn:aws:iam::000000000000:role/ManagedOpenShift-Installer-Role'
I: Created policy with ARN 'arn:aws:iam::000000000000:policy/ManagedOpenShift-openshift-machine-api-aws-cloud-credentials'
I: Created policy with ARN 'arn:aws:iam::000000000000:policy/ManagedOpenShift-openshift-cloud-credential-operator-cloud-crede'
I: Created policy with ARN 'arn:aws:iam::000000000000:policy/ManagedOpenShift-openshift-image-registry-installer-cloud-creden'
I: Created policy with ARN 'arn:aws:iam::000000000000:policy/ManagedOpenShift-openshift-ingress-operator-cloud-credentials'
I: Created policy with ARN 'arn:aws:iam::000000000000:policy/ManagedOpenShift-openshift-cluster-csi-drivers-ebs-cloud-credent'
I: To create a cluster with these roles, run the following command:
    rosa create cluster --sts
16.3.3.3.2. Creating a cluster
Run the following command to create a cluster with all the default options:
rosa create cluster --cluster-name <cluster-name> --sts --mode auto --yes
This will also create the required Operator roles and OIDC provider. If you want to see all available options for your cluster use the --help flag or --interactive for interactive mode.
Example input
$ rosa create cluster --cluster-name my-rosa-cluster --sts --mode auto --yes
Example output
I: Creating cluster 'my-rosa-cluster'
I: To view a list of clusters and their status, run 'rosa list clusters'
I: Cluster 'my-rosa-cluster' has been created.
I: Once the cluster is installed you will need to add an Identity Provider before you can login into the cluster. See 'rosa create idp --help' for more information.
I: To determine when your cluster is Ready, run 'rosa describe cluster -c my-rosa-cluster'.
I: To watch your cluster installation logs, run 'rosa logs install -c my-rosa-cluster --watch'.
Name:                       my-rosa-cluster
ID:                         1mlhulb3bo0l54ojd0ji000000000000
External ID:
OpenShift Version:
Channel Group:              stable
DNS:                        my-rosa-cluster.ibhp.p1.openshiftapps.com
AWS Account:                000000000000
API URL:
Console URL:
Region:                     us-west-2
Multi-AZ:                   false
Nodes:
- Master:                  3
- Infra:                   2
- Compute:                 2
Network:
- Service CIDR:            172.30.0.0/16
- Machine CIDR:            10.0.0.0/16
- Pod CIDR:                10.128.0.0/14
- Host Prefix:             /23
STS Role ARN:               arn:aws:iam::000000000000:role/ManagedOpenShift-Installer-Role
Support Role ARN:           arn:aws:iam::000000000000:role/ManagedOpenShift-Support-Role
Instance IAM Roles:
- Master:                  arn:aws:iam::000000000000:role/ManagedOpenShift-ControlPlane-Role
- Worker:                  arn:aws:iam::000000000000:role/ManagedOpenShift-Worker-Role
Operator IAM Roles:
- arn:aws:iam::000000000000:role/my-rosa-cluster-openshift-image-registry-installer-cloud-credentials
- arn:aws:iam::000000000000:role/my-rosa-cluster-openshift-ingress-operator-cloud-credentials
- arn:aws:iam::000000000000:role/my-rosa-cluster-openshift-cluster-csi-drivers-ebs-cloud-credentials
- arn:aws:iam::000000000000:role/my-rosa-cluster-openshift-machine-api-aws-cloud-credentials
- arn:aws:iam::000000000000:role/my-rosa-cluster-openshift-cloud-credential-operator-cloud-credential-oper
State:                      waiting (Waiting for OIDC configuration)
Private:                    No
Created:                    Oct 28 2021 20:28:09 UTC
Details Page:               https://console.redhat.com/openshift/details/s/1wupmiQy45xr1nN000000000000
OIDC Endpoint URL:          https://rh-oidc.s3.us-east-1.amazonaws.com/1mlhulb3bo0l54ojd0ji000000000000
16.3.3.3.2.1. Default configuration
The default settings are as follows:
Nodes:
- 3 control plane nodes
- 2 infrastructure nodes
- 2 worker nodes
- No autoscaling
- See the documentation on ec2 instances for more details.
-
Region: As configured for the
awsCLI Networking IP ranges:
- Machine CIDR: 10.0.0.0/16
- Service CIDR: 172.30.0.0/16
- Pod CIDR: 10.128.0.0/14
- New VPC
- Default AWS KMS key for encryption
-
The most recent version of OpenShift available to
rosa - A single availability zone
- Public cluster
16.3.3.3.3. Checking the installation status
Run one of the following commands to check the status of your cluster:
For a detailed view of the status, run:
rosa describe cluster --cluster <cluster-name>
For an abridged view of the status, run:
rosa list clusters
- The cluster state will change from “waiting” to “installing” to "ready". This will take about 40 minutes.
- Once the state changes to “ready” your cluster is installed.
16.3.3.4. Manual Mode
If you want to review the roles and policies before applying them to a cluster, use the manual method. This method requires running a few extra commands to create the roles and policies.
This section uses the --interactive mode. See the documentation on interactive mode for a description of the fields in this section.
16.3.3.4.1. Creating account roles
If this is the first time you are deploying ROSA in this account and you have not yet created the account roles, create the account-wide roles and policies, including the Operator policies. The command creates the needed JSON files for the required roles and policies for your account in the current directory. It also outputs the
awsCLI commands that you need to run to create these objects.Run the following command to create the needed files and output the additional commands:
rosa create account-roles --mode manual
Example output
I: All policy files saved to the current directory
I: Run the following commands to create the account roles and policies:
aws iam create-role \
--role-name ManagedOpenShift-Worker-Role \
--assume-role-policy-document file://sts_instance_worker_trust_policy.json \
--tags Key=rosa_openshift_version,Value=4.8 Key=rosa_role_prefix,Value=ManagedOpenShift Key=rosa_role_type,Value=instance_worker
aws iam put-role-policy \
--role-name ManagedOpenShift-Worker-Role \
--policy-name ManagedOpenShift-Worker-Role-Policy \
--policy-document file://sts_instance_worker_permission_policy.json
Check the contents of your current directory to see the new files. Use the
awsCLI to create each of these objects.Example output
$ ls
openshift_cloud_credential_operator_cloud_credential_operator_iam_ro_creds_policy.json
sts_instance_controlplane_permission_policy.json
openshift_cluster_csi_drivers_ebs_cloud_credentials_policy.json        sts_instance_controlplane_trust_policy.json
openshift_image_registry_installer_cloud_credentials_policy.json          sts_instance_worker_permission_policy.json
openshift_ingress_operator_cloud_credentials_policy.json                 sts_instance_worker_trust_policy.json
openshift_machine_api_aws_cloud_credentials_policy.json                   sts_support_permission_policy.json
sts_installer_permission_policy.json                                      sts_support_trust_policy.json
sts_installer_trust_policy.json
Optional: Open the files to review what you will create. For example, opening the
sts_installer_permission_policy.jsonshows:Example output
$ cat sts_installer_permission_policy.json
        {
        "Version": "2012-10-17",
        "Statement": [
        {
            "Effect": "Allow",
            "Action": [
                "autoscaling:DescribeAutoScalingGroups",
                "ec2:AllocateAddress",
                "ec2:AssociateAddress",
                "ec2:AssociateDhcpOptions",
                "ec2:AssociateRouteTable",
                "ec2:AttachInternetGateway",
                "ec2:AttachNetworkInterface",
                "ec2:AuthorizeSecurityGroupEgress",
                "ec2:AuthorizeSecurityGroupIngress",
                [...]
You can also see the contents in the About IAM resources for ROSA clusters documentation.
-
Run the
awscommands listed in step 1. You can copy and paste if you are in the same directory as the JSON files you created.
16.3.3.4.2. Creating a cluster
After the
awscommands are executed successfully, run the following command to begin ROSA cluster creation in interactive mode:rosa create cluster --interactive --sts
See the ROSA documentation for a description of the fields.
For the purpose of this tutorial, copy and then input the following values:
Cluster name: my-rosa-cluster
OpenShift version: <choose version>
External ID (optional): <leave blank>
Operator roles prefix: <accept default>
Multiple availability zones: No
AWS region: <choose region>
PrivateLink cluster: No
Install into an existing VPC: No
Enable Customer Managed key: No
Compute nodes instance type: m5.xlarge
Enable autoscaling: No
Compute nodes: 2
Machine CIDR: <accept default>
Service CIDR: <accept default>
Pod CIDR: <accept default>
Host prefix: <accept default>
Encrypt etcd data (optional): No
Disable Workload monitoring: No
Example output
I: Creating cluster 'my-rosa-cluster'
I: To create this cluster again in the future, you can run:
rosa create cluster --cluster-name my-rosa-cluster --role-arn arn:aws:iam::000000000000:role/ManagedOpenShift-Installer-Role --support-role-arn arn:aws:iam::000000000000:role/ManagedOpenShift-Support-Role --master-iam-role arn:aws:iam::000000000000:role/ManagedOpenShift-ControlPlane-Role --worker-iam-role arn:aws:iam::000000000000:role/ManagedOpenShift-Worker-Role --operator-roles-prefix my-rosa-cluster --region us-west-2 --version 4.8.13 --compute-nodes 2 --machine-cidr 10.0.0.0/16 --service-cidr 172.30.0.0/16 --pod-cidr 10.128.0.0/14 --host-prefix 23
I: To view a list of clusters and their status, run 'rosa list clusters'
I: Cluster 'my-rosa-cluster' has been created.
I: Once the cluster is installed you will need to add an Identity Provider before you can login into the cluster. See 'rosa create idp --help' for more information.
Name:                       my-rosa-cluster
ID:                         1t6i760dbum4mqltqh6o000000000000
External ID:
OpenShift Version:
Channel Group:              stable
DNS:                        my-rosa-cluster.abcd.p1.openshiftapps.com
AWS Account:                000000000000
API URL:
Console URL:
Region:                     us-west-2
Multi-AZ:                   false
Nodes:
- Control plane:           3
- Infra:                   2
- Compute:                 2
Network:
- Service CIDR:            172.30.0.0/16
- Machine CIDR:            10.0.0.0/16
- Pod CIDR:                10.128.0.0/14
- Host Prefix:             /23
STS Role ARN:               arn:aws:iam::000000000000:role/ManagedOpenShift-Installer-Role
Support Role ARN:           arn:aws:iam::000000000000:role/ManagedOpenShift-Support-Role
Instance IAM Roles:
- Control plane:           arn:aws:iam::000000000000:role/ManagedOpenShift-ControlPlane-Role
- Worker:                  arn:aws:iam::000000000000:role/ManagedOpenShift-Worker-Role
Operator IAM Roles:
- arn:aws:iam::000000000000:role/my-rosa-cluster-w7i6-openshift-ingress-operator-cloud-credentials
- arn:aws:iam::000000000000:role/my-rosa-cluster-w7i6-openshift-cluster-csi-drivers-ebs-cloud-credentials
- arn:aws:iam::000000000000:role/my-rosa-cluster-w7i6-openshift-cloud-network-config-controller-cloud-cre
- arn:aws:iam::000000000000:role/my-rosa-cluster-openshift-machine-api-aws-cloud-credentials
- arn:aws:iam::000000000000:role/my-rosa-cluster-openshift-cloud-credential-operator-cloud-credentia
- arn:aws:iam::000000000000:role/my-rosa-cluster-openshift-image-registry-installer-cloud-credential
State:                      waiting (Waiting for OIDC configuration)
Private:                    No
Created:                    Jul  1 2022 22:13:50 UTC
Details Page:               https://console.redhat.com/openshift/details/s/2BMQm8xz8Hq5yEN000000000000
OIDC Endpoint URL:          https://rh-oidc.s3.us-east-1.amazonaws.com/1t6i760dbum4mqltqh6o000000000000
I: Run the following commands to continue the cluster creation:
rosa create operator-roles --cluster my-rosa-cluster
rosa create oidc-provider --cluster my-rosa-cluster
I: To determine when your cluster is Ready, run 'rosa describe cluster -c my-rosa-cluster'.
I: To watch your cluster installation logs, run 'rosa logs install -c my-rosa-cluster --watch'.
NoteThe cluster state will remain as “waiting” until the next two steps are completed.
16.3.3.4.3. Creating Operator roles
The above step outputs the next commands to run. These roles need to be created once for each cluster. To create the roles run the following command:
rosa create operator-roles --mode manual --cluster <cluster-name>
Example output
I: Run the following commands to create the operator roles: aws iam create-role \ --role-name my-rosa-cluster-openshift-image-registry-installer-cloud-credentials \ --assume-role-policy-document file://operator_image_registry_installer_cloud_credentials_policy.json \ --tags Key=rosa_cluster_id,Value=1mkesci269png3tck000000000000000 Key=rosa_openshift_version,Value=4.8 Key=rosa_role_prefix,Value= Key=operator_namespace,Value=openshift-image-registry Key=operator_name,Value=installer-cloud-credentials aws iam attach-role-policy \ --role-name my-rosa-cluster-openshift-image-registry-installer-cloud-credentials \ --policy-arn arn:aws:iam::000000000000:policy/ManagedOpenShift-openshift-image-registry-installer-cloud-creden [...]-
Run each of the
awscommands.
16.3.3.4.4. Creating the OIDC provider
Run the following command to create the OIDC provider:
rosa create oidc-provider --mode manual --cluster <cluster-name>
This displays the
awscommands that you need to run.Example output
I: Run the following commands to create the OIDC provider:
$ aws iam create-open-id-connect-provider \
--url https://rh-oidc.s3.us-east-1.amazonaws.com/1mkesci269png3tckknhh0rfs2da5fj9 \
--client-id-list openshift sts.amazonaws.com \
--thumbprint-list a9d53002e97e00e043244f3d170d000000000000

$ aws iam create-open-id-connect-provider \
--url https://rh-oidc.s3.us-east-1.amazonaws.com/1mkesci269png3tckknhh0rfs2da5fj9 \
--client-id-list openshift sts.amazonaws.com \
--thumbprint-list a9d53002e97e00e043244f3d170d000000000000
- Your cluster will now continue the installation process.
16.3.3.4.5. Checking the installation status
Run one of the following commands to check the status of your cluster:
For a detailed view of the status, run:
rosa describe cluster --cluster <cluster-name>
For an abridged view of the status, run:
rosa list clusters
- The cluster state will change from “waiting” to “installing” to "ready". This will take about 40 minutes.
- Once the state changes to “ready” your cluster is installed.
16.3.3.5. Obtaining the Red Hat Hybrid Cloud Console URL
To obtain the Hybrid Cloud Console URL, run the following command:
rosa describe cluster -c <cluster-name> | grep Console
The cluster has now been successfully deployed. The next tutorial shows how to create an admin user to be able to use the cluster immediately.
16.3.4. Tutorial: Hosted Control Planes guide
This tutorial outlines deploying a Red Hat OpenShift Service on AWS (ROSA) with hosted control planes (HCP) cluster.
With ROSA with HCP, you can decouple the control plane from the data plane. This is a new deployment model for ROSA in which the control plane is hosted in a Red Hat-owned AWS account. The control plane is no longer hosted in your AWS account, reducing your AWS infrastructure expenses. The control plane is dedicated to a single cluster and is highly available. For more information, see the ROSA with HCP documentation.
16.3.4.1. Prerequisites
Before deploying a ROSA with HCP cluster, you must have the following resources:
- VPC - This is a bring-your-own VPC model, also referred to as BYO-VPC.
- OIDC - OIDC configuration and an OIDC provider with that specific configuration.
- ROSA version 1.2.31 or higher
In this tutorial, we will create these resources first. We will also set up some environment variables so that it is easier to run the command to create the ROSA with HCP cluster.
16.3.4.1.1. Creating a VPC
First, ensure that your AWS CLI (
aws) is configured to use a region where ROSA with HCP is available. To find out which regions are supported run the following command:rosa list regions --hosted-cp
Create the VPC. For this tutorial, the following script will create the VPC and its required components for you. It will use the region configured for the
awsCLI.curl https://raw.githubusercontent.com/openshift-cs/rosaworkshop/master/rosa-workshop/rosa/resources/setup-vpc.sh | bash
For more about VPC requirements, see the VPC documentation.
The above script outputs two commands. Set the commands as environment variables to make running the
create clustercommand easier. Copy them from the output and run them as shown:export PUBLIC_SUBNET_ID=<public subnet id here> export PRIVATE_SUBNET_ID=<private subnet id here>
Confirm that the environment variables are set by running the following command:
echo "Public Subnet: $PUBLIC_SUBNET_ID"; echo "Private Subnet: $PRIVATE_SUBNET_ID"
Example output
Public Subnet: subnet-0faeeeb0000000000
Private Subnet: subnet-011fe340000000000
16.3.4.1.2. Creating your OIDC configuration
In this tutorial, we will use the automatic mode when creating the OIDC configuration. We will also store the OIDC ID as an environment variable for later use. The command uses the ROSA CLI to create your cluster’s unique OIDC configuration.
To create the OIDC configuration for this tutorial, run the following command:
export OIDC_ID=$(rosa create oidc-config --mode auto --managed --yes -o json | jq -r '.id')
16.3.4.1.3. Creating additional environment variables
Run the following command to set up some environment variables so that it is easier to run the command to create the ROSA with HCP cluster:
export CLUSTER_NAME=<enter cluster name>
export REGION=<region VPC was created in>
TipRun
rosa whoamito find the VPC region.
16.3.4.2. Creating the cluster
If this is the first time you are deploying ROSA in this account and you have not yet created the account roles, create the account-wide roles and policies, including the Operator policies. Since ROSA uses AWS Security Token Service (STS), this step creates the AWS IAM roles and policies that are needed for ROSA to interact with your account.
Run the following command to create the account-wide roles:
rosa create account-roles --mode auto --yes
Run the following command to create the cluster:
rosa create cluster --cluster-name $CLUSTER_NAME \
    --subnet-ids ${PUBLIC_SUBNET_ID},${PRIVATE_SUBNET_ID} \
    --hosted-cp \
    --region $REGION \
    --oidc-config-id $OIDC_ID \
    --sts --mode auto --yes
The cluster is ready and completely usable after about 10 minutes. The cluster will have a control plane across three AWS availability zones in your selected region and create two worker nodes in your AWS account.
16.3.4.3. Checking the installation status
Run one of the following commands to check the status of the cluster:
For a detailed view of the cluster status, run:
rosa describe cluster --cluster $CLUSTER_NAME
For an abridged view of the cluster status, run:
rosa list clusters
To watch the log as it progresses, run:
rosa logs install --cluster $CLUSTER_NAME --watch
- Once the state changes to “ready” your cluster is installed. It might take a few more minutes for the worker nodes to come online.
16.3.5. Tutorial: Simple UI guide
This page outlines the minimum list of commands to deploy a ROSA cluster using the user interface (UI).
While this simple deployment works well for a tutorial setting, clusters used in production should be deployed with a more detailed method.
16.3.5.1. Prerequisites
- You have completed the prerequisites in the Setup tutorial.
16.3.5.2. Creating account roles
Run the following command once for each AWS account and y-stream OpenShift version:
rosa create account-roles --mode auto --yes
16.3.5.3. Creating Red Hat OpenShift Cluster Manager roles
Create one OpenShift Cluster Manager role for each AWS account by running the following command:
rosa create ocm-role --mode auto --admin --yes
Create one OpenShift Cluster Manager user role for each AWS account by running the following command:
rosa create user-role --mode auto --yes
- Use the OpenShift Cluster Manager to select your AWS account, cluster options, and begin deployment.
OpenShift Cluster Manager UI displays cluster status.
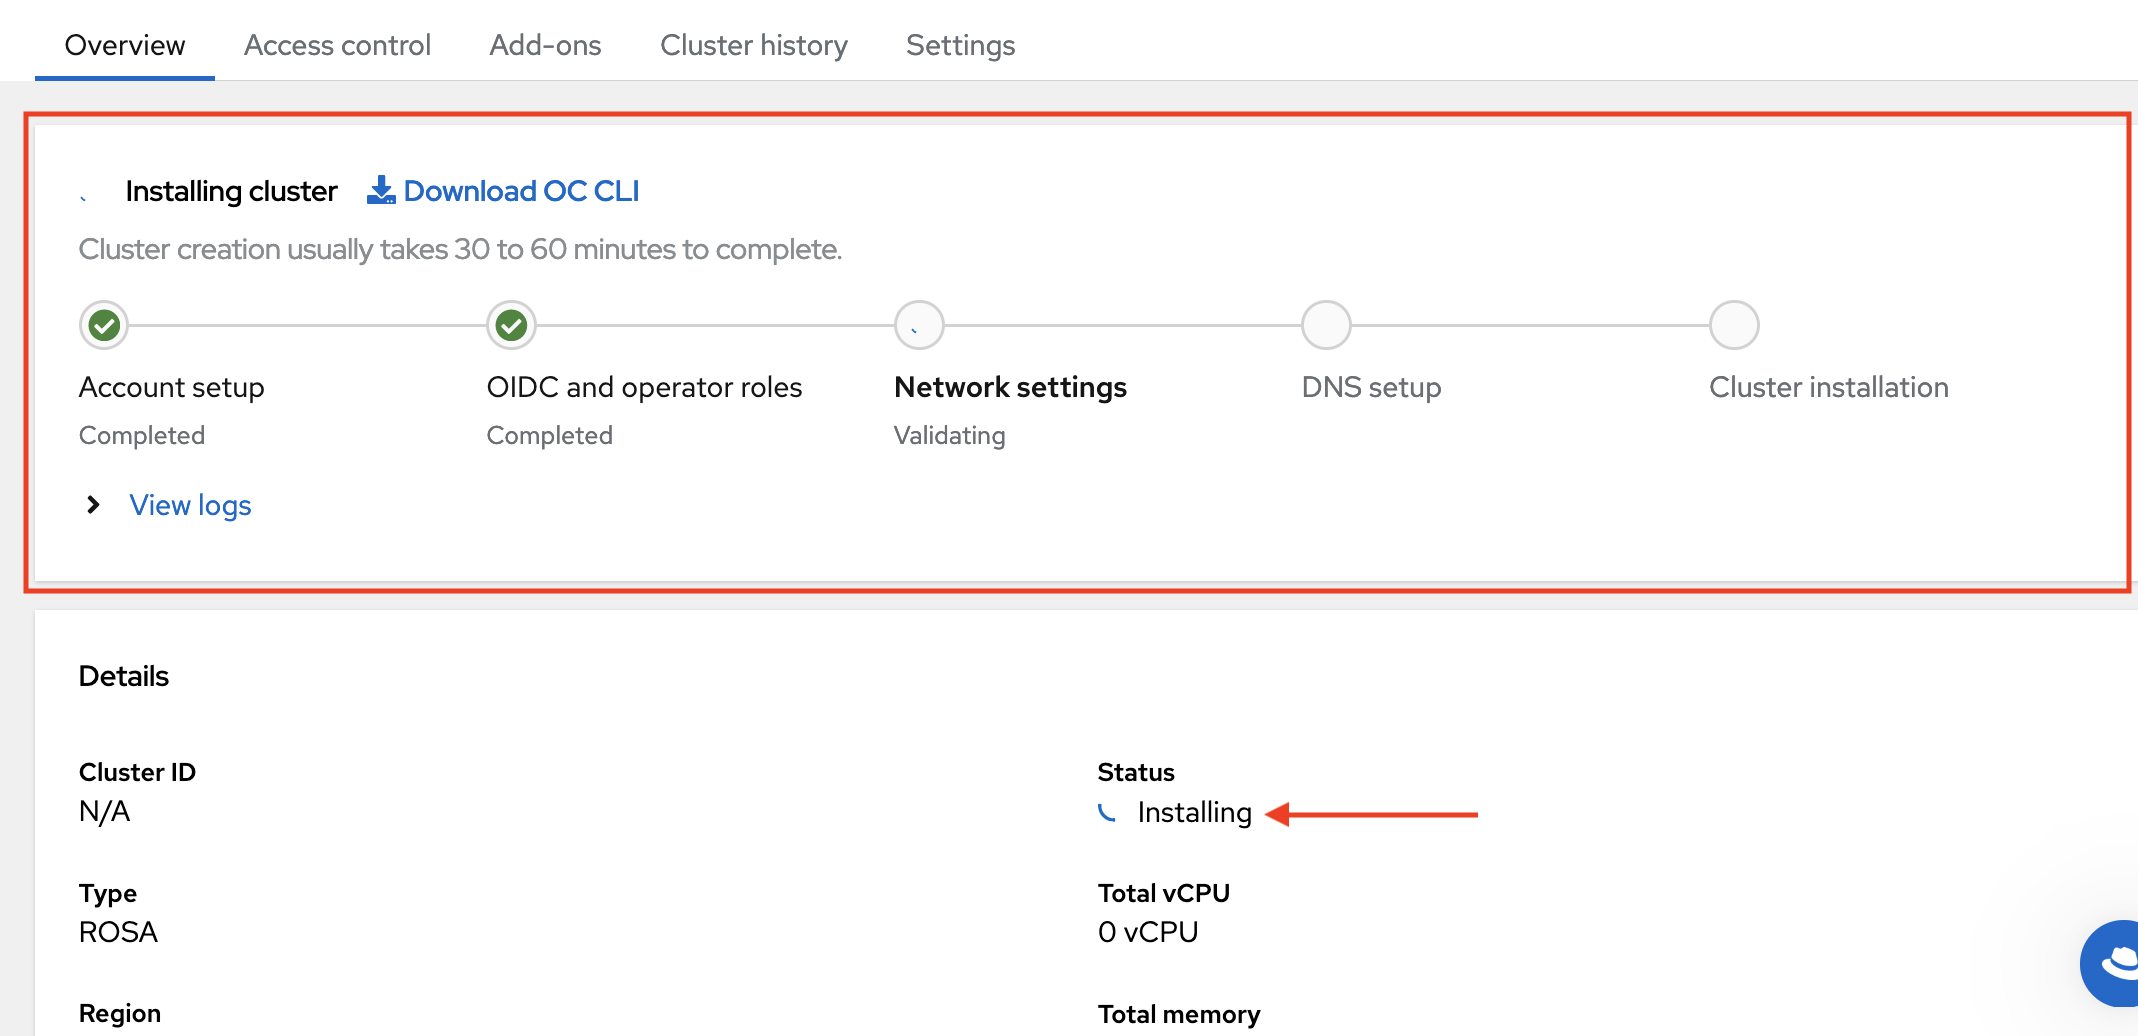
16.3.6. Tutorial: Detailed UI guide
This tutorial outlines the detailed steps to deploy a Red Hat OpenShift Service on AWS (ROSA) cluster using the Red Hat OpenShift Cluster Manager user interface (UI).
16.3.6.1. Deployment workflow
The overall deployment workflow follows these steps:
- Create the account wide roles and policies.
Associate your AWS account with your Red Hat account.
- Create and link the Red Hat OpenShift Cluster Manager role.
- Create and link the user role.
- Create the cluster.
Step 1 only needs to be performed the first time you are deploying into an AWS account. Step 2 only needs to be performed the first time you are using the UI. For successive clusters of the same y-stream version, you only need to create the cluster.
16.3.6.2. Creating account wide roles
If you already have account roles from an earlier deployment, skip this step. The UI will detect your existing roles after you select an associated AWS account.
If this is the first time you are deploying ROSA in this account and you have not yet created the account roles, create the account-wide roles and policies, including the Operator policies.
In your terminal, run the following command to create the account-wide roles:
$ rosa create account-roles --mode auto --yes
Example output
I: Creating roles using 'arn:aws:iam::000000000000:user/rosa-user'
I: Created role 'ManagedOpenShift-ControlPlane-Role' with ARN 'arn:aws:iam::000000000000:role/ManagedOpenShift-ControlPlane-Role'
I: Created role 'ManagedOpenShift-Worker-Role' with ARN 'arn:aws:iam::000000000000:role/ManagedOpenShift-Worker-Role'
I: Created role 'ManagedOpenShift-Support-Role' with ARN 'arn:aws:iam::000000000000:role/ManagedOpenShift-Support-Role'
I: Created role 'ManagedOpenShift-Installer-Role' with ARN 'arn:aws:iam::000000000000:role/ManagedOpenShift-Installer-Role'
I: Created policy with ARN 'arn:aws:iam::000000000000:policy/ManagedOpenShift-openshift-machine-api-aws-cloud-credentials'
I: Created policy with ARN 'arn:aws:iam::000000000000:policy/ManagedOpenShift-openshift-cloud-credential-operator-cloud-crede'
I: Created policy with ARN 'arn:aws:iam::000000000000:policy/ManagedOpenShift-openshift-image-registry-installer-cloud-creden'
I: Created policy with ARN 'arn:aws:iam::000000000000:policy/ManagedOpenShift-openshift-ingress-operator-cloud-credentials'
I: Created policy with ARN 'arn:aws:iam::000000000000:policy/ManagedOpenShift-openshift-cluster-csi-drivers-ebs-cloud-credent'
I: To create a cluster with these roles, run the following command:
rosa create cluster --sts
16.3.6.3. Associating your AWS account with your Red Hat account
This step tells the OpenShift Cluster Manager what AWS account you want to use when deploying ROSA.
If you have already associated your AWS accounts, skip this step.
- Open the Red Hat Hybrid Cloud Console by visiting the OpenShift Cluster Manager and logging in to your Red Hat account.
- Click Create Cluster.
Scroll down to the Red Hat OpenShift Service on AWS (ROSA) row and click Create Cluster.
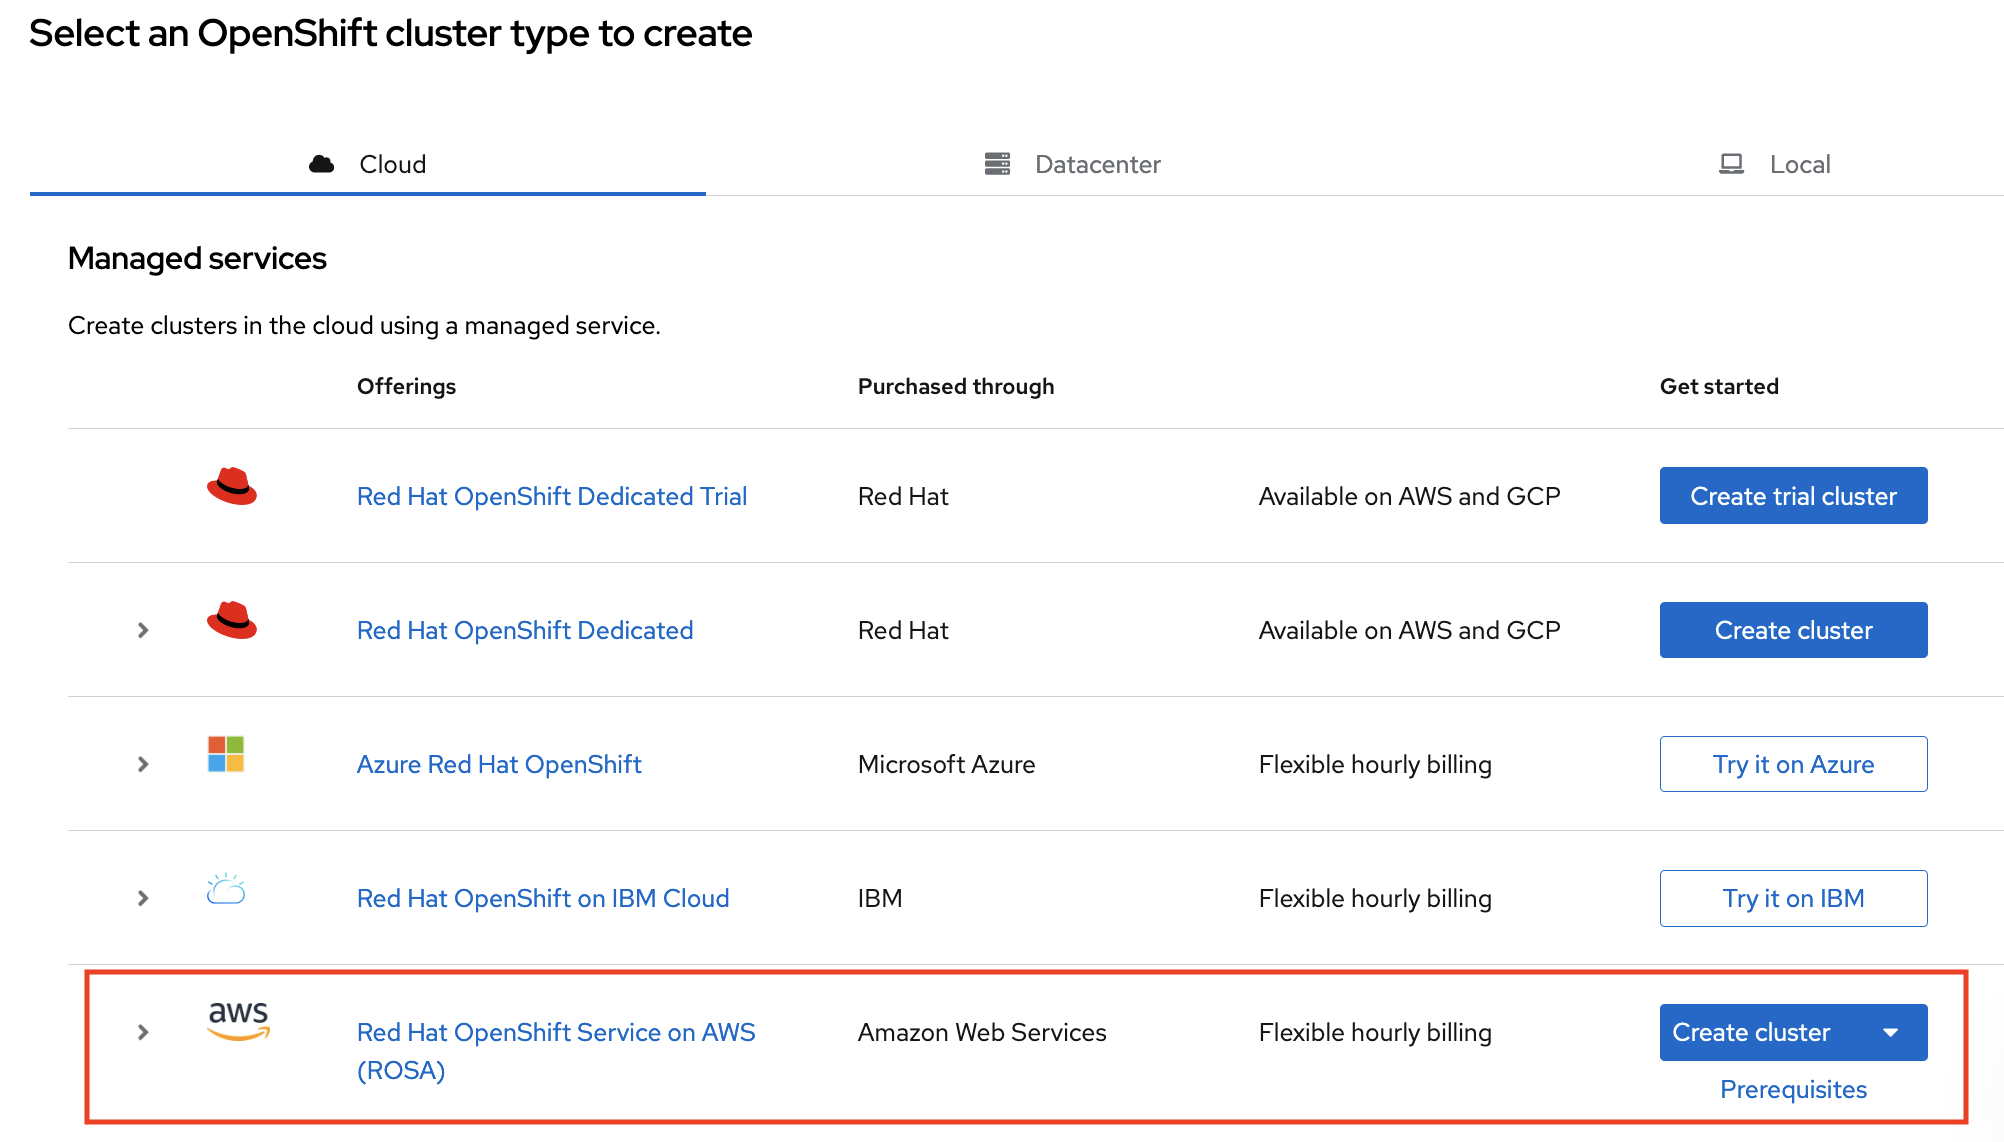
A dropdown menu appears. Click With web interface.

Under "Select an AWS control plane type," choose Classic. Then click Next.
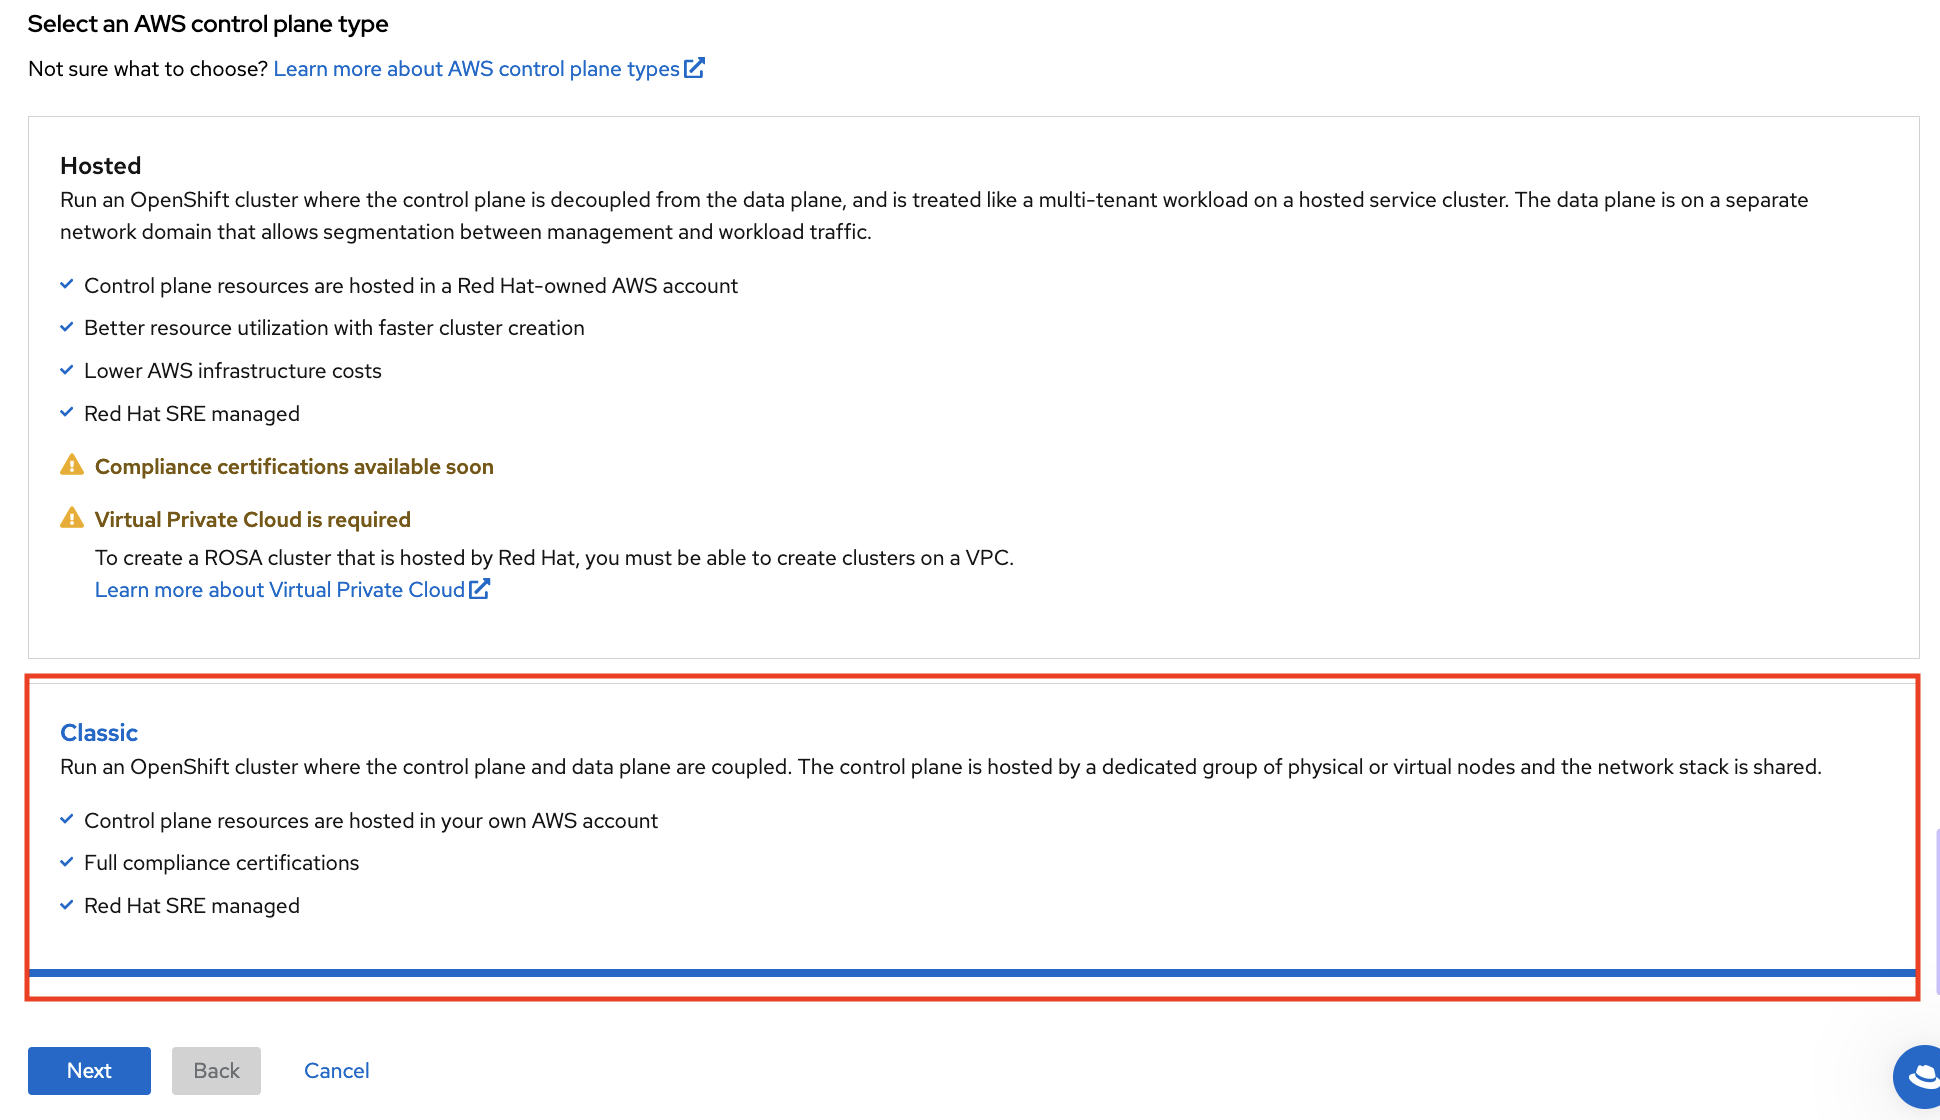
- Click the dropbox under Associated AWS infrastructure account. If you have not yet associated any AWS accounts, the dropbox may be empty.
Click How to associate a new AWS account.
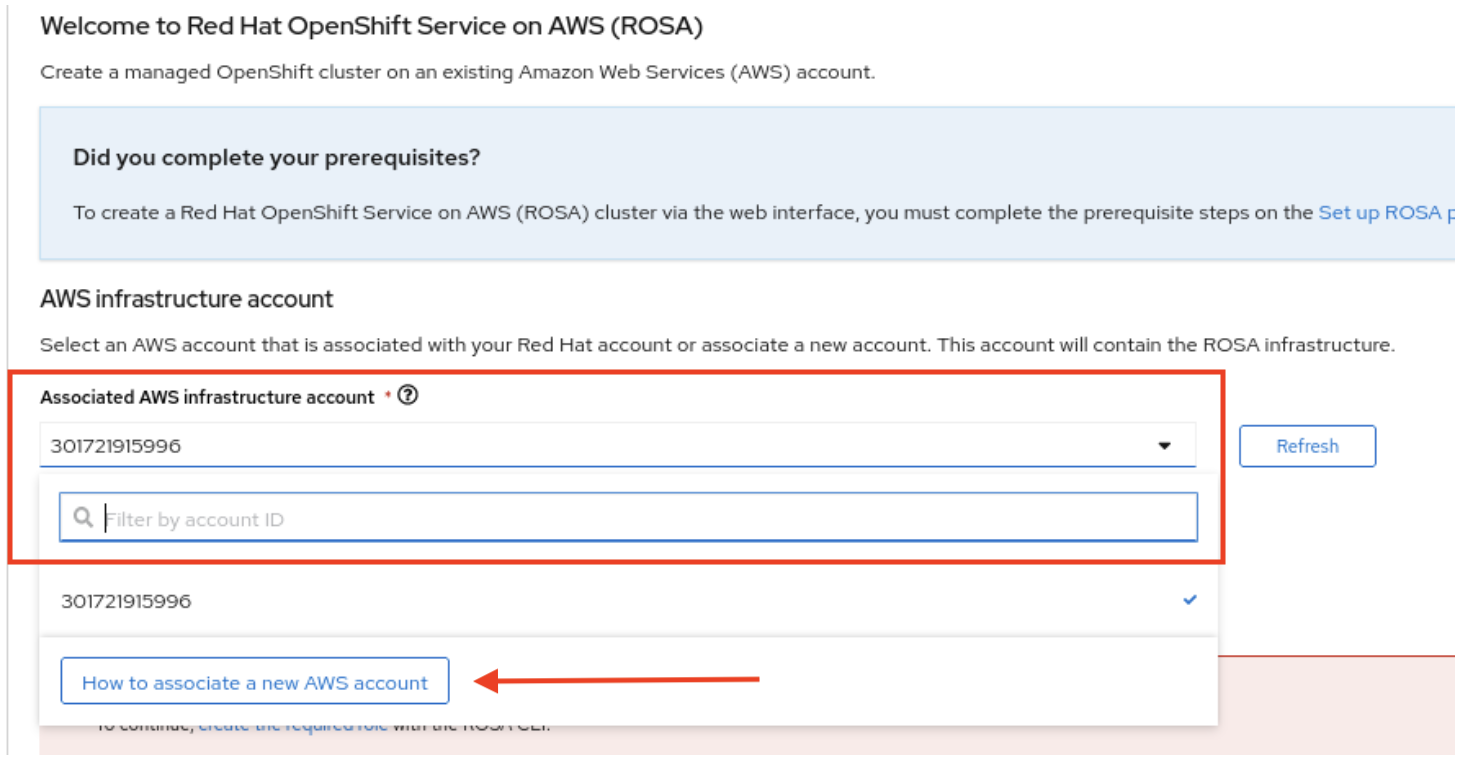
A sidebar appears with instructions for associating a new AWS account.

16.3.6.4. Creating and associating an OpenShift Cluster Manager role
Run the following command to see if an OpenShift Cluster Manager role exists:
$ rosa list ocm-role
The UI displays the commands to create an OpenShift Cluster Manager role with two different levels of permissions:
- Basic OpenShift Cluster Manager role: Allows the OpenShift Cluster Manager to have read-only access to the account to check if the roles and policies that are required by ROSA are present before creating a cluster. You will need to manually create the required roles, policies, and OIDC provider using the CLI.
Admin OpenShift Cluster Manager role: Grants the OpenShift Cluster Manager additional permissions to create the required roles, policies, and OIDC provider for ROSA. Using this makes the deployment of a ROSA cluster quicker since the OpenShift Cluster Manager will be able to create the required resources for you.
To read more about these roles, see the OpenShift Cluster Manager roles and permissions section of the documentation.
For the purposes of this tutorial, use the Admin OpenShift Cluster Manager role for the simplest and quickest approach.
Copy the command to create the Admin OpenShift Cluster Manager role from the sidebar or switch to your terminal and enter the following command:
$ rosa create ocm-role --mode auto --admin --yes
This command creates the OpenShift Cluster Manager role and associates it with your Red Hat account.
Example output
I: Creating ocm role
I: Creating role using 'arn:aws:iam::000000000000:user/rosa-user'
I: Created role 'ManagedOpenShift-OCM-Role-12561000' with ARN 'arn:aws:iam::000000000000:role/ManagedOpenShift-OCM-Role-12561000'
I: Linking OCM role
I: Successfully linked role-arn 'arn:aws:iam::000000000000:role/ManagedOpenShift-OCM-Role-12561000' with organization account '1MpZfntsZeUdjWHg7XRgP000000'
- Click Step 2: User role.
16.3.6.4.1. Other OpenShift Cluster Manager role creation options
Manual mode: If you prefer to run the AWS CLI commands yourself, you can define the mode as
manualrather thanauto. The CLI will output the AWS commands and the relevant JSON files are created in the current directory.Use the following command to create the OpenShift Cluster Manager role in manual mode:
$ rosa create ocm-role --mode manual --admin --yes
Basic OpenShift Cluster Manager role: If you prefer that the OpenShift Cluster Manager has read only access to the account, create a basic OpenShift Cluster Manager role. You will then need to manually create the required roles, policies, and OIDC provider using the CLI.
Use the following command to create a Basic OpenShift Cluster Manager role:
$ rosa create ocm-role --mode auto --yes
16.3.6.5. Creating an OpenShift Cluster Manager user role
As defined in the user role documentation, the user role needs to be created so that ROSA can verify your AWS identity. This role has no permissions, and it is only used to create a trust relationship between the installation program account and your OpenShift Cluster Manager role resources.
Check if a user role already exists by running the following command:
$ rosa list user-role
Run the following command to create the user role and to link it to your Red Hat account:
$ rosa create user-role --mode auto --yes
Example output
I: Creating User role
I: Creating ocm user role using 'arn:aws:iam::000000000000:user/rosa-user'
I: Created role 'ManagedOpenShift-User-rosa-user-Role' with ARN 'arn:aws:iam::000000000000:role/ManagedOpenShift-User-rosa-user-Role'
I: Linking User role
I: Successfully linked role ARN 'arn:aws:iam::000000000000:role/ManagedOpenShift-User-rosa-user-Role' with account '1rbOQez0z5j1YolInhcXY000000'
NoteAs before, you can define
--mode manualif you’d prefer to run the AWS CLI commands yourself. The CLI outputs the AWS commands and the relevant JSON files are created in the current directory. Make sure to link the role.- Click Step 3: Account roles.
16.3.6.6. Creating account roles
Create your account roles by running the following command:
$ rosa create account-roles --mode auto
- Click OK to close the sidebar.
16.3.6.7. Confirming successful account association
- You should now see your AWS account in the Associated AWS infrastructure account dropdown menu. If you see your account, account association was successful.
- Select the account.
You will see the account role ARNs populated below.
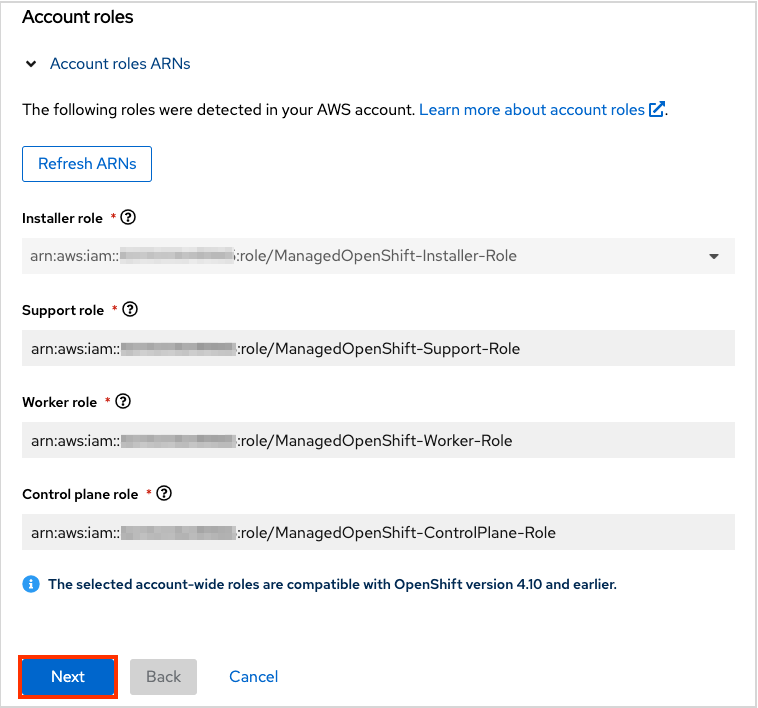
- Click Next.
16.3.6.8. Creating the cluster
For the purposes of this tutorial make the following selections:
Cluster settings
- Cluster name: <pick a name\>
- Version: <select latest version\>
- Region: <select region\>
- Availability: Single zone
- Enable user workload monitoring: leave checked
- Enable additional etcd encryption: leave unchecked
- Encrypt persistent volumes with customer keys: leave unchecked
- Click Next.
Leave the default settings on for the machine pool:
Default machine pool settings
- Compute node instance type: m5.xlarge - 4 vCPU 16 GiB RAM
- Enable autoscaling: unchecked
- Compute node count: 2
- Leave node labels blank
- Click Next.
16.3.6.8.1. Networking
- Leave all the default values for configuration.
- Click Next.
- Leave all the default values for CIDR ranges.
- Click Next.
16.3.6.8.2. Cluster roles and policies
For this tutorial, leave Auto selected. It will make the cluster deployment process simpler and quicker.
If you selected a Basic OpenShift Cluster Manager role earlier, you can only use manual mode. You must manually create the operator roles and OIDC provider. See the "Basic OpenShift Cluster Manager role" section below after you have completed the "Cluster updates" section and started cluster creation.
16.3.6.8.3. Cluster updates
- Leave all the options at default in this section.
16.3.6.8.4. Reviewing and creating your cluster
- Review the content for the cluster configuration.
- Click Create cluster.
16.3.6.8.5. Monitoring the installation progress
Stay on the current page to monitor the installation progress. It should take about 40 minutes.
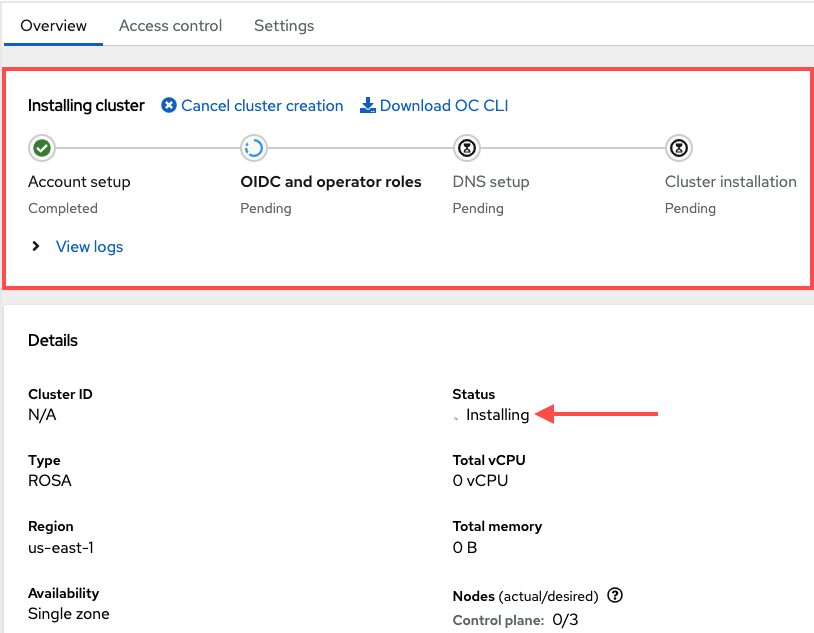
16.3.6.9. Basic OpenShift Cluster Manager Role
If you created an Admin OpenShift Cluster Manager role as directed above ignore this entire section. The OpenShift Cluster Manager will create the resources for you.
If you created a Basic OpenShift Cluster Manager role earlier, you will need to manually create two more elements before cluster installation can continue:
- Operator roles
- OIDC provider
16.3.6.9.1. Creating Operator roles
A pop up window will show you the commands to run.
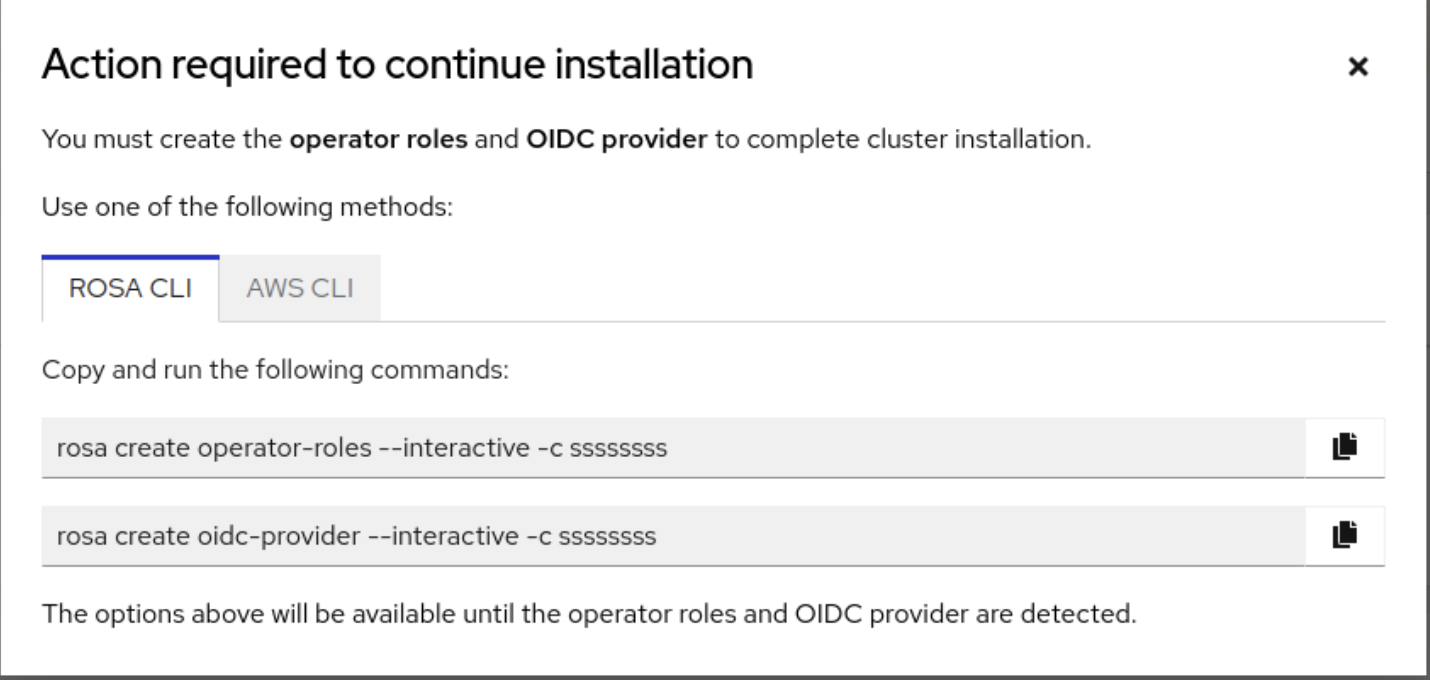
Run the commands from the window in your terminal to launch interactive mode. Or, for simplicity, run the following command to create the Operator roles:
$ rosa create operator-roles --mode auto --cluster <cluster-name> --yes
Example output
I: Creating roles using 'arn:aws:iam::000000000000:user/rosauser'
I: Created role 'rosacluster-b736-openshift-ingress-operator-cloud-credentials' with ARN 'arn:aws:iam::000000000000:role/rosacluster-b736-openshift-ingress-operator-cloud-credentials'
I: Created role 'rosacluster-b736-openshift-cluster-csi-drivers-ebs-cloud-credent' with ARN 'arn:aws:iam::000000000000:role/rosacluster-b736-openshift-cluster-csi-drivers-ebs-cloud-credent'
I: Created role 'rosacluster-b736-openshift-cloud-network-config-controller-cloud' with ARN 'arn:aws:iam::000000000000:role/rosacluster-b736-openshift-cloud-network-config-controller-cloud'
I: Created role 'rosacluster-b736-openshift-machine-api-aws-cloud-credentials' with ARN 'arn:aws:iam::000000000000:role/rosacluster-b736-openshift-machine-api-aws-cloud-credentials'
I: Created role 'rosacluster-b736-openshift-cloud-credential-operator-cloud-crede' with ARN 'arn:aws:iam::000000000000:role/rosacluster-b736-openshift-cloud-credential-operator-cloud-crede'
I: Created role 'rosacluster-b736-openshift-image-registry-installer-cloud-creden' with ARN 'arn:aws:iam::000000000000:role/rosacluster-b736-openshift-image-registry-installer-cloud-creden'
16.3.6.9.2. Creating the OIDC provider
In your terminal, run the following command to create the OIDC provider:
$ rosa create oidc-provider --mode auto --cluster <cluster-name> --yes
Example output
I: Creating OIDC provider using 'arn:aws:iam::000000000000:user/rosauser'
I: Created OIDC provider with ARN 'arn:aws:iam::000000000000:oidc-provider/rh-oidc.s3.us-east-1.amazonaws.com/1tt4kvrr2kha2rgs8gjfvf0000000000'
16.4. Tutorial: Creating an admin user
Creating an administration (admin) user allows you to access your cluster quickly. Follow these steps to create an admin user.
An admin user works well in this tutorial setting. For actual deployment, use a formal identity provider to access the cluster and grant the user admin privileges.
Run the following command to create the admin user:
rosa create admin --cluster=<cluster-name>
Example output
W: It is recommended to add an identity provider to login to this cluster. See 'rosa create idp --help' for more information.
I: Admin account has been added to cluster 'my-rosa-cluster'. It may take up to a minute for the account to become active.
I: To login, run the following command:
oc login https://api.my-rosa-cluster.abcd.p1.openshiftapps.com:6443 \
--username cluster-admin \
--password FWGYL-2mkJI-00000-00000
Copy the log in command returned to you in the previous step and paste it into your terminal. This will log you in to the cluster using the CLI so you can start using the cluster.
$ oc login https://api.my-rosa-cluster.abcd.p1.openshiftapps.com:6443 \
>    --username cluster-admin \
>    --password FWGYL-2mkJI-00000-00000
Example output
Login successful.

You have access to 79 projects, the list has been suppressed. You can list all projects with ' projects'

Using project "default".
To check that you are logged in as the admin user, run one of the following commands:
Option 1:
$ oc whoami
Example output
cluster-admin
Option 2:
oc get all -n openshift-apiserver
Only an admin user can run this command without errors.
- You can now use the cluster as an admin user, which will suffice for this tutorial. For actual deployment, it is highly recommended to set up an identity provider, which is explained in the next tutorial.
16.5. Tutorial: Setting up an identity provider
To log in to your cluster, set up an identity provider (IDP). This tutorial uses GitHub as an example IDP. See the full list of IDPs supported by ROSA.
To view all IDP options, run the following command:
rosa create idp --help
16.5.1. Setting up an IDP with GitHub
- Log in to your GitHub account.
Create a new GitHub organization where you are an administrator.
TipIf you are already an administrator in an existing organization and you want to use that organization, skip to step 9.
Click the + icon, then click New Organization.
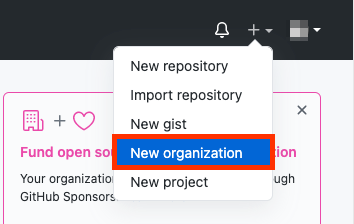
- Choose the most applicable plan for your situation or click Join for free.
Enter an organization account name, an email, and whether it is a personal or business account. Then, click Next.
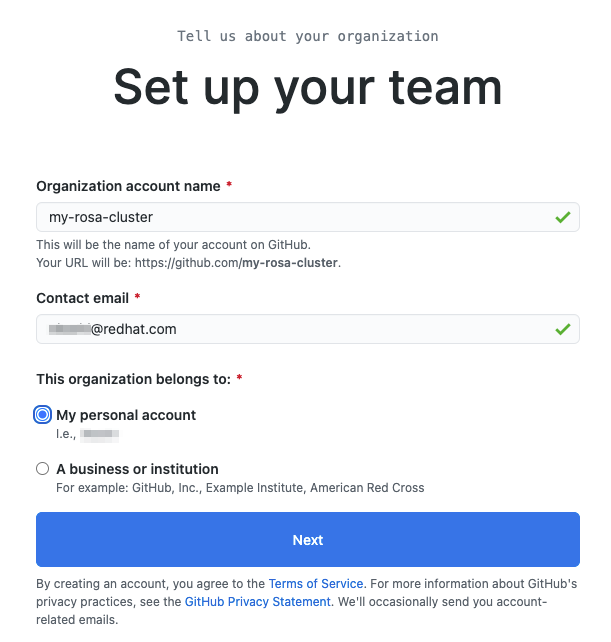
- Optional: Add the GitHub IDs of other users to grant additional access to your ROSA cluster. You can also add them later.
- Click Complete Setup.
- Optional: Enter the requested information on the following page.
- Click Submit.
Go back to the terminal and enter the following command to set up the GitHub IDP:
rosa create idp --cluster=<cluster name> --interactive
Enter the following values:
Type of identity provider: github
Identity Provider Name: <IDP-name>
Restrict to members of: organizations
GitHub organizations: <organization-account-name>
The CLI will provide you with a link. Copy and paste the link into a browser and press Enter. This will fill the required information to register this application for OAuth. You do not need to modify any of the information.
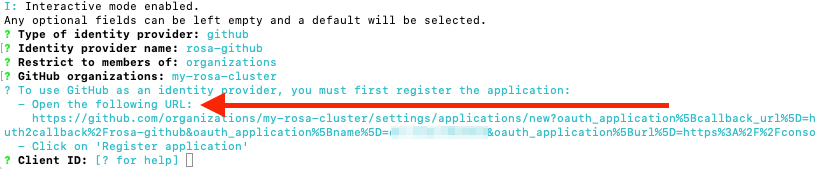
Click Register application.
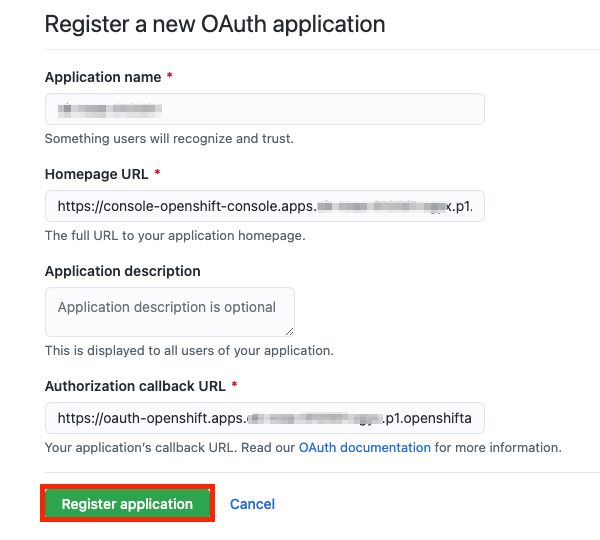
The next page displays a Client ID. Copy the ID and paste it in the terminal where it asks for Client ID.
NoteDo not close the tab.
The CLI will ask for a Client Secret. Go back in your browser and click Generate a new client secret.
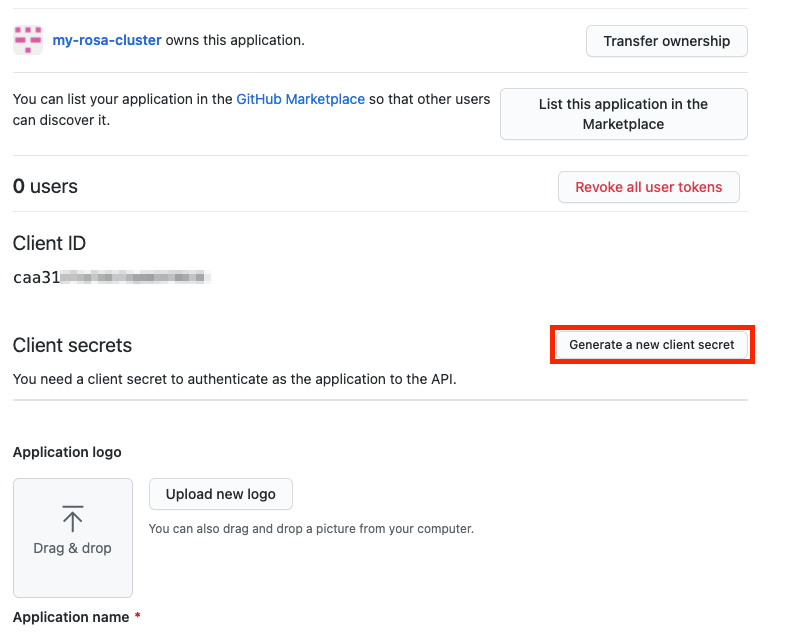
- A secret is generated for you. Copy your secret because it will never be visible again.
- Paste your secret into the terminal and press Enter.
- Leave GitHub Enterprise Hostname blank.
- Select claim.
Wait approximately 1 minute for the IDP to be created and the configuration to land on your cluster.
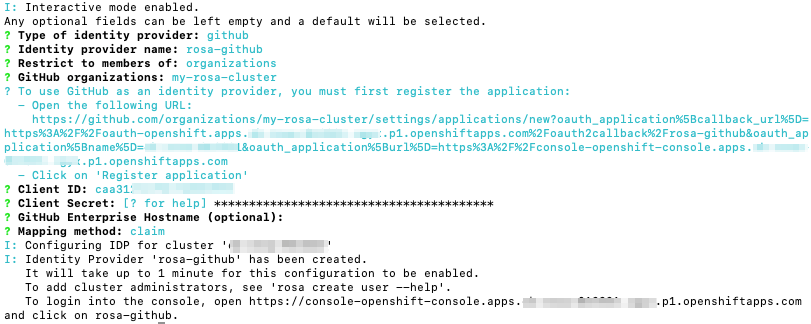
Copy the returned link and paste it into your browser. The new IDP should be available under your chosen name. Click your IDP and use your GitHub credentials to access the cluster.

16.5.2. Granting other users access to the cluster
To grant access to other cluster user you will need to add their GitHub user ID to the GitHub organization used for this cluster.
- In GitHub, go to the Your organizations page.
Click your profile icon, then Your organizations. Then click <your-organization-name>. In our example, it is
my-rosa-cluster.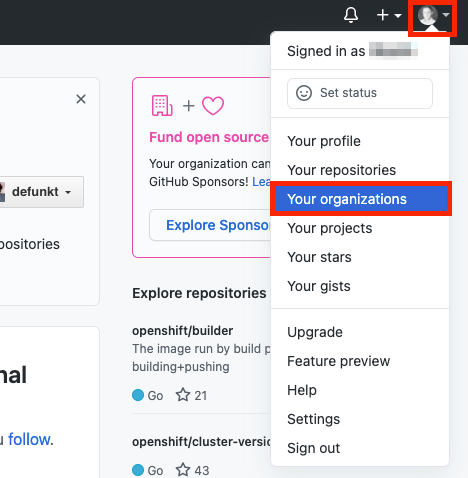
Click Invite someone.
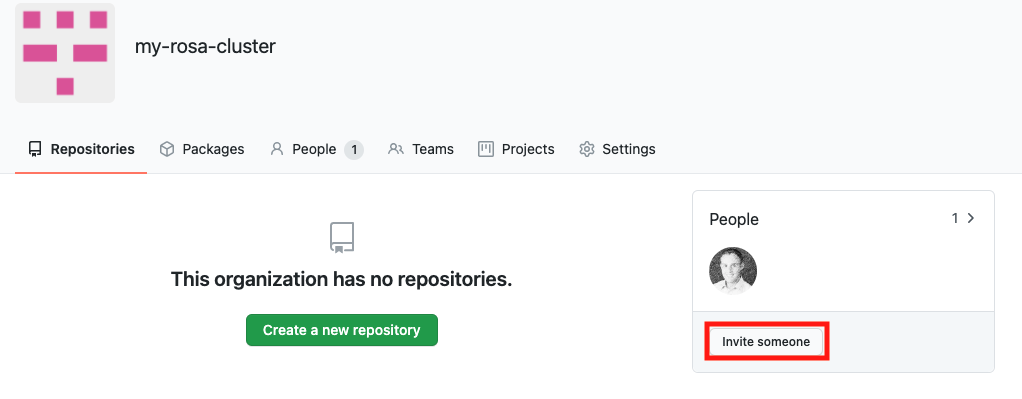
- Enter the GitHub ID of the new user, select the correct user, and click Invite.
- Once the new user accepts the invitation, they will be able to log in to the ROSA cluster using the Hybrid Cloud Console link and their GitHub credentials.
16.6. Tutorial: Granting admin privileges
Administration (admin) privileges are not automatically granted to users that you add to your cluster. If you want to grant admin-level privileges to certain users, you will need to manually grant them to each user. You can grant admin privileges from either the ROSA command line interface (CLI) or the Red Hat OpenShift Cluster Manager web user interface (UI).
Red Hat offers two types of admin privileges:
-
cluster-admin:cluster-adminprivileges give the admin user full privileges within the cluster. -
dedicated-admin:dedicated-adminprivileges allow the admin user to complete most administrative tasks with certain limitations to prevent cluster damage. It is best practice to usededicated-adminwhen elevated privileges are needed.
For more information on admin privileges, see the administering a cluster documentation.
16.6.1. Using the ROSA CLI
Assuming you are the user who created the cluster, run one of the following commands to grant admin privileges:
For
cluster-admin:$ rosa grant user cluster-admin --user <idp_user_name> --cluster=<cluster-name>
For
dedicated-admin:$ rosa grant user dedicated-admin --user <idp_user_name> --cluster=<cluster-name>
Verify that the admin privileges were added by running the following command:
$ rosa list users --cluster=<cluster-name>
Example output
$ rosa list users --cluster=my-rosa-cluster
ID                 GROUPS
<idp_user_name>    cluster-admins
If you are currently logged into the Red Hat Hybrid Cloud Console, log out of the console and log back in to the cluster to see a new perspective with the "Administrator Panel". You might need an incognito or private window.
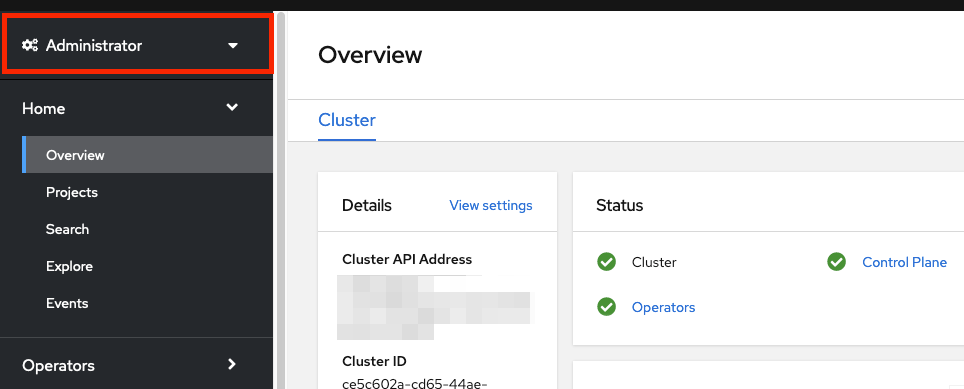
You can also test that admin privileges were added to your account by running the following command. Only a
cluster-adminusers can run this command without errors.$ oc get all -n openshift-apiserver
16.6.2. Using the Red Hat OpenShift Cluster Manager UI
- Log in to the OpenShift Cluster Manager.
- Select your cluster.
- Click the Access Control tab.
- Click the Cluster roles and Access tab in the sidebar.
Click Add user.
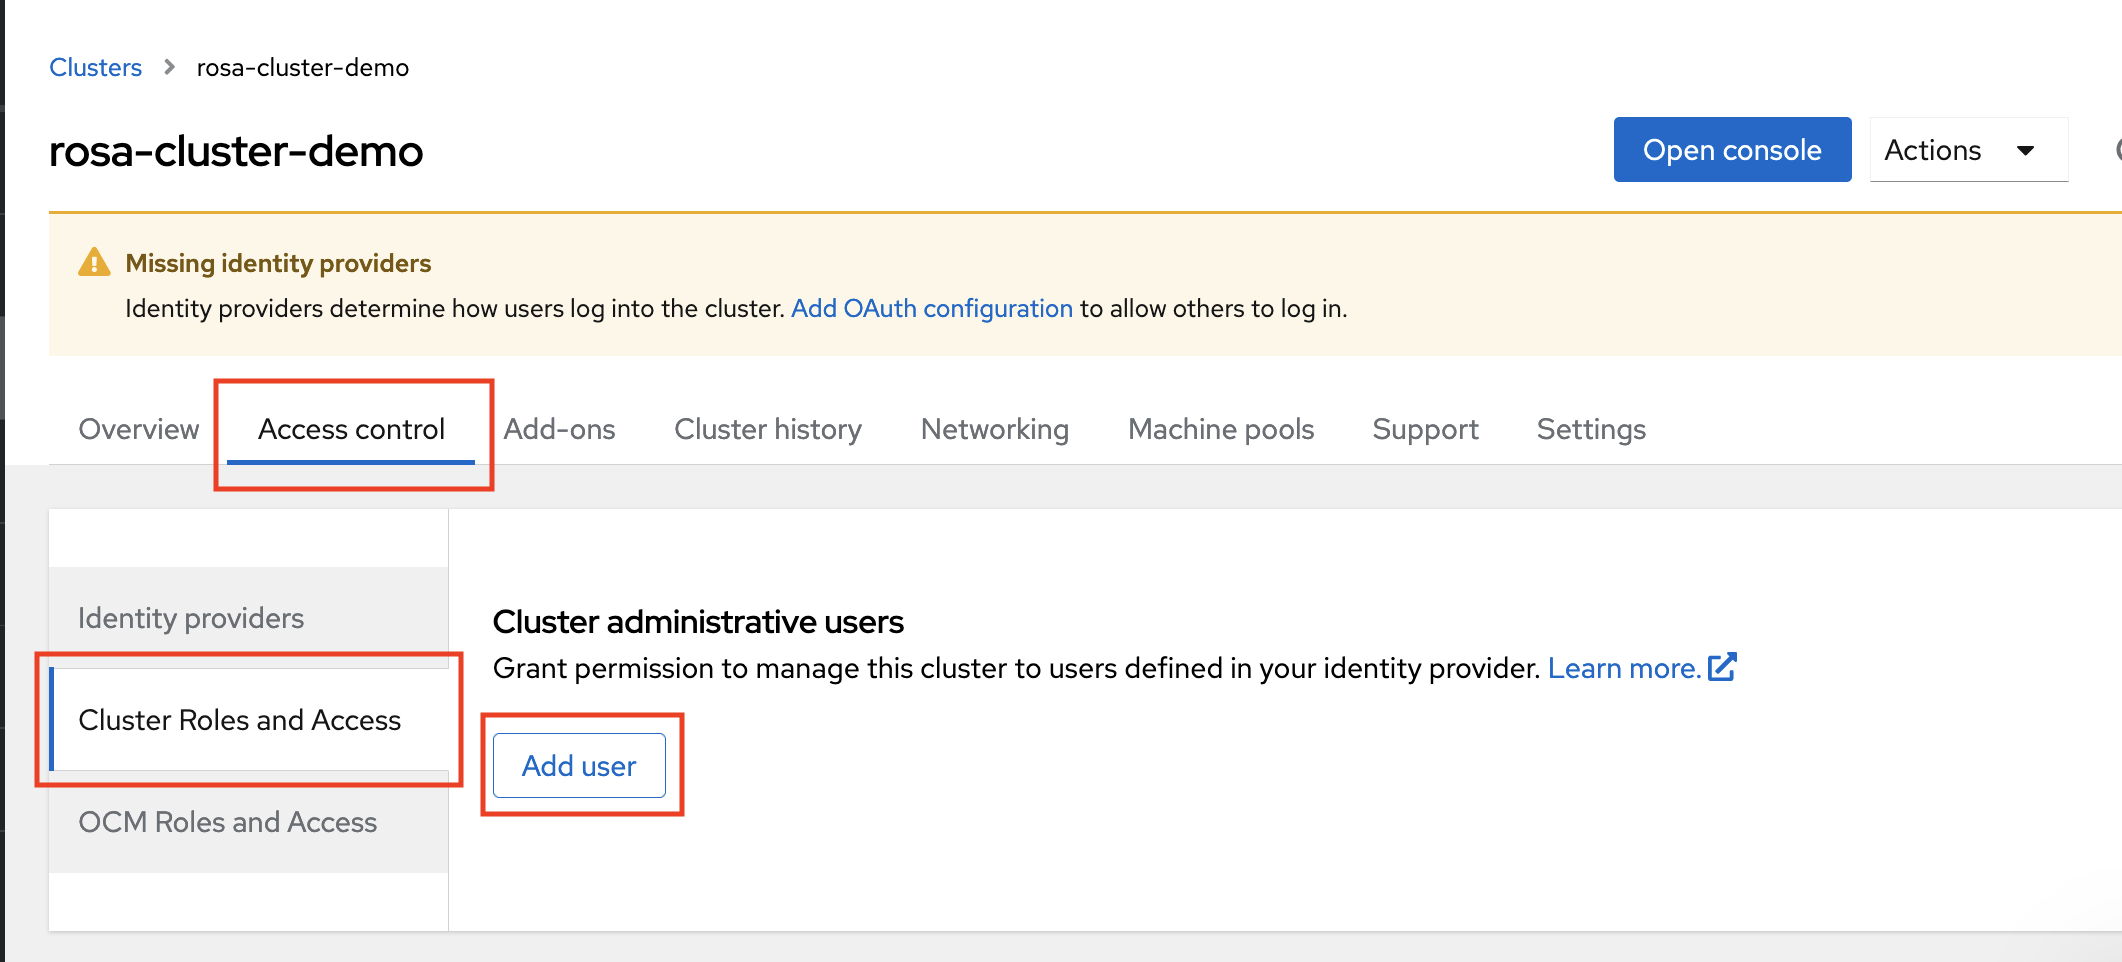
- On the pop-up screen, enter the user ID.
Select whether you want to grant the user
cluster-adminsordedicated-adminsprivileges.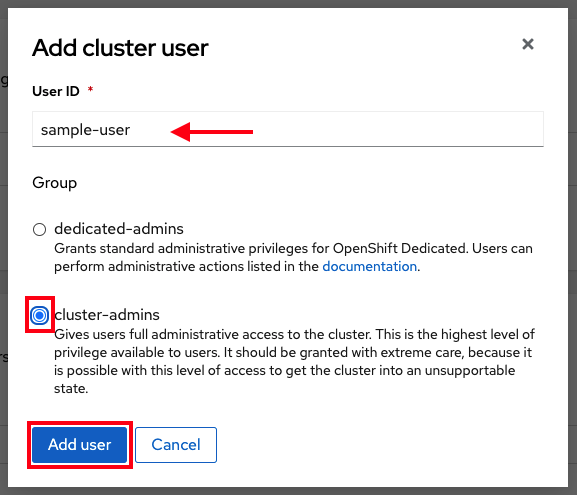
16.7. Tutorial: Accessing your cluster
You can connect to your cluster using the command line interface (CLI) or the Red Hat Hybrid Cloud Console user interface (UI).
16.7.1. Accessing your cluster using the CLI
To access the cluster using the CLI, you must have the oc CLI installed. If you are following the tutorials, you already installed the oc CLI.
- Log in to the OpenShift Cluster Manager.
- Click your username in the top right corner.
Click Copy Login Command.
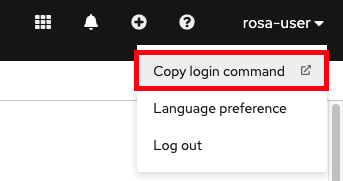
This opens a new tab with a choice of identity providers (IDPs). Click the IDP you want to use. For example, "rosa-github".
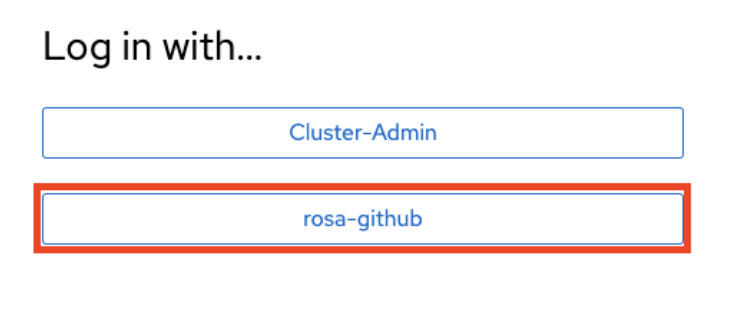
- A new tab opens. Click Display token.
Run the following command in your terminal:
$ oc login --token=sha256~GBAfS4JQ0t1UTKYHbWAK6OUWGUkdMGz000000000000 --server=https://api.my-rosa-cluster.abcd.p1.openshiftapps.com:6443
Example output
Logged into "https://api.my-rosa-cluster.abcd.p1.openshiftapps.com:6443" as "rosa-user" using the token provided.

You have access to 79 projects, the list has been suppressed. You can list all projects with ' projects'

Using project "default".
Confirm that you are logged in by running the following command:
$ oc whoami
Example output
rosa-user
- You can now access your cluster.
16.7.2. Accessing the cluster via the Hybrid Cloud Console
Log in to the OpenShift Cluster Manager.
To retrieve the Hybrid Cloud Console URL run:
rosa describe cluster -c <cluster-name> | grep Console
Click your IDP. For example, "rosa-github".
- Enter your user credentials.
You should be logged in. If you are following the tutorials, you will be a cluster-admin and should see the Hybrid Cloud Console webpage with the Administrator panel visible.
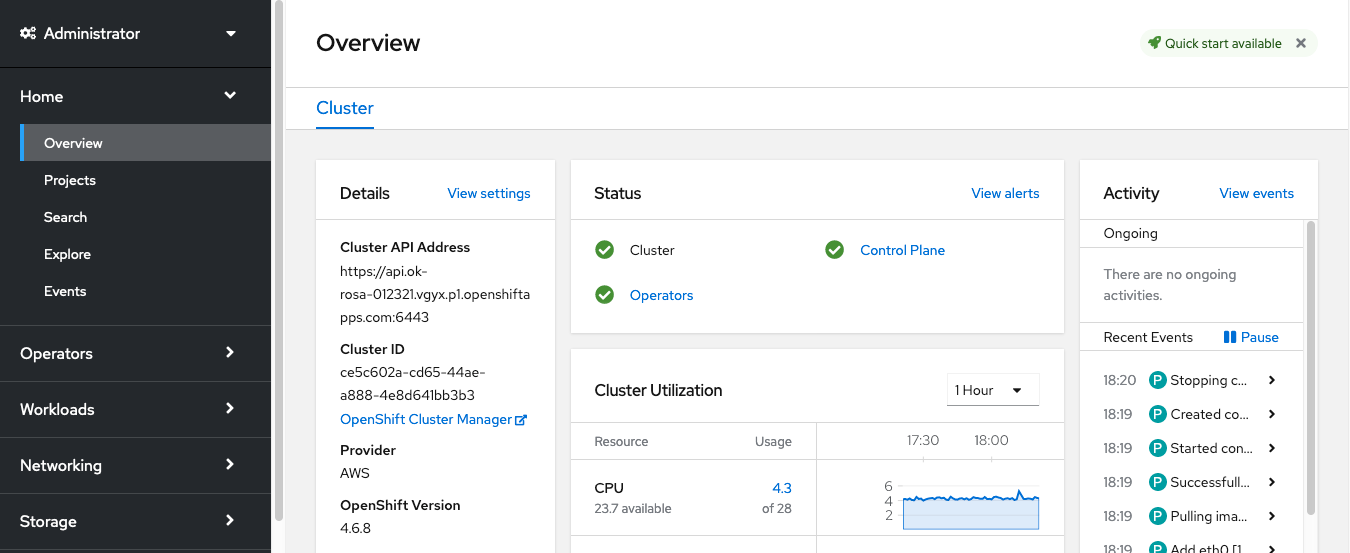
16.8. Tutorial: Managing worker nodes
In Red Hat OpenShift Service on AWS (ROSA), changing aspects of your worker nodes is performed through the use of machine pools. A machine pool allows users to manage many machines as a single entity. Every ROSA cluster has a default machine pool that is created when the cluster is created. For more information, see the machine pool documentation.
16.8.1. Creating a machine pool
You can create a machine pool with either the command line interface (CLI) or the user interface (UI).
16.8.1.1. Creating a machine pool with the CLI
Run the following command:
rosa create machinepool --cluster=<cluster-name> --name=<machinepool-name> --replicas=<number-nodes>
Example input
 $ rosa create machinepool --cluster=my-rosa-cluster --name=new-mp
 --replicas=2
Example output
I: Machine pool 'new-mp' created successfully on cluster 'my-rosa-cluster'
I: To view all machine pools, run 'rosa list machinepools -c my-rosa-cluster'
Optional: Add node labels or taints to specific nodes in a new machine pool by running the following command:
rosa create machinepool --cluster=<cluster-name> --name=<machinepool-name> --replicas=<number-nodes> --labels=`<key=pair>`
Example input
$ rosa create machinepool --cluster=my-rosa-cluster --name=db-nodes-mp --replicas=2 --labels='app=db','tier=backend'
Example output
I: Machine pool 'db-nodes-mp' created successfully on cluster 'my-rosa-cluster'
This creates an additional 2 nodes that can be managed as a unit and also assigns them the labels shown.
Run the following command to confirm machine pool creation and the assigned labels:
rosa list machinepools --cluster=<cluster-name>
Example output
ID          AUTOSCALING  REPLICAS  INSTANCE TYPE  LABELS            TAINTS    AVAILABILITY ZONES
Default     No           2         m5.xlarge                                  us-east-1a
16.8.1.2. Creating a machine pool with the UI
Log in to the OpenShift Cluster Manager and click your cluster.
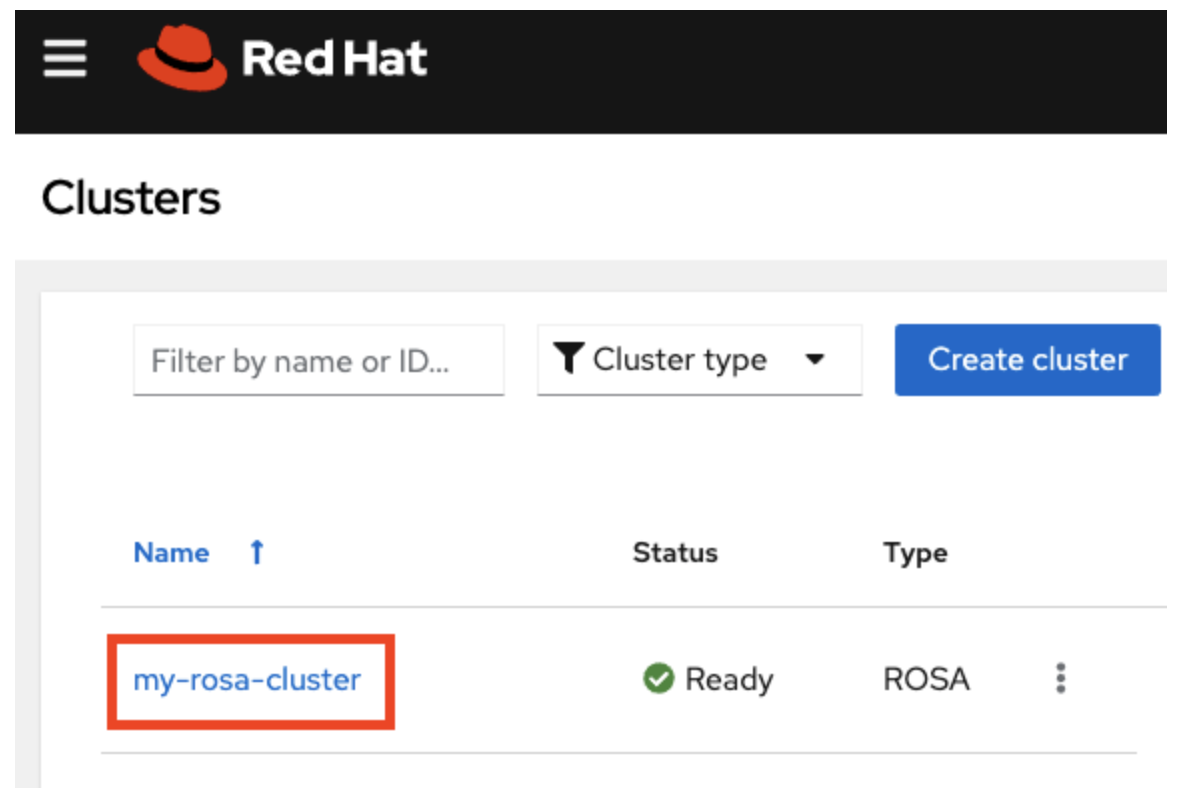
Click Machine pools.

- Click Add machine pool.
Enter the desired configuration.
TipYou can also and expand the Edit node labels and taints section to add node labels and taints to the nodes in the machine pool.
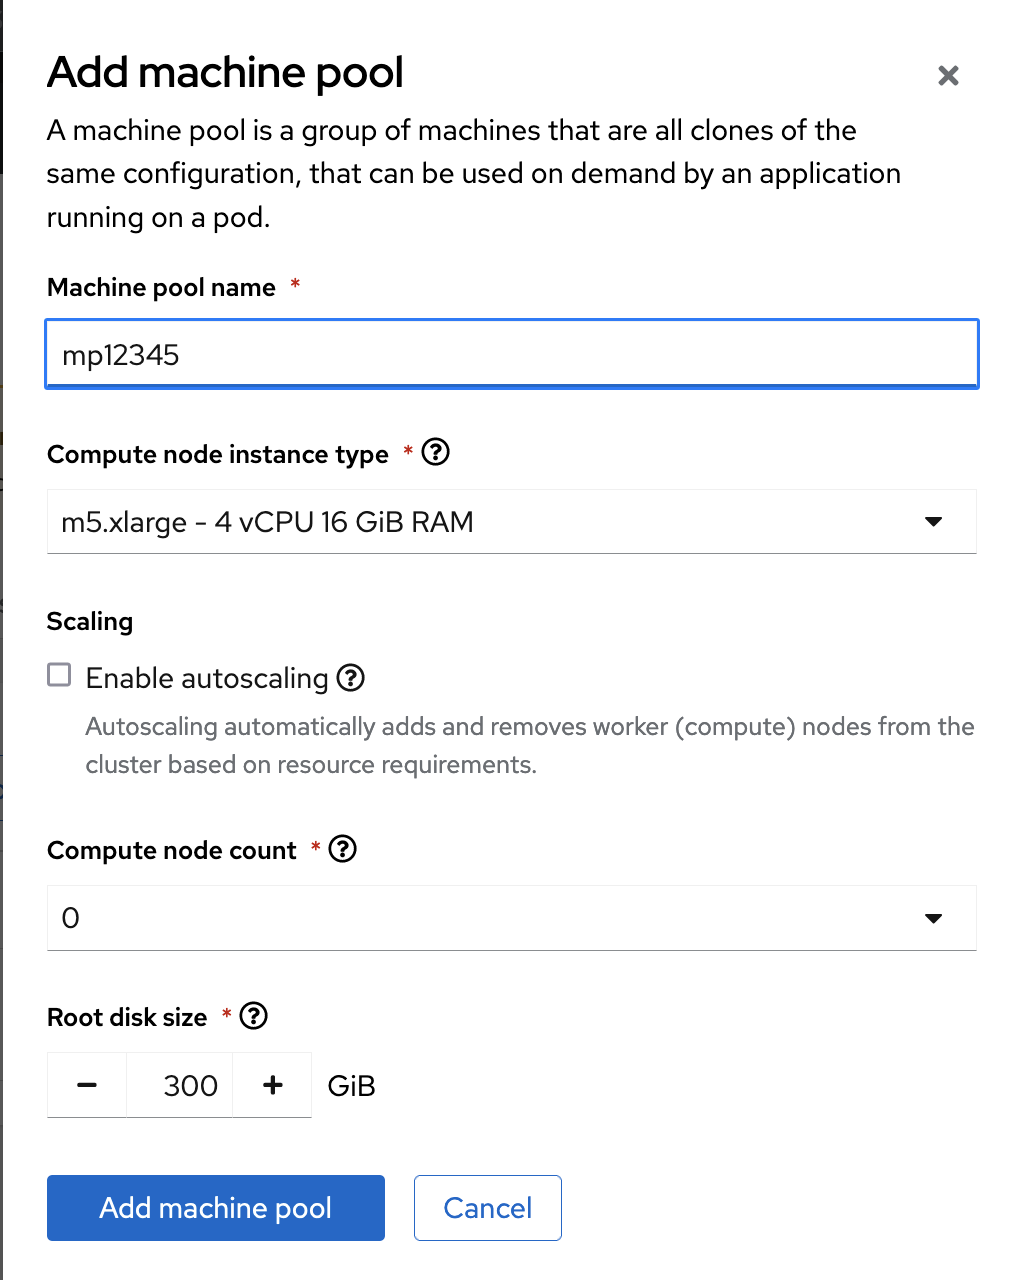
You will see the new machine pool you created.
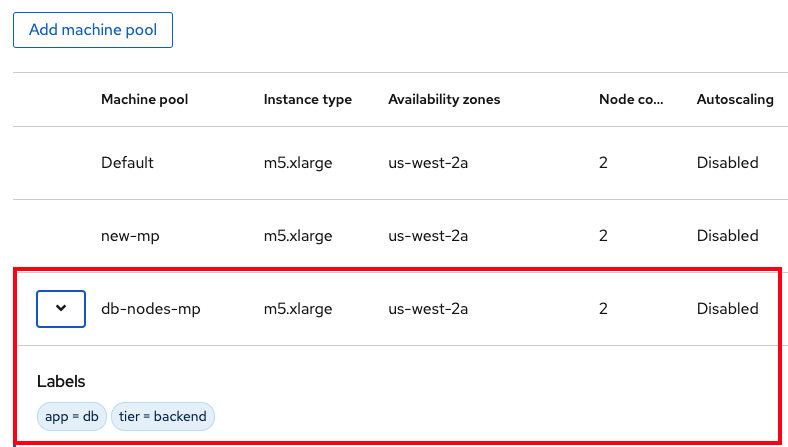
16.8.2. Scaling worker nodes
Edit a machine pool to scale the number of worker nodes in that specific machine pool. You can use either the CLI or the UI to scale worker nodes.
16.8.2.1. Scaling worker nodes using the CLI
Run the following command to see the default machine pool that is created with each cluster:
rosa list machinepools --cluster=<cluster-name>
Example output
ID          AUTOSCALING  REPLICAS  INSTANCE TYPE  LABELS            TAINTS    AVAILABILITY ZONES
Default     No           2         m5.xlarge                                  us-east-1a
To scale the default machine pool out to a different number of nodes, run the following command:
rosa edit machinepool --cluster=<cluster-name> --replicas=<number-nodes> <machinepool-name>
Example input
rosa edit machinepool --cluster=my-rosa-cluster --replicas 3 Default
Run the following command to confirm that the machine pool has scaled:
rosa describe cluster --cluster=<cluster-name> | grep Compute
Example input
$ rosa describe cluster --cluster=my-rosa-cluster | grep Compute
Example output
- Compute: 3 (m5.xlarge)
16.8.2.2. Scaling worker nodes using the UI
- Click the three dots to the right of the machine pool you want to edit.
- Click Edit.
- Enter the desired number of nodes, and click Save.
Confirm that the cluster has scaled by selecting the cluster, clicking the Overview tab, and scrolling to Compute listing. The compute listing should equal the scaled nodes. For example, 3/3.
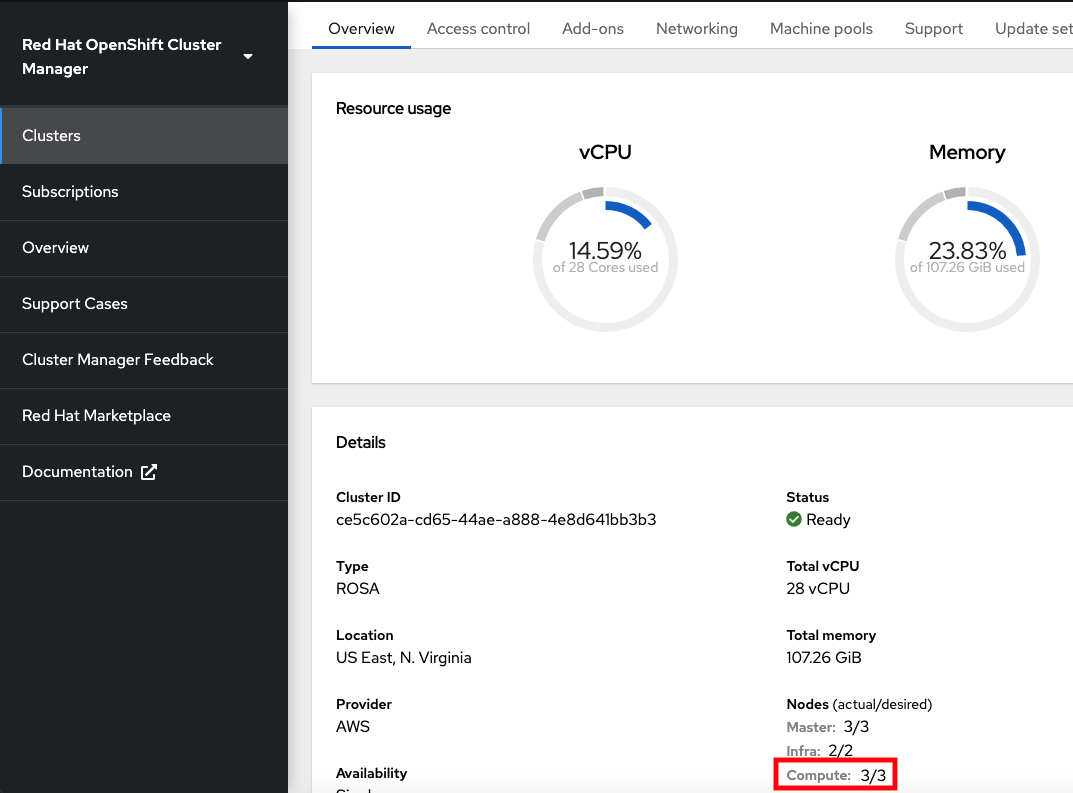
16.8.2.3. Adding node labels
Use the following command to add node labels:
rosa edit machinepool --cluster=<cluster-name> --replicas=<number-nodes> --labels='key=value' <machinepool-name>
Example input
rosa edit machinepool --cluster=my-rosa-cluster --replicas=2 --labels 'foo=bar','baz=one' new-mp
This adds 2 labels to the new machine pool.
This command replaces all machine pool configurations with the newly defined configuration. If you want to add another label and keep the old label, you must state both the new and preexisting the label. Otherwise the command will replace all preexisting labels with the one you wanted to add. Similarly, if you want to delete a label, run the command and state the ones you want, excluding the one you want to delete.
16.8.3. Mixing node types
You can also mix different worker node machine types in the same cluster by using new machine pools. You cannot change the node type of a machine pool once it is created, but you can create a new machine pool with different nodes by adding the --instance-type flag.
For example, to change the database nodes to a different node type, run the following command:
rosa create machinepool --cluster=<cluster-name> --name=<mp-name> --replicas=<number-nodes> --labels='<key=pair>' --instance-type=<type>
Example input
rosa create machinepool --cluster=my-rosa-cluster --name=db-nodes-large-mp --replicas=2 --labels='app=db','tier=backend' --instance-type=m5.2xlarge
To see all the instance types available, run the following command:
rosa list instance-types
To make step-by-step changes, use the
--interactiveflag:rosa create machinepool -c <cluster-name> --interactive

Run the following command to list the machine pools and see the new, larger instance type:
rosa list machinepools -c <cluster-name>

16.9. Tutorial: Autoscaling
The cluster autoscaler adds or removes worker nodes from a cluster based on pod resources.
The cluster autoscaler increases the size of the cluster when:
- Pods fail to schedule on the current nodes due to insufficient resources.
- Another node is necessary to meet deployment needs.
The cluster autoscaler does not increase the cluster resources beyond the limits that you specify.
The cluster autoscaler decreases the size of the cluster when:
- Some nodes are consistently not needed for a significant period. For example, when a node has low resource use and all of its important pods can fit on other nodes.
16.9.1. Enabling autoscaling for an existing machine pool using the CLI
Cluster autoscaling can be enabled at cluster creation and when creating a new machine pool by using the --enable-autoscaling option.
Autoscaling is set based on machine pool availability. To find out which machine pools are available for autoscaling, run the following command:
$ rosa list machinepools -c <cluster-name>
Example output
ID         AUTOSCALING  REPLICAS  INSTANCE TYPE  LABELS     TAINTS    AVAILABILITY ZONES
Default    No           2         m5.xlarge                           us-east-1a
Run the following command to add autoscaling to an available machine pool:
$ rosa edit machinepool -c <cluster-name> --enable-autoscaling <machinepool-name> --min-replicas=<num> --max-replicas=<num>
Example input
$ rosa edit machinepool -c my-rosa-cluster --enable-autoscaling Default --min-replicas=2 --max-replicas=4
The above command creates an autoscaler for the worker nodes that scales between 2 and 4 nodes depending on the resources.
16.9.2. Enabling autoscaling for an existing machine pool using the UI
Cluster autoscaling can be enabled at cluster creation by checking the Enable autoscaling checkbox when creating machine pools.
- Go to the Machine pools tab and click the three dots in the right..
- Click Scale, then Enable autoscaling.
Run the following command to confirm that autoscaling was added:
$ rosa list machinepools -c <cluster-name>
Example output
ID         AUTOSCALING  REPLICAS  INSTANCE TYPE  LABELS     TAINTS    AVAILABILITY ZONES
Default    Yes          2-4       m5.xlarge                           us-east-1a
16.10. Tutorial: Upgrading your cluster
Red Hat OpenShift Service on AWS (ROSA) executes all cluster upgrades as part of the managed service. You do not need to run any commands or make changes to the cluster. You can schedule the upgrades at a convenient time.
Ways to schedule a cluster upgrade include:
- Manually using the command line interface (CLI): Start a one-time immediate upgrade or schedule a one-time upgrade for a future date and time.
- Manually using the Red Hat OpenShift Cluster Manager user interface (UI): Start a one-time immediate upgrade or schedule a one-time upgrade for a future date and time.
- Automated upgrades: Set an upgrade window for recurring y-stream upgrades whenever a new version is available without needing to manually schedule it. Minor versions have to be manually scheduled.
For more details about cluster upgrades, run the following command:
$ rosa upgrade cluster --help
16.10.1. Manually upgrading your cluster using the CLI
Check if there is an upgrade available by running the following command:
$ rosa list upgrade -c <cluster-name>
Example output
$ rosa list upgrade -c <cluster-name> VERSION NOTES 4.14.7 recommended 4.14.6 ...
In the above example, versions 4.14.7 and 4.14.6 are both available.
Schedule the cluster to upgrade within the hour by running the following command:
$ rosa upgrade cluster -c <cluster-name> --version <desired-version>
Optional: Schedule the cluster to upgrade at a later date and time by running the following command:
$ rosa upgrade cluster -c <cluster-name> --version <desired-version> --schedule-date <future-date-for-update> --schedule-time <future-time-for-update>
16.10.2. Manually upgrading your cluster using the UI
- Log in to the OpenShift Cluster Manager, and select the cluster you want to upgrade.
- Click Settings.
If an upgrade is available, click Update.
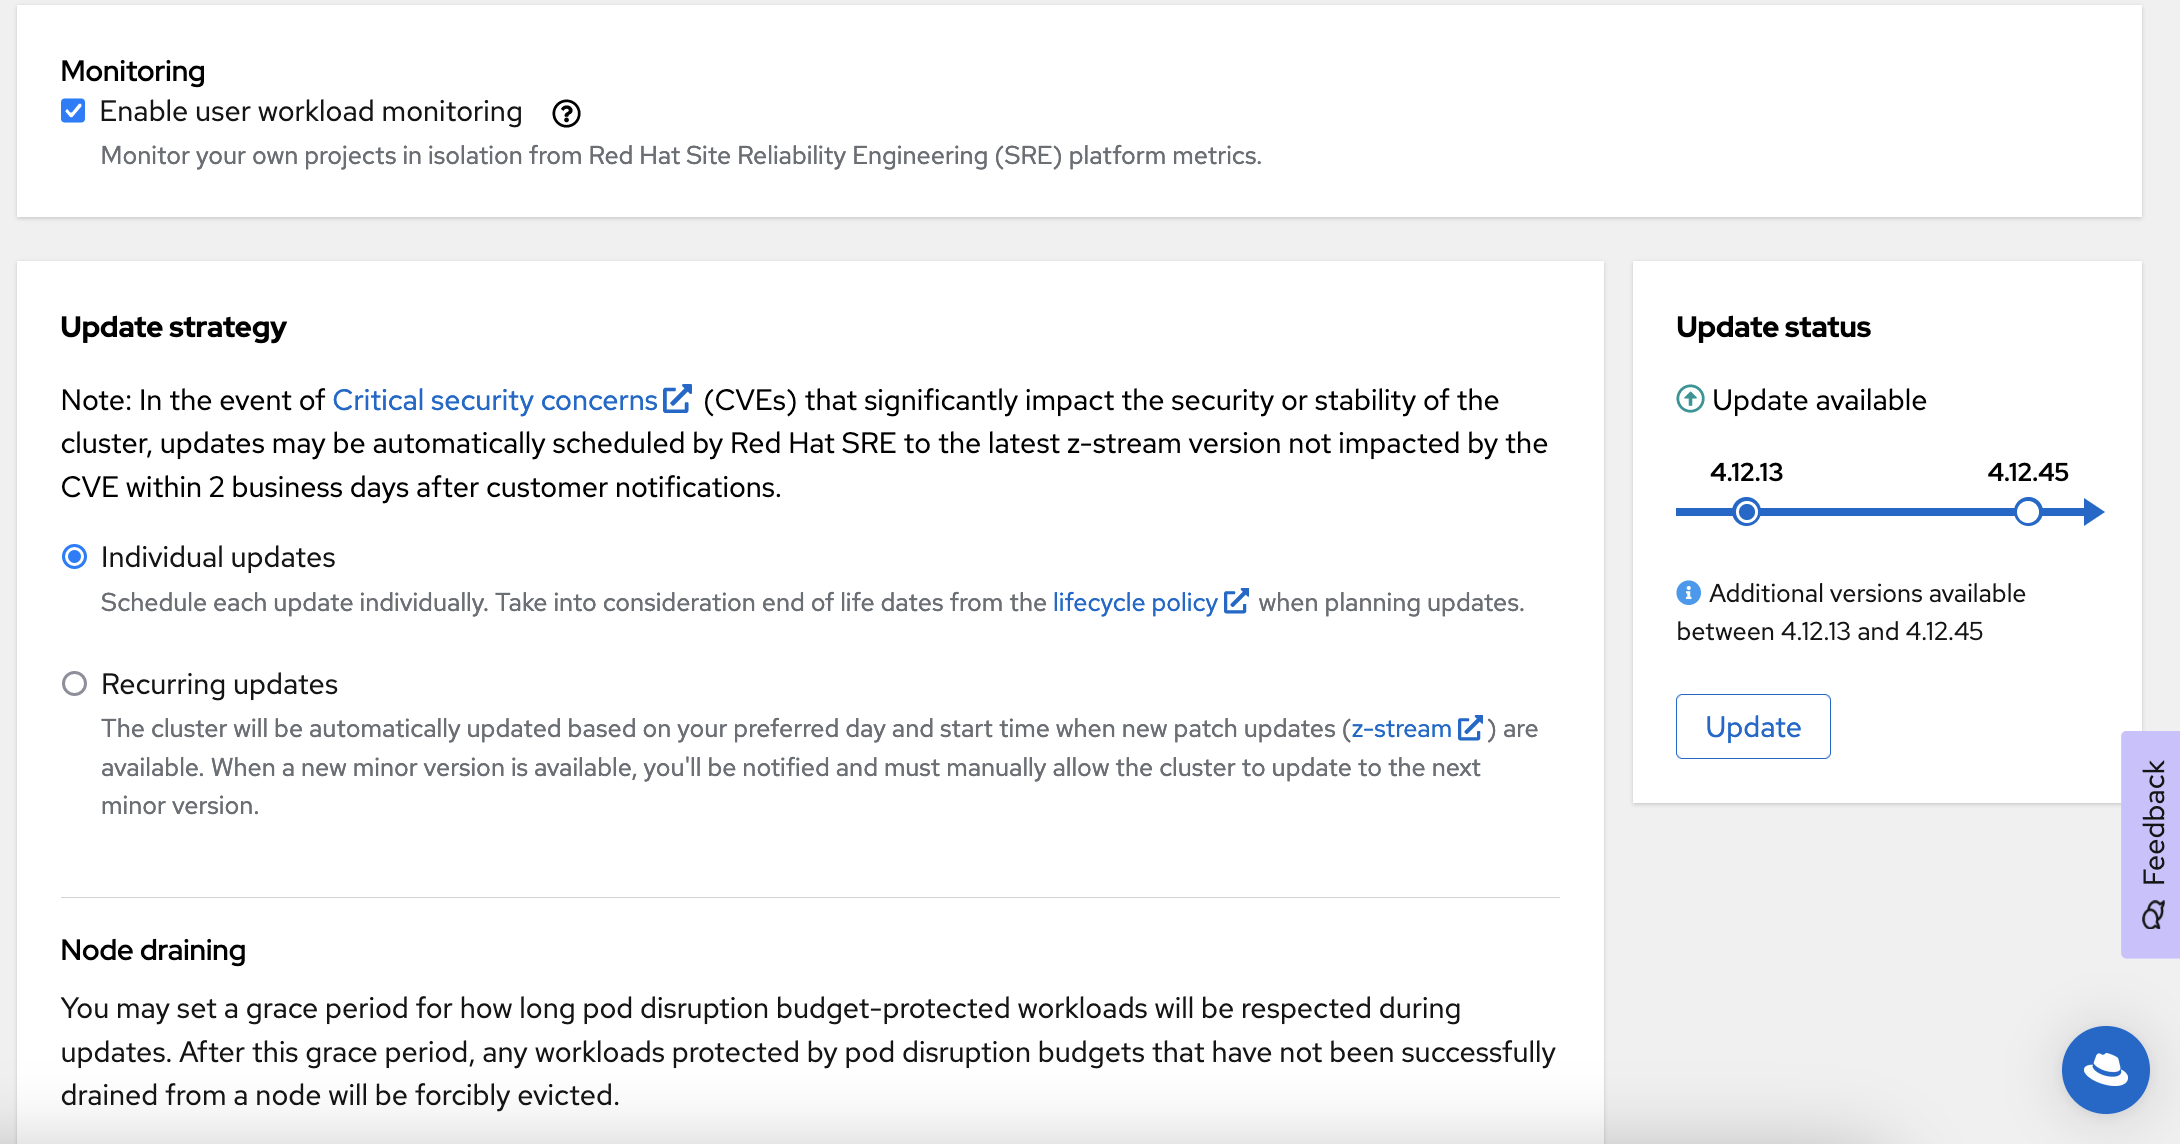
- Select the version to which you want to upgrade in the new window.
- Schedule a time for the upgrade or begin it immediately.
16.10.3. Setting up automatic recurring upgrades
- Log in to the OpenShift Cluster Manager, and select the cluster you want to upgrade.
Click Settings.
- Under Update Strategy, click Recurring updates.
- Set the day and time for the upgrade to occur.
- Under Node draining, select a grace period to allow the nodes to drain before pod eviction.
- Click Save.
16.11. Tutorial: Deleting your cluster
You can delete your Red Hat OpenShift Service on AWS (ROSA) cluster using either the command line interface (CLI) or the user interface (UI).
16.11.1. Deleting a ROSA cluster using the CLI
Optional: List your clusters to make sure you are deleting the correct one by running the following command:
$ rosa list clusters
Delete a cluster by running the following command:
$ rosa delete cluster --cluster <cluster-name>
WarningThis command is non-recoverable.
The CLI prompts you to confirm that you want to delete the cluster. Press y and then Enter. The cluster and all its associated infrastructure will be deleted.
NoteAll AWS STS and IAM roles and policies will remain and must be deleted manually once the cluster deletion is complete by following the steps below.
The CLI outputs the commands to delete the OpenID Connect (OIDC) provider and Operator IAM roles resources that were created. Wait until the cluster finishes deleting before deleting these resources. Perform a quick status check by running the following command:
$ rosa list clusters
Once the cluster is deleted, delete the OIDC provider by running the following command:
$ rosa delete oidc-provider -c <clusterID> --mode auto --yes
Delete the Operator IAM roles by running the following command:
$ rosa delete operator-roles -c <clusterID> --mode auto --yes
NoteThis command requires the cluster ID and not the cluster name.
Only remove the remaining account roles if they are no longer needed by other clusters in the same account. If you want to create other ROSA clusters in this account, do not perform this step.
To delete the account roles, you need to know the prefix used when creating them. The default is "ManagedOpenShift" unless you specified otherwise.
Delete the account roles by running the following command:
$ rosa delete account-roles --prefix <prefix> --mode auto --yes
16.11.2. Deleting a ROSA cluster using the UI
- Log in to the Red Hat OpenShift Cluster Manager, and locate the cluster you want to delete.
Click the three dots to the right of the cluster.
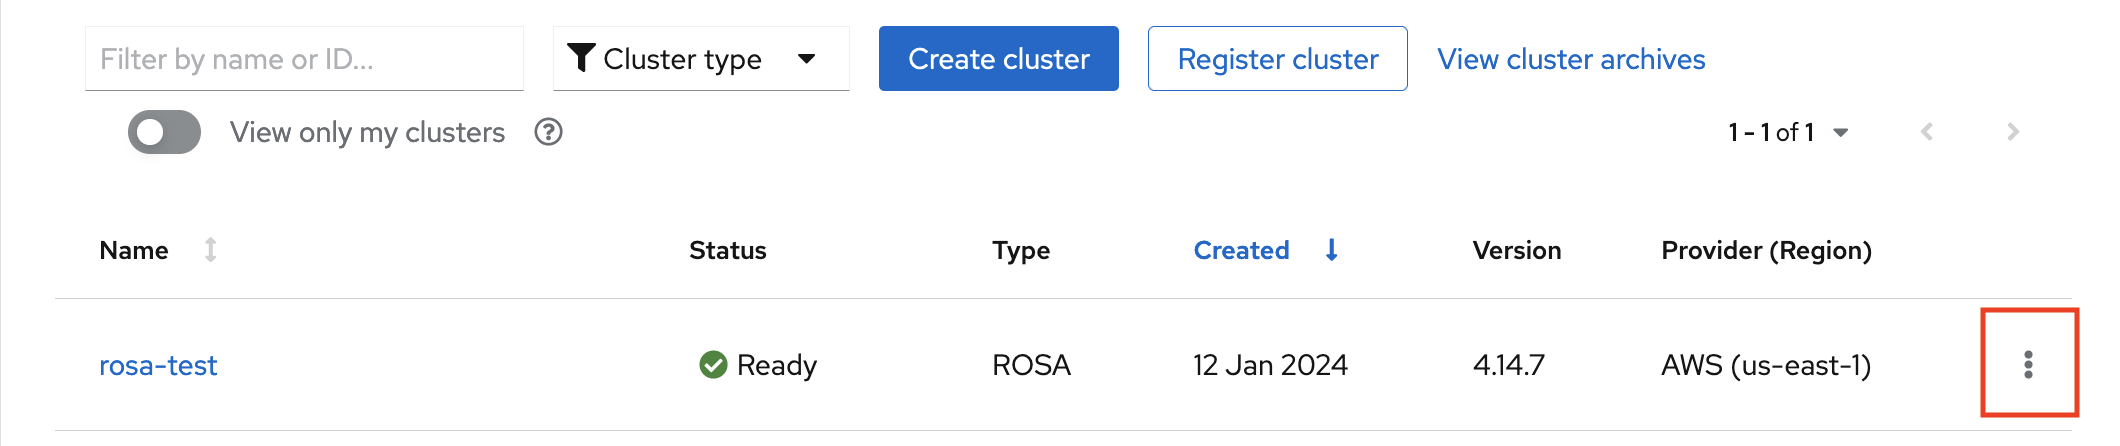
In the dropdown menu, click Delete cluster.
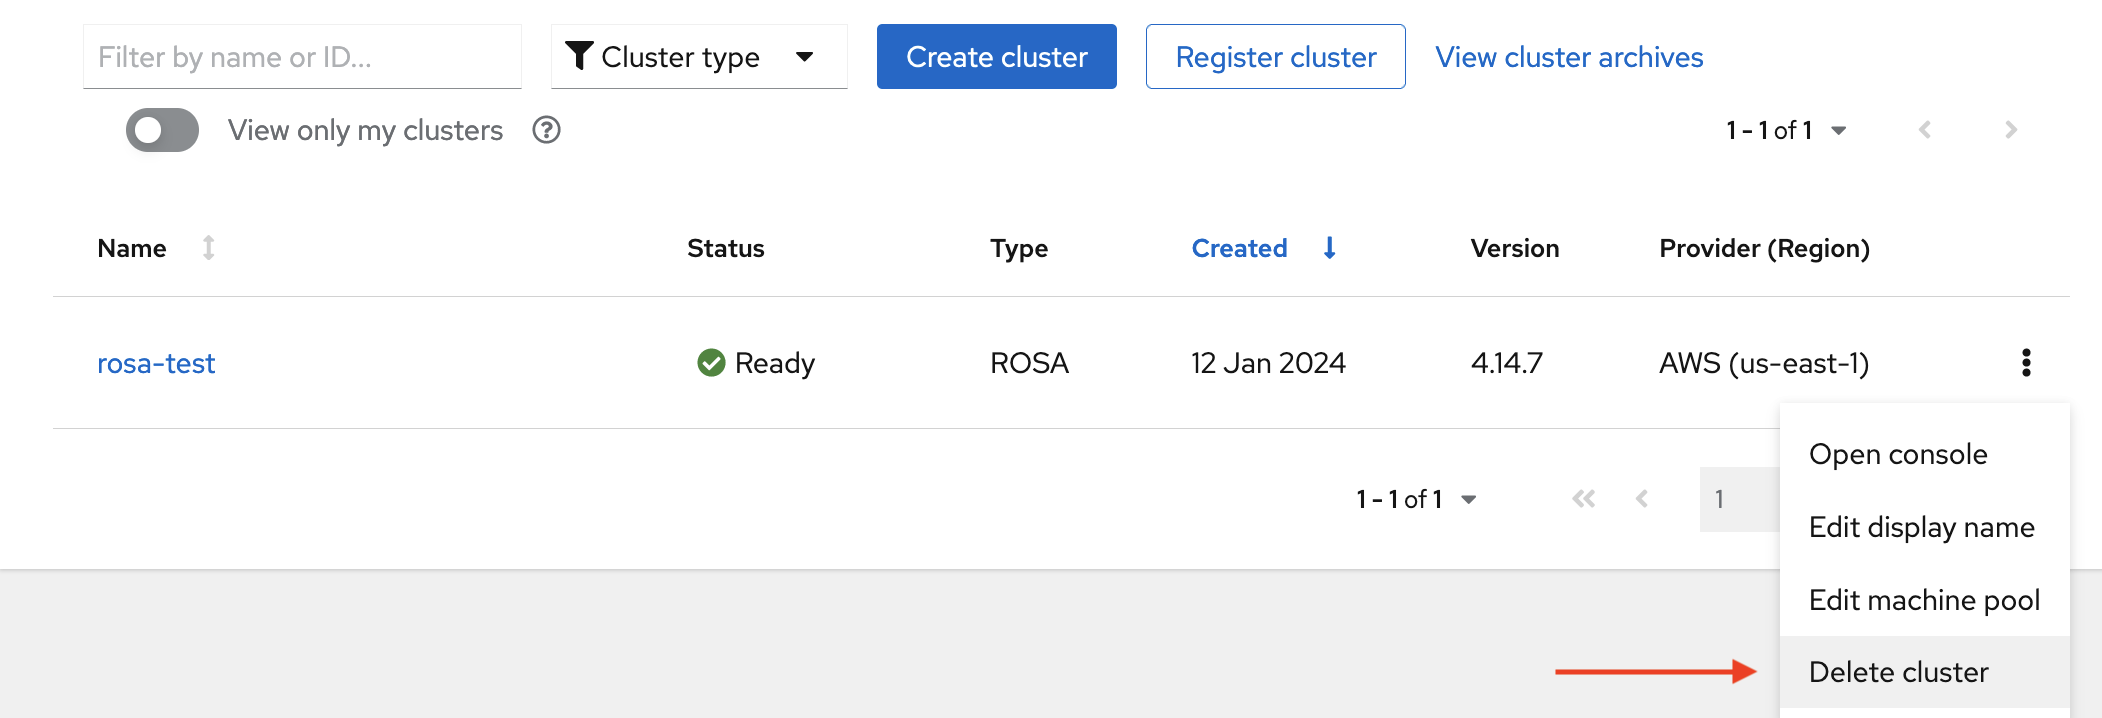
- Enter the name of the cluster to confirm deletion, and click Delete.
16.12. Tutorial: Obtaining support
Finding the right help when you need it is important. These are some of the resources at your disposal when you need assistance.
16.12.1. Adding support contacts
You can add additional email addresses for communications about your cluster.
- On the Red Hat OpenShift Cluster Manager user interface (UI), click select cluster.
- Click the Support tab.
- Click Add notification contact, and enter the additional email addresses.
16.12.2. Contacting Red Hat for support using the UI
- On the OpenShift Cluster Manager UI, click the Support tab.
- Click Open support case.
16.12.3. Contacting Red Hat for support using the support page
- Go to the Red Hat support page.
Click Open a new Case.
- Log in to your Red Hat account.
Select the reason for contacting support.
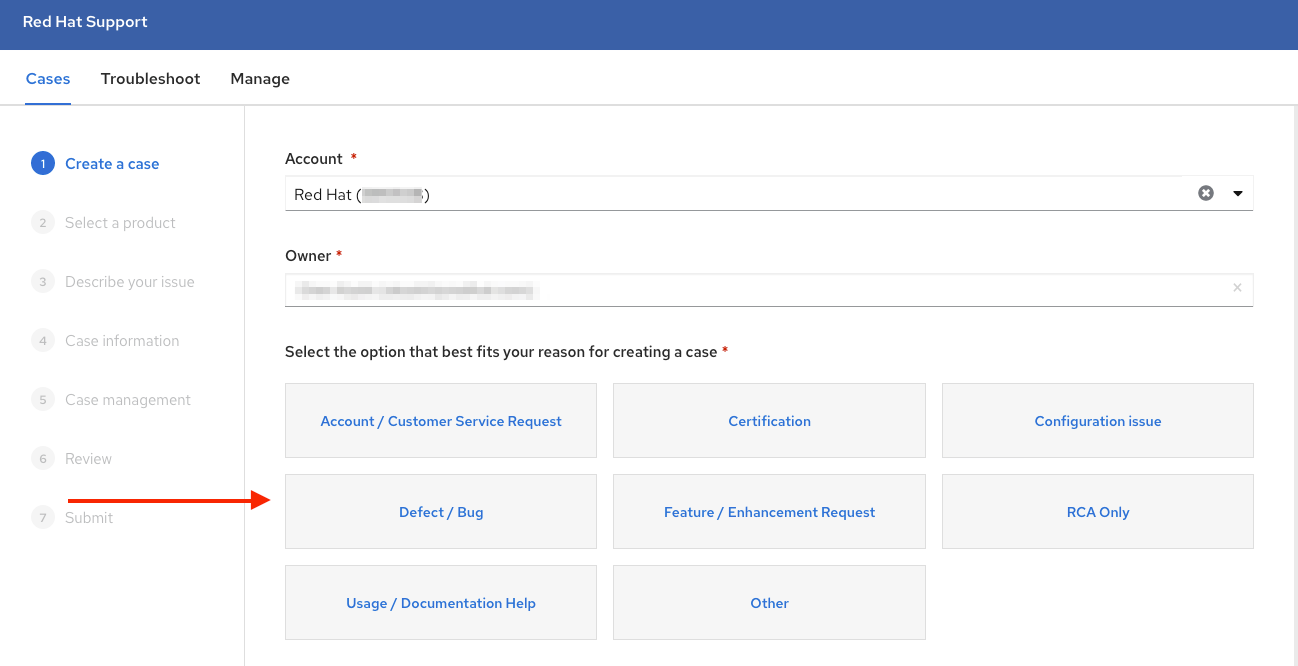
- Select Red Hat OpenShift Service on AWS.
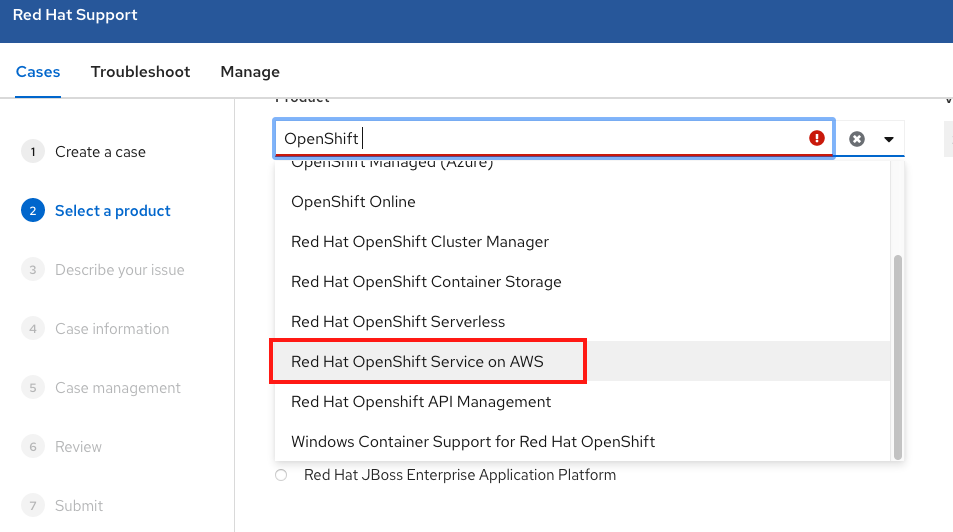
- Click continue.
Enter a summary of the issue and the details of your request. Upload any files, logs, and screenshots. The more details you provide, the better Red Hat support can help your case.
NoteRelevant suggestions that might help with your issue will appear at the bottom of this page.
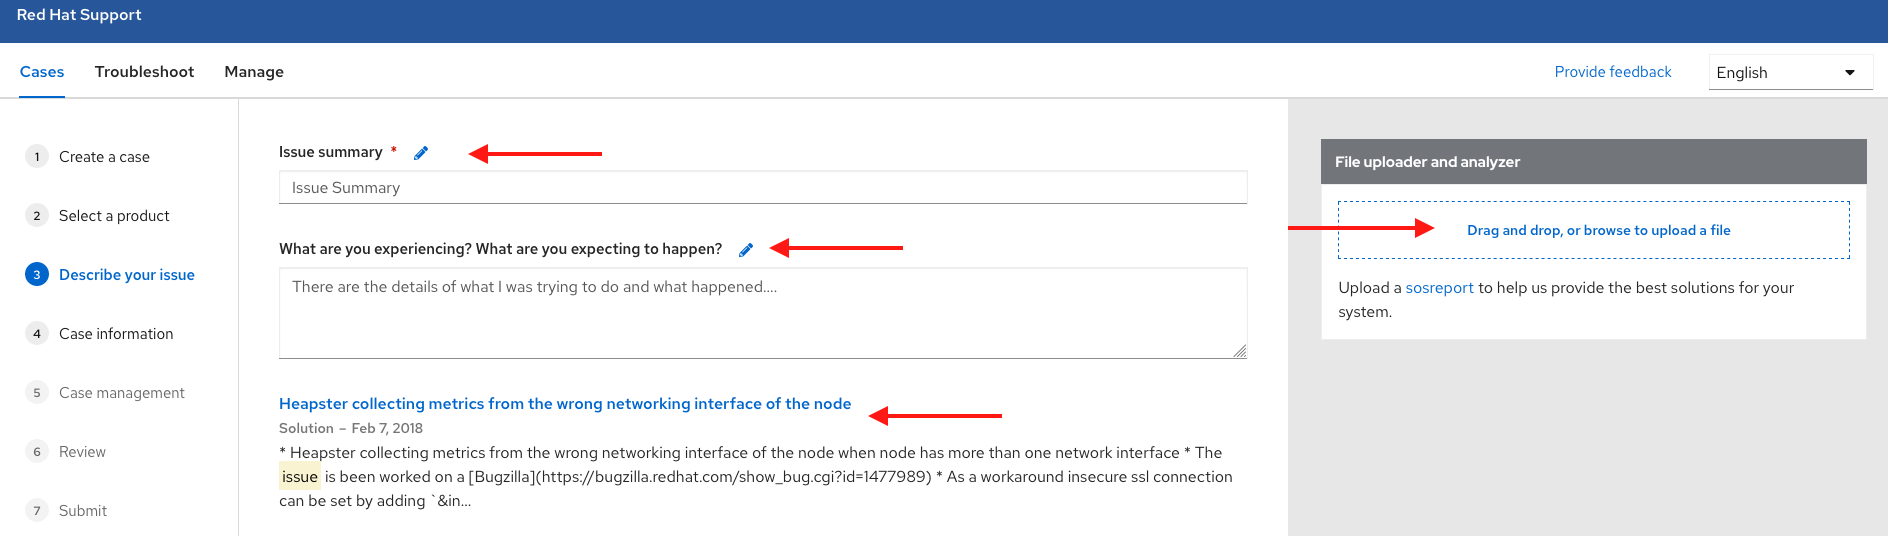
- Click Continue.
- Answer the questions in the new fields.
- Click Continue.
Enter the following information about your case:
- Support level: Premium
- Severity: Review the Red Hat Support Severity Level Definitions to choose the correct one.
- Group: If this is related to a few other cases you can select the corresponding group.
- Language
- Send notifications: Add any additional email addresses to keep notified of activity.
- Red Hat associates: If you are working with anyone from Red Hat and want to keep them in the loop you can enter their email address here.
- Alternate Case ID: If you want to attach your own ID to it you can enter it here.
- Click Continue.
On the review screen make sure you select the correct cluster ID that you are contacting support about.

- Click Submit.
- You will be contacted based on the response time committed to for the indicated severity level.
Chapter 17. Deploying an application
17.1. Tutorial: Deploying an application
17.1.1. Introduction
After successfully provisioning your cluster, you can deploy an application on it. This application allows you to become more familiar with some of the features of Red Hat OpenShift Service on AWS (ROSA) and Kubernetes.
17.1.1.1. Lab overview
In this lab, you will complete the following set of tasks designed to help you understand the concepts of deploying and operating container-based applications:
- Deploy a Node.js based app by using S2I and Kubernetes Deployment objects.
- Set up a continuous delivery (CD) pipeline to automatically push source code changes.
- Explore logging.
- Experience self healing of applications.
- Explore configuration management through configmaps, secrets, and environment variables.
- Use persistent storage to share data across pod restarts.
- Explore networking within Kubernetes and applications.
- Familiarize yourself with ROSA and Kubernetes functionality.
- Automatically scale pods based on loads from the Horizontal Pod Autoscaler.
- Use AWS Controllers for Kubernetes (ACK) to deploy and use an S3 bucket.
This lab uses either the ROSA CLI or ROSA web user interface (UI).
17.2. Tutorial: Deploying an application
17.2.1. Prerequisites
A Provisioned ROSA cluster
This lab assumes you have access to a successfully provisioned a ROSA cluster. If you have not yet created a ROSA cluster, see Red Hat OpenShift Service on AWS quickstart guide for more information.
The OpenShift Command Line Interface (CLI)
For more information, see Getting started with the OpenShift CLI.
A GitHub Account
Use your existing GitHub account or register at https://github.com/signup.
17.3. Tutorial: Deploying an application
17.3.1. Lab overview
17.3.1.1. Lab resources
- Source code for the OSToy application
- OSToy front-end container image
- OSToy microservice container image
Deployment Definition YAML files:
ostoy-frontend-deployment.yamlapiVersion: v1 kind: PersistentVolumeClaim metadata: name: ostoy-pvc spec: accessModes: - ReadWriteOnce resources: requests: storage: 1Gi --- apiVersion: apps/v1 kind: Deployment metadata: name: ostoy-frontend labels: app: ostoy spec: selector: matchLabels: app: ostoy-frontend strategy: type: Recreate replicas: 1 template: metadata: labels: app: ostoy-frontend spec: # Uncomment to use with ACK portion of the workshop # If you chose a different service account name please replace it. # serviceAccount: ostoy-sa containers: - name: ostoy-frontend securityContext: allowPrivilegeEscalation: false runAsNonRoot: true seccompProfile: type: RuntimeDefault capabilities: drop: - ALL image: quay.io/ostoylab/ostoy-frontend:1.6.0 imagePullPolicy: IfNotPresent ports: - name: ostoy-port containerPort: 8080 resources: requests: memory: "256Mi" cpu: "100m" limits: memory: "512Mi" cpu: "200m" volumeMounts: - name: configvol mountPath: /var/config - name: secretvol mountPath: /var/secret - name: datavol mountPath: /var/demo_files livenessProbe: httpGet: path: /health port: 8080 initialDelaySeconds: 10 periodSeconds: 5 env: - name: ENV_TOY_SECRET valueFrom: secretKeyRef: name: ostoy-secret-env key: ENV_TOY_SECRET - name: MICROSERVICE_NAME value: OSTOY_MICROSERVICE_SVC - name: NAMESPACE valueFrom: fieldRef: fieldPath: metadata.namespace volumes: - name: configvol configMap: name: ostoy-configmap-files - name: secretvol secret: defaultMode: 420 secretName: ostoy-secret - name: datavol persistentVolumeClaim: claimName: ostoy-pvc --- apiVersion: v1 kind: Service metadata: name: ostoy-frontend-svc labels: app: ostoy-frontend spec: type: ClusterIP ports: - port: 8080 targetPort: ostoy-port protocol: TCP name: ostoy selector: app: ostoy-frontend --- apiVersion: route.openshift.io/v1 kind: Route metadata: name: ostoy-route spec: to: kind: Service name: ostoy-frontend-svc --- apiVersion: v1 kind: Secret metadata: name: ostoy-secret-env type: Opaque data: ENV_TOY_SECRET: VGhpcyBpcyBhIHRlc3Q= --- kind: ConfigMap apiVersion: v1 metadata: name: ostoy-configmap-files data: config.json: '{ "default": "123" }' --- apiVersion: v1 kind: Secret metadata: name: ostoy-secret data: secret.txt: VVNFUk5BTUU9bXlfdXNlcgpQQVNTV09SRD1AT3RCbCVYQXAhIzYzMlk1RndDQE1UUWsKU01UUD1sb2NhbGhvc3QKU01UUF9QT1JUPTI1 type: Opaqueostoy-microservice-deployment.yamlapiVersion: apps/v1 kind: Deployment metadata: name: ostoy-microservice labels: app: ostoy spec: selector: matchLabels: app: ostoy-microservice replicas: 1 template: metadata: labels: app: ostoy-microservice spec: containers: - name: ostoy-microservice securityContext: allowPrivilegeEscalation: false runAsNonRoot: true seccompProfile: type: RuntimeDefault capabilities: drop: - ALL image: quay.io/ostoylab/ostoy-microservice:1.5.0 imagePullPolicy: IfNotPresent ports: - containerPort: 8080 protocol: TCP resources: requests: memory: "128Mi" cpu: "50m" limits: memory: "256Mi" cpu: "100m" --- apiVersion: v1 kind: Service metadata: name: ostoy-microservice-svc labels: app: ostoy-microservice spec: type: ClusterIP ports: - port: 8080 targetPort: 8080 protocol: TCP selector: app: ostoy-microserviceS3 bucket manifest for ACK S3
s3-bucket.yamlapiVersion: s3.services.k8s.aws/v1alpha1 kind: Bucket metadata: name: ostoy-bucket namespace: ostoy spec: name: ostoy-bucket
To simplify deployment of the OSToy application, all of the objects required in the above deployment manifests are grouped together. For a typical enterprise deployment, a separate manifest file for each Kubernetes object is recommended.
17.3.1.2. About the OSToy application
OSToy is a simple Node.js application that you will deploy to a ROSA cluster to help explore the functionality of Kubernetes. This application has a user interface where you can:
- Write messages to the log (stdout / stderr).
- Intentionally crash the application to view self-healing.
- Toggle a liveness probe and monitor OpenShift behavior.
- Read config maps, secrets, and env variables.
- If connected to shared storage, read and write files.
- Check network connectivity, intra-cluster DNS, and intra-communication with the included microservice.
- Increase the load to view automatic scaling of the pods to handle the load using the Horizontal Pod Autoscaler.
- Optional: Connect to an AWS S3 bucket to read and write objects.
17.3.1.3. OSToy Application Diagram
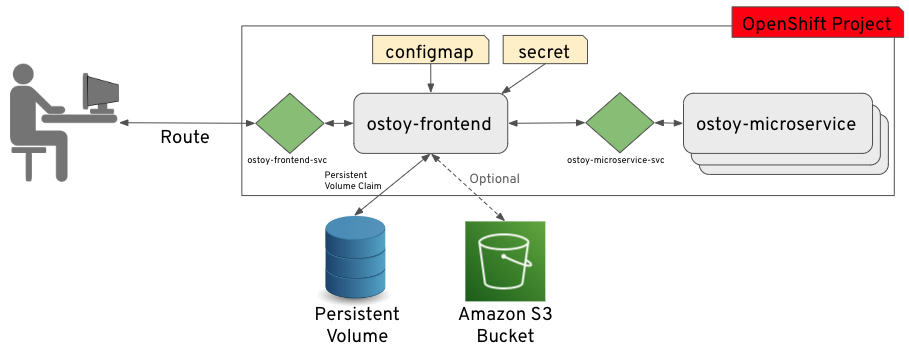
17.3.1.4. Understanding the OSToy UI
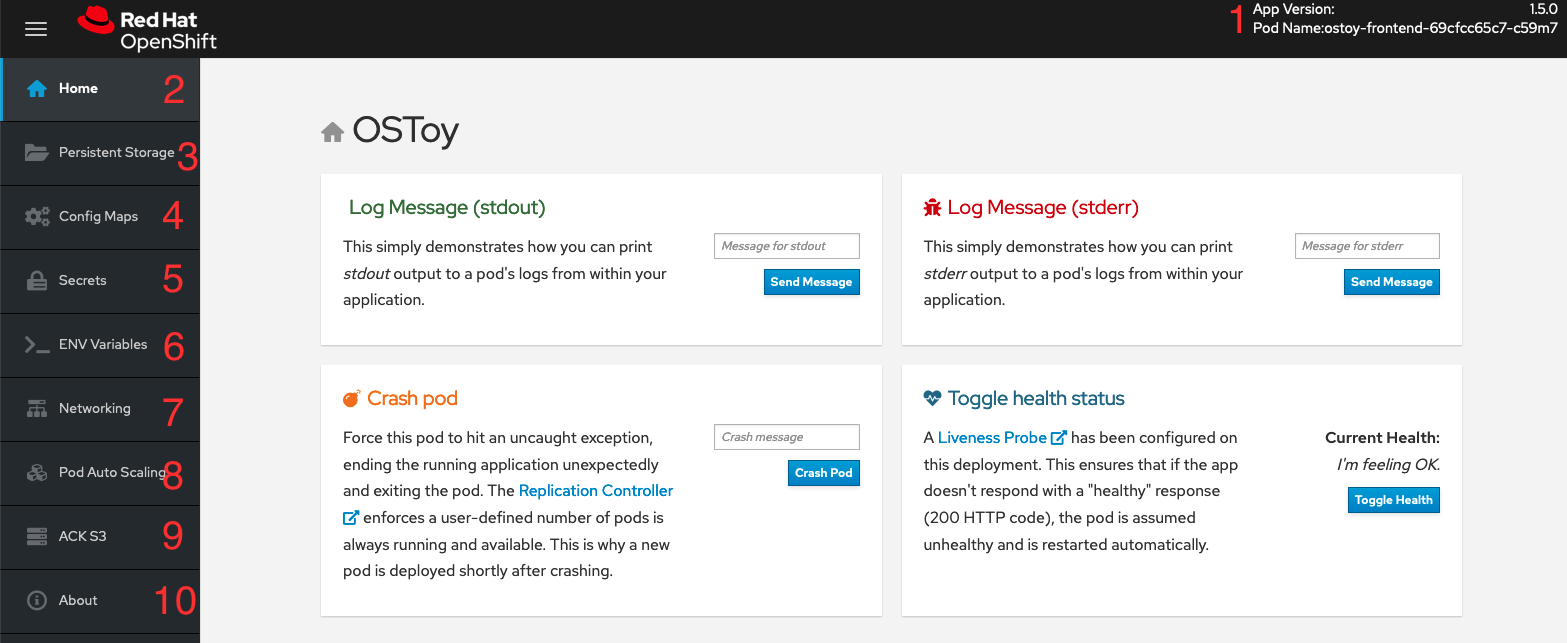
- Shows the pod name that served your browser the page.
- Home: The main page of the application where you can perform some of the functions listed which we will explore.
- Persistent Storage: Allows you to write data to the persistent volume bound to this application.
- Config Maps: Shows the contents of configmaps available to the application and the key:value pairs.
- Secrets: Shows the contents of secrets available to the application and the key:value pairs.
- ENV Variables: Shows the environment variables available to the application.
- Networking: Tools to illustrate networking within the application.
- Pod Auto Scaling: Tool to increase the load of the pods and test the HPA.
ACK S3: Optional: Integrate with AWS S3 to read and write objects to a bucket.
NoteIn order see the "ACK S3" section of OSToy, you must complete the ACK section of this workshop. If you decide not to complete that section, the OSToy application will still function.
- About: Displays more information about the application.