
Hosted control planes
Using hosted control planes with OpenShift Container Platform
Abstract
Chapter 1. Hosted control planes overview
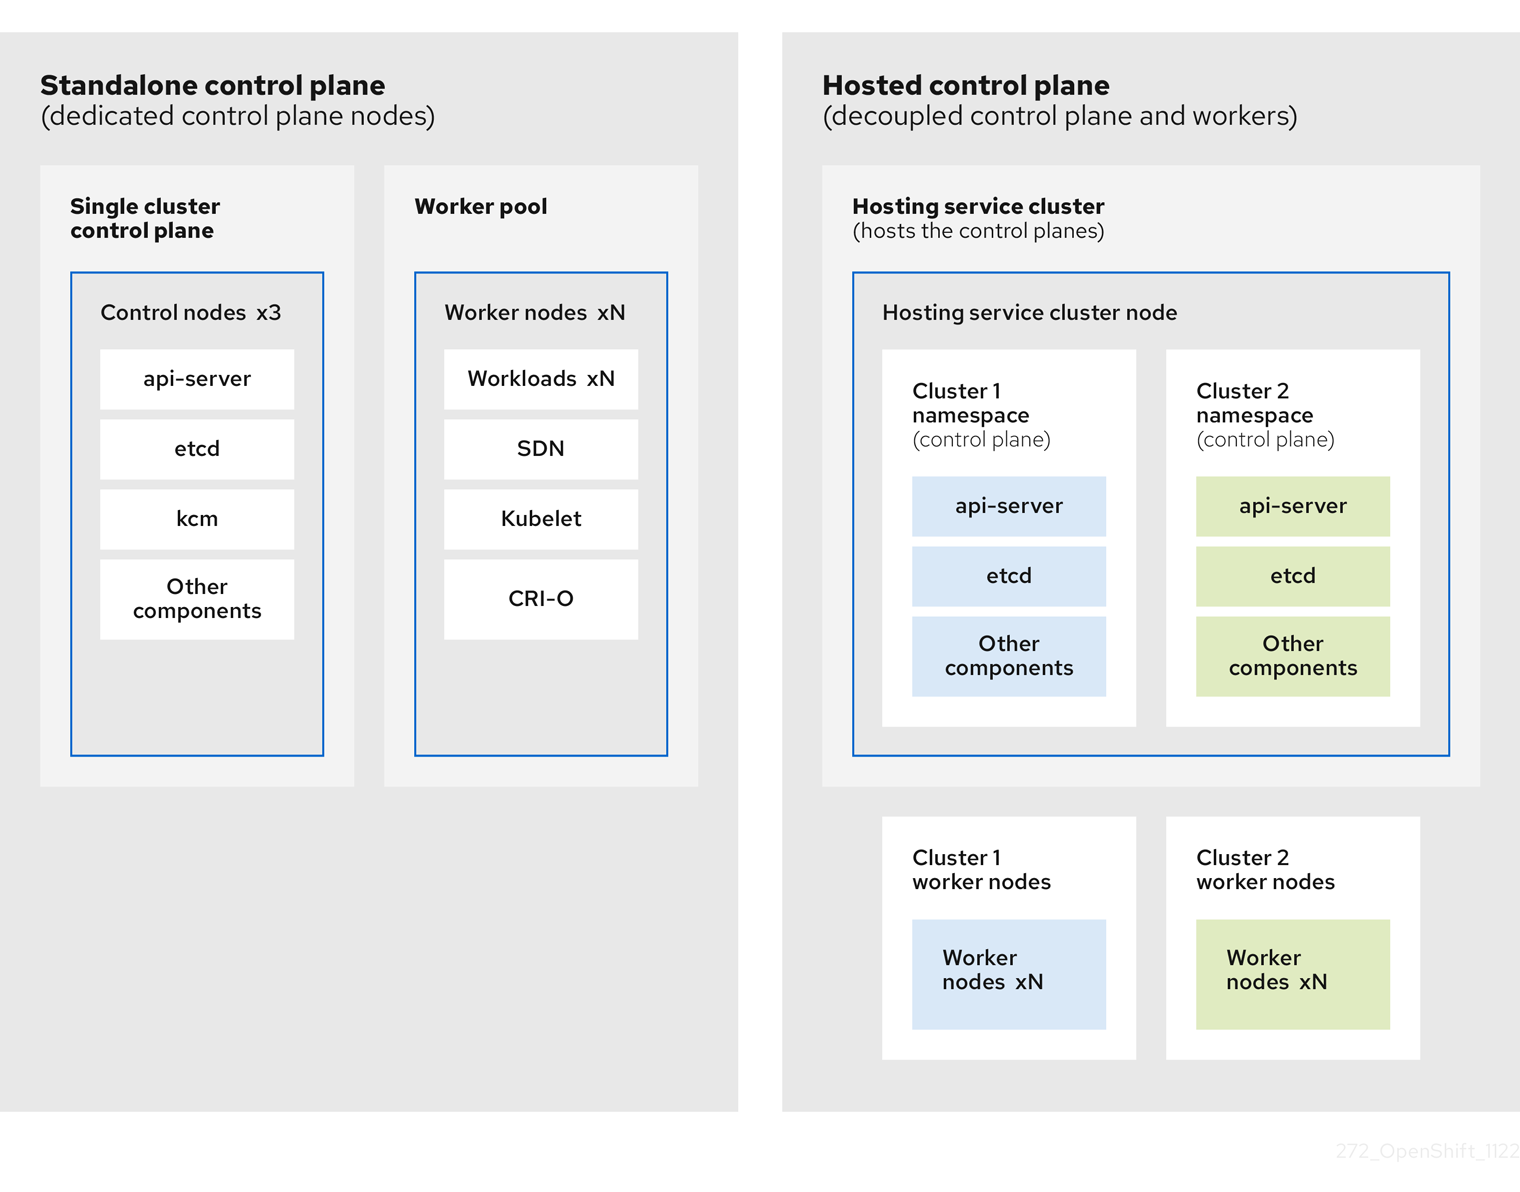
You can deploy OpenShift Container Platform clusters by using two different control plane configurations: standalone or hosted control planes. The standalone configuration uses dedicated virtual machines or physical machines to host the control plane. With hosted control planes for OpenShift Container Platform, you create control planes as pods on a hosting cluster without the need for dedicated virtual or physical machines for each control plane.
1.1. Introduction to hosted control planes
You can use hosted control planes for Red Hat OpenShift Container Platform to reduce management costs, optimize cluster deployment time, and separate management and workload concerns so that you can focus on your applications.
Hosted control planes is available by using the multicluster engine for Kubernetes operator version 2.0 or later on the following platforms:
- Bare metal by using the Agent provider
- OpenShift Virtualization
- Amazon Web Services (AWS), as a Technology Preview feature
- IBM Z, as a Technology Preview feature
- IBM Power, as a Technology Preview feature
1.1.1. Architecture of hosted control planes
OpenShift Container Platform is often deployed in a coupled, or standalone, model, where a cluster consists of a control plane and a data plane. The control plane includes an API endpoint, a storage endpoint, a workload scheduler, and an actuator that ensures state. The data plane includes compute, storage, and networking where workloads and applications run.
The standalone control plane is hosted by a dedicated group of nodes, which can be physical or virtual, with a minimum number to ensure quorum. The network stack is shared. Administrator access to a cluster offers visibility into the cluster’s control plane, machine management APIs, and other components that contribute to the state of a cluster.
Although the standalone model works well, some situations require an architecture where the control plane and data plane are decoupled. In those cases, the data plane is on a separate network domain with a dedicated physical hosting environment. The control plane is hosted by using high-level primitives such as deployments and stateful sets that are native to Kubernetes. The control plane is treated as any other workload.
1.1.2. Benefits of hosted control planes
With hosted control planes for OpenShift Container Platform, you can pave the way for a true hybrid-cloud approach and enjoy several other benefits.
- The security boundaries between management and workloads are stronger because the control plane is decoupled and hosted on a dedicated hosting service cluster. As a result, you are less likely to leak credentials for clusters to other users. Because infrastructure secret account management is also decoupled, cluster infrastructure administrators cannot accidentally delete control plane infrastructure.
- With hosted control planes, you can run many control planes on fewer nodes. As a result, clusters are more affordable.
- Because the control planes consist of pods that are launched on OpenShift Container Platform, control planes start quickly. The same principles apply to control planes and workloads, such as monitoring, logging, and auto-scaling.
- From an infrastructure perspective, you can push registries, HAProxy, cluster monitoring, storage nodes, and other infrastructure components to the tenant’s cloud provider account, isolating usage to the tenant.
- From an operational perspective, multicluster management is more centralized, which results in fewer external factors that affect the cluster status and consistency. Site reliability engineers have a central place to debug issues and navigate to the cluster data plane, which can lead to shorter Time to Resolution (TTR) and greater productivity.
Additional resources
1.2. Glossary of common concepts and personas for hosted control planes
When you use hosted control planes for OpenShift Container Platform, it is important to understand its key concepts and the personas that are involved.
1.2.1. Concepts
- hosted cluster
- An OpenShift Container Platform cluster with its control plane and API endpoint hosted on a management cluster. The hosted cluster includes the control plane and its corresponding data plane.
- hosted cluster infrastructure
- Network, compute, and storage resources that exist in the tenant or end-user cloud account.
- hosted control plane
- An OpenShift Container Platform control plane that runs on the management cluster, which is exposed by the API endpoint of a hosted cluster. The components of a control plane include etcd, the Kubernetes API server, the Kubernetes controller manager, and a VPN.
- hosting cluster
- See management cluster.
- managed cluster
- A cluster that the hub cluster manages. This term is specific to the cluster lifecycle that the multicluster engine for Kubernetes Operator manages in Red Hat Advanced Cluster Management. A managed cluster is not the same thing as a management cluster. For more information, see Managed cluster.
- management cluster
- An OpenShift Container Platform cluster where the HyperShift Operator is deployed and where the control planes for hosted clusters are hosted. The management cluster is synonymous with the hosting cluster.
- management cluster infrastructure
- Network, compute, and storage resources of the management cluster.
1.2.2. Personas
- cluster instance administrator
-
Users who assume this role are the equivalent of administrators in standalone OpenShift Container Platform. This user has the
cluster-adminrole in the provisioned cluster, but might not have power over when or how the cluster is updated or configured. This user might have read-only access to see some configuration projected into the cluster. - cluster instance user
- Users who assume this role are the equivalent of developers in standalone OpenShift Container Platform. This user does not have a view into OperatorHub or machines.
- cluster service consumer
- Users who assume this role can request control planes and worker nodes, drive updates, or modify externalized configurations. Typically, this user does not manage or access cloud credentials or infrastructure encryption keys. The cluster service consumer persona can request hosted clusters and interact with node pools. Users who assume this role have RBAC to create, read, update, or delete hosted clusters and node pools within a logical boundary.
- cluster service provider
Users who assume this role typically have the
cluster-adminrole on the management cluster and have RBAC to monitor and own the availability of the HyperShift Operator as well as the control planes for the tenant’s hosted clusters. The cluster service provider persona is responsible for several activities, including the following examples:- Owning service-level objects for control plane availability, uptime, and stability
- Configuring the cloud account for the management cluster to host control planes
- Configuring the user-provisioned infrastructure, which includes the host awareness of available compute resources
1.3. Versioning for hosted control planes
With each major, minor, or patch version release of OpenShift Container Platform, two components of hosted control planes are released:
- HyperShift Operator
- Command-line interface (CLI)
The HyperShift Operator manages the lifecycle of hosted clusters that are represented by HostedCluster API resources. The HyperShift Operator is released with each OpenShift Container Platform release. After the HyperShift Operator is installed, it creates a config map called supported-versions in the HyperShift namespace, as shown in the following example. The config map describes the HostedCluster versions that can be deployed.
    apiVersion: v1
    data:
      supported-versions: '{"versions":["4.15"]}'
    kind: ConfigMap
    metadata:
      labels:
        hypershift.openshift.io/supported-versions: "true"
      name: supported-versions
      namespace: hypershift
The CLI is a helper utility for development purposes. The CLI is released as part of any HyperShift Operator release. No compatibility policies are guaranteed.
The API, hypershift.openshift.io, provides a way to create and manage lightweight, flexible, heterogeneous OpenShift Container Platform clusters at scale. The API exposes two user-facing resources: HostedCluster and NodePool. A HostedCluster resource encapsulates the control plane and common data plane configuration. When you create a HostedCluster resource, you have a fully functional control plane with no attached nodes. A NodePool resource is a scalable set of worker nodes that is attached to a HostedCluster resource.
The API version policy generally aligns with the policy for Kubernetes API versioning.
1.4. Upgrading scenarios for hosted control planes
Consider the following information before you upgrade:
- You use bare metal as a management cluster platform.
- You use Agent or KubeVirt as a Hosted cluster platform.
The management cluster is based on the installer-provisioned infrastructure (IPI).
Review the following scenarios:
- While running your management cluster on OpenShift Container Platform 4.14, you can upgrade the multicluster engine (MCE) version from 2.4 to 2.5. Then, you can upgrade your hosted cluster and node pools from OpenShift Container Platform 4.14 to OpenShift Container Platform 4.15.
If you want to upgrade management cluster, MCE, hosted cluster, and node pools to their latest versions:
- Upgrade your management cluster from OpenShift Container Platform 4.14 to OpenShift Container Platform 4.15
- Upgrade the MCE version from 2.4 to 2.5
- Upgrade your hosted cluster and node pools from OpenShift Container Platform 4.14 to OpenShift Container Platform 4.15
Chapter 2. Getting started with hosted control planes
To get started with hosted control planes for OpenShift Container Platform, you first configure your hosted cluster on the provider that you want to use. Then, you complete a few management tasks.
You can view the procedures by selecting from one of the following providers:
2.1. Bare metal
- Hosted control plane sizing guidance
- Installing the hosted control plane command line interface
- Distributing hosted cluster workloads
- Bare metal firewall and port requirements
- Bare metal infrastructure requirements: Review the infrastructure requirements to create a hosted cluster on bare metal.
Configuring hosted control plane clusters on bare metal:
- Configure DNS
- Create a hosted cluster and verify cluster creation
-
Scale the
NodePoolobject for the hosted cluster - Handle ingress traffic for the hosted cluster
- Enable node auto-scaling for the hosted cluster
- Configuring hosted control planes in a disconnected environment
2.2. OpenShift Virtualization
- Hosted control plane sizing guidance
- Installing the hosted control plane command line interface
- Distributing hosted cluster workloads
- Managing hosted control plane clusters on OpenShift Virtualization: Create OpenShift Container Platform clusters with worker nodes that are hosted by KubeVirt virtual machines.
- Configuring hosted control planes in a disconnected environment
2.3. Amazon Web Services (AWS)
Hosted control planes on the AWS platform is a Technology Preview feature only. Technology Preview features are not supported with Red Hat production service level agreements (SLAs) and might not be functionally complete. Red Hat does not recommend using them in production. These features provide early access to upcoming product features, enabling customers to test functionality and provide feedback during the development process.
For more information about the support scope of Red Hat Technology Preview features, see Technology Preview Features Support Scope.
- AWS infrastructure requirements: Review the infrastructure requirements to create a hosted cluster on AWS.
- Configuring hosted control plane clusters on AWS (Technology Preview): The tasks to configure hosted control plane clusters on AWS include creating the AWS S3 OIDC secret, creating a routable public zone, enabling external DNS, enabling AWS PrivateLink, and deploying a hosted cluster.
- Deploying the SR-IOV Operator for hosted control planes: After you configure and deploy your hosting service cluster, you can create a subscription to the Single Root I/O Virtualization (SR-IOV) Operator on a hosted cluster. The SR-IOV pod runs on worker machines rather than the control plane.
2.4. IBM Z
Hosted control planes on the IBM Z platform is a Technology Preview feature only. Technology Preview features are not supported with Red Hat production service level agreements (SLAs) and might not be functionally complete. Red Hat does not recommend using them in production. These features provide early access to upcoming product features, enabling customers to test functionality and provide feedback during the development process.
For more information about the support scope of Red Hat Technology Preview features, see Technology Preview Features Support Scope.
2.5. IBM Power
Hosted control planes on the IBM Power platform is a Technology Preview feature only. Technology Preview features are not supported with Red Hat production service level agreements (SLAs) and might not be functionally complete. Red Hat does not recommend using them in production. These features provide early access to upcoming product features, enabling customers to test functionality and provide feedback during the development process.
For more information about the support scope of Red Hat Technology Preview features, see Technology Preview Features Support Scope.
2.6. Non bare metal agent machines
Hosted control planes clusters using non bare metal agent machines is a Technology Preview feature only. Technology Preview features are not supported with Red Hat production service level agreements (SLAs) and might not be functionally complete. Red Hat does not recommend using them in production. These features provide early access to upcoming product features, enabling customers to test functionality and provide feedback during the development process.
For more information about the support scope of Red Hat Technology Preview features, see Technology Preview Features Support Scope.
Chapter 3. Authentication and authorization for hosted control planes
The OpenShift Container Platform control plane includes a built-in OAuth server. You can obtain OAuth access tokens to authenticate to the OpenShift Container Platform API. After you create your hosted cluster, you can configure OAuth by specifying an identity provider.
3.1. Configuring the internal OAuth server for a hosted cluster
You can configure the internal OAuth server for your hosted cluster by using an OpenID Connect identity provider (oidc). You can also configure OAuth for the other supported identity providers such as htpasswd, keystone, ldap, basic-authentication, request-header, github, gitlab, and google. Adding any identity provider in the OAuth configuration removes the default kubeadmin user provider.
Prerequisites
- You created your hosted cluster.
Procedure
Edit the
HostedClustercustom resource (CR) on the hosting cluster by running the following command:$ oc edit <hosted_cluster_name> -n <hosted_cluster_namespace>
Add the OAuth configuration in the
HostedClusterCR by using the following example:apiVersion: hypershift.openshift.io/v1alpha1 kind: HostedCluster metadata: name: <hosted_cluster_name> 1 namespace: <hosted_cluster_namespace> 2 spec: configuration: oauth: identityProviders: - openID: 3 claims: email: 4 - <email_address> name: 5 - <display_name> preferredUsername: - <preferred_username> 6 clientID: <client_id> 7 clientSecret: name: <client_id_secret_name> 8 issuer: https://example.com/identity 9 mappingMethod: lookup 10 name: IAM type: OpenID
- 1
- Specifies your hosted cluster name.
- 2
- Specifies your hosted cluster namespace.
- 3
- This provider name is prefixed to the value of the identity claim to form an identity name. The provider name is also used to build the redirect URL.
- 4
- Defines a list of attributes to use as the email address.
- 5
- Defines a list of attributes to use as a display name.
- 6
- Defines a list of attributes to use as a preferred user name.
- 7
- Defines the ID of a client registered with the OpenID provider. You must allow the client to redirect to the
https://oauth-openshift.apps.<cluster_name>.<cluster_domain>/oauth2callback/<idp_provider_name>URL. - 8
- Defines a secret of a client registered with the OpenID provider.
- 9
- The Issuer Identifier described in the OpenID spec. You must use
httpswithout query or fragment component. - 10
- Defines a mapping method that controls how mappings are established between identities of this provider and
Userobjects.
- Save the file to apply the changes.
Additional resources
- To know more about supported identity providers, see "Understanding identity provider configuration" in Authentication and authorization.
Chapter 4. Managing hosted control planes
After you configure your environment for hosted control planes and create a hosted cluster, you can further manage your clusters and nodes.
4.1. Scaling down the data plane to zero
If you are not using the hosted control plane, to save the resources and cost you can scale down a data plane to zero.
Ensure you are prepared to scale down the data plane to zero. Because the workload from the worker nodes disappears after scaling down.
Procedure
Set the
kubeconfigfile to access the hosted cluster by running the following command:$ export KUBECONFIG=<install_directory>/auth/kubeconfig
Get the name of the
NodePoolresource associated to your hosted cluster by running the following command:$ oc get nodepool --namespace <HOSTED_CLUSTER_NAMESPACE>
Optional: To prevent the pods from draining, add the
nodeDrainTimeoutfield in theNodePoolresource by running the following command:$ oc edit NodePool <nodepool> -o yaml --namespace <HOSTED_CLUSTER_NAMESPACE>
Example output
apiVersion: hypershift.openshift.io/v1alpha1
kind: NodePool
metadata:
# ...
  name: nodepool-1
  namespace: clusters
# ...
spec:
  arch: amd64
  clusterName: clustername 1
  management:
    autoRepair: false
    replace:
      rollingUpdate:
        maxSurge: 1
        maxUnavailable: 0
      strategy: RollingUpdate
    upgradeType: Replace
  nodeDrainTimeout: 0s 2
# ...
NoteTo allow the node draining process to continue for a certain period of time, you can set the value of the
nodeDrainTimeoutfield accordingly, for example,nodeDrainTimeout: 1m.Scale down the
NodePoolresource associated to your hosted cluster by running the following command:$ oc scale nodepool/<NODEPOOL_NAME> --namespace <HOSTED_CLUSTER_NAMESPACE> --replicas=0
NoteAfter scaling down the data plan to zero, some pods in the control plane stay in the
Pendingstatus and the hosted control plane stays up and running. If necessary, you can scale up theNodePoolresource.Optional: Scale up the
NodePoolresource associated to your hosted cluster by running the following command:$ oc scale nodepool/<NODEPOOL_NAME> --namespace <HOSTED_CLUSTER_NAMESPACE> --replicas=1
After rescaling the
NodePoolresource, wait for couple of minutes for theNodePoolresource to become available in aReadystate.
Verification
Verify that the value for the
nodeDrainTimeoutfield is greater than0sby running the following command:$ oc get nodepool -n <hosted_cluster_namespace> <nodepool_name> -ojsonpath='{.spec.nodeDrainTimeout}'
4.2. Deleting a hosted cluster
The steps to delete a hosted cluster differ depending on which provider you use.
Procedure
- If the cluster is on AWS, follow the instructions in Destroying a hosted cluster on AWS.
- If the cluster is on bare metal, follow the instructions in Destroying a hosted cluster on bare metal.
- If the cluster is on OpenShift Virtualization, follow the instructions in Destroying a hosted cluster on OpenShift Virtualization.
Next steps
If you want to disable the hosted control plane feature, see Disabling the hosted control plane feature.
Chapter 5. Using feature gates in a hosted cluster
You can use feature gates in a hosted cluster to enable features that are not part of the default set of features. You can enable the TechPreviewNoUpgrade feature set by using feature gates in your hosted cluster.
5.1. Enabling feature sets by using feature gates
You can enable the TechPreviewNoUpgrade feature set in a hosted cluster by editing the HostedCluster custom resource (CR) with the OpenShift CLI.
Prerequisites
-
You installed the OpenShift CLI (
oc).
Procedure
Open the
HostedClusterCR for editing on the hosting cluster by running the following command:$ oc edit <hosted_cluster_name> -n <hosted_cluster_namespace>
Define the feature set by entering a value in the
featureSetfield. For example:apiVersion: hypershift.openshift.io/v1beta1 kind: HostedCluster metadata: name: <hosted_cluster_name> 1 namespace: <hosted_cluster_namespace> 2 spec: configuration: featureGate: featureSet: TechPreviewNoUpgrade 3
WarningEnabling the
TechPreviewNoUpgradefeature set on your cluster cannot be undone and prevents minor version updates. This feature set allows you to enable these Technology Preview features on test clusters, where you can fully test them. Do not enable this feature set on production clusters.- Save the file to apply the changes.
Verification
Verify that the
TechPreviewNoUpgradefeature gate is enabled in your hosted cluster by running the following command:$ oc get featuregate cluster -o yaml
Additional resources
Chapter 6. Updating hosted control planes
Updates for hosted control planes involve updating the hosted cluster and the node pools. For a cluster to remain fully operational during an update process, you must meet the requirements of the Kubernetes version skew policy while completing the control plane and node updates.
6.1. Updates for the hosted cluster
The spec.release value dictates the version of the control plane. The HostedCluster object transmits the intended spec.release value to the HostedControlPlane.spec.release value and runs the appropriate Control Plane Operator version.
The hosted control plane manages the rollout of the new version of the control plane components along with any OpenShift Container Platform components through the new version of the Cluster Version Operator (CVO).
6.2. Updates for node pools
With node pools, you can configure the software that is running in the nodes by exposing the spec.release and spec.config values. You can start a rolling node pool update in the following ways:
-
Changing the
spec.releaseorspec.configvalues. - Changing any platform-specific field, such as the AWS instance type. The result is a set of new instances with the new type.
- Changing the cluster configuration, if the change propagates to the node.
Node pools support replace updates and in-place updates. The nodepool.spec.release value dictates the version of any particular node pool. A NodePool object completes a replace or an in-place rolling update according to the .spec.management.upgradeType value.
After you create a node pool, you cannot change the update type. If you want to change the update type, you must create a node pool and delete the other one.
6.2.1. Replace updates for node pools
A replace update creates instances in the new version while it removes old instances from the previous version. This update type is effective in cloud environments where this level of immutability is cost effective.
Replace updates do not preserve any manual changes because the node is entirely re-provisioned.
6.2.2. In place updates for node pools
An in-place update directly updates the operating systems of the instances. This type is suitable for environments where the infrastructure constraints are higher, such as bare metal.
In-place updates can preserve manual changes, but will report errors if you make manual changes to any file system or operating system configuration that the cluster directly manages, such as kubelet certificates.
6.3. Updating node pools for hosted control planes
On hosted control planes, you update your version of OpenShift Container Platform by updating the node pools. The node pool version must not surpass the hosted control plane version.
Procedure
To start the process to update to a new version of OpenShift Container Platform, change the
spec.release.imagevalue of the node pool by entering the following command:$ oc -n <hosted_cluster_namespace> patch hostedcluster <hosted_cluster_name> --patch '{"spec":{"release":{"image": "<image_name>"}}}' --type=merge
Verification
To verify that the new version was rolled out, check the
.status.versionand.status.conditionsvalues in theHostedClustercustom resource (CR) by running the following command:$ oc get hostedcluster <hosted_cluster_name> -o yaml
Chapter 7. Hosted control planes Observability
You can gather metrics for hosted control planes by configuring metrics sets. The HyperShift Operator can create or delete monitoring dashboards in the management cluster for each hosted cluster that it manages.
7.1. Configuring metrics sets for hosted control planes
Hosted control planes for Red Hat OpenShift Container Platform creates ServiceMonitor resources in each control plane namespace that allow a Prometheus stack to gather metrics from the control planes. The ServiceMonitor resources use metrics relabelings to define which metrics are included or excluded from a particular component, such as etcd or the Kubernetes API server. The number of metrics that are produced by control planes directly impacts the resource requirements of the monitoring stack that gathers them.
Instead of producing a fixed number of metrics that apply to all situations, you can configure a metrics set that identifies a set of metrics to produce for each control plane. The following metrics sets are supported:
-
Telemetry: These metrics are needed for telemetry. This set is the default set and is the smallest set of metrics. -
SRE: This set includes the necessary metrics to produce alerts and allow the troubleshooting of control plane components. -
All: This set includes all of the metrics that are produced by standalone OpenShift Container Platform control plane components.
To configure a metrics set, set the METRICS_SET environment variable in the HyperShift Operator deployment by entering the following command:
$ oc set env -n hypershift deployment/operator METRICS_SET=All
7.1.1. Configuring the SRE metrics set
When you specify the SRE metrics set, the HyperShift Operator looks for a config map named sre-metric-set with a single key: config. The value of the config key must contain a set of RelabelConfigs that are organized by control plane component.
You can specify the following components:
-
etcd -
kubeAPIServer -
kubeControllerManager -
openshiftAPIServer -
openshiftControllerManager -
openshiftRouteControllerManager -
cvo -
olm -
catalogOperator -
registryOperator -
nodeTuningOperator -
controlPlaneOperator -
hostedClusterConfigOperator
A configuration of the SRE metrics set is illustrated in the following example:
kubeAPIServer:
  - action:       "drop"
    regex:        "etcd_(debugging|disk|server).*"
    sourceLabels: ["__name__"]
  - action:       "drop"
    regex:        "apiserver_admission_controller_admission_latencies_seconds_.*"
    sourceLabels: ["__name__"]
  - action:       "drop"
    regex:        "apiserver_admission_step_admission_latencies_seconds_.*"
    sourceLabels: ["__name__"]
  - action:       "drop"
    regex:        "scheduler_(e2e_scheduling_latency_microseconds|scheduling_algorithm_predicate_evaluation|scheduling_algorithm_priority_evaluation|scheduling_algorithm_preemption_evaluation|scheduling_algorithm_latency_microseconds|binding_latency_microseconds|scheduling_latency_seconds)"
    sourceLabels: ["__name__"]
  - action:       "drop"
    regex:        "apiserver_(request_count|request_latencies|request_latencies_summary|dropped_requests|storage_data_key_generation_latencies_microseconds|storage_transformation_failures_total|storage_transformation_latencies_microseconds|proxy_tunnel_sync_latency_secs)"
    sourceLabels: ["__name__"]
  - action:       "drop"
    regex:        "docker_(operations|operations_latency_microseconds|operations_errors|operations_timeout)"
    sourceLabels: ["__name__"]
  - action:       "drop"
    regex:        "reflector_(items_per_list|items_per_watch|list_duration_seconds|lists_total|short_watches_total|watch_duration_seconds|watches_total)"
    sourceLabels: ["__name__"]
  - action:       "drop"
    regex:        "etcd_(helper_cache_hit_count|helper_cache_miss_count|helper_cache_entry_count|request_cache_get_latencies_summary|request_cache_add_latencies_summary|request_latencies_summary)"
    sourceLabels: ["__name__"]
  - action:       "drop"
    regex:        "transformation_(transformation_latencies_microseconds|failures_total)"
    sourceLabels: ["__name__"]
  - action:       "drop"
    regex:        "network_plugin_operations_latency_microseconds|sync_proxy_rules_latency_microseconds|rest_client_request_latency_seconds"
    sourceLabels: ["__name__"]
  - action:       "drop"
    regex:        "apiserver_request_duration_seconds_bucket;(0.15|0.25|0.3|0.35|0.4|0.45|0.6|0.7|0.8|0.9|1.25|1.5|1.75|2.5|3|3.5|4.5|6|7|8|9|15|25|30|50)"
    sourceLabels: ["__name__", "le"]
kubeControllerManager:
  - action:       "drop"
    regex:        "etcd_(debugging|disk|request|server).*"
    sourceLabels: ["__name__"]
  - action:       "drop"
    regex:        "rest_client_request_latency_seconds_(bucket|count|sum)"
    sourceLabels: ["__name__"]
  - action:       "drop"
    regex:        "root_ca_cert_publisher_sync_duration_seconds_(bucket|count|sum)"
    sourceLabels: ["__name__"]
openshiftAPIServer:
  - action:       "drop"
    regex:        "etcd_(debugging|disk|server).*"
    sourceLabels: ["__name__"]
  - action:       "drop"
    regex:        "apiserver_admission_controller_admission_latencies_seconds_.*"
    sourceLabels: ["__name__"]
  - action:       "drop"
    regex:        "apiserver_admission_step_admission_latencies_seconds_.*"
    sourceLabels: ["__name__"]
  - action:       "drop"
    regex:        "apiserver_request_duration_seconds_bucket;(0.15|0.25|0.3|0.35|0.4|0.45|0.6|0.7|0.8|0.9|1.25|1.5|1.75|2.5|3|3.5|4.5|6|7|8|9|15|25|30|50)"
    sourceLabels: ["__name__", "le"]
openshiftControllerManager:
  - action:       "drop"
    regex:        "etcd_(debugging|disk|request|server).*"
    sourceLabels: ["__name__"]
openshiftRouteControllerManager:
  - action:       "drop"
    regex:        "etcd_(debugging|disk|request|server).*"
    sourceLabels: ["__name__"]
olm:
  - action:       "drop"
    regex:        "etcd_(debugging|disk|server).*"
    sourceLabels: ["__name__"]
catalogOperator:
  - action:       "drop"
    regex:        "etcd_(debugging|disk|server).*"
    sourceLabels: ["__name__"]
cvo:
  - action: drop
    regex: "etcd_(debugging|disk|server).*"
    sourceLabels: ["__name__"]
7.2. Enabling monitoring dashboards in a hosted cluster
To enable monitoring dashboards in a hosted cluster, complete the following steps:
Procedure
Create the
hypershift-operator-install-flagsconfig map in thelocal-clusternamespace, being sure to specify the--monitoring-dashboardsflag in thedata.installFlagsToAddsection. For example:kind: ConfigMap apiVersion: v1 metadata: name: hypershift-operator-install-flags namespace: local-cluster data: installFlagsToAdd: "--monitoring-dashboards" installFlagsToRemove: ""
Wait a couple of minutes for the HyperShift Operator deployment in the
hypershiftnamespace to be updated to include the following environment variable:- name: MONITORING_DASHBOARDS value: "1"When monitoring dashboards are enabled, for each hosted cluster that the HyperShift Operator manages, the Operator creates a config map named
cp-<hosted_cluster_namespace>-<hosted_cluster_name>in theopenshift-config-managednamespace, where<hosted_cluster_namespace>is the namespace of the hosted cluster and<hosted_cluster_name>is the name of the hosted cluster. As a result, a new dashboard is added in the administrative console of the management cluster.- To view the dashboard, log in to the management cluster’s console and go to the dashboard for the hosted cluster by clicking Observe → Dashboards.
-
Optional: To disable a monitoring dashboards in a hosted cluster, remove the
--monitoring-dashboardsflag from thehypershift-operator-install-flagsconfig map. When you delete a hosted cluster, its corresponding dashboard is also deleted.
7.2.1. Dashboard customization
To generate dashboards for each hosted cluster, the HyperShift Operator uses a template that is stored in the monitoring-dashboard-template config map in the Operator namespace (hypershift). This template contains a set of Grafana panels that contain the metrics for the dashboard. You can edit the content of the config map to customize the dashboards.
When a dashboard is generated, the following strings are replaced with values that correspond to a specific hosted cluster:
| Name | Description |
|
| The name of the hosted cluster |
|
| The namespace of the hosted cluster |
|
| The namespace where the control plane pods of the hosted cluster are placed |
|
|
The UUID of the hosted cluster, which matches the |
Chapter 8. Backup, restore, and disaster recovery for hosted control planes
If you need to back up and restore etcd on a hosted cluster or provide disaster recovery for a hosted cluster, see the following procedures.
8.1. Recovering etcd pods for hosted clusters
In hosted clusters, etcd pods run as part of a stateful set. The stateful set relies on persistent storage to store etcd data for each member. In a highly available control plane, the size of the stateful set is three pods, and each member has its own persistent volume claim.
8.1.1. Checking the status of a hosted cluster
To check the status of your hosted cluster, complete the following steps.
Procedure
Enter the running etcd pod that you want to check by entering the following command:
$ oc rsh -n <control_plane_namespace> -c etcd <etcd_pod_name>
Set up the etcdctl environment by entering the following commands:
sh-4.4$ export ETCDCTL_API=3
sh-4.4$ export ETCDCTL_CACERT=/etc/etcd/tls/etcd-ca/ca.crt
sh-4.4$ export ETCDCTL_CERT=/etc/etcd/tls/client/etcd-client.crt
sh-4.4$ export ETCDCTL_KEY=/etc/etcd/tls/client/etcd-client.key
sh-4.4$ export ETCDCTL_ENDPOINTS=https://etcd-client:2379
Print the endpoint status for each cluster member by entering the following command:
sh-4.4$ etcdctl endpoint health --cluster -w table
8.1.2. Recovering an etcd member for a hosted cluster
An etcd member of a 3-node cluster might fail because of corrupted or missing data. To recover the etcd member, complete the following steps.
Procedure
If you need to confirm that the etcd member is failing, enter the following command:
$ oc get pods -l app=etcd -n <control_plane_namespace>
The output resembles this example if the etcd member is failing:
Example output
NAME     READY   STATUS             RESTARTS     AGE
etcd-0   2/2     Running            0            64m
etcd-1   2/2     Running            0            45m
etcd-2   1/2     CrashLoopBackOff   1 (5s ago)   64m
Delete the persistent volume claim of the failing etcd member and the pod by entering the following command:
$ oc delete pvc/<pvc_name> pod/<etcd_pod_name> --wait=false
When the pod restarts, verify that the etcd member is added back to the etcd cluster and is correctly functioning by entering the following command:
$ oc get pods -l app=etcd -n <control_plane_namespace>
Example output
NAME     READY   STATUS    RESTARTS   AGE
etcd-0   2/2     Running   0          67m
etcd-1   2/2     Running   0          48m
etcd-2   2/2     Running   0          2m2s
8.2. Backing up and restoring etcd on a hosted cluster on AWS
If you use hosted control planes for OpenShift Container Platform, the process to back up and restore etcd is different from the usual etcd backup process.
The following procedures are specific to hosted control planes on AWS.
Hosted control planes on the AWS platform is a Technology Preview feature only. Technology Preview features are not supported with Red Hat production service level agreements (SLAs) and might not be functionally complete. Red Hat does not recommend using them in production. These features provide early access to upcoming product features, enabling customers to test functionality and provide feedback during the development process.
For more information about the support scope of Red Hat Technology Preview features, see Technology Preview Features Support Scope.
8.2.1. Taking a snapshot of etcd on a hosted cluster
As part of the process to back up etcd for a hosted cluster, you take a snapshot of etcd. After you take the snapshot, you can restore it, for example, as part of a disaster recovery operation.
This procedure requires API downtime.
Procedure
Pause reconciliation of the hosted cluster by entering this command:
$ oc patch -n clusters hostedclusters/<hosted_cluster_name> -p '{"spec":{"pausedUntil":"true"}}' --type=mergeStop all etcd-writer deployments by entering this command:
$ oc scale deployment -n <hosted_cluster_namespace> --replicas=0 kube-apiserver openshift-apiserver openshift-oauth-apiserver
To take an etcd snapshot, use the
execcommand in each etcd container by running the following command:$ oc exec -it <etcd_pod_name> -n <hosted_cluster_namespace> -- env ETCDCTL_API=3 /usr/bin/etcdctl --cacert /etc/etcd/tls/client/etcd-client-ca.crt --cert /etc/etcd/tls/client/etcd-client.crt --key /etc/etcd/tls/client/etcd-client.key --endpoints=localhost:2379 snapshot save /var/lib/data/snapshot.db
To check the snapshot status, use the
execcommand in each etcd container by running the following command:$ oc exec -it <etcd_pod_name> -n <hosted_cluster_namespace> -- env ETCDCTL_API=3 /usr/bin/etcdctl -w table snapshot status /var/lib/data/snapshot.db
Copy the snapshot data to a location where you can retrieve it later, such as an S3 bucket, as shown in the following example.
NoteThe following example uses signature version 2. If you are in a region that supports signature version 4, such as the us-east-2 region, use signature version 4. Otherwise, if you use signature version 2 to copy the snapshot to an S3 bucket, the upload fails and signature version 2 is deprecated.
Example
BUCKET_NAME=somebucket
FILEPATH="/${BUCKET_NAME}/${CLUSTER_NAME}-snapshot.db"
CONTENT_TYPE="application/x-compressed-tar"
DATE_VALUE=`date -R`
SIGNATURE_STRING="PUT\n\n${CONTENT_TYPE}\n${DATE_VALUE}\n${FILEPATH}"
ACCESS_KEY=accesskey
SECRET_KEY=secret
SIGNATURE_HASH=`echo -en ${SIGNATURE_STRING} | openssl sha1 -hmac ${SECRET_KEY} -binary | base64`

oc exec -it etcd-0 -n ${HOSTED_CLUSTER_NAMESPACE} -- curl -X PUT -T "/var/lib/data/snapshot.db" \
  -H "Host: ${BUCKET_NAME}.s3.amazonaws.com" \
  -H "Date: ${DATE_VALUE}" \
  -H "Content-Type: ${CONTENT_TYPE}" \
  -H "Authorization: AWS ${ACCESS_KEY}:${SIGNATURE_HASH}" \
  https://${BUCKET_NAME}.s3.amazonaws.com/${CLUSTER_NAME}-snapshot.db
If you want to be able to restore the snapshot on a new cluster later, save the encryption secret that the hosted cluster references, as shown in this example:
Example
oc get hostedcluster $CLUSTER_NAME -o=jsonpath='{.spec.secretEncryption.aescbc}'
{"activeKey":{"name":"CLUSTER_NAME-etcd-encryption-key"}}

# Save this secret, or the key it contains so the etcd data can later be decrypted
oc get secret ${CLUSTER_NAME}-etcd-encryption-key -o=jsonpath='{.data.key}'
Next steps
Restore the etcd snapshot.
8.2.2. Restoring an etcd snapshot on a hosted cluster
If you have a snapshot of etcd from your hosted cluster, you can restore it. Currently, you can restore an etcd snapshot only during cluster creation.
To restore an etcd snapshot, you modify the output from the create cluster --render command and define a restoreSnapshotURL value in the etcd section of the HostedCluster specification.
Prerequisites
You took an etcd snapshot on a hosted cluster.
Procedure
On the
awscommand-line interface (CLI), create a pre-signed URL so that you can download your etcd snapshot from S3 without passing credentials to the etcd deployment:ETCD_SNAPSHOT=${ETCD_SNAPSHOT:-"s3://${BUCKET_NAME}/${CLUSTER_NAME}-snapshot.db"} ETCD_SNAPSHOT_URL=$(aws s3 presign ${ETCD_SNAPSHOT})Modify the
HostedClusterspecification to refer to the URL:spec: etcd: managed: storage: persistentVolume: size: 4Gi type: PersistentVolume restoreSnapshotURL: - "${ETCD_SNAPSHOT_URL}" managementType: Managed-
Ensure that the secret that you referenced from the
spec.secretEncryption.aescbcvalue contains the same AES key that you saved in the previous steps.
8.3. Backing up and restoring etcd on a hosted cluster in an on-premise environment
By backing up and restoring etcd on a hosted cluster, you can fix failures, such as corrupted or missing data in an etcd member of a three node cluster. If multiple members of the etcd cluster encounter data loss or have a CrashLoopBackOff status, this approach helps prevent an etcd quorum loss.
This procedure requires API downtime.
Prerequisites
-
The
ocandjqbinaries have been installed.
Procedure
First, set up your environment variables and scale down the API servers:
Set up environment variables for your hosted cluster by entering the following commands, replacing values as necessary:
$ CLUSTER_NAME=my-cluster
$ HOSTED_CLUSTER_NAMESPACE=clusters
$ CONTROL_PLANE_NAMESPACE="${HOSTED_CLUSTER_NAMESPACE}-${CLUSTER_NAME}"Pause reconciliation of the hosted cluster by entering the following command, replacing values as necessary:
$ oc patch -n ${HOSTED_CLUSTER_NAMESPACE} hostedclusters/${CLUSTER_NAME} -p '{"spec":{"pausedUntil":"true"}}' --type=mergeScale down the API servers by entering the following commands:
Scale down the
kube-apiserver:$ oc scale -n ${CONTROL_PLANE_NAMESPACE} deployment/kube-apiserver --replicas=0Scale down the
openshift-apiserver:$ oc scale -n ${CONTROL_PLANE_NAMESPACE} deployment/openshift-apiserver --replicas=0Scale down the
openshift-oauth-apiserver:$ oc scale -n ${CONTROL_PLANE_NAMESPACE} deployment/openshift-oauth-apiserver --replicas=0
Next, take a snapshot of etcd by using one of the following methods:
- Use a previously backed-up snapshot of etcd.
If you have an available etcd pod, take a snapshot from the active etcd pod by completing the following steps:
List etcd pods by entering the following command:
$ oc get -n ${CONTROL_PLANE_NAMESPACE} pods -l app=etcdTake a snapshot of the pod database and save it locally to your machine by entering the following commands:
$ ETCD_POD=etcd-0
$ oc exec -n ${CONTROL_PLANE_NAMESPACE} -c etcd -t ${ETCD_POD} -- env ETCDCTL_API=3 /usr/bin/etcdctl \
--cacert /etc/etcd/tls/etcd-ca/ca.crt \
--cert /etc/etcd/tls/client/etcd-client.crt \
--key /etc/etcd/tls/client/etcd-client.key \
--endpoints=https://localhost:2379 \
snapshot save /var/lib/snapshot.db
Verify that the snapshot is successful by entering the following command:
$ oc exec -n ${CONTROL_PLANE_NAMESPACE} -c etcd -t ${ETCD_POD} -- env ETCDCTL_API=3 /usr/bin/etcdctl -w table snapshot status /var/lib/snapshot.db
Make a local copy of the snapshot by entering the following command:
$ oc cp -c etcd ${CONTROL_PLANE_NAMESPACE}/${ETCD_POD}:/var/lib/snapshot.db /tmp/etcd.snapshot.dbMake a copy of the snapshot database from etcd persistent storage:
List etcd pods by entering the following command:
$ oc get -n ${CONTROL_PLANE_NAMESPACE} pods -l app=etcdFind a pod that is running and set its name as the value of
ETCD_POD: ETCD_POD=etcd-0, and then copy its snapshot database by entering the following command:$ oc cp -c etcd ${CONTROL_PLANE_NAMESPACE}/${ETCD_POD}:/var/lib/data/member/snap/db /tmp/etcd.snapshot.db
Next, scale down the etcd statefulset by entering the following command:
$ oc scale -n ${CONTROL_PLANE_NAMESPACE} statefulset/etcd --replicas=0Delete volumes for second and third members by entering the following command:
$ oc delete -n ${CONTROL_PLANE_NAMESPACE} pvc/data-etcd-1 pvc/data-etcd-2Create a pod to access the first etcd member’s data:
Get the etcd image by entering the following command:
$ ETCD_IMAGE=$(oc get -n ${CONTROL_PLANE_NAMESPACE} statefulset/etcd -o jsonpath='{ .spec.template.spec.containers[0].image }')Create a pod that allows access to etcd data:
$ cat << EOF | oc apply -n ${CONTROL_PLANE_NAMESPACE} -f -
apiVersion: apps/v1
kind: Deployment
metadata:
  name: etcd-data
spec:
  replicas: 1
  selector:
    matchLabels:
      app: etcd-data
  template:
    metadata:
      labels:
        app: etcd-data
    spec:
      containers:
      - name: access
        image: $ETCD_IMAGE
        volumeMounts:
        - name: data
          mountPath: /var/lib
        command:
        - /usr/bin/bash
        args:
        - -c
        - |-
          while true; do
            sleep 1000
          done
      volumes:
      - name: data
        persistentVolumeClaim:
          claimName: data-etcd-0
EOF
Check the status of the
etcd-datapod and wait for it to be running by entering the following command:$ oc get -n ${CONTROL_PLANE_NAMESPACE} pods -l app=etcd-dataGet the name of the
etcd-datapod by entering the following command:$ DATA_POD=$(oc get -n ${CONTROL_PLANE_NAMESPACE} pods --no-headers -l app=etcd-data -o name | cut -d/ -f2)
Copy an etcd snapshot into the pod by entering the following command:
$ oc cp /tmp/etcd.snapshot.db ${CONTROL_PLANE_NAMESPACE}/${DATA_POD}:/var/lib/restored.snap.dbRemove old data from the
etcd-datapod by entering the following commands:$ oc exec -n ${CONTROL_PLANE_NAMESPACE} ${DATA_POD} -- rm -rf /var/lib/data$ oc exec -n ${CONTROL_PLANE_NAMESPACE} ${DATA_POD} -- mkdir -p /var/lib/dataRestore the etcd snapshot by entering the following command:
$ oc exec -n ${CONTROL_PLANE_NAMESPACE} ${DATA_POD} -- etcdutl snapshot restore /var/lib/restored.snap.db \
     --data-dir=/var/lib/data --skip-hash-check \
     --name etcd-0 \
     --initial-cluster-token=etcd-cluster \
     --initial-cluster etcd-0=https://etcd-0.etcd-discovery.${CONTROL_PLANE_NAMESPACE}.svc:2380,etcd-1=https://etcd-1.etcd-discovery.${CONTROL_PLANE_NAMESPACE}.svc:2380,etcd-2=https://etcd-2.etcd-discovery.${CONTROL_PLANE_NAMESPACE}.svc:2380 \
     --initial-advertise-peer-urls https://etcd-0.etcd-discovery.${CONTROL_PLANE_NAMESPACE}.svc:2380
Remove the temporary etcd snapshot from the pod by entering the following command:
$ oc exec -n ${CONTROL_PLANE_NAMESPACE} ${DATA_POD} -- rm /var/lib/restored.snap.dbDelete data access deployment by entering the following command:
$ oc delete -n ${CONTROL_PLANE_NAMESPACE} deployment/etcd-dataScale up the etcd cluster by entering the following command:
$ oc scale -n ${CONTROL_PLANE_NAMESPACE} statefulset/etcd --replicas=3Wait for the etcd member pods to return and report as available by entering the following command:
$ oc get -n ${CONTROL_PLANE_NAMESPACE} pods -l app=etcd -wScale up all etcd-writer deployments by entering the following command:
$ oc scale deployment -n ${CONTROL_PLANE_NAMESPACE} --replicas=3 kube-apiserver openshift-apiserver openshift-oauth-apiserver
Restore reconciliation of the hosted cluster by entering the following command:
$ oc patch -n ${CLUSTER_NAMESPACE} hostedclusters/${CLUSTER_NAME} -p '{"spec":{"pausedUntil":""}}' --type=merge
8.4. Disaster recovery for a hosted cluster within an AWS region
In a situation where you need disaster recovery (DR) for a hosted cluster, you can recover a hosted cluster to the same region within AWS. For example, you need DR when the upgrade of a management cluster fails and the hosted cluster is in a read-only state.
Hosted control planes is a Technology Preview feature only. Technology Preview features are not supported with Red Hat production service level agreements (SLAs) and might not be functionally complete. Red Hat does not recommend using them in production. These features provide early access to upcoming product features, enabling customers to test functionality and provide feedback during the development process.
For more information about the support scope of Red Hat Technology Preview features, see Technology Preview Features Support Scope.
The DR process involves three main steps:
- Backing up the hosted cluster on the source management cluster
- Restoring the hosted cluster on a destination management cluster
- Deleting the hosted cluster from the source management cluster
Your workloads remain running during the process. The Cluster API might be unavailable for a period, but that will not affect the services that are running on the worker nodes.
Both the source management cluster and the destination management cluster must have the --external-dns flags to maintain the API server URL, as shown in this example:
Example: External DNS flags
--external-dns-provider=aws \
--external-dns-credentials=<AWS Credentials location> \
--external-dns-domain-filter=<DNS Base Domain>
That way, the server URL ends with https://api-sample-hosted.sample-hosted.aws.openshift.com.
If you do not include the --external-dns flags to maintain the API server URL, the hosted cluster cannot be migrated.
8.4.1. Example environment and context
Consider an scenario where you have three clusters to restore. Two are management clusters, and one is a hosted cluster. You can restore either the control plane only or the control plane and the nodes. Before you begin, you need the following information:
- Source MGMT Namespace: The source management namespace
- Source MGMT ClusterName: The source management cluster name
-
Source MGMT Kubeconfig: The source management
kubeconfigfile -
Destination MGMT Kubeconfig: The destination management
kubeconfigfile -
HC Kubeconfig: The hosted cluster
kubeconfigfile - SSH key file: The SSH public key
- Pull secret: The pull secret file to access the release images
- AWS credentials
- AWS region
- Base domain: The DNS base domain to use as an external DNS
- S3 bucket name: The bucket in the AWS region where you plan to upload the etcd backup
This information is shown in the following example environment variables.
Example environment variables
SSH_KEY_FILE=${HOME}/.ssh/id_rsa.pub
BASE_PATH=${HOME}/hypershift
BASE_DOMAIN="aws.sample.com"
PULL_SECRET_FILE="${HOME}/pull_secret.json"
AWS_CREDS="${HOME}/.aws/credentials"
AWS_ZONE_ID="Z02718293M33QHDEQBROL"

CONTROL_PLANE_AVAILABILITY_POLICY=SingleReplica
HYPERSHIFT_PATH=${BASE_PATH}/src/hypershift
HYPERSHIFT_CLI=${HYPERSHIFT_PATH}/bin/hypershift
HYPERSHIFT_IMAGE=${HYPERSHIFT_IMAGE:-"quay.io/${USER}/hypershift:latest"}
NODE_POOL_REPLICAS=${NODE_POOL_REPLICAS:-2}

# MGMT Context
MGMT_REGION=us-west-1
MGMT_CLUSTER_NAME="${USER}-dev"
MGMT_CLUSTER_NS=${USER}
MGMT_CLUSTER_DIR="${BASE_PATH}/hosted_clusters/${MGMT_CLUSTER_NS}-${MGMT_CLUSTER_NAME}"
MGMT_KUBECONFIG="${MGMT_CLUSTER_DIR}/kubeconfig"

# MGMT2 Context
MGMT2_CLUSTER_NAME="${USER}-dest"
MGMT2_CLUSTER_NS=${USER}
MGMT2_CLUSTER_DIR="${BASE_PATH}/hosted_clusters/${MGMT2_CLUSTER_NS}-${MGMT2_CLUSTER_NAME}"
MGMT2_KUBECONFIG="${MGMT2_CLUSTER_DIR}/kubeconfig"

# Hosted Cluster Context
HC_CLUSTER_NS=clusters
HC_REGION=us-west-1
HC_CLUSTER_NAME="${USER}-hosted"
HC_CLUSTER_DIR="${BASE_PATH}/hosted_clusters/${HC_CLUSTER_NS}-${HC_CLUSTER_NAME}"
HC_KUBECONFIG="${HC_CLUSTER_DIR}/kubeconfig"
BACKUP_DIR=${HC_CLUSTER_DIR}/backup

BUCKET_NAME="${USER}-hosted-${MGMT_REGION}"

# DNS
AWS_ZONE_ID="Z07342811SH9AA102K1AC"
EXTERNAL_DNS_DOMAIN="hc.jpdv.aws.kerbeross.com"
8.4.2. Overview of the backup and restore process
The backup and restore process works as follows:
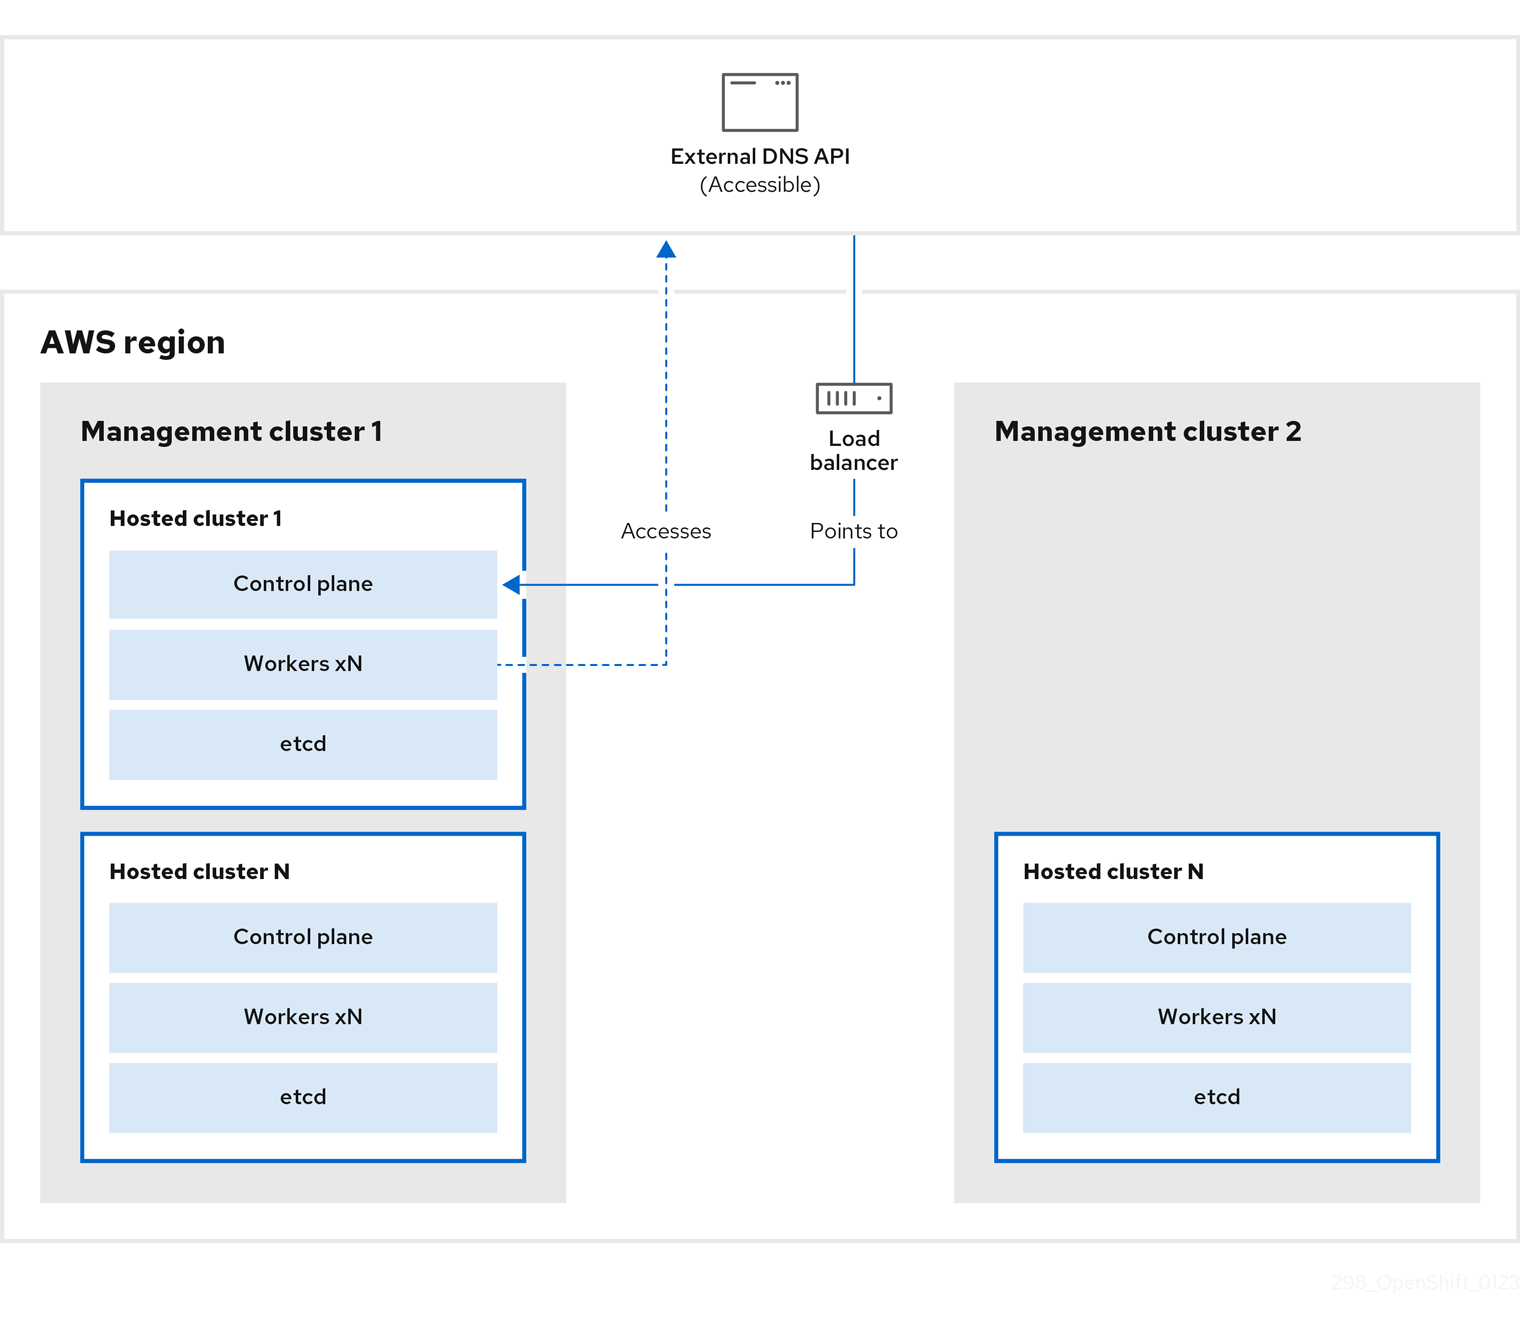
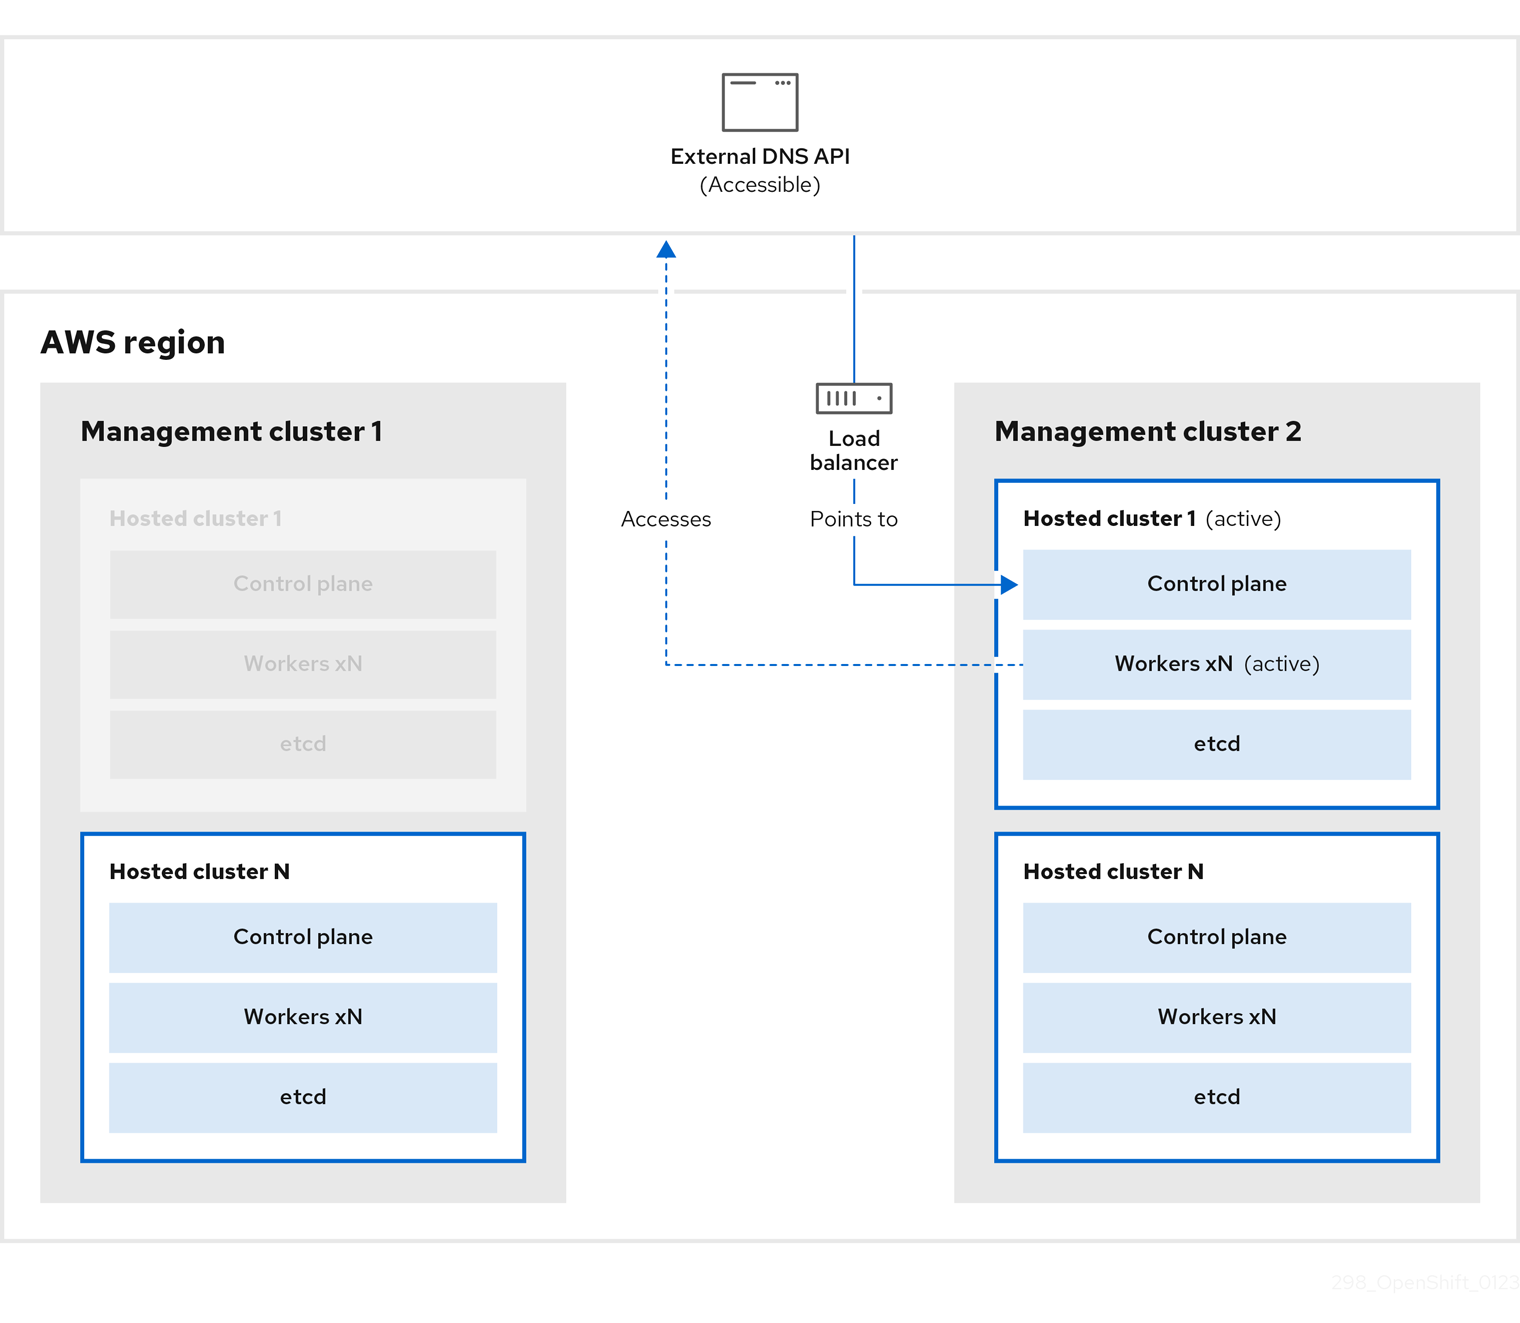
On management cluster 1, which you can think of as the source management cluster, the control plane and workers interact by using the external DNS API. The external DNS API is accessible, and a load balancer sits between the management clusters.
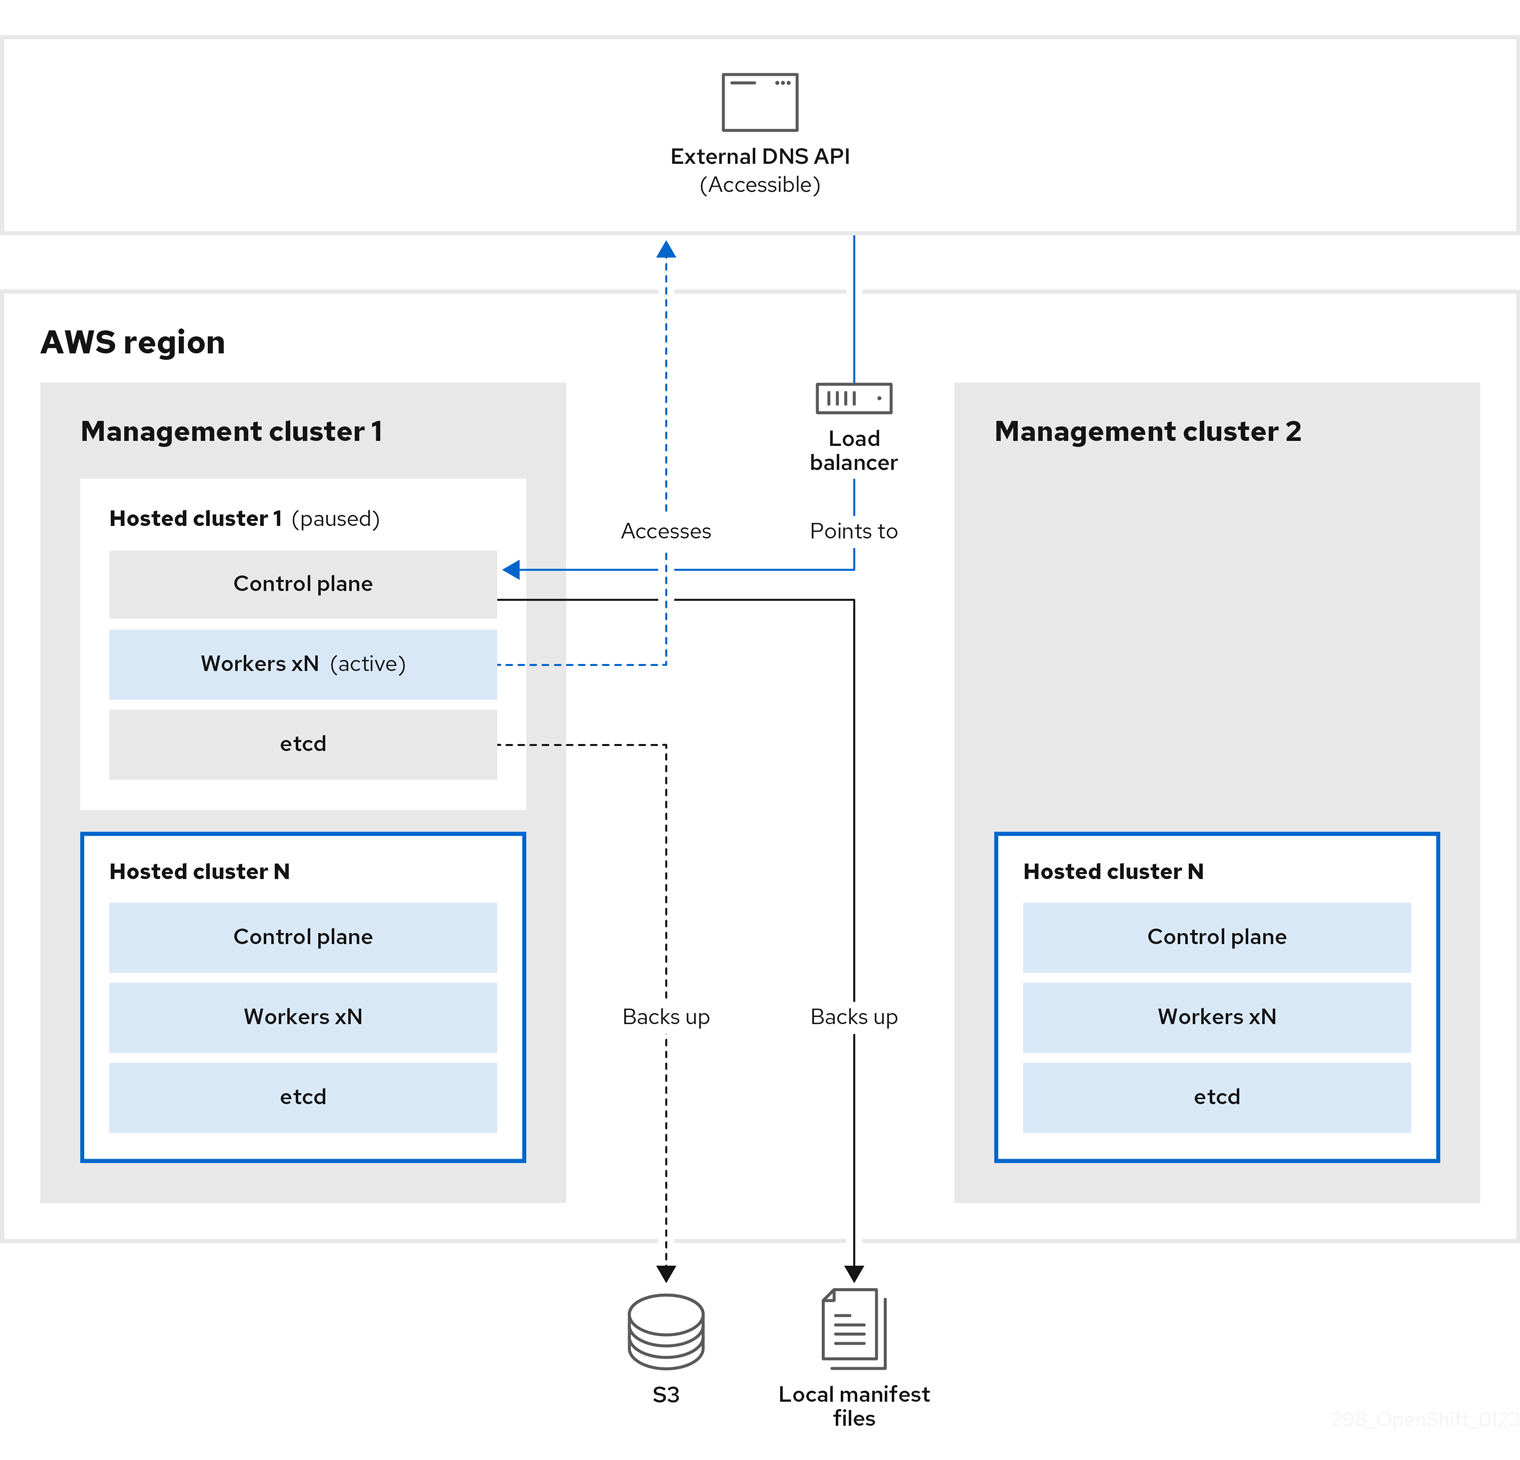
You take a snapshot of the hosted cluster, which includes etcd, the control plane, and the worker nodes. During this process, the worker nodes continue to try to access the external DNS API even if it is not accessible, the workloads are running, the control plane is saved in a local manifest file, and etcd is backed up to an S3 bucket. The data plane is active and the control plane is paused.
On management cluster 2, which you can think of as the destination management cluster, you restore etcd from the S3 bucket and restore the control plane from the local manifest file. During this process, the external DNS API is stopped, the hosted cluster API becomes inaccessible, and any workers that use the API are unable to update their manifest files, but the workloads are still running.
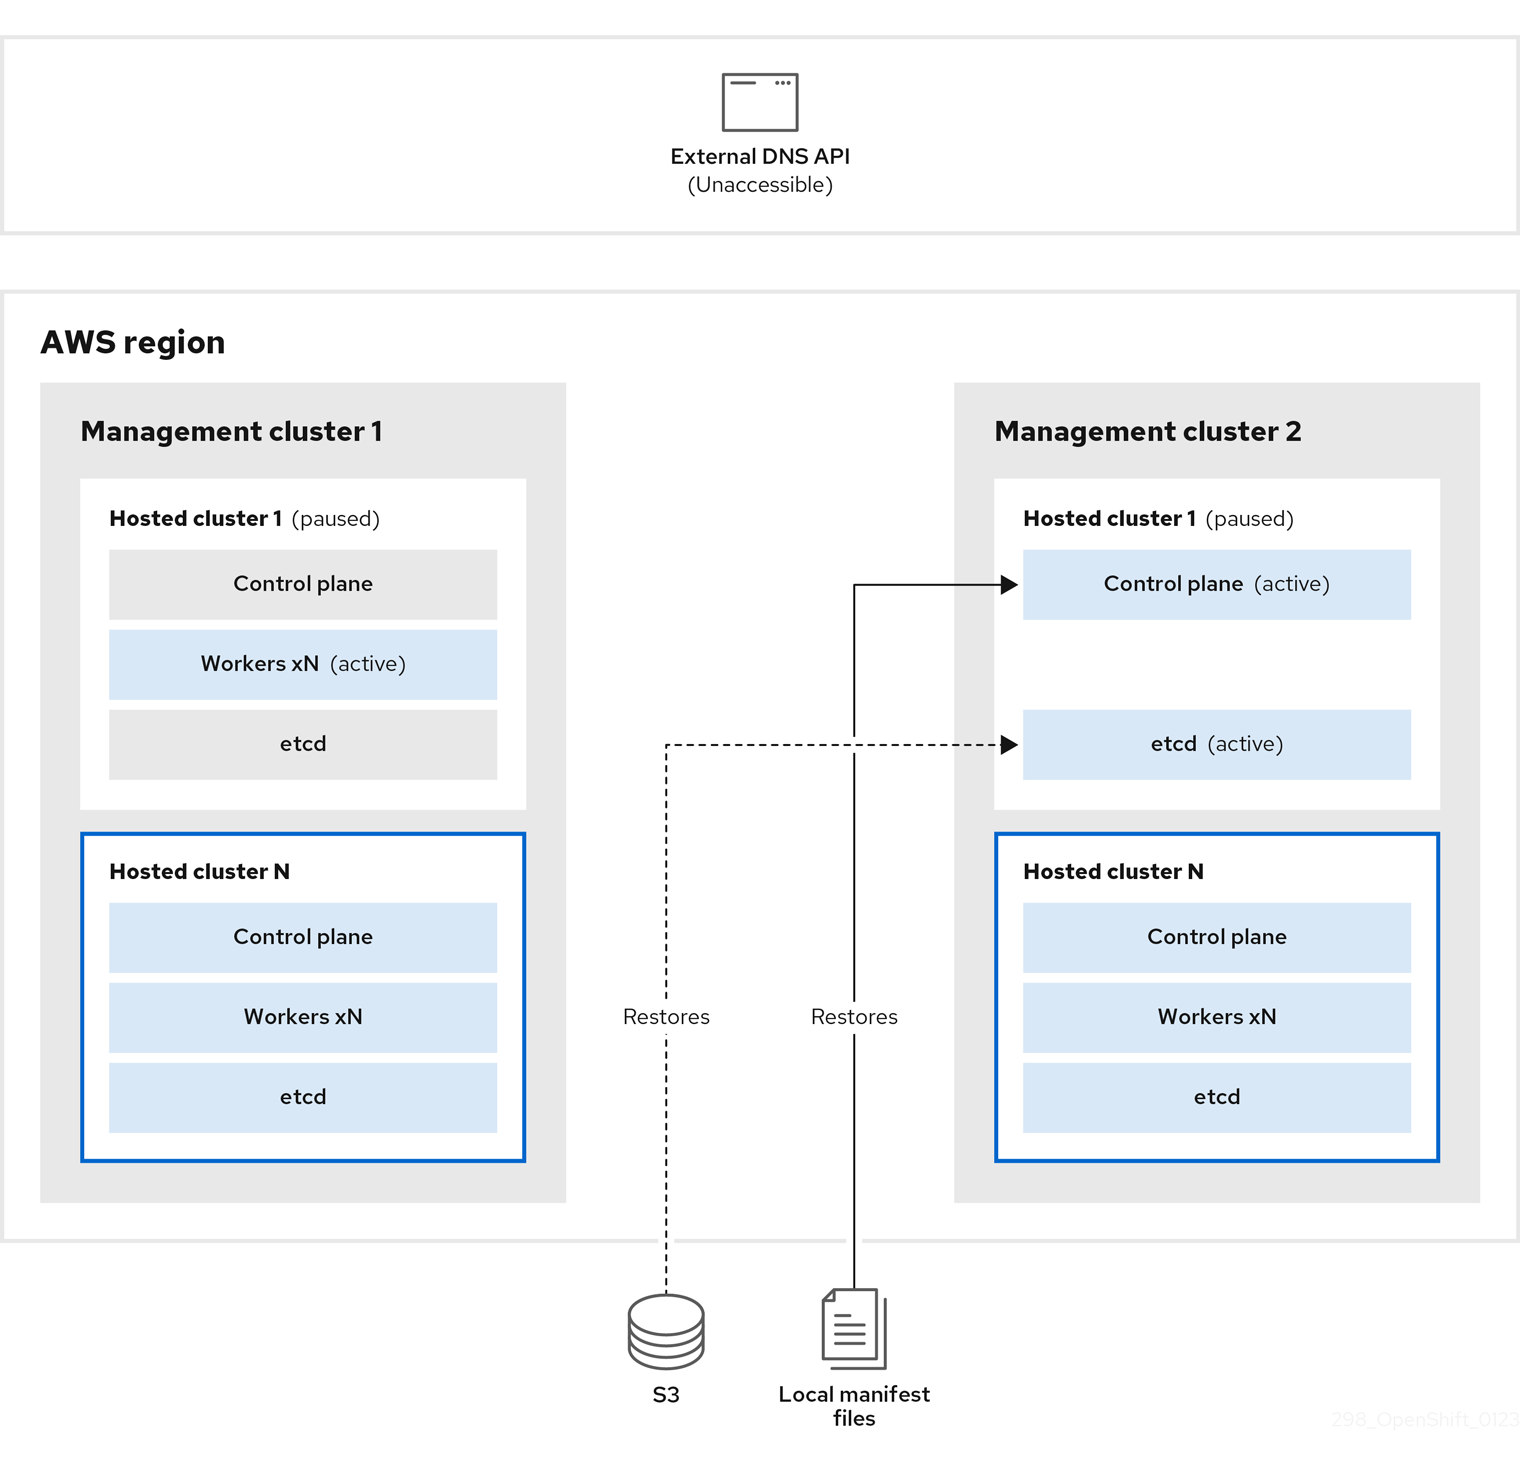
The external DNS API is accessible again, and the worker nodes use it to move to management cluster 2. The external DNS API can access the load balancer that points to the control plane.
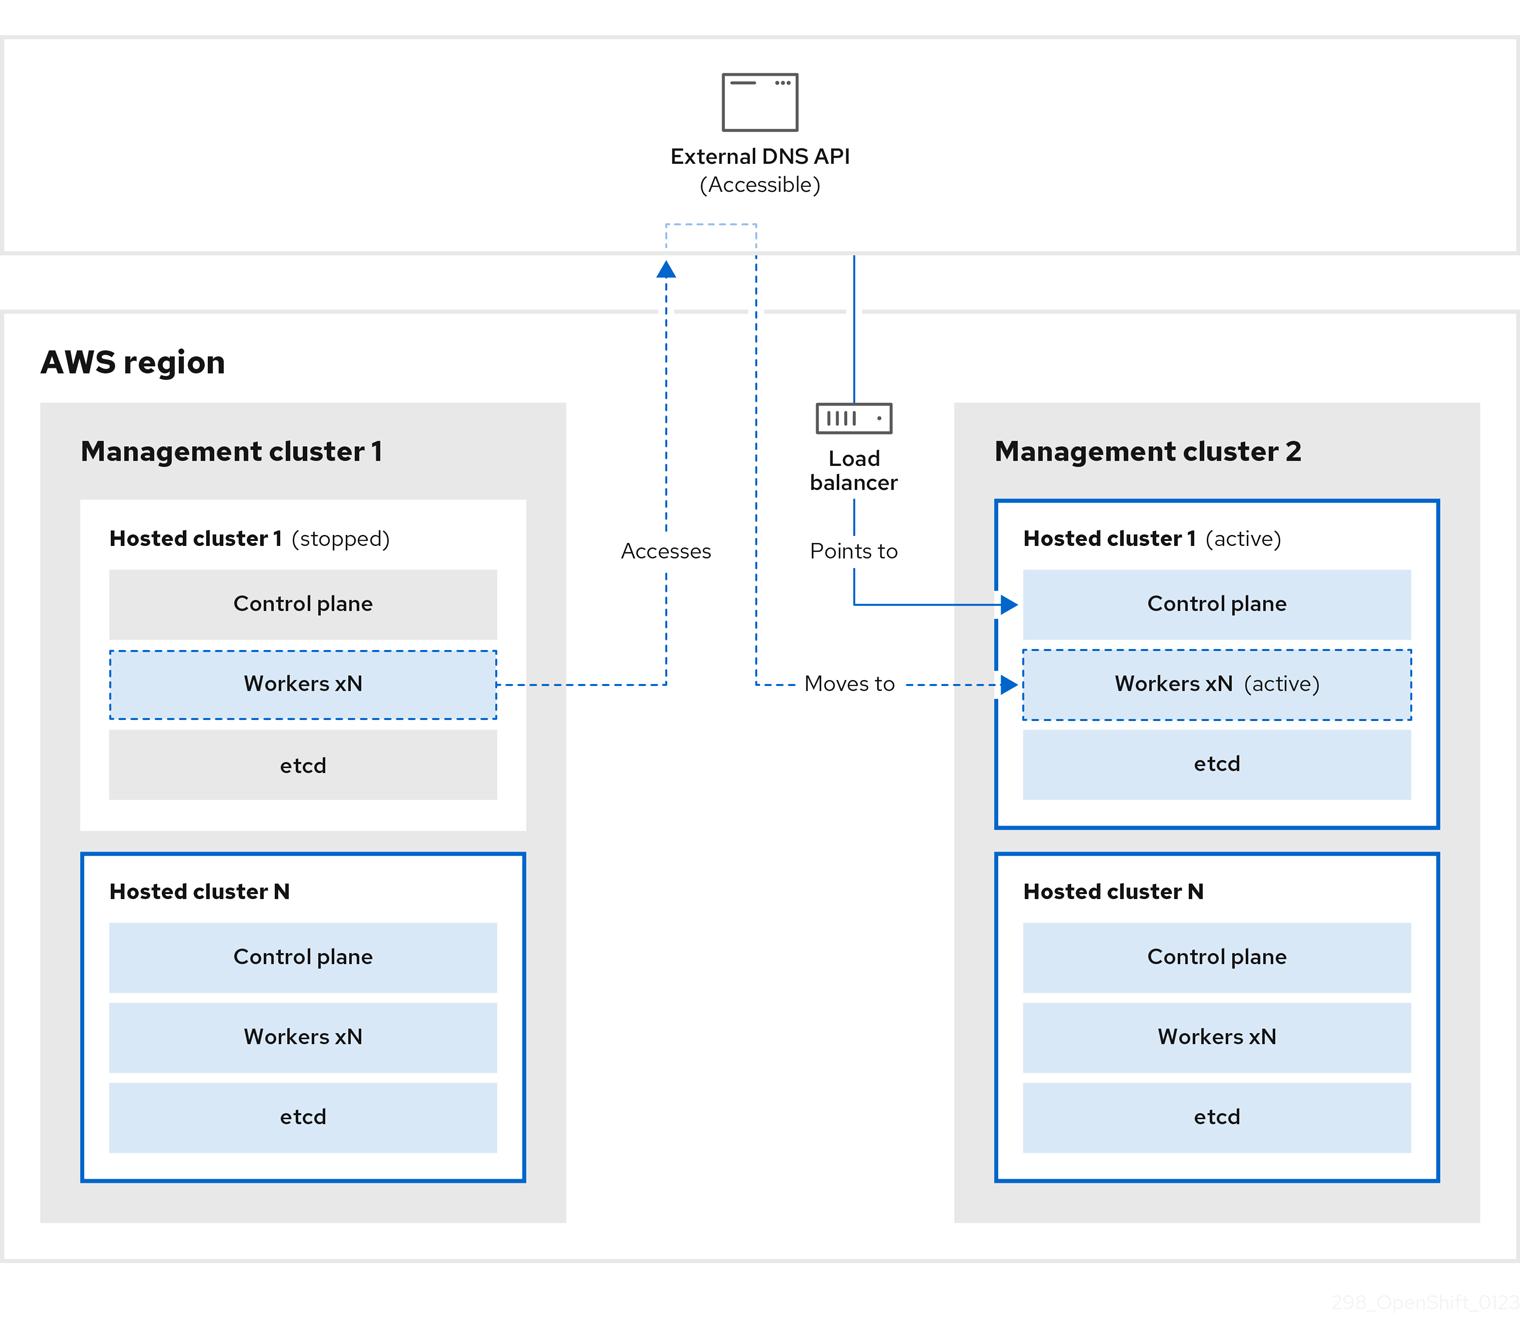
On management cluster 2, the control plane and worker nodes interact by using the external DNS API. The resources are deleted from management cluster 1, except for the S3 backup of etcd. If you try to set up the hosted cluster again on mangagement cluster 1, it will not work.
You can manually back up and restore your hosted cluster, or you can run a script to complete the process. For more information about the script, see "Running a script to back up and restore a hosted cluster".
8.4.3. Backing up a hosted cluster
To recover your hosted cluster in your target management cluster, you first need to back up all of the relevant data.
Procedure
Create a configmap file to declare the source management cluster by entering this command:
$ oc create configmap mgmt-parent-cluster -n default --from-literal=from=${MGMT_CLUSTER_NAME}Shut down the reconciliation in the hosted cluster and in the node pools by entering these commands:
PAUSED_UNTIL="true"
oc patch -n ${HC_CLUSTER_NS} hostedclusters/${HC_CLUSTER_NAME} -p '{"spec":{"pausedUntil":"'${PAUSED_UNTIL}'"}}' --type=merge
oc scale deployment -n ${HC_CLUSTER_NS}-${HC_CLUSTER_NAME} --replicas=0 kube-apiserver openshift-apiserver openshift-oauth-apiserver control-plane-operator
PAUSED_UNTIL="true" oc patch -n ${HC_CLUSTER_NS} hostedclusters/${HC_CLUSTER_NAME} -p '{"spec":{"pausedUntil":"'${PAUSED_UNTIL}'"}}' --type=merge oc patch -n ${HC_CLUSTER_NS} nodepools/${NODEPOOLS} -p '{"spec":{"pausedUntil":"'${PAUSED_UNTIL}'"}}' --type=merge oc scale deployment -n ${HC_CLUSTER_NS}-${HC_CLUSTER_NAME} --replicas=0 kube-apiserver openshift-apiserver openshift-oauth-apiserver control-plane-operatorBack up etcd and upload the data to an S3 bucket by running this bash script:
TipWrap this script in a function and call it from the main function.
# ETCD Backup
ETCD_PODS="etcd-0"
if [ "${CONTROL_PLANE_AVAILABILITY_POLICY}" = "HighlyAvailable" ]; then
  ETCD_PODS="etcd-0 etcd-1 etcd-2"
fi

for POD in ${ETCD_PODS}; do
  # Create an etcd snapshot
  oc exec -it ${POD} -n ${HC_CLUSTER_NS}-${HC_CLUSTER_NAME} -- env ETCDCTL_API=3 /usr/bin/etcdctl --cacert /etc/etcd/tls/client/etcd-client-ca.crt --cert /etc/etcd/tls/client/etcd-client.crt --key /etc/etcd/tls/client/etcd-client.key --endpoints=localhost:2379 snapshot save /var/lib/data/snapshot.db
  oc exec -it ${POD} -n ${HC_CLUSTER_NS}-${HC_CLUSTER_NAME} -- env ETCDCTL_API=3 /usr/bin/etcdctl -w table snapshot status /var/lib/data/snapshot.db

  FILEPATH="/${BUCKET_NAME}/${HC_CLUSTER_NAME}-${POD}-snapshot.db"
  CONTENT_TYPE="application/x-compressed-tar"
  DATE_VALUE=`date -R`
  SIGNATURE_STRING="PUT\n\n${CONTENT_TYPE}\n${DATE_VALUE}\n${FILEPATH}"

  set +x
  ACCESS_KEY=$(grep aws_access_key_id ${AWS_CREDS} | head -n1 | cut -d= -f2 | sed "s/ //g")
  SECRET_KEY=$(grep aws_secret_access_key ${AWS_CREDS} | head -n1 | cut -d= -f2 | sed "s/ //g")
  SIGNATURE_HASH=$(echo -en ${SIGNATURE_STRING} | openssl sha1 -hmac "${SECRET_KEY}" -binary | base64)
  set -x

  # FIXME: this is pushing to the OIDC bucket
  oc exec -it etcd-0 -n ${HC_CLUSTER_NS}-${HC_CLUSTER_NAME} -- curl -X PUT -T "/var/lib/data/snapshot.db" \
    -H "Host: ${BUCKET_NAME}.s3.amazonaws.com" \
    -H "Date: ${DATE_VALUE}" \
    -H "Content-Type: ${CONTENT_TYPE}" \
    -H "Authorization: AWS ${ACCESS_KEY}:${SIGNATURE_HASH}" \
    https://${BUCKET_NAME}.s3.amazonaws.com/${HC_CLUSTER_NAME}-${POD}-snapshot.db
done
For more information about backing up etcd, see "Backing up and restoring etcd on a hosted cluster".
Back up Kubernetes and OpenShift Container Platform objects by entering the following commands. You need to back up the following objects:
-
HostedClusterandNodePoolobjects from the HostedCluster namespace -
HostedClustersecrets from the HostedCluster namespace -
HostedControlPlanefrom the Hosted Control Plane namespace -
Clusterfrom the Hosted Control Plane namespace -
AWSCluster,AWSMachineTemplate, andAWSMachinefrom the Hosted Control Plane namespace -
MachineDeployments,MachineSets, andMachinesfrom the Hosted Control Plane namespace ControlPlanesecrets from the Hosted Control Plane namespacemkdir -p ${BACKUP_DIR}/namespaces/${HC_CLUSTER_NS} ${BACKUP_DIR}/namespaces/${HC_CLUSTER_NS}-${HC_CLUSTER_NAME} chmod 700 ${BACKUP_DIR}/namespaces/ # HostedCluster echo "Backing Up HostedCluster Objects:" oc get hc ${HC_CLUSTER_NAME} -n ${HC_CLUSTER_NS} -o yaml > ${BACKUP_DIR}/namespaces/${HC_CLUSTER_NS}/hc-${HC_CLUSTER_NAME}.yaml echo "--> HostedCluster" sed -i '' -e '/^status:$/,$d' ${BACKUP_DIR}/namespaces/${HC_CLUSTER_NS}/hc-${HC_CLUSTER_NAME}.yaml # NodePool oc get np ${NODEPOOLS} -n ${HC_CLUSTER_NS} -o yaml > ${BACKUP_DIR}/namespaces/${HC_CLUSTER_NS}/np-${NODEPOOLS}.yaml echo "--> NodePool" sed -i '' -e '/^status:$/,$ d' ${BACKUP_DIR}/namespaces/${HC_CLUSTER_NS}/np-${NODEPOOLS}.yaml # Secrets in the HC Namespace echo "--> HostedCluster Secrets:" for s in $(oc get secret -n ${HC_CLUSTER_NS} | grep "^${HC_CLUSTER_NAME}" | awk '{print $1}'); do oc get secret -n ${HC_CLUSTER_NS} $s -o yaml > ${BACKUP_DIR}/namespaces/${HC_CLUSTER_NS}/secret-${s}.yaml done # Secrets in the HC Control Plane Namespace echo "--> HostedCluster ControlPlane Secrets:" for s in $(oc get secret -n ${HC_CLUSTER_NS}-${HC_CLUSTER_NAME} | egrep -v "docker|service-account-token|oauth-openshift|NAME|token-${HC_CLUSTER_NAME}" | awk '{print $1}'); do oc get secret -n ${HC_CLUSTER_NS}-${HC_CLUSTER_NAME} $s -o yaml > ${BACKUP_DIR}/namespaces/${HC_CLUSTER_NS}-${HC_CLUSTER_NAME}/secret-${s}.yaml done # Hosted Control Plane echo "--> HostedControlPlane:" oc get hcp ${HC_CLUSTER_NAME} -n ${HC_CLUSTER_NS}-${HC_CLUSTER_NAME} -o yaml > ${BACKUP_DIR}/namespaces/${HC_CLUSTER_NS}-${HC_CLUSTER_NAME}/hcp-${HC_CLUSTER_NAME}.yaml # Cluster echo "--> Cluster:" CL_NAME=$(oc get hcp ${HC_CLUSTER_NAME} -n ${HC_CLUSTER_NS}-${HC_CLUSTER_NAME} -o jsonpath={.metadata.labels.\*} | grep ${HC_CLUSTER_NAME}) oc get cluster ${CL_NAME} -n ${HC_CLUSTER_NS}-${HC_CLUSTER_NAME} -o yaml > ${BACKUP_DIR}/namespaces/${HC_CLUSTER_NS}-${HC_CLUSTER_NAME}/cl-${HC_CLUSTER_NAME}.yaml # AWS Cluster echo "--> AWS Cluster:" oc get awscluster ${HC_CLUSTER_NAME} -n ${HC_CLUSTER_NS}-${HC_CLUSTER_NAME} -o yaml > ${BACKUP_DIR}/namespaces/${HC_CLUSTER_NS}-${HC_CLUSTER_NAME}/awscl-${HC_CLUSTER_NAME}.yaml # AWS MachineTemplate echo "--> AWS Machine Template:" oc get awsmachinetemplate ${NODEPOOLS} -n ${HC_CLUSTER_NS}-${HC_CLUSTER_NAME} -o yaml > ${BACKUP_DIR}/namespaces/${HC_CLUSTER_NS}-${HC_CLUSTER_NAME}/awsmt-${HC_CLUSTER_NAME}.yaml # AWS Machines echo "--> AWS Machine:" CL_NAME=$(oc get hcp ${HC_CLUSTER_NAME} -n ${HC_CLUSTER_NS}-${HC_CLUSTER_NAME} -o jsonpath={.metadata.labels.\*} | grep ${HC_CLUSTER_NAME}) for s in $(oc get awsmachines -n ${HC_CLUSTER_NS}-${HC_CLUSTER_NAME} --no-headers | grep ${CL_NAME} | cut -f1 -d\ ); do oc get -n ${HC_CLUSTER_NS}-${HC_CLUSTER_NAME} awsmachines $s -o yaml > ${BACKUP_DIR}/namespaces/${HC_CLUSTER_NS}-${HC_CLUSTER_NAME}/awsm-${s}.yaml done # MachineDeployments echo "--> HostedCluster MachineDeployments:" for s in $(oc get machinedeployment -n ${HC_CLUSTER_NS}-${HC_CLUSTER_NAME} -o name); do mdp_name=$(echo ${s} | cut -f 2 -d /) oc get -n ${HC_CLUSTER_NS}-${HC_CLUSTER_NAME} $s -o yaml > ${BACKUP_DIR}/namespaces/${HC_CLUSTER_NS}-${HC_CLUSTER_NAME}/machinedeployment-${mdp_name}.yaml done # MachineSets echo "--> HostedCluster MachineSets:" for s in $(oc get machineset -n ${HC_CLUSTER_NS}-${HC_CLUSTER_NAME} -o name); do ms_name=$(echo ${s} | cut -f 2 -d /) oc get -n ${HC_CLUSTER_NS}-${HC_CLUSTER_NAME} $s -o yaml > ${BACKUP_DIR}/namespaces/${HC_CLUSTER_NS}-${HC_CLUSTER_NAME}/machineset-${ms_name}.yaml done # Machines echo "--> HostedCluster Machine:" for s in $(oc get machine -n ${HC_CLUSTER_NS}-${HC_CLUSTER_NAME} -o name); do m_name=$(echo ${s} | cut -f 2 -d /) oc get -n ${HC_CLUSTER_NS}-${HC_CLUSTER_NAME} $s -o yaml > ${BACKUP_DIR}/namespaces/${HC_CLUSTER_NS}-${HC_CLUSTER_NAME}/machine-${m_name}.yaml done
-
Clean up the
ControlPlaneroutes by entering this command:$ oc delete routes -n ${HC_CLUSTER_NS}-${HC_CLUSTER_NAME} --allBy entering that command, you enable the ExternalDNS Operator to delete the Route53 entries.
Verify that the Route53 entries are clean by running this script:
function clean_routes() {

    if [[ -z "${1}" ]];then
        echo "Give me the NS where to clean the routes"
        exit 1
    fi

    # Constants
    if [[ -z "${2}" ]];then
        echo "Give me the Route53 zone ID"
        exit 1
    fi

    ZONE_ID=${2}
    ROUTES=10
    timeout=40
    count=0

    # This allows us to remove the ownership in the AWS for the API route
    oc delete route -n ${1} --all

    while [ ${ROUTES} -gt 2 ]
    do
        echo "Waiting for ExternalDNS Operator to clean the DNS Records in AWS Route53 where the zone id is: ${ZONE_ID}..."
        echo "Try: (${count}/${timeout})"
        sleep 10
        if [[ $count -eq timeout ]];then
            echo "Timeout waiting for cleaning the Route53 DNS records"
            exit 1
        fi
        count=$((count+1))
        ROUTES=$(aws route53 list-resource-record-sets --hosted-zone-id ${ZONE_ID} --max-items 10000 --output json | grep -c ${EXTERNAL_DNS_DOMAIN})
    done
}

# SAMPLE: clean_routes "<HC ControlPlane Namespace>" "<AWS_ZONE_ID>"
clean_routes "${HC_CLUSTER_NS}-${HC_CLUSTER_NAME}" "${AWS_ZONE_ID}"
Verification
Check all of the OpenShift Container Platform objects and the S3 bucket to verify that everything looks as expected.
Next steps
Restore your hosted cluster.
8.4.4. Restoring a hosted cluster
Gather all of the objects that you backed up and restore them in your destination management cluster.
Prerequisites
You backed up the data from your source management cluster.
Ensure that the kubeconfig file of the destination management cluster is placed as it is set in the KUBECONFIG variable or, if you use the script, in the MGMT2_KUBECONFIG variable. Use export KUBECONFIG=<Kubeconfig FilePath> or, if you use the script, use export KUBECONFIG=${MGMT2_KUBECONFIG}.
Procedure
Verify that the new management cluster does not contain any namespaces from the cluster that you are restoring by entering these commands:
# Just in case
export KUBECONFIG=${MGMT2_KUBECONFIG}
BACKUP_DIR=${HC_CLUSTER_DIR}/backup

# Namespace deletion in the destination Management cluster
$ oc delete ns ${HC_CLUSTER_NS} || true
$ oc delete ns ${HC_CLUSTER_NS}-{HC_CLUSTER_NAME} || true
Re-create the deleted namespaces by entering these commands:
# Namespace creation
$ oc new-project ${HC_CLUSTER_NS}
$ oc new-project ${HC_CLUSTER_NS}-${HC_CLUSTER_NAME}
Restore the secrets in the HC namespace by entering this command:
$ oc apply -f ${BACKUP_DIR}/namespaces/${HC_CLUSTER_NS}/secret-*Restore the objects in the
HostedClustercontrol plane namespace by entering these commands:# Secrets $ oc apply -f ${BACKUP_DIR}/namespaces/${HC_CLUSTER_NS}-${HC_CLUSTER_NAME}/secret-* # Cluster $ oc apply -f ${BACKUP_DIR}/namespaces/${HC_CLUSTER_NS}-${HC_CLUSTER_NAME}/hcp-* $ oc apply -f ${BACKUP_DIR}/namespaces/${HC_CLUSTER_NS}-${HC_CLUSTER_NAME}/cl-*If you are recovering the nodes and the node pool to reuse AWS instances, restore the objects in the HC control plane namespace by entering these commands:
# AWS
$ oc apply -f ${BACKUP_DIR}/namespaces/${HC_CLUSTER_NS}-${HC_CLUSTER_NAME}/awscl-*
$ oc apply -f ${BACKUP_DIR}/namespaces/${HC_CLUSTER_NS}-${HC_CLUSTER_NAME}/awsmt-*
$ oc apply -f ${BACKUP_DIR}/namespaces/${HC_CLUSTER_NS}-${HC_CLUSTER_NAME}/awsm-*

# Machines
$ oc apply -f ${BACKUP_DIR}/namespaces/${HC_CLUSTER_NS}-${HC_CLUSTER_NAME}/machinedeployment-*
$ oc apply -f ${BACKUP_DIR}/namespaces/${HC_CLUSTER_NS}-${HC_CLUSTER_NAME}/machineset-*
$ oc apply -f ${BACKUP_DIR}/namespaces/${HC_CLUSTER_NS}-${HC_CLUSTER_NAME}/machine-*
Restore the etcd data and the hosted cluster by running this bash script:
ETCD_PODS="etcd-0"
if [ "${CONTROL_PLANE_AVAILABILITY_POLICY}" = "HighlyAvailable" ]; then
  ETCD_PODS="etcd-0 etcd-1 etcd-2"
fi

HC_RESTORE_FILE=${BACKUP_DIR}/namespaces/${HC_CLUSTER_NS}/hc-${HC_CLUSTER_NAME}-restore.yaml
HC_BACKUP_FILE=${BACKUP_DIR}/namespaces/${HC_CLUSTER_NS}/hc-${HC_CLUSTER_NAME}.yaml
HC_NEW_FILE=${BACKUP_DIR}/namespaces/${HC_CLUSTER_NS}/hc-${HC_CLUSTER_NAME}-new.yaml
cat ${HC_BACKUP_FILE} > ${HC_NEW_FILE}
cat > ${HC_RESTORE_FILE} <<EOF
    restoreSnapshotURL:
EOF

for POD in ${ETCD_PODS}; do
  # Create a pre-signed URL for the etcd snapshot
  ETCD_SNAPSHOT="s3://${BUCKET_NAME}/${HC_CLUSTER_NAME}-${POD}-snapshot.db"
  ETCD_SNAPSHOT_URL=$(AWS_DEFAULT_REGION=${MGMT2_REGION} aws s3 presign ${ETCD_SNAPSHOT})

  # FIXME no CLI support for restoreSnapshotURL yet
  cat >> ${HC_RESTORE_FILE} <<EOF
    - "${ETCD_SNAPSHOT_URL}"
EOF
done

cat ${HC_RESTORE_FILE}

if ! grep ${HC_CLUSTER_NAME}-snapshot.db ${HC_NEW_FILE}; then
  sed -i '' -e "/type: PersistentVolume/r ${HC_RESTORE_FILE}" ${HC_NEW_FILE}
  sed -i '' -e '/pausedUntil:/d' ${HC_NEW_FILE}
fi

HC=$(oc get hc -n ${HC_CLUSTER_NS} ${HC_CLUSTER_NAME} -o name || true)
if [[ ${HC} == "" ]];then
    echo "Deploying HC Cluster: ${HC_CLUSTER_NAME} in ${HC_CLUSTER_NS} namespace"
    oc apply -f ${HC_NEW_FILE}
else
    echo "HC Cluster ${HC_CLUSTER_NAME} already exists, avoiding step"
fi
If you are recovering the nodes and the node pool to reuse AWS instances, restore the node pool by entering this command:
oc apply -f ${BACKUP_DIR}/namespaces/${HC_CLUSTER_NS}/np-*
Verification
To verify that the nodes are fully restored, use this function:
timeout=40
count=0
NODE_STATUS=$(oc get nodes --kubeconfig=${HC_KUBECONFIG} | grep -v NotReady | grep -c "worker") || NODE_STATUS=0

while [ ${NODE_POOL_REPLICAS} != ${NODE_STATUS} ]
do
    echo "Waiting for Nodes to be Ready in the destination MGMT Cluster: ${MGMT2_CLUSTER_NAME}"
    echo "Try: (${count}/${timeout})"
    sleep 30
    if [[ $count -eq timeout ]];then
        echo "Timeout waiting for Nodes in the destination MGMT Cluster"
        exit 1
    fi
    count=$((count+1))
    NODE_STATUS=$(oc get nodes --kubeconfig=${HC_KUBECONFIG} | grep -v NotReady | grep -c "worker") || NODE_STATUS=0
done
Next steps
Shut down and delete your cluster.
8.4.5. Deleting a hosted cluster from your source management cluster
After you back up your hosted cluster and restore it to your destination management cluster, you shut down and delete the hosted cluster on your source management cluster.
Prerequisites
You backed up your data and restored it to your source management cluster.
Ensure that the kubeconfig file of the destination management cluster is placed as it is set in the KUBECONFIG variable or, if you use the script, in the MGMT_KUBECONFIG variable. Use export KUBECONFIG=<Kubeconfig FilePath> or, if you use the script, use export KUBECONFIG=${MGMT_KUBECONFIG}.
Procedure
Scale the
deploymentandstatefulsetobjects by entering these commands:ImportantDo not scale the stateful set if the value of its
spec.persistentVolumeClaimRetentionPolicy.whenScaledfield is set toDelete, because this could lead to a loss of data.As a workaround, update the value of the
spec.persistentVolumeClaimRetentionPolicy.whenScaledfield toRetain. Ensure that no controllers exist that reconcile the stateful set and would return the value back toDelete, which could lead to a loss of data.# Just in case export KUBECONFIG=${MGMT_KUBECONFIG} # Scale down deployments oc scale deployment -n ${HC_CLUSTER_NS}-${HC_CLUSTER_NAME} --replicas=0 --all oc scale statefulset.apps -n ${HC_CLUSTER_NS}-${HC_CLUSTER_NAME} --replicas=0 --all sleep 15Delete the
NodePoolobjects by entering these commands:NODEPOOLS=$(oc get nodepools -n ${HC_CLUSTER_NS} -o=jsonpath='{.items[?(@.spec.clusterName=="'${HC_CLUSTER_NAME}'")].metadata.name}') if [[ ! -z "${NODEPOOLS}" ]];then oc patch -n "${HC_CLUSTER_NS}" nodepool ${NODEPOOLS} --type=json --patch='[ { "op":"remove", "path": "/metadata/finalizers" }]' oc delete np -n ${HC_CLUSTER_NS} ${NODEPOOLS} fiDelete the
machineandmachinesetobjects by entering these commands:# Machines for m in $(oc get machines -n ${HC_CLUSTER_NS}-${HC_CLUSTER_NAME} -o name); do oc patch -n ${HC_CLUSTER_NS}-${HC_CLUSTER_NAME} ${m} --type=json --patch='[ { "op":"remove", "path": "/metadata/finalizers" }]' || true oc delete -n ${HC_CLUSTER_NS}-${HC_CLUSTER_NAME} ${m} || true done oc delete machineset -n ${HC_CLUSTER_NS}-${HC_CLUSTER_NAME} --all || trueDelete the cluster object by entering these commands:
# Cluster
C_NAME=$(oc get cluster -n ${HC_CLUSTER_NS}-${HC_CLUSTER_NAME} -o name)
oc patch -n ${HC_CLUSTER_NS}-${HC_CLUSTER_NAME} ${C_NAME} --type=json --patch='[ { "op":"remove", "path": "/metadata/finalizers" }]'
oc delete cluster.cluster.x-k8s.io -n ${HC_CLUSTER_NS}-${HC_CLUSTER_NAME} --all
Delete the AWS machines (Kubernetes objects) by entering these commands. Do not worry about deleting the real AWS machines. The cloud instances will not be affected.
# AWS Machines
for m in $(oc get awsmachine.infrastructure.cluster.x-k8s.io -n ${HC_CLUSTER_NS}-${HC_CLUSTER_NAME} -o name)
do
    oc patch -n ${HC_CLUSTER_NS}-${HC_CLUSTER_NAME} ${m} --type=json --patch='[ { "op":"remove", "path": "/metadata/finalizers" }]' || true
    oc delete -n ${HC_CLUSTER_NS}-${HC_CLUSTER_NAME} ${m} || true
done
Delete the
HostedControlPlaneandControlPlaneHC namespace objects by entering these commands:# Delete HCP and ControlPlane HC NS oc patch -n ${HC_CLUSTER_NS}-${HC_CLUSTER_NAME} hostedcontrolplane.hypershift.openshift.io ${HC_CLUSTER_NAME} --type=json --patch='[ { "op":"remove", "path": "/metadata/finalizers" }]' oc delete hostedcontrolplane.hypershift.openshift.io -n ${HC_CLUSTER_NS}-${HC_CLUSTER_NAME} --all oc delete ns ${HC_CLUSTER_NS}-${HC_CLUSTER_NAME} || trueDelete the
HostedClusterand HC namespace objects by entering these commands:# Delete HC and HC Namespace oc -n ${HC_CLUSTER_NS} patch hostedclusters ${HC_CLUSTER_NAME} -p '{"metadata":{"finalizers":null}}' --type merge || true oc delete hc -n ${HC_CLUSTER_NS} ${HC_CLUSTER_NAME} || true oc delete ns ${HC_CLUSTER_NS} || true
Verification
To verify that everything works, enter these commands:
# Validations
export KUBECONFIG=${MGMT2_KUBECONFIG}

oc get hc -n ${HC_CLUSTER_NS}
oc get np -n ${HC_CLUSTER_NS}
oc get pod -n ${HC_CLUSTER_NS}-${HC_CLUSTER_NAME}
oc get machines -n ${HC_CLUSTER_NS}-${HC_CLUSTER_NAME}

# Inside the HostedCluster
export KUBECONFIG=${HC_KUBECONFIG}
oc get clusterversion
oc get nodes
Next steps
Delete the OVN pods in the hosted cluster so that you can connect to the new OVN control plane that runs in the new management cluster:
-
Load the
KUBECONFIGenvironment variable with the hosted cluster’s kubeconfig path. Enter this command:
$ oc delete pod -n openshift-ovn-kubernetes --all
8.4.6. Running a script to back up and restore a hosted cluster
To expedite the process to back up a hosted cluster and restore it within the same region on AWS, you can modify and run a script.
Procedure
Replace the variables in the following script with your information:
# Fill the Common variables to fit your environment, this is just a sample SSH_KEY_FILE=${HOME}/.ssh/id_rsa.pub BASE_PATH=${HOME}/hypershift BASE_DOMAIN="aws.sample.com" PULL_SECRET_FILE="${HOME}/pull_secret.json" AWS_CREDS="${HOME}/.aws/credentials" CONTROL_PLANE_AVAILABILITY_POLICY=SingleReplica HYPERSHIFT_PATH=${BASE_PATH}/src/hypershift HYPERSHIFT_CLI=${HYPERSHIFT_PATH}/bin/hypershift HYPERSHIFT_IMAGE=${HYPERSHIFT_IMAGE:-"quay.io/${USER}/hypershift:latest"} NODE_POOL_REPLICAS=${NODE_POOL_REPLICAS:-2} # MGMT Context MGMT_REGION=us-west-1 MGMT_CLUSTER_NAME="${USER}-dev" MGMT_CLUSTER_NS=${USER} MGMT_CLUSTER_DIR="${BASE_PATH}/hosted_clusters/${MGMT_CLUSTER_NS}-${MGMT_CLUSTER_NAME}" MGMT_KUBECONFIG="${MGMT_CLUSTER_DIR}/kubeconfig" # MGMT2 Context MGMT2_CLUSTER_NAME="${USER}-dest" MGMT2_CLUSTER_NS=${USER} MGMT2_CLUSTER_DIR="${BASE_PATH}/hosted_clusters/${MGMT2_CLUSTER_NS}-${MGMT2_CLUSTER_NAME}" MGMT2_KUBECONFIG="${MGMT2_CLUSTER_DIR}/kubeconfig" # Hosted Cluster Context HC_CLUSTER_NS=clusters HC_REGION=us-west-1 HC_CLUSTER_NAME="${USER}-hosted" HC_CLUSTER_DIR="${BASE_PATH}/hosted_clusters/${HC_CLUSTER_NS}-${HC_CLUSTER_NAME}" HC_KUBECONFIG="${HC_CLUSTER_DIR}/kubeconfig" BACKUP_DIR=${HC_CLUSTER_DIR}/backup BUCKET_NAME="${USER}-hosted-${MGMT_REGION}" # DNS AWS_ZONE_ID="Z026552815SS3YPH9H6MG" EXTERNAL_DNS_DOMAIN="guest.jpdv.aws.kerbeross.com"- Save the script to your local file system.
Run the script by entering the following command:
source <env_file>
where:
env_fileis the name of the file where you saved the script.The migration script is maintained at the following repository: https://github.com/openshift/hypershift/blob/main/contrib/migration/migrate-hcp.sh.
Chapter 9. Troubleshooting hosted control planes
If you encounter issues with hosted control planes, see the following information to guide you through troubleshooting.
9.1. Gathering information to troubleshoot hosted control planes
When you need to troubleshoot an issue with hosted control plane clusters, you can gather information by running the hypershift dump cluster command. The command generates output for the management cluster and the hosted cluster.
The output for the management cluster contains the following content:
- Cluster-scoped resources: These resources are node definitions of the management cluster.
-
The
hypershift-dumpcompressed file: This file is useful if you need to share the content with other people. - Namespaced resources: These resources include all of the objects from the relevant namespaces, such as config maps, services, events, and logs.
- Network logs: These logs include the OVN northbound and southbound databases and the status for each one.
- Hosted clusters: This level of output involves all of the resources inside of the hosted cluster.
The output for the hosted cluster contains the following content:
- Cluster-scoped resources: These resources include all of the cluster-wide objects, such as nodes and CRDs.
- Namespaced resources: These resources include all of the objects from the relevant namespaces, such as config maps, services, events, and logs.
Although the output does not contain any secret objects from the cluster, it can contain references to the names of secrets.
Prerequisites
-
You must have
cluster-adminaccess to the management cluster. -
You need the
namevalue for theHostedClusterresource and the namespace where the CR is deployed. -
You must have the
hcpcommand line interface installed. For more information, see Installing the hosted control planes command line interface. -
You must have the OpenShift CLI (
oc) installed. -
You must ensure that the
kubeconfigfile is loaded and is pointing to the management cluster.
Procedure
To gather the output for troubleshooting, enter the following command:
$ hypershift dump cluster \ --name <hosted_cluster_name> \1 --namespace <hosted_cluster_namespace> \ 2 --dump-guest-cluster \ --artifact-dir clusterDump-<hosted_cluster_namespace>-<hosted_cluster_name>Example output
2023-06-06T12:18:20+02:00   INFO    Archiving dump  {"command": "tar", "args": ["-cvzf", "hypershift-dump.tar.gz", "cluster-scoped-resources", "event-filter.html", "namespaces", "network_logs", "timestamp"]}
2023-06-06T12:18:21+02:00   INFO    Successfully archived dump  {"duration": "1.519376292s"}
To configure the command-line interface so that it impersonates all of the queries against the management cluster by using a username or service account, enter the
hypershift dump clustercommand with the--asflag.The service account must have enough permissions to query all of the objects from the namespaces, so the
cluster-adminrole is recommended to make sure you have enough permissions. The service account must be located in or have permissions to query the namespace of theHostedControlPlaneresource.If your username or service account does not have enough permissions, the output contains only the objects that you have permissions to access. During that process, you might see
forbiddenerrors.To use impersonation by using a service account, enter the following command:
$ hypershift dump cluster \ --name <hosted_cluster_name> \1 --namespace <hosted_cluster_namespace> \2 --dump-guest-cluster \ --as "system:serviceaccount:<service_account_namespace>:<service_account_name>" \ 3 --artifact-dir clusterDump-<hosted_cluster_namespace>-<hosted_cluster_name>To use impersonation by using a username, enter the following command:
$ hypershift dump cluster \
    --name <hosted_cluster_name> \1
    --namespace <hosted_cluster_namespace> \2
    --dump-guest-cluster \
    --as "<cluster_user_name>" \ 3
    --artifact-dir clusterDump-<hosted_cluster_namespace>-<hosted_cluster_name>
9.2. Pausing the reconciliation of a hosted cluster and hosted control plane
If you are a cluster instance administrator, you can pause the reconciliation of a hosted cluster and hosted control plane. You might want to pause reconciliation when you back up and restore an etcd database or when you need to debug problems with a hosted cluster or hosted control plane.
Procedure
To pause reconciliation for a hosted cluster and hosted control plane, populate the
pausedUntilfield of theHostedClusterresource.To pause the reconciliation until a specific time, enter the following command:
$ oc patch -n <hosted_cluster_namespace> hostedclusters/<hosted_cluster_name> -p '{"spec":{"pausedUntil":"<timestamp>"}}' --type=merge 1- 1
- Specify a timestamp in the RFC339 format, for example,
2024-03-03T03:28:48Z. The reconciliation is paused until the specified time is passed.
To pause the reconciliation indefinitely, enter the following command:
$ oc patch -n <hosted_cluster_namespace> hostedclusters/<hosted_cluster_name> -p '{"spec":{"pausedUntil":"true"}}' --type=mergeThe reconciliation is paused until you remove the field from the
HostedClusterresource.When the pause reconciliation field is populated for the
HostedClusterresource, the field is automatically added to the associatedHostedControlPlaneresource.
To remove the
pausedUntilfield, enter the following patch command:$ oc patch -n <hosted_cluster_namespace> hostedclusters/<hosted_cluster_name> -p '{"spec":{"pausedUntil":null}}' --type=merge
Additional resources