
部署 Ansible Automation Platform 2.1
注释和反馈
在开源的感觉中,我们邀请任何人提供有关任何参考架构的反馈和评论。虽然我们在内部回顾了我们的文档,但有时会遇到问题或排字错误。反馈使我们不仅能提高我们生成的文档质量,而是让读者能够向其潜在改进和主题扩展提供自己的想法。您可以通过发送电子邮件至 ansible-feedback@redhat.com 来提供关于文档的反馈。请参阅电子邮件中的标题。
第 1 章 概述
Ansible Automation Platform 2.1 参考架构提供了部署高可用性 Ansible Automation Platform 环境的建议设置。它提供逐步部署过程,附带安装和配置 Ansible Automation Platform 2.1 的最新最佳实践。它最适合希望部署 Ansible Automation Platform 的系统和平台管理员。
此参考环境中所使用的环境的可疑表示显示在中 图 1.1 “参考架构概述”
图 1.1. 参考架构概述
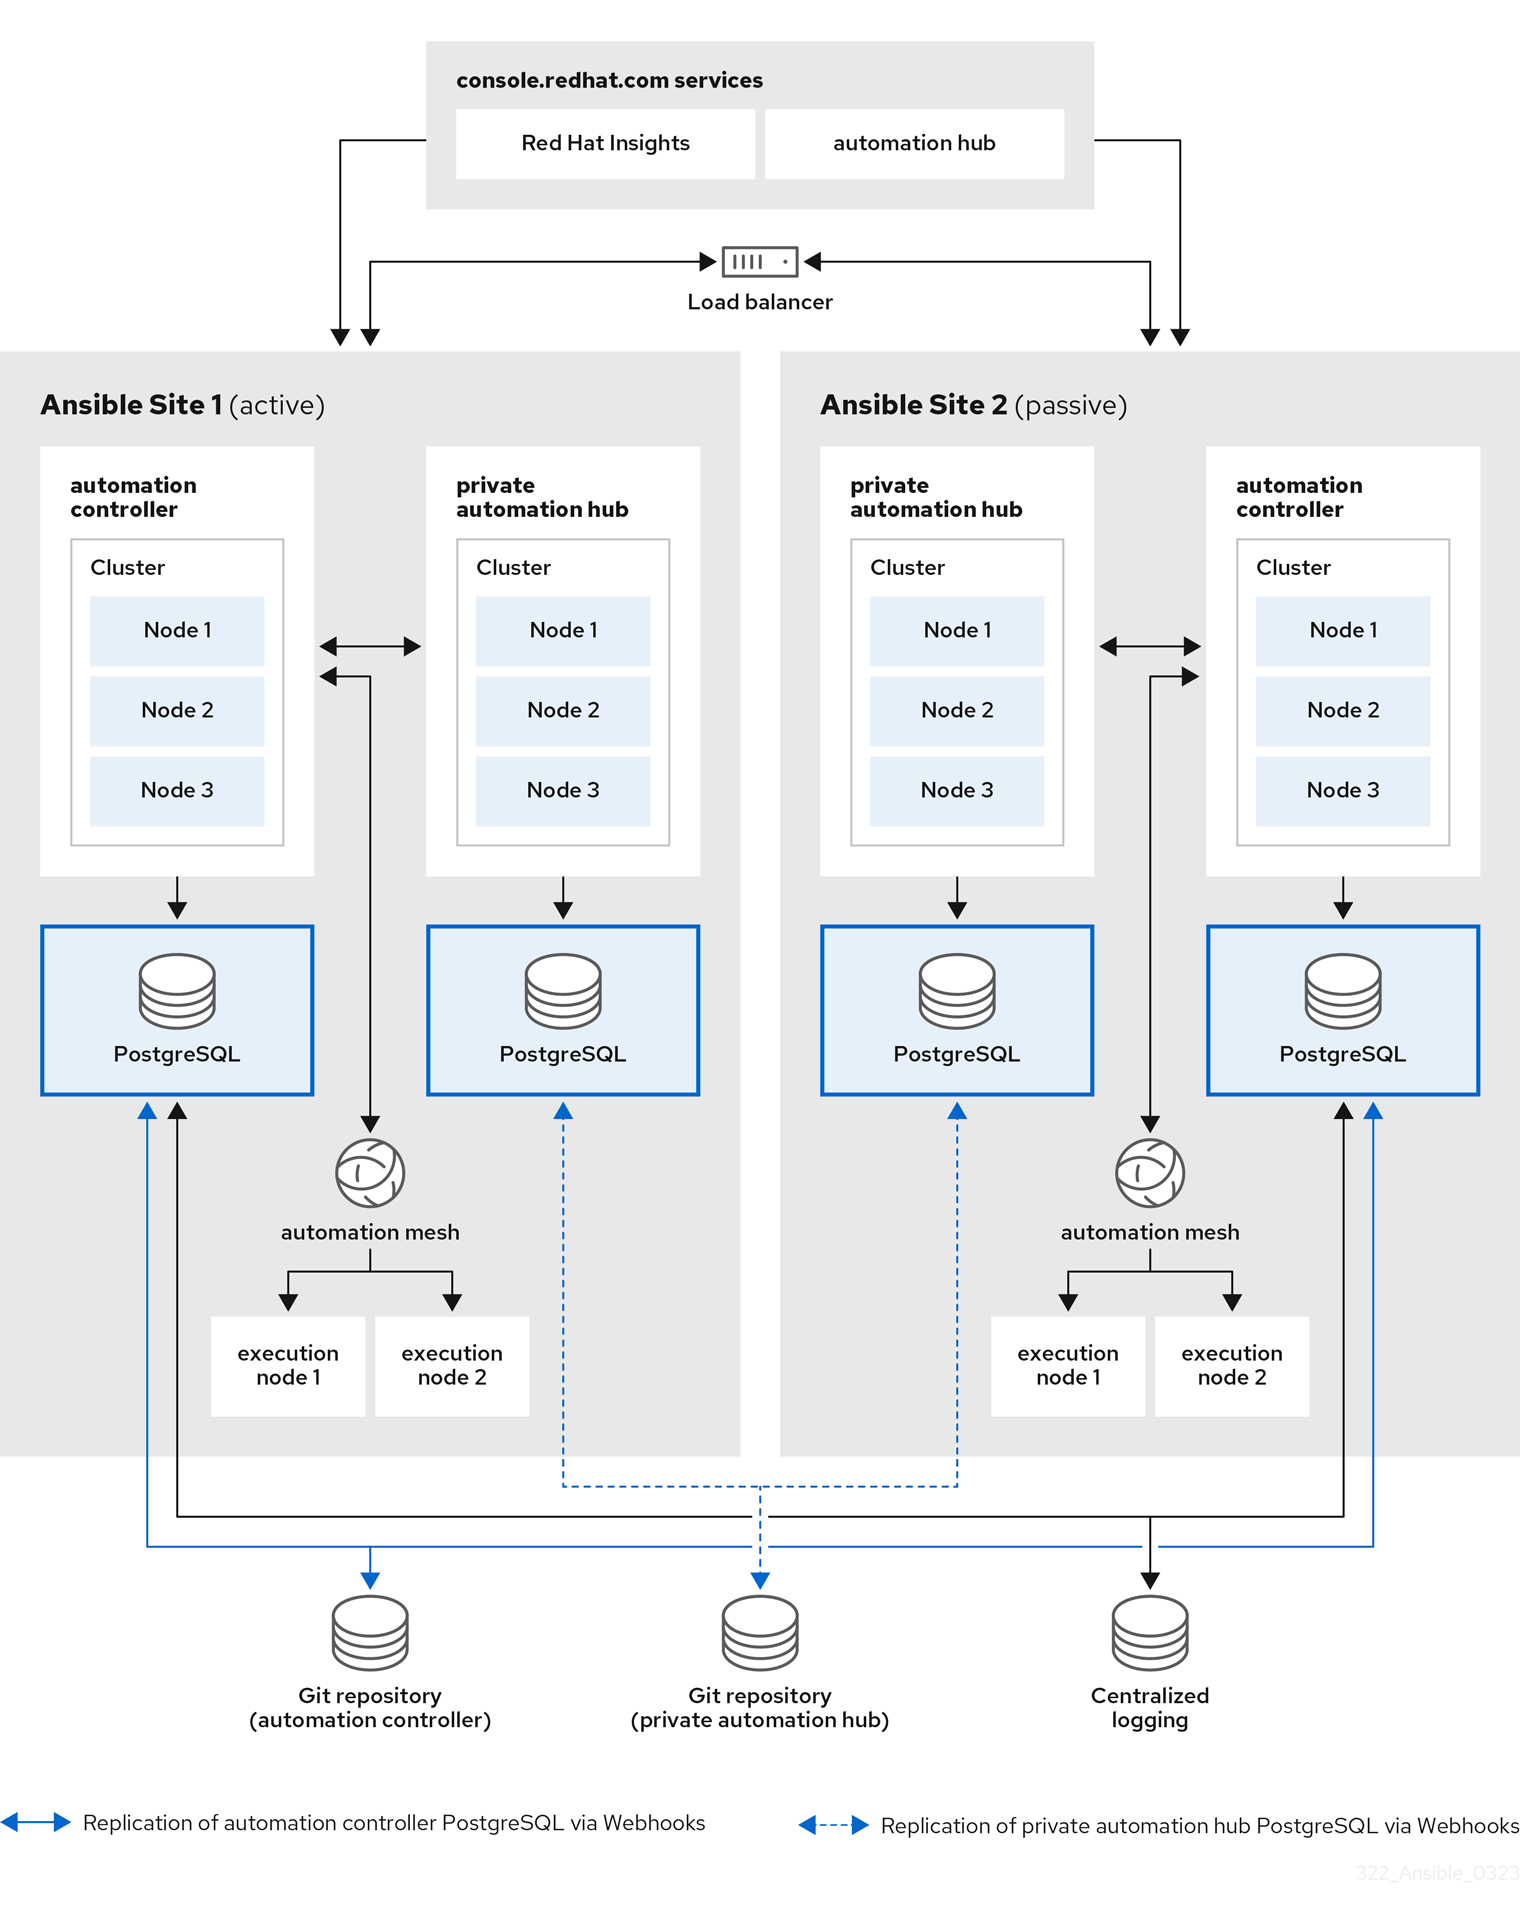
以上镜像由两个站点组成,即 Ansible Site 1 和 Ansible Site 2 以实现高可用性。站点是一个主动环境,而站点两个是被动环境。每个站点包括:
- 三个带有一个 PostgreSQL 数据库的节点自动化控制器集群
- 三个带有一个 PostgreSQL 数据库的节点自动化中心集群
- 每个自动化控制器集群有两个执行节点
- 访问 console.redhat.com 服务,如 Red Hat Insights 和 Service Catalog
为了实现 PostgreSQL 数据库的 HA,当推送或合并事件在 Git 存储库上触发时,会使用与 Git Webhook 的代码配置,该事件将同时在 Ansible Site 1 和 Ansible Site 2 上配置指定事件。
最后,为了确保日志记录一致性,将安装高度可用的日志记录环境,这两个 Ansible Automation Platform 环境都将使用。
第 2 章 先决条件
安装此高可用性 Ansible Automation Platform 2.1 参考环境 在每个 站点中使用以下内容:
- 三个 control plane 节点
- 一个 control plane 数据库节点
- 两个执行节点
- 三个自动化中心节点
- 一个自动化中心数据库节点
- 用于自动化中心安装的共享文件系统(/var/lib/pulp)
这些节点不需要是物理服务器。
2.1. 节点要求
表 2.1. 执行节点
| 执行节点 | 必填 | 备注 |
| RAM | 16Gb | |
| CPU | 4 |
|
表 2.2. 自动化控制器节点
| 控制节点 | 必填 | 备注 |
| RAM | 16Gb | |
| CPU | 4 |
|
| 磁盘:服务节点 | 40GB 专用硬盘空间 |
|
| 磁盘:数据库节点 | 20GB 专用的硬盘空间 |
|
| 浏览器 | 当前支持的 Mozilla FireFox 或 Google Chrome 版本 | |
| 数据库 | PostgreSQL 版本 12 |
表 2.3. Automation hub 节点
| Automation hub 节点 | 必填 | 备注 |
| RAM | 最小 8GB |
|
| CPU | 最少 2 个 |
|
| 磁盘:服务节点 | 40GB 专用硬盘空间 |
|
| 磁盘:数据库节点 | 20GB 专用的硬盘空间 |
|
| 浏览器 | 当前支持的 Mozilla FireFox 或 Google Chrome 版本 | |
| 数据库 | PostgreSQL 版本 12 |
表 2.4. 数据库节点
| 数据库节点 | 必填 | 备注 |
| RAM | 16GB | |
| CPU | 4 | |
| 磁盘 | 20GB 专用的硬盘空间 |
|
所有自动化控制器数据都存储在 PostgreSQL 数据库中。通过管理的主机数量、作业运行数量、事实缓存中存储的 fact 数量以及单个作业中的任务数量,数据库存储会增加。例如,一个 playbook 在 250 个主机之间每小时运行一次(一天 24 次),20 个任务每周会将 800,000 个事件存储在数据库中。
如果没有为数据库保留足够空间,旧的作业和 fact 将需要定期清理。如需更多信息,请参阅自动化控制器 管理指南中的管理作业
2.2. 网络要求
Ansible Automation Platform 2.1 需要 Ansible Automation Platform 集群中的所有节点至少有一个网络。
要访问 Ansible Automation Platform 仪表板,需要一个可以访问 control plane 节点所在的网络的浏览器。如果要从外部访问 Ansible Automation Platform 仪表板,请确保在 control plane 节点中添加公共 IP 地址。
建议网络管理员为所有节点和适当的 DNS 记录设置静态 DHCP 地址。这样可确保在没有 DHCP 服务器时每个节点的 IP 地址保持恒定状态。要使用静态 IP 地址,请使用无限租期保留 IP 地址。
在本参考架构中,设置 DHCP 服务器,设置 DNS 记录和设置负载均衡器超出范围。
网络管理员应至少保留以下 IP 地址数,包括:
- 每个 control plane 节点有一个 IP 地址。
- 每个执行节点有一个 IP 地址。
- 每个自动化中心节点有一个 IP 地址。
- control plane 数据库的一个 IP 地址。
- 一个用于自动化中心数据库的 IP 地址。
- 用于 Ansible Automation Platform Site 1 的负载均衡器自动化控制器集群地址的一个 IP 地址。
- 用于 Ansible Automation Platform Site 2 的负载均衡器自动化控制器集群地址的一个 IP 地址。
- 用于 Ansible Automation Platform Site 1 的负载均衡器私有自动化中心集群地址的一个 IP 地址。
- 用于 Ansible Automation Platform Site 2 的负载均衡器私有自动化中心集群地址的一个 IP 地址。
此参考环境为每个站点保留 12 个 IP 地址。
下表提供了参考环境的 Ansible Site 1 示例。
| 使用方法 | 主机名 | IP |
| Control Plane 1 | controlplane-1.site1.example.com | 192.168.0.10 |
| Control Plane 2 | controlplane-2.site1.example.com | 192.168.0.11 |
| Control Plane 3 | controlplane-3.site1.example.com | 192.168.0.12 |
| Control Plane 数据库 | controlplane-db.site1.example.com | 192.168.0.13 |
| Control Plane 集群地址 | controlplane-cluster.site1.example.com | 192.168.0.14 |
| 执行节点 1 | executionnode-1.site1.example.com | 192.168.0.15 |
| 执行节点 2 | executionnode-2.site1.example.com | 192.168.0.16 |
| Automation Hub 节点 1 | automationhub-1.site1.example.com | 192.168.0.17 |
| Automation Hub 节点 2 | automationhub-2.site1.example.com | 192.168.0.18 |
| Automation Hub 节点 3 | automationhub-3.site1.example.com | 192.168.0.19 |
| Automation Hub 数据库 | automationhub-db.site1.example.com | 192.168.0.20 |
| Automation Hub 集群 | automationhub-cluster.site1.example.com | 192.168.0.21 |
2.3. 节点验证清单
以下是所有要求的概述:
- odc 用于控制器节点和执行节点的 16 GB RAM
- <.> 用于私有自动化中心节点的 8 GB RAM
- <.> 为控制器节点和执行节点的 4 个 CPU
- <.> 2 个用于私有自动化中心节点的 CPU
- <.> 20 GB+ 磁盘空间用于数据库节点
- <.> 非数据库节点的 40 GB+ 磁盘空间
- <.> DHCP 保留使用无限租期来部署使用静态 IP 地址的集群。
- <.> 所有节点的 DNS 记录
- <.> 为所有节点安装 Red Hat Enterprise Linux 8.4 或更高的 64 位版本(x86)
- <.> 为所有节点配置 chrony
- <.> 为所有节点安装 Ansible-core 版本 2.11 或更高版本
第 3 章 Ansible Automation Platform Controller 配置详情
此参考架构侧重于在 Red Hat Enterprise Linux 8.4 x86_64 上使用自动化网格部署 Ansible Automation Platform 2.1。配置旨在提供全面的 Ansible Automation Platform 解决方案。本参考构架中涵盖的关键解决方案组件包括:
- Red Hat Enterprise Linux 8.4
- Ansible Automation Platform 2.1
- 自动化网格
- 私有自动化中心
3.1. 网络配置
3.1.1. chrony 配置
集群中的每个 Ansible Automation Platform 节点都必须有权访问 NTP 服务器。chronyd 是一个用于同步系统时钟的守护进程。它可以与 NTP 服务器同步时钟。这样可确保当集群节点使用需要验证的 SSL 证书时,如果节点之间的日期和时间没有同步,则不会失败。
在所有节点上,
如果没有安装,请安装
chrony,如下所示# dnf install chrony --assumeyes
使用文本编辑器(如
vi)编辑/etc/chrony.conf文件。# vi /etc/chrony.conf
找到以下公共服务器池部分,再修改 以包含相应的服务器。只需要一个服务器,但建议使用三个服务器。添加 iburst 选项,以加快与服务器正确同步所需的时间。
# Use public servers from the pool.ntp.org project. # Please consider joining the pool (http://www.pool.ntp.org/join.html). server <ntp-server-address> iburst-
将所有更改保存到
/etc/chrony.conf文件中。 启动并启用
chronyd守护进程在主机引导时启动。# systemctl --now enable chronyd.service
验证 chronyd 守护进程状态。
# systemctl status chronyd.service
3.2. 操作系统配置
3.2.1. Red Hat Subscription Manager
subscription-manager 命令将系统注册到 Red Hat Network (RHN),并管理系统的订阅权利。--help 选项在命令行中指定,以查询可用选项的命令。如果与 command 指令一起发出 --help 选项,则会列出可用于特定 command 指令的选项。
要使用红帽订阅管理为系统提供软件包,系统必须首先注册到该服务。要注册系统,请使用 subscription-manager 命令并传递 register 命令指令。如果指定了 --username 和 --password 选项,则命令不会提示输入 RHN 网络身份验证凭据。
以下是使用 subscription-manager 注册系统的示例。
# subscription-manager register --username [User] --password '[Password]'
The system has been registered with id: abcd1234-ab12-ab12-ab12-481ba8187f60
注册系统后,必须将其附加到授权池。在本参考环境中,Red Hat Ansible Automation Platform 是所选的池。识别并订阅 Red Hat Ansible Automation Platform 权利池,需要以下命令指令。
# subscription-manager list --available | grep -A8 "Red Hat Ansible Automation Platform"
---
Subscription Name:   Red Hat Ansible Automation Platform, Premium (5000 Managed Nodes)
Provides:            Red Hat Ansible Engine
                     Red Hat Single Sign-On
                     Red Hat Ansible Automation Platform
SKU:                 MCT3695
Contract:            <contract>
Pool ID:             <pool_id>
Provides Management: No
Available:           9990
Suggested:           1
Service Type:        L1-L3
Roles:
# subscription-manager attach --pool <pool_id>
Successfully attached a subscription for: Red Hat Ansible Automation Platform, Premium (5000 Managed Nodes)# subscription-manager repos --enable=ansible-automation-platform-2.1-for-rhel-8-x86_64-rpms
3.2.2. 用户帐户
在安装 Ansible Automation Platform 2.1 之前,建议为部署过程创建一个具有 sudo 特权的非 root 用户。此用户用于:
- SSH 连接
- 在安装过程中进行免密码身份验证
然而,出于此参考环境,选择了 ansible 用户,但任何用户名都会挂起。
在所有节点上,创建一个名为 ansible 的用户并生成 ssh 密钥。
创建非 root 用户
# useradd ansible
为您的
ansible用户设置密码。# passwd ansible
以
ansible用户身份生成ssh密钥。$ ssh-keygen -t rsa
将
sudo用作ansible用户时禁用密码要求# echo "ansible ALL=(ALL) NOPASSWD:ALL" | sudo tee -a /etc/sudoers.d/ansible
3.2.3. 将 SSH 密钥复制到所有节点
以 ansible 用户身份创建 ansible 用户,将 ssh 密钥复制到所有节点。这样可确保在 Ansible Automation Platform 安装运行时,它可以在没有密码的情况下 ssh 到所有节点。
这可以通过 ssh-copy-id 命令完成,如下所示:
$ ssh-copy-id ansible@hostname.example.com
如果在云供应商中运行,您可能需要创建一个 ~/.ssh/authorized_keys 文件,其中包含所有节点上的 ansible 用户的公钥,并将权限设置为 authorized_keys 文件,使其只能具有读写访问权限(权限 644)。
3.2.4. 配置防火墙设置
防火墙访问和限制在保护 Ansible Automation Platform 2.1 环境时扮演了关键角色。Red Hat Enterprise Linux 8.4 的使用默认为使用 firewalld,它是一个动态防火墙守护进程。firewalld 的工作原理是将网络区分配给网络及其关联的连接和接口。
建议将防火墙配置为允许访问成功 Ansible Automation Platform 2.1 安装的适当服务和端口。
在所有节点上,确保已安装、启动和启用 firewalld。
安装
firewalld软件包# dnf install firewalld --assumeyes
启动
firewalld服务# systemctl start firewalld
启用
firewalld服务# systemctl enable firewalld
第 4 章 Ansible Automation Platform Controller 数据库配置详情
4.1. 配置控制器数据库防火墙设置
对于成功的 Ansible Automation Platform 安装,其中一个先决条件是在数据库节点上启用数据库端口。使用的端口由 清单文件中的 pg_port 配置。
清单文件片断
pg_port='5432'
在数据库节点中,以 ansible 用户身份设置用于安装的 firewalld 端口。
确保
firewalld正在运行。$ sudo systemctl status firewalld
在控制器数据库节点上添加
firewalld端口(例如端口 5432)$ sudo firewall-cmd --permanent --zone=public --add-port=5432/tcp
重新加载
firewalld$ sudo firewall-cmd --reload
确认端口已打开
$ sudo firewall-cmd --list-ports
第 5 章 Ansible Automation Platform 执行和 Hop 节点配置详情
5.1. 配置执行和跃点节点的防火墙设置
对于成功的 Ansible Automation Platform 安装,其中一个先决条件是在网格节点上启用自动化网格端口(execution 和 hop 节点)。用于所有节点上的网格网络的默认端口被设置为 27199/tcp,但可以通过将 receptor_listener_port 指定为 清单文件中的 每个节点变量来配置为使用不同的端口。
清单文件片断
receptor_listener_port=27199
对于此参考环境,所有 Ansible Automation Platform 2 控制器节点被指定为节点类型 控制。如果将控制节点指定为 混合节点 (默认节点类型),则需要启用网格端口(默认为 27199/tcp)。
在跃点和执行节点中,以 ansible 用户身份:
确保
firewalld正在运行。$ sudo systemctl status firewalld
在跃点和执行节点上添加
firewalld端口(如端口 27199)$ sudo firewall-cmd --permanent --zone=public --add-port=27199/tcp
重新加载
firewalld$ sudo firewall-cmd --reload
确认端口已打开
$ sudo firewall-cmd --list-ports
第 6 章 安装 Ansible Automation Platform 2.1
Ansible Automation Platform 2.1 安装利用自动化控制器和自动化网格提供简单、安全且灵活的处理自动化工作负载方法。
自动化控制器通过其 UI、Restful API、RBAC 工作流和 CI/CD 集成提供控制平面来实现自动化。
自动化网格是一个覆盖网络,它可以通过使用现有网络相互建立对等连接的节点,简化在大型和分散的 worker 集合间工作分布的功能。
使用自动化网格时,您可以:
- 在不停机的情况下动态扩展集群容量
- 分离执行和控制平面
- 当中断可能自动存在时,将执行重新路由到不同的路径
以下步骤提供使用自动化网格部署集群 Ansible Automation Platform 2.1 的逐步步骤。
以下安装是在此参考环境 Ansible Automation Platform 集群的 Ansible Site 1 中完成的。完成后,确保遵循 Ansible Site 2 的同一步骤。
在 controlplane-1.site1.example.com 上,以 ansible 用户身份执行以下操作:
- 下载 Ansible Automation Platform 2.1 Setup tar ansible-automation-platform-setup-2.1.0-1.tar.gz
解压 ansible-automation-platform-setup-2.1.0-1.tar.gz
$ tar zxvf ansible-automation-platform-setup-2.1.0-1.tar.gz
将目录更改为 ansible-automation-platform-setup-2.1.0-1.tar.gz
cd ansible-automation-platform-setup-2.1.0-1/
备份现有 清单文件
$ cp inventory inventory.bkup
安装
ansible-core软件包$ sudo dnf install ansible-core --assumeyes
修改清单,使其包含与您的环境相关的信息。以下是此参考环境的示例。
[automationcontroller]
controlplane-1.site1.example.com ansible_connection=local
controlplane-2.site1.example.com
controlplane-3.site1.example.com

[automationcontroller:vars]
node_type=control 1
peers=execution_nodes 2

[execution_nodes]
executionnode-1.site1.example.com peers=executionnode-2.site1.example.com 3
executionnode-2.site1.example.com

[database]
controldatabase.site1.example.com 4

[all:vars]
#Handled by Ansible Vault
admin_password='' 5

pg_host='controldatabase.site1.example.com' 6
pg_port='5432' 7

pg_database='awx'
pg_username='awx'

#Handled by Ansible Vault
pg_password='' 8

pg_sslmode='prefer'

registry_url=’registry.redhat.io’ 9
registry_username='myusername' 10

#Handled by Ansible Vault
registry_password='' 11
- 1
- 控制节点运行项目和清单更新和系统作业,但不运行执行作业。这些节点上禁用了执行功能。
- 2
- 对等关系定义节点到节点的连接。在 control plane 节点和执行节点之间建立对等关系。
- 3
- 设置执行节点之间的对等关系。
- 4
- 设置将为控制器安装安装 PostgreSQL 数据库的节点。
- 5
- 设置 admin 用户的密码,在安装完成时访问 UI。
- 6
- 设置 PostgreSQL 主机(数据库节点)。
- 7
- 设置用于数据库节点的 PostgreSQL 端口。
- 8
- 设置 PostgreSQL 数据库的密码。
- 9
- 执行环境镜像已下载并包含在您的安装中。下载镜像所需的正确凭证。
- 10
- 用于访问 registry_url 的用户凭据。
- 11
- 用于访问 registry_url 的密码凭证。
创建一个标记为 credentials.yml 的文件,它将存储加密凭证。
$ cat credentials.yml
admin_password: my_long_admin_pw
pg_password: my_long_pg_pw
registry_password: my_long_registry_pw
使用
ansible-vault加密 credentials.yml 文件。$ ansible-vault encrypt credentials.yml
New Vault password:
Confirm New Vault password:
Encryption successful
警告将加密的 vault 密码存储在安全的地方。
验证 credentials.yml 文件是否已加密
$ cat credentials.yml
$ANSIBLE_VAULT;1.1;AES256
36383639653562386534316333333961383336306465336465613831353435313530376464616539
3765393063303065323466663330646232363065316666310a373062303133376339633831303033
34313534383962613632303761636632623932653062343839613639653635643365616233313365
3636616639313864300a353239373433313339613465326339313035633565353464356538653631
63346434383534643237663862353361366632613634333231316334363939396461326561643336
3430633534303935646264633034383966336232303365383763
运行
setup.sh用于安装 Ansible Automation Platform 2.1,并传递 credentials.yml,以及 --ask-vault-pass 选项$ ANSIBLE_BECOME_METHOD='sudo' ANSIBLE_BECOME=True ANSIBLE_HOST_KEY_CHECKING=False ./setup.sh -e @credentials.yml -- --ask-vault-pass
注意设置了以下 ANSIBLE*_ 变量,以确保安装成功。
注意有关清单文件中可设置的不同值的更多信息,请访问: 设置清单文件
- 登录到 Ansible Automation Platform 仪表板,如 controlplane-cluster.site1.example.com
通过订阅清单或用户名/密码激活 Ansible Automation Platform 订阅。
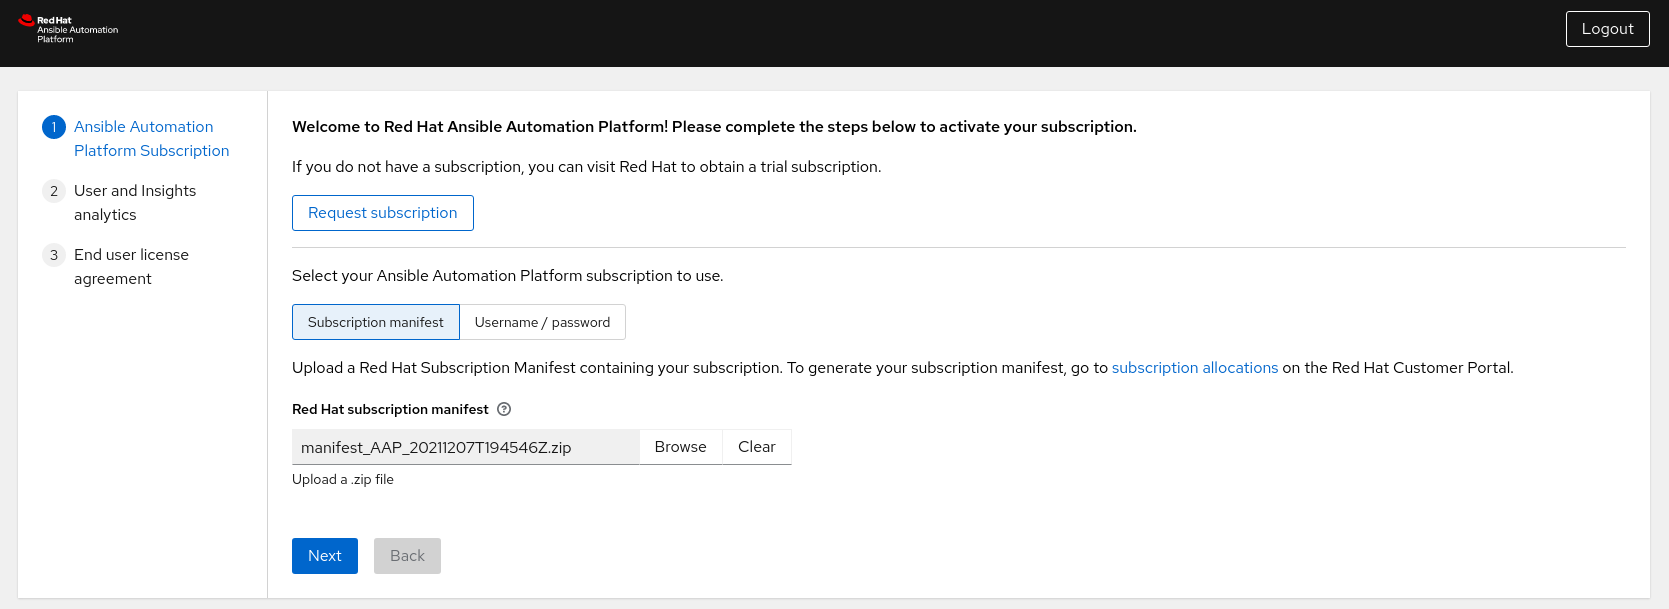 注意
注意可以找到生成订阅清单的步骤 附录 D, 生成订阅清单
第 7 章 私有 Automation Hub
Automation Hub 是认证集合的中心位置。它充当可信、经过测试和支持的内容的主要来源。私有自动化中心使自动化开发人员能够协作和发布自己的自动化内容,并简化在其机构中交付 Ansible 代码的能力。
Ansible Automation Platform 2.1 中的私有自动化中心主要提供对自动化执行环境的支持。执行环境是定义、构建和分发自动化运行环境的标准化方法。在 nutshell 中,自动化执行环境是容器镜像,允许由平台管理员更轻松地管理 Ansible。
7.1. 高可用性 Automation Hub 的要求
7.1.1. 启用防火墙服务
作为高可用性自动化中心环境的一部分,由于需要使用共享文件系统,应启用以下防火墙服务,以确保成功挂载文件系统,如下一节所示。
在每个 自动化中心节点上,以 ansible 用户身份:
确保启用了以下
firewalld服务(nfs、mountd、rpc-bind)。$ sudo firewall-cmd --zone=public --add-service=nfs $ sudo firewall-cmd --zone=public --add-service=mountd $ sudo firewall-cmd --zone=public --add-service=rpc-bind
重新加载
firewalld以使更改生效。$ sudo firewall-cmd --reload
验证
firewalld服务是否已启用$ sudo firewall-cmd --get-services
第 8 章 安装私有 Automation Hub
设置好所有先决条件后,最后一步是修改集群的自动化中心安装并运行 setup.sh 的清单文件。
在这个引用环境中,controlplane-1.site1.example.com 系统用于运行集群的自动化中心环境的 setup.sh,因为它可以访问所有节点。
以下安装是在此参考环境 Ansible Automation Platform 集群的站点 Ansible Site 1 中完成的。完成后,确保遵循 Ansible Site 2 的同一步骤。
在 controlplane-1.site1.example.com 上,以 ansible 用户身份执行以下操作:
将目录更改为 ansible-automation-platform-setup-2.1.0-1.tar.gz
cd ansible-automation-platform-setup-2.1.0-1/
备份现有 清单文件
$ cp inventory inventory-controller.bkup
修改 清单文件,使其包含与您环境相关的信息。以下是此参考环境的示例。
[automationcontroller]

[automationcontroller:vars]

[execution_nodes]

[automationhub]
ahub-1.site1.example.com 1
ahub-2.site1.example.com
ahub-3.site1.example.com


[database]
ahub-db.site1.example.com 2

[servicescatalog_workers]

[sso]

[all:vars]
admin_password=''

pg_host=''
pg_port=''

pg_database=''
pg_username=''
pg_password=''
pg_sslmode=''  # set to 'verify-full' for client-side enforced SSL

registry_url= 'registry.redhat.io' 3
registry_username='myusername' 4


#Handled by Ansible vault
registry_password='' 5

receptor_listener_port=27199

#Handled by Ansible vault
automationhub_admin_password='' 6

automationhub_pg_host='ahub-db.site1.example.com' 7
automationhub_pg_port='5432' 8

automationhub_pg_database='automationhub'
automationhub_pg_username='automationhub'

#Handled by Ansible vault
automationhub_pg_password='' 9

automationhub_pg_sslmode='prefer'

sso_console_admin_password=''
注意有关 Ansible Automation Platform 控制器安装的所有信息已被删除。
创建一个标记为 credentials_ah.yml 的文件,它将存储加密凭据。
$ cat credentials_ah.yml
automationhub_admin_password: my_long_ahub_pw
automationhub_pg_password: my_long_ahub_pw
registry_password: my_long_registry_pw
使用
ansible-vault加密 credentials_ah.yml 文件。$ ansible-vault encrypt credentials_ah.yml
New Vault password:
Confirm New Vault password:
Encryption successful
警告将加密的 vault 密码存储在安全的地方。
验证 credentials_ah.yml 文件是否已加密
$ cat credentials_ah.yml
$ANSIBLE_VAULT;1.1;AES256
36383639653562386534316333333961383336306465336465613831353435313530376464616539
3765393063303065323466663330646232363065316666310a373062303133376339633831303033
34313534383962613632303761636632623932653062343839613639653635643365616233313365
3636616639313864300a353239373433313339613465326339313035633565353464356538653631
63346434383534643237663862353361366632613634333231316334363939396461326561643336
3430633534303935646264633034383966336232303365383763
运行
setup.sh用于安装 Ansible Automation Platform 2.1,并传递 credentials_ah.yml,以及 --ask-vault-pass 选项$ ANSIBLE_BECOME_METHOD='sudo' ANSIBLE_BECOME=True ANSIBLE_HOST_KEY_CHECKING=False ./setup.sh -e @credentials_ah.yml -- --ask-vault-pass
注意设置了以下 ANSIBLE*_ 变量,以确保安装成功。
注意有关清单文件中可设置的不同值的更多信息,请访问: 设置清单文件
- 登录到私有自动化中心仪表板,如 automationhub-cluster.site1.example.com
第 9 章 集中式日志记录
当我们考虑日志记录时,最需要考虑的第一个想法是解决特定问题的能力。随着技术不断演变以及许多应用程序捕获的大量数据,日志在不仅捕获数据方面扮演着重要角色,还允许应用操作智能方法。
Ansible Automation Platform 提供了一个日志记录功能,允许该功能将详细日志发送到多种第三方外部日志聚合服务。连接到此数据源的服务非常有用,可以深入了解自动化控制器的使用情况或技术趋势。数据可用于分析基础架构中的事件、监控异常情况,并将一个服务中的事件与另一个服务中的事件相关联。
自动化控制器最有用的数据类型是作业事实数据、作业事件/作业运行、活动流数据和日志消息。数据以 JSON 格式通过 HTTP 连接发送,使用自定义处理程序中设计的最小服务特定调整,或者通过导入的库发送。
Ansible Automation Platform 中的日志记录功能目前已设置为使用 Splunk、Logstash、Loggly、Sumologic,并提供 其他选项 (如果您想使用不同的第三方外部日志聚合服务)。
在本参考环境中,重点是使用 Splunk Enterprise 8.2.2 在 Ansible Automation Platform 站点间设置集中式日志记录。
Splunk Enterprise 的安装超出了此参考架构的范围。详情请参阅: 如何安装 Splunk Enterprise
9.1. 设置 Splunk HTTP 事件收集器(HEC)
HTTP 事件收集器是一个端点,允许开发人员使用基于令牌的身份验证模型通过 HTTP 或 HTTPS 直接将应用程序事件发送到 Splunk 平台。
要使用 HEC,第一步是在 Splunk 部署中启用 HEC。
作为 Splunk 管理员,
- 登录到您的 Splunk 仪表板。
- 点 Settings → Data Inputs → HTTP Event Collector。
- 单击右上角的 Global Settings。
- 在 All Tokens 切换选项中选择 Enabled (默认)。
-
为所有 HEC 令牌选择一个 默认 源类型,例如
_json - 如果您的 Splunk 部署使用 HTTPS,请选中 启用 SSL。
- 通过 HTTP 端口号 为 HTTP 输入设置专用 端口。默认值为 8088。
- 点击 Save。
图 9.1. 全局设置
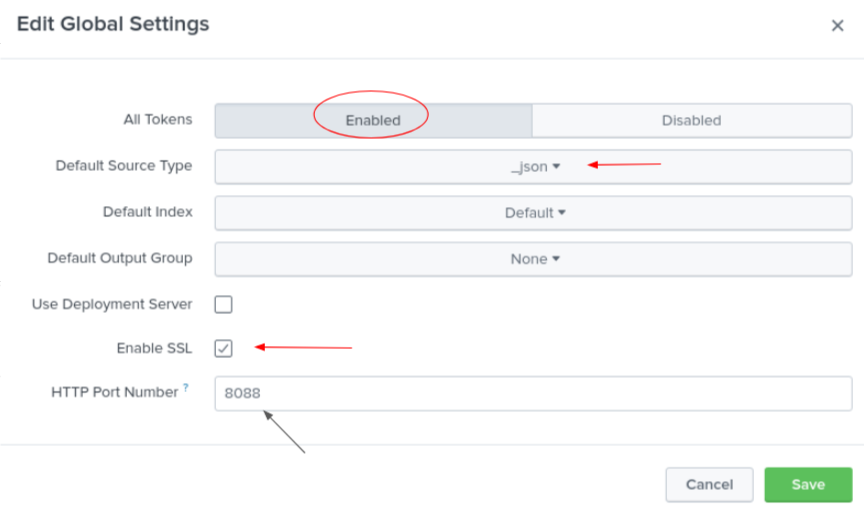
确保 Splunk 部署中打开了端口 8088 (或分配的端口)。
在 Splunk 部署中启用了 HEC 后,生成一个 HEC 令牌,它将用于通过 Splunk 进行自动化控制器身份验证。
虽然如何配置令牌以通过 HTTP 接收数据的方法不同,但以下是用于此参考环境的配置设置。
有关 HEC 的更多信息,请访问: HTTP 事件收集器
- 点 Settings → Add Data。
- 选择页面底部的 monitor。
- 单击 HTTP Event Collector。
- 在 Name 字段中输入您的令牌名称,例如 AAP
- 将 Source Type 更改为 Select,然后在下拉菜单中选择 _json。
- 在索引中 , 创建标记为 ansible 的索引。
将新创建的索引添加到所选项框中。
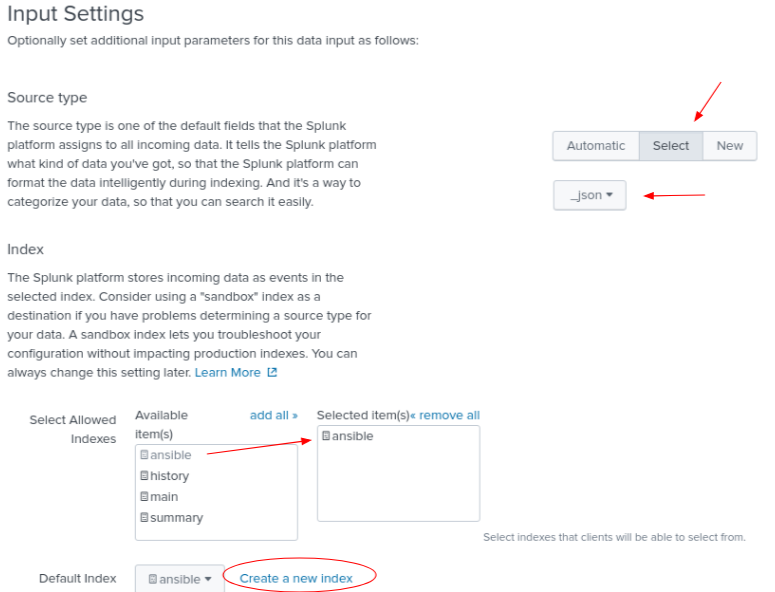
点右上角的 Review。
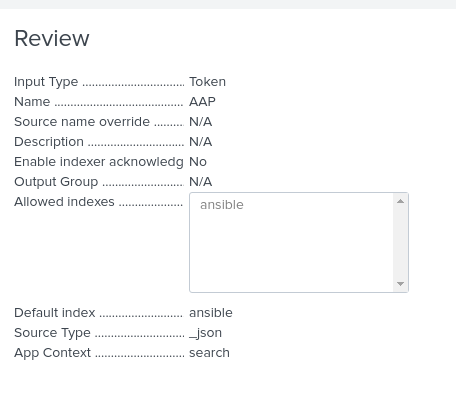
- 点 Submit。
存储创建的 Token 值,它将用于在 Ansible Automation Platform 上验证 Splunk
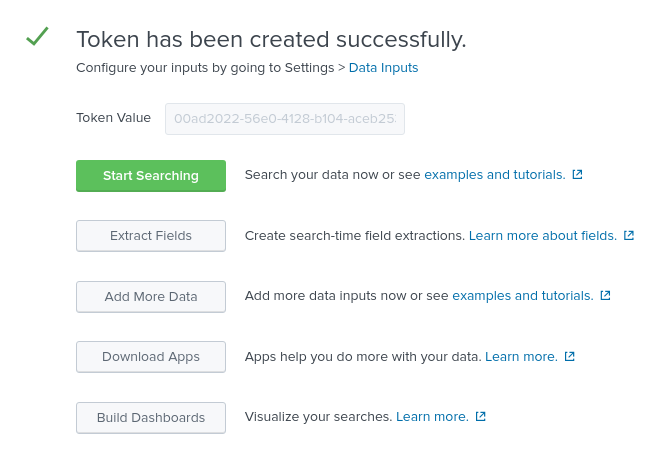
单击 Start Search green 按钮,再复制提供的示例查询以供以后使用。
source="http:AAP" (index="ansible") sourcetype="_json"
9.2. 配置 Ansible Automation Platform 自动化控制器
启用 HEC 并创建了 HEC 时,我们的 Splunk 环境已准备好从 Ansible Automation Platform 接收事件。
最后一步是将 Ansible Automation Platform 自动化控制器集群配置为使用 Splunk 环境进行集中式日志记录,如下所示。
在每个 Ansible Automation Platform 环境中,
-
以
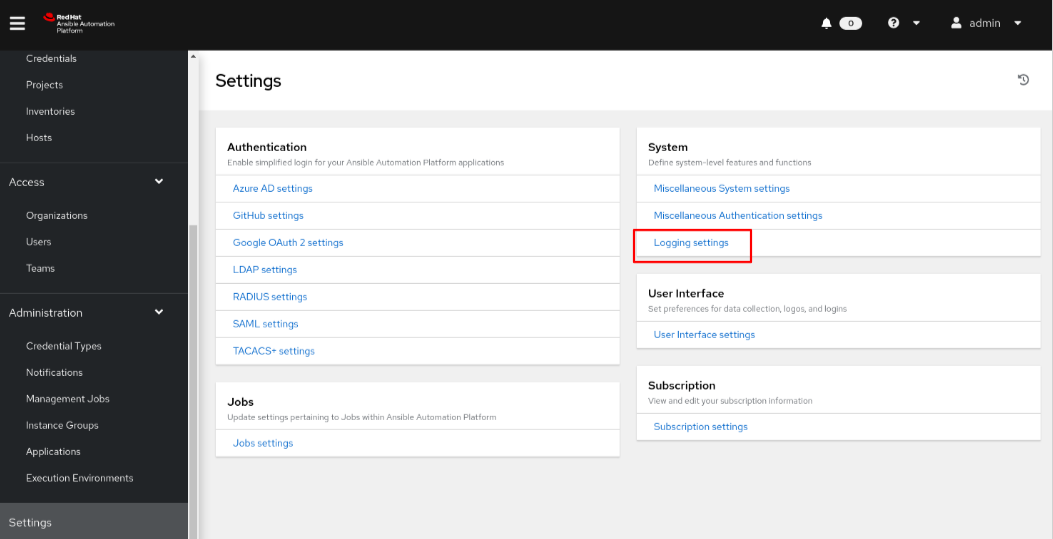
admin用户身份登录 Ansible Automation Platform 仪表板。 - 滚动到页面底部,然后单击 Settings。
在 System 下,选择 Logging settings。
在 日志记录聚合器 内,输入日志应发送到的位置。
这个 Splunk 环境使用 https://splunk.example.com:8088/services/collector/event
注意如果没有使用默认的 8088,请修改您的位置协议(HTTP/HTTPS)和端口。
- 在 Logging Aggregator Type 中,从下拉菜单中选择 mvapich。
- 在 日志记录聚合器密码/令牌中,复制并粘贴之前创建的 HEC 令牌。
- 在 日志记录聚合器协议中,从下拉菜单中选择 HTTPS/HTTP。
- 在 Logging Aggregator Level Threshold 中,为您的环境选择适当的日志记录级别,如 INFO
图 9.2. 参考环境日志记录设置
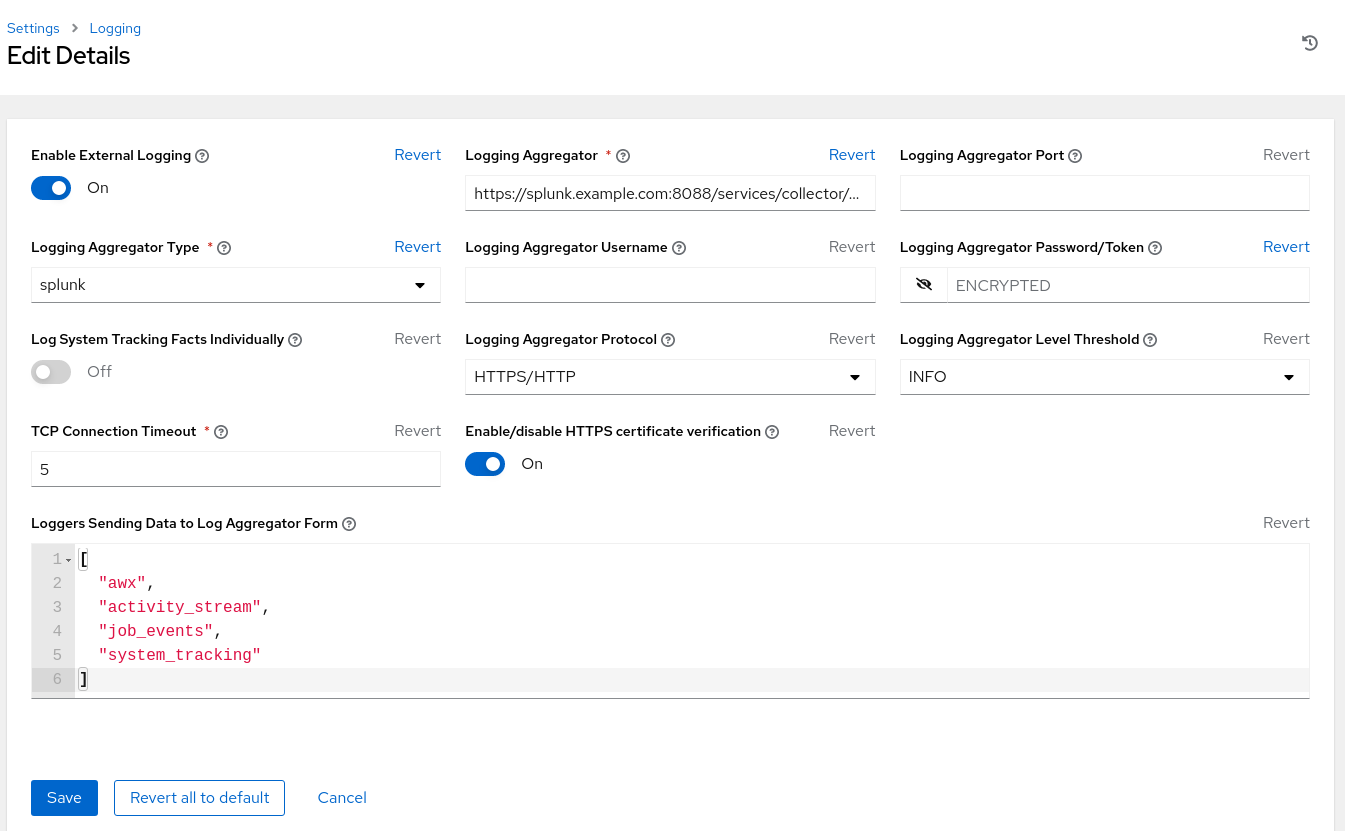
以上设置包括使用 Splunk 实现日志记录的最小设置。调整日志记录设置以最适合您的环境。
完成后,在站点两上重复日志记录功能配置。这样可确保两个站点都使用相同的集中式日志记录环境。
9.3. 验证发送到 Splunk 的事件
最后,验证 Ansible Automation Platform 事件是否正确发送到 Splunk。为完成此操作,请通过 Ansible Automation Platform 自动化控制器运行一个临时命令来确认。
在 Ansible Automation Platform 仪表板中,
- 在 Resources → Inventories 下,选择 Demo Inventory。
- 在详细信息 中,选择 Hosts。
- 点 Run Command 按钮。
- 在 Run command Details 窗口 部分,从下拉菜单中选择模块 ping,然后点 Next。
- 在 Run command Execution Environment 部分中,选择 Default execution environment 并点 Next。
- 在 Run command Credential 部分中,选择 Demo Credential,再单击 Next。
- 在 Run command Preview 部分中,单击蓝色 启动按钮。
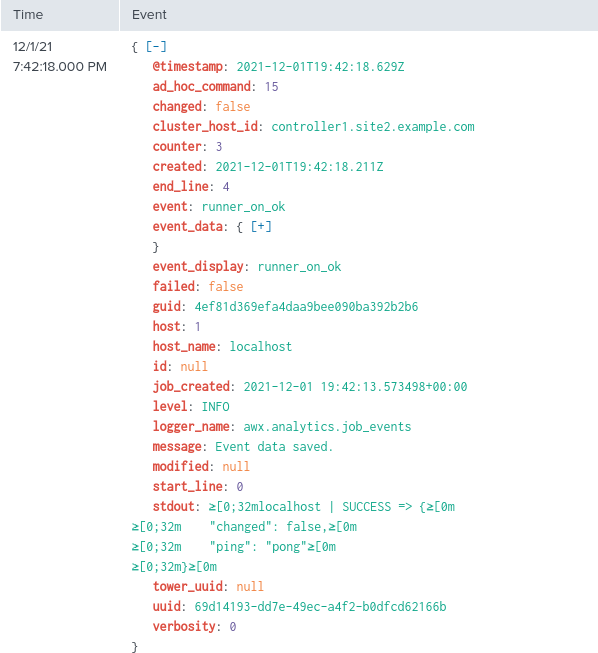
提供的输出应如下所示:
localhost | SUCCESS => {
    "changed": false,
    "ping": "pong"
}
现在,进入 Splunk 仪表板并在搜索中查看 Splunk 中是否触发了 Ansible Automation Platform 事件。
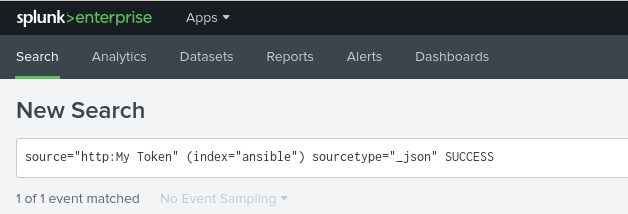
搜索应该显示类似如下的事件
为每个 Ansible Automation Platform 站点设置重复相同的验证过程。
第 10 章 在多 Ansible Automation Platform 部署间配置一致性
10.1. 为什么配置为代码?
传统上,当我们想在多个 Ansible Automation Platform 部署站点间保持一致性时,我们考虑使用数据库复制从一个 Ansible Automation Platform 环境复制数据,并将该数据导入到另一个 Ansible Automation Platform 站点。
这可以通过脚本、专用软件、手动将数据库导出,然后将 Ansible Automation Platform 数据库导入到新站点,甚至运行执行类似内容的自定义 Ansible playbook。
虽然有许多不同的方法,但这些方法通常与它们关联。
例如,数据库复制需要存储基础架构的投资,并且在没有适当专业知识的情况下,并发性可能很难实现。
10.2. 什么是代码配置?
作为代码配置被定义为管理存储库中配置文件的做法。对于 Ansible Automation Platform,这些配置文件将建立要在 Ansible Automation Platform 环境中应用的设置。
通过将 Ansible Automation Platform 配置文件存储和管理为代码,我们可以:
- 标准化应用到所有 Ansible Automation Platform 环境的设置
- 继承配置的版本控制的好处
- 轻松扩展额外的 Ansible Automation Platform 部署以使用相同的配置设置
- 轻松跟踪配置设置的更改,以便更轻松地解决问题
虽然将配置为代码提供了许多优点和最佳实践,但可以在 Ansible Automation Platform 环境中应用,从而简化并自动化将配置交付到多个 Ansible Automation Platform 站点,我们必须通过 Git Webhook 自动将配置作为代码解决方案配对。
10.3. 什么是 Git Webhook?
每当存储库或机构上发生某些操作时,Git Webhook 定义为将通知发送到外部 Web 服务器的方法。
例如,当更新存储库时,这可能会触发一个事件,该事件可能会触发 CI 构建、部署环境或在这种情况下,将配置更新至 Ansible Automation Platform 环境。
通过将配置作为代码和 Git Webhook 的解决方案,我们可以设置 Ansible Automation Platform 工作流,该流程会立即更新所有平台上的所有 Ansible Automation Platform 站点。
实际上,消除了维护数据库备份或启用昂贵的数据库复制解决方案所需的开销,同时实现这些解决方案。
考虑到这种方法,以下章节侧重于管理员如何使用 Git webhook 将配置用作代码,以确保跨多个 Ansible Automation Platform 环境的一致性。
10.4. 使用 Webhook
Webhook 提供了通过 Web 在应用程序间执行指定命令的功能。Ansible 自动化控制器目前提供 webhook 与 GitHub 和 GitLab 的集成。本参考环境描述了使用 GitHub 在自动化控制器中设置 Webhook 的步骤。
10.4.1. GitHub webhook 设置
自动化控制器可以根据触发的 webhook 事件运行作业。以下为设置提供了分步。
创建 GitHub 个人访问令牌
生成用于自动化控制器的个人访问令牌(PAT)。
- 在 GitHub 帐户的配置集设置中,点 Settings。
在 Personal settings 下,点 Developer Settings。
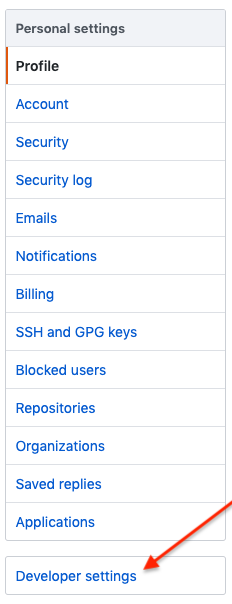
- 在 Developer 设置中,点 Personal access token。
- 在个人访问令牌屏幕中点 Generate new token 按钮。
- 提示时,请输入您的 GitHub 帐户密码以继续。
- 在 Note 字段中,输入有关此 PAT 用途的简要描述。
- 在 Expiration 下拉菜单中选择 No expiration。
在 Scope 字段中,自动化控制器 Webhook 只需要存储库范围访问权限,但邀请除外。有关其他范围的详情,请点击表上方的链接来访问文档。
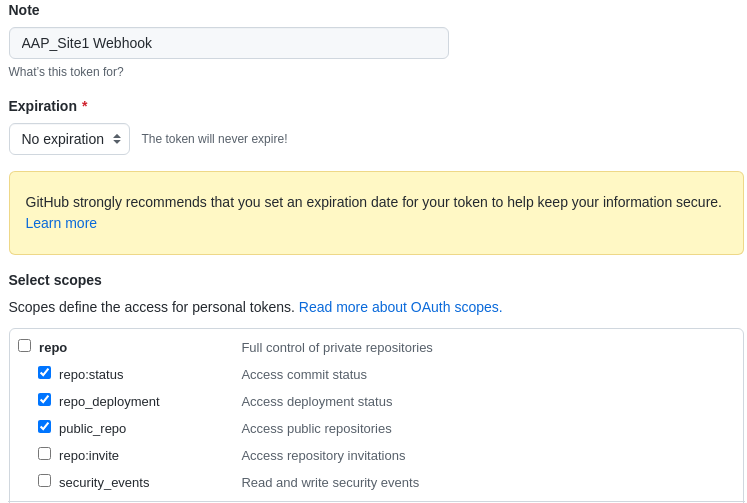
点页面底部的 Generate Token 按钮。
警告生成令牌后,请确保复制 PAT,因为它将在以后的步骤中供 Ansible Automation Platform 自动化控制器集群使用。在 GitHub 中您将无法再次访问此令牌。
创建 GitHub 存储库
在我们就位 PAT 后,下一步是创建一个 Git 存储库,在对存储库进行更改时由 GitHub Webhook 触发。
由于重点是能够轻松更新或修改我们的自动化控制器配置,因此此参考环境利用名为 redhat_cop.controller_configuration 的 Ansible 集合。
此 Ansible 集合允许使用控制器集合模块通过 Ansible 角色轻松与 Ansible 控制器服务器交互。
通过这个集合,我们可以使用这些预先存在的角色在所有站点中修改或更新我们的自动化控制器环境。
redhat_cop.controller_configuration 集合是一个社区项目,不受红帽支持。
在 GitHub 中,创建新存储库。
确保选择适当的 所有者 并提供 存储库名称。
- 此参考环境使用存储库名称 aap_refarch。
- 提供描述您的存储库的可选描述。
将您的存储库设置为公共或私有。
- 此参考环境将存储库 设置为公共。
- 使用 Add a README 文件 初始化存储库。
- 单击 创建存储库按钮。
在新创建的 GitHub 存储库中,会创建三个文件。
- playbook.yml - 具有所有适当角色的 playbook,以更新或修改我们的自动化控制器。
- requirements.yml - 一个 requirements.yml 文件,其中包含运行 playbook 所需的所有集合。
- group_vars/ all.yml - 包含要修改特定配置(role)的所有变量的 all.yml 文件。
这三个文件的目的是提供一种在将 group_vars/all.yml 修改为存储库时的方法,这将在 Ansible Automation Platform 自动化控制器集群中启动作业模板,以进行适当的更改或更新。
这三个文件的示例可在本指南的 附录 C, supplemental 部分或 https://github.com/ansible/aap_refarch部分找到
在 Ansible Automation Platform 自动化控制器集群中设置资源凭证
在将存储库用作代码之前,请在 Ansible Automation Platform 站点中设置适当的凭证资源。
这可确保创建新项目、工作流和作业模板时,我们可以轻松地将这些凭据附加到这些资源。
以下步骤演示了如何创建我们的两个必要的凭证。
与之前创建的 GitHub (PAT)令牌关联的凭证。
与将更新的 Ansible Automation Platform 站点关联的其他凭证。每个 Ansible Automation Platform 站点都会自行更新,如 site1 更新 site1。
在每个 Ansible Automation Platform 网站上:
- 登录到 Ansible Automation Platform 自动化控制器仪表板
在 Resources→ Credentials 下,点蓝色 添加按钮。
- 提供一个名称,如 GitHub PAT
- 选择 GitHub Personal Access Token 作为 凭证类型。
- 在 Type Details 中,使用之前从 GitHub 生成的令牌添加 secret。
点击 Save。
注意记下此凭证的名称,因为它将用于回发到 GitHub 的作业模板。
设置 GitHub PAT 凭证后,为现有 Ansible Automation Platform 环境创建第二个凭证。
在 Resources→ Credentials 下,点蓝色 添加按钮。
- 提供一个名称 , 如 AAP_Site1
- 提供 Red Hat Ansible Automation Platform 作为 凭证类型。
在 Type Details 中,添加适当的详情
- Red Hat Ansible Automation Platform,如 controlplane-cluster.site1.example.com
- 用户名,如 admin
- 密码,例如 redhat
- 如果 SSL 证书已签名,请确保在 Options 中选择 Verify SSL。
- 点击 Save。
在 Ansible Automation Platform 站点 2 上重复此部分。
controlPlane-cluster.site1.example.com 使用,因为此引用环境利用负载均衡器。对负载均衡器的设置超出了此参考环境的范围。
创建配置作为代码项目
将配置作为代码项目的目的是创建一个工作流,其中包含一个作业模板,每次更新配置时会自动运行。
这样可确保当您进行更改(如设置变量)时,Git 存储库 playbook 为大量自动化控制器配置运行适当的角色。
本节会创建一个项目、工作流和作业模板来实现上述目的。
在一个仪表板的 Ansible Automation Platform 站点中,
- 在 Resources→ Projects 下,点蓝色 添加按钮。
- 提供一个名称 , 如 Configuration as Code Project
- 选择 Default 作为机构
- 选择 Default 执行环境 作为 Execution Environment
- 选择 Git 作为 Source Control Credential Type
在 类型详情中,
- 添加 Source Control URL (您的 GitHub 存储库)
选项内
- 选择 Clean,Delete,Update Revision on Launch
- 点击 Save。
接下来,创建一个工作流模板。
- 在 Resources→ Templates 下,点 blue Add → Add 工作流模板。
- 提供一个名称 , 如 Configuration as Code Workflow
在 Options 中,选中标记 启用 Webhook。
- 在 Webhook 详情中,选择 GitHub 作为 Webhook 服务。
- 在 Webhook 详情中,选择之前创建的 GitHub PAT 令牌作为 Webhook 凭证,如 GitHub PAT
- 点击 Save。
- 在 Please click the Start 按钮开始 窗口中,点右上角的 Save。
- 复制 Webhook URL 和 Webhook 密钥,因为它们将在以后使用。
在 Ansible Automation Platform 站点 2 上重复上述过程。
为存储库启用 GitHub Webhook
在创建了 Ansible Automation Platform 工作流模板以及带有所需文件的 GitHub 存储库时,下一步是为我们的存储库启用 Webhook,如 aap_refarch。
- 在 GitHub 存储库的主页中,选择 Settings 选项卡。
在 Settings 选项卡中,选择 Webhooks。
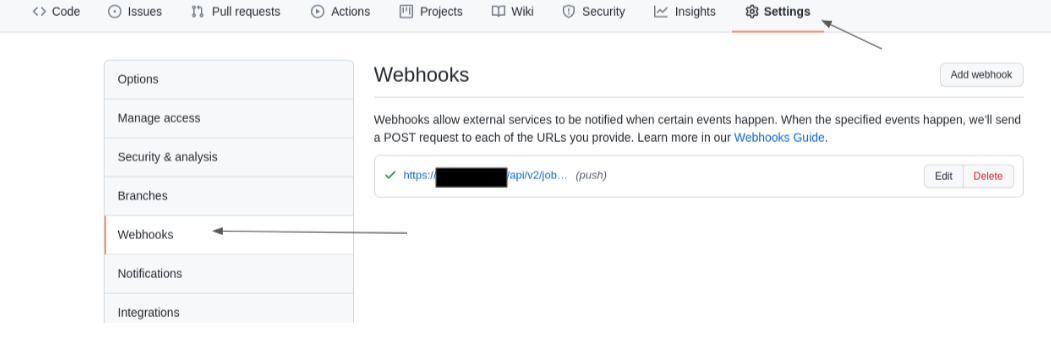
- 在 Webhooks 部分中,选择 Add webhook 按钮。
- 输入 Payload URL (工作流的Webhook URL)。
- 将 Content type 下拉菜单更改为 application/json。
- 输入 Secret (工作流的Webhook 密钥)。
保留默认值使用推送事件,然后单击添加 Webhook 按钮。
警告默认情况下,GitHub 在提供有效负载时验证 SSL 证书。如果您的自动化控制器 SSL 证书 没有签名,请确保 禁用SSL 验证。
在 Ansible Automation Platform 站点 2 上重复上述过程。
将配置创建为代码作业模板
为我们 的配置创建作业模板,因为代码项目 在每次更新 Git 存储库时都会自动运行 playbook.yml 文件。
这样可确保因为需要配置更改,我们可以使用 Ansible Automation Platform 控制器 API 来适当地进行这些更改。当我们在所有 Ansible Automation Platform 站点合并相同的方法时,所有更改都会在配置的站点间成为全局性。
- 在 Resources→ Templates 下,点 blue Add → Add job template。
- 提供 名称,如 Configuration as Code Job
- 选择 Run 作为 Job Type
- 选择 Demo Inventory 作为 清单
- 选择 Configuration as Code Project 作为项目
- 选择 Default 执行环境 作为 Execution Environment
- 选择 playbook.yml 作为 Playbook
- 选择 Credentials 并将类别从 Machine 切换到 Red Hat Ansible Automation Platform
- 为 Ansible Automation Platform 站点选择适当的凭证,如 AAP_Site1
- 在 Options 中,选择 Enable webhook。
- 选择 GitHub 作为 Webhook 服务。
- 选择之前创建的 GitHub PAT 令牌作为 Webhook 凭证,如 GitHub PAT
- 点击 Save。
在 Ansible Automation Platform 站点 2 上重复上述过程。
将创建的配置更新为代码工作流
在以前的版本中,创建了 Configuration as Code 工作流。此工作流的目的是确保 Configuration as Code Project 始终保持同步,并且 Configuration as Code 作业会在存储库更改时将配置作为代码 playbook 运行。
- 在 Resources→ Templates 下,选择您的模板。例如 Configuration as Code Workflow
- 在 Details 部分中,选择 Visualizer 选项卡,再单击绿色的 Start。
- 对于 Node Type,选择 Project Sync 并选择适当的项目,例如 Configuration as Code Project,然后单击 Save。
- 将鼠标悬停在 Configuration as Code Project 上,然后选择加号"+"符号。
- 在 Add Node 窗口中,选择 Always as to when this node should be execution,再单击 Next。
- 选择 Configuration as Code Job 作为 Node Type,再单击 Save。
- 返回可视化工具后,选择右上角的 Save 按钮。
验证配置作为代码设置
在 redhat_cop.controller_configuration 中已经包含的许多角色时,一个简单的方法来验证所有内容是否按预期工作,方法是使用适当的 yaml 更新 group_vars/all.yml 文件来创建用户。
如果要创建用户,我们会仔细查看 用户角色文档,以进一步查看我们的所有变量。
进一步审阅后,我们注意到创建一个名为 John 的非管理员用户,如下所示:
group_vars/all.yml
---
controller_user_accounts:
  - user: "john"
    is_superuser: false
    password: "redhat"
当使用以上更新 group_vars/all.yml 文件并推送到 Git 存储库后,Ansible Automation Platform 自动化控制器中的作业应该启动。
这可以通过在自动化控制器仪表板的 Views 部分下选择 Jobs 来验证。参考中的作业应具有作业的数量,后跟作业名称。对于此参考环境,您会看到类似于 8-Configuration as Code Job 的内容,并带有 TypePlaybook 运行
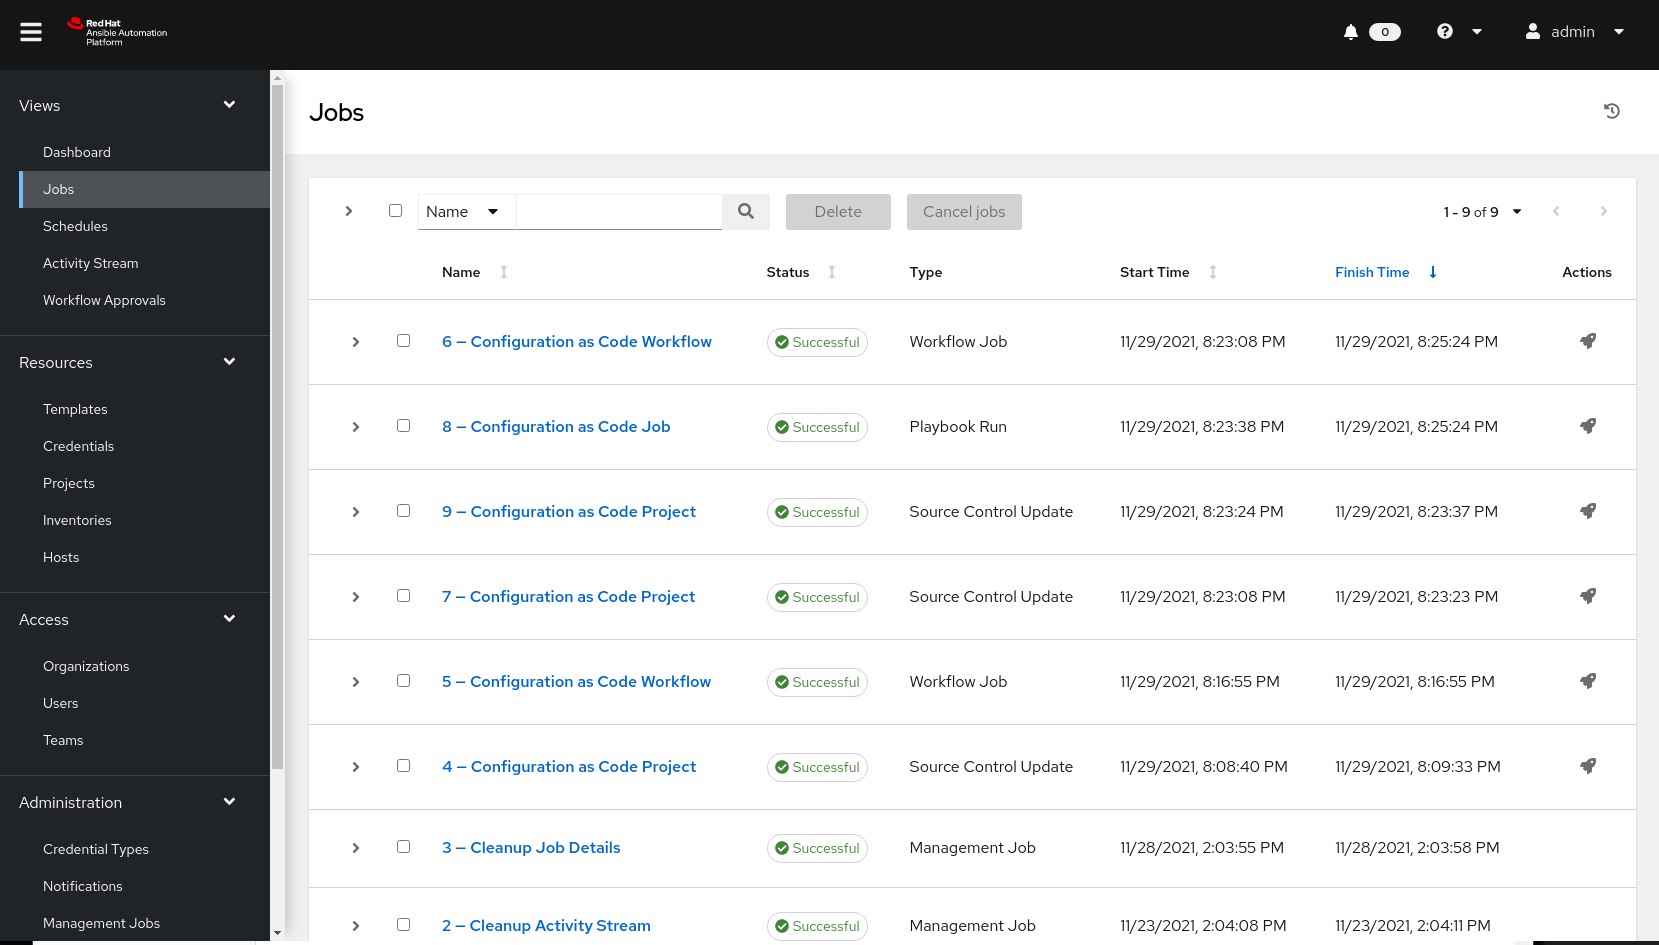
作业完成后,其状态将为 Successful。
以 admin 身份注销,并以用户 john 身份(使用密码 redhat 重新记录)应确认作业成功。
如果您遵循此整个章节,并为每个 Ansible Automation Platform 站点正确设置 Webhook,您会注意到用户 john 由对应的 Ansible Automation Platform 平台同时创建。
虽然本示例是简化的一个配置(角色),但允许配置 Ansible Automation Platform 自动化控制器的许多配置(角色)在 redhat_cop.controller_configuration 中提供。
可以在以下位置找到其他 示例:示例配置.
虽然 Ansible 集合具有您需要的许多关键角色,但不仅限于在此 Ansible 集合中可以找到的内容。您的机构可实施或创建新的角色,以进一步增强您的功能。
附录 A. 关于 Author
附录 B. 贡献者
当我们与此过程合作时,我们借此感谢以下个人的时间和变动。在没有很多贡献的情况下,无法实现本文档。
| 贡献者 | 标题 | 贡献 |
|---|---|---|
| Landon Holley | 高级咨询架构师 | 技术审查 |
| Ajay Chenampara | 主体专家解决方案架构师 | 技术审查 |
| 将主题 | 主体专家解决方案架构师 | 技术审查 |
| Sean Sullivan | 高级顾问 | 技术审查 |
| Vinny Valdez | 高级管理架构师 | 技术审查 |
| Chris Budzilowicz | 主体技术写器 | 内容审核 |
| shrink Avery | 高级 Ansible 专家解决方案架构师 | 技术审查 |
附录 C. supplemental
C.1. 配置自动化控制器 playbook
---
- name: Playbook to configure ansible Controller post installation
  hosts: localhost
  connection: local
  vars:
    controller_validate_certs: false
  collections:
    - awx.awx
    - redhat_cop.controller_configuration

  roles:
    - {role: settings, when: controller_settings is defined, tags: settings}
    - {role: organizations, when: controller_organizations is defined, tags: organizations}
    - {role: labels, when: controller_labels is defined, tags: labels}
    - {role: users, when: controller_user_accounts is defined, tags: users}
    - {role: teams, when: controller_teams is defined, tags: teams}
    - {role: credential_types, when: controller_credential_types is defined, tags: credential_types}
    - {role: credentials, when: controller_credentials is defined, tags: credentials}
    - {role: credential_input_sources, when: controller_credential_input_sources is defined, tags: credential_input_sources}
    - {role: notification_templates, when: controller_notifications is defined, tags: notification_templates}
    - {role: projects, when: controller_projects is defined, tags: projects}
    - {role: execution_environments, when: controller_execution_environments is defined, tags: execution_environments}
    - {role: applications, when: controller_applications is defined, tags: applications}
    - {role: inventories, when: controller_inventories is defined, tags: inventories}
    - {role: instance_groups, when: controller_instance_groups is defined, tags: instance_groups}
    - {role: project_update, when: controller_projects is defined, tags: projects}
    - {role: inventory_sources, when: controller_inventory_sources is defined, tags: inventory_sources}
    - {role: inventory_source_update, when: controller_inventory_sources is defined, tags: inventory_sources}
    - {role: hosts, when: controller_hosts is defined, tags: hosts}
    - {role: groups, when: controller_groups is defined, tags: inventories}
    - {role: job_templates, when: controller_templates is defined, tags: job_templates}
    - {role: workflow_job_templates, when: controller_workflows is defined, tags: workflow_job_templates}
    - {role: schedules, when: controller_schedules is defined, tags: schedules}
    - {role: roles, when: controller_roles is defined, tags: roles}
C.2. 用于自动化控制器配置的 group_vars/all.yml 变量文件(用户创建示例)
---
controller_user_accounts:
  - user: "colin"
    is_superuser: false
    password: "redhat"
C.3. 用于自动化控制器配置的 requirements.yml
collections:
- name: redhat_cop.controller_configuration
- name: awx.awx
附录 D. 生成订阅清单
要成功生成订阅清单:
- 登录 access.redhat.com,再单击左上角的 订阅。
- 选择 订阅分配 选项卡。
选择标有 New Subscription Allocation 的按钮。
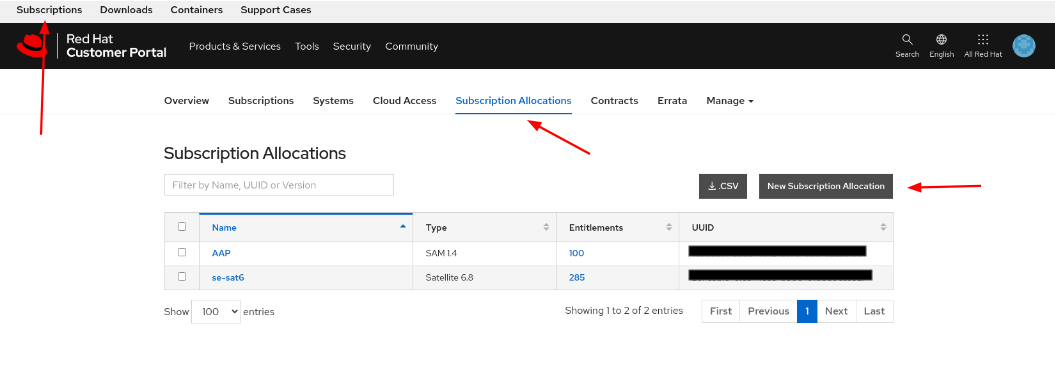
在 Create a New subscription allocation 页面中,从下拉菜单中选择 Name,为 Type 选择 Subscription Asset Manager 1.4,再点 Create。

- 创建后,选择 Subscriptions 选项卡,然后选择 Ansible Automation Platform 订阅以及您要提供的授权数。
点 Details 选项卡,查看权利数量正确,然后选择 Export Manifest 按钮。
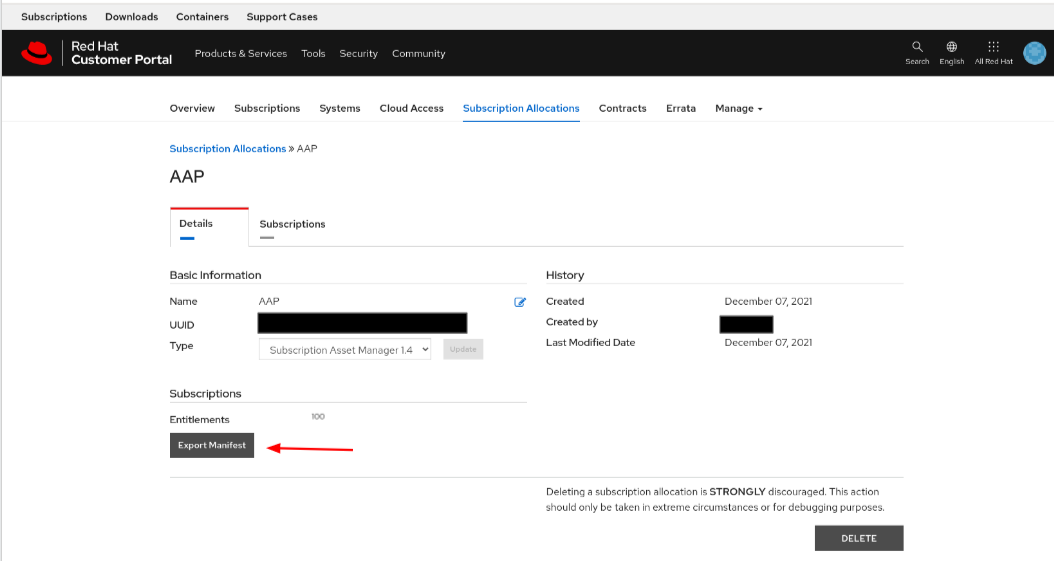
返回到 Ansible Automation Platform 仪表板,然后导入 manifest.zip,然后点 Next。
- (推荐)通过提供您的红帽或 Red Hat Satellite 凭证并点 Next,为 Ansible Automation Platform 启用用户分析和 Insights。
- 接受最终用户许可协议。
附录 E. 参考
- Red Hat Ansible Automation Platform 安装指南
- Joseph Tejal 将 Ansible Tower 日志聚合到 Splunk
- 使用 Ansible Tower 和 Splunk Enterprise 集中您的自动化日志( Leonardo Araujo)
- Tower 日志记录和聚合
- 在 Splunk Web 中设置和使用 HTTP 事件收集器
- Splunk - 管理索引器和索引器的集群
- Daniel Leroux 与私有 Automation Hub 发起
- Daniel Leroux 与私有 Automation Hub 的第 II 部分
- 自动化控制器工作流通过 Sean Sullivan 作为代码部署
附录 F. Revision History
| 修订历史 | ||
|---|---|---|
| 修订 1.2-0 | 2022-05-03 | Anshul Behl,Roger Lopez |
| ||
| 修订 1.1-0 | 2022-04-11 | Roger Lopez |
| ||
| 修订 1.0-0 | 2021-12-02 | Roger Lopez |
| ||