
Tuning performance in Identity Management
Optimizing the IdM services, such as Directory Server, KDC, and SSSD, for better performance
Résumé
Rendre l'open source plus inclusif
Red Hat s'engage à remplacer les termes problématiques dans son code, sa documentation et ses propriétés Web. Nous commençons par ces quatre termes : master, slave, blacklist et whitelist. En raison de l'ampleur de cette entreprise, ces changements seront mis en œuvre progressivement au cours de plusieurs versions à venir. Pour plus de détails, voir le message de notre directeur technique Chris Wright.
Dans le domaine de la gestion de l'identité, les remplacements terminologiques prévus sont les suivants :
- block list remplace blacklist
- allow list remplace whitelist
- secondary remplace slave
Le mot master est remplacé par un langage plus précis, en fonction du contexte :
- IdM server remplace IdM master
- CA renewal server remplace CA renewal master
- CRL publisher server remplace CRL master
- multi-supplier remplace multi-master
Fournir un retour d'information sur la documentation de Red Hat
Nous apprécions vos commentaires sur notre documentation. Faites-nous savoir comment nous pouvons l'améliorer.
Soumettre des commentaires sur des passages spécifiques
- Consultez la documentation au format Multi-page HTML et assurez-vous que le bouton Feedback apparaît dans le coin supérieur droit après le chargement complet de la page.
- Utilisez votre curseur pour mettre en évidence la partie du texte que vous souhaitez commenter.
- Cliquez sur le bouton Add Feedback qui apparaît près du texte en surbrillance.
- Ajoutez vos commentaires et cliquez sur Submit.
Soumettre des commentaires via Bugzilla (compte requis)
- Connectez-vous au site Web de Bugzilla.
- Sélectionnez la version correcte dans le menu Version.
- Saisissez un titre descriptif dans le champ Summary.
- Saisissez votre suggestion d'amélioration dans le champ Description. Incluez des liens vers les parties pertinentes de la documentation.
- Cliquez sur Submit Bug.
Chapitre 1. Important considerations when tuning IdM
Identity Management’s component services are tuned to work in an optimal way for most deployments. As a System Administrator, you may want to adjust the performance of IdM services to suit the demands of your specific environment.
Important considerations
- Each IdM deployment is a unique combination of hardware, software, networking, data, workloads, and many other factors. Adjustments that benefit one environment may be detrimental to another.
- Performance-tuning is an iterative, experimental process. Red Hat recommends making adjustments to only one variable at a time and monitoring its impact in your environment. After achieving the desired result with one variable, adjust the next variable while continuing to monitor the performance of previous adjustments.
Chapitre 2. Recommandations en matière de matériel
La mémoire vive est la caractéristique matérielle la plus importante à dimensionner correctement. Assurez-vous que votre système dispose de suffisamment de mémoire vive. Les exigences typiques en matière de RAM sont les suivantes
- Pour 10 000 utilisateurs et 100 groupes : au moins 4 Go de RAM et 4 Go d'espace de pagination
- Pour 100 000 utilisateurs et 50 000 groupes : au moins 16 Go de RAM et 4 Go d'espace d'échange
Pour les déploiements plus importants, il est plus efficace d'augmenter la mémoire vive que l'espace disque, car une grande partie des données est stockée dans la mémoire cache. En général, l'augmentation de la mémoire vive permet d'obtenir de meilleures performances pour les déploiements plus importants grâce à la mise en cache.
Une entrée utilisateur de base ou une entrée hôte simple avec un certificat a une taille d'environ 5 à 10 kB.
Chapitre 3. Basculement, équilibrage de la charge et haute disponibilité dans l'IdM
La gestion des identités (IdM) intègre des mécanismes de basculement pour les clients IdM, ainsi que des fonctions d'équilibrage de la charge et de haute disponibilité pour les serveurs IdM.
3.1. Capacité de basculement côté client
Par défaut, le service
SSSDd'un client IdM est configuré pour utiliser les enregistrements de ressources de service (SRV) du DNS afin de déterminer automatiquement le meilleur serveur IdM auquel se connecter. Ce comportement est contrôlé par l'option_srv_dans le paramètreipa_serverdu fichier/etc/sssd/sssd.conf:[root@client ~]# cat /etc/sssd/sssd.conf [domain/example.com] id_provider = ipa ipa_server = _srv_, server.example.com ...Si un serveur IdM est hors ligne, le service SSSD du client IdM se connecte à un autre serveur IdM qu'il a automatiquement découvert.
Si vous préférez éviter les recherches DNS pour des raisons de performance, supprimez l'entrée
_srv_du paramètreipa_serveret indiquez les serveurs IdM auxquels le client doit se connecter, par ordre de préférence :[root@client ~]# cat /etc/sssd/sssd.conf [domain/example.com] id_provider = ipa ipa_server = server1.example.com, server2.example.com ...
3.2. Équilibrage de la charge côté serveur et disponibilité des services
L'installation de plusieurs répliques IdM permet d'équilibrer la charge et d'assurer la haute disponibilité de l'IdM :
- Si vous disposez d'un réseau géographiquement dispersé, vous pouvez raccourcir le chemin entre les clients IdM et le serveur accessible le plus proche en configurant plusieurs répliques IdM par centre de données.
- Red Hat prend en charge les environnements comportant jusqu'à 60 répliques.
- Le mécanisme de réplication de l'IdM assure une disponibilité active/active des services : les services de toutes les répliques de l'IdM sont disponibles en même temps.
Red Hat recommande de ne pas combiner IdM et d'autres logiciels d'équilibrage de charge ou de haute disponibilité (HA).
De nombreuses solutions tierces de haute disponibilité supposent des scénarios actifs/passifs et provoquent des interruptions de service inutiles pour la disponibilité de l'IdM. D'autres solutions utilisent des IP virtuelles ou un seul nom d'hôte par service groupé. Toutes ces méthodes ne fonctionnent généralement pas bien avec le type de disponibilité de service fourni par la solution IdM. Elles s'intègrent également très mal à Kerberos, ce qui réduit la sécurité et la stabilité globales du déploiement.
Chapitre 4. Optimizing the replica topology
A robust replica topology distributes workloads and reduces replication delays. Follow these guidelines to optimize the layout of your replica topology.
4.1. Lignes directrices pour déterminer le nombre approprié de répliques IdM dans une topologie
- Mettre en place au moins deux répliques dans chaque centre de données (ce n'est pas une obligation absolue)
- Un centre de données peut être, par exemple, un bureau principal ou un emplacement géographique.
- Mettre en place un nombre suffisant de serveurs pour servir vos clients
- Un serveur de gestion d'identité (IdM) peut fournir des services à 2000 - 3000 clients. Cela suppose que les clients interrogent les serveurs plusieurs fois par jour, mais pas, par exemple, toutes les minutes. Si vous prévoyez des requêtes plus fréquentes, prévoyez plus de serveurs.
- Mettre en place un nombre suffisant de répliques de l'autorité de certification (CA)
- Seules les répliques sur lesquelles le rôle d'autorité de certification est installé peuvent répliquer les données des certificats. Si vous utilisez l'autorité de certification IdM, assurez-vous que votre environnement dispose d'au moins deux répliques d'autorité de certification avec des accords de réplication de certificats entre elles.
- Configurer un maximum de 60 répliques dans un seul domaine IdM
- Red Hat prend en charge les environnements comportant jusqu'à 60 répliques.
4.2. Lignes directrices pour la connexion des répliques IdM dans une topologie
- Connecter chaque réplique à au moins deux autres répliques
- La configuration d'accords de réplication supplémentaires garantit que les informations sont répliquées non seulement entre le réplica initial et le premier serveur que vous avez installé, mais aussi entre les autres réplicas.
- Connecter une réplique à un maximum de quatre autres répliques (ce n'est pas une exigence absolue)
Un grand nombre d'accords de réplication par serveur n'apporte pas d'avantages significatifs. Une réplique réceptrice ne peut être mise à jour que par une seule autre réplique à la fois et, pendant ce temps, les autres accords de réplication sont inactifs. Plus de quatre accords de réplication par réplique signifient généralement un gaspillage de ressources.
NoteCette recommandation s'applique aux accords de réplication de certificats et de domaines.
Il existe deux exceptions à la limite de quatre accords de réplication par réplique :
- Vous voulez des chemins de basculement si certaines répliques ne sont pas en ligne ou ne répondent pas.
- Dans les déploiements plus importants, vous souhaitez disposer de liens directs supplémentaires entre des nœuds spécifiques.
La configuration d'un nombre élevé d'accords de réplication peut avoir un impact négatif sur les performances globales : lorsque plusieurs accords de réplication dans la topologie envoient des mises à jour, certaines répliques peuvent subir une forte contention sur le fichier de la base de données changelog entre les mises à jour entrantes et les mises à jour sortantes.
Si vous décidez d'utiliser davantage d'accords de réplication par réplique, assurez-vous que vous ne rencontrez pas de problèmes de réplication et de latence. Notez toutefois que les grandes distances et le nombre élevé de nœuds intermédiaires peuvent également entraîner des problèmes de latence.
- Connecter les répliques d'un centre de données entre elles
- Cela permet d'assurer la réplication du domaine au sein du centre de données.
- Connecter chaque centre de données à au moins deux autres centres de données
- Cela garantit la réplication du domaine entre les centres de données.
- Connecter les centres de données en utilisant au moins une paire d'accords de réplication
- Si les centres de données A et B ont un accord de réplication de A1 à B1, le fait d'avoir un accord de réplication de A2 à B2 garantit que si l'un des serveurs est en panne, la réplication peut se poursuivre entre les deux centres de données.
4.3. Exemples de topologie de réplique
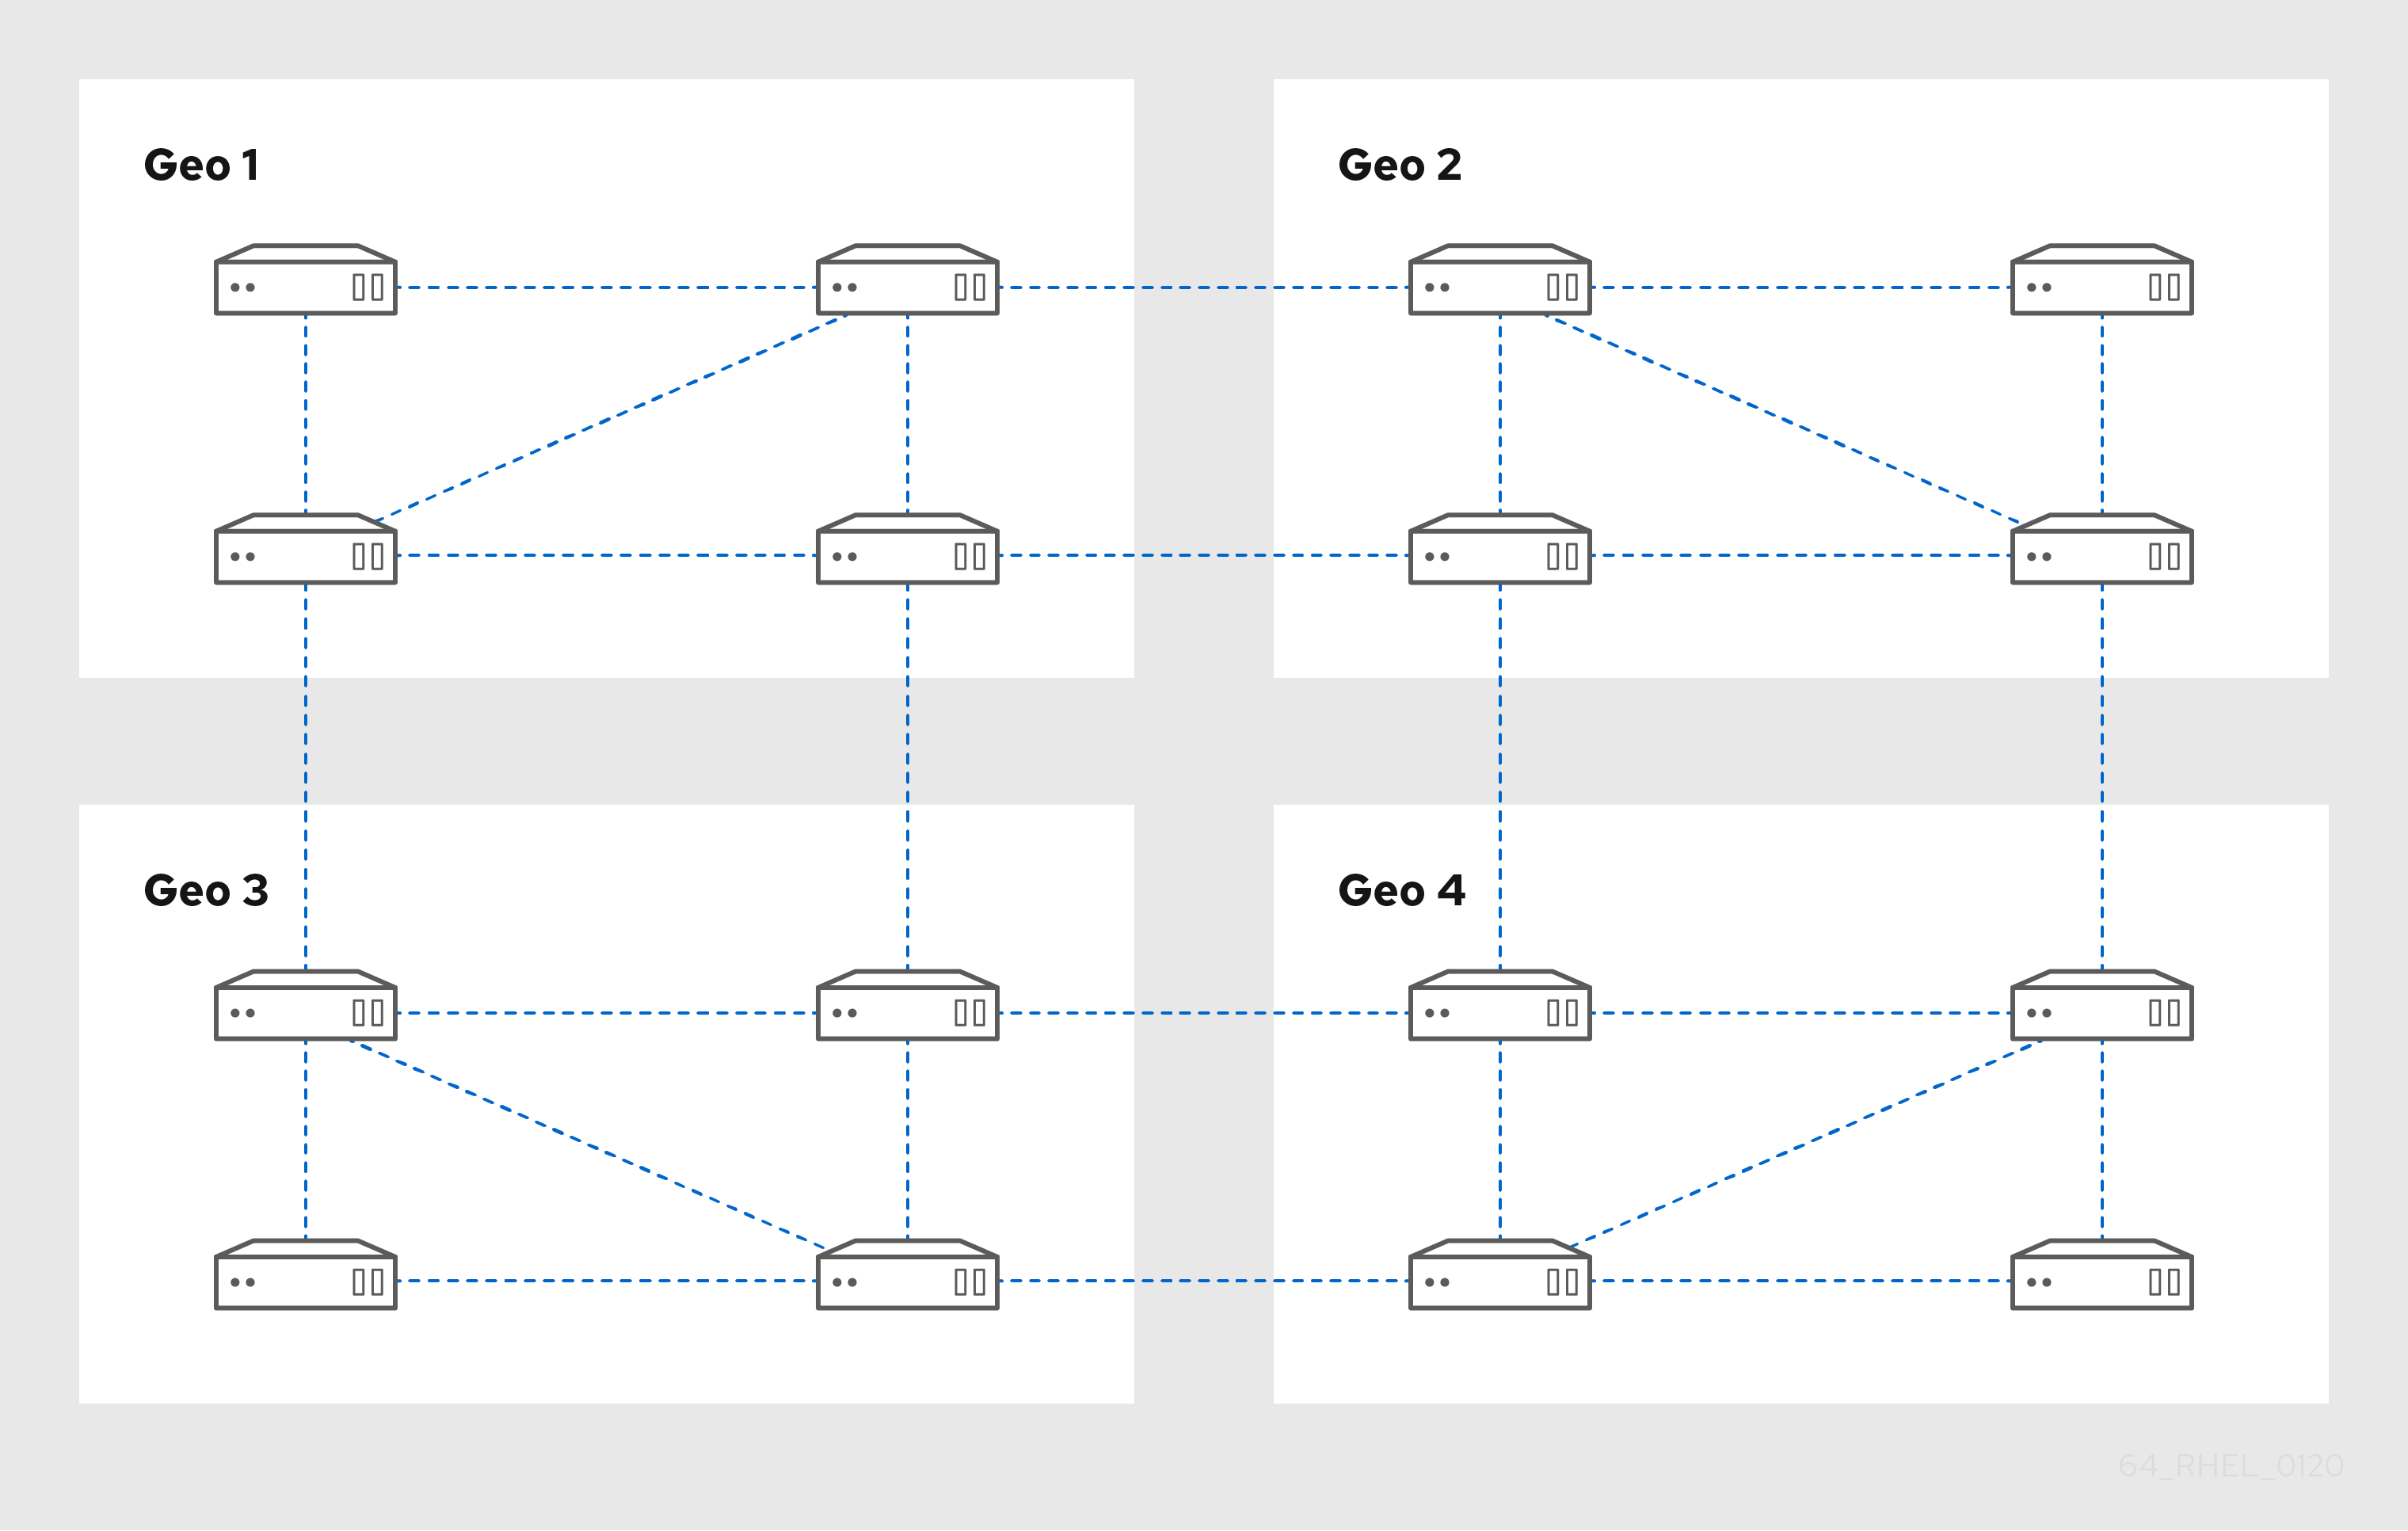
Les figures ci-dessous montrent des exemples de topologies de gestion d'identité (IdM) basées sur les lignes directrices pour la création d'une topologie fiable.
Replica Topology Example 1 shows four data centers, each with four servers. The servers are connected with replication agreements.
Figure 4.1. Exemple de topologie répliquée 1
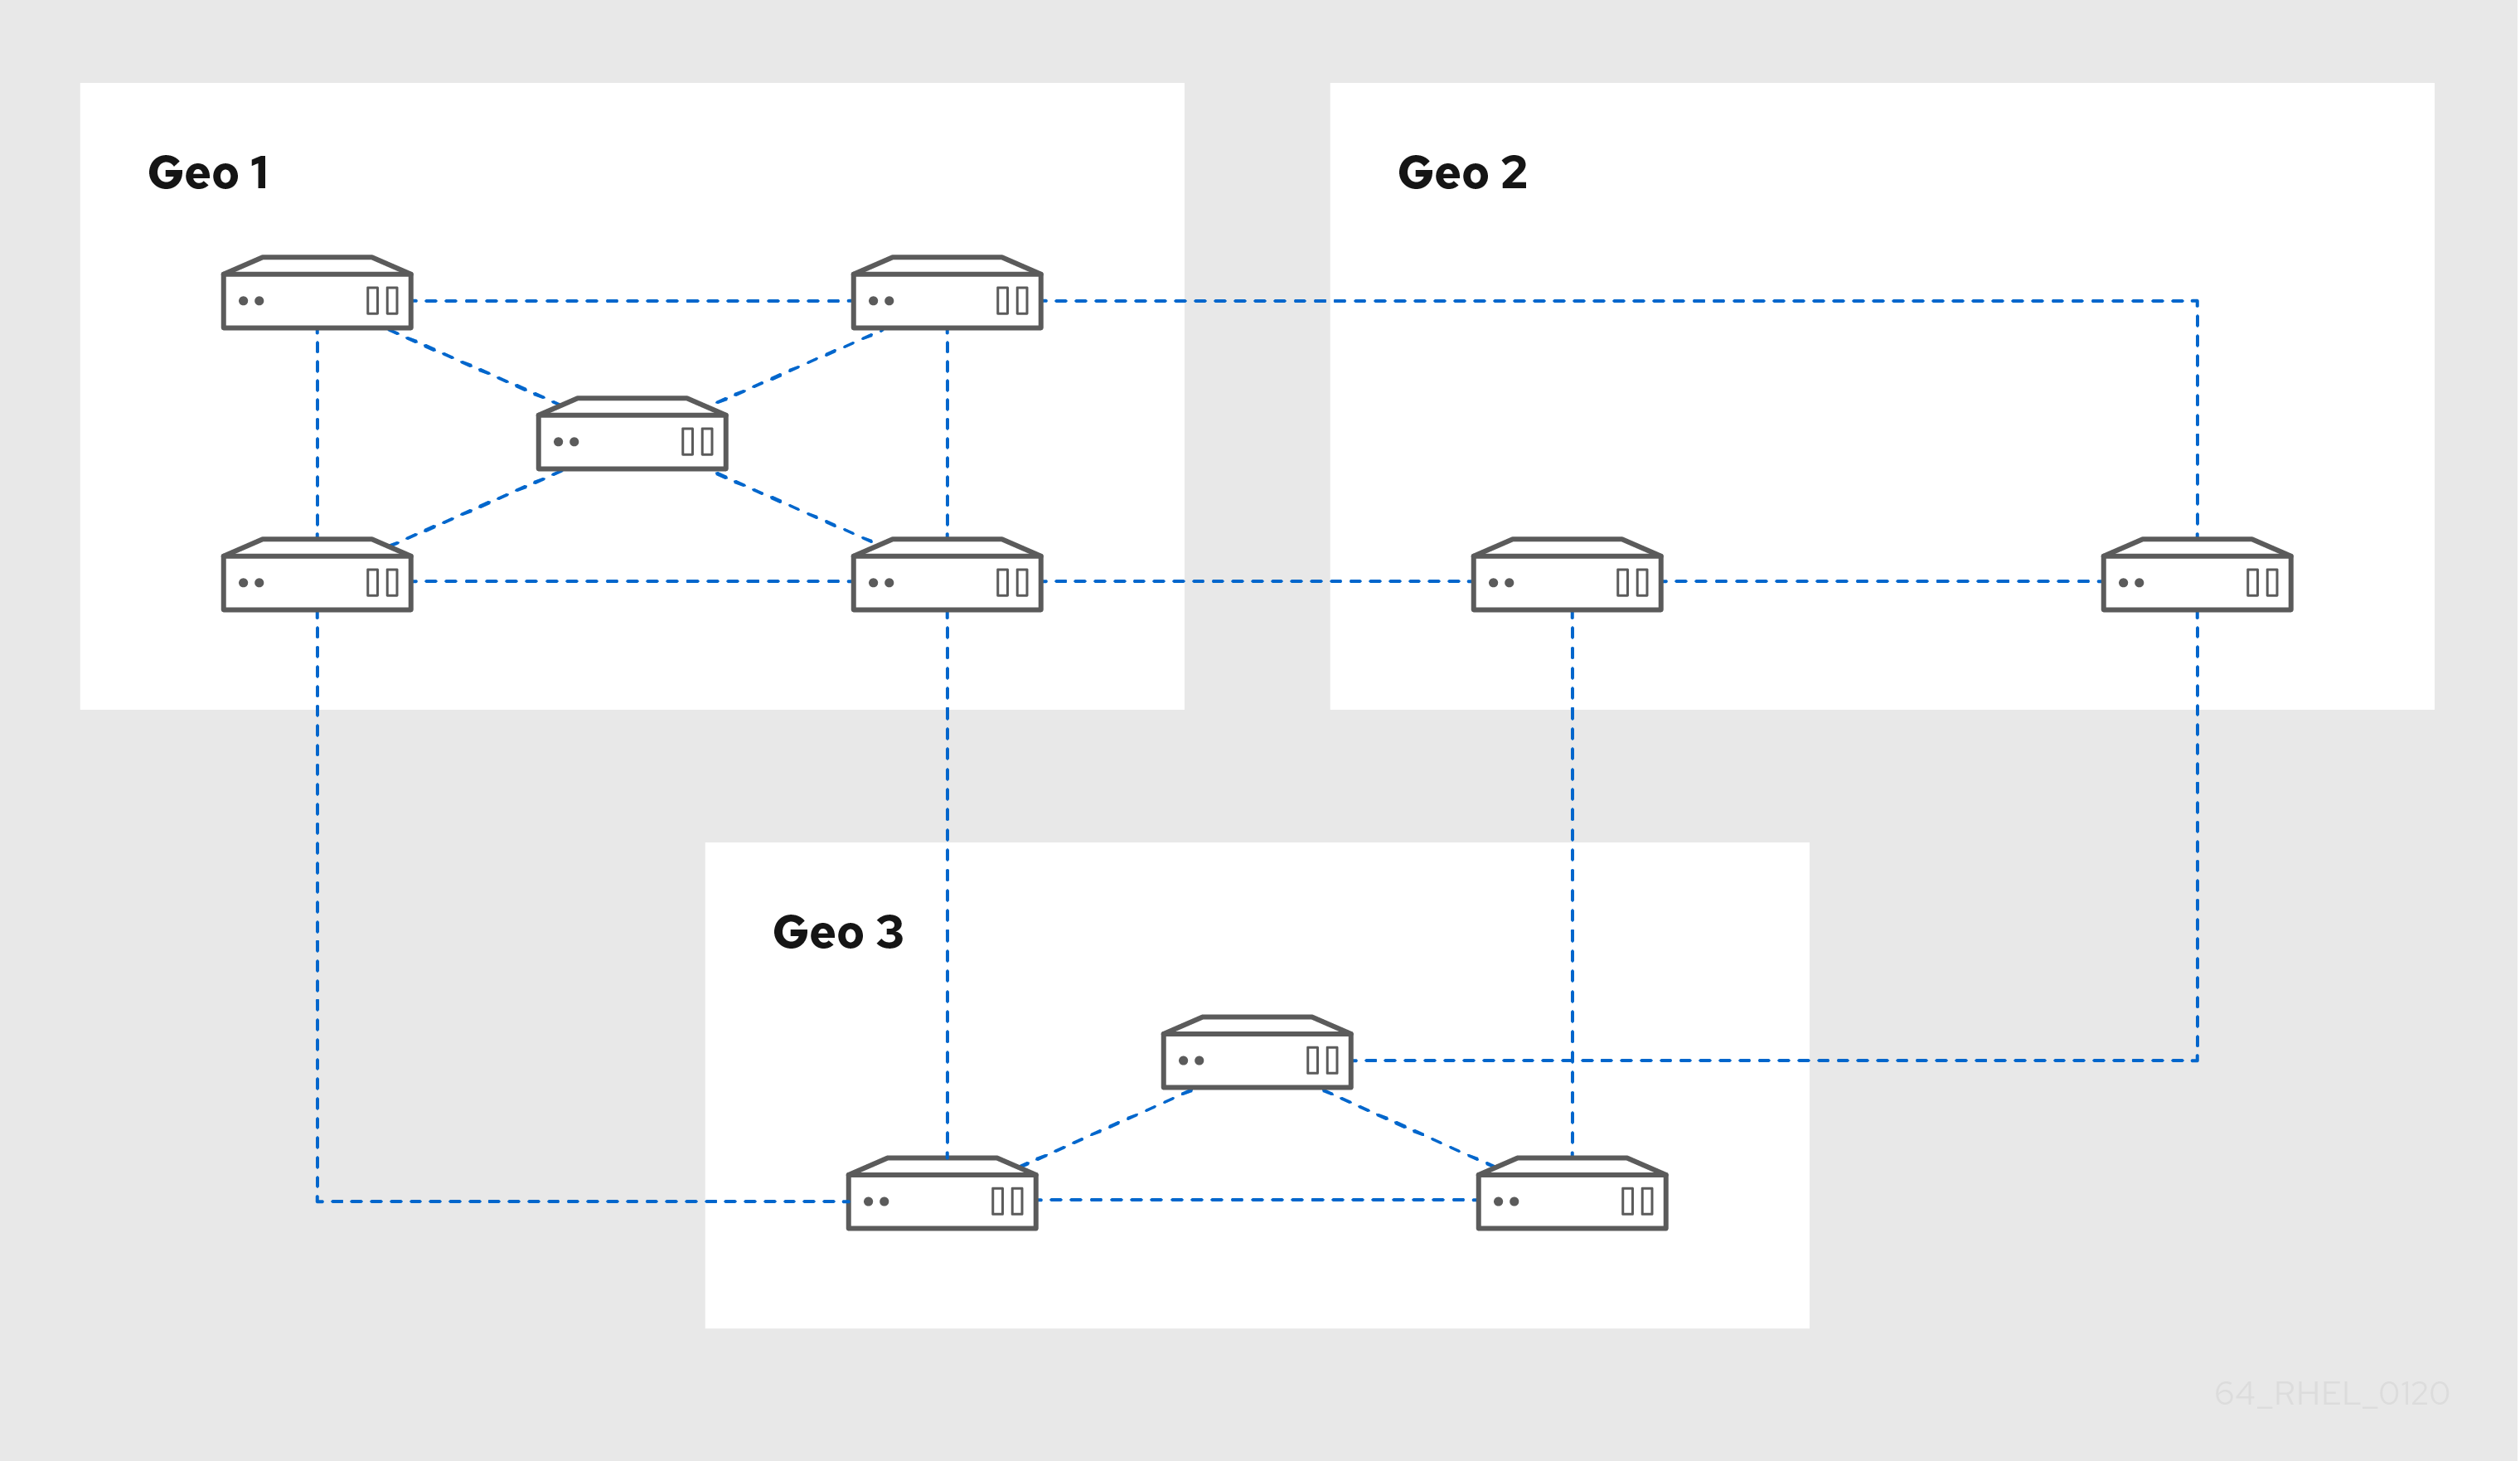
Replica Topology Example 2 shows three data centers, each with a different number of servers. The servers are connected with replication agreements.
Figure 4.2. Exemple de topologie répliquée 2
4.4. Ressources supplémentaires
Chapitre 5. Réglage de la taille et de la durée de la recherche
Certaines requêtes, telles que la demande d'une liste d'utilisateurs IdM, peuvent renvoyer un très grand nombre d'entrées. En réglant ces opérations de recherche, vous pouvez améliorer les performances globales du serveur lors de l'exécution des commandes ipa *-find, telles que ipa user-find, et lors de l'affichage des listes correspondantes dans l'interface Web.
- Limite de la taille de la recherche
Définit le nombre maximum d'entrées renvoyées pour une requête envoyée au serveur à partir de l'interface CLI d'un client ou d'un navigateur accédant à l'interface Web IdM.
Valeur par défaut : 100 entrées.
- Limite de temps de recherche
Définit la durée maximale (en secondes) pendant laquelle le serveur attend que les recherches s'exécutent. Lorsque la recherche atteint cette limite, le serveur l'arrête et renvoie les entrées découvertes pendant cette période.
Valeur par défaut : 2 secondes.
Si vous définissez les valeurs sur -1, l'IdM n'appliquera aucune limite lors de la recherche.
Le fait de fixer des limites de taille ou de durée de recherche trop élevées peut avoir un impact négatif sur les performances du serveur.
5.1. Ajuster la taille de la recherche et la limite de temps dans la ligne de commande
La procédure suivante décrit le réglage des limites de taille et de temps de recherche dans la ligne de commande :
- Au niveau mondial
- Pour une entrée spécifique
Procédure
Pour afficher le temps de recherche actuel et les limites de taille dans l'interface CLI, utilisez la commande
ipa config-show:$ ipa config-show Search time limit: 2 Search size limit: 100Pour ajuster les limites globally pour toutes les requêtes, utilisez la commande
ipa config-modet ajoutez les options--searchrecordslimitet--searchtimelimit. Par exemple :$ ipa config-mod --searchrecordslimit=500 --searchtimelimit=5-
Pour que temporarily ajuste les limites uniquement pour une requête spécifique, ajoutez les options
--sizelimitou--timelimità la commande. Par exemple :
$ ipa user-find --sizelimit=200 --timelimit=1205.2. Ajuster la taille de la recherche et la limite de temps dans l'interface Web
La procédure suivante décrit le réglage des limites de taille et de temps de la recherche globale dans l'interface Web IdM.
Procédure
- Connectez-vous à l'interface Web IdM.
Cliquez sur IPA Server.
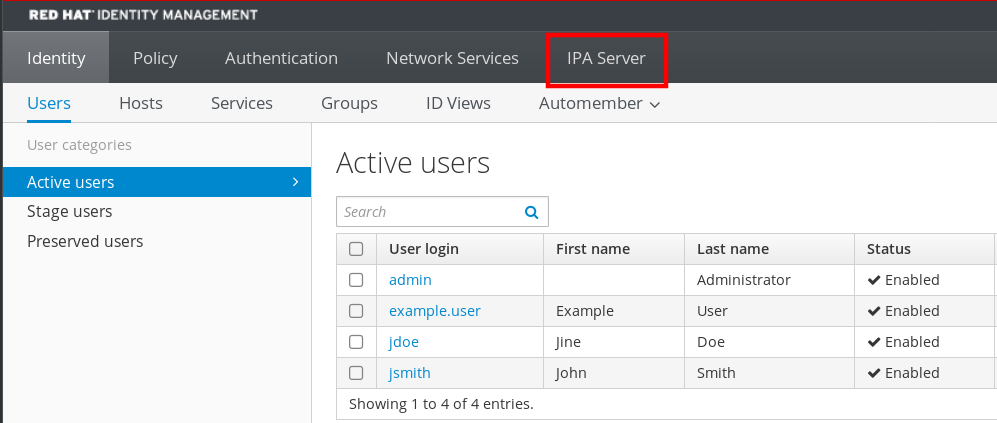
- Dans l'onglet IPA Server, cliquez sur Configuration.
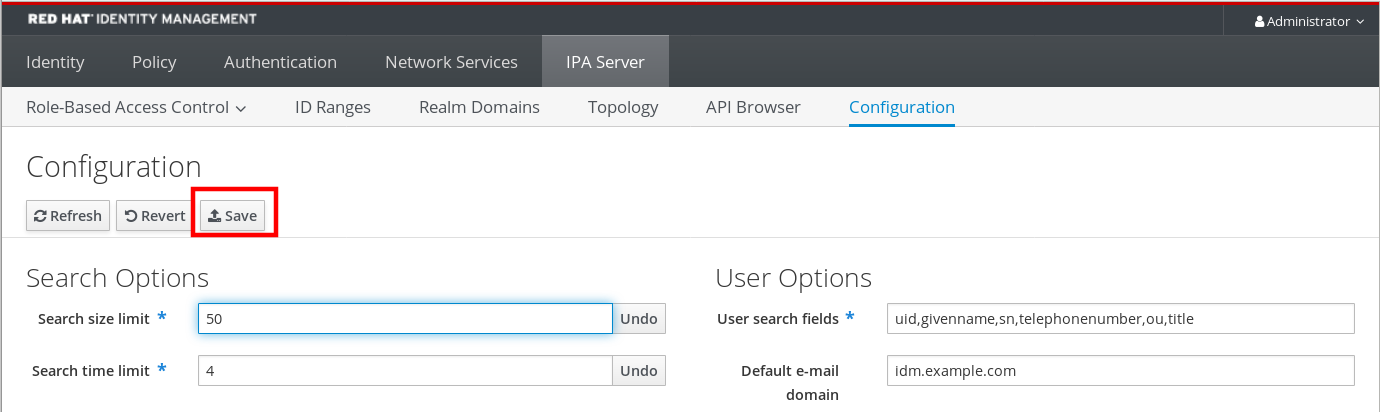
Réglez les valeurs requises dans la zone Search Options.
Les valeurs par défaut sont les suivantes :
- Limite de la taille de la recherche : 100 entrées
- Limite de temps de recherche : 2 secondes
Cliquez sur Save en haut de la page.
Chapitre 6. Adjusting IdM Directory Server performance
You can tune the performance of Identity Management’s databases by adjusting LDAP attributes controlling the Directory Server’s resources and behavior.
To adjust how the Directory Server caches data, see the following procedures:
To adjust the Directory Server’s resource limits, see the following procedures:
To adjust timeouts that have the most influence on performance, see the following procedures:
To install an IdM server or replica with custom Directory Server settings from an LDIF file, see the following procedure:
6.1. Adjusting the entry cache size
Red Hat recommends using the built-in cache auto-sizing feature for optimized performance. Only change this value if you need to purposely deviate from the auto-tuned values.
The nsslapd-cachememsize attribute specifies the size, in bytes, for the available memory space for the entry cache. This attribute is one of the most important values for controlling how much physical RAM the directory server uses.
If the entry cache size is too small, you might see the following error in the Directory Server error logs in the /var/log/dirsrv/slapd-INSTANCE-NAME/errors log file:
REASON: entry too large (83886080 bytes) for the import buffer size (67108864 bytes). Try increasing nsslapd-cachememsize.
Red Hat recommends fitting the entry cache and the database index entry cache in memory.
| Default value |
|
| Valid range |
|
| Entry DN location |
|
Conditions préalables
- Le mot de passe du gestionnaire de répertoire LDAP
Procédure
Disable automatic cache tuning.
[root@server ~]# dsconf -D "cn=Directory Manager" ldap://server.example.com backend config set --cache-autosize=0Display the database suffixes and their corresponding back ends.
[root@server ~]# dsconf -D "cn=Directory Manager" ldap://server.example.com backend suffix list
cn=changelog (changelog)
dc=example,dc=com (userroot)
o=ipaca (ipaca)
This command displays the name of the back end database next to each suffix. Use the suffix’s database name in the next step.
Set the entry cache size for the database. This example sets the entry cache for the userroot database to 2 gigabytes.
[root@server ~]# dsconf -D "cn=Directory Manager" ldap://server.example.com backend suffix set --cache-memsize=2147483648 userrootRestart the Directory Server.
[root@server ~]# systemctl restart dirsrv.target-
Monitor the IdM directory server’s performance. If it does not change in a desirable way, repeat this procedure and adjust
cache-memsizeto a different value, or re-enable cache auto-sizing.
Verification steps
Display the value of the
nsslapd-cachememsizeattribute and verify it has been set to your desired value.[root@server ~]# ldapsearch -D "cn=directory manager" -w DirectoryManagerPassword -b "cn=userroot,cn=ldbm database,cn=plugins,cn=config" | grep nsslapd-cachememsize nsslapd-cachememsize: 2147483648
Ressources supplémentaires
- nsslapd-cachememsize in Directory Server 11 documentation
- Re-enabling entry and database cache auto-sizing.
6.2. Adjusting the database index cache size
Red Hat recommends using the built-in cache auto-sizing feature for optimized performance. Only change this value if you need to purposely deviate from the auto-tuned values.
The nsslapd-dbcachesize attribute controls the amount of memory the database indexes use. This cache size has less of an impact on Directory Server performance than the entry cache size does, but if there is available RAM after the entry cache size is set, Red Hat recommends increasing the amount of memory allocated to the database cache.
The database cache is limited to 1.5 GB RAM because higher values do not improve performance.
| Default value |
|
| Valid range |
|
| Entry DN location |
|
Conditions préalables
- Le mot de passe du gestionnaire de répertoire LDAP
Procédure
Disable automatic cache tuning, and set the database cache size. This example sets the database cache to 256 megabytes.
[root@server ~]# dsconf -D "cn=Directory Manager" ldap://server.example.com backend config set --cache-autosize=0 --dbcachesize=268435456Restart the Directory Server.
[root@server ~]# systemctl restart dirsrv.target-
Monitor the IdM directory server’s performance. If it does not change in a desirable way, repeat this procedure and adjust
dbcachesizeto a different value, or re-enable cache auto-sizing.
Verification steps
Display the value of the
nsslapd-dbcachesizeattribute and verify it has been set to your desired value.[root@server ~]# ldapsearch -D "cn=directory manager" -w DirectoryManagerPassword -b "cn=config,cn=ldbm database,cn=plugins,cn=config" | grep nsslapd-dbcachesize nsslapd-dbcachesize: 2147483648
Ressources supplémentaires
- nsslapd-dbcachesize in Directory Server 11 documentation
- Re-enabling entry and database cache auto-sizing.
6.3. Re-enabling database and entry cache auto-sizing
Red Hat recommends using the built-in cache auto-sizing feature for optimized performance. Red Hat does not recommend setting cache sizes manually.
By default, the IdM Directory Server automatically determines the optimal size for the database cache and entry cache. Auto-sizing sets aside a portion of free RAM and optimizes the size of both caches based on the hardware resources of the server when the instance starts.
Use this procedure to undo custom database cache and entry cache values and restore the cache auto-sizing feature to its default values.
|
|
This settings controls how much free RAM is allocated for auto-sizing the database and entry caches. A value of |
| Default value |
|
| Valid range |
|
| Entry DN location |
|
|
|
This value sets the percentage of free memory determined by |
| Default value |
|
| Valid range |
|
| Entry DN location |
|
Conditions préalables
- You have previously disabled database and entry cache auto-tuning.
Procédure
Stop the Directory Server.
[root@server ~]# systemctl stop dirsrv.targetBackup the
/etc/dirsrv/slapd-instance_name/dse.ldiffile before making any further modifications.[root@server ~]# *cp /etc/dirsrv/slapd-instance_name/dse.ldif \ /etc/dirsrv/slapd-instance_name/dse.ldif.bak.$(date "+%F_%H-%M-%S")
Edit the
/etc/dirsrv/slapd-instance_name/dse.ldiffile:Set the percentage of free system RAM to use for the database and entry caches back to the default of 10% of free RAM.
nsslapd-cache-autosize: 10Set the percentage used from the free system RAM for the database cache to the default of 25%:
nsslapd-cache-autosize-split: 25
-
Save your changes to the
/etc/dirsrv/slapd-instance_name/dse.ldiffile. Start the Directory Server.
[root@server ~]# systemctl start dirsrv.target
Verification steps
Display the values of the
nsslapd-cache-autosizeandnsslapd-cache-autosize-splitattributes and verify they have been set to your desired values.[root@server ~]# ldapsearch -D "cn=directory manager" -w DirectoryManagerPassword -b "cn=config,cn=ldbm database,cn=plugins,cn=config" | grep nsslapd-cache-autosize nsslapd-cache-autosize: *10 nsslapd-cache-autosize-split: 25
Ressources supplémentaires
- nsslapd-cache-autosize in Directory Server 11 documentation
6.4. Adjusting the DN cache size
Red Hat recommends using the built-in cache auto-sizing feature for optimized performance. Only change this value if you need to purposely deviate from the auto-tuned values.
The nsslapd-dncachememsize attribute specifies the size, in bytes, for the available memory space for the Distinguished Names (DN) cache. The DN cache is similar to the entry cache for a database, but its table stores only the entry ID and the entry DN, which allows faster lookups for rename and moddn operations.
| Default value |
|
| Valid range |
|
| Entry DN location |
|
Conditions préalables
- Le mot de passe du gestionnaire de répertoire LDAP
Procédure
(Optional) Display the database suffixes and their corresponding database names.
[root@server ~]# dsconf -D "cn=Directory Manager" ldap://server.example.com backend suffix list
dc=example,dc=com (userroot)
This command displays the name of the back end database next to each suffix. Use the suffix’s database name in the next step.
Set the DN cache size for the database. This example sets the DN cache to 20 megabytes.
[root@server ~]# dsconf -D "cn=Directory Manager" ldap://server.example.com backend suffix set --dncache-memsize=20971520 userrootRestart the Directory Server.
[root@server ~]# systemctl restart dirsrv.target-
Monitor the IdM directory server’s performance. If it does not change in a desirable way, repeat this procedure and adjust
dncache-memsizeto a different value, or back to the default of 10 MB.
Verification steps
Display the new value of the
nsslapd-dncachememsizeattribute and verify it has been set to your desired value.[root@server ~]# ldapsearch -D "cn=directory manager" -w DirectoryManagerPassword -b "cn=userroot,cn=ldbm database,cn=plugins,cn=config" | grep nsslapd-dncachememsize nsslapd-dncachememsize: 20971520
Ressources supplémentaires
- nsslapd-dncachememsize in Directory Server 11 documentation
6.5. Adjusting the normalized DN cache size
Red Hat recommends using the built-in cache auto-sizing feature for optimized performance. Only change this value if you need to purposely deviate from the auto-tuned values.
The nsslapd-ndn-cache-max-size attribute controls the size, in bytes, of the cache that stores normalized distinguished names (NDNs). Increasing this value will retain more frequently used DNs in memory.
| Default value |
|
| Valid range |
|
| Entry DN location |
|
Conditions préalables
- Le mot de passe du gestionnaire de répertoire LDAP
Procédure
Ensure the NDN cache is enabled.
[root@server ~]# dsconf -D "cn=Directory Manager" ldap://server.example.com config get nsslapd-ndn-cache-enabled
Enter password for cn=Directory Manager on ldap://server.example.com:
nsslapd-ndn-cache-enabled: on
If the cache is
off, enable it with the following command.[root@server ~]# dsconf -D "cn=Directory Manager" ldap://server.example.com config replace nsslapd-ndn-cache-enabled=on Enter password for cn=Directory Manager on ldap://server.example.com: Successfully replaced "nsslapd-ndn-cache-enabled"Retrieve the current value of the
nsslapd-ndn-cache-max-sizeparameter and make a note of it before making any adjustments, in case it needs to be restored. Enter the Directory Manager password when prompted.[root@server ~]# dsconf -D "cn=Directory Manager" ldap://server.example.com config get nsslapd-ndn-cache-max-size Enter password for cn=Directory Manager on ldap://server.example.com: nsslapd-ndn-cache-max-size: 20971520Modify the value of the
nsslapd-ndn-cache-max-sizeattribute. This example increases the value to41943040(40 MB).[root@server ~]# dsconf -D "cn=Directory Manager" ldap://server.example.com config replace nsslapd-ndn-cache-max-size=41943040-
Monitor the IdM directory server’s performance. If it does not change in a desirable way, repeat this procedure and adjust
nsslapd-ndn-cache-max-sizeto a different value, or re-enable cache auto-sizing.
Verification steps
Display the new value of the
nsslapd-ndn-cache-max-sizeattribute and verify it has been set to your desired value.[root@server ~]# dsconf -D "cn=Directory Manager" ldap://server.example.com config get nsslapd-ndn-cache-max-size Enter password for cn=Directory Manager on ldap://server.example.com: nsslapd-ndn-cache-max-size: 41943040
Ressources supplémentaires
- nsslapd-ndn-cache-max-size in Directory Server 11 documentation
6.6. Adjusting the maximum message size
The nsslapd-maxbersize attribute sets the maximum size in bytes allowed for an incoming message or LDAP request. Limiting the size of requests prevents some kinds of denial of service attacks.
If the maximum message size is too small, you might see the following error in the Directory Server error logs at /var/log/dirsrv/slapd-INSTANCE-NAME/errors:
Incoming BER Element was too long, max allowable is 2097152 bytes. Change the nsslapd-maxbersize attribute in cn=config to increase.The limit applies to the total size of the LDAP request. For example, if the request is to add an entry and if the entry in the request is larger than the configured value or the default, then the add request is denied. However, the limit is not applied to replication processes. Be cautious before changing this attribute.
| Default value |
|
| Valid range |
|
| Entry DN location |
|
Conditions préalables
- Le mot de passe du gestionnaire de répertoire LDAP
Procédure
Retrieve the current value of the
nsslapd-maxbersizeparameter and make a note of it before making any adjustments, in case it needs to be restored. Enter the Directory Manager password when prompted.[root@server ~]# dsconf -D "cn=Directory Manager" ldap://server.example.com config get nsslapd-maxbersize Enter password for cn=Directory Manager on ldap://server.example.com: nsslapd-maxbersize: 2097152Modify the value of the
nsslapd-maxbersizeattribute. This example increases the value to4194304, 4 MB.[root@server ~]# dsconf -D "cn=Directory Manager" ldap://server.example.com config replace nsslapd-maxbersize=4194304Authenticate as the Directory Manager to make the configuration change.
Enter password for cn=Directory Manager on ldap://server.example.com: Successfully replaced "nsslapd-maxbersize"-
Monitor the IdM directory server’s performance. If it does not change in a desirable way, repeat this procedure and adjust
nsslapd-maxbersizeto a different value, or back to the default of2097152.
Verification steps
Display the value of the
nsslapd-maxbersizeattribute and verify it has been set to your desired value.[root@server ~]# dsconf -D "cn=Directory Manager" ldap://server.example.com config get nsslapd-maxbersize Enter password for cn=Directory Manager on ldap://server.example.com: nsslapd-maxbersize: 4194304
Ressources supplémentaires
- nsslapd-maxbersize (Maximum Message Size) in Directory Server 11 documentation
6.7. Adjusting the maximum number of file descriptors
The nsslapd-maxdescriptors attribute sets the maximum, platform-dependent number of file descriptors that the Directory Server uses. File descriptors are used for client connections, log files, sockets, and other resources.
If you set the nsslapd-maxdescriptors value higher than the total number of file descriptors that the operating system allows the ns-slapd process to use, the Directory Server queries the operating system for the maximum allowable value, and then uses that value.
| Default value |
|
| Valid range |
|
| Entry DN location |
|
Conditions préalables
- Le mot de passe du gestionnaire de répertoire LDAP
Procédure
Retrieve the current value of the
nsslapd-maxdescriptorsparameter and make a note of it before making any adjustments, in case it needs to be restored. Enter the Directory Manager password when prompted.[root@server ~]# dsconf -D "cn=Directory Manager" ldap://server.example.com config get nsslapd-maxdescriptors Enter password for cn=Directory Manager on ldap://server.example.com: nsslapd-maxdescriptors: 4096Modify the value of the
nsslapd-maxdescriptorsattribute. This example increases the value to8192.[root@server ~]# dsconf -D "cn=Directory Manager" ldap://server.example.com config replace nsslapd-maxdescriptors=8192Authenticate as the Directory Manager to make the configuration change.
Enter password for cn=Directory Manager on ldap://server.example.com: Successfully replaced "nsslapd-maxdescriptors"-
Monitor the IdM directory server’s performance. If it does not change in a desirable way, repeat this procedure and adjust
nsslapd-maxdescriptorsto a different value, or back to the default of4096.
Verification steps
Display the value of the
nsslapd-maxdescriptorsattribute and verify it has been set to your desired value.[root@server ~]# dsconf -D "cn=Directory Manager" ldap://server.example.com config get nsslapd-maxdescriptors Enter password for cn=Directory Manager on ldap://server.example.com: nsslapd-maxdescriptors: 8192
Ressources supplémentaires
- nsslapd-maxdescriptors (Maximum File Descriptors) in Directory Server 11 documentation
6.8. Adjusting the connection backlog size
The listen service sets the number of sockets available to receive incoming connections. The nsslapd-listen-backlog-size value sets the maximum length of the queue for the sockfd socket before refusing connections.
If your IdM environment handles a large amount of connections, consider increasing the value of nsslapd-listen-backlog-size.
| Default value |
|
| Valid range |
|
| Entry DN location |
|
Conditions préalables
- Le mot de passe du gestionnaire de répertoire LDAP
Procédure
Retrieve the current value of the
nsslapd-listen-backlog-sizeparameter and make a note of it before making any adjustments, in case it needs to be restored. Enter the Directory Manager password when prompted.[root@server ~]# dsconf -D "cn=Directory Manager" ldap://server.example.com config get nsslapd-listen-backlog-size Enter password for cn=Directory Manager on ldap://server.example.com: nsslapd-listen-backlog-size: 128Modify the value of the
nsslapd-listen-backlog-sizeattribute. This example increases the value to192.[root@server ~]# dsconf -D "cn=Directory Manager" ldap://server.example.com config replace nsslapd-listen-backlog-size=192Authenticate as the Directory Manager to make the configuration change.
Enter password for cn=Directory Manager on ldap://server.example.com:
Successfully replaced "nsslapd-listen-backlog-size"
Verification steps
Display the value of the
nsslapd-listen-backlog-sizeattribute and verify it has been set to your desired value.[root@server ~]# dsconf -D "cn=Directory Manager" ldap://server.example.com config get nsslapd-listen-backlog-size Enter password for cn=Directory Manager on ldap://server.example.com: nsslapd-listen-backlog-size: 192
Ressources supplémentaires
- nsslapd-listen-backlog-size) in Directory Server 11 documentation
6.9. Adjusting the maximum number of database locks
Lock mechanisms control how many copies of Directory Server processes can run at the same time, and the nsslapd-db-locks parameter sets the maximum number of locks.
Increase the maximum number of locks if if you see the following error messages in the /var/log/dirsrv/slapd-instance_name/errors log file:
libdb: Lock table is out of available locks| Default value |
|
| Valid range |
|
| Entry DN location |
|
Conditions préalables
- Le mot de passe du gestionnaire de répertoire LDAP
Procédure
Retrieve the current value of the
nsslapd-db-locksparameter and make a note of it before making any adjustments, in case it needs to be restored.[root@server ~]# ldapsearch -D "cn=directory manager" -w DirectoryManagerPassword -b "cn=bdb,cn=config,cn=ldbm database,cn=plugins,cn=config" | grep nsslapd-db-locks nsslapd-db-locks: 50000Modify the value of the
locksattribute. This example doubles the value to100000locks.[root@server ~]# dsconf -D "cn=Directory Manager" ldap://server.example.com backend config set --locks=100000Authenticate as the Directory Manager to make the configuration change.
Enter password for cn=Directory Manager on ldap://server.example.com:
Successfully updated database configuration
Restart the Directory Server.
[root@server ~]# systemctl restart dirsrv.target
Verification steps
Display the value of the
nsslapd-db-locksattribute and verify it has been set to your desired value.[root@server ~]# ldapsearch -D "cn=directory manager" -w DirectoryManagerPassword -b "cn=bdb,cn=config,cn=ldbm database,cn=plugins,cn=config" | grep nsslapd-db-locks nsslapd-db-locks: 100000
Ressources supplémentaires
- nsslapd-db-locks in Directory Server 11 documentation
6.10. Adjusting the input/output block timeout
The nsslapd-ioblocktimeout attribute sets the amount of time in milliseconds after which the connection to a stalled LDAP client is closed. An LDAP client is considered to be stalled when it has not made any I/O progress for read or write operations.
Lower the value of the nsslapd-ioblocktimeout attribute to free up connections sooner.
| Default value |
|
| Valid range |
|
| Entry DN location |
|
Conditions préalables
- Le mot de passe du gestionnaire de répertoire LDAP
Procédure
Retrieve the current value of the
nsslapd-ioblocktimeoutparameter and make a note of it before making any adjustments, in case it needs to be restored. Enter the Directory Manager password when prompted.[root@server ~]# dsconf -D "cn=Directory Manager" ldap://server.example.com config get nsslapd-ioblocktimeout Enter password for cn=Directory Manager on ldap://server.example.com: nsslapd-ioblocktimeout: 10000Modify the value of the
nsslapd-ioblocktimeoutattribute. This example lowers the value to8000.[root@server ~]# dsconf -D "cn=Directory Manager" ldap://server.example.com config replace nsslapd-ioblocktimeout=8000Authenticate as the Directory Manager to make the configuration change.
Enter password for cn=Directory Manager on ldap://server.example.com: Successfully replaced "nsslapd-ioblocktimeout"-
Monitor the IdM directory server’s performance. If it does not change in a desirable way, repeat this procedure and adjust
nsslapd-ioblocktimeoutto a different value, or back to the default of10000.
Verification steps
Display the value of the
nsslapd-ioblocktimeoutattribute and verify it has been set to your desired value.[root@server ~]# dsconf -D "cn=Directory Manager" ldap://server.example.com config get nsslapd-ioblocktimeout Enter password for cn=Directory Manager on ldap://server.example.com: nsslapd-idletimeout: 8000
Ressources supplémentaires
- nsslapd-ioblocktimeout (IO Block Time Out) in Directory Server 11 documentation
6.11. Adjusting the idle connection timeout
The nsslapd-idletimeout attribute sets the amount of time in seconds after which an idle LDAP client connection is closed by the IdM server. A value of 0 means that the server never closes idle connections.
Red Hat recommends adjusting this value so stale connections are closed, but active connections are not closed prematurely.
| Default value |
|
| Valid range |
|
| Entry DN location |
|
Conditions préalables
- Le mot de passe du gestionnaire de répertoire LDAP
Procédure
Retrieve the current value of the
nsslapd-idletimeoutparameter and make a note of it before making any adjustments, in case it needs to be restored. Enter the Directory Manager password when prompted.[root@server ~]# dsconf -D "cn=Directory Manager" ldap://server.example.com config get nsslapd-idletimeout Enter password for cn=Directory Manager on ldap://server.example.com: nsslapd-idletimeout: 3600Modify the value of the
nsslapd-idletimeoutattribute. This example lowers the value to1800(30 minutes).[root@server ~]# dsconf -D "cn=Directory Manager" ldap://server.example.com config replace nsslapd-idletimeout=1800Authenticate as the Directory Manager to make the configuration change.
Enter password for cn=Directory Manager on ldap://server.example.com: Successfully replaced "nsslapd-idletimeout"-
Monitor the IdM directory server’s performance. If it does not change in a desirable way, repeat this procedure and adjust
nsslapd-idletimeoutto a different value, or back to the default of3600.
Verification steps
Display the value of the
nsslapd-idletimeoutattribute and verify it has been set to your desired value.[root@server ~]# dsconf -D "cn=Directory Manager" ldap://server.example.com config get nsslapd-idletimeout Enter password for cn=Directory Manager on ldap://server.example.com: nsslapd-idletimeout: 3600
Ressources supplémentaires
- nsslapd-idletimeout (Default Idle Timeout) in Directory Server 11 documentation
6.12. Adjusting the replication release timeout
An IdM replica is exclusively locked during a replication session with another replica. In some environments, a replica is locked for a long time due to large updates or network congestion, which increases replication latency.
You can release a replica after a fixed amount of time by adjusting the repl-release-timeout parameter. Red Hat recommends setting this value between 30 and 120:
- If the value is set too low, replicas are constantly reacquiring one another and replicas are not able to send larger updates.
-
A longer timeout can improve high-traffic situations where it is best if a server exclusively accesses a replica for longer amounts of time, but a value higher than
120seconds slows down replication.
| Default value |
|
| Valid range |
|
| Recommended range |
|
Conditions préalables
- Le mot de passe du gestionnaire de répertoire LDAP
Procédure
Display the database suffixes and their corresponding back ends.
[root@server ~]# dsconf -D "cn=Directory Manager" ldap://server.example.com backend suffix list
cn=changelog (changelog)
dc=example,dc=com (userroot)
o=ipaca (ipaca)
This command displays the names of the back end databases next to their suffix. Use the suffix name in the next step.
Modify the value of the
repl-release-timeoutattribute for the main userroot database. This example increases the value to90seconds.[root@server ~]# dsconf -D "cn=Directory Manager" ldap://server.example.com replication set --suffix="dc=example,dc=com" --repl-release-timeout=90Authenticate as the Directory Manager to make the configuration change.
Enter password for cn=Directory Manager on ldap://server.example.com:
Successfully replaced "repl-release-timeout"
(Optional) If your IdM environment uses the IdM Certificate Authority (CA), you can modify the value of the
repl-release-timeoutattribute for the CA database. This example increases the value to90seconds.[root@server ~]# dsconf -D "cn=Directory Manager" ldap://server.example.com replication set --suffix="o=ipaca" --repl-release-timeout=90 Enter password for cn=Directory Manager on ldap://server.example.com: Successfully replaced "repl-release-timeout"
Restart the Directory Server.
[root@server ~]# systemctl restart dirsrv.target-
Monitor the IdM directory server’s performance. If it does not change in a desirable way, repeat this procedure and adjust
repl-release-timeoutto a different value, or back to the default of60seconds.
Verification steps
Display the value of the
nsds5ReplicaReleaseTimeoutattribute and verify it has been set to your desired value.[root@server ~]# ldapsearch -D "cn=directory manager" -w DirectoryManagerPassword -b "cn=replica,cn=dc\3Dexample\2Cdc\3Dcom,cn=mapping tree,cn=config" | grep nsds5ReplicaReleaseTimeout nsds5ReplicaReleaseTimeout: 90
The Distinguished Name of the suffix in this example is dc=example,dc=com, but the equals sign (=) and comma (,) must be escaped in the ldapsearch command.
Convert the suffix DN to cn=dc\3Dexample\2Cdc\3Dcom with the following escape characters:
-
\3Dreplacing= -
\2Creplacing,
Ressources supplémentaires
- nsDS5ReplicaReleaseTimeout in Directory Server 11 documentation
6.13. Installation d'un serveur IdM ou d'un réplica avec des paramètres de base de données personnalisés à partir d'un fichier LDIF
Vous pouvez installer un serveur IdM et des répliques IdM avec des paramètres personnalisés pour la base de données du serveur Directory. La procédure suivante vous montre comment créer un fichier LDAP Data Interchange Format (LDIF) avec les paramètres de la base de données et comment transmettre ces paramètres aux commandes d'installation du serveur IdM et des réplicas.
Conditions préalables
- Vous avez déterminé des paramètres personnalisés pour le serveur d'annuaire qui améliorent les performances de votre environnement IdM. Voir Ajustement des performances du serveur d'annuaire IdM.
Procédure
Créez un fichier texte au format LDIF avec vos paramètres de base de données personnalisés. Séparez les modifications d'attributs LDAP par un tiret (-). Cet exemple définit des valeurs par défaut pour le délai d'inactivité et le nombre maximum de descripteurs de fichiers.
dn: cn=config
changetype: modify
replace: nsslapd-idletimeout
nsslapd-idletimeout=1800
-
replace: nsslapd-maxdescriptors
nsslapd-maxdescriptors=8192
Utilisez le paramètre
--dirsrv-config-filepour transmettre le fichier LDIF au script d'installation.Pour installer un serveur IdM :
# ipa-server-install --dirsrv-config-file filename.ldifPour installer une réplique IdM :
# ipa-replica-install --dirsrv-config-file filename.ldif
Ressources supplémentaires
6.14. Ressources supplémentaires
Chapitre 7. Adjusting the performance of the KDC
The following sections describe how to adjust the performance of the Kerberos Key Distribution Center (KDC), which is responsible for authenticating users, hosts, and services.
7.1. Adjusting the length of the KDC listen queue
You can adjust the size of the listen queue length for the KDC daemon by setting the kdc_tcp_listen_backlog option in the [kdcdefaults] section of the /var/kerberos/krb5kdc/kdc.conf file. The default value of 5 may be too low for some IdM deployments that experience high amounts of Kerberos traffic, but setting this value too high degrades performance.
| Valeur par défaut |
|
| Valid range |
|
Procédure
-
Open the
/var/kerberos/krb5kdc/kdc.conffile in a text editor. Set the TCP listen backlog to your desired value, such as
7.[kdcdefaults] ... kdc_tcp_listen_backlog = 7-
Save and close the
/var/kerberos/krb5kdc/kdc.conffile. - Restart the KDC to load the new settings.
7.2. Options controlling KDC behavior per realm
To track locking and unlocking user accounts for each Kerberos realm, the KDC writes to its database after each successful and failed authentication. By adjusting the following options in the [dbmodules] section of the /etc/krb5.conf file, you may be able to improve performance by minimizing how often the KDC writes information.
- disable_last_success
If set to
true, this option suppresses KDC updates to theLast successful authenticationfield of principal entries requiring preauthentication.Valeur par défaut
falseValid range
trueorfalse- disable_lockout
If set to
true, this option suppresses KDC updates to theLast failed authenticationandFailed password attemptsfields of principal entries requiring preauthentication. Setting this flag may improve performance, but disabling account lockout may be considered a security risk.Valeur par défaut
falseValid range
trueorfalse
Ressources supplémentaires
7.3. Adjusting KDC settings per realm
This procedure adjusts KDC behavior per Kerberos realm.
Procédure
-
Open the
/etc/krb5.conffile in a text editor. Specify any options and their desired values within the
[dbmodules]section, and in the respective Kerberos realm. In this example, you are setting thedisable_last_successvariable for theEXAMPLE.COMKerberos realm.[dbmodules] EXAMPLE.COM = { disable_last_success = true }-
Save and close the
/etc/krb5.conffile. - Restart the KDC to load the new settings.
Ressources supplémentaires
7.4. Adjusting the number of krb5kdc processes
This procedure describes how to manually adjust the number of processes that the Key Distribution Center (KDC) starts to handle incoming connections.
By default, the IdM installer detects the number of CPU cores and enters the value in the /etc/sysconfig/krb5kdc file. For example, the file might contain the following entry:
KRB5KDC_ARGS='-w 2'
[...]
In this example, with the KRB5KDC_ARGS parameter set to -w 2, the KDC starts two separate processes to handle incoming connections from the main process. You might want to adjust this value, especially in virtual environments where you can easily add or remove the number of virtual CPUs based on your requirements. To prevent performance issues or even IdM servers becoming unresponsive due to an ever-increasing TCP/IP queue on port 88, simulate a higher number of processes by manually setting the KRB5KDC_ARGS parameter to a higher value.
Procédure
-
Open the
/etc/sysconfig/krb5kdcfile in a text editor. Specify the value of the
KRB5KDC_ARGSparameter. In this example, you are setting the number of processes to 10:KRB5KDC_ARGS='-w 10' [...]
-
Save and close the
/etc/sysconfig/krb5kdcfile. Reload the systemd configuration:
# systemctl daemon-reload
Restart the
krb5kdcservice:# systemctl restart krb5kdc.service
You can use the IdM Healthcheck utility to verify that the KDC is configured to use the optimal number of worker processes. See Verifying the optimal number of KDC worker processes using IdM Healthcheck.
7.5. Ressources supplémentaires
Chapitre 8. Tuning SSSD performance for large IdM-AD trust deployments
Retrieving user and group information is a very data-intensive operation for the System Security Services Daemon (SSSD), especially in an IdM deployment with a trust to a large Active Directory (AD) domain. You can improve this performance by adjusting which information SSSD retrieves from identity providers and for how long.
8.1. Tuning SSSD in IdM servers for large IdM-AD trust deployments
This procedure applies tuning options to the configuration of the SSSD service in an IdM server to improve its response time when retrieving information from a large AD environment.
Conditions préalables
-
Vous devez disposer des autorisations
rootpour modifier le fichier de configuration/etc/sssd/sssd.conf.
Procédure
-
Ouvrez le fichier de configuration
/etc/sssd/sssd.confdans un éditeur de texte. Add the following options to the
[domain]section for your Active Directory domain. If you do not already have a domain section for your AD domain, create one.[domain/ad.example.com] ignore_group_members = true subdomain_inherit = ignore_group_members ...
-
Save and close the
/etc/sssd/sssd.conffile on the server. Redémarrez le service SSSD pour charger les modifications de configuration.
[root@client ~]# systemctl restart sssd
Ressources supplémentaires
8.2. Tuning the config timeout for the ipa-extdom plugin on IdM servers
IdM clients cannot receive information about users and groups from Active Directory (AD) directly, so IdM servers use the ipa-extdom plugin to receive information about AD users and groups, and that information is forwarded to the requesting client.
The ipa-extdom plug-in sends a request to SSSD for the data about AD users. If the information is not in the SSSD cache, SSSD requests the data from an AD domain controller (DC). You can adjust the config timeout value, which defines how long the ipa-extdom plug-in waits for a reply from SSSD before the plug-in cancels the connection and returns a timeout error to the caller. The default value is 10000 milliseconds (10 seconds).
The following example adjusts the config timeout to 20 seconds (20000 milliseconds).
Exercise caution when adjusting the config timeout:
- If you set a value that is too small, such as 500 milliseconds, SSSD might not have enough time to reply and requests will always return a timeout.
- If you set a value that is too large, such as 30000 milliseconds (30 seconds), a single request might block the connection to SSSD for this amount of time. Because only one thread can connect to SSSD at a time, all other requests from the plug-in have to wait.
- If there are many requests sent by IdM clients, they can block all available workers configured for the Directory Server on the IdM server. As a consequence, the server might not be able to reply to any kind of request for some time.
Only change the config timeout in the following situations:
- If IdM clients frequently receive timeout errors before their own search timeout is reached when requesting information about AD users and groups, the config timeout value is too small.
-
If the Directory Server on the IdM server is often locked and the
pstackutility reports that many or all worker threads are handlingipa-extdomrequests at this time, the value is too large.
Conditions préalables
- Le mot de passe du gestionnaire de répertoire LDAP
Procédure
Use the following command to adjust the config timeout to 20000 milliseconds:
# ldapmodify -D "cn=directory manager" -W
dn: cn=ipa_extdom_extop,cn=plugins,cn=config
changetype: modify
replace: ipaExtdomMaxNssTimeout
ipaExtdomMaxNssTimeout: 20000
8.3. Tuning the maximum buffer size for the ipa-extdom plugin on IdM servers
IdM clients cannot receive information about users and groups from Active Directory (AD) directly, so IdM servers use the ipa-extdom plugin to receive information about AD users and groups, and that information is forwarded to the requesting client.
You can tune the maximum buffer size for the ipa-extdom plugin, which adjusts the size of the buffer where SSSD can store the data it receives. If the buffer is too small, SSSD returns an ERANGE error and the plug-in retries the request with a larger buffer. The default buffer size is 134217728 bytes (128 MB).
The following example adjusts the maximum buffer size to 256 MB (268435456 bytes).
Conditions préalables
- Le mot de passe du gestionnaire de répertoire LDAP
Procédure
Use the following command to set the maximum buffer size to 268435456 bytes:
# ldapmodify -D "cn=directory manager" -W
dn: cn=ipa_extdom_extop,cn=plugins,cn=config
changetype: modify
replace: ipaExtdomMaxNssBufSize
ipaExtdomMaxNssBufSize: 268435456
8.4. Tuning the maximum number of instances for the ipa-extdom plugin on IdM servers
As IdM clients cannot receive information about users and groups from Active Directory (AD) directly, IdM servers use the ipa-extdom plugin to receive information about AD users and groups and then forward this information to the requesting client.
By default, the ipa-extdom plugin is configured to use up to 80% of the LDAP worker threads to handle requests from IdM clients. If the SSSD service on an IdM client has requested a large amount of information about AD trust users and groups, this operation can halt the LDAP service if it uses most of the LDAP threads. If you experience these issues, you might see similar errors in the SSSD log file for your AD domain, /var/log/sssd/sssd__your-ad-domain-name.com_.log:
(2022-05-22  5:00:13): [be[ad.example.com]] [ipa_s2n_get_user_done] (0x0040): s2n exop request failed.
(2022-05-22  5:00:13): [be[ad.example.com]] [ipa_s2n_get_user_done] (0x0040): s2n exop request failed.
(2022-05-22  5:00:13): [be[ad.example.com]] [ipa_s2n_exop_done] (0x0040): ldap_extended_operation result: Server is busy(51), Too many extdom instances running.
You can adjust the maximum number of ipa-extdom instances by setting the value for the ipaExtdomMaxInstances option, which must be an integer larger than 0 and less than the total number of worker threads.
Conditions préalables
- Le mot de passe du gestionnaire de répertoire LDAP
Procédure
Retrieve the total number of worker threads.
# ldapsearch -xLLLD cn=directory\ manager -W -b cn=config -s base nsslapd-threadnumber
Enter LDAP Password:
dn: cn=config
nsslapd-threadnumber: 16
This means that the current value for
ipaExtdomMaxInstancesis 13.Adjust the maximum number of instances. This example changes the value to 14:
# ldapmodify -D "cn=directory manager" -W
dn: cn=ipa_extdom_extop,cn=plugins,cn=config
changetype: modify
replace: ipaExtdomMaxInstances
ipaExtdomMaxInstances: 14
-
Monitor the IdM directory server’s performance and if it does not improve, repeat this procedure and adjust the value of the
ipaExtdomMaxInstancesvariable.
8.5. Tuning SSSD in IdM clients for large IdM-AD trust deployments
This procedure applies tuning options to SSSD service configuration in an IdM client to improve its response time when retrieving information from a large AD environment.
Conditions préalables
-
Vous devez disposer des autorisations
rootpour modifier le fichier de configuration/etc/sssd/sssd.conf.
Procédure
Determine the number of seconds a single un-cached login takes.
Clear the SSSD cache on the IdM client
client.example.com.[root@client ~]# sss_cache -EMeasure how long it takes to log in as an AD user with the
timecommand. In this example, from the IdM clientclient.example.com, log into the same host as the userad-userfrom thead.example.comAD domain.[root@client ~]# time ssh ad-user@ad.example.com@client.example.comType in the password as soon as possible.
Password:
Last login: Sat Jan 23 06:29:54 2021 from 10.0.2.15
[ad-user@ad.example.com@client ~]$
Log out as soon as possible to display elapsed time. In this example, a single un-cached login takes about
9seconds.[ad-user@ad.example.com@client /]$ exit logout Connection to client.example.com closed. real 0m8.755s user 0m0.017s sys 0m0.013s
-
Ouvrez le fichier de configuration
/etc/sssd/sssd.confdans un éditeur de texte. Add the following options to the
[domain]section for your Active Directory domain. Set thepam_id_timeoutandkrb5_auth_timeoutoptions to the number of seconds an un-cached login takes. If you do not already have a domain section for your AD domain, create one.[domain/example.com/ad.example.com] krb5_auth_timeout = 9 ldap_deref_threshold = 0 ...
Add the following option to the
[pam]section:[pam] pam_id_timeout = 9-
Save and close the
/etc/sssd/sssd.conffile on the server. Redémarrez le service SSSD pour charger les modifications de configuration.
[root@client ~]# systemctl restart sssd
Ressources supplémentaires
8.6. Mounting the SSSD cache in tmpfs
The System Security Services Daemon (SSSD) constantly writes LDAP objects to its cache. These internal SSSD transactions write data to disk, which is much slower than reading and writing from Random-Access Memory (RAM).
To improve this performance, mount the SSSD cache in RAM.
Considérations
- Cached information does not persist after a reboot if the SSSD cache is in RAM.
- It is safe to perform this change on IdM servers, as the SSSD instance on an IdM server cannot lose connectivity with the Directory Server on the same host.
- If you perform this adjustment on an IdM client and it loses connectivity to IdM servers, users will not be able to authenticate after a reboot until you reestablish connectivity.
Conditions préalables
-
You need
rootpermissions to edit the/etc/fstabconfiguration file.
Procédure
Create a
tmpfstemporary filesystem:On RHEL 8.6 and later, confirm that the SSSD user owns the
config.ldbfile:# ls -al /var/lib/sss/db/config.ldb -rw-------. 1 sssd sssd 1286144 Jun 8 16:41 /var/lib/sss/db/config.ldbIn this case, add the following entry to the
/etc/fstabfile as a single line:tmpfs /var/lib/sss/db/ tmpfs size=300M,mode=0700,uid=sssd,gid=sssd,rootcontext=system_u:object_r:sssd_var_lib_t:s0 0 0
On RHEL 8 versions lower than 8.6, the
config.ldbfile is owned by therootuser:# ls -al /var/lib/sss/db/config.ldb -rw-------. 1 root root 1286144 Jun 8 14:15 /var/lib/sss/db/config.ldbIn this case, add the following entry to the
/etc/fstabfile as a single line:tmpfs /var/lib/sss/db/ tmpfs size=300M,mode=0700,rootcontext=system_u:object_r:sssd_var_lib_t:s0 0 0This example creates a 300MB cache. Tune the
sizeparameter according to your IdM and AD directory size, estimating 100 MBs per 10,000 LDAP entries.
Mount the new SSSD cache directory.
[root@host ~]# mount /var/lib/sss/db/Restart SSSD to reflect this configuration change.
[root@host ~]# systemctl restart sssd
8.7. Options in sssd.conf for tuning IdM servers and clients for large IdM-AD trust deployments
You can use the following options in the /etc/sssd/sssd.conf configuration file to tune the performance of SSSD in IdM servers and clients when you have a large IdM-AD trust deployment.
8.7.1. Tuning options for IdM servers
- ignore_group_members
Knowing which groups a user belongs to, as opposed to all the users that belong to a group, is important when authenticating and authorizing a user. When
ignore_group_membersis set totrue, SSSD only retrieves information about the group objects themselves and not their members, providing a significant performance boost.NoteThe
id user@ad-domain.comcommand still returns the correct list of groups, butgetent group ad-group@ad-domain.comreturns an empty list.Valeur par défaut
falseRecommended value
trueNoteYou should not set this option to
truewhen the deployment involves an IdM server with the compat tree.- subdomain_inherit
With the
subdomain_inheritoption, you can apply theignore_group_memberssetting to the trusted AD domains’ configuration. Settings listed in thesubdomain_inheritoptions apply to both the main (IdM) domain as well as the AD subdomain.Valeur par défaut
noneRecommended value
subdomain_inherit = ignore_group_members
8.7.2. Tuning options for IdM clients
- pam_id_timeout
This parameter controls how long results from a PAM session are cached, to avoid excessive round-trips to the identity provider during an identity lookup. The default value of
5seconds might not be enough in environments where complex group memberships are populated on the IdM Server and IdM client side. Red Hat recommends settingpam_id_timeoutto the number of seconds a single un-cached login takes.Valeur par défaut
5Recommended value
the number of seconds a single un-cached login takes- krb5_auth_timeout
Increasing
krb5_auth_timeoutallows more time to process complex group information in environments where users are members of a large number of groups. Red Hat recommends setting this value to the number of seconds a single un-cached login takes.Valeur par défaut
6Recommended value
the number of seconds a single un-cached login takes- ldap_deref_threshold
A dereference lookup is a means of fetching all group members in a single LDAP call. The
ldap_deref_thresholdvalue specifies the number of group members that must be missing from the internal cache to trigger a dereference lookup. If less members are missing, they are looked up individually. Dereference lookups may take a long time in large environments and decrease performance. To disable dereference lookups, set this option to0.Valeur par défaut
10Recommended value
0