
Install ROSA with HCP clusters
Installing, accessing, and deleting Red Hat OpenShift Service on AWS (ROSA) clusters.
Abstract
Chapter 1. Creating ROSA with HCP clusters using the default options
If you are looking for a quickstart guide for ROSA Classic, see Red Hat OpenShift Service on AWS quickstart guide.
Red Hat OpenShift Service on AWS (ROSA) with hosted control planes (HCP) offers a more efficient and reliable architecture for creating Red Hat OpenShift Service on AWS (ROSA) clusters. With ROSA with HCP, each cluster has a dedicated control plane that is isolated in a ROSA service account.
Create a ROSA with HCP cluster quickly by using the default options and automatic AWS Identity and Access Management (IAM) resource creation. You can deploy your cluster by using the ROSA CLI (rosa).
Since it is not possible to upgrade or convert existing ROSA clusters to a hosted control planes architecture, you must create a new cluster to use ROSA with HCP functionality.
ROSA with HCP clusters only support AWS Security Token Service (STS) authentication.
Further reading
- For a comparison between ROSA with HCP and ROSA Classic, see the Comparing architecture models documentation.
- See the AWS documentation for information about Getting started with ROSA with HCP using the ROSA CLI in auto mode.
Additional resources
For a full list of the supported certificates, see the Compliance section of "Understanding process and security for Red Hat OpenShift Service on AWS".
Considerations regarding auto creation mode
The procedures in this document use the auto mode in the ROSA CLI to immediately create the required IAM resources using the current AWS account. The required resources include the account-wide IAM roles and policies, cluster-specific Operator roles and policies, and OpenID Connect (OIDC) identity provider.
Alternatively, you can use manual mode, which outputs the aws commands needed to create the IAM resources instead of deploying them automatically. For steps to deploy a ROSA with HCP cluster by using manual mode or with customizations, see Creating a cluster using customizations.
Next steps
- Ensure that you have completed the AWS prerequisites.
1.1. Overview of the default cluster specifications
You can quickly create a ROSA with HCP cluster with the AWS Security Token Service (STS) by using the default installation options. The following summary describes the default cluster specifications.
Table 1.1. Default ROSA with HCP cluster specifications
| Component | Default specifications |
|---|---|
| Accounts and roles |
|
| Cluster settings |
|
| Encryption |
|
| Compute node machine pool |
|
| Networking configuration |
|
| Classless Inter-Domain Routing (CIDR) ranges |
|
| Cluster roles and policies |
|
| Cluster update strategy |
|
1.2. ROSA with HCP Prerequisites
To create a ROSA with HCP cluster, you must have the following items:
- A configured virtual private cloud (VPC)
- Account-wide roles
- An OIDC configuration
- Operator roles
1.2.1. Creating a Virtual Private Cloud for your ROSA with HCP clusters
You must have a Virtual Private Cloud (VPC) to create ROSA with HCP cluster. You can use the following methods to create a VPC:
- Create a VPC by using a Terraform template
- Manually create the VPC resources in the AWS console
The Terraform instructions are for testing and demonstration purposes. Your own installation requires some modifications to the VPC for your own use. You should also ensure that when you use this Terraform script it is in the same region that you intend to install your cluster. In these examples, use us-east-2.
Creating a Virtual Private Cloud using Terraform
Terraform is a tool that allows you to create various resources using an established template. The following process uses the default options as required to create a ROSA with HCP cluster. For more information about using Terraform, see the additional resources.
Prerequisites
- You have installed Terraform version 1.4.0 or newer on your machine.
- You have installed Git on your machine.
Procedure
Open a shell prompt and clone the Terraform VPC repository by running the following command:
$ git clone https://github.com/openshift-cs/terraform-vpc-example
Navigate to the created directory by running the following command:
$ cd terraform-vpc-example
Initiate the Terraform file by running the following command:
$ terraform init
A message confirming the initialization appears when this process completes.
To build your VPC Terraform plan based on the existing Terraform template, run the
plancommand. You must include your AWS region. You can choose to specify a cluster name. Arosa.tfplanfile is added to thehypershift-tfdirectory after theterraform plancompletes. For more detailed options, see the Terraform VPC repository’s README file.$ terraform plan -out rosa.tfplan -var region=<region>
Apply this plan file to build your VPC by running the following command:
$ terraform apply rosa.tfplan
Optional: You can capture the values of the Terraform-provisioned private, public, and machinepool subnet IDs as environment variables to use when creating your ROSA with HCP cluster by running the following commands:
$ export SUBNET_IDS=$(terraform output -raw cluster-subnets-string)
Verify that the variables were correctly set with the following command:
$ echo $SUBNET_IDS
Sample output
$ subnet-0a6a57e0f784171aa,subnet-078e84e5b10ecf5b0
Additional resources
- See the Terraform VPC repository for a detailed list of all options available when customizing the VPC for your needs.
Creating a Virtual Private Cloud manually
If you choose to manually create your Virtual Private Cloud (VPC) instead of using Terraform, go to the VPC page in the AWS console. Your VPC must meet the requirements shown in the following table.
Table 1.2. Requirements for your VPC
| Requirement | Details |
|---|---|
| VPC name | You need to have the specific VPC name and ID when creating your cluster. |
| CIDR range | Your VPC CIDR range should match your machine CIDR. |
| Availability zone | You need one availability zone for a single zone, and you need three for availability zones for multi-zone. |
| Public subnet | You must have one public subnet with a NAT gateway for public clusters. Private clusters do not need a public subnet. |
| DNS hostname and resolution | You must ensure that the DNS hostname and resolution are enabled. |
Tagging your subnets
Before you can use your VPC to create a ROSA with HCP cluster, you must tag your VPC subnets. Automated service preflight checks verify that these resources are tagged correctly before you can use these resources. The following table shows how your resources should be tagged as the following:
| Resource | Key | Value |
|---|---|---|
| Public subnet |
|
|
| Private subnet |
|
|
You must tag at least one private subnet and, if applicable, and one public subnet.
Prerequisites
- You have created a VPC.
-
You have installed the
awsCLI.
Procedure
Tag your resources in your terminal by running the following commands:
For public subnets, run:
$ aws ec2 create-tags --resources <public-subnet-id> --tags Key=kubernetes.io/role/elb,Value=1
For private subnets, run:
$ aws ec2 create-tags --resources <private-subnet-id> --tags Key=kubernetes.io/role/internal-elb,Value=1
Verification
Verify that the tag is correctly applied by running the following command:
$ aws ec2 describe-tags --filters "Name=resource-id,Values=<subnet_id>"
Example output
TAGS    Name                    <subnet-id>        subnet  <prefix>-subnet-public1-us-east-1a
TAGS    kubernetes.io/role/elb  <subnet-id>        subnet  1
Additional resources
1.2.2. Creating the account-wide STS roles and policies
Before using the Red Hat OpenShift Service on AWS (ROSA) CLI (rosa) to create Red Hat OpenShift Service on AWS (ROSA) with hosted control planes (HCP) clusters, create the required account-wide roles and policies, including the Operator policies.
ROSA with HCP clusters require account and Operator roles with AWS managed policies attached. Customer managed policies are not supported. For more information regarding AWS managed policies for ROSA with HCP clusters, see AWS managed policies for ROSA account roles.
Prerequisites
- You have completed the AWS prerequisites for ROSA with HCP.
- You have available AWS service quotas.
- You have enabled the ROSA service in the AWS Console.
-
You have installed and configured the latest ROSA CLI (
rosa) on your installation host. - You have logged in to your Red Hat account by using the ROSA CLI.
Procedure
If they do not exist in your AWS account, create the required account-wide STS roles and attach the policies by running the following command:
$ rosa create account-roles --hosted-cp
Optional: Set your prefix as an environmental variable by running the following command:
$ export ACCOUNT_ROLES_PREFIX=<account_role_prefix>
View the value of the variable by running the following command:
$ echo $ACCOUNT_ROLES_PREFIX
Example output
ManagedOpenShift
For more information regarding AWS managed IAM policies for ROSA, see AWS managed IAM policies for ROSA.
1.2.3. Creating an OpenID Connect configuration
When using a ROSA with HCP cluster, you must create the OpenID Connect (OIDC) configuration prior to creating your cluster. This configuration is registered to be used with OpenShift Cluster Manager.
Prerequisites
- You have completed the AWS prerequisites for ROSA with HCP.
- You have completed the AWS prerequisites for Red Hat OpenShift Service on AWS.
-
You have installed and configured the latest Red Hat OpenShift Service on AWS (ROSA) CLI,
rosa, on your installation host.
Procedure
To create your OIDC configuration alongside the AWS resources, run the following command:
$ rosa create oidc-config --mode=auto --yes
This command returns the following information.
Example output
? Would you like to create a Managed (Red Hat hosted) OIDC Configuration Yes
I: Setting up managed OIDC configuration
I: To create Operator Roles for this OIDC Configuration, run the following command and remember to replace <user-defined> with a prefix of your choice:
	rosa create operator-roles --prefix <user-defined> --oidc-config-id 13cdr6b
If you are going to create a Hosted Control Plane cluster please include '--hosted-cp'
I: Creating OIDC provider using 'arn:aws:iam::4540112244:user/userName'
? Create the OIDC provider? Yes
I: Created OIDC provider with ARN 'arn:aws:iam::4540112244:oidc-provider/dvbwgdztaeq9o.cloudfront.net/13cdr6b'
When creating your cluster, you must supply the OIDC config ID. The CLI output provides this value for
--mode auto, otherwise you must determine these values based onawsCLI output for--mode manual.Optional: you can save the OIDC configuration ID as a variable to use later. Run the following command to save the variable:
$ export OIDC_ID=<oidc_config_id>1- 1
- In the example output above, the OIDC configuration ID is 13cdr6b.
View the value of the variable by running the following command:
$ echo $OIDC_ID
Example output
13cdr6b
Verification
You can list the possible OIDC configurations available for your clusters that are associated with your user organization. Run the following command:
$ rosa list oidc-config
Example output
ID                                MANAGED  ISSUER URL                                                             SECRET ARN
2330dbs0n8m3chkkr25gkkcd8pnj3lk2  true     https://dvbwgdztaeq9o.cloudfront.net/2330dbs0n8m3chkkr25gkkcd8pnj3lk2
233hvnrjoqu14jltk6lhbhf2tj11f8un  false    https://oidc-r7u1.s3.us-east-1.amazonaws.com                           aws:secretsmanager:us-east-1:242819244:secret:rosa-private-key-oidc-r7u1-tM3MDN
1.2.4. Creating Operator roles and policies
When using a ROSA with HCP cluster, you must create the Operator IAM roles that are required for Red Hat OpenShift Service on AWS (ROSA) with hosted control planes (HCP) deployments. The cluster Operators use the Operator roles to obtain the temporary permissions required to carry out cluster operations, such as managing back-end storage, cloud provider credentials, and external access to a cluster.
Prerequisites
- You have completed the AWS prerequisites for ROSA with HCP.
-
You have installed and configured the latest Red Hat OpenShift Service on AWS ROSA CLI (
rosa), on your installation host. - You created the account-wide AWS roles.
Procedure
Set your prefix name to an environment variable using the following command:
$ export OPERATOR_ROLES_PREFIX=<prefix_name>
To create your Operator roles, run the following command:
$ rosa create operator-roles --hosted-cp --prefix=$OPERATOR_ROLES_PREFIX --oidc-config-id=$OIDC_ID --installer-role-arn arn:aws:iam::${AWS_ACCOUNT_ID}:role/${ACCOUNT_ROLES_PREFIX}-HCP-ROSA-Installer-RoleThe following breakdown provides options for the Operator role creation.
$ rosa create operator-roles --hosted-cp
	--prefix=$OPERATOR_ROLES_PREFIX 1
	--oidc-config-id=$OIDC_ID 2
	--installer-role-arn arn:aws:iam::${AWS_ACCOUNT_ID}:role/${ACCOUNT_ROLES_PREFIX}-HCP-ROSA-Installer-Role 3
- 1
- You must supply a prefix when creating these Operator roles. Failing to do so produces an error. See the Additional resources of this section for information on the Operator prefix.
- 2
- This value is the OIDC configuration ID that you created for your ROSA with HCP cluster.
- 3
- This value is the installer role ARN that you created when you created the ROSA account roles.
You must include the
--hosted-cpparameter to create the correct roles for ROSA with HCP clusters. This command returns the following information.Sample output
? Role creation mode: auto
? Operator roles prefix: <pre-filled_prefix> 1
? OIDC Configuration ID: 23soa2bgvpek9kmes9s7os0a39i13qm4 | https://dvbwgdztaeq9o.cloudfront.net/23soa2bgvpek9kmes9s7os0a39i13qm4 2
? Create hosted control plane operator roles: Yes
W: More than one Installer role found
? Installer role ARN: arn:aws:iam::4540112244:role/<prefix>-HCP-ROSA-Installer-Role
? Permissions boundary ARN (optional):
I: Reusable OIDC Configuration detected. Validating trusted relationships to operator roles:
I: Creating roles using 'arn:aws:iam::4540112244:user/<userName>'
I: Created role '<prefix>-openshift-cluster-csi-drivers-ebs-cloud-credentials' with ARN 'arn:aws:iam::4540112244:role/<prefix>-openshift-cluster-csi-drivers-ebs-cloud-credentials'
I: Created role '<prefix>-openshift-cloud-network-config-controller-cloud-credenti' with ARN 'arn:aws:iam::4540112244:role/<prefix>-openshift-cloud-network-config-controller-cloud-credenti'
I: Created role '<prefix>-kube-system-kube-controller-manager' with ARN 'arn:aws:iam::4540112244:role/<prefix>-kube-system-kube-controller-manager'
I: Created role '<prefix>-kube-system-capa-controller-manager' with ARN 'arn:aws:iam::4540112244:role/<prefix>-kube-system-capa-controller-manager'
I: Created role '<prefix>-kube-system-control-plane-operator' with ARN 'arn:aws:iam::4540112244:role/<prefix>-kube-system-control-plane-operator'
I: Created role '<prefix>-kube-system-kms-provider' with ARN 'arn:aws:iam::4540112244:role/<prefix>-kube-system-kms-provider'
I: Created role '<prefix>-openshift-image-registry-installer-cloud-credentials' with ARN 'arn:aws:iam::4540112244:role/<prefix>-openshift-image-registry-installer-cloud-credentials'
I: Created role '<prefix>-openshift-ingress-operator-cloud-credentials' with ARN 'arn:aws:iam::4540112244:role/<prefix>-openshift-ingress-operator-cloud-credentials'
I: To create a cluster with these roles, run the following command:
	rosa create cluster --sts --oidc-config-id 23soa2bgvpek9kmes9s7os0a39i13qm4 --operator-roles-prefix <prefix> --hosted-cp
The Operator roles are now created and ready to use for creating your ROSA with HCP cluster.
Verification
You can list the Operator roles associated with your ROSA account. Run the following command:
$ rosa list operator-roles
Sample output
I: Fetching operator roles ROLE PREFIX AMOUNT IN BUNDLE <prefix> 8 ? Would you like to detail a specific prefix Yes 1 ? Operator Role Prefix: <prefix> ROLE NAME ROLE ARN VERSION MANAGED <prefix>-kube-system-capa-controller-manager arn:aws:iam::4540112244:role/<prefix>-kube-system-capa-controller-manager 4.13 No <prefix>-kube-system-control-plane-operator arn:aws:iam::4540112244:role/<prefix>-kube-system-control-plane-operator 4.13 No <prefix>-kube-system-kms-provider arn:aws:iam::4540112244:role/<prefix>-kube-system-kms-provider 4.13 No <prefix>-kube-system-kube-controller-manager arn:aws:iam::4540112244:role/<prefix>-kube-system-kube-controller-manager 4.13 No <prefix>-openshift-cloud-network-config-controller-cloud-credenti arn:aws:iam::4540112244:role/<prefix>-openshift-cloud-network-config-controller-cloud-credenti 4.13 No <prefix>-openshift-cluster-csi-drivers-ebs-cloud-credentials arn:aws:iam::4540112244:role/<prefix>-openshift-cluster-csi-drivers-ebs-cloud-credentials 4.13 No <prefix>-openshift-image-registry-installer-cloud-credentials arn:aws:iam::4540112244:role/<prefix>-openshift-image-registry-installer-cloud-credentials 4.13 No <prefix>-openshift-ingress-operator-cloud-credentials arn:aws:iam::4540112244:role/<prefix>-openshift-ingress-operator-cloud-credentials 4.13 No- 1
- After the command runs, it displays all the prefixes associated with your AWS account and notes how many roles are associated with this prefix. If you need to see all of these roles and their details, enter "Yes" on the detail prompt to have these roles listed out with specifics.
Additional resources
- See About custom Operator IAM role prefixes for information on the Operator prefixes.
1.3. Creating a ROSA with HCP cluster using the CLI
When using the Red Hat OpenShift Service on AWS (ROSA) CLI, rosa, to create a cluster, you can select the default options to create the cluster quickly.
Prerequisites
- You have completed the AWS prerequisites for ROSA with HCP.
- You have available AWS service quotas.
- You have enabled the ROSA service in the AWS Console.
-
You have installed and configured the latest ROSA CLI (
rosa) on your installation host. Runrosa versionto see your currently installed version of the ROSA CLI. If a newer version is available, the CLI provides a link to download this upgrade. - You have logged in to your Red Hat account by using the ROSA CLI.
- You have created an OIDC configuration.
- You have verified that the AWS Elastic Load Balancing (ELB) service role exists in your AWS account.
Procedure
Use one of the following commands to create your ROSA with HCP cluster:
NoteWhen creating a ROSA with HCP cluster, the default machine Classless Inter-Domain Routing (CIDR) is
10.0.0.0/16. If this does not correspond to the CIDR range for your VPC subnets, add--machine-cidr <address_block>to the following commands. To learn more about the default CIDR ranges for Red Hat OpenShift Service on AWS, see CIDR range definitions.If you did not set environmental variables, run the following command:
$ rosa create cluster --cluster-name=<cluster_name> \ <.>
    --mode=auto --hosted-cp [--private] \ <.>
    --operator-roles-prefix <operator-role-prefix> \ <.>
    --oidc-config-id <id-of-oidc-configuration> \
    --subnet-ids=<public-subnet-id>,<private-subnet-id>
<.> Specify the name of your cluster. If your cluster name is longer than 15 characters, it will contain an autogenerated domain prefix as a subdomain for your provisioned cluster on openshiftapps.com. To customize the subdomain, use the
--domain-prefixflag. The domain prefix cannot be longer than 15 characters, must be unique, and cannot be changed after cluster creation. <.> Optional: The--privateargument is used to create private ROSA with HCP clusters. If you use this argument, ensure that you only use your private subnet ID for--subnet-ids. <.> By default, the cluster-specific Operator role names are prefixed with the cluster name and a random 4-digit hash. You can optionally specify a custom prefix to replace<cluster_name>-<hash>in the role names. The prefix is applied when you create the cluster-specific Operator IAM roles. For information about the prefix, see About custom Operator IAM role prefixes.NoteIf you specified custom ARN paths when you created the associated account-wide roles, the custom path is automatically detected. The custom path is applied to the cluster-specific Operator roles when you create them in a later step.
If you set the environmental variables, create a cluster with a single, initial machine pool, using either a publicly or privately available API, and a publicly or privately available Ingress by running the following command:
$ rosa create cluster --private --cluster-name=<cluster_name> \
  --mode=auto --hosted-cp --operator-roles-prefix=$OPERATOR_ROLES_PREFIX \
  --oidc-config-id=$OIDC_ID --subnet-ids=$SUBNET_IDS
If you set the environmental variables, create a cluster with a single, initial machine pool, a publicly available API, and a publicly available Ingress by running the following command:
$ rosa create cluster --cluster-name=<cluster_name> --mode=auto --hosted-cp --operator-roles-prefix=$OPERATOR_ROLES_PREFIX --oidc-config-id=$OIDC_CONFIG --subnet-ids=$SUBNET_IDS
Check the status of your cluster by running the following command:
$ rosa describe cluster --cluster=<cluster_name>
The following
Statefield changes are listed in the output as the cluster installation progresses:-
pending (Preparing account) -
installing (DNS setup in progress) -
installing readyNoteIf the installation fails or the
Statefield does not change toreadyafter more than 10 minutes, check the installation troubleshooting documentation for details. For more information, see Troubleshooting installations. For steps to contact Red Hat Support for assistance, see Getting support for Red Hat OpenShift Service on AWS.
-
Track the progress of the cluster creation by watching the Red Hat OpenShift Service on AWS installation program logs. To check the logs, run the following command:
$ rosa logs install --cluster=<cluster_name> --watch \ <.>
<.> Optional: To watch for new log messages as the installation progresses, use the
--watchargument.
1.4. Next steps
1.5. Additional resources
- For steps to deploy a ROSA cluster using manual mode, see Creating a cluster using customizations.
- For more information about the AWS Identity Access Management (IAM) resources required to deploy Red Hat OpenShift Service on AWS with STS, see About IAM resources for clusters that use STS.
- See Additional custom security groups for information about security group requirements.
- For details about optionally setting an Operator role name prefix, see About custom Operator IAM role prefixes.
- For information about the prerequisites to installing ROSA with STS, see AWS prerequisites for ROSA with STS.
-
For details about using the
autoandmanualmodes to create the required STS resources, see Understanding the auto and manual deployment modes. - For more information about using OpenID Connect (OIDC) identity providers in AWS IAM, see Creating OpenID Connect (OIDC) identity providers in the AWS documentation.
- For more information about troubleshooting ROSA cluster installations, see Troubleshooting installations.
- For steps to contact Red Hat Support for assistance, see Getting support for Red Hat OpenShift Service on AWS.
Chapter 2. Creating ROSA with HCP clusters using a custom AWS KMS encryption key
Create a Red Hat OpenShift Service on AWS (ROSA) with a hosted control planes (HCP) cluster using a custom AWS Key Management Service (KMS) key.
2.1. ROSA with HCP Prerequisites
To create a ROSA with HCP cluster, you must have the following items:
- A configured virtual private cloud (VPC)
- Account-wide roles
- An OIDC configuration
- Operator roles
2.1.1. Creating a Virtual Private Cloud for your ROSA with HCP clusters
You must have a Virtual Private Cloud (VPC) to create ROSA with HCP cluster. You can use the following methods to create a VPC:
- Create a VPC by using a Terraform template
- Manually create the VPC resources in the AWS console
The Terraform instructions are for testing and demonstration purposes. Your own installation requires some modifications to the VPC for your own use. You should also ensure that when you use this Terraform script it is in the same region that you intend to install your cluster. In these examples, use us-east-2.
Creating a Virtual Private Cloud using Terraform
Terraform is a tool that allows you to create various resources using an established template. The following process uses the default options as required to create a ROSA with HCP cluster. For more information about using Terraform, see the additional resources.
Prerequisites
- You have installed Terraform version 1.4.0 or newer on your machine.
- You have installed Git on your machine.
Procedure
Open a shell prompt and clone the Terraform VPC repository by running the following command:
$ git clone https://github.com/openshift-cs/terraform-vpc-example
Navigate to the created directory by running the following command:
$ cd terraform-vpc-example
Initiate the Terraform file by running the following command:
$ terraform init
A message confirming the initialization appears when this process completes.
To build your VPC Terraform plan based on the existing Terraform template, run the
plancommand. You must include your AWS region. You can choose to specify a cluster name. Arosa.tfplanfile is added to thehypershift-tfdirectory after theterraform plancompletes. For more detailed options, see the Terraform VPC repository’s README file.$ terraform plan -out rosa.tfplan -var region=<region>
Apply this plan file to build your VPC by running the following command:
$ terraform apply rosa.tfplan
Optional: You can capture the values of the Terraform-provisioned private, public, and machinepool subnet IDs as environment variables to use when creating your ROSA with HCP cluster by running the following commands:
$ export SUBNET_IDS=$(terraform output -raw cluster-subnets-string)
Verify that the variables were correctly set with the following command:
$ echo $SUBNET_IDS
Sample output
$ subnet-0a6a57e0f784171aa,subnet-078e84e5b10ecf5b0
Additional resources
- See the Terraform VPC repository for a detailed list of all options available when customizing the VPC for your needs.
Creating a Virtual Private Cloud manually
If you choose to manually create your Virtual Private Cloud (VPC) instead of using Terraform, go to the VPC page in the AWS console. Your VPC must meet the requirements shown in the following table.
Table 2.1. Requirements for your VPC
| Requirement | Details |
|---|---|
| VPC name | You need to have the specific VPC name and ID when creating your cluster. |
| CIDR range | Your VPC CIDR range should match your machine CIDR. |
| Availability zone | You need one availability zone for a single zone, and you need three for availability zones for multi-zone. |
| Public subnet | You must have one public subnet with a NAT gateway for public clusters. Private clusters do not need a public subnet. |
| DNS hostname and resolution | You must ensure that the DNS hostname and resolution are enabled. |
Additional resources
2.1.2. Creating the account-wide STS roles and policies
Before using the Red Hat OpenShift Service on AWS (ROSA) CLI (rosa) to create Red Hat OpenShift Service on AWS (ROSA) with hosted control planes (HCP) clusters, create the required account-wide roles and policies, including the Operator policies.
ROSA with HCP clusters require account and Operator roles with AWS managed policies attached. Customer managed policies are not supported. For more information regarding AWS managed policies for ROSA with HCP clusters, see AWS managed policies for ROSA account roles.
Prerequisites
- You have completed the AWS prerequisites for ROSA with HCP.
- You have available AWS service quotas.
- You have enabled the ROSA service in the AWS Console.
-
You have installed and configured the latest ROSA CLI (
rosa) on your installation host. - You have logged in to your Red Hat account by using the ROSA CLI.
Procedure
If they do not exist in your AWS account, create the required account-wide STS roles and attach the policies by running the following command:
$ rosa create account-roles --hosted-cp
Optional: Set your prefix as an environmental variable by running the following command:
$ export ACCOUNT_ROLES_PREFIX=<account_role_prefix>
View the value of the variable by running the following command:
$ echo $ACCOUNT_ROLES_PREFIX
Example output
ManagedOpenShift
For more information regarding AWS managed IAM policies for ROSA, see AWS managed IAM policies for ROSA.
2.1.3. Creating an OpenID Connect configuration
When using a ROSA with HCP cluster, you must create the OpenID Connect (OIDC) configuration prior to creating your cluster. This configuration is registered to be used with OpenShift Cluster Manager.
Prerequisites
- You have completed the AWS prerequisites for ROSA with HCP.
- You have completed the AWS prerequisites for Red Hat OpenShift Service on AWS.
-
You have installed and configured the latest Red Hat OpenShift Service on AWS (ROSA) CLI,
rosa, on your installation host.
Procedure
To create your OIDC configuration alongside the AWS resources, run the following command:
$ rosa create oidc-config --mode=auto --yes
This command returns the following information.
Example output
? Would you like to create a Managed (Red Hat hosted) OIDC Configuration Yes
I: Setting up managed OIDC configuration
I: To create Operator Roles for this OIDC Configuration, run the following command and remember to replace <user-defined> with a prefix of your choice:
	rosa create operator-roles --prefix <user-defined> --oidc-config-id 13cdr6b
If you are going to create a Hosted Control Plane cluster please include '--hosted-cp'
I: Creating OIDC provider using 'arn:aws:iam::4540112244:user/userName'
? Create the OIDC provider? Yes
I: Created OIDC provider with ARN 'arn:aws:iam::4540112244:oidc-provider/dvbwgdztaeq9o.cloudfront.net/13cdr6b'
When creating your cluster, you must supply the OIDC config ID. The CLI output provides this value for
--mode auto, otherwise you must determine these values based onawsCLI output for--mode manual.Optional: you can save the OIDC configuration ID as a variable to use later. Run the following command to save the variable:
$ export OIDC_ID=<oidc_config_id>1- 1
- In the example output above, the OIDC configuration ID is 13cdr6b.
View the value of the variable by running the following command:
$ echo $OIDC_ID
Example output
13cdr6b
Verification
You can list the possible OIDC configurations available for your clusters that are associated with your user organization. Run the following command:
$ rosa list oidc-config
Example output
ID                                MANAGED  ISSUER URL                                                             SECRET ARN
2330dbs0n8m3chkkr25gkkcd8pnj3lk2  true     https://dvbwgdztaeq9o.cloudfront.net/2330dbs0n8m3chkkr25gkkcd8pnj3lk2
233hvnrjoqu14jltk6lhbhf2tj11f8un  false    https://oidc-r7u1.s3.us-east-1.amazonaws.com                           aws:secretsmanager:us-east-1:242819244:secret:rosa-private-key-oidc-r7u1-tM3MDN
2.1.4. Creating Operator roles and policies
When using a ROSA with HCP cluster, you must create the Operator IAM roles that are required for Red Hat OpenShift Service on AWS (ROSA) with hosted control planes (HCP) deployments. The cluster Operators use the Operator roles to obtain the temporary permissions required to carry out cluster operations, such as managing back-end storage, cloud provider credentials, and external access to a cluster.
Prerequisites
- You have completed the AWS prerequisites for ROSA with HCP.
-
You have installed and configured the latest Red Hat OpenShift Service on AWS ROSA CLI (
rosa), on your installation host. - You created the account-wide AWS roles.
Procedure
Set your prefix name to an environment variable using the following command:
$ export OPERATOR_ROLES_PREFIX=<prefix_name>
To create your Operator roles, run the following command:
$ rosa create operator-roles --hosted-cp --prefix=$OPERATOR_ROLES_PREFIX --oidc-config-id=$OIDC_ID --installer-role-arn arn:aws:iam::${AWS_ACCOUNT_ID}:role/${ACCOUNT_ROLES_PREFIX}-HCP-ROSA-Installer-RoleThe following breakdown provides options for the Operator role creation.
$ rosa create operator-roles --hosted-cp
	--prefix=$OPERATOR_ROLES_PREFIX 1
	--oidc-config-id=$OIDC_ID 2
	--installer-role-arn arn:aws:iam::${AWS_ACCOUNT_ID}:role/${ACCOUNT_ROLES_PREFIX}-HCP-ROSA-Installer-Role 3
- 1
- You must supply a prefix when creating these Operator roles. Failing to do so produces an error. See the Additional resources of this section for information on the Operator prefix.
- 2
- This value is the OIDC configuration ID that you created for your ROSA with HCP cluster.
- 3
- This value is the installer role ARN that you created when you created the ROSA account roles.
You must include the
--hosted-cpparameter to create the correct roles for ROSA with HCP clusters. This command returns the following information.Sample output
? Role creation mode: auto
? Operator roles prefix: <pre-filled_prefix> 1
? OIDC Configuration ID: 23soa2bgvpek9kmes9s7os0a39i13qm4 | https://dvbwgdztaeq9o.cloudfront.net/23soa2bgvpek9kmes9s7os0a39i13qm4 2
? Create hosted control plane operator roles: Yes
W: More than one Installer role found
? Installer role ARN: arn:aws:iam::4540112244:role/<prefix>-HCP-ROSA-Installer-Role
? Permissions boundary ARN (optional):
I: Reusable OIDC Configuration detected. Validating trusted relationships to operator roles:
I: Creating roles using 'arn:aws:iam::4540112244:user/<userName>'
I: Created role '<prefix>-openshift-cluster-csi-drivers-ebs-cloud-credentials' with ARN 'arn:aws:iam::4540112244:role/<prefix>-openshift-cluster-csi-drivers-ebs-cloud-credentials'
I: Created role '<prefix>-openshift-cloud-network-config-controller-cloud-credenti' with ARN 'arn:aws:iam::4540112244:role/<prefix>-openshift-cloud-network-config-controller-cloud-credenti'
I: Created role '<prefix>-kube-system-kube-controller-manager' with ARN 'arn:aws:iam::4540112244:role/<prefix>-kube-system-kube-controller-manager'
I: Created role '<prefix>-kube-system-capa-controller-manager' with ARN 'arn:aws:iam::4540112244:role/<prefix>-kube-system-capa-controller-manager'
I: Created role '<prefix>-kube-system-control-plane-operator' with ARN 'arn:aws:iam::4540112244:role/<prefix>-kube-system-control-plane-operator'
I: Created role '<prefix>-kube-system-kms-provider' with ARN 'arn:aws:iam::4540112244:role/<prefix>-kube-system-kms-provider'
I: Created role '<prefix>-openshift-image-registry-installer-cloud-credentials' with ARN 'arn:aws:iam::4540112244:role/<prefix>-openshift-image-registry-installer-cloud-credentials'
I: Created role '<prefix>-openshift-ingress-operator-cloud-credentials' with ARN 'arn:aws:iam::4540112244:role/<prefix>-openshift-ingress-operator-cloud-credentials'
I: To create a cluster with these roles, run the following command:
	rosa create cluster --sts --oidc-config-id 23soa2bgvpek9kmes9s7os0a39i13qm4 --operator-roles-prefix <prefix> --hosted-cp
The Operator roles are now created and ready to use for creating your ROSA with HCP cluster.
Verification
You can list the Operator roles associated with your ROSA account. Run the following command:
$ rosa list operator-roles
Sample output
I: Fetching operator roles ROLE PREFIX AMOUNT IN BUNDLE <prefix> 8 ? Would you like to detail a specific prefix Yes 1 ? Operator Role Prefix: <prefix> ROLE NAME ROLE ARN VERSION MANAGED <prefix>-kube-system-capa-controller-manager arn:aws:iam::4540112244:role/<prefix>-kube-system-capa-controller-manager 4.13 No <prefix>-kube-system-control-plane-operator arn:aws:iam::4540112244:role/<prefix>-kube-system-control-plane-operator 4.13 No <prefix>-kube-system-kms-provider arn:aws:iam::4540112244:role/<prefix>-kube-system-kms-provider 4.13 No <prefix>-kube-system-kube-controller-manager arn:aws:iam::4540112244:role/<prefix>-kube-system-kube-controller-manager 4.13 No <prefix>-openshift-cloud-network-config-controller-cloud-credenti arn:aws:iam::4540112244:role/<prefix>-openshift-cloud-network-config-controller-cloud-credenti 4.13 No <prefix>-openshift-cluster-csi-drivers-ebs-cloud-credentials arn:aws:iam::4540112244:role/<prefix>-openshift-cluster-csi-drivers-ebs-cloud-credentials 4.13 No <prefix>-openshift-image-registry-installer-cloud-credentials arn:aws:iam::4540112244:role/<prefix>-openshift-image-registry-installer-cloud-credentials 4.13 No <prefix>-openshift-ingress-operator-cloud-credentials arn:aws:iam::4540112244:role/<prefix>-openshift-ingress-operator-cloud-credentials 4.13 No- 1
- After the command runs, it displays all the prefixes associated with your AWS account and notes how many roles are associated with this prefix. If you need to see all of these roles and their details, enter "Yes" on the detail prompt to have these roles listed out with specifics.
2.1.5. Creating a ROSA cluster using a custom AWS KMS key
You can create a Red Hat OpenShift Service on AWS (ROSA) cluster with a customer-provided KMS key that is used to encrypt either node root volumes, the etcd database, or both. A different KMS key ARN can be provided for each option.
ROSA with HCP does not automatically configure the default storage class to encrypt persistent volumes with the customer-provided KMS key. This is something that can be configured in-cluster after installation.
Procedure
Create a custom AWS customer-managed KMS key by running the following command:
$ KMS_ARN=$(aws kms create-key --region $AWS_REGION --description 'Custom ROSA Encryption Key' --tags TagKey=red-hat,TagValue=true --query KeyMetadata.Arn --output text)
This command saves the Amazon Resource Name (ARN) output of this custom key for further steps.
NoteCustomers must provide the
--tags TagKey=red-hat,TagValue=trueargument that is required for a customer KMS key.Verify the KMS key has been created by running the following command:
$ echo $KMS_ARN
Set your AWS account ID to an environment variable.
$ AWS_ACCOUNT_ID=<aws_account_id>
Add the ARN for the account-wide installer role and operator roles that you created in the preceding step to the
Statement.Principal.AWSsection in the file. In the following example, the ARN for the defaultManagedOpenShift-HCP-ROSA-Installer-Rolerole is added:{ "Version": "2012-10-17", "Id": "key-rosa-policy-1", "Statement": [ { "Sid": "Enable IAM User Permissions", "Effect": "Allow", "Principal": { "AWS": "arn:aws:iam::${AWS_ACCOUNT_ID}:root" }, "Action": "kms:*", "Resource": "*" }, { "Sid": "Installer Permissions", "Effect": "Allow", "Principal": { "AWS": "arn:aws:iam::${AWS_ACCOUNT_ID}:role/ManagedOpenShift-HCP-ROSA-Installer-Role" }, "Action": [ "kms:CreateGrant", "kms:DescribeKey", "kms:GenerateDataKeyWithoutPlaintext" ], "Resource": "*" }, { "Sid": "ROSA KubeControllerManager Permissions", "Effect": "Allow", "Principal": { "AWS": "arn:aws:iam::${AWS_ACCOUNT_ID}:role/<operator_role_prefix>-kube-system-kube-controller-manager" }, "Action": "kms:DescribeKey", "Resource": "*" }, { "Sid": "ROSA KMS Provider Permissions", "Effect": "Allow", "Principal": { "AWS": "arn:aws:iam::${AWS_ACCOUNT_ID}:role/<operator_role_prefix>-kube-system-kms-provider" }, "Action": [ "kms:Encrypt", "kms:Decrypt", "kms:DescribeKey" ], "Resource": "*" }, { "Sid": "ROSA NodeManager Permissions", "Effect": "Allow", "Principal": { "AWS": "arn:aws:iam::${AWS_ACCOUNT_ID}:role/<operator_role_prefix>-kube-system-capa-controller-manager" }, "Action": [ "kms:DescribeKey", "kms:GenerateDataKeyWithoutPlaintext", "kms:CreateGrant" ], "Resource": "*" } ] }Confirm the details of the policy file created by running the following command:
$ cat rosa-key-policy.json
Apply the newly generated key policy to the custom KMS key by running the following command:
$ aws kms put-key-policy --key-id $KMS_ARN \
--policy file://rosa-key-policy.json \
--policy-name default
Create the cluster by running the following command:
NoteIf your cluster name is longer than 15 characters, it will contain an autogenerated domain prefix as a sub-domain for your provisioned cluster on
*.openshiftapps.com.To customize the subdomain, use the
--domain-prefixflag. The domain prefix cannot be longer than 15 characters, must be unique, and cannot be changed after cluster creation.$ rosa create cluster --cluster-name <cluster_name> \ --subnet-ids <private_subnet_id>,<public_subnet_id> \ --sts \ --mode auto \ --machine-cidr 10.0.0.0/16 \ --compute-machine-type m5.xlarge \ --hosted-cp \ --region <aws_region> \ --oidc-config-id $OIDC_ID \ --kms-key-arn $KMS_ARN \ 1 --etcd-encryption-kms-arn $KMS_ARN \ 2 --operator-roles-prefix $OPERATOR_ROLES_PREFIX
- 1
- This KMS key ARN is used to encrypt all worker node root volumes. It is not required if only etcd database encryption is needed.
- 2
- This KMS key ARN is used to encrypt the etcd database. The etcd database is always encrypted by default with an AES cipher block, but can be encrypted instead with a KMS key. It is not required if only node root volume encryption is needed.
Verification
You can verify that your KMS key works by using OpenShift Cluster Manager.
- Navigate to OpenShift Cluster Manager and select Instances.
- Select your instance.
- Click the Storage tab.
- Copy the KMS key ID.
- Search and select Key Management Service.
- Enter your copied KMS key ID in the Filter field.
2.2. Next steps
2.3. Additional resources
- For information on using the CLI to create a cluster, see Creating a ROSA with HCP cluster using the CLI.
- For steps to deploy a ROSA cluster using manual mode, see Creating a cluster using customizations.
- For more information about the AWS Identity Access Management (IAM) resources required to deploy Red Hat OpenShift Service on AWS with STS, see About IAM resources for clusters that use STS.
- For details about optionally setting an Operator role name prefix, see About custom Operator IAM role prefixes.
- For information about the prerequisites to installing ROSA with STS, see AWS prerequisites for ROSA with STS.
-
For details about using the
autoandmanualmodes to create the required STS resources, see Understanding the auto and manual deployment modes. - For more information about using OpenID Connect (OIDC) identity providers in AWS IAM, see Creating OpenID Connect (OIDC) identity providers.
- For more information about troubleshooting ROSA cluster installations, see Troubleshooting installations.
- For steps to contact Red Hat Support for assistance, see Getting support for Red Hat OpenShift Service on AWS.
Chapter 3. Creating a private cluster on ROSA with HCP
This document describes how to create a Red Hat OpenShift Service on AWS (ROSA) with hosted control planes (HCP) private cluster.
3.1. Creating an AWS private cluster
You can create a private cluster with multiple availability zones (Multi-AZ) on ROSA with HCP using the ROSA command line interface (CLI), rosa.
Prerequisites
- You have available AWS service quotas.
- You have enabled the ROSA service in the AWS Console.
- You have installed and configured the latest version of the ROSA CLI on your installation host.
Procedure
Creating a cluster with hosted control planes can take around 10 minutes.
Create a VPC with at least one private subnet. Ensure that your machine’s classless inter-domain routing (CIDR) matches your virtual private cloud’s CIDR. For more information, see Requirements for using your own VPC and VPC Validation.
ImportantIf you use a firewall, you must configure it so that ROSA can access the sites that required to function.
For more information, see the "AWS PrivateLink firewall prerequisites" section.
Create the account-wide IAM roles by running the following command:
$ rosa create account-roles --hosted-cp
Create the OIDC configuration by running the following command:
$ rosa create oidc-config --mode=auto --yes
Save the OIDC configuration ID because you need it to create the Operator roles.
Example output
I: Setting up managed OIDC configuration
I: To create Operator Roles for this OIDC Configuration, run the following command and remember to replace <user-defined> with a prefix of your choice:
	rosa create operator-roles --prefix <user-defined> --oidc-config-id 28s4avcdt2l318r1jbk3ifmimkurk384
If you are going to create a Hosted Control Plane cluster please include '--hosted-cp'
I: Creating OIDC provider using 'arn:aws:iam::46545644412:user/user'
I: Created OIDC provider with ARN 'arn:aws:iam::46545644412:oidc-provider/oidc.op1.openshiftapps.com/28s4avcdt2l318r1jbk3ifmimkurk384'
Create the Operator roles by running the following command:
$ rosa create operator-roles --hosted-cp --prefix <operator_roles_prefix> --oidc-config-id <oidc_config_id> --installer-role-arn arn:aws:iam::$<account_roles_prefix>:role/$<account_roles_prefix>-HCP-ROSA-Installer-Role
Create a private ROSA with HCP cluster by running the following command:
$ rosa create cluster --private --cluster-name=<cluster-name> --sts --mode=auto --hosted-cp --operator-roles-prefix <operator_role_prefix> --oidc-config-id <oidc_config_id> [--machine-cidr=<VPC CIDR>/16] --subnet-ids=<private-subnet-id1>[,<private-subnet-id2>,<private-subnet-id3>]
Enter the following command to check the status of your cluster. During cluster creation, the
Statefield from the output will transition frompendingtoinstalling, and finally, toready.$ rosa describe cluster --cluster=<cluster_name>
NoteIf installation fails or the
Statefield does not change toreadyafter 10 minutes, see the "Troubleshooting Red Hat OpenShift Service on AWS installations" documentation in the Additional resources section.Enter the following command to follow the OpenShift installer logs to track the progress of your cluster:
$ rosa logs install --cluster=<cluster_name> --watch
3.2. Configuring AWS security groups to access the API
With ROSA with HCP private clusters, the AWS PrivateLink endpoint exposed in the customer’s VPC has a default security group. This security group has access to the PrivateLink endpoint that is limited to only those resources that exist within the VPC or resources that are present with an IP address associated with the VPC CIDR range. In order to grant access to any entities outside of the VPC, through VPC peering and transit gateway, you must create and attach another security group to the PrivateLink endpoint to grant the necessary access.
Prerequisites
- Your corporate network or other VPC has connectivity.
- You have permission to create and attach security groups within the VPC.
Procedure
Set your cluster name as an environmental variable by running the following command:
$ export CLUSTER_NAME=<cluster_name>
You can verify that the variable has been set by running the following command:
$ echo $CLUSTER_NAME
Example output
hcp-private
Find the VPC endpoint (VPCE) ID and VPC ID by running the following command:
$ read -r VPCE_ID VPC_ID <<< $(aws ec2 describe-vpc-endpoints --filters "Name=tag:api.openshift.com/id,Values=$(rosa describe cluster -c ${CLUSTER_NAME} -o yaml | grep '^id: ' | cut -d' ' -f2)" --query 'VpcEndpoints[].[VpcEndpointId,VpcId]' --output text)Create your security group by running the following command:
$ export SG_ID=$(aws ec2 create-security-group --description "Granting API access to ${CLUSTER_NAME} from outside of VPC" --group-name "${CLUSTER_NAME}-api-sg" --vpc-id $VPC_ID --output text)Add an ingress rule to the security group by running the following command:
$ aws ec2 authorize-security-group-ingress --group-id $SG_ID --ip-permissions FromPort=443,ToPort=443,IpProtocol=tcp,IpRanges=[{CidrIp=0.0.0.0/0}]Add the new security group to the VPCE by running the following command:
$ aws ec2 modify-vpc-endpoint --vpc-endpoint-id $VPCE_ID --add-security-group-ids $SG_ID
You now can access the API with your ROSA with HCP private cluster.
3.3. Next steps
3.4. Additional resources
Chapter 4. Using the Node Tuning Operator on ROSA with HCP clusters
Red Hat OpenShift Service on AWS (ROSA) with hosted control planes (HCP) supports the Node Tuning Operator to improve performance of your nodes on your ROSA with HCP clusters. Prior to creating a node tuning configuration, you must create a custom tuning specification.
Purpose
The Node Tuning Operator helps you manage node-level tuning by orchestrating the TuneD daemon and achieves low latency performance by using the Performance Profile controller. The majority of high-performance applications require some level of kernel tuning. The Node Tuning Operator provides a unified management interface to users of node-level sysctls and more flexibility to add custom tuning specified by user needs.
The Operator manages the containerized TuneD daemon for Red Hat OpenShift Service on AWS as a Kubernetes daemon set. It ensures the custom tuning specification is passed to all containerized TuneD daemons running in the cluster in the format that the daemons understand. The daemons run on all nodes in the cluster, one per node.
Node-level settings applied by the containerized TuneD daemon are rolled back on an event that triggers a profile change or when the containerized TuneD daemon is terminated gracefully by receiving and handling a termination signal.
The Node Tuning Operator uses the Performance Profile controller to implement automatic tuning to achieve low latency performance for Red Hat OpenShift Service on AWS applications.
The cluster administrator configures a performance profile to define node-level settings such as the following:
- Updating the kernel to kernel-rt.
- Choosing CPUs for housekeeping.
- Choosing CPUs for running workloads.
Currently, disabling CPU load balancing is not supported by cgroup v2. As a result, you might not get the desired behavior from performance profiles if you have cgroup v2 enabled. Enabling cgroup v2 is not recommended if you are using performance profiles.
The Node Tuning Operator is part of a standard Red Hat OpenShift Service on AWS installation in version 4.1 and later.
In earlier versions of Red Hat OpenShift Service on AWS, the Performance Addon Operator was used to implement automatic tuning to achieve low latency performance for OpenShift applications. In Red Hat OpenShift Service on AWS 4.11 and later, this functionality is part of the Node Tuning Operator.
4.1. Custom tuning specification
The custom resource (CR) for the Operator has two major sections. The first section, profile:, is a list of TuneD profiles and their names. The second, recommend:, defines the profile selection logic.
Multiple custom tuning specifications can co-exist as multiple CRs in the Operator’s namespace. The existence of new CRs or the deletion of old CRs is detected by the Operator. All existing custom tuning specifications are merged and appropriate objects for the containerized TuneD daemons are updated.
Management state
The Operator Management state is set by adjusting the default Tuned CR. By default, the Operator is in the Managed state and the spec.managementState field is not present in the default Tuned CR. Valid values for the Operator Management state are as follows:
- Managed: the Operator will update its operands as configuration resources are updated
- Unmanaged: the Operator will ignore changes to the configuration resources
- Removed: the Operator will remove its operands and resources the Operator provisioned
Profile data
The profile: section lists TuneD profiles and their names.
{
  "profile": [
    {
      "name": "tuned_profile_1",
      "data": "# TuneD profile specification\n[main]\nsummary=Description of tuned_profile_1 profile\n\n[sysctl]\nnet.ipv4.ip_forward=1\n# ... other sysctl's or other TuneD daemon plugins supported by the containerized TuneD\n"
    },
    {
      "name": "tuned_profile_n",
      "data": "# TuneD profile specification\n[main]\nsummary=Description of tuned_profile_n profile\n\n# tuned_profile_n profile settings\n"
    }
  ]
}
Recommended profiles
The profile: selection logic is defined by the recommend: section of the CR. The recommend: section is a list of items to recommend the profiles based on a selection criteria.
"recommend": [
    {
      "recommend-item-1": details_of_recommendation,
      # ...
      "recommend-item-n": details_of_recommendation,
    }
  ]
The individual items of the list:
{
  "profile": [
    {
    # ...
    }
  ],
  "recommend": [
    {
      "profile": <tuned_profile_name>, 1
      "priority":{ <priority>, 2
      },
      "match": [ 3
        {
          "label": <label_information> 4
        },
      ]
    },
  ]
}
<match> is an optional list recursively defined as follows:
"match": [
        {
          "label": 1
        },
]- 1
- Node or pod label name.
If <match> is not omitted, all nested <match> sections must also evaluate to true. Otherwise, false is assumed and the profile with the respective <match> section will not be applied or recommended. Therefore, the nesting (child <match> sections) works as logical AND operator. Conversely, if any item of the <match> list matches, the entire <match> list evaluates to true. Therefore, the list acts as logical OR operator.
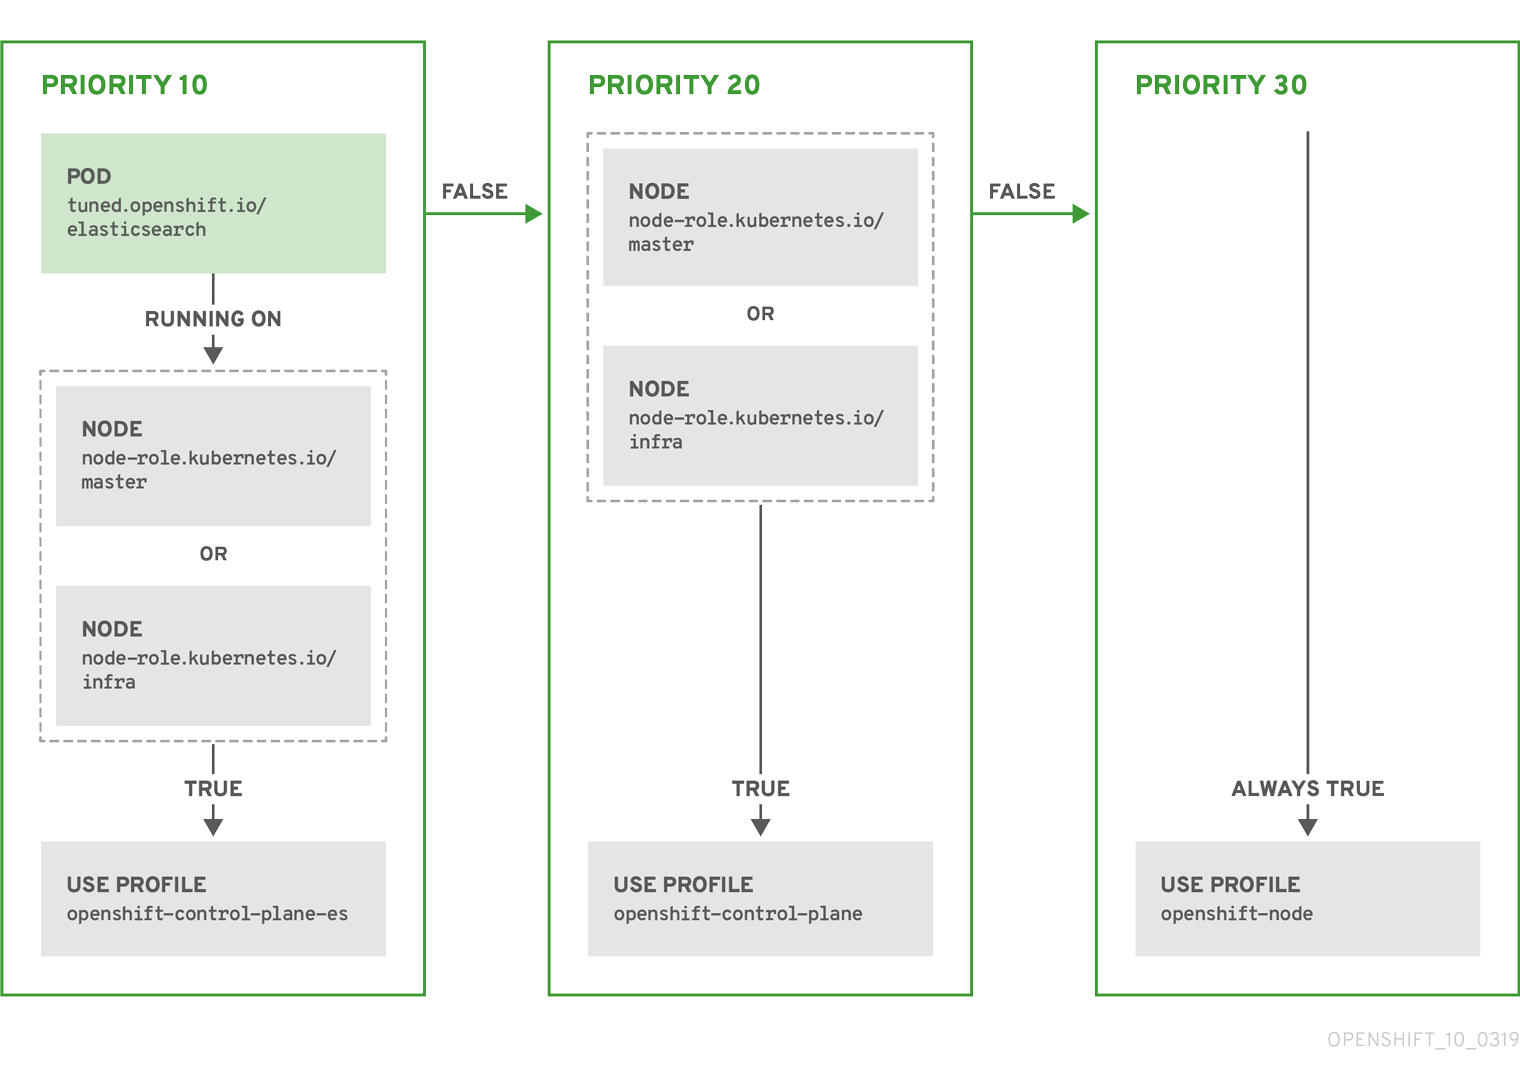
Example: Node or pod label based matching
[
  {
    "match": [
      {
        "label": "tuned.openshift.io/elasticsearch",
        "match": [
          {
            "label": "node-role.kubernetes.io/master"
          },
          {
            "label": "node-role.kubernetes.io/infra"
          }
        ],
        "type": "pod"
      }
    ],
    "priority": 10,
    "profile": "openshift-control-plane-es"
  },
  {
    "match": [
      {
        "label": "node-role.kubernetes.io/master"
      },
      {
        "label": "node-role.kubernetes.io/infra"
      }
    ],
    "priority": 20,
    "profile": "openshift-control-plane"
  },
  {
    "priority": 30,
    "profile": "openshift-node"
  }
]
The CR above is translated for the containerized TuneD daemon into its recommend.conf file based on the profile priorities. The profile with the highest priority (10) is openshift-control-plane-es and, therefore, it is considered first. The containerized TuneD daemon running on a given node looks to see if there is a pod running on the same node with the tuned.openshift.io/elasticsearch label set. If not, the entire <match> section evaluates as false. If there is such a pod with the label, in order for the <match> section to evaluate to true, the node label also needs to be node-role.kubernetes.io/master or node-role.kubernetes.io/infra.
If the labels for the profile with priority 10 matched, openshift-control-plane-es profile is applied and no other profile is considered. If the node/pod label combination did not match, the second highest priority profile (openshift-control-plane) is considered. This profile is applied if the containerized TuneD pod runs on a node with labels node-role.kubernetes.io/master or node-role.kubernetes.io/infra.
Finally, the profile openshift-node has the lowest priority of 30. It lacks the <match> section and, therefore, will always match. It acts as a profile catch-all to set openshift-node profile, if no other profile with higher priority matches on a given node.
Example: Machine pool based matching
{
  "apiVersion": "tuned.openshift.io/v1",
  "kind": "Tuned",
  "metadata": {
    "name": "openshift-node-custom",
    "namespace": "openshift-cluster-node-tuning-operator"
  },
  "spec": {
    "profile": [
      {
        "data": "[main]\nsummary=Custom OpenShift node profile with an additional kernel parameter\ninclude=openshift-node\n[bootloader]\ncmdline_openshift_node_custom=+skew_tick=1\n",
        "name": "openshift-node-custom"
      }
    ],
    "recommend": [
      {
        "priority": 20,
        "profile": "openshift-node-custom"
      }
    ]
  }
}
Cloud provider-specific TuneD profiles
With this functionality, all Cloud provider-specific nodes can conveniently be assigned a TuneD profile specifically tailored to a given Cloud provider on a Red Hat OpenShift Service on AWS cluster. This can be accomplished without adding additional node labels or grouping nodes into machine pools.
This functionality takes advantage of spec.providerID node object values in the form of <cloud-provider>://<cloud-provider-specific-id> and writes the file /var/lib/tuned/provider with the value <cloud-provider> in NTO operand containers. The content of this file is then used by TuneD to load provider-<cloud-provider> profile if such profile exists.
The openshift profile that both openshift-control-plane and openshift-node profiles inherit settings from is now updated to use this functionality through the use of conditional profile loading. Neither NTO nor TuneD currently include any Cloud provider-specific profiles. However, it is possible to create a custom profile provider-<cloud-provider> that will be applied to all Cloud provider-specific cluster nodes.
Example GCE Cloud provider profile
{
  "apiVersion": "tuned.openshift.io/v1",
  "kind": "Tuned",
  "metadata": {
    "name": "provider-gce",
    "namespace": "openshift-cluster-node-tuning-operator"
  },
  "spec": {
    "profile": [
      {
        "data": "[main]\nsummary=GCE Cloud provider-specific profile\n# Your tuning for GCE Cloud provider goes here.\n",
        "name": "provider-gce"
      }
    ]
  }
}
Due to profile inheritance, any setting specified in the provider-<cloud-provider> profile will be overwritten by the openshift profile and its child profiles.
4.2. Creating node tuning configurations on ROSA with HCP
You can create tuning configurations using the Red Hat OpenShift Service on AWS (ROSA) CLI, rosa.
Prerequisites
- You have downloaded the latest version of the ROSA CLI.
- You have a cluster on the latest version.
- You have a specification file configured for node tuning.
Procedure
Run the following command to create your tuning configuration:
$ rosa create tuning-config -c <cluster_id> --name <name_of_tuning> --spec-path <path_to_spec_file>
You must supply the path to the
spec.jsonfile or the command returns an error.Sample output
$ I: Tuning config 'sample-tuning' has been created on cluster 'cluster-example'.
$ I: To view all tuning configs, run 'rosa list tuning-configs -c cluster-example'
Validation
You can verify the existing tuning configurations that are applied by your account with the following command:
$ rosa list tuning-configs -c <cluster_name> [-o json]
You can specify the type of output you want for the configuration list.
Without specifying the output type, you see the ID and name of the tuning configuration:
Sample output without specifying output type
ID                                    NAME
20468b8e-edc7-11ed-b0e4-0a580a800298  sample-tuning
If you specify an output type, such as
json, you receive the tuning configuration as JSON text:NoteThe following JSON output has hard line-returns for the sake of reading clarity. This JSON output is invalid unless you remove the newlines in the JSON strings.
Sample output specifying JSON output
[
  {
    "kind": "TuningConfig",
    "id": "20468b8e-edc7-11ed-b0e4-0a580a800298",
    "href": "/api/clusters_mgmt/v1/clusters/23jbsevqb22l0m58ps39ua4trff9179e/tuning_configs/20468b8e-edc7-11ed-b0e4-0a580a800298",
    "name": "sample-tuning",
    "spec": {
      "profile": [
        {
          "data": "[main]\nsummary=Custom OpenShift profile\ninclude=openshift-node\n\n[sysctl]\nvm.dirty_ratio=\"55\"\n",
          "name": "tuned-1-profile"
        }
      ],
      "recommend": [
        {
          "priority": 20,
          "profile": "tuned-1-profile"
        }
      ]
    }
  }
]
4.3. Modifying your node tuning configurations for ROSA with HCP
You can view and update the node tuning configurations using the Red Hat OpenShift Service on AWS (ROSA) CLI, rosa.
Prerequisites
- You have downloaded the latest version of the ROSA CLI.
- You have a cluster on the latest version
- Your cluster has a node tuning configuration added to it
Procedure
You view the tuning configurations with the
rosa describecommand:$ rosa describe tuning-config -c <cluster_id> 1 --name <name_of_tuning> 2 [-o json] 3
The following items in this spec file are:
Sample output without specifying output type
Name:    sample-tuning
ID:      20468b8e-edc7-11ed-b0e4-0a580a800298
Spec:    {
            "profile": [
              {
                "data": "[main]\nsummary=Custom OpenShift profile\ninclude=openshift-node\n\n[sysctl]\nvm.dirty_ratio=\"55\"\n",
                "name": "tuned-1-profile"
              }
            ],
            "recommend": [
              {
                 "priority": 20,
                 "profile": "tuned-1-profile"
              }
            ]
         }
Sample output specifying JSON output
{
  "kind": "TuningConfig",
  "id": "20468b8e-edc7-11ed-b0e4-0a580a800298",
  "href": "/api/clusters_mgmt/v1/clusters/23jbsevqb22l0m58ps39ua4trff9179e/tuning_configs/20468b8e-edc7-11ed-b0e4-0a580a800298",
  "name": "sample-tuning",
  "spec": {
    "profile": [
      {
        "data": "[main]\nsummary=Custom OpenShift profile\ninclude=openshift-node\n\n[sysctl]\nvm.dirty_ratio=\"55\"\n",
        "name": "tuned-1-profile"
      }
    ],
    "recommend": [
      {
        "priority": 20,
        "profile": "tuned-1-profile"
      }
    ]
  }
}
After verifying the tuning configuration, you edit the existing configurations with the
rosa editcommand:$ rosa edit tuning-config -c <cluster_id> --name <name_of_tuning> --spec-path <path_to_spec_file>
In this command, you use the
spec.jsonfile to edit your configurations.
Verification
Run the
rosa describecommand again, to see that the changes you made to thespec.jsonfile are updated in the tuning configurations:$ rosa describe tuning-config -c <cluster_id> --name <name_of_tuning>
Sample output
Name:  sample-tuning
ID:    20468b8e-edc7-11ed-b0e4-0a580a800298
Spec:  {
           "profile": [
             {
              "data": "[main]\nsummary=Custom OpenShift profile\ninclude=openshift-node\n\n[sysctl]\nvm.dirty_ratio=\"55\"\n",
              "name": "tuned-2-profile"
             }
           ],
           "recommend": [
             {
              "priority": 10,
              "profile": "tuned-2-profile"
             }
           ]
       }
4.4. Deleting node tuning configurations on ROSA with HCP
You can delete tuning configurations by using the Red Hat OpenShift Service on AWS (ROSA) CLI, rosa.
You cannot delete a tuning configuration referenced in a machine pool. You must first remove the tuning configuration from all machine pools before you can delete it.
Prerequisites
- You have downloaded the latest version of the ROSA CLI.
- You have a cluster on the latest version .
- Your cluster has a node tuning configuration that you want delete.
Procedure
To delete the tuning configurations, run the following command:
$ rosa delete tuning-config -c <cluster_id> <name_of_tuning>
The tuning configuration on the cluster is deleted
Sample output
? Are you sure you want to delete tuning config sample-tuning on cluster sample-cluster? Yes
I: Successfully deleted tuning config 'sample-tuning' from cluster 'sample-cluster'
Chapter 5. Deleting a ROSA with HCP cluster
If you want to delete a Red Hat OpenShift Service on AWS (ROSA) with hosted control planes (HCP) cluster, you can use either the Red Hat OpenShift Cluster Manager or the ROSA command line interface (CLI) (rosa). After deleting your cluster, you can also delete the AWS Identity and Access Management (IAM) resources that are used by the cluster.
5.1. Deleting a ROSA with HCP cluster and the cluster-specific IAM resources
You can delete a ROSA with HCP cluster by using the ROSA command line interface (CLI) (rosa) or Red Hat OpenShift Cluster Manager.
After deleting the cluster, you can clean up the cluster-specific Identity and Access Management (IAM) resources in your AWS account by using the ROSA CLI. The cluster-specific resources include the Operator roles and the OpenID Connect (OIDC) provider.
The cluster deletion must complete before you remove the IAM resources, because the resources are used in the cluster deletion and clean up processes.
If add-ons are installed, the cluster deletion takes longer because add-ons are uninstalled before the cluster is deleted. The amount of time depends on the number and size of the add-ons.
Prerequisites
- You have installed a ROSA with HCP cluster.
-
You have installed and configured the latest ROSA CLI (
rosa) on your installation host.
Procedure
Get the cluster ID, the Amazon Resource Names (ARNs) for the cluster-specific Operator roles, and the endpoint URL for the OIDC provider by running the following command:
$ rosa describe cluster --cluster=<cluster_name>
Example output
Name:                       test_cluster
Domain Prefix:              test_cluster
Display Name:               test_cluster
ID:                         <cluster_id> 1
External ID:                <external_id>
Control Plane:              ROSA Service Hosted
OpenShift Version:          4.15.0
Channel Group:              stable
DNS:                        test_cluster.l3cn.p3.openshiftapps.com
AWS Account:                <AWS_id>
AWS Billing Account:        <AWS_id>
API URL:                    https://api.test_cluster.l3cn.p3.openshiftapps.com:443
Console URL:
Region:                     us-east-1
Availability:
 - Control Plane:           MultiAZ
 - Data Plane:              SingleAZ

Nodes:
 - Compute (desired):       2
 - Compute (current):       0
Network:
 - Type:                    OVNKubernetes
 - Service CIDR:            172.30.0.0/16
 - Machine CIDR:            10.0.0.0/16
 - Pod CIDR:                10.128.0.0/14
 - Host Prefix:             /23
 - Subnets:                 <subnet_ids>
EC2 Metadata Http Tokens:   optional
Role (STS) ARN:             arn:aws:iam::<AWS_id>:role/test_cluster-HCP-ROSA-Installer-Role
Support Role ARN:           arn:aws:iam::<AWS_id>:role/test_cluster-HCP-ROSA-Support-Role
Instance IAM Roles:
 - Worker:                  arn:aws:iam::<AWS_id>:role/test_cluster-HCP-ROSA-Worker-Role
Operator IAM Roles: 2
 - arn:aws:iam::<AWS_id>:role/test_cluster-openshift-cloud-network-config-controller-cloud-crede
 - arn:aws:iam::<AWS_id>:role/test_cluster-openshift-image-registry-installer-cloud-credentials
 - arn:aws:iam::<AWS_id>:role/test_cluster-openshift-ingress-operator-cloud-credentials
 - arn:aws:iam::<AWS_id>:role/test_cluster-kube-system-kube-controller-manager
 - arn:aws:iam::<AWS_id>:role/test_cluster-kube-system-capa-controller-manager
 - arn:aws:iam::<AWS_id>:role/test_cluster-kube-system-control-plane-operator
 - arn:aws:iam::<AWS_id>:role/hcpcluster-kube-system-kms-provider
 - arn:aws:iam::<AWS_id>:role/test_cluster-openshift-cluster-csi-drivers-ebs-cloud-credentials
Managed Policies:           Yes
State:                      ready
Private:                    No
Created:                    Apr 16 2024 20:32:06 UTC
User Workload Monitoring:   Enabled
Details Page:               https://console.redhat.com/openshift/details/s/<cluster_id>
OIDC Endpoint URL:          https://oidc.op1.openshiftapps.com/<cluster_id> (Managed) 3
Audit Log Forwarding:       Disabled
External Authentication:    Disabled
- 1
- Lists the cluster ID.
- 2
- Specifies the ARNs for the cluster-specific Operator roles. For example, in the sample output the ARN for the role required by the Machine Config Operator is
arn:aws:iam::<aws_account_id>:role/mycluster-x4q9-openshift-machine-api-aws-cloud-credentials. - 3
- Displays the endpoint URL for the cluster-specific OIDC provider.
ImportantAfter the cluster is deleted, you need the cluster ID to delete the cluster-specific STS resources using the ROSA CLI.
Delete the cluster by using either the OpenShift Cluster Manager or the ROSA CLI (
rosa):To delete the cluster by using the OpenShift Cluster Manager:
- Navigate to the OpenShift Cluster Manager.
-
Click the Options menu
 next to your cluster and select Delete cluster.
- Type the name of your cluster into the prompt and click Delete.
To delete the cluster using the ROSA CLI:
Run the following command, replacing
<cluster_name>with the name or ID of your cluster:$ rosa delete cluster --cluster=<cluster_name> --watch
ImportantYou must wait for cluster deletion to complete before you remove the Operator roles and the OIDC provider.
Delete the cluster-specific Operator IAM roles by running the following command:
$ rosa delete operator-roles --prefix <operator_role_prefix>
Delete the OIDC provider by running the following command:
$ rosa delete oidc-provider --oidc-config-id <oidc_config_id>
Troubleshooting
- If the cluster cannot be deleted because of missing IAM roles, see Repairing a cluster that cannot be deleted.
If the cluster cannot be deleted for other reasons:
- Ensure that there are no add-ons for your cluster pending in the Hybrid Cloud Console.
- Ensure that all AWS resources and dependencies have been deleted in the Amazon Web Console.
5.2. Deleting the account-wide IAM resources
After you have deleted all Red Hat OpenShift Service on AWS (ROSA) with hosted control planes (HCP) clusters that depend on the account-wide AWS Identity and Access Management (IAM) resources, you can delete the account-wide resources.
If you no longer need to install a ROSA with HCP cluster by using Red Hat OpenShift Cluster Manager, you can also delete the OpenShift Cluster Manager and user IAM roles.
The account-wide IAM roles and policies might be used by other ROSA with HCP clusters in the same AWS account. Only remove the resources if they are not required by other clusters.
The OpenShift Cluster Manager and user IAM roles are required if you want to install, manage, and delete other Red Hat OpenShift Service on AWS clusters in the same AWS account by using OpenShift Cluster Manager. Only remove the roles if you no longer need to install Red Hat OpenShift Service on AWS clusters in your account by using OpenShift Cluster Manager. For more information about repairing your cluster if these roles are removed before deletion, see "Repairing a cluster that cannot be deleted" in Troubleshooting cluster deployments.
Additional resources
5.2.1. Deleting the account-wide IAM roles and policies
This section provides steps to delete the account-wide IAM roles and policies that you created for ROSA with HCP deployments, along with the account-wide Operator policies. You can delete the account-wide AWS Identity and Access Management (IAM) roles and policies only after deleting all of the ROSA with HCP clusters that depend on them.
The account-wide IAM roles and policies might be used by other Red Hat OpenShift Service on AWS in the same AWS account. Only remove the roles if they are not required by other clusters.
Prerequisites
- You have account-wide IAM roles that you want to delete.
-
You have installed and configured the latest ROSA CLI (
rosa) on your installation host.
Procedure
Delete the account-wide roles:
List the account-wide roles in your AWS account by using the ROSA CLI (
rosa):$ rosa list account-roles
Example output
I: Fetching account roles
ROLE NAME                                 ROLE TYPE      ROLE ARN                                                                 OPENSHIFT VERSION  AWS Managed
ManagedOpenShift-HCP-ROSA-Installer-Role  Installer      arn:aws:iam::<aws_account_id>:role/ManagedOpenShift-HCP-ROSA-Installer-Role  4.15               Yes
ManagedOpenShift-HCP-ROSA-Support-Role    Support        arn:aws:iam::<aws_account_id>:role/ManagedOpenShift-HCP-ROSA-Support-Role    4.15               Yes
ManagedOpenShift-HCP-ROSA-Worker-Role     Worker         arn:aws:iam::<aws_account_id>:role/ManagedOpenShift-HCP-ROSA-Worker-Role     4.15               Yes
Delete the account-wide roles:
$ rosa delete account-roles --prefix <prefix> --mode auto 1- 1
- You must include the
--<prefix>argument. Replace<prefix>with the prefix of the account-wide roles to delete. If you did not specify a custom prefix when you created the account-wide roles, specify the default prefix,ManagedOpenShift.
ImportantThe account-wide IAM roles might be used by other ROSA clusters in the same AWS account. Only remove the roles if they are not required by other clusters.
Example output
W: There are no classic account roles to be deleted
I: Deleting hosted CP account roles
? Delete the account role 'delete-rosa-HCP-ROSA-Installer-Role'? Yes
I: Deleting account role 'delete-rosa-HCP-ROSA-Installer-Role'
? Delete the account role 'delete-rosa-HCP-ROSA-Support-Role'? Yes
I: Deleting account role 'delete-rosa-HCP-ROSA-Support-Role'
? Delete the account role 'delete-rosa-HCP-ROSA-Worker-Role'? Yes
I: Deleting account role 'delete-rosa-HCP-ROSA-Worker-Role'
I: Successfully deleted the hosted CP account roles
Delete the account-wide in-line and Operator policies:
Under the Policies page in the AWS IAM Console, filter the list of policies by the prefix that you specified when you created the account-wide roles and policies.
NoteIf you did not specify a custom prefix when you created the account-wide roles, search for the default prefix,
ManagedOpenShift.Delete the account-wide in-line policies and Operator policies by using the AWS IAM Console. For more information about deleting IAM policies by using the AWS IAM Console, see Deleting IAM policies in the AWS documentation.
ImportantThe account-wide in-line and Operator IAM policies might be used by other ROSA with HCP in the same AWS account. Only remove the roles if they are not required by other clusters.
Additional resources
5.2.2. Unlinking and deleting the OpenShift Cluster Manager and user IAM roles
When you install a ROSA with HCP cluster by using Red Hat OpenShift Cluster Manager, you also create OpenShift Cluster Manager and user Identity and Access Management (IAM) roles that link to your Red Hat organization. After deleting your cluster, you can unlink and delete the roles by using the ROSA CLI (rosa).
The OpenShift Cluster Manager and user IAM roles are required if you want to use OpenShift Cluster Manager to install and manage other ROSA with HCP in the same AWS account. Only remove the roles if you no longer need to use the OpenShift Cluster Manager to install ROSA with HCP clusters.
Prerequisites
- You created OpenShift Cluster Manager and user IAM roles and linked them to your Red Hat organization.
-
You have installed and configured the latest ROSA CLI (
rosa) on your installation host. - You have organization administrator privileges in your Red Hat organization.
Procedure
Unlink the OpenShift Cluster Manager IAM role from your Red Hat organization and delete the role:
List the OpenShift Cluster Manager IAM roles in your AWS account:
$ rosa list ocm-roles
Example output
I: Fetching ocm roles
ROLE NAME                                                     ROLE ARN                                                                                         LINKED  ADMIN  AWS Managed
ManagedOpenShift-OCM-Role-<red_hat_organization_external_id>  arn:aws:iam::<aws_account_id>:role/ManagedOpenShift-OCM-Role-<red_hat_organization_external_id>  Yes      Yes     Yes
If your OpenShift Cluster Manager IAM role is listed as linked in the output of the preceding command, unlink the role from your Red Hat organization by running the following command:
$ rosa unlink ocm-role --role-arn <arn> 1- 1
- Replace
<arn>with the Amazon Resource Name (ARN) for your OpenShift Cluster Manager IAM role. The ARN is specified in the output of the preceding command. In the preceding example, the ARN is in the formatarn:aws:iam::<aws_account_id>:role/ManagedOpenShift-OCM-Role-<red_hat_organization_external_id>.
Example output
I: Unlinking OCM role
? Unlink the 'arn:aws:iam::<aws_account_id>:role/ManagedOpenShift-OCM-Role-<red_hat_organization_external_id>' role from organization '<red_hat_organization_id>'? Yes
I: Successfully unlinked role-arn 'arn:aws:iam::<aws_account_id>:role/ManagedOpenShift-OCM-Role-<red_hat_organization_external_id>' from organization account '<red_hat_organization_id>'
Delete the OpenShift Cluster Manager IAM role and policies:
$ rosa delete ocm-role --role-arn <arn>
Example output
I: Deleting OCM role ? OCM Role ARN: arn:aws:iam::<aws_account_id>:role/ManagedOpenShift-OCM-Role-<red_hat_organization_external_id> ? Delete 'arn:aws:iam::<aws_account_id>:role/ManagedOpenShift-OCM-Role-<red_hat_organization_external_id>' ocm role? Yes ? OCM role deletion mode: auto 1 I: Successfully deleted the OCM role- 1
- Specifies the deletion mode. You can use
automode to automatically delete the OpenShift Cluster Manager IAM role and policies. Inmanualmode, the ROSA CLI generates theawscommands needed to delete the role and policies.manualmode enables you to review the details before running theawscommands manually.
Unlink the user IAM role from your Red Hat organization and delete the role:
List the user IAM roles in your AWS account:
$ rosa list user-roles
Example output
I: Fetching user roles
ROLE NAME                                  ROLE ARN                                                                  LINKED
ManagedOpenShift-User-<ocm_user_name>-Role  arn:aws:iam::<aws_account_id>:role/ManagedOpenShift-User-<ocm_user_name>-Role  Yes
If your user IAM role is listed as linked in the output of the preceding command, unlink the role from your Red Hat organization:
$ rosa unlink user-role --role-arn <arn> 1- 1
- Replace
<arn>with the Amazon Resource Name (ARN) for your user IAM role. The ARN is specified in the output of the preceding command. In the preceding example, the ARN is in the formatarn:aws:iam::<aws_account_id>:role/ManagedOpenShift-User-<ocm_user_name>-Role.
Example output
I: Unlinking user role
? Unlink the 'arn:aws:iam::<aws_account_id>:role/ManagedOpenShift-User-<ocm_user_name>-Role' role from the current account '<ocm_user_account_id>'? Yes
I: Successfully unlinked role ARN 'arn:aws:iam::<aws_account_id>:role/ManagedOpenShift-User-<ocm_user_name>-Role' from account '<ocm_user_account_id>'
Delete the user IAM role:
$ rosa delete user-role --role-arn <arn>
Example output
I: Deleting user role ? User Role ARN: arn:aws:iam::<aws_account_id>:role/ManagedOpenShift-User-<ocm_user_name>-Role ? Delete the 'arn:aws:iam::<aws_account_id>:role/ManagedOpenShift-User-<ocm_user_name>-Role' role from the AWS account? Yes ? User role deletion mode: auto 1 I: Successfully deleted the user role- 1
- Specifies the deletion mode. You can use
automode to automatically delete the user IAM role. Inmanualmode, the ROSA CLI generates theawscommand needed to delete the role.manualmode enables you to review the details before running theawscommand manually.