
Updating Red Hat JBoss Enterprise Application Platform
Comprehensive instructions for updating Red Hat JBoss Enterprise Application Platform.
Abstract
Providing feedback on JBoss EAP documentation
To report an error or to improve our documentation, log in to your Red Hat Jira account and submit an issue. If you do not have a Red Hat Jira account, then you will be prompted to create an account.
Procedure
- Click the following link to create a ticket.
- Enter a brief description of the issue in the Summary.
- Provide a detailed description of the issue or enhancement in the Description. Include a URL to where the issue occurs in the documentation.
- Clicking Submit creates and routes the issue to the appropriate documentation team.
Making open source more inclusive
Red Hat is committed to replacing problematic language in our code, documentation, and web properties. We are beginning with these four terms: master, slave, blacklist, and whitelist. Because of the enormity of this endeavor, these changes will be implemented gradually over several upcoming releases. For more details, see our CTO Chris Wright’s message.
Chapter 1. JBoss EAP 8.0 update methods
You can update JBoss EAP 8.0 using the following methods:
- JBoss EAP Installation Manager
- Management CLI
- Web console
- RPM
From JBoss EAP 8.0 onward, the JBoss EAP server can be updated in either online or offline mode. These modes are supported by all the update methods.
- Online update: You can update JBoss EAP directly from an online repository. You must have access to the Red Hat repositories or their mirrors to use this mode. This option always updates to the latest available JBoss EAP 8.0 update.
- Offline update: You can update JBoss EAP from a local file-system. Use the offline update mode if you do not have online access to the Red Hat repositories or their mirrors. You will need to download the latest update and distribute it to your systems.
Depending on your requirements, choose one of the listed update methods. The following table provides a brief overview of each type of update method.
Table 1.1. Update Methods
| Method | Description |
|---|---|
| |
| |
| |
|
You can run JBoss EAP on the following cloud platforms. This documentation does not cover provisioning on other cloud platforms. See the related documentation.
- JBoss EAP on OpenShift.
Additional resources
Chapter 2. Understanding channels in JBoss EAP
The jboss-eap-installation-manager provides a streamlined and controlled pathway to access the most recent supported versions of JBoss EAP components. These streamlined and controlled pathways are called channels. A channel consists of a curated list of component versions (called channel manifest) and a collection of repositories used to resolve and retrieve those components. Each repository has a unique name (id) and a default Maven repository URL. The jboss-eap-installation-manager allows you to manage these channels effectively in both stand-alone and managed domain configurations.
Chapter 3. Updating JBoss EAP using the jboss-eap-installation-manager
3.1. Updating JBoss EAP using the jboss-eap-installation-manager
You can update JBoss EAP periodically if new updates are available after you have downloaded and installed it.
Prerequisites
- You have access to the internet.
- You have created an account on the Red Hat customer portal and are logged in.
-
You have downloaded the
jboss-eap-installation-manager.
Procedure
-
Navigate to the directory containing the downloaded
jboss-eap-installation-managerby using your terminal emulator. Check for available updates:
./jboss-eap-installation-manager.sh update list --dir eap-8
Update JBoss EAP by running the following command
Syntax
./jboss-eap-installation-manager.sh update perform --dir eap-8
Example
./jboss-eap-installation-manager.sh update perform --dir eap-8
Updates found:
  org.wildfly.galleon-plugins:wildfly-galleon-plugins    6.3.1.Final-redhat-00001 ==>  6.3.2.Final-redhat-00001
  org.wildfly.wildfly-http-client:wildfly-http-transaction-client    2.0.1.Final-redhat-00001 ==>  2.0.2.Final-redhat-00001
Follow the rest of the prompts to update JBoss EAP.
Continue with update [y/N]: y
Building updates

Feature-packs resolved.
Packages installed.
Downloaded artifacts.
JBoss modules installed.
Configurations generated.
JBoss examples installed.

Build update complete!
Applying updates
Update complete!
Operation completed in 60.49 seconds.
3.2. Updating JBoss EAP offline using the jboss-eap-installation-manager
You can update your JBoss EAP installation without access to the internet if new updates are available locally on your machine. This offline update capability gives you more control over the update process and can be useful in scenarios where access to external Maven repositories is not possible or if you prefer to manage updates manually.
Prerequisites
- You have created an account on the Red Hat customer portal.
-
You have downloaded the JBoss EAP
jboss-eap-installation-manager.
Procedure
- Download the offline repository from Red Hat customer portal.
- Extract the downloaded archive file.
Stop the server.
NoteBefore continuing, ensure you have correctly set the path to point to the extracted Maven-repository sub-folder.
Perform the update.
$ ./jboss-eap-installation-manager.sh update perform \
  --dir jboss-eap-8.0 \
  --repositories mrrc::file:<PATH_TO_EXTRACTED_REPOSITORY>/jboss-eap-8.0.1.GA-maven-repository/maven-repository \
  --offline
Follow the remaining prompts to complete the update process for JBoss EAP.
Updates found:
  io.undertow:undertow-core                             2.3.7.SP1-redhat-00001 ==>  2.3.8.Final-redhat-00001
Continue with update [y/N]: y
Building updates

Feature-packs resolved.
Packages installed.
Downloaded artifacts.
JBoss modules installed.
Configurations generated.
JBoss examples installed.

Build update complete!
Applying updates
Update complete!
Operation completed in 46.35 seconds.
3.3. Reverting JBoss EAP updates using the jboss-eap-installation-manager
After installing an update, you can revert back to a previously installed version of JBoss EAP.
Prerequisites
- You have access to the internet.
- You have created an account on the Red Hat customer portal and are logged in.
-
You have downloaded the
jboss-eap-installation-manager. - You have updated JBoss EAP.
Procedure
-
Navigate to the directory containing the
jboss-eap-installation-managerby using your terminal emulator. View the history of all versions of JBoss EAP, which you have installed:
./jboss-eap-installation-manager.sh history --dir eap-8
NoteThis command displays all JBoss EAP installations and updates with their respective installation state ID.
Investigate specific changes made to JBoss EAP during an update:
./jboss-eap-installation-manager.sh history --dir eap-8 --revision <Installation state>
This command displays specific JBoss EAP components that have been updated
Revert JBoss EAP by specifying the installation state of the JBoss EAP version in the following command:
Syntax
./jboss-eap-installation-manager.sh revert perform --dir eap-8 --revision <Installation state>
ImportantYou must specify the installation state of the JBoss EAP version.
Example
./jboss-eap-installation-manager.sh revert perform --dir eap-8 --revision 6a6f55eb
Feature-packs resolved.
Packages installed.
Downloaded artifacts.
JBoss modules installed.
Configurations generated.
JBoss examples installed.

Reverted server prepared, comparing changes
No changes found
Follow the rest of the prompts to revert JBoss EAP updates.
Continue with revert [y/N]: y
Applying changes

Server reverted to state ea768519.
Operation completed in 55.39 seconds.
3.4. Managing JBoss EAP installation channels
After successfully setting up JBoss EAP, you can change the channels to which your JBoss EAP installation is subscribed.
Prerequisite
-
You have downloaded the
jboss-eap-installation-managerfrom the Red Hat Customer Portal.
Procedure
Managing JBoss EAP installation channels
Investigate the channels your JBoss EAP installation is currently subscribed to by using the following command:
./jboss-eap-installation-manager.sh channel list --dir eap-8
Subscribe your JBoss EAP installation to a new channel by using the following command:
./jboss-eap-installation-manager.sh channel add --channel-name <CHANNEL_NAME> --manifest <GROUP_ID:ARTIFACT_ID> --repositories <ID::REPOSITORY_URL> --dir eap-8
unsubscribe your JBoss EAP installation from a channel using the following command:
./jboss-eap-installation-manager.sh channel remove --channel-name <CHANNEL_NAME> --dir eap-8
Export a server snapshot by using the following command:
./jboss-eap-installation-manager.sh clone export --dir=<directory> --path=<target_archive>
Any modifications you have made to configuration files will not be exported.
Chapter 4. Updating Feature packs to your JBoss EAP installation using the jboss-eap-installation-manager
4.1. Updating Feature Packs from your JBoss EAP installation
You can use the jboss-eap-installation-manager to update Feature Packs on your JBoss EAP server installation.
Prerequisites
-
The
jboss-eap-installation-manageris present on your system. - Your JBoss EAP installation has a feature pack installed on it.
Procedure
- Stop the JBoss EAP server.
-
Open the terminal emulator and navigate to the directory containing the downloaded
jboss-eap-installation-manager. Update the feature packs on the server:
$ ./jboss-eap-installation-manager.sh update perform --dir jboss-eap8
4.2. Updating feature packs on an offline JBoss EAP server
You can use the jboss-eap-installation-manager to update Feature Packs on your JBoss EAP server installation offline.
Prerequisites
- You have downloaded and extracted the latest JBoss EAP 8.0 repository.
- If required, you have downloaded the latest feature pack repository.
- You have added Feature Packs to your JBoss EAP installation.
Procedure
- Stop the JBoss EAP server.
-
Open the terminal emulator and navigate to the directory containing the downloaded
jboss-eap-installation-manager. Update the feature packs on the server:
$ ./jboss-eap-installation-manager.sh update perform --dir jboss-eap8 --repositories <EAP8_OFFLINE_REPO_PATH>,<FEATURE_PACK_OFFLINE_REPO>
4.3. Updating additional artifacts
You can use the jboss-eap-installation-manager to update additional artifacts in your JBoss EAP installation.
- MyFaces artifacts are not provided or supported by Red Hat.
- All other channels outside of JBoss EAP channels are not supported.
Prerequisite
- You have an account on the Red Hat Customer Portal and are logged in.
- You have reviewed the supported configurations for JBoss EAP 8.0.
- You have installed a supported JDK.
-
You have downloaded the
jboss-eap-installation-manager.
Procedure
-
Open the terminal emulator and navigate to the directory containing
jboss-eap-installation-manager. Update the subscribed custom channels in the
manifest.yamlfile with the new version ofmyfacesartifacts:schemaVersion: 1.0.0 name: MyFaces manifest file streams: - groupId: org.apache.myfaces.core artifactId: myfaces-impl version: 4.0.1 - groupId: org.apache.myfaces.core artifactId: myfaces-api version: 4.0.1Deploy the newly updated manifest:
mvn deploy:deploy-file -Dfile=manifest.yaml \
  -DgroupId=com.example.channels -DartifactId=myfaces \
  -Dclassifier=manifest -Dpackaging=yaml -Dversion=1.0.1 \
  -Durl=file:/path/to/local/repository
- Stop the JBoss EAP server.
Update the artifacts:
$ ./jboss-eap-installation-manager.sh update perform --dir jboss-eap8
Updating server: /tmp/jboss/jboss-eap-8.0

Updates found:
  org.apache.myfaces.core:myfaces-api                   4.0.0                ==>  4.0.1
  org.apache.myfaces.core:myfaces-impl                  4.0.0                ==>  4.0.1

Continue with update [y/N]: y
Building updates

Feature-packs resolved.
Packages installed.
Downloaded artifacts.
JBoss modules installed.
Configurations generated.
JBoss examples installed.

Build update complete!
Applying updates
Update complete!
Operation completed in 21.48 seconds.
Chapter 5. Managing your JBoss EAP server installation using the Management CLI
In JBoss EAP 8.0, we have integrated the jboss-eap-installation-manager into the JBoss EAP server management model, allowing you to update and revert your remote server installations without the need to log in to the remote machine and use the jboss-eap-installation-manager from the operating system command line.
If you are updating or reverting a local JBoss EAP installation, the jboss-eap-installation-manager is recommended instead of the Management CLI operations. However, you cannot use the jboss-eap-installation-manager to update or revert a remote JBoss EAP installation. In this case, use the Management CLI.
5.1. Prerequisite
- You have a JBoss EAP installed.
5.2. Updating JBoss EAP running as a stand-alone server or a managed domain using the Management CLI
You can update your JBoss EAP server installation in a stand-alone server or a managed domain using the JBoss EAP Management CLI. The following steps outline the phases of the update process.
-
List update: Before preparing the server to be updated, the
installer updatecommand will check for all available updates and provide a list of updates ready to be applied to your JBoss EAP instance. -
Prepare update: After confirming the available updates, the command will prepare a candidate server ready to be applied to your current installation. The candidate server is prepared in the server temporal directory, which is the directory represented by the file system path
jboss.domain.temp.dirin a managed domain orjboss.server.temp.dirin stand-alone server mode. Once the preparation phase is completed, no further server preparations can be made. However, at any time, you can remove the prepared candidate server by cleaning up the manager cache. This action clears the cache and allows the preparation of a different installation, enabling you to start afresh. For more information, see Cleaning the installer. - Apply update: Once the candidate server is created, you can apply it to your instance by restarting your JBoss EAP server.
Procedure
Launch the JBoss EAP Management CLI.
EAP_HOME/bin/jboss-cli.sh
Update JBoss EAP:
Update JBoss EAP in a stand-alone server.
[standalone@localhost:9990 /] installer update
Update JBoss EAP in a managed domain
[domain@localhost:9990 /] installer update --host=target-host
Restart your JBoss EAP server to complete the update process:
NoteYou must ensure that no other processes are launched from the
JBOSS_EAP/binfolder, such asJBOSS_EAP/bin/jconsole.shandJBOSS_EAP/bin/appclient.sh, when restarting the server with the--perform-installationoption. This precaution prevents conflicts in writing files that might be in use by other processes during the server’s update.Restart your JBoss EAP server in a stand-alone server.
[standalone@localhost:9990 /] shutdown --perform-installation
Restart your JBoss EAP server in a managed domain.
[domain@localhost:9990 /] shutdown --host=target-host --perform-installation
For more information about additional command options use the help command.
Additional resources
5.3. Updating your JBoss EAP server offline using the Management CLI
The following example describes how to use the Management CLI to update JBoss EAP offline in a stand-alone server and a managed domain. This is useful in scenarios where the target server installation lacks access to external Maven repositories. You can use the Management CLI to update your server. To do so, you need to specify the location of the Maven repository that contains the required artifacts to update your server. You can download the Maven repository for your update from the Red Hat Customer Portal
Prerequisite
- You have the Maven archive repository containing the required artifacts locally on your machine.
Procedure
Launch the Management CLI:
EAP_HOME/bin/jboss-cli.sh
Update JBoss EAP offline:
Update JBoss EAP offline in a stand-alone server:
[standalone@localhost:9990 /] installer update --maven-repo-files=<An absolute or a relative path pointing to the local archive file that contains a maven repository>
Update JBoss EAP offline in a managed domain:
[domain@localhost:9990 /] installer update --host=target-host --maven-repo-files=<An absolute or a relative path pointing to the local archive file that contains a maven repository>
Restart your JBoss EAP server to complete the update process:
NoteYou must ensure that no other processes are launched from the
JBOSS_EAP/binfolder, such asJBOSS_EAP/bin/jconsole.shandJBOSS_EAP/bin/appclient.sh, when restarting the server with the--perform-installationoption. This precaution prevents conflicts in writing files that might be in use by other processes during the server’s update.Restart your JBoss EAP server in a stand-alone server:
[standalone@localhost:9990 /] shutdown --perform-installation
Restart your JBoss EAP server in a managed domain:
[domain@localhost:9990 /] shutdown --host=target-host --perform-installation
Chapter 6. Viewing the history of your JBoss EAP server changes using the Management CLI
The JBoss EAP Management CLI allows you to easily view the history of all the updates and reverts that you applied on your JBoss EAP server. The Management CLI provides you with a comprehensive list of changes on your JBoss EAP server when you run the installer history command. These include updates, reverts and other modifications to the channel configuration. If you need more detailed information about a particular change, you can investigate futher it by appending --revision=<Installation state> to the command. This allows you to access the specific revision’s details and gain deeper insights into the changes to your JBoss EAP server.
6.1. Prerequisite
- You have a JBoss EAP server installed.
6.2. Viewing the history of your JBoss EAP server changes in a stand-alone or a managed domain
The following example describes how to use the JBoss EAP Management CLI to view the history of updates, reverts, or configuration changes on your JBoss EAP server in a stand-alone or a managed domain.
Procedure
Launch the Management CLI:
EAP_HOME/bin/jboss-cli.sh
View the history of JBoss EAP changes:
View the history of JBoss EAP changes in a stand-alone server:
[standalone@localhost:9990 /] installer history
View the history of JBoss EAP changes in a managed domain:
[domain@localhost:9990 /] installer history --host=target-host
Chapter 7. Reverting your JBoss EAP server updates using the Management CLI
You can revert updates applied to your JBoss EAP server using the Management CLI. To revert the changes applied to your JBoss EAP server, use the installer history command to view the previous versions of JBoss EAP installations on your server. Once you have confirmed the correct version of JBoss EAP you want to revert to, prepare a candidate server using the installer revert command. After preparing the candidate server, restart your JBoss EAP server to complete the revert process.
For more information see how to view the history of JBoss EAP installations on your server.
7.1. Reverting your JBoss EAP server updates in a stand-alone server or a managed domain
You can revert your JBoss EAP server installation in a stand-alone server or a managed domain using the JBoss EAP Management CLI. The following steps outline the phases of the revert process.
-
Prepare revert: In this phase, the JBoss EAP installation is prepared for the revert on the target machine. The candidate server is prepared in the server temporal directory, which is the directory represented by the file system path
jboss.domain.temp.dirin a managed domain orjboss.server.temp.dirin stand-alone server mode. Once this phase is completed, no further server preparations can be performed on the same candidate server. However, you can clean the installation manager cache, which allows you to prepare a different installation if needed. For more information, see Cleaning the installer. - Apply revert: Once you have completed the revert process, restart your JBoss EAP server to apply the candidate server prepared to revert your installation.
Procedure
Launch the Management CLI:
EAP_HOME/bin/jboss-cli.sh
Revert your JBoss EAP server:
NoteUse the installer history command to view the installation state you want to revert your installation to.
Revert your JBoss EAP server updates in a stand-alone server:
[standalone@localhost:9990 /] installer revert --revision=abcd1234
Revert your JBoss EAP server updates in a managed domain:
[domain@localhost:9990 /] installer revert --host=target-host --revision=abcd1234
NoteFor more information about additional command options use the help command.
Restart your JBoss EAP server to complete the revert process:
NoteYou must ensure that no other processes are launched from the
JBOSS_EAP/binfolder, such asJBOSS_EAP/bin/jconsole.shandJBOSS_EAP/bin/appclient.sh, when restarting the server with the--perform-installationoption. This precaution prevents conflicts in writing files that might be in use by other processes during the server’s revert.Restart your JBoss EAP server in a stand-alone server:
[standalone@localhost:9990 /] shutdown --perform-installation
Restart your JBoss EAP server in a managed domain:
[domain@localhost:9990 /] shutdown --host=target-host --perform-installation
Additional resources
7.2. Reverting your JBoss EAP server installation offline using the Management CLI
The following example describes how to use the Management CLI to revert your JBoss EAP installation offline in a stand-alone server and a managed domain. This is useful in scenarios where the target server installation lacks access to external Maven repositories. You can use the Management CLI to revert your JBoss EAP server installation. To do so, you need to specify the location of the Maven repository that contains the required artifacts to revert your server. You can download the Maven repository for your update from the Red Hat Customer Portal.
Prerequisite
- You have the Maven archive repository containing the required artifacts locally on your machine.
Procedure
Launch the Management CLI:
EAP_HOME/bin/jboss-cli.sh
Revert JBoss EAP installation offline:
Revert JBoss EAP installation offline in a stand-alone server:
[standalone@localhost:9990 /] installer revert --revision=abcd1234 --maven-repo-files=<An absolute or a relative path pointing to the local archive file that contains a maven repository>
Revert JBoss EAP offline in a managed domain:
[domain@localhost:9990 /] installer revert --host=target-host --revision=abcd1234 --maven-repo-files=<An absolute or a relative path pointing to the local archive file that contains a maven repository>
NoteFor more information about additional command options use the help command.
Restart your JBoss EAP server to complete the revert process:
NoteYou must ensure that no other processes are launched from the
JBOSS_EAP/binfolder, such asJBOSS_EAP/bin/jconsole.shandJBOSS_EAP/bin/appclient.sh, when restarting the server with the--perform-installationoption. This precaution prevents conflicts in writing files that might be in use by other processes during the server’s revert.Restart your JBoss EAP server in a stand-alone server:
[standalone@localhost:9990 /] shutdown --perform-installation
Restart your JBoss EAP server in a managed domain:
[domain@localhost:9990 /] shutdown --host=target-host --perform-installation
Chapter 8. Cleaning the installer
Using the JBoss EAP Management CLI, you have the capability to discard a candidate server that has been prepared using update or revert commands.
Procedure
Launch the Management CLI:
EAP_HOME/bin/jboss-cli.sh
Clean the JBoss EAP server:
Clean the installer in a stand-alone server:
[standalone@localhost:9990 /] installer clean
Clean the installer in a managed domain:
[domain@localhost:9990 /] installer clean --host=target-host
Chapter 9. Managing your installation manager configurations using the Management CLI
The Management CLI enables you to manage your installation manager configuration. You can perform actions like viewing channels, subscribing, and unsubscribing from channels. For more information about managing channels on JBoss EAP 8.0 see JBoss EAP channels in the Installation guide.
9.1. Listing subscribed channels
The following example describes how to use the Management CLI to list all the channels you are subscribed to in a stand-alone server and managed domain.
Procedure
Launch the Management CLI:
EAP_HOME/bin/jboss-cli.sh
List subscribed channels in your JBoss EAP server:
List channels in a stand-alone server:
[standalone@localhost:9990 /] installer channel-list
List channels in a managed domain:
[domain@localhost:9990 /] installer channel-list --host=target-host
9.2. Subscribing to a channel
The following example describes how to use the Management CLI to subscribe to a channel in a stand-alone server and a managed domain.
Procedure
Launch the Management CLI:
EAP_HOME/bin/jboss-cli.sh
Subscribe to a channel:
Subscribe to a channel in stand-alone server:
[standalone@localhost:9990 /] installer channel-add --channel-name=test-channel --manifest=org.test:test-manifest --repositories=mrrc::https://maven.repository.redhat.com
Subscribe to a channel in a managed domain:
[domain@localhost:9990 /] installer channel-add --host=target-host --channel-name=test-channel --manifest=org.test:test-manifest --repositories=mrrc::https://maven.repository.redhat.com
9.3. Unsubscribing from a channel
The following example describes how to use the Management CLI to unsubscribe from a channel in a stand-alone server and a managed domain.
Procedure
Launch the Management CLI:
EAP_HOME/bin/jboss-cli.sh
Unsubscribe to a channel:
Unsubscribe to a channel in a stand-alone server:
[standalone@localhost:9990 /] installer channel-remove --channel-name=test-channel
Unsubscribe to a channel in a managed domain:
[domain@localhost:9990 /] installer channel-remove --host=target-host --channel-name=test-channel
9.4. Editing a channel subscription
The following example describes editing a channel subscription using the Management CLI.
Procedure
Launch the Management CLI:
EAP_HOME/bin/jboss-cli.sh
Edit a channel subscription in JBoss EAP:
Edit a channel subscription in a stand-alone server:
[standalone@localhost:9990 /] installer channel-edit
--channel-name=channel-name --manifest=org.new.test:org.new.test-manifest
--repositories=mrrc::https://maven.repository.redhat.com ,mvncentral::https://repo.maven.apache.org/maven2/
Edit a channel subscription in a managed domain:
[domain@localhost:9990 /] installer channel-edit
--host=target-host
--channel-name=channel-name --manifest=org.new.test:org.new.test-manifest --repositories=mrrc::https://maven.repository.redhat.com ,mvncentral::https://repo.maven.apache.org/maven2/
9.5. Exporting a server snapshot
You can export the installation manager configuration used by your JBoss EAP server to an archive file. This file can be used to recreate the same server configuration using the jboss-eap-installation-manager tool. This feature ensures easy replication of your server setup in other environments. For information see exporting a server snapshot using the jboss-eap-installation-manager.
One compelling use case for this capability is when you encounter a technical issue and need to seek support from the JBoss EAP team. By sharing the exported archive file with the support team, they can recreate your server configuration precisely as it is in your environment. This ensures that the support team can replicate the issue you are facing and provide targeted assistance, ultimately expediting the resolution process. You can also provide more details about your environment by following the steps in the JDR tool documentation.
Procedure
Launch the Management CLI:
EAP_HOME/bin/jboss-cli.sh
Export a server snapshot:
Export a server snapshot in a stand-alone server:
standalone@localhost:9990 /] attachment save --operation=/core-service=installer:clone-export()
Export a server snapshot in a managed domain:
[domain@localhost:9990 /] attachment save --operation=/host=target-host/core-service=installer:clone-export()
Additional resources
Chapter 10. Updating your JBoss EAP server using the web console
As a system administrator you can update your JBoss EAP installation using the web console. The JBoss EAP web console also allows you to perform other operations such as, viewing the history of your updates, reverting JBoss EAP updates to a previous version, and managing channels.
10.1. Prerequisites
- You may need access to the internet.
- You have created an account on the Red Hat Customer Portal and are logged in.
- You have installed JBoss EAP using any of the installation methods. For more information see JBoss EAP installation methods.
10.2. Updating JBoss EAP online using the web console
JBoss EAP has periodic releases that contain bug and security fixes, you can use the JBoss EAP web console to keep your installation up-to-date.
Procedure
- Open the JBoss EAP web console.
- Navigate to the top menu and click Update Manager.
- Click Updates.
Click on the Update icon and click Online Updates to list the updates.
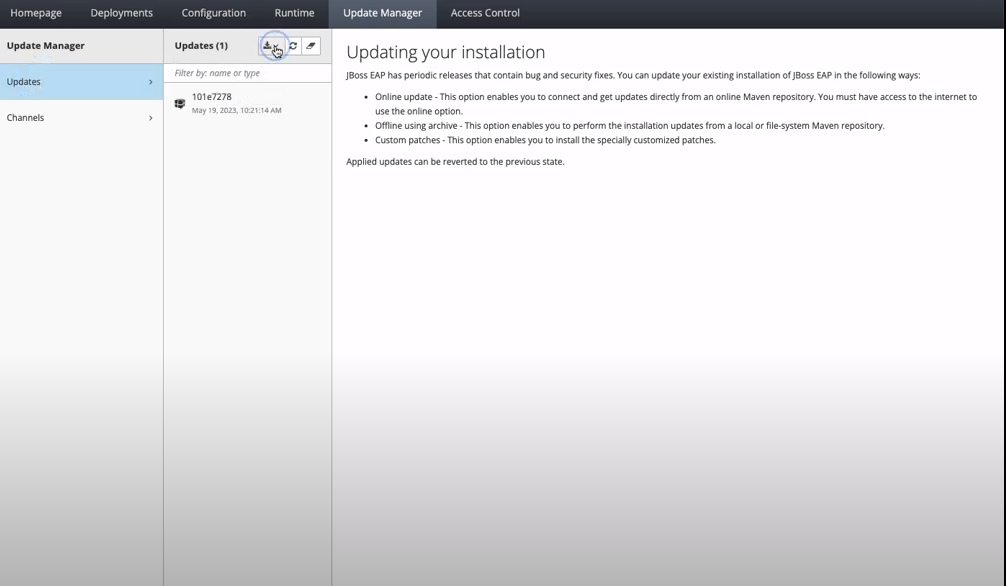
- Click Next to prepare server candidate
- Click Next to apply update
- Click Finish to complete the update
Verification
- Click on the refresh icon to verify that the update was applied successfully.
10.3. Updating JBoss EAP offline using the web console
JBoss EAP has periodic releases that contain bug and security fixes, you can use the JBoss EAP web console to keep your installation up-to-date using a local archive file.
Internet access is not required to update your JBoss EAP 8.0 installation offline using the web console.
Procedure
- Open the JBoss EAP web console.
- Navigate to the top menu and click Update Manager.
- Click Updates.
Click on the Update icon and click Offline Updates to upload the archive.
- Choose archive file and click Next.
- Click Next to prepare server candidate.
- Click Next to apply update.
- Click Finish to complete the update.
Verification
- Click on the refresh icon to verify that the update was applied successfully.
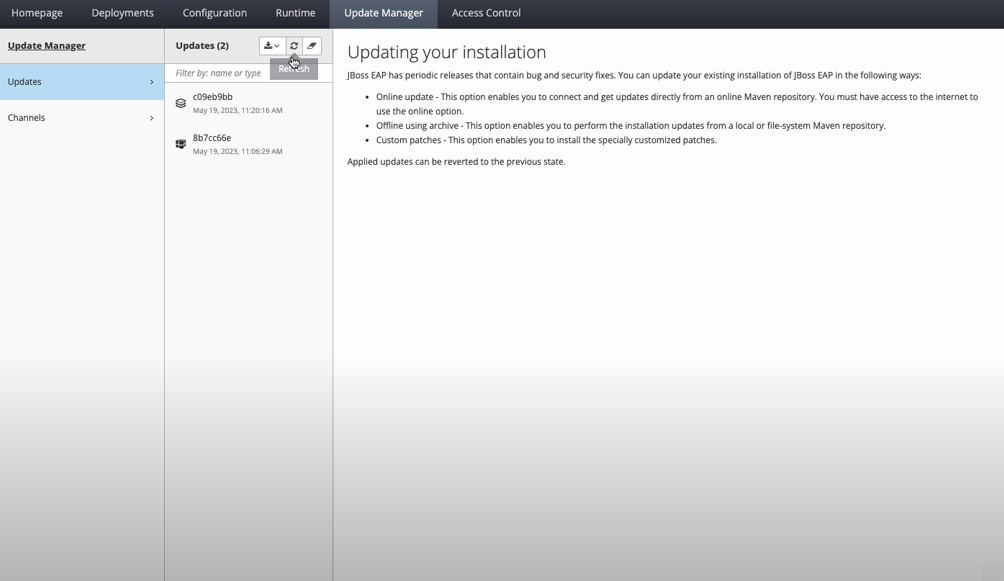
10.4. Viewing JBoss EAP installation history using the web console
Use the JBoss EAP web console to view the complete history of updates applied to your JBoss EAP installation.
Procedure
- Open the JBoss EAP web console.
- Navigate to the top menu and click Update Manager.
- Click Updates.
Verification
- In the Updates column, verify that you can see a list of all updates that has been applied on your JBoss EAP installation.
10.5. Reverting to a previous version of JBoss EAP using the web console
Use the JBoss EAP web console to revert your JBoss EAP installation to a previous update version.
Procedure
- Open the JBoss EAP web console.
- Click Update Manager in the top menu.
- Click Updates.
- In the Updates column, select the appropriate JBoss EAP version you want to revert to.
Click Revert.
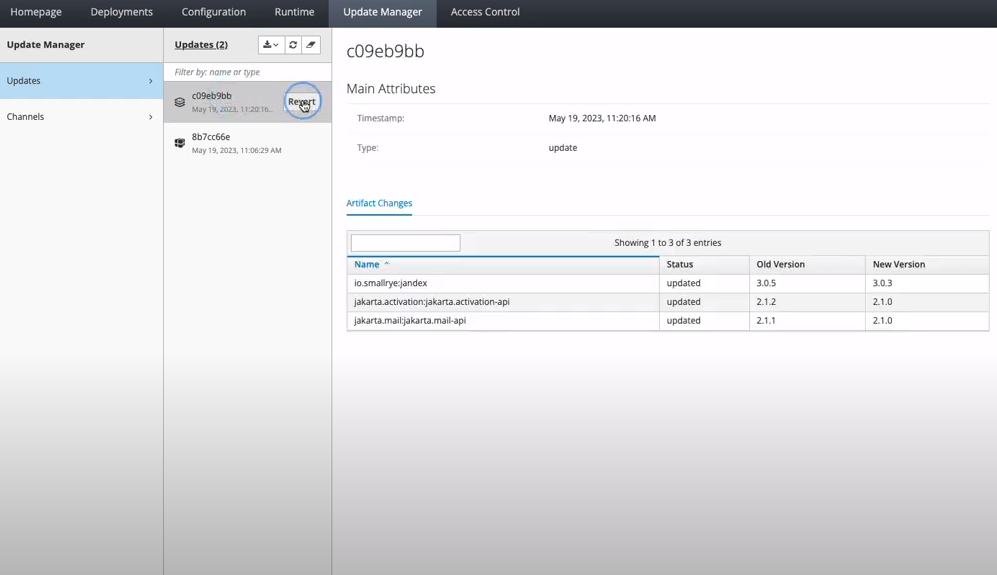
- Click Next to prepare server candidate.
- Click Next to apply update.
- Click Finish to complete the update.
Verification
- In the Updates column, you will see that your installation has been reverted.
10.6. Managing channels using the web console
Use the JBoss EAP 8.0 web console to manage channels by enabling direct addition, removal and editing of channels through its interface.
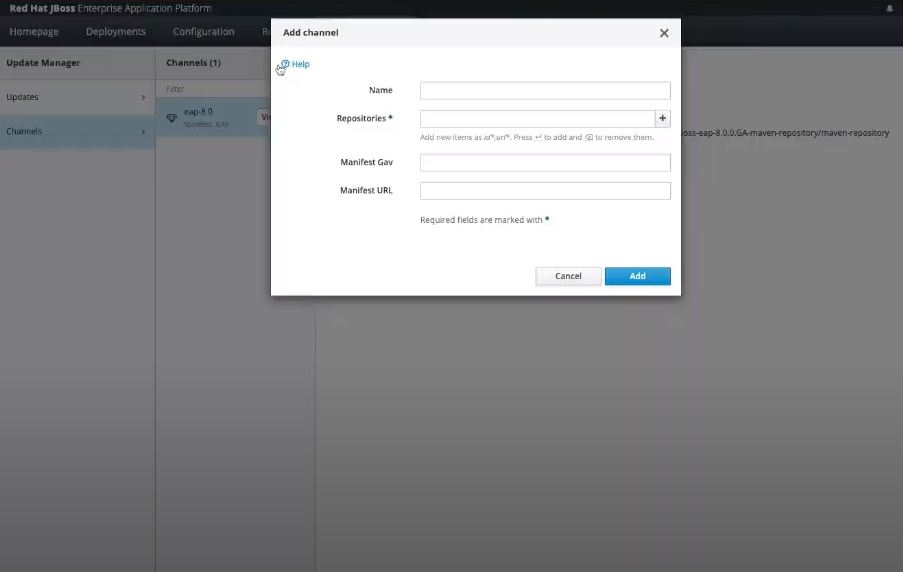
10.6.1. Adding a channel using the web console
You can add or subscribe to a channel using the JBoss EAP 8.0 web console.
Procedure
Add a channel:
- Open the JBoss EAP web console.
- Click Update Manager in the top menu.
- Click Channels.
- Click on the + symbol.
Enter the channel details and click Add.
10.6.2. Removing a channel using the web console
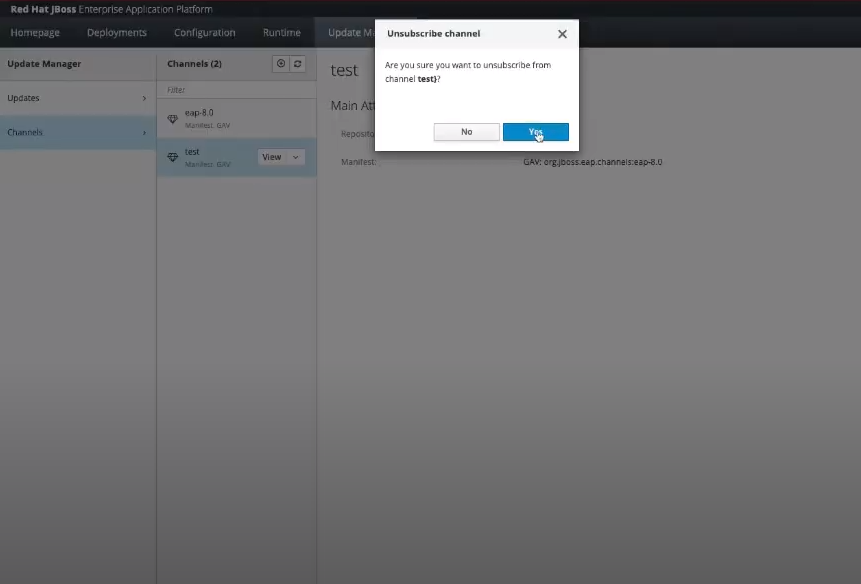
You can remove or unsubscribe from a channel using the JBoss EAP 8.0 web console.
Procedure
Remove a channel:
- Open the JBoss EAP web console.
- Click Update Manager in the top menu.
- Click Channels.
In the Channels column click on the Channel, you will be prompted to unsubscribe, click Yes
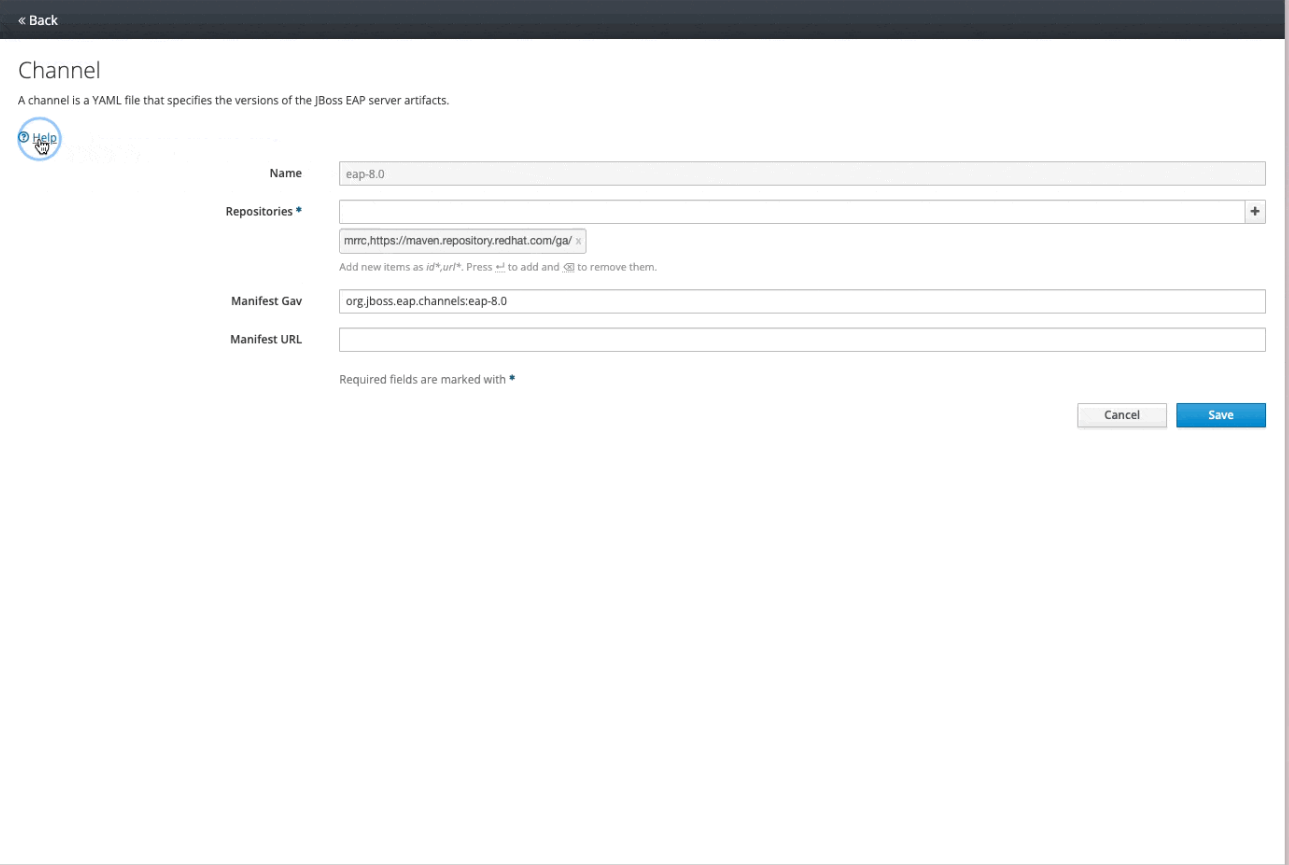
10.6.3. Editing a channel using the web console
You can edit a channel using the web console using the JBoss EAP 8.0 web console.
Procedure
Edit a channel:
- Open the JBoss EAP web console.
- Click Update Manager in the top menu.
- Click Channels.
- In the Channels column click on the Channel.
- Click on view on your desired channels.
- Click Edit to edit your channel.
Click Save.
Chapter 11. Updating an RPM installation
Before updating your current JBoss EAP instance by using the RPM installation method, check that your system meets certain setup prerequisites.
Prerequisites
- You installed JBoss EAP server using RPM installation method.
- The base operating system is up to date, and you get updates from the standard Red Hat Enterprise Linux repositories.
You are subscribed to the relevant JBoss EAP repository for the update.
- If you are subscribed to a previous minor JBoss EAP repository, you have changed to the latest minor repository to get the update.
For a managed domain, update the JBoss EAP domain controller before you update to a newer release of JBoss EAP.
An updated JBoss EAP 8.0 domain controller can still manage other JBoss EAP 8.0 hosts in a managed domain, as long as the domain controller is running the same or more recent version than the rest of the domain.
Procedure
Update your current JBoss EAP version to the newer JBoss EAP version by issuing the following command in your terminal:
# dnf update
-
Enable new features in the updated release, such as new subsystems, by manually merging each
.rpmnewfile into your existing configuration files. The RPM update process does not replace any of your modified JBoss EAP configuration files, but it creates.rpmnewfiles based on the default configuration of your updated JBoss EAP instance.
Additional resources
- For more information, see Installing JBoss EAP 8.0 using the RPM Installation installation method.