
Getting started with Red Hat JBoss Enterprise Application Platform
Get up and running with Red Hat JBoss Enterprise Application Platform quickly. Learn administrative tasks such as basic installation, management, and configuration. Get started writing Jakarta EE applications by using the JBoss EAP quickstarts
Abstract
Providing feedback on JBoss EAP documentation
To report an error or to improve our documentation, log in to your Red Hat Jira account and submit an issue. If you do not have a Red Hat Jira account, then you will be prompted to create an account.
Procedure
- Click the following link to create a ticket.
- Enter a brief description of the issue in the Summary.
- Provide a detailed description of the issue or enhancement in the Description. Include a URL to where the issue occurs in the documentation.
- Clicking Submit creates and routes the issue to the appropriate documentation team.
Making open source more inclusive
Red Hat is committed to replacing problematic language in our code, documentation, and web properties. We are beginning with these four terms: master, slave, blacklist, and whitelist. Due to the enormity of this endeavor, these changes will be gradually implemented over upcoming releases. For more details on making our language more inclusive, see our CTO Chris Wright’s message.
Chapter 1. Administering JBoss EAP
1.1. Downloading and installing JBoss EAP
The .zip file option is a quick, platform-independent way to download and install JBoss EAP.
1.1.1. Downloading JBoss EAP
You must download the JBoss EAP .zip file before you can install JBoss EAP.
Prerequisites
- Confirm that your system meets the JBoss EAP Supported Configurations.
- Install the latest updates and errata patches.
- Set read and write access for the installation directory.
- Install your desired Java Development Kit (JDK).
-
Optional: Set the
JAVA_HOMEandPATHenvironment variables.
Procedure
- Log in to the Red Hat Customer Portal.
- Click Downloads.
- In the Product Downloads list, click Red Hat JBoss Enterprise Application Platform.
- In the Version drop-down menu, select 8.0.
Find Red Hat JBoss Enterprise Application Platform 8.0 in the list and click the Download link.
The `.zip`file is downloaded to your system.
Additional resources
1.1.2. Installing JBoss EAP
You can install the JBoss EAP .zip file by extracting the package contents to your desired file location.
Prerequisites
- Download JBoss EAP.
- Confirm that your system meets the JBoss EAP Supported Configurations.
- Install the latest updates and errata patches.
- Set read and write access for the installation directory.
- Install your desired Java Development Kit (JDK).
-
Optional: Set the
JAVA_HOMEandPATHenvironment variables.
Procedure
-
Move the
.zipfile to the server and location where you want JBoss EAP to be installed. Extract the
.zipfile.On Linux, use the following command:
$ unzip jboss-eap-8.0.0.zip
On Windows Server, right-click the
.zipfile and select Extract All.The directory created by extracting the
.zipfile is the top-level directory for the JBoss EAP installation. This directory is referred to asEAP_HOME.
1.2. Starting and stopping JBoss EAP
The method for starting JBoss EAP depends on whether you are running JBoss EAP as a standalone server or on servers in a managed domain.
The method for stopping JBoss EAP depends on whether you are running an interactive or background instance of JBoss EAP.
1.2.1. Starting JBoss EAP as a standalone server
You can run JBoss EAP as a standalone server to manage a single instance of JBoss EAP.
The server starts in a suspended state and does not accept requests until all required services start. After required services start, the server transitions into a normal running state and can start accepting requests.
This startup script uses the EAP_HOME/bin/standalone.conf file, or standalone.conf.bat for Windows Server, to set default preferences, such as JVM options. You can customize the settings in this file.
To see a list of startup script arguments in your terminal, use the --help argument.
JBoss EAP uses the standalone.xml configuration file by default, but you can start it using a different one.
Prerequisites
- Install JBoss EAP.
Procedure
- Open a terminal.
Start JBoss EAP as a standalone server by using the following script:
$ EAP_HOME/bin/standalone.sh-
For Windows Server, use the
EAP_HOME\bin\standalone.batscript.
-
For Windows Server, use the
Additional resources
1.2.2. Starting JBoss EAP for servers in a managed domain
You can run JBoss EAP in a managed domain operating mode to manage several JBoss EAP instances using a single domain controller.
Servers start in a suspended state and do not accept requests until all required services start. After required services start, the servers transition into a normal running state and start accepting requests.
You must start the domain controller before the servers in any of the server groups in the domain.
Prerequisites
- Install JBoss EAP.
Procedure
- Open a terminal.
Start the domain controller first and then start each associated host controller by using the following script:
$ EAP_HOME/bin/domain.sh-
For Windows Server, use the
EAP_HOME\bin\domain.batscript.
-
For Windows Server, use the
This startup script uses the EAP_HOME/bin/domain.conf file, or domain.conf.bat for Windows Server, to set default preferences, such as JVM options. You can customize the settings in this file.
JBoss EAP uses the host.xml host configuration file by default, but you can start it using a different configuration file.
When setting up a managed domain, you must pass additional arguments into the startup script.
For a complete listing of all available startup script arguments and their purposes, use the --help argument.
Additional resources
1.2.3. Stopping an interactive instance of JBoss EAP
You can stop an interactive instance of a standalone server or a domain controller from the terminal where you started it.
Prerequisites
- Have a running instance of JBoss EAP.
Procedure
-
Press
Ctrl+Cin the terminal where you started JBoss EAP.
1.2.4. Stopping a background instance of JBoss EAP
You can connect to the management CLI to shut down a running instance of a standalone server or servers in a managed domain.
Prerequisites
- Have a running instance of JBoss EAP running in a terminal.
Procedure
Start the management CLI by using the following script:
$ EAP_HOME/bin/jboss-cli.sh --connectIssue the
shutdowncommand:shutdown
When running an instance of JBoss EAP on servers in a managed domain, you must specify the host name to shut down by using the --host argument with the shutdown command.
1.3. JBoss EAP management
You can configure JBoss EAP using the command-line management CLI, web-based management console, Java API, or HTTP API. Changes you make using these management interfaces persist automatically, and the management API overwrites the XML configuration files. The management CLI and management console are the preferred methods, and it is not recommended to edit the XML configuration files manually.
JBoss EAP uses a simplified configuration, with one configuration file per standalone server or servers in a managed domain.
-
Default configuration for a standalone server is stored in the
EAP_HOME/standalone/configuration/standalone.xmlfile. -
Default configuration for servers in a managed domain is stored in the
EAP_HOME/domain/configuration/domain.xmlfile. -
Default configuration for a host controller is stored in the
EAP_HOME/domain/configuration/host.xmlfile.
1.3.1. Management users
You must add a management user if you want to access the management CLI remotely or use the management console, which is considered remote access even if the traffic originates on the local host. If you attempt to access the management console before adding a management user, you will receive an error message.
The default JBoss EAP configuration provides local authentication so that a user can access the management CLI on the local host without having to authenticate.
If you install JBoss EAP using the graphical installer, the graphical installer creates a management user during the installation process.
1.3.2. Adding a management user
You can add a management user for JBoss EAP using the add-user script, which is a utility for adding new users to the properties files for immediate authentication.
Prerequisites
- You have installed JBoss EAP.
Procedure
- Start the management CLI.
Run the
add-userutility script and follow the prompts.$ EAP_HOME/bin/add-user.sh-
For Windows Server, use the
EAP_HOME\bin\add-user.batscript.
-
For Windows Server, use the
Press ENTER to select the default option
ato add a management user.This adds the user to the ManagementRealm and authorizes the user to perform management operations using the management console or management CLI. The other choice,
b, adds a user to the ApplicationRealm, which is used for applications and provides no particular permissions.Enter a username and password. You must confirm the password when prompted.
NoteUser names can only contain the following characters, in any number and in any order:
- Alphanumeric characters (a-z, A-Z, 0-9)
- Dashes (-), periods (.), commas (,), at sign (@)
- Backslash (\)
- Equals (=)
By default, JBoss EAP allows weak passwords but with a warning.
- Enter a comma-separated list of groups to which the user belongs. If you do not want the user to belong to any groups, press ENTER to leave it blank.
- Review the information and enter yes to confirm.
Determine whether this user represents a remote JBoss EAP server instance. For a basic management user, enter no.
If you are adding a user to the ManagementRealm whom represents a host controller that needs to connect to a domain controller, answer yes to this prompt. You will be given an encoded secret value representing the user’s password that must be added to the host controller’s
host*.xmlfile.
You can create users non-interactively by passing parameters to the add-user script. This approach is not recommended on shared systems, because the passwords will be visible in log and history files.
Additional resources
1.3.3. Running the add-user utility non-interactively
You can run the add-user script non-interactively by passing in arguments on the command line. At a minimum, the username and password must be provided.
This approach is not recommended on shared systems, because the passwords are visible in log and history files.
Create a user belonging to multiple groups
The following command adds a management user, mgmtuser1, with the guest and mgmtgroup groups:
$ EAP_HOME/bin/add-user.sh -u 'mgmtuser1' -p 'password1!' -g 'guest,mgmtgroup'Specify an alternative properties file
By default, user and group information created using the add-user script are stored in properties files located in the server configuration directory.
User information is stored in the following properties files:
-
EAP_HOME/standalone/configuration/mgmt-users.properties -
EAP_HOME/domain/configuration/mgmt-users.properties
Group information is stored in the following properties files:
-
EAP_HOME/standalone/configuration/mgmt-groups.properties -
EAP_HOME/domain/configuration/mgmt-groups.properties
The following command adds a new user, specifying a different name and location for the user properties files:
$ EAP_HOME/bin/add-user.sh -u 'mgmtuser2' -p 'password1!' -sc '/path/to/standaloneconfig/' -dc '/path/to/domainconfig/' -up 'newname.properties'
The new user was added to the user properties files located at /path/to/standaloneconfig/newname.properties and /path/to/domainconfig/newname.properties. Note that these files must already exist or you will see an error.
For a complete listing of all available add-user arguments and their purposes, use the --help argument.
Additional resources
1.3.4. Management CLI
The management command line interface (CLI) is a command line administration tool for JBoss EAP.
Use the management CLI to start and stop servers, deploy and remove applications, configure system settings, and perform other administrative tasks. You can perform operations in batch mode, allowing multiple tasks to be run as a group.
Many common terminal commands are available, such as ls (list), cd (change directory), and pwd (print working directory). The management CLI also supports tab completion.
Start the management CLI
$ EAP_HOME/bin/jboss-cli.sh
For Windows Server, use the EAP_HOME\bin\jboss-cli.bat script.
Connect to a running server
connect
You can start the management CLI and connect in one step by using the EAP_HOME/bin/jboss-cli.sh --connect command.
Display help
Use the following command for general help:
help
Use the --help flag on a command to receive instructions on using that specific command. For instance, to receive information about using deploy, use the following command:
deploy --help
Quit the management CLI
Use the following command to quit the management CLI:
quit
View system settings
The following command uses the read-attribute operation to display whether the example datasource is enabled:
/subsystem=datasources/data-source=ExampleDS:read-attribute(name=enabled)
{
    "outcome" => "success",
    "result" => true
}
When running servers in a managed domain, you must specify which profile to update by preceding the command with /profile=PROFILE_NAME.
/profile=default/subsystem=datasources/data-source=ExampleDS:read-attribute(name=enabled)
View subsystem configuration
The following command uses the read-resource-description operation to display a description of a given subsystem configuration that includes whether the resource is required, if property replacement is available, etc:
/subsystem=datasources:read-resource-description(recursive=true)
Update system settings
The following command uses the write-attribute operation to disable the example datasource:
/subsystem=datasources/data-source=ExampleDS:write-attribute(name=enabled,value=false)
Start servers
Use the following command to start and stop servers when running in a managed domain:
/host=HOST_NAME/server-config=server-one:start1.3.5. Management console
The management console is a web-based administration tool for JBoss EAP.
Use the management console to start and stop servers, deploy and remove applications, tune system settings, and make persistent modifications to the server configuration. The management console can also perform administrative tasks, with live notifications when a user makes any changes that require you to restart or reload the server.
In a managed domain, server instances and server groups in the same domain are centrally managed from the management console of the domain controller.
For a JBoss EAP instance running on the local host using the default management port, you can access the management console through a web browser at http://localhost:9990/console/index.html. You must authenticate with a user role that has permissions to access the management console.
The management console provides the following tabs for navigating and managing your JBoss EAP standalone server or managed domain.
- Home
- Learn how to accomplish several common configuration and management tasks. Take a tour to become familiar with the JBoss EAP management console.
- Deployments
- Add, remove, and enable deployments. In a managed domain, assign deployments to server groups.
- Configuration
- Configure available subsystems, which provide capabilities such as web services, messaging, or high availability. In a managed domain, manage the profiles that contain different subsystem configurations.
- Runtime
- View runtime information, such as server status, JVM usage, and server logs. In a managed domain, manage your hosts, server groups, and servers.
- Patching
- Apply patches to your JBoss EAP instances.
- Access control
- Assign roles to users and groups when using Role-Based Access Control.
1.3.5.1. Updating resource attributes in the management console
If you have the required permissions, you can edit resource attributes in the management console.
Prerequisites
- JBoss EAP is running.
- You have the proper permissions to modify the selected resource.
- You have created a user.
Procedure
- Log in to the management console. For a local server running at the default port, you can access the management console at http://localhost:9990/console/index.html.
- Go to the appropriate section of the management console for the resource that you want to modify.
- Click Edit.
Make the required changes.
Required fields are marked with an asterisk (*). You can view the attribute descriptions by clicking Help.
NoteDepending on the attribute type, the input field can be a text field, an ON/OFF field, or a dropdown. In some text fields, as you type, values from elsewhere in the configuration might appear as suggestions.
- Click Save.
If necessary, reload the server for the changes to take effect.
A pop-up window opens when you make changes that require a reload in order to take effect. To reload a standalone server, click Reload in the pop-up window. To reload a server in a managed domain, click Topology, select the appropriate server, and select Reload from the drop-down list.
To view the history of recent configuration actions you have performed, click the notification icon.
1.3.5.2. Enable or disable the management console
You can enable or disable the management console by setting the console-enabled boolean attribute of the /core-service=management/management-interface=http-interface resource. For the master host in domain mode, use /host=master/core-service=management/management-interface=http-interface.
After you enable or disable the management console, you must restart or reload your JBoss EAP instance.
Enable management console example
/core-service=management/management-interface=http-interface:write-attribute(name=console-enabled,value=true)
Disable management console example
/core-service=management/management-interface=http-interface:write-attribute(name=console-enabled,value=false)
1.3.5.3. Changing the language of the management console
By default, the language settings of the management console is English. You can choose to use one of the following languages instead:
- German (de)
- Simplified Chinese (zh-Hans)
- Brazilian Portuguese (pt-BR)
- French (fr)
- Spanish (es)
- Japanese (ja)
Prerequisite
- JBoss EAP is running.
- You have created a user.
Procedure
- Log in to the management console. For a local server running at the default port, you can access the management console at http://localhost:9990/console/index.html.
- Click Settings.
- Select the required language from the Locale list.
- Click Save. A confirmation box informs you that you need to reload the application.
- Click Yes. The system refreshes your web browser automatically to use the selected locale.
1.3.5.4. Customizing the management console title
You can customize the management console title so that each of your JBoss EAP instances can be quickly and easily identified.
Prerequisite
- JBoss EAP is running.
- You have created a user.
Procedure
- Log in to the management console. For a local server running at the default port, you can access the management console at http://localhost:9990/console/index.html.
- Click Settings and modify the title in the Title field.
Click Save.
A confirmation box informs you that you must reload the management console.
Click Yes.
The system refreshes your web browser automatically and the new title is displayed on the tab header.
1.3.6. Standalone server configuration files
The standalone configuration files are located in the EAP_HOME/standalone/configuration/ directory. A separate file exists for each of the five predefined profiles (default, ha, full, full-ha, load-balancer). These are example configuration files that you can modify using the management CLI when you start JBoss EAP.
Table 1.1. Standalone configuration files
| Configuration file | Purpose |
|---|---|
|
| This standalone configuration file is the default configuration that JBoss EAP uses when you start your standalone server. This configuration corresponds to the Jakarta EE Web and Core Profiles and contains all information about the server, including subsystems, networking, deployments, socket bindings, and other configurable details. This configuration does not provide the subsystems required for messaging or high availability. |
|
|
This standalone configuration file includes all of the default subsystems and adds the |
|
|
This standalone configuration file includes all of the default subsystems and adds the |
|
| This standalone configuration file includes support for every possible subsystem, including those for messaging and high availability. |
|
| This standalone configuration file includes the minimum subsystems necessary to use the built-in mod_cluster front-end load balancer to load balance other JBoss EAP instances. |
By default, starting JBoss EAP as a standalone server uses the standalone.xml file. To start JBoss EAP with a different configuration, use the --server-config argument. For example,
$ EAP_HOME/bin/standalone.sh --server-config=standalone-full.xml1.3.7. Managed domain configuration files
The managed domain configuration files are located in the EAP_HOME/domain/configuration/ directory. These are example configuration files that you can modify using the management CLI when you start JBoss EAP.
Table 1.2. Managed domain configuration files
| Configuration file | Purpose |
|---|---|
|
| This is the main configuration file for a managed domain. Only the domain master reads this file. This file contains the configurations for all of the profiles (default, ha, full, full-ha, load-balancer). |
|
|
This file includes configuration details specific to a physical host in a managed domain, such as network interfaces, socket bindings, the name of the host, and other host-specific details. The |
|
|
This file includes only the configuration details necessary to run a server as the managed domain controller. The |
|
|
This file includes only the configuration details necessary to run a server as a managed domain host controller. It does not define a domain controller and you must configure a domain controller address for |
By default, starting JBoss EAP in a managed domain uses the host.xml file. To start JBoss EAP with a different configuration, use the --host-config argument. For example,
$ EAP_HOME/bin/domain.sh --host-config=host-master.xml1.3.8. Backing up configuration data
To restore your JBoss EAP server configuration, you must back up your data in the following locations:
EAP_HOME/standalone/configuration/- Back up the entire directory to save user data, server configuration, and logging settings for standalone servers.
_EAP_HOME/standalone/data- Back up data for managed deployments that are confined in the data/content directory.
EAP_HOME/standalone/deployments- Back up deployments for standalone servers.
EAP_HOME/domain/configuration/- Back up the entire directory to save user and profile data, domain and host configuration, and logging settings for managed domains.
EAP_HOME/domain/data- Back up data for managed domains and deployments in managed domains that are confined in the data/content directory.
EAP_HOME/modules/- Back up any custom modules.
EAP_HOME/welcome-content/- Back up any custom welcome content.
EAP_HOME/bin/- Back up any custom scripts or startup configuration files.
1.3.9. Configuration file snapshots
To assist in the maintenance and management of the server, JBoss EAP creates a timestamped version of the original configuration file at the time of startup.
Any additional configuration changes made by management operations will result in the original file being automatically backed up, and a working copy of the instance being preserved for reference and rollback. Additionally, configuration snapshots can be taken, which are point-in-time copies of the current server configuration. These snapshots can be saved and loaded by an administrator.
The following examples use the standalone.xml file, but the same process applies to the domain.xml and host.xml files.
Take a snapshot
Use the management CLI to take a snapshot of the current configurations.
:take-snapshot
{
    "outcome" => "success",
    "result" => "EAP_HOME/standalone/configuration/standalone_xml_history/snapshot/20151022-133109702standalone.xml"
}
List snapshots
Use the management CLI to list all snapshots.
:list-snapshots
{
    "outcome" => "success",
    "result" => {
        "directory" => "EAP_HOME/standalone/configuration/standalone_xml_history/snapshot",
        "names" => [
            "20151022-133109702standalone.xml",
            "20151022-132715958standalone.xml"
        ]
    }
}
Delete a snapshot
Use the management CLI to delete a snapshot.
:delete-snapshot(name=20151022-133109702standalone.xml)
1.3.10. Starting the server with a snapshot
You can start a server using a snapshot or an automatically-saved version of the configuration.
Prerequisites
- You have installed JBoss EAP.
- You have taken a snapshot of the configuration file.
Procedure
-
Navigate to the
EAP_HOME/standalone/configuration/standalone_xml_historydirectory and identify the snapshot or saved configuration file to be loaded. Start the server and point to the selected configuration file. Pass in the file path relative to the configuration directory,
EAP_HOME/standalone/configuration/.$ EAP_HOME/bin/standalone.sh --server-config=standalone_xml_history/snapshot/20151022-133109702standalone.xml
When running servers in a managed domain, use the --host-config and --domain-config=<config> arguments instead to specify the configuration file.
1.3.11. Property replacement
You can use expressions in JBoss EAP to define replaceable properties in place of literal values in the configuration.
Using property replacement in standalone*.xml or domain.xml configuration files will replace the property with the value found in a system property. System properties are defined in the EAP profile xml file or by typing -D command from the command line terminal.
To determine if property replacement is allowed in a given subsystem, use the following command to display a description of a subsystem configuration:
/subsystem=datasources:read-resource-description(recursive=true)
If the expressions-allowed attribute is set to true, property replacement is allowed.
Expressions use the format ${PARAMETER:DEFAULT_VALUE}. If the specified parameter is set, then the parameter’s value will be used. Otherwise, the default value provided will be used.
The supported sources for resolving expressions are system properties and environment variables. When resolving expressions using environment variables, use the format ${env.LANG}.
The following example from the standalone.xml configuration file sets the inet-address for the public interface to 127.0.0.1 unless the jboss.bind.address parameter is set.
<interface name="public">
    <inet-address value="${jboss.bind.address:127.0.0.1}"/>
</interface>
You can use the following command to set the jboss.bind.address parameter when starting EAP as a standalone server:
$ EAP_HOME/bin/standalone.sh -Djboss.bind.address=IP_ADDRESS
For deployments only, the source can be properties listed in a META-INF/jboss.properties file in the deployment archive. For deployment types that support subdeployments, the resolution is scoped to all subdeployments if the properties file is in the outer deployment, for example the EAR. If the properties file is in the subdeployment, then the resolution is scoped just to that subdeployment.
1.3.12. Nested expressions
You can nest expressions, which allows for more advanced use of expressions in place of fixed values.
The format of a nested expression is like that of a normal expression, but one expression is embedded in the other, for example:
${SYSTEM_VALUE_1${SYSTEM_VALUE_2}}JBoss EAP evaluates nested expressions recursively, so the inner expression is first evaluated, then the outer expression is evaluated. Expressions can also be recursive, where an expression resolves to another expression, which is then resolved. Nested expressions are permitted anywhere that expressions are permitted, with the exception of management CLI commands.
You might use a nested expression if a datasource definition password is masked, for example. The configuration for the datasource might have the following line:
<password>${VAULT::ds_ExampleDS::password::1}</password>
A system property (datasource_name) replaces the value of ds_ExampleDS using a nested expression. The following line is an example configuration for the datasource:
<password>${VAULT::${datasource_name}::password::1}</password>
JBoss EAP would first evaluate the expression ${datasource_name}, then input this to the larger expression and evaluate the resulting expression. The advantage of this configuration is that the name of the datasource is abstracted from the fixed configuration.
1.3.13. Deployment descriptor-based property replacement
Deployment descriptor-based property replacement substitutes properties based on descriptors, so that you can remove assumptions about the environment from the application and the build chain.
Environment-specific configurations can be specified in deployment descriptors rather than annotations or build system scripts. You can provide configuration in files or as parameters at the command line.
Application configuration, such as datasource connection parameters, typically varies between development, testing, and production environments. This variance is sometimes accommodated by build system scripts, as the Jakarta EE specification does not contain a method to externalize these configurations. With JBoss EAP, you can use descriptor-based property replacement to manage configuration externally.
The spec-descriptor-property-replacement flag controls Jakarta EE descriptor replacement, and JBoss EAP disables it by default. When it’s enabled, you can replace properties in the following deployment descriptors:
-
ejb-jar.xml -
permissions.xml -
persistence.xml -
application.xml -
web.xml
You can use the following management CLI command to enable or disable property replacement in Jakarta EE descriptors:
/subsystem=ee:write-attribute(name="spec-descriptor-property-replacement",value=VALUE)
The jboss-descriptor-property-replacement flag controls JBoss-specific descriptor replacement, and JBoss EAP enables it by default. When it’s enabled, you can replace properties in the following deployment descriptors:
-
jboss-ejb3.xml -
jboss-app.xml -
jboss-web.xml -
jboss-permissions.xml -
*-jms.xml -
*-ds.xml
Use the following management CLI command to enable or disable property replacement in JBoss EAP-specific descriptors:
/subsystem=ee:write-attribute(name="jboss-descriptor-property-replacement",value=VALUE)
The annotation-property-replacement flag controls property replacement inside of annotations, and it is not enabled by default. When it’s enabled, you can replace properties in the annotation attributes inside of application classes.
Use the following management CLI command to enable or disable property replacement in annotations:
/subsystem=ee:write-attribute(name="annotation-property-replacement",value=VALUE)
1.4. JBoss EAP network and port configuration
You can configure the network accessibility of various services with JBoss EAP as well as use port offsets to easily run multiple JBoss EAP instances on the same machine using the same interface. Network configuration is organized in terms of interfaces and socket bindings.
Use the following detailed information about each of these network and port configurations to run JBoss EAP successfully.
1.4.1. Interfaces
JBoss EAP references named interfaces throughout the configuration. You can configure JBoss EAP to reference individual interface declarations with logical names rather than requiring the full details of the interface at each use.
You can also experience easier configuration in a managed domain where network interface details can vary across multiple machines. Each server instance can correspond to a logical name group.
The standalone.xml, domain.xml, and host.xml files all include interface declarations. There are several preconfigured interface names, depending on which default configuration is used. The management interface can be used for all components and services that require the management layer, including the HTTP management endpoint. The public interface can be used for all application-related network communications. The unsecure interface is used for IIOP sockets in the standard configuration. The private interface is used for JGroups sockets in the standard configuration.
1.4.1.1. Default interface configurations
JBoss EAP includes the following four default interfaces:
<interfaces>
  <interface name="management">
    <inet-address value="${jboss.bind.address.management:127.0.0.1}"/>
  </interface>
  <interface name="public">
    <inet-address value="${jboss.bind.address:127.0.0.1}"/>
  </interface>
  <interface name="private">
    <inet-address value="${jboss.bind.address.private:127.0.0.1}"/>
  </interface>
  <interface name="unsecure">
    <inet-address value="${jboss.bind.address.unsecure:127.0.0.1}"/>
  </interface>
</interfaces>
By default, JBoss EAP binds these interfaces to 127.0.0.1, but these values can be overridden at runtime by setting the appropriate property. For example, the inet-address of the public interface can be set when starting JBoss EAP as a standalone server with the following command.
$ EAP_HOME/bin/standalone.sh -Djboss.bind.address=IP_ADDRESS
Alternatively, you can use the -b switch on the server start command line.
If you modify the default network interfaces or ports that JBoss EAP uses, you must also change any scripts that use the modified interfaces or ports. These include JBoss EAP service scripts, as well as specifying the correct interface and port when accessing the management console or management CLI.
Additional resources
1.4.1.2. Optional interface configurations
Network interfaces are declared by specifying a logical name and selection criteria for the physical interface. The selection criteria can reference a wildcard address or specify a set of one or more characteristics that an interface or address must have to be a valid match.
You can configure interfaces using the management console or the management CLI. The information later in this section includes several examples of adding and updating interfaces. The management CLI command is shown first, followed by the corresponding configuration XML.
Additional resources
1.4.1.2.1. Interface with a NIC value
You can use the following example to add a new interface with a NIC value of eth0.
/interface=external:add(nic=eth0)
<interface name="external">
   <nic name="eth0"/>
</interface>
1.4.1.2.2. Interface with several conditional values
You can use the following example to add a new interface that matches any interface or address on the correct subnet if it is running, supports multicast, and is not point-to-point.
/interface=default:add(subnet-match=192.168.0.0/16,up=true,multicast=true,not={point-to-point=true})<interface name="default">
<subnet-match value="192.168.0.0/16"/>
<up/>
<multicast/>
<not>
<point-to-point/>
</not>
</interface>1.4.1.2.3. Updates to an interface attribute
In this example, you can update the public interface’s default inet-address value, keeping the jboss.bind.address property so that you can set this value at runtime.
/interface=public:write-attribute(name=inet-address,value="${jboss.bind.address:192.168.0.0}")<interface name="public">
<inet-address value="${jboss.bind.address:192.168.0.0}"/>
</interface>1.4.1.2.4. Additional interfaces to a server in a managed domain
You can add more interfaces to a server in a managed domain using the following code.
/host=HOST_NAME/server-config=SERVER_NAME/interface=INTERFACE_NAME:add(inet-address=127.0.0.1)
<servers>
   <server name="SERVER_NAME" group="main-server-group">
      <interfaces>
         <interface name="INTERFACE_NAME">
            <inet-address value="127.0.0.1"/>
         </interface>
      </interfaces>
   </server>
</servers>
1.4.2. Socket bindings
Use socket bindings and socket binding groups to define network ports and their relationship to the networking interfaces required for your JBoss EAP configuration. A socket binding is a named configuration for a socket. A socket binding group is a collection of socket binding declarations that are grouped under a logical name.
This allows other sections of the configuration to reference socket bindings by their logical name, rather than requiring the full details of the socket configuration at each use.
You can find the declarations for these named configurations in the standalone.xml and domain.xml configuration files. A standalone server contains only one socket binding group, while a managed domain can contain multiple groups. You can create a socket binding group for each server group in the managed domain, or share a socket binding group between multiple server groups.
The ports JBoss EAP uses by default depend on which socket binding groups are used and the requirements of your individual deployments.
There are three types of socket bindings that can be defined in a socket binding group in the JBoss EAP configuration:
- Inbound socket bindings
-
The
socket-bindingelement is used to configure inbound socket bindings for the JBoss EAP server. The default JBoss EAP configurations provide several preconfiguredsocket-bindingelements, for example, for HTTP and HTTPS traffic. - Remote outbound socket bindings
-
The
remote-destination-outbound-socket-bindingelement is used to configure outbound socket bindings for destinations that are remote to the JBoss EAP server. The default JBoss EAP configurations provide an example remote destination socket binding that can be used for a mail server. - Local outbound socket bindings
-
The
local-destination-outbound-socket-bindingelement is used to configure outbound socket bindings for destinations that are local to the JBoss EAP server. This type of socket binding is not expected to be commonly used.
Additional resources
1.4.2.1. Management ports
By default, JBoss EAP 8.0 uses port 9990 for both native management, used by the management CLI, and HTTP management, used by the web-based management console. Port 9999, which was used as the native management port in JBoss EAP 6, is no longer used but can still be enabled if desired.
If HTTPS is enabled for the management console, then port 9993 is used by default.
1.4.2.2. Default socket bindings
JBoss EAP ships with a socket binding group for each of the five predefined profiles (default, ha, full, full-ha, load-balancer).
If you modify the default network interfaces or ports that JBoss EAP uses, you must also change any scripts that use the modified interfaces or ports. These include JBoss EAP service scripts, as well as specifying the correct interface and port when accessing the management console or management CLI.
Additional resources
1.4.2.2.1. Socket binding group for a standalone server
When running as a standalone server, only one socket binding group is defined per configuration file. Each standalone configuration file (standalone.xml, standalone-ha.xml, standalone-full.xml, standalone-full-ha.xml, standalone-load-balancer.xml) defines socket bindings for the technologies used by its corresponding profile.
For example, the default standalone configuration file (standalone.xml) specifies the following socket bindings.
<socket-binding-group name="standard-sockets" default-interface="public" port-offset="${jboss.socket.binding.port-offset:0}">
    <socket-binding name="management-http" interface="management" port="${jboss.management.http.port:9990}"/>
    <socket-binding name="management-https" interface="management" port="${jboss.management.https.port:9993}"/>
    <socket-binding name="ajp" port="${jboss.ajp.port:8009}"/>
    <socket-binding name="http" port="${jboss.http.port:8080}"/>
    <socket-binding name="https" port="${jboss.https.port:8443}"/>
    <socket-binding name="txn-recovery-environment" port="4712"/>
    <socket-binding name="txn-status-manager" port="4713"/>
    <outbound-socket-binding name="mail-smtp">
        <remote-destination host="localhost" port="25"/>
    </outbound-socket-binding>
</socket-binding-group>
1.4.2.2.2. Socket binding groups in a managed domain
When running in a managed domain, all socket binding groups are defined in the domain.xml file. There are five predefined socket binding groups:
-
standard-sockets -
ha-sockets -
full-sockets -
full-ha-sockets -
load-balancer-sockets
Each socket binding group specifies socket bindings for the technologies used by its corresponding profile. For example, the full-ha-sockets socket binding group defines several jgroups socket bindings, which are used by the full-ha profile for high availability.
<socket-binding-groups>
  <socket-binding-group name="standard-sockets" default-interface="public">
    <!-- Needed for server groups using the 'default' profile  -->
    <socket-binding name="ajp" port="${jboss.ajp.port:8009}"/>
    <socket-binding name="http" port="${jboss.http.port:8080}"/>
    <socket-binding name="https" port="${jboss.https.port:8443}"/>
    <socket-binding name="txn-recovery-environment" port="4712"/>
    <socket-binding name="txn-status-manager" port="4713"/>
    <outbound-socket-binding name="mail-smtp">
      <remote-destination host="localhost" port="25"/>
    </outbound-socket-binding>
  </socket-binding-group>
  <socket-binding-group name="ha-sockets" default-interface="public">
    <!-- Needed for server groups using the 'ha' profile  -->
    ...
  </socket-binding-group>
  <socket-binding-group name="full-sockets" default-interface="public">
    <!-- Needed for server groups using the 'full' profile  -->
    ...
  </socket-binding-group>
  <socket-binding-group name="full-ha-sockets" default-interface="public">
    <!-- Needed for server groups using the 'full-ha' profile  -->
    <socket-binding name="ajp" port="${jboss.ajp.port:8009}"/>
    <socket-binding name="http" port="${jboss.http.port:8080}"/>
    <socket-binding name="https" port="${jboss.https.port:8443}"/>
    <socket-binding name="iiop" interface="unsecure" port="3528"/>
    <socket-binding name="iiop-ssl" interface="unsecure" port="3529"/>
    <socket-binding name="jgroups-mping" interface="private" port="0" multicast-address="${jboss.default.multicast.address:230.0.0.4}" multicast-port="45700"/>
    <socket-binding name="jgroups-tcp" interface="private" port="7600"/>
    <socket-binding name="jgroups-udp" interface="private" port="55200" multicast-address="${jboss.default.multicast.address:230.0.0.4}" multicast-port="45688"/>
    <socket-binding name="modcluster" port="0" multicast-address="224.0.1.105" multicast-port="23364"/>
    <socket-binding name="txn-recovery-environment" port="4712"/>
    <socket-binding name="txn-status-manager" port="4713"/>
    <outbound-socket-binding name="mail-smtp">
      <remote-destination host="localhost" port="25"/>
    </outbound-socket-binding>
  </socket-binding-group>
  <socket-binding-group name="load-balancer-sockets" default-interface="public">
    <!-- Needed for server groups using the 'load-balancer' profile  -->
    ...
  </socket-binding-group>
</socket-binding-groups>
The socket configuration for the management interfaces is defined in the domain controller’s host.xml file.
1.4.2.3. Configuring socket bindings
When defining a socket binding, you can configure the port and interface attributes, as well as multicast settings such as multicast-address and multicast-port.
Procedure
Socket bindings can be configured using the management console or the management CLI. The following steps go through adding a socket binding group, adding a socket binding, and configuring socket binding settings using the management CLI.
Add a new socket binding group.
NoteYou cannot add an additional socket binding when running an instance of JBoss EAP as a standalone server. You can remove, add, or modify the existing socket binding.
/socket-binding-group=new-sockets:add(default-interface=public)
Add a socket binding.
/socket-binding-group=new-sockets/socket-binding=new-socket-binding:add(port=1234)
Change the socket binding to use an interface other than the default, which is set by the socket binding group.
/socket-binding-group=new-sockets/socket-binding=new-socket-binding:write-attribute(name=interface,value=unsecure)
The following example shows how the XML configuration may look after the above steps have been completed.
<socket-binding-groups>
    ...
    <socket-binding-group name="new-sockets" default-interface="public">
        <socket-binding name="new-socket-binding" interface="unsecure" port="1234"/>
    </socket-binding-group>
</socket-binding-groups>
Additional resources
1.4.2.4. Port offsets
A port offset is a numeric offset value added to all port values specified in the socket binding group for that server. This allows the server to inherit the port values defined in its socket binding group, with an offset to ensure that it does not conflict with any other servers on the same host and interface. For instance, if the HTTP port of the socket binding group is 8080, and a server uses a port offset of 100, then its HTTP port is 8180.
The information later is this section is an example of setting a port offset of 250 for a server in a managed domain using the management CLI.
/host=master/server-config=server-two/:write-attribute(name=socket-binding-port-offset,value=250)
Port offsets can be used for servers in a managed domain and for running multiple standalone servers on the same host.
You can pass in a port offset when starting a standalone server using the jboss.socket.binding.port-offset property.
$ EAP_HOME/bin/standalone.sh -Djboss.socket.binding.port-offset=100Port offset is defined in JBoss Profiles with the system property name. You can change the system property name or remove it and hard code the port offset setting.
<socket-binding-group name="standard-sockets" default-interface="public" port-offset ="${jboss.socket.binding.port-offset:0}">1.4.3. IPv6 addresses
By default, JBoss EAP is configured to run using IPv4 addresses. The following procedures describe how to configure JBoss EAP to run using IPv6 addresses.
1.4.3.1. Configuring the JVM Stack for IPv6 Addresses
You can configure your JBoss EAP to run using IPv6.
Procedure
To update your start-up configuration to run on IPv6 addresses, complete the following steps.
Open the startup configuration file.
-
When running as a standalone server, edit the
EAP_HOME/bin/standalone.conffile (orstandalone.conf.batfor Windows Server). -
When running in a managed domain, edit the
EAP_HOME/bin/domain.conffile (ordomain.conf.batfor Windows Server).
-
When running as a standalone server, edit the
Set the
java.net.preferIPv4Stackproperty tofalse.-Djava.net.preferIPv4Stack=false
Append the
java.net.preferIPv6Addressesproperty and set it totrue.-Djava.net.preferIPv6Addresses=true
The following example shows how the JVM options in the startup configuration file may look after making the above changes.
#
# Specify options to pass to the Java VM.
#
if [ "x$JAVA_OPTS" = "x" ]; then
   JAVA_OPTS="-Xms1303m -Xmx1303m -XX:MaxPermSize=256m -Djava.net.preferIPv4Stack=true"
   JAVA_OPTS="$JAVA_OPTS -Djboss.modules.system.pkgs=$JBOSS_MODULES_SYSTEM_PKGS -Djava.awt.headless=true"
   JAVA_OPTS="$JAVA_OPTS -Djboss.modules.policy-permissions=true"
else
   echo "JAVA_OPTS already set in environment; overriding default settings with values: $JAVA_OPTS"
fi
1.4.3.2. Default interface values updated to IPv6 addresses
The default interface values in the configuration can be changed to IPv6 addresses. For example, the following management CLI command sets the management interface to the IPv6 loopback address (::1).
/interface=management:write-attribute(name=inet-address,value="${jboss.bind.address.management:[::1]}")After running the previous command, the following example shows how the XML configuration might look.
<interfaces>
    <interface name="management">
        <inet-address value="${jboss.bind.address.management:[::1]}"/>
    </interface>
    ....
</interfaces>
1.5. Optimization of the JBoss EAP server configuration
Apply the latest updates to JBoss EAP to stay current on security CVEs and other customer reported bug fixes.
Once you have installed the JBoss EAP server, and you have created a management user, optimize your server configuration.
Common optimizations include:
-
Setting
ulimitsto ensure that your operating system provides enough file descriptors needed for web connections - Adjusting the thread pool size
Chapter 2. Developing applications using JBoss EAP
You can start developing applications by using JBoss Tools with the Eclipse integrated development environment (IDE) and the JBoss EAP 8.0 quickstart examples.
JBoss Tools is deprecated in JBoss EAP 8.0. No enhancements will be made to this feature, and it might be removed in a future release.
2.1. Overview
JBoss Tools is a set of Eclipse-based plug-ins that enhance support for JBoss EAP technology. JBoss Tools works with the Eclipse integrated development environment (IDE).
JBoss Tools is deprecated in JBoss EAP 8.0. No enhancements will be made to this feature, and it might be removed in a future release.
JBoss Tools is a community project and is not supported by Red Hat. Please reference the community website for assistance with setting up and running your instance of JBoss Tools. To download JBoss Tools, see JBoss Tools Downloads.
Many quick start code examples are provided with JBoss EAP 8.0 to help users get started writing applications using different Jakarta EE technologies. You can use JBoss Tools to run the quick start examples.
Additional resources
- For more information about tested JBoss Tools versions, see Red Hat JBoss Enterprise Application Platform (EAP) and JBoss Tools.
2.2. Setting up the development environment
You must setup your development environment for use with the Eclipse IDE.
JBoss Tools is deprecated in JBoss EAP 8.0. No enhancements will be made to this feature, and it might be removed in a future release.
Procedure
Download and install JBoss Tools.
For instructions, see Installation Methods in the JBoss Tools Installation guide.
Set up the JBoss EAP server in JBoss Tools.
For instructions, see How To: Configure the IDE for use with JBoss EAP and JBoss Web Framework Kit in the JBoss Tools guide.
Additional resources
- For more information about tested JBoss Tools versions, see Red Hat JBoss Enterprise Application Platform (EAP) and JBoss Tools.
2.3. Using the quickstart example
The quickstart examples provided with JBoss EAP are Maven projects.
2.3.1. About Maven
Apache Maven is a distributed build automation tool used in Java application development to create, manage, and build software projects. Maven uses standard configuration files called Project Object Model (POM) files to define projects and manage the build process. POMs describe the module and component dependencies, build order, and targets for the resulting project packaging and output using an XML file. This ensures that the project is built in a correct and uniform manner.
Maven achieves this by using a repository. A Maven repository stores Java libraries, plug-ins, and other build artifacts. The default public repository is the Maven 2 Central Repository, but repositories can be private and internal within a company with a goal to share common artifacts among development teams. Repositories are also available from third-parties. For more information, see the Apache Maven project and the Introduction to Repositories guide. Jakarta EE developers typically use to build applications on JBoss EAP.
2.3.2. Using Maven with the quickstarts
The artifacts and dependencies needed to build and deploy applications to JBoss EAP 8.0 are hosted on a public repository. Starting with the JBoss EAP 7 quickstarts, it is no longer necessary to configure your Maven settings.xml file to use these repositories when building the quickstarts. The Maven repositories are now configured in the quickstart project POM files. This method of configuration is provided to make it easier to get started with the quickstarts, however, is generally not recommended for production projects because it can slow down your build.
JBoss Tools includes Maven, so there is no need to download and install it separately.
If you plan to use the Maven command line to build and deploy your applications, then you must first download Maven from the Apache Maven project and install it using the instructions provided in the Maven documentation.
JBoss Tools is deprecated in JBoss EAP 8.0. No enhancements will be made to this feature, and it might be removed in a future release.
2.4. Download and run the quickstarts
2.4.1. Download the quickstarts
JBoss EAP comes with a comprehensive set of quickstart code examples designed to help users begin writing applications using various Jakarta EE technologies. The quickstarts can be downloaded from the Red Hat Customer Portal.
Procedure
- Log in to the JBoss EAP download page on the Red Hat Customer Portal.
- Select 8.0 in the Version drop-down menu.
-
Find the Red Hat JBoss Enterprise Application Platform 8.0.0 Quickstarts entry in the list and click Download to download a
.zipfile containing the quickstarts. -
Save the
.zipfile to the desired directory. -
Extract the
.zipfile.
2.4.2. Import a quickstart into JBoss Tools
Once the quickstarts have been downloaded, they can be imported into JBoss Tools and deployed to JBoss EAP.
JBoss Tools is deprecated in JBoss EAP 8.0. No enhancements will be made to this feature, and it might be removed in a future release.
Each quickstart ships with a POM file that contains its project and configuration information. Use this POM file to easily import the quickstart into JBoss Tools.
If your quickstart project folder is located within the IDE workspace when you import it into JBoss Tools, the IDE generates an invalid project name and WAR archive name. Be sure your quickstart project folder is located outside the IDE workspace before you begin.
Procedure
- Start JBoss Tools.
- Select File → Import.
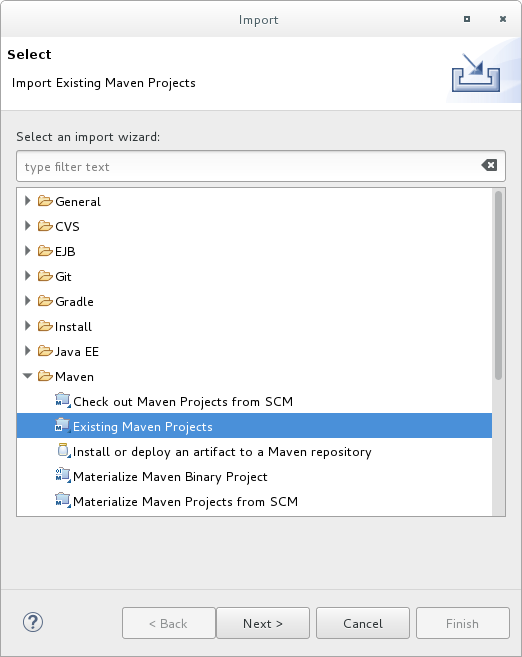
Choose Maven → Existing Maven Projects, then click Next.
Figure 2.1. Import Existing Maven Projects
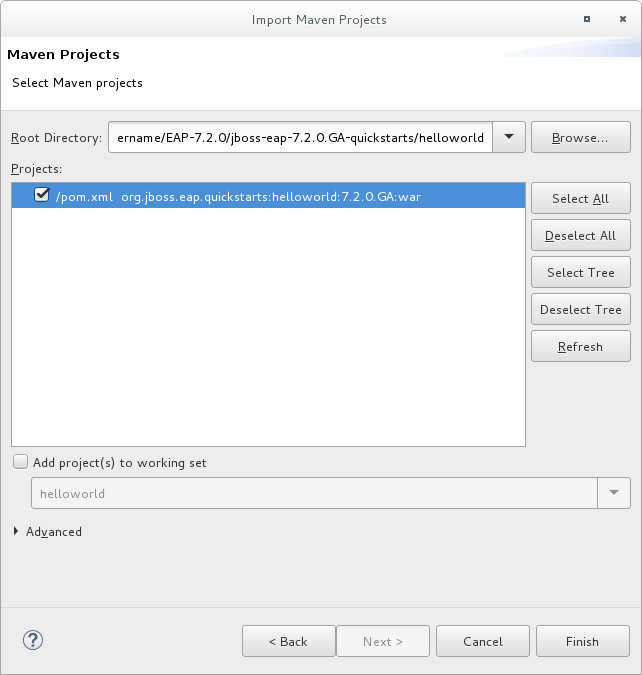
Browse to the desired quickstart’s directory (for example the
helloworldquickstart), and click OK. The Projects list box is populated with thepom.xmlfile of the selected quickstart project.Figure 2.2. Select Maven Projects
- Click Finish.
Additional resources
- For more information about tested JBoss Tools versions, see Red Hat JBoss Enterprise Application Platform (EAP) and JBoss Tools.
2.4.3. Run the helloworld quickstart
Running the helloworld quickstart is a simple way to verify that the JBoss EAP server is configured and running correctly.
JBoss Tools is deprecated in JBoss EAP 8.0. No enhancements will be made to this feature, and it might be removed in a future release.
Procedure
- If you have not yet defined a server, add the JBoss EAP server to JBoss Tools. See How To: Configure the IDE for use with JBoss EAP and JBoss Web Framework Kit in the JBoss Tools guide.
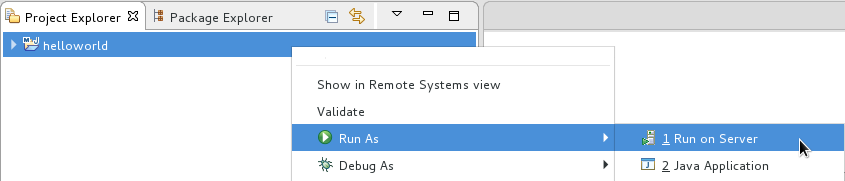
Right-click the helloworld project in the Project Explorer tab and select Run As → Run on Server.
Figure 2.3. Run As - Run on Server
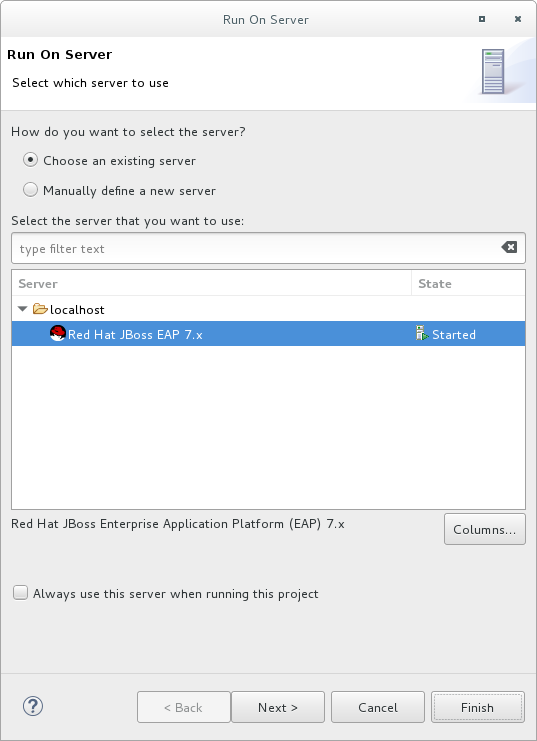
Select the JBoss EAP 8.0 server from the server list and click Next.
Figure 2.4. Run on Server
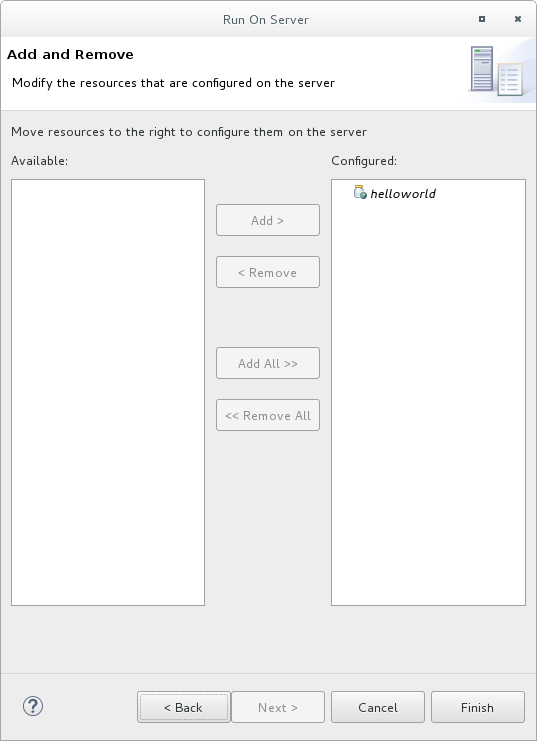
The helloworld quickstart is already listed to be configured on the server. Click Finish to deploy the quickstart.
Figure 2.5. Modify Resources Configured on the Server
Verify the results.
-
In the Server tab, the JBoss EAP 8.0 server status changes to
Started. The Console tab shows messages detailing the JBoss EAP server start and the
helloworldquickstart deployment.WFLYUT0021: Registered web context: /helloworld WFLYSRV0010: Deployed "helloworld.war" (runtime-name : "helloworld.war")
-
The
helloworldapplication is available at http://localhost:8080/helloworld and displays the textHello World!.
-
In the Server tab, the JBoss EAP 8.0 server status changes to
2.4.4. Run the bean-validation quickstart
Some quickstarts, such as the bean-validation quickstart, do not provide a user interface layer and instead provide Arquillian tests to demonstrate functionality.
JBoss Tools is deprecated in JBoss EAP 8.0. No enhancements will be made to this feature, and it might be removed in a future release.
Procedure
-
Import the
bean-validationquickstart into JBoss Tools. - In the Servers tab, right-click on the server and choose Start to start the JBoss EAP server. If you do not see a Servers tab or have not yet defined a server, add the JBoss EAP server to JBoss Tools. See How To: Configure the IDE for use with JBoss EAP and JBoss Web Framework Kit in the JBoss Tools guide.
-
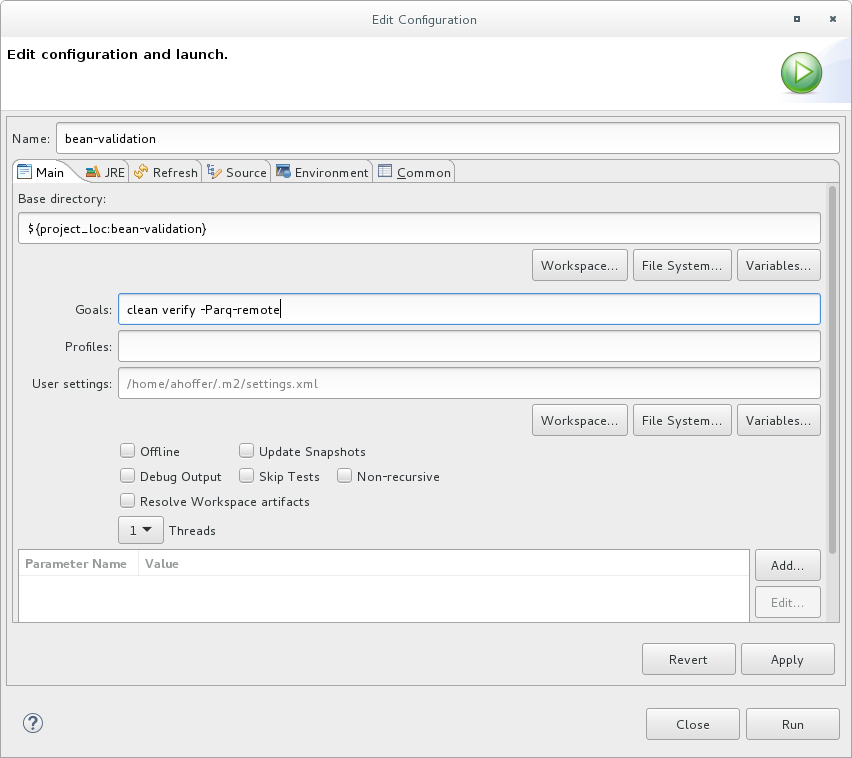
Right-click on the
bean-validationproject in the Project Explorer tab and select Run As → Maven Build. Enter the following in the Goals input field and then click Run.
clean verify -Parq-remote
Figure 2.6. Edit Configuration
Verify the results.
The Console tab shows the results of the
bean-validationArquillian tests:------------------------------------------------------- T E S T S ------------------------------------------------------- Running org.jboss.as.quickstarts.bean_validation.test.MemberValidationTest Tests run: 5, Failures: 0, Errors: 0, Skipped: 0, Time elapsed: 2.189 sec Results : Tests run: 5, Failures: 0, Errors: 0, Skipped: 0 [INFO] ------------------------------------------------------------------------ [INFO] BUILD SUCCESS [INFO] ------------------------------------------------------------------------
2.4.5. Run the quickstarts from the command line
You can easily build and deploy the quickstarts from the command line using Maven. If you do not yet have Maven installed, see the Apache Maven project to download and install it.
A README.md file is provided at the root directory of the quickstarts that contains general information about system requirements, configuring Maven, adding users, and running the quickstarts.
Each quickstart also contains its own README.md file that provides the specific instructions and Maven commands to run that quickstart.
Procedure
-
Review the
README.mdfile in the root directory of the helloworld quickstart. Start the JBoss EAP server.
$ EAP_HOME/bin/standalone.sh- Navigate to the helloworld quickstart directory.
Build and deploy the quickstart using the Maven command provided in the quickstart’s
README.mdfile.$ mvn clean install wildfly:deploy
-
The helloworld application is now available at http://localhost:8080/helloworld and displays the text
Hello World!.
2.5. Review the quickstart examples
2.5.1. Explore the helloworld quickstart
The helloworld quickstart shows you how to deploy a simple servlet to JBoss EAP. The business logic is encapsulated in a service, which is provided as a Contexts and Dependency Injection (CDI) bean and injected into the Servlet. This quickstart is a starting point to be sure you have configured and started your server properly.
Detailed instructions to build and deploy this quickstart using the command line can be found in the README.html file at the root of the helloworld quickstart directory. This topic shows you how to use JBoss Tools to run the quickstart and assumes you have installed JBoss Tools, configured Maven, and imported and successfully run the helloworld quickstart.
JBoss Tools is deprecated in JBoss EAP 8.0. No enhancements will be made to this feature, and it might be removed in a future release.
2.5.1.1. Examine the directory structure
The code for the helloworld quickstart can be found in the QUICKSTART_HOME/helloworld/ directory. The helloworld quickstart is comprised of a Servlet and a CDI bean. It also contains a beans.xml file in the application’s WEB-INF/ directory that has a version number of 1.1 and a bean-discovery-mode of all. This marker file identifies the WAR as a bean archive and tells JBoss EAP to look for beans in this application and to activate the CDI.
The src/main/webapp/ directory contains the files for the quickstart. All the configuration files for this example are located in the WEB-INF/ directory within src/main/webapp/, including the beans.xml file. The src/main/webapp/ directory also includes an index.html file, which uses a simple meta refresh to redirect the user’s browser to the Servlet, which is located at http://localhost:8080/helloworld/HelloWorld. The quickstart does not require a web.xml file.
2.5.1.2. Review HelloWorldServlet.java code
The package declaration and imports have been excluded from these listings. The complete listing is available in the quickstart source code.
JBoss Tools is deprecated in JBoss EAP 8.0. No enhancements will be made to this feature, and it might be removed in a future release.
Prerequisites
- Install JBoss Tools. For instructions, see Installation Methods in the JBoss Tools Installation guide.
-
Run the
helloworldquickstart. -
Verify that the
helloworldquickstart was successfully deployed to JBoss EAP by opening a web browser and accessing the application at http://localhost:8080/helloworld.
Procedure
Review the
HelloWorldServletcode.The
HelloWorldServlet.javafile is located in thesrc/main/java/org/jboss/as/quickstarts/helloworld/directory. This servlet sends the information to the browser.Example: HelloWorldServlet Class Code
42 @SuppressWarnings("serial")
43 @WebServlet("/HelloWorld")
44 public class HelloWorldServlet extends HttpServlet {
45
46     static String PAGE_HEADER = "<html><head><title>helloworld</title></head><body>";
47
48     static String PAGE_FOOTER = "</body></html>";
49
50     @Inject
51	   HelloService helloService;
52
53     @Override
54     protected void doGet(HttpServletRequest req, HttpServletResponse resp) throws ServletException, IOException {
55         resp.setContentType("text/html");
56         PrintWriter writer = resp.getWriter();
57         writer.println(PAGE_HEADER);
58         writer.println("<h1>" + helloService.createHelloMessage("World") + "</h1>");
59         writer.println(PAGE_FOOTER);
60         writer.close();
61     }
62
63 }
2.5.1.2.1. HelloWorldServlet Details
This servlet sends information to your browser.
Table 2.1. HelloWorldServlet Details
| Line | Note |
|---|---|
| 43 |
All you need to do is add the |
| 46-48 | Every web page needs correctly formed HTML. This quickstart uses static Strings to write the minimum header and footer output. |
| 50-51 | These lines inject the HelloService CDI bean which generates the actual message. As long as we don’t alter the API of HelloService, this approach allows us to alter the implementation of HelloService at a later date without changing the view layer. |
| 58 | This line calls into the service to generate the message "Hello World", and write it out to the HTTP request. |
Review the
HelloServicecode.The
HelloService.javafile is located in thesrc/main/java/org/jboss/as/quickstarts/helloworld/directory. This service simply returns a message. No XML or annotation registration is required.Example: HelloService Class Code
public class HelloService {

    String createHelloMessage(String name) {
        return "Hello " + name + "!";
    }
}
Additional resources
- For more information about tested JBoss Tools versions, see Red Hat JBoss Enterprise Application Platform (EAP) and JBoss Tools.
2.5.2. Explore the numberguess quickstart
The numberguess quickstart shows you how to create and deploy a simple non-persistant application to JBoss EAP. Information is displayed using a JSF view and business logic is encapsulated in two CDI beans. In the numberguess quickstart, you have ten attempts to guess a number between 1 and 100. After each attempt, you’re told whether your guess was too high or too low.
The code for the numberguess quickstart can be found in the QUICKSTART_HOME/numberguess/ directory where QUICKSTART_HOME is the directory where you downloaded and unzipped the JBoss EAP quickstarts. The numberguess quickstart is comprised of a number of beans, configuration files, and Facelets (JSF) views, and is packaged as a WAR module.
Detailed instructions to build and deploy this quickstart using the command line can be found in the README.html file at the root of the numberguess quickstart directory. The following examples use JBoss Tools to run the quickstart.
JBoss Tools is deprecated in JBoss EAP 8.0. No enhancements will be made to this feature, and it might be removed in a future release.
2.5.2.1. Examine the numberguess configuration files
All the configuration files for this example are located in the QUICKSTART_HOME/numberguess/src/main/webapp/WEB-INF/ directory of the quickstart.
Prerequisites
- Install JBoss Tools. For instructions, see Installation Methods in the JBoss Tools Installation guide.
-
Run the
numberguessquickstart. -
Verify the
numberguessquickstart was deployed successfully to JBoss EAP by opening a web browser and accessing the application at this URL: http://localhost:8080/numberguess.
JBoss Tools is deprecated in JBoss EAP 8.0. No enhancements will be made to this feature, and it might be removed in a future release.
Procedure
Examine the
faces-config.xmlfile.This quickstart uses the JSF 2.2 version of
faces-config.xmlfilename. A standardized version of Facelets is the default view handler in JSF 2.2 so it requires no configuration. This file consists of only the root element and is simply a marker file to indicate JSF should be enabled in the application.<faces-config version="2.2" xmlns="http://xmlns.jcp.org/xml/ns/javaee" xmlns:xsi="http://www.w3.org/2001/XMLSchema-instance" xsi:schemaLocation=" http://xmlns.jcp.org/xml/ns/javaee http://xmlns.jcp.org/xml/ns/javaee/web-facesconfig_2_2.xsd"> </faces-config>Examine the
beans.xmlfile.The
beans.xmlfile contains a version number of 1.1 and abean-discovery-modeofall. This file is a marker file that identifies the WAR as a bean archive and tells JBoss EAP to look for beans in this application and to activate the CDI.<beans xmlns="http://xmlns.jcp.org/xml/ns/javaee" xmlns:xsi="http://www.w3.org/2001/XMLSchema-instance" xsi:schemaLocation=" http://xmlns.jcp.org/xml/ns/javaee http://xmlns.jcp.org/xml/ns/javaee/beans_1_1.xsd" bean-discovery-mode="all"> </beans>
This quickstart does not need a web.xml file.
Additional resources
- For more information about tested JBoss Tools versions, see Red Hat JBoss Enterprise Application Platform (EAP) and JBoss Tools.
2.5.2.2. Examine the JSF code
JSF uses the .xhtml file extension for source files, but delivers the rendered views with the .jsf extension. The home.xhtml file is located in the src/main/webapp/ directory.
Example: JSF Source Code
19<html xmlns="http://www.w3.org/1999/xhtml"
20	xmlns:ui="http://java.sun.com/jsf/facelets"
21	xmlns:h="http://java.sun.com/jsf/html"
22	xmlns:f="http://java.sun.com/jsf/core">
23
24	<head>
25	<meta http-equiv="Content-Type" content="text/html; charset=iso-8859-1" />
26	<title>Numberguess</title>
27	</head>
28
29	<body>
30	<div id="content">
31		<h1>Guess a number...</h1>
32		<h:form id="numberGuess">
33
34		<!-- Feedback for the user on their guess -->
35	<div style="color: red">
36		<h:messages id="messages" globalOnly="false" />
37		<h:outputText id="Higher" value="Higher!"
38 		  rendered="#{game.number gt game.guess and game.guess ne 0}" />
39		<h:outputText id="Lower" value="Lower!"
40		   rendered="#{game.number lt game.guess and game.guess ne 0}" />
41	</div>
42
43	<!-- Instructions for the user -->
44	<div>
45	I'm thinking of a number between <span
46	id="numberGuess:smallest">#{game.smallest}</span> and <span
47	id="numberGuess:biggest">#{game.biggest}</span>. You have
48	#{game.remainingGuesses} guesses remaining.
49	</div>
50
51	<!-- Input box for the users guess, plus a button to submit, and reset -->
52	<!-- These are bound using EL to our CDI beans -->
53	<div>
54	Your guess:
55	<h:inputText id="inputGuess" value="#{game.guess}"
56		required="true" size="3"
57		disabled="#{game.number eq game.guess}"
58		validator="#{game.validateNumberRange}" />
59		<h:commandButton id="guessButton" value="Guess"
60			action="#{game.check}"
61			disabled="#{game.number eq game.guess}" />
62	</div>
63	<div>
64	<h:commandButton id="restartButton" value="Reset"
65	action="#{game.reset}" immediate="true" />
66	</div>
67	</h:form>
68
69	</div>
70
71	<br style="clear: both" />
72
73	</body>
74</html>
The following line numbers correspond to those seen when viewing the file in JBoss Tools.
JBoss Tools is deprecated in JBoss EAP 8.0. No enhancements will be made to this feature, and it might be removed in a future release.
Table 2.2. JSF Details
| Line | Note |
|---|---|
| 36-40 | These are the messages which can be sent to the user: "Higher!" and "Lower!" |
| 45-48 | As the user guesses, the range of numbers they can guess gets smaller. This sentence changes to make sure they know the number range of a valid guess. |
| 55-58 | This input field is bound to a bean property using a value expression. |
| 58 | A validator binding is used to make sure the user does not accidentally input a number outside of the range in which they can guess. If the validator was not here, the user might use up a guess on an out of bounds number. |
| 59-61 | There must be a way for the user to send their guess to the server. Here we bind to an action method on the bean. |
2.5.2.3. Examine the numberguess class files
All of the numberguess quickstart source files can be found in the QUICKSTART_HOME/numberguess/src/main/java/org/jboss/as/quickstarts/numberguess/ directory. The package declaration and imports have been excluded from these listings. The complete listing is available in the quickstart source code.
Procedure
Review the
Random.javaQualifier CodeA qualifier is used to remove ambiguity between two beans, both of which are eligible for injection based on their type. The
@Randomqualifier is used for injecting a random number.@Target({ TYPE, METHOD, PARAMETER, FIELD }) @Retention(RUNTIME) @Documented @Qualifier public @interface Random { }Review the
MaxNumber.javaQualifier CodeThe
@MaxNumberqualifieris used for injecting the maximum number allowed.@Target({ TYPE, METHOD, PARAMETER, FIELD }) @Retention(RUNTIME) @Documented @Qualifier public @interface MaxNumber { }Review the
Generator.javaCodeThe
Generatorclass creates the random number via a producer method, exposing the maximum possible number via the same. This class is application-scoped, so you don’t get a different random each time.@SuppressWarnings("serial") @ApplicationScoped public class Generator implements Serializable { private java.util.Random random = new java.util.Random(System.currentTimeMillis()); private int maxNumber = 100; java.util.Random getRandom() { return random; } @Produces @Random int next() { // a number between 1 and 100 return getRandom().nextInt(maxNumber - 1) + 1; } @Produces @MaxNumber int getMaxNumber() { return maxNumber; } }Review the
Game.javaCodeThe session-scoped
Gameclass is the primary entry point of the application. It is responsible for setting up or resetting the game, capturing and validating the user’s guess, and providing feedback to the user with aFacesMessage. It uses the post-construct lifecycle method to initialize the game by retrieving a random number from the@Random Instance<Integer>bean.Notice the
@Namedannotation in the class. This annotation is only required when you want to make the bean accessible to a JSF view by using Jakarta Expression Language, in this case#{game}.@SuppressWarnings("serial") @Named @SessionScoped public class Game implements Serializable { /** * The number that the user needs to guess */ private int number; /** * The users latest guess */ private int guess; /** * The smallest number guessed so far (so we can track the valid guess range). */ private int smallest; /** * The largest number guessed so far */ private int biggest; /** * The number of guesses remaining */ private int remainingGuesses; /** * The maximum number we should ask them to guess */ @Inject @MaxNumber private int maxNumber; /** * The random number to guess */ @Inject @Random Instance<Integer> randomNumber; public Game() { } public int getNumber() { return number; } public int getGuess() { return guess; } public void setGuess(int guess) { this.guess = guess; } public int getSmallest() { return smallest; } public int getBiggest() { return biggest; } public int getRemainingGuesses() { return remainingGuesses; } /** * Check whether the current guess is correct, and update the biggest/smallest guesses as needed. Give feedback to the user * if they are correct. */ public void check() { if (guess > number) { biggest = guess - 1; } else if (guess < number) { smallest = guess + 1; } else if (guess == number) { FacesContext.getCurrentInstance().addMessage(null, new FacesMessage("Correct!")); } remainingGuesses--; } /** * Reset the game, by putting all values back to their defaults, and getting a new random number. We also call this method * when the user starts playing for the first time using {@linkplain PostConstruct @PostConstruct} to set the initial * values. */ @PostConstruct public void reset() { this.smallest = 0; this.guess = 0; this.remainingGuesses = 10; this.biggest = maxNumber; this.number = randomNumber.get(); } /** * A JSF validation method which checks whether the guess is valid. It might not be valid because there are no guesses left, * or because the guess is not in range. * */ public void validateNumberRange(FacesContext context, UIComponent toValidate, Object value) { if (remainingGuesses <= 0) { FacesMessage message = new FacesMessage("No guesses left!"); context.addMessage(toValidate.getClientId(context), message); ((UIInput) toValidate).setValid(false); return; } int input = (Integer) value; if (input < smallest || input > biggest) { ((UIInput) toValidate).setValid(false); FacesMessage message = new FacesMessage("Invalid guess"); context.addMessage(toValidate.getClientId(context), message); } } }
Appendix A. Reference information for getting started with JBoss EAP
You can use the arguments, attributes, and default socket binding to help you get started with using JBoss EAP. For example, you can use arguments to set an alternative configuration to a default JBoss EAP standalone server. This helps configure the server to meet your needs.
A.1. Server runtime arguments and switches
On standalone servers and servers in a managed domain, you can use specific server runtime arguments with an application’s startup script. The script can start a server with alternative configurations to those defined in the standalone.xml, domain.xml, and host.xml configuration files. Alternative configurations might include starting the server with an alternative socket bindings set or a secondary configuration.
Before you start the server, you can access the available parameters list by issuing the help switch, -h or --help, in your terminal.
Table A.1. Descriptions of runtime arguments and switches:
| Argument or switch | Server type | Description |
|---|---|---|
|
| Standalone |
Sets the server’s running type to |
|
| Domain |
Sets the host controller’s running type to |
|
| Standalone, Domain |
Sets system property |
|
| Standalone, Domain |
Sets system property |
|
| Domain | Keep a copy of the persistent domain configuration even if this host is not the domain controller. |
|
| Standalone |
Name of the server configuration file to use. The default is |
|
| Domain |
Name of the server configuration file to use. The default is |
|
| Domain | If the host is not the domain controller and cannot contact the domain controller at boot, then you must boot by using a locally cached copy of the domain configuration. |
|
| Standalone | Activate debug mode with an optional argument to specify the port. Argument only works if the launch script supports the argument. |
|
| Standalone, Domain | Sets a system property. |
|
| Domain |
Name of the server configuration file to use. Defaults as |
|
| Standalone |
The location of the Git repository that is used to manage and persist server configuration data. This can be |
|
| Standalone | The branch or tag name in the Git repository to use. You must name an existing branch or tag name as it will not be created if it does not exist. If you use a tag name, you put the repository in a detached HEAD state, meaning future commits are not attached to any branches. Tag names are read-only and are normally used when you need to replicate a configuration across several nodes. |
|
| Standalone |
The URL to an Elytron configuration file that contains the credentials the server uses when it connects to a remote Git repository. You can use the argument when your remote Git repository requires authentication. Elytron does not support SSH. Elytron supports only default SSH authentication by using private keys without a password. You cannot use the argument with a |
|
| Standalone, Domain | Display the help message and exit the help index. |
|
| Domain |
Name of the host configuration file to use. Defaults as |
|
| Domain | Address on which the host controller can listen for communication from the process controller. |
|
| Domain | Port on which the host controller can listen for communication from the process controller. |
|
| Domain |
Sets system property |
|
| Domain |
Sets system property |
|
| Standalone |
Name of the server configuration file to use. Argument differs from |
|
| Domain |
Name of the domain configuration file to use. Argument differs from |
|
| Domain |
Name of the host configuration file to use. Argument differs from |
|
| Standalone, Domain | Load system properties from the given URL. |
|
| Domain | Address on which the process controller listens for communication from processes it controls. |
|
| Domain | Port on which the process controller listens for communication from processes it controls. |
|
| Standalone | Sets a security property. |
|
| Standalone, Domain | Runs the server with a security manager installed. |
|
| Standalone |
Name of the server configuration file to use. Defaults as |
|
| Standalone |
Sets the start mode of the server. You cannot use the argument with the
|
|
| Standalone, Domain |
Sets system property |
|
| Standalone, Domain | Display the application server version and exit. |
JBoss EAP sets its included configuration files to handle the behavior of the switches. For example, -b and -u. If you change your configuration files to no longer use the system property controlled by the switch then adding the system property to the start command does not work.
A.2. Add-user arguments
You can use arguments with the add-user.sh script or the add-user.bat script to configure how these scripts add new users to a properties file for authentication purposes.
Table A.2. Descriptions of add-user arguments
| Command line argument | Description |
|---|---|
|
| Creates a user in the application realm. If you do not create a user in the application realm then the script creates a user in the management realm by default. |
|
|
The domain configuration directory that contains the properties files. If you omit the argument then the script sets |
|
|
An alternative standalone server configuration directory that contains properties files. If you omit the argument then the script sets |
|
|
The name of the alternative user properties file. You can set an absolute path for the file or specify a file name by using the argument with an |
|
| A comma-separated list of groups to assign to a user. |
|
|
The name of the alternative group properties file. You can set an absolute path for the file or specify a file name by using the argument with an |
|
| The password of the user. |
|
| The name of the user. User names can only contain the following characters, in any number and in any order:
|
|
|
The name of the realm used to secure the management interfaces. If omitted, the default is |
|
|
Run the |
|
| Enable the user. |
|
| Disable the user. |
|
| Automatically confirm warning in interactive mode. |
|
|
Display usage information for the |
|
| Print the secret value in non-interactive mode. |
A.3. Interface attributes
You can use interface attributes to configure a JBoss EAP interface.
Attribute names in the table display in the order JBoss EAP lists them in its management model. See the schema definition file located at EAP_HOME/docs/schema/wildfly-config_5_0.xsd to view the elements as they appear in the XML. XML element listings must differ from those displayed in the management model.
Table A.3. Descriptions of interface attributes:
| Interface attribute | Description |
|---|---|
|
| Specifies that an interface must meet at least one, but not necessarily all, of the selected nested set of criteria. |
|
| Empty attribute that binds a wildcard address to sockets that use an interface. The attribute has the following configuration options:
|
|
| Specifies either an IP address in IPv6 or IPv4 dotted decimal notation or a host name resolved to an IP address. |
|
| Empty attribute that specifies criteria for whether or not an interface includes a link-local address. |
|
| Empty attribute that specifies criteria for whether or not an interface identifies as a loopback interface. |
|
|
A loopback address that might not have been configured on the machine’s loopback interface. Attribute differs from |
|
| Empty attribute that specifies criteria for whether or not an interface supports multicast. |
|
| The name of the interface. |
|
|
The name of a network interface, such as |
|
| A regular expression that matches the names of the network interfaces available on a machine to an acceptable interface. |
|
| Attribute that indicates the selection criteria that an interface must not meet. |
|
| Empty attribute that specifies criteria for whether or not an interface identifies as a point-to-point interface. |
|
| Empty attribute that specifies criteria for whether or not an interface contains a publicly routable address. |
|
| Empty attribute that specifies criteria for whether or not an interface contains a site-local address. |
|
|
Specifies a network IP address and the number of bits in the address' network prefix, which is written in slash notation ,such as |
|
| Empty attribute that specifies criteria for whether or not an interface locates as up. |
|
| Empty attribute that specifies criteria for whether or not an interface contains identifies as a virtual interface. |
A.4. Socket binding attributes
You can use socket binding attributes to configure the socket binding for your JBoss EAP server.
Specific attributes exist for the following types of socket bindings:
- Inbound socket bindings
- Remote outbound socket bindings
- Local outbound socket bindings
Attribute names in the table display in the order JBoss EAP lists them in its management model. See the schema definition file located at EAP_HOME/docs/schema/wildfly-config_5_0.xsd to view the elements as they appear in the XML. XML element listings must differ from those displayed in the management model.
Table A.4. Descriptions of inbound socket binding, socket-binding, attributes:
| Attribute | Description |
|---|---|
|
|
Specifies the client mappings for an inbound socket binding. A client that connects to an inbound socket must use the destination address specified in the mapping. This address matches the outbound interface. By using the |
|
| Use the attribute to determine if the port value must remain fixed. You can use the attribute even if you applied numeric offsets to the other sockets in the socket group. |
|
|
An attribute that sets the name of the interface to which the socket binds. You can also use the attribute to set the interface that multicast sockets must listen. If you do not define a declared interface, then the attribute uses the |
|
| Multicast address on which the socket receives multicast traffic. If you do not specify a value for the attribute, then you do not configure the socket to receive multicast functionality. |
|
|
Port on which the socket receives multicast traffic. You must configure the attribute if you configured the |
|
| You must set a name of the socket. A service requiring access to the socket configuration information cannot use the name to find the socket. |
|
|
Number of the port to which the socket binds. You must override the attribute value if you configured servers to apply a |
Table A.5. Descriptions of remote outbound socket binding, remote-destination-outbound-socket-binding, attributes:
| Attribute | Description |
|---|---|
|
| Determines whether the port value must remain fixed, even if you applied numeric offsets to the other outbound sockets in a socket group. |
|
| The host name or IP address of the remote destination to which an outbound socket connects. |
|
| The port number of the remote destination to which an outbound socket connects. |
|
| The name of the interface that JBoss EAP uses for the source address of the outbound socket. |
|
| The port number that JBoss EAP uses as the source port of the outbound socket. |
Table A.6. Descriptions of local outbound socket binding, local-destination-outbound-socket-binding, attributes:
| Attribute | Description |
|---|---|
|
| Determines whether the port value must remain fixed, even if you applied numeric offsets to the other outbound sockets in the socket group. |
|
| The name of the local socket binding that JBoss EAP uses to determine the port for the connecting outbound socket. |
|
| The name of the interface that JBoss EAP uses for the source address of the outbound socket. |
|
| The port number that JBoss EAP uses as the source port of the outbound socket. |
A.5. Default socket bindings
You can set default socket bindings for each socket binding group.
The following five types of default socket bindings exist for JBoss EAP:
-
standard-sockets -
ha-sockets -
full-sockets -
full-ha-sockets -
load-balancer-sockets
Table A.7. Descriptions of default standard-sockets socket bindings:
| Socket Binding | Port | Description |
|---|---|---|
|
|
| Apache JServ Protocol. Used for HTTP clustering and load balancing. |
|
|
| The default port for deployed web applications. |
|
|
| SSL-encrypted connection between deployed web applications and clients. |
|
|
| Used for HTTP communication with the management layer. |
|
|
| Used for HTTPS communication with the management layer. |
|
|
| The JTA transaction recovery manager. |
|
|
| The JTA / JTS transaction manager. |
Table A.8. Descriptions of default ha-sockets socket bindings:
| Socket Binding | Port | Multicast Port | Description |
|---|---|---|---|
|
|
| Apache JServ Protocol. Used for HTTP clustering and load balancing. | |
|
|
| The default port for deployed web applications. | |
|
|
| SSL-encrypted connection between deployed web applications and clients. | |
|
|
| Multicast. Used to discover initial membership in a HA cluster. | |
|
|
| Unicast peer discovery in HA clusters using TCP. | |
|
|
|
| Multicast peer discovery in HA clusters using UDP. |
|
|
| Used for HTTP communication with the management layer. | |
|
|
| Used for HTTPS communication with the management layer. | |
|
|
| Multicast port for communication between JBoss EAP and the HTTP load balancer. | |
|
|
| The JTA transaction recovery manager. | |
|
|
| The JTA / JTS transaction manager. |
Table A.9. Descriptions of default full-sockets socket bindings:
| Socket Binding | Port | Description |
|---|---|---|
|
|
| Apache JServ Protocol. Used for HTTP clustering and load balancing. |
|
|
| The default port for deployed web applications. |
|
|
| SSL-encrypted connection between deployed web applications and clients. |
|
|
| CORBA services for JTS transactions and other ORB-dependent services. |
|
|
| SSL-encrypted CORBA services. |
|
|
| Used for HTTP communication with the management layer. |
|
|
| Used for HTTPS communication with the management layer. |
|
|
| The JTA transaction recovery manager. |
|
|
| The JTA / JTS transaction manager. |
Table A.10. Descriptions of default full-ha-sockets socket bindings:
| Name | Port | Multicast Port | Description |
|---|---|---|---|
|
|
| Apache JServ Protocol. Used for HTTP clustering and load balancing. | |
|
|
| The default port for deployed web applications. | |
|
|
| SSL-encrypted connection between deployed web applications and clients. | |
|
|
| CORBA services for JTS transactions and other ORB-dependent services. | |
|
|
| SSL-encrypted CORBA services. | |
|
|
| Multicast. Used to discover initial membership in a HA cluster. | |
|
|
| Unicast peer discovery in HA clusters using TCP. | |
|
|
|
| Multicast peer discovery in HA clusters using UDP. |
|
|
| Used for HTTP communication with the management layer. | |
|
|
| Used for HTTPS communication with the management layer. | |
|
|
| Multicast port for communication between JBoss EAP and the HTTP load balancer. | |
|
|
| The JTA transaction recovery manager. | |
|
|
| The JTA / JTS transaction manager. |
Table A.11. Descriptions of default load-balancer-sockets socket bindings:
| Name | Port | Multicast Port | Description |
|---|---|---|---|
|
|
| The default port for deployed web applications. | |
|
|
| SSL-encrypted connection between deployed web applications and clients. | |
|
|
| Used for HTTP communication with the management layer. | |
|
|
| Used for HTTPS communication with the management layer. | |
|
|
| The port for the Mod-Cluster Management Protocol (MCMP) connection to transmit lifecycle events. | |
|
|
| Multicast port for communication between JBoss EAP and the HTTP load balancer. |
Chapter 3. Package Namespace Change for JBoss EAP 8.0
This section provides additional information for the package namespace changes in JBoss EAP 8.0. JBoss EAP 8.0 provides full support for Jakarta EE 10 and many other implementations of the Jakarta EE 10 APIs. An important change supported by Jakarta EE 10 for JBoss EAP 8.0 is the package namespace change.
3.1. javax to jakarta Namespace change
A key difference between Jakarta EE 8 and EE 10 is the renaming of the EE API Java packages from javax.* to jakarta.*. This follows the move of Java EE to the Eclipse Foundation and the establishment of Jakarta EE.
Adapting to this namespace change is the biggest task of migrating an application from JBoss EAP 7 to JBoss EAP 8. To migrate applications to Jakarta EE 10, you must complete the following steps:
-
Update any import statements or other source code uses of EE API classes from the
javaxpackage to thejakartapackage. -
Update the names of any EE-specified system properties or other configuration properties that begin with
javaxto begin withjakarta. -
For any application-provided implementations of EE interfaces or abstract classes that are bootstrapped using the
java.util.ServiceLoadermechanism, change the name of the resource that identifies the implementation class fromMETA-INF/services/javax.[rest_of_name]toMETA-INF/services/jakarta.[rest_of_name].
The Red Hat Migration Toolkit can assist in updating the namespaces in the application source code. For more information, see How to use Red Hat Migration Toolkit for Auto-Migration of an Application to the Jakarta EE 10 Namespace. In cases where source code migration is not an option, the Open Source Eclipse Transformer project provides bytecode transformation tooling to transform existing Java archives from the javax namespace to the jakarta namespace.
This change does not affect javax packages that are part of Java SE.
Additional resources
- For more information, see The javax to jakarta Package Namespace Change.
Revised on 2024-02-21 14:02:49 UTC