
Red Hat Ansible Automation Platform automation mesh guide
This guide provides information used to deploy automation mesh as part of your Ansible Automation Platform environment
Abstract
Preface
Thank you for your interest in Red Hat Ansible Automation Platform. Ansible Automation Platform is a commercial offering that helps teams manage complex multi-tier deployments by adding control, knowledge, and delegation to Ansible-powered environments.
This guide helps you to understand the installation requirements and processes behind installing Ansible Automation Platform. This document has been updated to include information for the latest release of Ansible Automation Platform.
Making open source more inclusive
Red Hat is committed to replacing problematic language in our code, documentation, and web properties. We are beginning with these four terms: master, slave, blacklist, and whitelist. Because of the enormity of this endeavor, these changes will be implemented gradually over several upcoming releases. For more details, see our CTO Chris Wright’s message.
Chapter 1. Planning for automation mesh in your Red Hat Ansible Automation Platform environment
The following topics contain information to help plan an automation mesh deployment in your Ansible Automation Platform environment. The subsequent sections explain the concepts that comprise automation mesh in addition to providing examples on how you can design automation mesh topologies. Simple to complex topology examples are included to illustrate the various ways you can deploy automation mesh.
1.1. About automation mesh
Automation mesh is an overlay network intended to ease the distribution of work across a large and dispersed collection of workers through nodes that establish peer-to-peer connections with each other using existing networks.
Red Hat Ansible Automation Platform 2 replaces Ansible Tower and isolated nodes with automation controller and automation hub. Automation controller provides the control plane for automation through its UI, Restful API, RBAC, workflows and CI/CD integration, while Automation Mesh can be used for setting up, discovering, changing or modifying the nodes that form the control and execution layers.
Automation Mesh introduces:
- Dynamic cluster capacity that scales independently, allowing you to create, register, group, ungroup and deregister nodes with minimal downtime.
- Control and execution plane separation that enables you to scale playbook execution capacity independently from control plane capacity.
- Deployment choices that are resilient to latency, reconfigurable without outage, and that dynamically re-reroute to choose a different path when outages may exist. mesh routing changes.
- Connectivity that includes bi-directional, multi-hopped mesh communication possibilities which are Federal Information Processing Standards (FIPS) compliant.
1.2. Control and execution planes
Automation mesh makes use of unique node types to create both the control and execution plane. Learn more about the control and execution plane and their node types before designing your automation mesh topology.
1.2.1. Control plane
The control plane consists of hybrid and control nodes. Instances in the control plane run persistent automation controller services such as the the web server and task dispatcher, in addition to project updates, and management jobs.
-
Hybrid nodes - this is the default node type for control plane nodes, responsible for automation controller runtime functions like project updates, management jobs and
ansible-runnertask operations. Hybrid nodes are also used for automation execution. - Control nodes - control nodes run project and inventory updates and system jobs, but not regular jobs. Execution capabilities are disabled on these nodes.
1.2.2. Execution plane
The execution plane consists of execution nodes that execute automation on behalf of the control plane and have no control functions. Hop nodes serve to communicate. Nodes in the execution plane only run user-space jobs, and may be geographically separated, with high latency, from the control plane.
-
Execution nodes - Execution nodes run jobs under
ansible-runnerwithpodmanisolation. This node type is similar to isolated nodes. This is the default node type for execution plane nodes. - Hop nodes - similar to a jump host, hop nodes will route traffic to other execution nodes. Hop nodes cannot execute automation.
1.2.3. Peers
Peer relationships define node-to-node connections. You can define peers within the [automationcontroller] and [execution_nodes] groups or using the [automationcontroller:vars] or [execution_nodes:vars] groups
1.2.4. Defining automation mesh node types
The examples in this section demonstrate how to set the node type for the hosts in your inventory file.
You can set the node_type for single nodes in the control plane or execution plane inventory groups. To define the node type for an entire group of nodes, set the node_type in the vars stanza for the group.
-
The allowed values for
node_typein the control plane[automationcontroller]group arehybrid(default) andcontrol. -
The allowed values for
node_typein the[execution_nodes]group areexecution(default) andhop.
Hybrid node
The following inventory consists of a single hybrid node in the control plane:
[automationcontroller]
control-plane-1.example.com
Control node
The following inventory consists of a single control node in the control plane:
[automationcontroller]
control-plane-1.example.com node_type=control
If you set node_type to control in the vars stanza for the control plane nodes, then all of the nodes in control plane are control nodes.
[automationcontroller]
control-plane-1.example.com

[automationcontroller:vars]
node_type=control
Execution node
The following stanza defines a single execution node in the execution plane:
[execution_nodes]
execution-plane-1.example.com
Hop node
The following stanza defines a single hop node and an execution node in the execution plane. The node_type variable is set for every individual node.
[execution_nodes]
execution-plane-1.example.com node_type=hop
execution-plane-2.example.com
If you want to set the node-type at the group level, you must create separate groups for the execution nodes and the hop nodes.
[execution_nodes]
execution-plane-1.example.com
execution-plane-2.example.com

[execution_group]
execution-plane-2.example.com

[execution_group:vars]
node_type=execution

[hop_group]
execution-plane-1.example.com

[hop_group:vars]
node_type=hop
Peer connections
Create node-to-node connections using the peers= host variable. The following example connects control-plane-1.example.com to execution-node-1.example.com and execution-node-1.example.com to execution-node-2.example.com:
[automationcontroller]
control-plane-1.example.com peers=execution-node-1.example.com

[automationcontroller:vars]
node_type=control

[execution_nodes]
execution-node-1.example.com peers=execution-node-2.example.com
execution-node-2.example.com
Additional resources
- See the example automation mesh topologies in this guide for more examples of how to implement mesh nodes.
Chapter 2. Setting up automation mesh
Configure the Ansible Automation Platform installer to set up automation mesh for your Ansible environment. Perform additional tasks to customize your installation, such as importing a Certificate Authority (CA) certificate.
2.1. automation mesh Installation
You use the Ansible Automation Platform installation program to set up automation mesh or to upgrade to automation mesh. To provide Ansible Automation Platform with details about the nodes, groups, and peer relationships in your mesh network, you define them in an the inventory file in the installer bundle.
Additional Resources
2.2. Importing a Certificate Authority (CA) certificate
A Certificate Authority (CA) verifies and signs individual node certificates in an automation mesh environment. You can provide your own CA by specifying the path to the certificate and the private RSA key file in the inventory file of your Red Hat Ansible Automation Platform installer.
The Ansible Automation Platform installation program generates a CA if you do not provide one.
Procedure
-
Open the
inventoryfile for editing. -
Add the
mesh_ca_keyfilevariable and specify the full path to the private RSA key (.key). -
Add the
mesh_ca_certfilevariable and specify the full path to the CA certificate file (.crt). - Save the changes to the inventory file.
Example
[all:vars]
mesh_ca_keyfile=/tmp/<mesh_CA>.key
mesh_ca_certfile=/tmp/<mesh_CA>.crt
With the CA files added to the inventory file, run the installation program to apply the CA. This process copies the CA to the to /etc/receptor/tls/ca/ directory on each control and execution node on your mesh network.
Additional resources
Chapter 3. Automation mesh design patterns
The automation mesh topologies in this section provide examples you can use to design a mesh deployment in your environment. Examples range from a simple, hydrid node deployment to a complex pattern that deploys numerous automation controller instances, employing several execution and hop nodes.
Prerequisites
- You reviewed conceptual information on node types and relationsips
The following examples include images that illustrate the mesh topology. The arrows in the images indicate the direction of peering. After peering is established, the connection between the nodes allows bidirectional communication.
3.1. Multiple hybrid nodes inventory file example
This example inventory file deploys a control plane consisting of multiple hybrid nodes. The nodes in the control plane are automatically peered to one another.
[automationcontroller]
aap_c_1.example.com
aap_c_2.example.com
aap_c_3.example.com
The following image displays the topology of this mesh network.
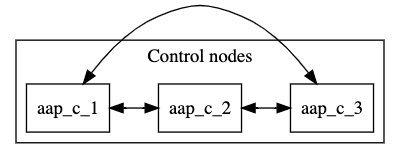
The default node_type for nodes in the control plane is hybrid. You can explicitly set the node_type of individual nodes to hybrid in the [automationcontroller group]:
[automationcontroller]
aap_c_1.example.com node_type=hybrid
aap_c_2.example.com node_type=hybrid
aap_c_3.example.com node_type=hybrid
Alternatively, you can set the node-type of all nodes in the [automationcontroller] group. When you add new nodes to the control plane they are automatically set to hybrid nodes.
[automationcontroller]
aap_c_1.example.com
aap_c_2.example.com
aap_c_3.example.com

[automationcontroller:vars]
node_type=hybrid
If you think that you might add control nodes to your control plane in future, it is better to define a separate group for the hybrid nodes, and set the node-type for the group:
[automationcontroller]
aap_c_1.example.com
aap_c_2.example.com
aap_c_3.example.com

[hybrid_group]
aap_c_1.example.com
aap_c_2.example.com
aap_c_3.example.com

[hybrid_group:vars]
node_type=hybrid
3.2. Single node control plane with single execution node
This example inventory file deploys a single-node control plane and establishes a peer relationship to an execution node.
[automationcontroller]
aap_c_1.example.com

[automationcontroller:vars]
node_type=control
peers=execution_nodes

[execution_nodes]
aap_e_1.example.com
The following image displays the topology of this mesh network.
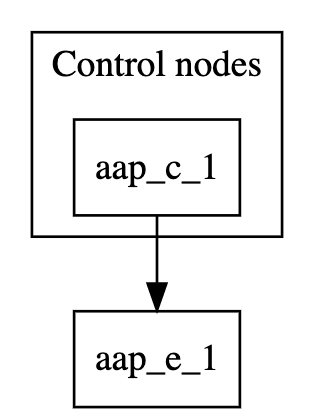
The [automationcontroller] stanza defines the control nodes. If you add a new node to the automationcontroller group, it will automatically peer with the aap_c_1.example.com node.
The [automationcontroller:vars] stanza sets the node type to control for all nodes in the control plane and defines how the nodes peer to the execution nodes:
-
If you add a new node to the
execution_nodesgroup, the control plane nodes automatically peer to it. -
If you add a new node to the
automationcontrollergroup, the node type is set tocontrol.
The [execution_nodes] stanza lists all the execution and hop nodes in the inventory. The default node type is execution. You can specify the node type for an individual node:
[execution_nodes]
aap_e_1.example.com node_type=execution
Alternatively, you can set the node_type of all execution nodes in the [execution_nodes] group. When you add new nodes to the group, they are automatically set to execution nodes.
[execution_nodes]
aap_e_1.example.com

[execution_nodes:vars]
node_type=execution
If you plan to add hop nodes to your inventory in future, it is better to define a separate group for the execution nodes, and set the node_type for the group:
[execution_nodes]
aap_e_1.example.com

[local_execution_group]
aap_e_1.example.com

[local_execution_group:vars]
node_type=execution
3.3. Minimum resilient configuration
This example inventory file deploys a control plane consisting of two control nodes, and two execution nodes. All nodes in the control plane are automatically peered to one another. All nodes in the control plane are peered with all nodes in the execution_nodes group. This configuration is resilient because the execution nodes are reachable from all control nodes.
The capacity algorithm determines which control node is chosen when a job is launched. Refer to Automation controller Capacity Determination and Job Impact in the Automation Controller User Guide for more information.
The following inventory file defines this configuration.
[automationcontroller]
aap_c_1.example.com
aap_c_2.example.com

[automationcontroller:vars]
node_type=control
peers=execution_nodes

[execution_nodes]
aap_e_1.example.com
aap_e_1.example.com
The [automationcontroller] stanza defines the control nodes. All nodes in the control plane are peered to one another. If you add a new node to the automationcontroller group, it will automatically peer with the original nodes.
The [automationcontroller:vars] stanza sets the node type to control for all nodes in the control plane and defines how the nodes peer to the execution nodes:
-
If you add a new node to the
execution_nodesgroup, the control plane nodes automatically peer to it. -
If you add a new node to the
automationcontrollergroup, the node type is set tocontrol.
The following image displays the topology of this mesh network.

3.4. Segregated local and remote execution configuration
This configuration adds a hop node and a remote execution node to the resilient configuration. The remote execution node is reachable from the hop node.
You can use this setup if you are setting up execution nodes in a remote location, or if you need to run automation in a DMZ network.
[automationcontroller]
aap_c_1.example.com
aap_c_2.example.com

[automationcontroller:vars]
node_type=control
peers=instance_group_local

[execution_nodes]
aap_e_1.example.com
aap_e_2.example.com
aap_h_1.example.com
aap_e_3.example.com

[instance_group_local]
aap_e_1.example.com
aap_e_2.example.com

[hop]
aap_h_1.example.com

[hop:vars]
peers=automationcontroller

[instance_group_remote]
aap_e_3.example.com

[instance_group_remote:vars]
peers=hop
The following image displays the topology of this mesh network.

The [automationcontroller:vars] stanza sets the node types for all nodes in the control plane and defines how the control nodes peer to the local execution nodes:
- All nodes in the control plane are automatically peered to one another.
- All nodes in the control plane are peered with all local execution nodes.
If the name of a group of nodes begins with instance_group_, the installer recognises it as an instance group and adds it to the Ansible Automation Platform user interface.
3.5. Multi-hopped execution node
In this configuration, resilient controller nodes are peered with resilient local execution nodes. Resilient local hop nodes are peered with the controller nodes. A remote execution node and a remote hop node are peered with the local hop nodes.
You can use this setup if you need to run automation in a DMZ network from a remote network.
[automationcontroller]
aap_c_1.example.com
aap_c_2.example.com
aap_c_3.example.com

[automationcontroller:vars]
node_type=control
peers=instance_group_local

[execution_nodes]
aap_e_1.example.com
aap_e_2.example.com
aap_e_3.example.com
aap_e_4.example.com
aap_h_1.example.com node_type=hop
aap_h_2.example.com node_type=hop
aap_h_3.example.com node_type=hop

[instance_group_local]
aap_e_1.example.com
aap_e_2.example.com

[instance_group_remote]
aap_e_3.example.com

[instance_group_remote:vars]
peers=local_hop

[instance_group_multi_hop_remote]
aap_e_4.example.com

[instance_group_multi_hop_remote:vars]
peers=remote_multi_hop

[local_hop]
aap_h_1.example.com
aap_h_2.example.com

[local_hop:vars]
peers=automationcontroller

[remote_multi_hop]
aap_h_3 peers=local_hop
The following image displays the topology of this mesh network.
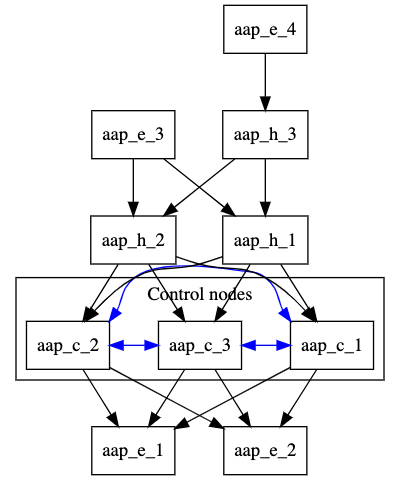
The [automationcontroller:vars] stanza sets the node types for all nodes in the control plane and defines how the control nodes peer to the local execution nodes:
- All nodes in the control plane are automatically peered to one another.
- All nodes in the control plane are peered with all local execution nodes.
The [local_hop:vars] stanza peers all nodes in the [local_hop] group with all the control nodes.
If the name of a group of nodes begins with instance_group_, the installer recognises it as an instance group and adds it to the Ansible Automation Platform user interface.
Chapter 4. Deprovisioning individual nodes or groups
You can deprovision automation mesh nodes and instance groups using the Ansible Automation Platform installer. The procedures in this section describe how to deprovision specific nodes or entire groups, with example inventory files for each procedure.
4.1. Deprovisioning individual nodes using the installer
You can deprovision nodes from your automation mesh using the Ansible Automation Platform installer. Edit the inventory file to mark the nodes to deprovision, then run the installer. Running the installer also removes all configuration files and logs attached to the node.
You can deprovision any of your inventory’s hosts except for the first host specified in the [automationcontroller] group.
Procedure
-
Append
node_state=deprovisionto nodes in the installer file you want to deprovision.
Example
This example inventory file deprovisions two nodes from an automation mesh configuration.
[automationcontroller]
126-addr.tatu.home ansible_host=192.168.111.126  node_type=control
121-addr.tatu.home ansible_host=192.168.111.121  node_type=hybrid  routable_hostname=121-addr.tatu.home
115-addr.tatu.home ansible_host=192.168.111.115  node_type=hybrid node_state=deprovision

[automationcontroller:vars]
peers=connected_nodes

[execution_nodes]
110-addr.tatu.home ansible_host=192.168.111.110 receptor_listener_port=8928
108-addr.tatu.home ansible_host=192.168.111.108 receptor_listener_port=29182 node_state=deprovision
100-addr.tatu.home ansible_host=192.168.111.100 peers=110-addr.tatu.home node_type=hop
4.1.1. Deprovisioning isolated nodes
You have the option to manually remove any isolated nodes using the awx-manage deprovisioning utility.
Use the deprovisioning command to remove only isolated nodes that have not migrated to execution nodes. To deprovision execution nodes from your automation mesh architecture, use the installer method instead.
Procedure
Shut down the instance:
$ automation-controller-service stop
Run the deprovision command from another instance, replacing
host_namewith the name of the node as listed in the inventory file:$ awx-manage deprovision_instance --hostname=<host_name>
4.2. Deprovisioning groups using the installer
You can deprovision entire groups from your automation mesh using the Ansible Automation Platform installer. Running the installer will remove all configuration files and logs attached to the nodes in the group.
You can deprovision any hosts in your inventory except for the first host specified in the [automationcontroller] group.
Procedure
-
Add
node_state=deprovisionto the [group:vars] associated with the group you wish to deprovision.
Example
[execution_nodes]
execution-node-1.example.com peers=execution-node-2.example.com
execution-node-2.example.com peers=execution-node-3.example.com
execution-node-3.example.com peers=execution-node-4.example.com
execution-node-4.example.com peers=execution-node-5.example.com
execution-node-5.example.com peers=execution-node-6.example.com
execution-node-6.example.com peers=execution-node-7.example.com
execution-node-7.example.com

[execution_nodes:vars]
node_state=deprovision
4.2.1. Deprovisioning isolated instance groups
You have the option to manually remove any isolated instance groups using the awx-manage deprovisioning utility.
Use the deprovisioning command to only remove isolated instance groups. To deprovision instance groups from your automation mesh architecture, use the installer method instead.
Procedure
Run the following command, replacing
<name>with the name of the instance group:$ awx-manage unregister_queue --queuename=<name>