
Using image mode for RHEL to build, deploy, and manage operating systems
Using RHEL bootable container images on Red Hat Enterprise Linux 9
Abstract
Making open source more inclusive
Red Hat is committed to replacing problematic language in our code, documentation, and web properties. We are beginning with these four terms: master, slave, blacklist, and whitelist. Because of the enormity of this endeavor, these changes will be implemented gradually over several upcoming releases. For more details, see our CTO Chris Wright’s message.
Providing feedback on Red Hat documentation
We appreciate your feedback on our documentation. Let us know how we can improve it.
Submitting feedback through Jira (account required)
- Log in to the Jira website.
- Click Create in the top navigation bar
- Enter a descriptive title in the Summary field.
- Enter your suggestion for improvement in the Description field. Include links to the relevant parts of the documentation.
- Click Create at the bottom of the dialogue.
Chapter 1. Introducing image mode for RHEL
Use image mode for RHEL to build, test, and deploy operating systems by using the same tools and techniques as application containers. Image mode for RHEL is available by using the registry.redhat.io/rhel9/rhel-bootc bootable container image. The RHEL bootable container images differ from the existing application Universal Base Images (UBI) in that they contain additional components necessary to boot that were traditionally excluded, such as, kernel, initrd, boot loader, firmware, among others.
Red Hat provides the rhel9/rhel-bootc container image as a Technology Preview. Technology Preview features provide early access to upcoming product innovations, enabling customers to test functionality and provide feedback during the development process. However, these features are not fully supported. Documentation for a Technology Preview feature might be incomplete or include only basic installation and configuration information. See Technology Preview Features Support Scope on the Red Hat Customer Portal for information about the support scope for Technology Preview features.
Figure 1.1. Building, deploying, and managing operating system by using image mode for RHEL
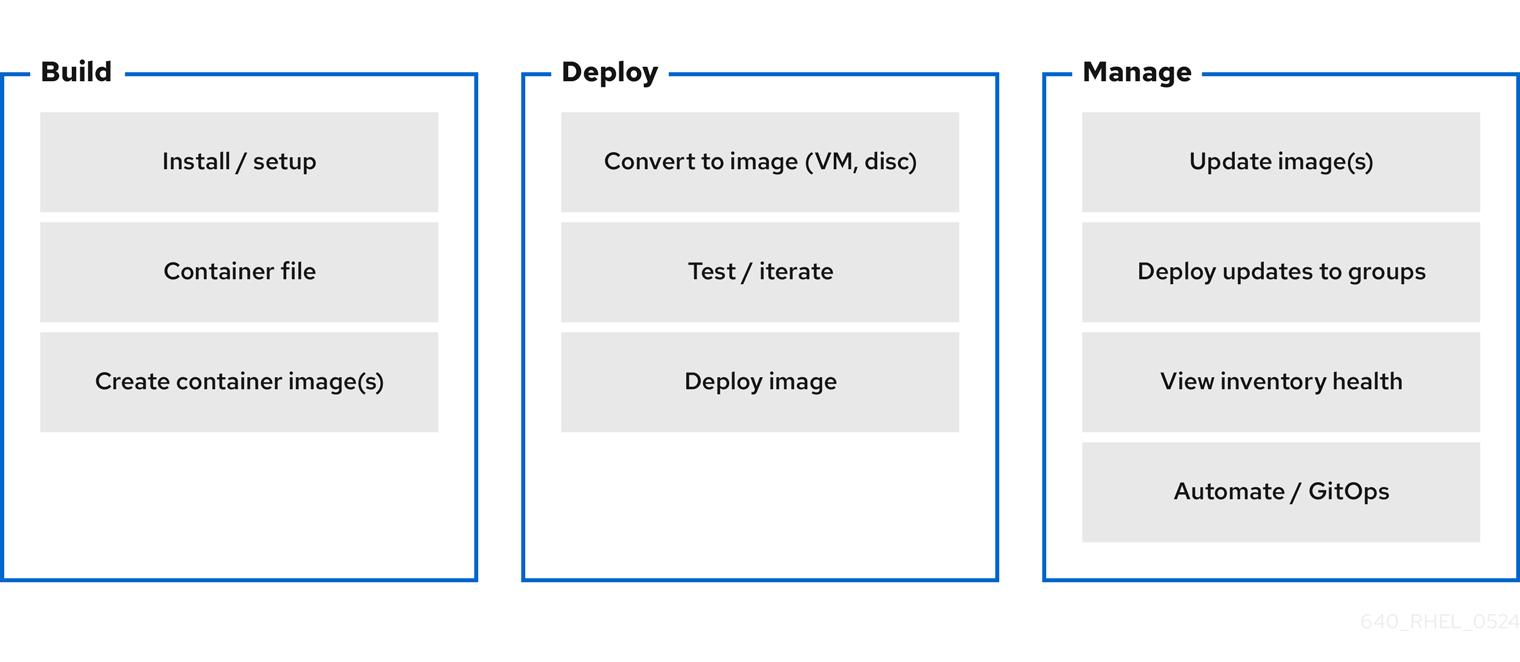
The benefits of image mode for RHEL occur across the lifecycle of a system. The following list contains some of the most important advantages:
- Container images are easier to understand and use than other image formats and are fast to build
- Containerfiles, also known as Dockerfiles, provide a straightforward approach to defining the content and build instructions for an image. Container images are often significantly faster to build and iterate on compared to other image creation tools.
- Consolidate process, infrastructure, and release artifacts
- As you distribute applications as containers, you can use the same infrastructure and processes to manage the underlying operating system.
- Immutable updates
-
Just as containerized applications are updated in an immutable way, with image mode for RHEL, the operating system is also. You can boot into updates and roll back when needed in the same way that you use
rpm-ostreesystems.
The use of rpm-ostree to make changes, or install content, is not supported.
- Portability across hybrid cloud environments
- You can use bootable container images across physical, virtualized, cloud, and edge environments.
Although containers provide the foundation to build, transport, and run images, it is important to understand that after you deploy these bootable container images, either by using an installation mechanism, or you convert them to a disk image, the system does not run as a container.
The supported image types are the following:
- Container image formats: OCI
Disk image formats:
- ISO
- QEMU copy-on-write (QCOW2), Raw
- Amazon Machine Image (AMI)
- Virtual Machine Image (VMI)
- Virtual Machine Disk (VMDK)
Containers help streamline the lifecycle of a RHEL system by offering the following possibilities:
- Building container images
-
You can configure your operating system at a build time by modifying the Containerfile. Image mode for RHEL is available by using the
registry.redhat.io/rhel9/rhel-bootccontainer image. You can use Podman, OpenShift Container Platform, or other standard container build tools to manage your containers and container images. You can automate the build process by using CI/CD pipelines. - Versioning, mirroring, and testing container images
- You can version, mirror, introspect, and sign your derived bootable container image by using any container tools such as Podman or OpenShift Container Platform.
- Deploying container images to the target environment
You have several options on how to deploy your image:
- Anaconda: is the installation program used by RHEL. You can deploy all image types to the target environment by using Anaconda and Kickstart to automate the installation process.
-
bootc-image-builder: is a containerized tool that converts the container image to different types of disk images, and optionally uploads them to an image registry or object storage. -
bootc: is a tool responsible for fetching container images from a container registry and installing them to a system, updating the operating system, or switching from an existing ostree-based system. The RHEL bootable container image contains thebootcutility by default and works with all image types. However, remember that therpm-ostreeis not supported and must not be used to make changes.
- Updating your operating system
-
The system supports in-place transactional updates with rollback after deployment. Automatic updates are on by default. A systemd service unit and systemd timer unit files check the container registry for updates and apply them to the system. As the updates are transactional, a reboot is required. For environments that require more sophisticated or scheduled rollouts, disable auto updates and use the
bootcutility to update your operating system.
RHEL has two deployment modes. Both provide the same stability, reliability, and performance during deployment.
-
Package mode: the operating system uses RPM packages and is updated by using the
dnfpackage manager. The root filesystem is mutable. -
Image mode: a container-native approach to build, deploy, and manage RHEL. The same RPM packages are delivered as a base image and updates are deployed as a container image. The root filesystem is immutable by default, except for
/etcand/var, with most content coming from the container image.
You can use both deployment modes to build, test, share, deploy, and manage your operating system in the same way as any other containerized application.
1.1. Prerequisites
- You have a subscribed RHEL 9 system. For more information, see Getting Started with RHEL System Registration documentation.
- You have a container registry. You can create your registry locally or create a free account on the Quay.io service. To create the Quay.io account, see Red Hat Quay.io page.
- You have a Red Hat account with either production or developer subscriptions. No cost developer subscriptions are available on the Red Hat Enterprise Linux Overview page.
- You have authenticated to registry.redhat.io. For more information, see Red Hat Container Registry Authentication article.
1.2. Additional resources
- Introducing image mode for RHEL and bootable containers in Podman Desktop quick start guide
- Image mode for Red Hat Enterprise Linux quick start: AI inference quick start guide
- Getting Started with Podman AI Lab blog article
- Customizing Anaconda product documentation
- Performing an advanced RHEL 9 installation product documentation (Kickstart)
- Composing a customized RHEL system image product documentation
- Composing, installing, and managing RHEL for Edge images product documentation
Chapter 2. Building and testing RHEL bootable container images
The following procedures use Podman to build and test your container image. You can also use other tools, for example, OpenShift Container Platform. For more examples of configuring RHEL systems by using containers, see the rhel-bootc-examples repository.
Red Hat provides the rhel9/rhel-bootc container image as a Technology Preview. Technology Preview features provide early access to upcoming product innovations, enabling customers to test functionality and provide feedback during the development process. However, these features are not fully supported. Documentation for a Technology Preview feature might be incomplete or include only basic installation and configuration information. See Technology Preview Features Support Scope on the Red Hat Customer Portal for information about the support scope for Technology Preview features.
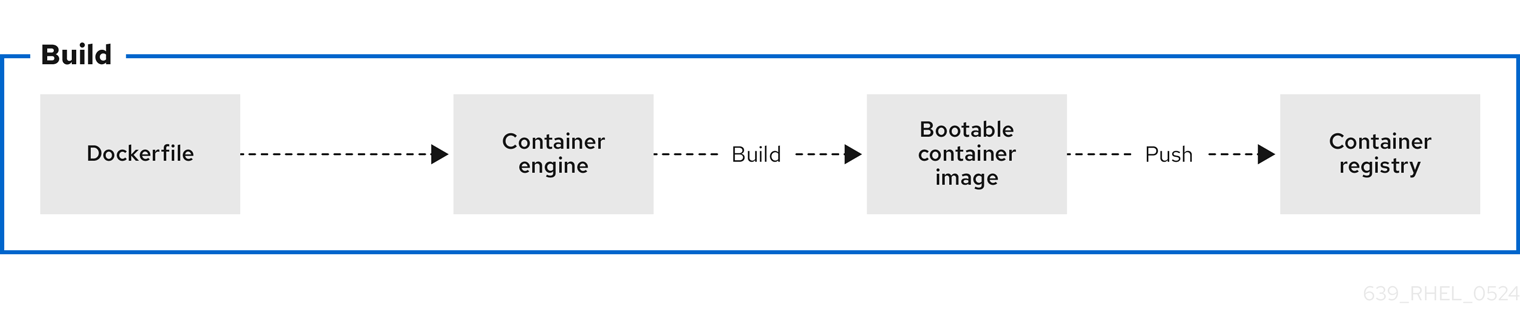
Figure 2.1. Building an image by using instructions from a Containerfile, testing the container, pushing an image to a registry, and sharing it with others
A general Containerfile structure is the following:
FROM registry.redhat.io/rhel9/rhel-bootc:latest

RUN dnf -y install [software] [dependencies] && dnf clean all

ADD [application]
ADD [configuration files]

RUN [config scripts]
The rhel-9-bootc container image reuses the OCI image format.
-
The
rhel-9-bootccontainer image ignores the container config section (Config) when it is installed to a system. -
The
rhel-9-bootccontainer image does not ignore the container config section (Config) when you run this image by using container runtimes such aspodmanordocker.
For example, the following commands in a Containerfile are ignored when the rhel-9-bootc image is installed to a system:
-
ENTRYPOINTandCMD(OCI:Entrypoint/Cmd): you can setCMD /sbin/initinstead. -
ENV(OCI:Env): change thesystemdconfiguration to configure the global system environment. -
EXPOSE(OCI:exposedPorts): it is independent of how the system firewall and network function at runtime. -
USER(OCI:User): configure individual services inside the RHEL bootable container to run as unprivileged users instead.
The available commands that are usable inside a Containerfile and a Dockerfile are equivalent.
Building custom rhel-bootc base images is not supported in this release.
2.1. Building a container image
Use the podman build command to build an image using instructions from a Containerfile.
Prerequisites
-
The
container-toolsmeta-package is installed.
Procedure
Create a
Containerfile:$ cat Containerfile FROM registry.redhat.io/rhel9/rhel-bootc:latest RUN dnf -y install cloud-init && \ ln -s ../cloud-init.target /usr/lib/systemd/system/default.target.wants && \ dnf clean allThis
Containerfileexample adds thecloud-inittool, so it automatically fetches SSH keys and can run scripts from the infrastructure and also gather configuration and secrets from the instance metadata. For example, you can use this container image for pre-generated AWS or KVM guest systems.Build the
<image>image by usingContainerfilein the current directory:$ podman build -t quay.io/<namespace>/<image>:<tag>
Verification
List all images:
$ podman images
REPOSITORY                                  TAG      IMAGE ID       CREATED              SIZE
localhost/<image>                           latest   b28cd00741b3   About a minute ago   2.1 GB
Additional resources
2.2. Running a container image
Use the podman run command to run and test your container.
Prerequisites
-
The
container-toolsmeta-package is installed.
Procedure
Run the container named
mybootcbased on thequay.io/<namespace>/<image>:<tag>container image:$ podman run -it --rm --name mybootc quay.io/<namespace>/<image>:<tag> /bin/bash-
The
-ioption creates an interactive session. Without the-toption, the shell stays open, but you cannot type anything to the shell. -
The
-toption opens a terminal session. Without the-ioption, the shell opens and then exits. -
The
--rmoption removes thequay.io/<namespace>/<image>:<tag>container image after the container exits.
-
The
Verification
List all running containers:
$ podman ps
CONTAINER ID  IMAGE                                    COMMAND          CREATED        STATUS            PORTS   NAMES
7ccd6001166e  quay.io/<namespace>/<image>:<tag>  /sbin/init  6 seconds ago  Up 5 seconds ago          mybootc
Additional resources
2.3. Pushing a container image to the registry
Use the podman push command to push an image to your own, or a third party, registry and share it with others. The following procedure uses the Red Hat Quay registry.
Prerequisites
-
The
container-toolsmeta-package is installed. - An image is built and available on the local system.
- You have created the Red Hat Quay registry. For more information see Proof of Concept - Deploying Red Hat Quay.
Procedure
Push the
quay.io/<namespace>/<image>:<tag>container image from your local storage to the registry:$ podman push quay.io/<namespace>/<image>:<tag>
Additional resources
Chapter 3. Creating bootc compatible base disk images with bootc-image-builder
The bootc-image-builder, available as a Technology Preview, is a containerized tool to create disk images from bootable container images. You can use the images that you build to deploy disk images in different environments, such as the edge, server, and clouds.
Red Hat provides the bootc-image-builder tool as a Technology Preview. Technology Preview features provide early access to upcoming product innovations, enabling customers to test functionality and provide feedback during the development process. However, these features are not fully supported. Documentation for a Technology Preview feature might be incomplete or include only basic installation and configuration information. See Technology Preview Features Support Scope on the Red Hat Customer Portal for information about the support scope for Technology Preview features.
3.1. Introducing image mode for RHEL for bootc-image-builder
With the bootc-image-builder tool, you can convert bootable container images into disk images for a variety of different platforms and formats. Converting bootable container images into disk images is equivalent to installing a bootable container. After you deploy these disk images to the target environment, you can update them directly from the container registry.
The bootc-image-builder tool supports generating the following image types:
- Disk image formats, such as ISO, suitable for disconnected installations.
Virtual disk images formats, such as:
- QEMU copy-on-write (QCOW2)
- Amazon Machine Image (AMI)/ — Raw
- Virtual Machine Image (VMI)
Deploying from a container image is beneficial when you run VMs or servers because you can achieve the same installation result. That consistency extends across multiple different image types and platforms when you build them from the same container image. Consequently, you can minimize the effort in maintaining operating system images across platforms. You can also update systems that you deploy from these disk images by using the bootc tool, instead of re-creating and uploading new disk images with bootc-image-builder.
Generic base container images do not include any default passwords or SSH keys. Also, the disk images that you create by using the bootc-image-builder tool do not contain the tools that are available in common disk images, such as cloud-init. These disk images are transformed container images only.
Although you can deploy a rhel-9-bootc image directly, you can also create your own customized images that are derived from this bootable base image. The bootc-image-builder tool takes the rhel-9-bootc OCI container image as an input.
Building base disk images which come from private registries by using bootc-image-builder is not supported in this release.
Additional resources
3.2. Installing bootc-image-builder
The bootc-image-builder is intended to be used as a container and it is not available as an RPM package in RHEL. To access it, follow the procedure.
Prerequisites
-
The
container-toolsmeta-package is installed. The meta-package contains all container tools, such as Podman, Buildah, and Skopeo. -
You are authenticated to
registry.redhat.io. For details, see Red Hat Container Registry Authentication.
Procedure
Login to authenticate to
registry.redhat.io:$ sudo podman login registry.redhat.ioInstall the
bootc-image-buildertool:$ sudo podman pull registry.redhat.io/rhel9/bootc-image-builder
Verification
List all images pulled to your local system:
$ sudo podman images
REPOSITORY                                    TAG         IMAGE ID      CREATED       SIZE
registry.redhat.io/rhel9/bootc-image-builder  latest      b361f3e845ea  24 hours ago  676 MB
Additional resources
3.3. Creating QCOW2 images by using bootc-image-builder
Build a RHEL bootable container image into a QEMU Disk Images (QCOW2) image for the architecture that you are running the commands on.
The RHEL base image does not include a default user. Optionally, you can inject a user configuration with the --config option to run the bootc-image-builder container. Alternatively, you can configure the base image with cloud-init to inject users and SSH keys on first boot. See Injecting users and SSH keys by using cloud-init.
Prerequisites
- You have Podman installed on your host machine.
-
You have
virt-installinstalled on your host machine. -
You have root access to run the
bootc-image-buildertool, and run the containers in--privilegedmode, to build the images.
Procedure
Optional: Create a
config.tomlto configure user access, for example:[[blueprint.customizations.user]] name = "user" password = "pass" key = "ssh-rsa AAA ... user@email.com" groups = ["wheel"]
Run
bootc-image-builder. If you want to use user access configuration, pass theconfig.tomlas an argument:$ sudo podman run \ --rm \ -it \ --privileged \ --pull=newer \ --security-opt label=type:unconfined_t \ -v ./config.toml:/config.toml \ -v ./output:/output \ registry.redhat.io/rhel9/bootc-image-builder:latest \ --type qcow2 \ --config config.toml \ quay.io/<namespace>/<image>:<tag>
You can find the
.qcow2image in the output folder.
Next steps
- You can deploy your image. See Deploying a container image using KVM with a QCOW2 disk image. You can make updates to the image and push the changes to a registry. See Managing RHEL bootable images.
3.4. Creating AMI images by using bootc-image-builder and uploading it to AWS
Create an Amazon Machine Image (AMI) from a bootable container image and use it to launch an Amazon Web Service EC2 (Amazon Elastic Compute Cloud) instance.
Prerequisites
- You have Podman installed on your host machine.
-
You have an existing
AWS S3bucket within your AWS account. -
You have root access to run the
bootc-image-buildertool, and run the containers in--privilegedmode, to build the images. -
You have the
vmimportservice role configured on your account to import an AMI into your AWS account.
Procedure
Create a disk image from the bootable container image.
- Configure the user details in the Containerfile. Make sure that you assign it with sudo access.
- Build a customized operating system image with the configured user from the Containerfile. It creates a default user with passwordless sudo access.
Optional: Configure the machine image with
cloud-init. See Injecting users and SSH keys by using cloud-init. The following is an example:FROM registry.redhat.io/rhel9/rhel-bootc:9.4 RUN dnf -y install cloud-init && \ ln -s ../cloud-init.target /usr/lib/systemd/system/default.target.wants && \ rm -rf /var/{cache,log} /var/lib/{dnf,rhsm}NoteYou can also use
cloud-initto add users and additional configuration by using instance metadata.Build the bootable container image. For example, to deploy the image to an
x86_64AWS machine, use the following commands:$ podman build -t quay.io/<namespace>/<image>:<tag> . $ podman push quay.io/<namespace>/<image>:<tag> .
Use the
bootc-image-buildertool to create an AMI from the bootc container image.$ sudo podman run \ --rm \ -it \ --privileged \ --pull=newer \ -v $HOME/.aws:/root/.aws:ro \ --env AWS_PROFILE=default \ registry.redhat.io/rhel9/bootc-image-builder:latest \ --type ami \ --aws-ami-name rhel-bootc-x86 \ --aws-bucket rhel-bootc-bucket \ --aws-region us-east-1 \ quay.io/<namespace>/<image>:<tag>
NoteThe following flags must be specified all together. If you do not specify any flag, the AMI is exported to your output directory.
-
--aws-ami-name- The name of the AMI image in AWS -
--aws-bucket- The target S3 bucket name for intermediate storage when you are creating the AMI --aws-region- The target region for AWS uploadsThe
bootc-image-buildertool builds an AMI image and uploads it to your AWS s3 bucket by using your AWS credentials to push and register an AMI image after building it.
-
Next steps
- You can deploy your image. See Deploying a container image to AWS with an AMI disk image.
- You can make updates to the image and push the changes to a registry. See Managing RHEL bootable images.
Additional resources
3.5. Creating Raw disk images by using bootc-image-builder
You can convert a bootable container image to a Raw image with an MBR or GPT partition table by using bootc-image-builder. The RHEL base image does not include a default user, so optionally, you can inject a user configuration with the --config option to run the bootc-image-builder container. Alternatively, you can configure the base image with cloud-init to inject users and SSH keys on first boot. See Injecting users and SSH keys by using cloud-init.
Prerequisites
- You have Podman installed on your host machine.
-
You have root access to run the
bootc-image-buildertool, and run the containers in--privilegedmode, to build the images. - You have pulled your target container image in the container storage.
Procedure
Optional: Create a
config.tomlto configure user access, for example:[[blueprint.customizations.user]] name = "user" password = "pass" key = "ssh-rsa AAA ... user@email.com" groups = ["wheel"]
Run
bootc-image-builder. If you want to use user access configuration, pass theconfig.tomlas an argument:$ sudo podman run \ --rm \ -it \ --privileged \ --pull=newer \ --security-opt label=type:unconfined_t \ -v /var/lib/containers/storage:/var/lib/containers/storage \ -v ./config.toml:/config.toml \ -v ./output:/output \ registry.redhat.io/rhel9/bootc-image-builder:latest \ --local \ --type raw \ --config config.toml \ quay.io/<namespace>/<image>:<tag>
You can find the
.rawimage in the output folder.
Next steps
- You can deploy your image. See Deploying a container image by using KVM with a QCOW2 disk image.
- You can make updates to the image and push the changes to a registry. See Managing RHEL bootable images.
3.6. Creating ISO images by using bootc-image-builder
You can use bootc-image-builder to create an ISO from which you can perform an offline deployment of a bootable container.
Prerequisites
- You have Podman installed on your host machine.
-
You have root access to run the
bootc-image-buildertool, and run the containers in--privilegedmode, to build the images.
Procedure
Run
bootc-image-builder:$ sudo podman run \ --rm \ -it \ --privileged \ --pull=newer \ --security-opt label=type:unconfined_t \ -v $(pwd)/config.toml:/config.toml \ -v $(pwd)/output:/output \ registry.redhat.io/rhel9/bootc-image-builder:latest \ --type iso \ --config config.toml \ quay.io/<namespace>/<image>:<tag>
You can find the
.isoimage in the output folder.
Next steps
You can use the ISO image on unattended installation methods, such as USB sticks or Install-on-boot. The installable boot ISO contains a configured Kickstart file. See Deploying a container image by using Anaconda and Kickstart.
WarningBooting the ISO on a machine with an existing operating system or data can be destructive, because the Kickstart is configured to automatically reformat the first disk on the system.
- You can make updates to the image and push the changes to a registry. See Managing RHEL bootable images.
3.7. Verification and troubleshooting
- If you have any issues configuring the requirements for your AWS image, see the following documentation
- For more details on users, groups, SSH keys, and secrets, see
Chapter 4. Deploying the RHEL bootable images
You can deploy the rhel-bootc container image by using the following different mechanisms.
- Anaconda
-
bootc-image-builder -
bootc install
The following bootable image types are available:
Disk images that you generated by using the
bootc image-buildersuch as:- QCOW2 (QEMU copy-on-write, virtual disk)
- Raw (Mac Format)
- AMI (Amazon Cloud)
- ISO: Unattended installation method, by using an USB Sticks or Install-on-boot.
After you have created a layered image that you can deploy, there are several ways that the image can be installed to a host:
You can use RHEL installer and Kickstart to install the layered image to a bare metal system, by using the following mechanisms:
- Deploy by using USB
- PXE
-
You can also use
bootc-image-builderto convert the container image to a bootable image and deploy it to a bare metal or to a cloud environment.
The installation method happens only one time. After you deploy your image, any future updates will apply directly from the container registry as the updates are published.
Figure 4.1. Deploying a bootable container image by using a basic build installer bootc install, or deploying a container image by using Anaconda and Kickstart
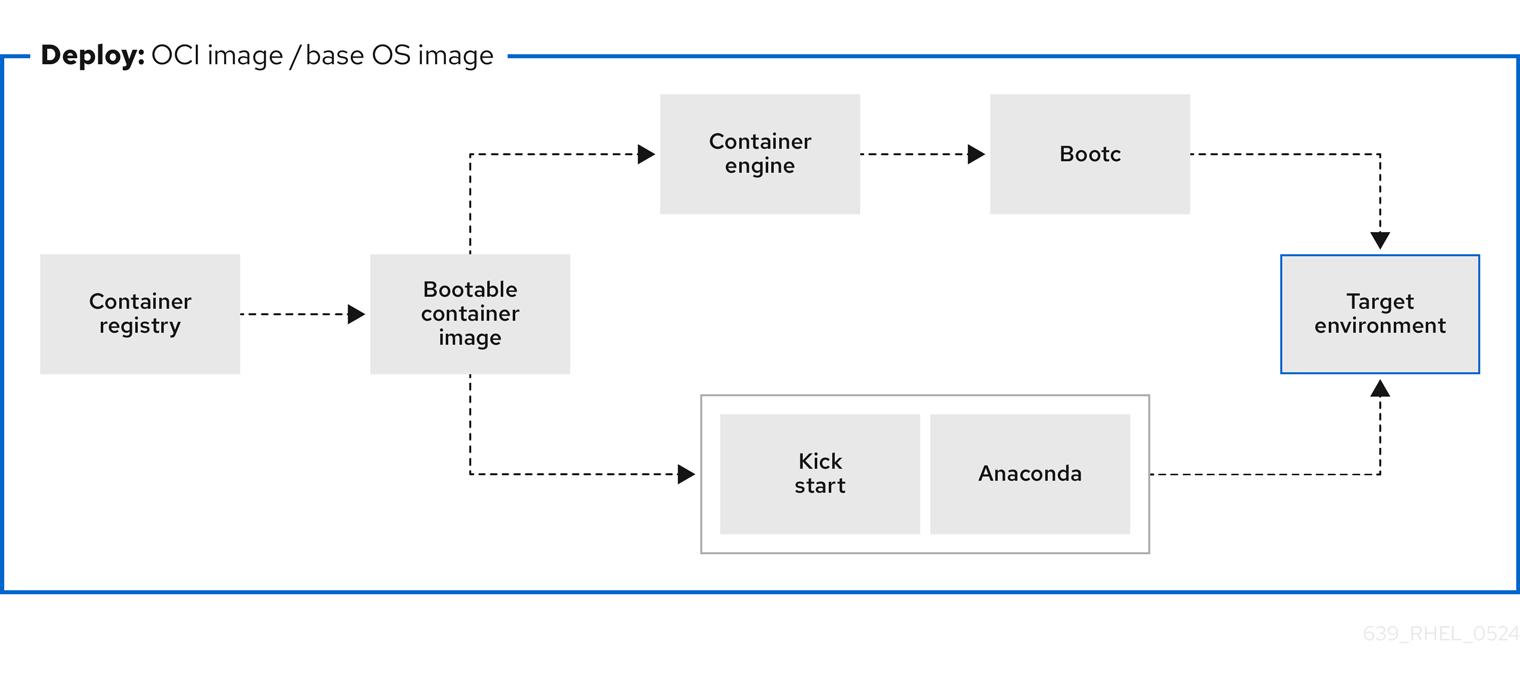
Figure 4.2. Using bootc-image-builder to create disk images from bootable container images and deploying disk images in different environments, such as the edge, servers, and clouds by using Anaconda, bootc-image-builder or bootc install

4.1. Deploying a container image by using KVM with a QCOW2 disk image
After creating a QEMU disk image from a RHEL bootable container image by using the bootc-image-builder tool, you can use a virtualization software to boot it.
Prerequisites
- You created a container image. See Creating QCOW2 images by using bootc-image-builder.
- You pushed the container image to an accessible repository.
Procedure
Run the container image that you create by using either
libvirt. See Creating virtual machines by using the command-line interface for more details.The following example uses
libvirt:$ sudo virt-install \ --name bootc \ --memory 4096 \ --vcpus 2 \ --disk qcow2/disk.qcow2 \ --import \ --os-variant rhel9-unknown
Verification
- Connect to the VM in which you are running the container image. See Connecting to virtual machines for more details.
Next steps
- You can make updates to the image and push the changes to a registry. See Managing RHEL bootable images.
Additional resources
4.2. Deploying a container image to AWS with an AMI disk image
After using the bootc-image-builder tool to create an AMI from a bootable container image, and uploading it to a AWS s3 bucket, you can deploy a container image to AWS with the AMI disk image.
Prerequisites
- You created an Amazon Machine Image (AMI) from a bootable container image. See Creating AMI images by using bootc-image-builder and uploading it to AWS.
-
cloud-initis available in the Containerfile that you previously created so that you can create a layered image for your use case.
Procedure
- In a browser, access Service→EC2 and log in.
- On the AWS console dashboard menu, choose the correct region. The image must have the Available status, to indicate that it was correctly uploaded.
- On the AWS dashboard, select your image and click .
- In the new window that opens, choose an instance type according to the resources you need to start your image. Click .
- Review your instance details. You can edit each section if you need to make any changes. Click .
- Before you start the instance, select a public key to access it. You can either use the key pair you already have or you can create a new key pair.
Click to start your instance. You can check the status of the instance, which displays as Initializing.
After the instance status is Running, the button becomes available.
- Click . A window appears with instructions on how to connect by using SSH.
Run the following command to set the permissions of your private key file so that only you can read it. See Connect to your Linux instance.
$ chmod 400 <your-instance-name.pem>Connect to your instance by using its Public DNS:
$ ssh -i <your-instance-name.pem>ec2-user@<your-instance-IP-address>
Your instance continues to run unless you stop it.
Verification
After launching your image, you can:
- Try to connect to http://<your_instance_ip_address> in a browser.
- Check if you are able to perform any action while connected to your instance by using SSH.
Next steps
- After you deploy your image, you can make updates to the image and push the changes to a registry. See Managing RHEL bootable images.
Additional resources
4.3. Deploying a container image by using Anaconda and Kickstart
After you convert your bootable container image to an ISO image by using bootc-image-builder, you can deploy the ISO image by using Anaconda and Kickstart to install your container image. The installable boot ISO already contains the ostreecontainer Kickstart file configured that you can use to provision your custom container image.
The use of rpm-ostree to make changes, or install content, is not supported.
Prerequisites
- You have downloaded the 9.4 Boot ISO for your architecture from Red Hat. See Downloading RH boot images.
Procedure
Create an
ostreecontainerKickstart file. For example:# Basic setup text network --bootproto=dhcp --device=link --activate # Basic partitioning clearpart --all --initlabel --disklabel=gpt reqpart --add-boot part / --grow --fstype xfs # Reference the container image to install - The kickstart # has no
%packagessection. A container image is being installed. ostreecontainer --url registry.redhat.io/rhel9/bootc-image-builder:latest firewall --disabled services --enabled=sshd # Only inject a SSH key for root rootpw --iscrypted locked sshkey --username root "<your key here>" rebootBoot a system by using the 9.4 Boot ISO installation media.
Append the Kickstart file with the following to the kernel argument:
inst.ks=http://<path_to_your_kickstart>
- Press CTRL+X to boot the system.
Next steps
- After you deploy your container image, you can make updates to the image and push the changes to a registry. See Managing RHEL bootable images.
Additional resources
- ostreecontainer documentation
- bootc upgrade fails when using local rpm-ostree modifications solution
4.4. Deploying a custom ISO container image
Convert a bootable container image to an ISO image by using bootc-image-builder. This creates a system similar to the RHEL ISOs available for download, except that your container image content is embedded in the ISO disk image. You do not need to have access to the network during installation. Then, you install the ISO disk image that you created from bootc-image-builder to a bare metal system.
Prerequisites
- You have created a customized container image.
Procedure
-
Create a custom installer ISO disk image with
bootc-image-builder. See Creating ISO images by using bootc-image-builder. - Copy the ISO disk image to a USB flash drive.
- Perform a bare metal installation by using the content in the USB stick into a disconnected environment.
Next steps
- After you deploy your container image, you can make updates to the image and push the changes to a registry. See Managing RHEL bootable images.
4.5. Deploying an ISO bootable container over PXE boot
You can use a network installation to deploy the RHEL ISO image over PXE boot to run your ISO bootable container image.
Prerequisites
- You have downloaded the 9.4 Boot ISO for your architecture from Red Hat. See Downloading RH boot images.
You have configured the server for the PXE boot. Choose one of the following options:
- For HTTP clients, see Configuring the DHCPv4 server for HTTP and PXE boot.
- For UEFI-based clients, see Configuring a TFTP server for UEFI-based clients.
- For BIOS-based clients, see Configuring a TFTP server for BIOS-based clients.
- You have a client, also known as the system to which you are installing your ISO image.
Procedure
- Export the RHEL installation ISO image to the HTTP server. The PXE boot server is now ready to serve PXE clients.
- Boot the client and start the installation.
- Select PXE Boot when prompted to specify a boot source. If the boot options are not displayed, press the Enter key on your keyboard or wait until the boot window opens.
- From the Red Hat Enterprise Linux boot window, select the boot option that you want, and press Enter.
- Start the network installation.
Next steps
- You can make updates to the image and push the changes to a registry. See Managing RHEL bootable images.
4.6. Building, configuring, and launching disk images with bootc-image-builder
You can inject configuration into a custom image by using a Containerfile.
Procedure
Create a disk image. The following example shows how to add a user to the disk image.
[[blueprint.customizations.user]]
name = "user"
password = "pass"
key = "ssh-rsa AAA ... user@email.com"
groups = ["wheel"]
-
name- User name. Mandatory -
password- Nonencrypted password. Not mandatory -
key- Public SSH key contents. Not mandatory -
groups- An array of groups to add the user into. Not mandatory
-
Run
bootc-image-builderand pass the following arguments:$ sudo podman run \ --rm \ -it \ --privileged \ --pull=newer \ --security-opt label=type:unconfined_t \ -v $(pwd)/config.toml:/config.toml \ -v $(pwd)/output:/output \ registry.redhat.io/rhel9/bootc-image-builder:latest \ --type qcow2 \ --config config.toml \ quay.io/<namespace>/<image>:<tag>
Launch a VM, for example, by using
virt-install:$ sudo virt-install \ --name bootc \ --memory 4096 \ --vcpus 2 \ --disk qcow2/disk.qcow2 \ --import \ --os-variant rhel9
Verification
Access the system with SSH:
# ssh -i /<path_to_private_ssh-key> <user1>@<ip-address>
Next steps
- After you deploy your container image, you can make updates to the image and push the changes to a registry. See Managing RHEL bootable images.
4.7. Deploying a container image by using bootc
With bootc, you have a container that is the source of truth. It contains a basic build installer and it is available as bootc install to-disk or bootc install to-filesystem. By using the bootc install methods you do not need to perform any additional steps to deploy the container image, because the container images include a basic installer.
With image mode for RHEL, you can install unconfigured images, for example, images that do not have a default password or SSH key.
Perform a bare metal installation to a device by using a RHEL ISO image.
Prerequisites
- You have downloaded the 9.4 Boot ISO for your architecture from Red Hat. See Downloading RH boot images.
- You have created a configuration file.
Procedure
inject a configuration into the running ISO image, for example:
$ podman run --rm --privileged --pid=host -v /var/lib/containers:/var/lib/containers --security-opt label=type:unconfined_t <image> bootc install to-disk <path-to-disk>
Next steps
- After you deploy your container image, you can make updates to the image and push the changes to a registry. See Managing RHEL bootable images.
4.8. Advanced installation with to-filesystem
The bootc install contains two subcommands: bootc install to-disk and bootc install to-filesystem.
-
The
bootc-install-to-filesystemperforms installation to the target filesystem. The
bootc install to-disksubcommand consists of a set of opinionated lower level tools that you can also call independently. The command consist of the following tools:-
mkfs.$fs /dev/disk -
mount /dev/disk /mnt -
bootc install to-filesystem --karg=root=UUID=<uuid of /mnt> --imgref $self /mnt
-
4.8.1. Using bootc install to-existing-root
The bootc install to-existing-root is a variant of install to-filesystem. You can use it to convert an existing system into the target container image.
This conversion eliminates the /boot and /boot/efi partitions and can delete the existing Linux installation. The conversion process reuses the filesystem, and even though the user data is preserved, the system no longer boots in package mode.
Prerequisites
- You must have root permissions to complete the procedure.
-
You must match the host environment and the target container version, for example, if your host is a RHEL 9 host, then you must have a RHEL 9 container. Installing a RHEL container on a Fedora host by using
btrfsas the RHEL kernel will not support that filesystem.
Procedure
Run the following command to convert an existing system into the target container image. Pass the target
rootfsby using the-v /:/targetoption.# podman run --rm --privileged -v /dev:/dev -v /var/lib/containers:/var/lib/containers -v /:/target \ --pid=host --security-opt label=type:unconfined_t \ <image> \ bootc install to-existing-root
This command deletes the data in
/boot, but everything else in the existing operating system is not automatically deleted. This can be useful because the new image can automatically import data from the previous host system. Consequently, container images, database, the user home directory data, configuration files in/etcare all available after the subsequent reboot in/sysroot.You can also use the
--root-ssh-authorized-keysflag to inherit the root user SSH keys, by adding--root-ssh-authorized-keys /target/root/.ssh/authorized_keys. For example:# podman run --rm --privileged -v /dev:/dev -v /var/lib/containers:/var/lib/containers -v /:/target \ --pid=host --security-opt label=type:unconfined_t \ <image> \ bootc install to-existing-root --root-ssh-authorized-keys /target/root/.ssh/authorized_keys
Chapter 5. Managing RHEL bootable images
After installing and deploying RHEL bootable images, you can perform management operations on your container images, such as changing or updating the systems. The system supports in-place transactional updates with rollback after deployment.
This kind of management, also known as Day 2 management baseline, consists of transactionally fetching new operating system updates from a container registry and booting the system into them, while supporting manual, or automated rollbacks in case of failures.
You can also rely on automatic updates, that are turned on by default. The systemd service unit and the systemd timer unit files check the container registry for updates and apply them to the system. You can trigger an update process with different events, such as updating an application. There are automation tools watching these updates and then triggering the CI/CD pipelines. A reboot is required, because the updates are transactional. For environments that require more sophisticated or scheduled rollouts, you must disable auto updates and use the bootc utility to update your operating system.
See Day 2 operations support for more details.
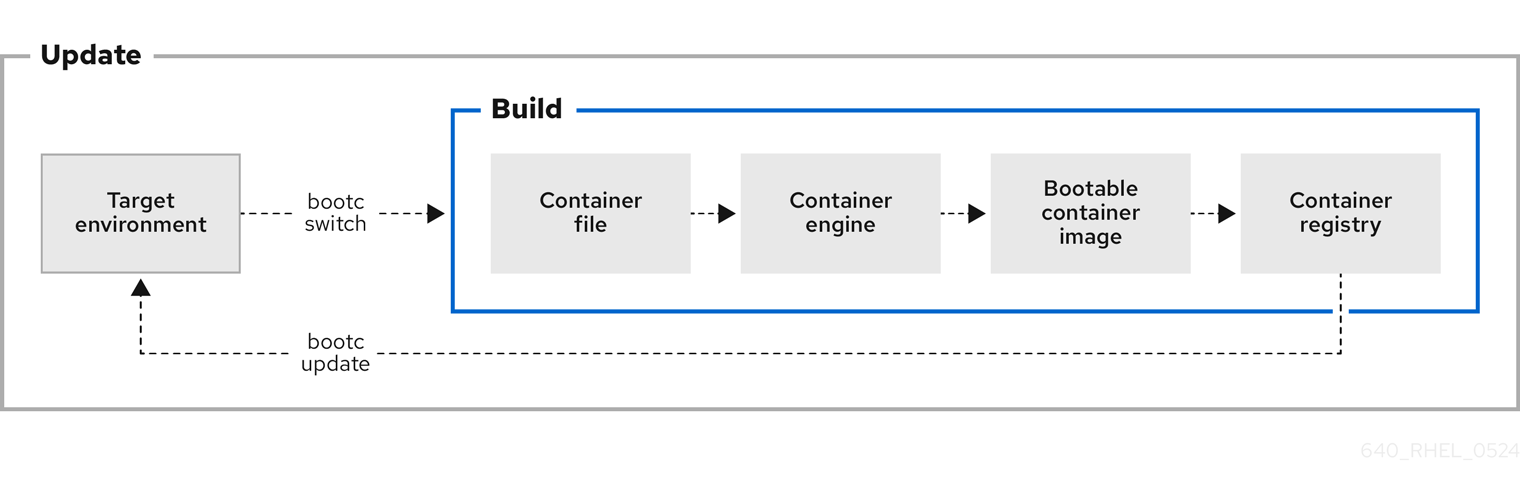
Figure 5.1. Manually updating an installed operating system, changing the container image reference or rolling back changes if needed
5.1. Switching the container image reference
You can change the container image reference used for upgrades by using the bootc switch command. For example, you can switch from the stage to the production tag. The bootc switch command performs the same operations as the bootc upgrade command and additionally changes the container image reference.
To manually switch an existing ostree-based container image reference, use the bootc switch command.
The use of rpm-ostree to make changes, or install content, is not supported.
Prerequisites
-
A booted system using
bootc.
Procedure
Run the following command:
$ bootc switch [--apply] quay.io/<namespace>/<image>:<tag>Optionally, you can use the
--applyoption when you want to automatically take actions, such as rebooting if the system has changed.
The bootc switch command has the same effect as bootc upgrade. The only difference is the container image reference is changed. This allows preserving the existing states in /etc and /var, for example, host SSH keys and home directories.
Additional resources
-
The
bootc-switchman page
5.2. Performing manual updates from an installed operating system
Installing image mode for RHEL is a one time task. You can perform any other management task, such as changing or updating the system, by pushing the changes to the container registry.
When using image mode for RHEL, you can choose to perform manual updates for your systems. Manual updates are also useful if you have an automated way to perform updates, for example, by using Ansible. Because the automatic updates are enabled by default, to perform manual updates you must turn the automatic updates off. You can do this by choosing one of the following options:
-
Running the
bootc upgradecommand -
Modifying the
systemdtimer file
5.3. Turning off automatic updates
To perform manual updates you must turn off automatic updates. You can do this by choosing one of the following options in the procedure below.
Procedure
Disable the timer of a container build.
By running the
bootc upgradecommand:$ systemctl mask bootc-fetch-apply-updates.timerBy modifying the
systemdtimer file. Usesystemd"drop-ins" to override the timer. In the following example, updates are scheduled for once a week.Create an
updates.conffile with the following content:[Timer] # Clear previous timers OnBootSec= OnBootSec=1w OnUnitInactiveSec=1w
Add your container to the file that you created:
$ mkdir -p /usr/lib/systemd/system/bootc-fetch-apply-updates.timer.d
$ cp updates.conf /usr/lib/systemd/system/bootc-fetch-apply-updates.timer.d
5.4. Manually updating an installed operating system
To manually fetch updates from a registry and boot the system into the new updates, use bootc upgrade. This command fetches the transactional in-place updates from the installed operating system to the container image registry. The command queries the registry and queues an updated container image for the next boot. It stages the changes to the base image, while not changing the running system by default.
Procedure
Run the following command:
$ bootc upgrade [--apply]The
applyargument is optional and you can use it when you want to automatically take actions, such as rebooting if the system has changed.
The bootc upgrade and bootc update commands are aliases.
Additional resources
-
The
bootc-upgrademan page
5.5. Performing rollbacks from a updated operating system
You can roll back to a previous boot entry to revert changes by using the bootc rollback command. This command changes the boot loader entry ordering by making the deployment under rollback queued for the next boot. The current deployment then becomes the rollback. Any staged changes, such as a queued upgrade that was not applied, are discarded.
After a rollback completes, the system reboots and the update timer run within 1 to 3 hours which automatically update and reboot your system to the image you just rolled back from.
If you perform a rollback, the system will automatically update again unless you turn off auto-updates. See Turning off automatic updates.
Prerequisites
- You performed an update to the system.
Procedure
Run the following command:
$ bootc rollback [-h|--help] [-V|--version]
The bootc rollback command has the same effect as bootc upgrade. The only difference is the container image being tracked. This enables preserving the existing states in /etc and /var, for example, host SSH keys and home directories.
Verification
Use
systemd journalto check the logged message for the detected rollback invocation.$ journalctl -bYou can see a log similar to:
MESSAGE_ID=26f3b1eb24464d12aa5e7b544a6b5468
Additional resources
-
The
bootc-rollbackman page
5.6. Deploying updates to system groups
You can change the configuration of your operating system by modifying the Containerfile. Then you can build and push your container image to the registry. When you next boot your operating system, an update will be applied.
You can also change the container image source by using the bootc switch command. The container registry is the source of truth. See Switching the container image reference.
Usually, when deploying updates to system groups, you can use a central management service to provide a client to be installed on each system which connects to the central service. Often, the management service requires the client to perform a one time registration. The following is an example on how to deploy updates to system groups. You can modify it to create a persistent systemd service, if required.
For clarity reasons, the Containerfile in the example is not optimized. For example, a better optimization to avoid creating multiple layers in the image is by invoking RUN a single time.
You can install a client into a image mode for RHEL image and run it at startup to register the system.
Prerequisites
-
The management-client handles future connections to the server, by using a
cronjob or a separatesystemdservice.
Procedure
Create a management service with the following characteristics. It determines when to upgrade the system.
-
Disable
bootc-fetch-apply-updates.timerif it is included in the base image. -
Install the client by using
dnf, or some other method that applies for your client. - Inject the credentials for the management service into the image.
-
Disable
5.7. Checking inventory health
Health checks are one of the Day 2 Operations. You can manually check the system health of the container images and events that are running inside the container.
You can set health checks by creating the container on the command line. You can display the health check status of a container by using the podman inspect or podman ps commands.
You can monitor and print events that occur in Podman by using the podman events command. Each event includes a timestamp, a type, a status, a name, if applicable, and an image, if applicable.
For more information about health checks and events, see chapter Monitoring containers.
5.8. Automation and GitOps
You can automate the building process by using CI/CD pipelines so that an update process can be triggered by events, such as updating an application. You can use automation tools that track these updates and trigger the CI/CD pipelines. The pipeline keeps the systems up to date by using the transactional background operating system updates.
Chapter 6. Managing file systems in image mode for RHEL
Currently, image mode for RHEL uses OSTree as a backend, and enables composefs for storage by default. The /opt and /usr/local paths are plain directories, and not symbolic links into /var. This enables you to easily install third-party content in derived container images that write into /opt for example.
6.1. Physical and logical root with /sysroot
When a system is fully booted, it is similar to chroot, that is, the operating system changes the apparent root directory for the current running process and its children. The physical host root filesystem is mounted at /sysroot. The chroot filesystem is called a deployment root.
The remaining filesystem paths are part of a deployment root which is used as a final target for the system boot. The system uses the ostree=kernel argument to find the deployment root.
/usr-
This filesystem keeps all operating system content in
/usr, with directories such as/binworking as symbolic links to/usr/bin.
composefs enabled /usr is not different from /. Both directories are part of the same immutable image, so you do not need to perform a full UsrMove with a bootc system.
/usr/local-
The base image is configured with
/usr/localas the default directory. /etcThe
/etcdirectory contains mutable persistent state by default, but it supports enabling theetc.transient configoption. When the directory is in mutable persistent state, it performs a 3-way merge across upgrades:-
Uses the new default
/etcas a base -
Applies the diff between current and previous
/etcto the new/etcdirectory -
Retains locally modified files that are different from the default
/usr/etcof the same deployment in/etc.
-
Uses the new default
The ostree-finalize-staged.service executes these tasks during shutdown time, before creating the new boot loader entry.
This happens because many components of a Linux system ship default configuration files in the /etc directory. Even if the default package does not ship it, by default the software only checks for config files in /etc. Non bootc image based update systems with no distinct versions of /etc are populated only during the installation time, and will not be changed at any point after installation. This causes the /etc system state to be influenced by the initial image version and can lead to problems to apply a change, for example, to /etc/sudoers.conf, and requires external intervention. For more details about file configuration, see xref: Building and testing RHEL bootable container images.
/var-
The content in the
/vardirectory is persistent by default. You can also make/varor subdirectories mount points be persistent, whether network ortmpfs.
There is just one /var directory. If it is not a distinct partition, then physically the /var directory is a bind mount into /ostree/deploy/$stateroot/var and is shared across the available boot loader entries deployments.
By default, the content in /var acts as a volume, that is, the content from the container image is copied during the initial installation time, and is not updated thereafter.
The /var and the /etc directories are different. You can use /etc for relatively small configuration files, and the expected configuration files are often bound to the operating system binaries in /usr. The /var directory has arbitrarily large data, for example, system logs, databases, and by default, will not be rolled back if the operating system state is rolled back.
For example, making an update such as dnf downgrade postgresql should not affect the physical database in /var/lib/postgres. Similarly, making a bootc update or bootc rollback do not affect this application data.
Having /var separate also makes it work cleanly to stage new operating system updates before applying them, that is, updates are downloaded and ready, but only take effect on reboot. The same applies for Docker volume, as it decouples the application code from its data.
You can use this case if you want applications to have a pre-created directory structure, for example, /var/lib/postgresql. Use systemd tmpfiles.d for this. You can also use StateDirectory=<directory> in units.
- Other directories
-
There is no support to ship content in
/run,/procor other API Filesystems in container images. Apart from that, other top level directories such as/usr, and/opt, are lifecycled with the container image. /opt-
With
bootcusingcomposefs, the/optdirectory is read-only, alongside other top levels directories such as/usr.
When a software needs to write to its own directory in /opt/exampleapp, a common pattern is to use a symbolic link to redirect to, for example, /var for operations such as log files:
RUN rmdir /opt/exampleapp/logs && ln -sr /var/log/exampleapp /opt/exampleapp/logs
Optionally, you can configure the systemd unit to launch the service to do these mounts dynamically. For example:
BindPaths=/var/log/exampleapp:/opt/exampleapp/logs
- Enabling transient root
-
To enable a fully transient writable
rootfsby default, set the following option inprepare-root.conf.
[root]
transient = true
This enables a software to transiently writes to /opt, with symlinks to /var for content that must persist.
6.2. Version selection and bootup
Image mode for RHEL uses GRUB by default, with exception to s390x architectures. Each version of image mode for RHEL currently available on a system has a menu entry.
The menu entry references an OSTree deployment which consists of a Linux kernel, an initramfs and a hash linking to an OSTree commit, that you can pass by using the ostree=kernel argument.
During bootup, OSTree reads the kernel argument to determine which deployment to use as the root filesystem. Each update or change to the system, such as package installation, addition of kernel arguments, creates a new deployment.
This enables rolling back to a previous deployment if the update causes problems.
Chapter 7. Appendix: Managing users, groups, SSH keys, and secrets in image mode for RHEL
Learn more about users, groups, SSH keys, and secrets management in image mode for RHEL.
7.1. Users and groups configuration
Image mode for RHEL is a generic operating system update and configuration mechanism. You cannot use it to configure users or groups. The only exception is the bootc install command that has the --root-ssh-authorized-keys option.
- Users and groups configuration for generic base images
- Usually, the distribution base images do not have any configuration. Do not encrypt passwords and SSH keys with publicly-available private keys in generic images because of security risks.
- Injecting SSH keys through
systemdcredentials -
You can use
systemdto inject a root password or SSHauthorized_keysfile in some environments. For example, use System Management BIOS (SMBIOS) to inject SSH keys system firmware. You can configure this in local virtualization environments, such asqemu. - Injecting users and SSH keys by using
cloud-init -
Many Infrastructure as a service (IaaS) and virtualization systems use metadata servers that are commonly processed by software such as
cloud-initorignition. See AWS instance metadata. The base image you are using might includecloud-initor Ignition, or you can install it in your own derived images. In this model, the SSH configuration is managed outside of the bootable image. - Adding users and credentials by using container or unit custom logic
-
Systems such as
cloud-initare not privileged. You can inject any logic you want to manage credentials in the way you want to launch a container image, for example, by using asystemdunit. To manage the credentials, you can use a custom network-hosted source, for example, FreeIPA. - Adding users and credentials statically in the container build
In package-oriented systems, you can use the derived build to inject users and credentials by using the following command:
RUN useradd someuserYou can find issues in the default
shadow-utilsimplementation ofuseradd: Users and groups IDs are allocated dynamically, and this can cause drift.- User and group home directories and
/vardirectory For systems configured with persistent
/home → /var/home, any changes to/varmade in the container image after initial installation will not be applied on subsequent updates.For example, if you inject
/var/home/someuser/.ssh/authorized_keysinto a container build, existing systems do not get the updatedauthorized_keysfile.- Using DynamicUser=yes for
systemdunits Use the
systemdDynamicUser=yesoption where possible for system users.This is significantly better than the pattern of allocating users or groups at package install time, because it avoids potential UID or GID drift.
- Using
systemd-sysusers Use
systemd-sysusers, for example, in your derived build. For more information, see thesystemd-sysusers documentation.COPY mycustom-user.conf /usr/lib/sysusers.d
The
sysuserstool makes changes to the traditional/etc/passwdfile as necessary during boot time. If/etcis persistent, this can avoidUIDorGIDdrift. It means that theUIDorGIDallocation depends on how a specific machine was upgraded over time.- Using
systemdJSON user records -
See JSON user records
systemddocumentation. Unlikesysusers, the canonical state for these users lives in/usr. If a subsequent image drops a user record, then it also vanishes from the system. - Using
nss-altfiles With
nss-altfiles, you can remove thesystemdJSON user records. It splits system users into/usr/lib/passwdand/usr/lib/group, aligning with the way the OSTree project handles the 3 way merge for/etcas it relates to/etc/passwd. Currently, if the/etc/passwdfile is modified in any way on the local system, then subsequent changes to/etc/passwdin the container image are not applied.Base images built by
rpm-ostreehavenns-altfilesenabled by default.Also, base images have a system users pre-allocated and managed by the NSS file to avoid UID or GID drift.
In a derived container build, you can also append users to
/usr/lib/passwd, for example. Usesysusers.dorDynamicUser=yes.- Machine-local state for users
The filesystem layout depends on the base image.
By default, the user data is stored in both
/etc,/etc/passwd,/etc/shadowandgroups, and/home, depending on the base image. However, the generic base images have to both be machine-local persistent state. In this model/homeis a symlink to/var/home/user.- Injecting users and SSH keys at system provisioning time
For base images where
/etcand/varare configured to persist by default, you can inject users by using installers such as Anaconda or Kickstart.Typically, generic installers are designed for one time bootstrap. Then, the configuration becomes a mutable machine-local state that you can change in Day 2 operations, by using some other mechanism.
You can use the Anaconda installer to set the initial password. However, changing this initial password requires a different in-system tool, such as
passwd.These flows work equivalently in a
bootc-compatiblesystem, to support users directly installing generic base images, without requiring changes to the different in-system tool.- Transient home directories
Many operating system deployments minimize persistent, mutable, and executable state. This can damage user home directories.
The
/homedirectory can be set astmpfs, to ensure that user data is cleared across reboots. This approach works especially well when combined with a transient/etcdirectory.To set up the user’s home directory to, for example, inject SSH
authorized_keysor other files, use thesystemdtmpfiles.dsnippets:f~ /home/user/.ssh/authorized_keys 600 user user - <base64 encoded data>
SSH is embedded in the image as:
/usr/lib/tmpfiles.d/<username-keys.conf. Another example is a service embedded in the image that can fetch keys from the network and write them. This is the pattern used bycloud-init.- UID and GID drift
-
The
/etc/passwdand similar files are a mapping between names and numeric identifiers. When the mapping is dynamic and mixed with "stateless" container image builds, it can cause issues. Each container image build might result in the UID changing due to RPM installation ordering or other reasons. This can be a problem if that user maintains a persistent state. To handle such cases, convert it to usesysusers.dor useDynamicUser=yes.
7.2. Injecting secrets in image mode for RHEL
Image mode for RHEL does not have an opinionated mechanism for secrets. You can inject container pull secrets in your system for some cases, for example:
For
bootcto fetch updates from a registry that requires authentication, you must include a pull secret in a file. In the following example, thecredssecret contains the registry pull secret.FROM registry.redhat.io/rhel9/bootc-image-builder:latest COPY containers-auth.conf /usr/lib/tmpfiles.d/link-podman-credentials.conf RUN --mount=type=secret,id=creds,required=true cp /run/secrets/creds /usr/lib/container-auth.json && \ chmod 0600 /usr/lib/container-auth.json && \ ln -sr /usr/lib/container-auth.json /etc/ostree/auth.jsonTo build it, run
podman build --secret id=creds,src=$HOME/.docker/config.json. Use a single pull secret forbootcand Podman by using a symlink to both locations to a common persistent file embedded in the container image, for example/usr/lib/container-auth.json.For Podman to fetch container images, include a pull secret to
/etc/containers/auth.json. With this configuration, the two stacks share the/usr/lib/container-auth.jsonfile.- Injecting secrets by embedding them in a container build
- You can include secrets in the container image if the registry server is suitably protected. In some cases, embedding only bootstrap secrets into the container image is a viable pattern, especially alongside a mechanism for having a machine authenticate to a cluster. In this pattern, a provisioning tool, whether run as part of the host system or a container image, uses the bootstrap secret to inject or update other secrets, such as SSH keys, certificates, among others.
- Injecting secrets by using cloud metadata
-
Most production Infrastructure as a Service (IaaS) systems support a metadata server or equivalent which can securely host secrets, particularly bootstrap secrets. Your container image can include tools such as
cloud-initorignitionto fetch these secrets. - Injecting secrets by embedding them in disk images
-
You can embed
bootstrap secretsonly in disk images. For example, when you generate a cloud disk image from an input container image, such as AMI or OpenStack, the disk image can contain secrets that are effectively machine-local state. Rotating them requires an additional management tool or refreshing the disk images. - Injecting secrets by using bare metal installers
- Installer tools usually support injecting configuration through secrets.
- Injecting secrets through
systemdcredentials -
The
systemdproject has a credential concept for securely acquiring and passing credential data to systems and services, which applies in some deployment methodologies. See the systemd credentials documentation for more details.
Additional resources