
Red Hat Ansible Automation Platform Hardening Guide
Install, configure, and maintain Ansible Automation Platform running on Red Hat Enterprise Linux in a secure manner.
Abstract
Preface
This guide provides recommended practices for various processes needed to install, configure, and maintain Ansible Automation Platform on Red Hat Enterprise Linux in a secure manner.
Making open source more inclusive
Red Hat is committed to replacing problematic language in our code, documentation, and web properties. We are beginning with these four terms: master, slave, blacklist, and whitelist. Because of the enormity of this endeavor, these changes will be implemented gradually over several upcoming releases. For more details, see our CTO Chris Wright’s message.
Providing feedback on Red Hat documentation
If you have a suggestion to improve this documentation, or find an error, please contact technical support at https://access.redhat.com to create an issue on the Ansible Automation Platform Jira project using the docs-product component.
Chapter 1. Introduction to hardening Ansible Automation Platform
This document provides guidance for improving the security posture (referred to as “hardening” throughout this guide) of your Red Hat Ansible Automation Platform deployment on Red Hat Enterprise Linux.
Other deployment targets, such as OpenShift, are not currently within the scope of this guide. Ansible Automation Platform managed services available through cloud service provider marketplaces are also not within the scope of this guide.
This guide takes a practical approach to hardening the Ansible Automation Platform security posture, starting with the planning and architecture phase of deployment and then covering specific guidance for installation, initial configuration, and day two operations. As this guide specifically covers Ansible Automation Platform running on Red Hat Enterprise Linux, hardening guidance for Red Hat Enterprise Linux will be covered where it affects the automation platform components. Additional considerations with regards to the Defense Information Systems Agency (DISA) Security Technical Implementation Guides (STIGs) are provided for those organizations that integrate the DISA STIG as a part of their overall security strategy.
These recommendations do not guarantee security or compliance of your deployment of Ansible Automation Platform. You must assess security from the unique requirements of your organization to address specific threats and risks and balance these against implementation factors.
1.1. Audience
This guide is written for personnel responsible for installing, configuring, and maintaining Ansible Automation Platform 2.4 when deployed on Red Hat Enterprise Linux. Additional information is provided for security operations, compliance assessment, and other functions associated with related security processes.
1.2. Overview of Ansible Automation Platform
Ansible is an open source, command-line IT automation software application written in Python. You can use Ansible Automation Platform to configure systems, deploy software, and orchestrate advanced workflows to support application deployment, system updates, and more. Ansible’s main strengths are simplicity and ease of use. It also has a strong focus on security and reliability, featuring minimal moving parts. It uses secure, well-known communication protocols like SSH, HTTPS, and WinRM for transport and uses a human-readable language that is designed for getting started quickly without extensive training.
Ansible Automation Platform enhances the Ansible language with enterprise-class features, such as Role-Based Access Controls (RBAC), centralized logging and auditing, credential management, job scheduling, and complex automation workflows. With Ansible Automation Platform you get certified content from our robust partner ecosystem; added security, reporting, and analytics; and life cycle technical support to scale automation across your organization. Ansible Automation Platform simplifies the development and operation of automation workloads for managing enterprise application infrastructure life cycles. It works across multiple IT domains including operations, networking, security, and development, as well as across diverse hybrid environments.
1.2.1. Ansible Automation Platform components
Ansible Automation Platform is a modular platform that includes automation controller, automation hub, Event-Driven Ansible controller, and Insights for Ansible Automation Platform.
Additional resources
For more information about the components provided within Ansible Automation Platform, see Red Hat Ansible Automation Platform components in the Red Hat Ansible Automation Platform Planning Guide.
Chapter 2. Hardening Ansible Automation Platform
This guide takes a practical approach to hardening the Ansible Automation Platform security posture, starting with the planning and architecture phase of deployment and then covering specific guidance for the installation phase. As this guide specifically covers Ansible Automation Platform running on Red Hat Enterprise Linux, hardening guidance for Red Hat Enterprise Linux will be covered where it affects the automation platform components.
2.1. Planning considerations
When planning an Ansible Automation Platform installation, ensure that the following components are included:
Installer-manged components
- Automation controller
- Event-Driven Ansible controller
- Private automation hub
PostgreSQL database (if not external)
- External services
- Red Hat Insights for Red Hat Ansible Automation Platform
- Automation hub
-
registry.redhat.io(default execution environment container registry)
See the system requirements section of the Red Hat Ansible Automation Platform Planning Guide for additional information.
2.1.1. Ansible Automation Platform reference architecture
For large-scale production environments with availability requirements, this guide recommends deploying the components described in section 2.1 of this guide using the instructions in the reference architecture documentation for Red Hat Ansible Automation Platform on Red Hat Enterprise Linux. While some variation may make sense for your specific technical requirements, following the reference architecture results in a supported production-ready environment.
Figure 2.1. Reference architecture overview
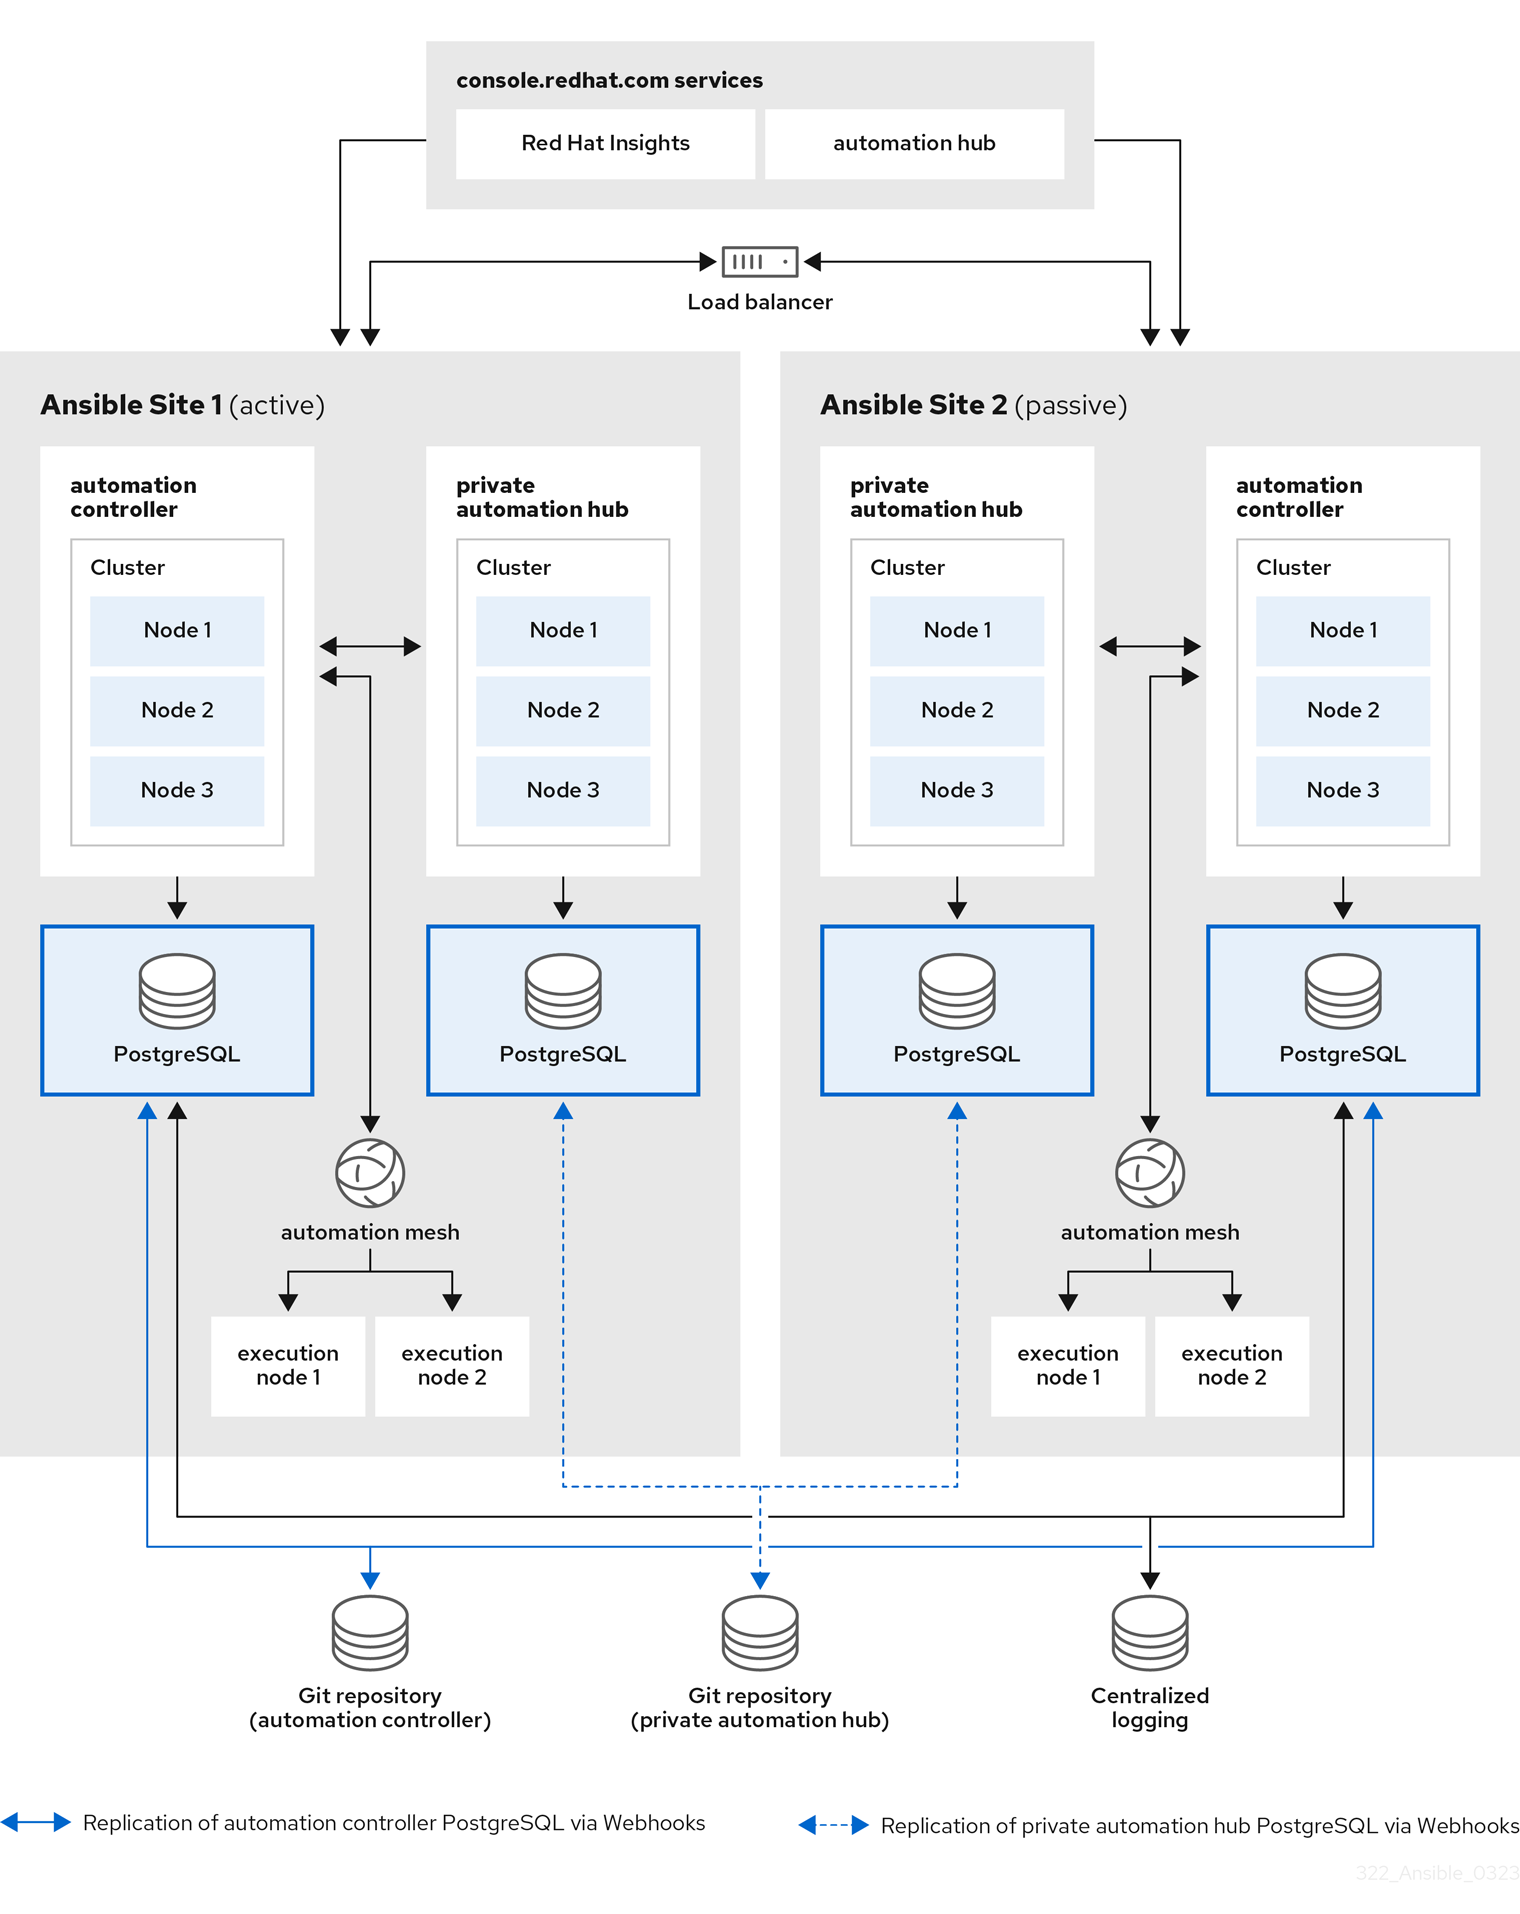
Event-Driven Ansible is a new feature of Ansible Automation Platform 2.4 that was not available when the reference architecture detailed in Figure 1: Reference architecture overview was originally written. Currently, the supported configuration for Event-Driven Ansible is a single Event-Driven Ansible controller with a dedicated internal database. For an organization interested in Event-Driven Ansible, the recommendation is to install according to the configuration documented in the Ansible Automtion Platform Installation Guide. This document will provide additional clarifications when Event-Driven Ansible specific hardening configuration is required.
For smaller production deployments where the full reference architecture may not be needed, this guide recommends deploying Ansible Automation Platform with a dedicated PostgreSQL database server whether managed by the installer or provided externally.
2.1.2. Network, firewall, and network services planning for Ansible Automation Platform
Ansible Automation Platform requires access to a network to integrate to external auxiliary services and to manage target environments and resources such as hosts, other network devices, applications, cloud services. The network ports and protocols section of the Ansible Automation Platform planning guide describes how Ansible Automation Platform components interact on the network as well as which ports and protocols are used, as shown in the following diagram:
Figure 2.2. Ansible Automation Platform Network ports and protocols
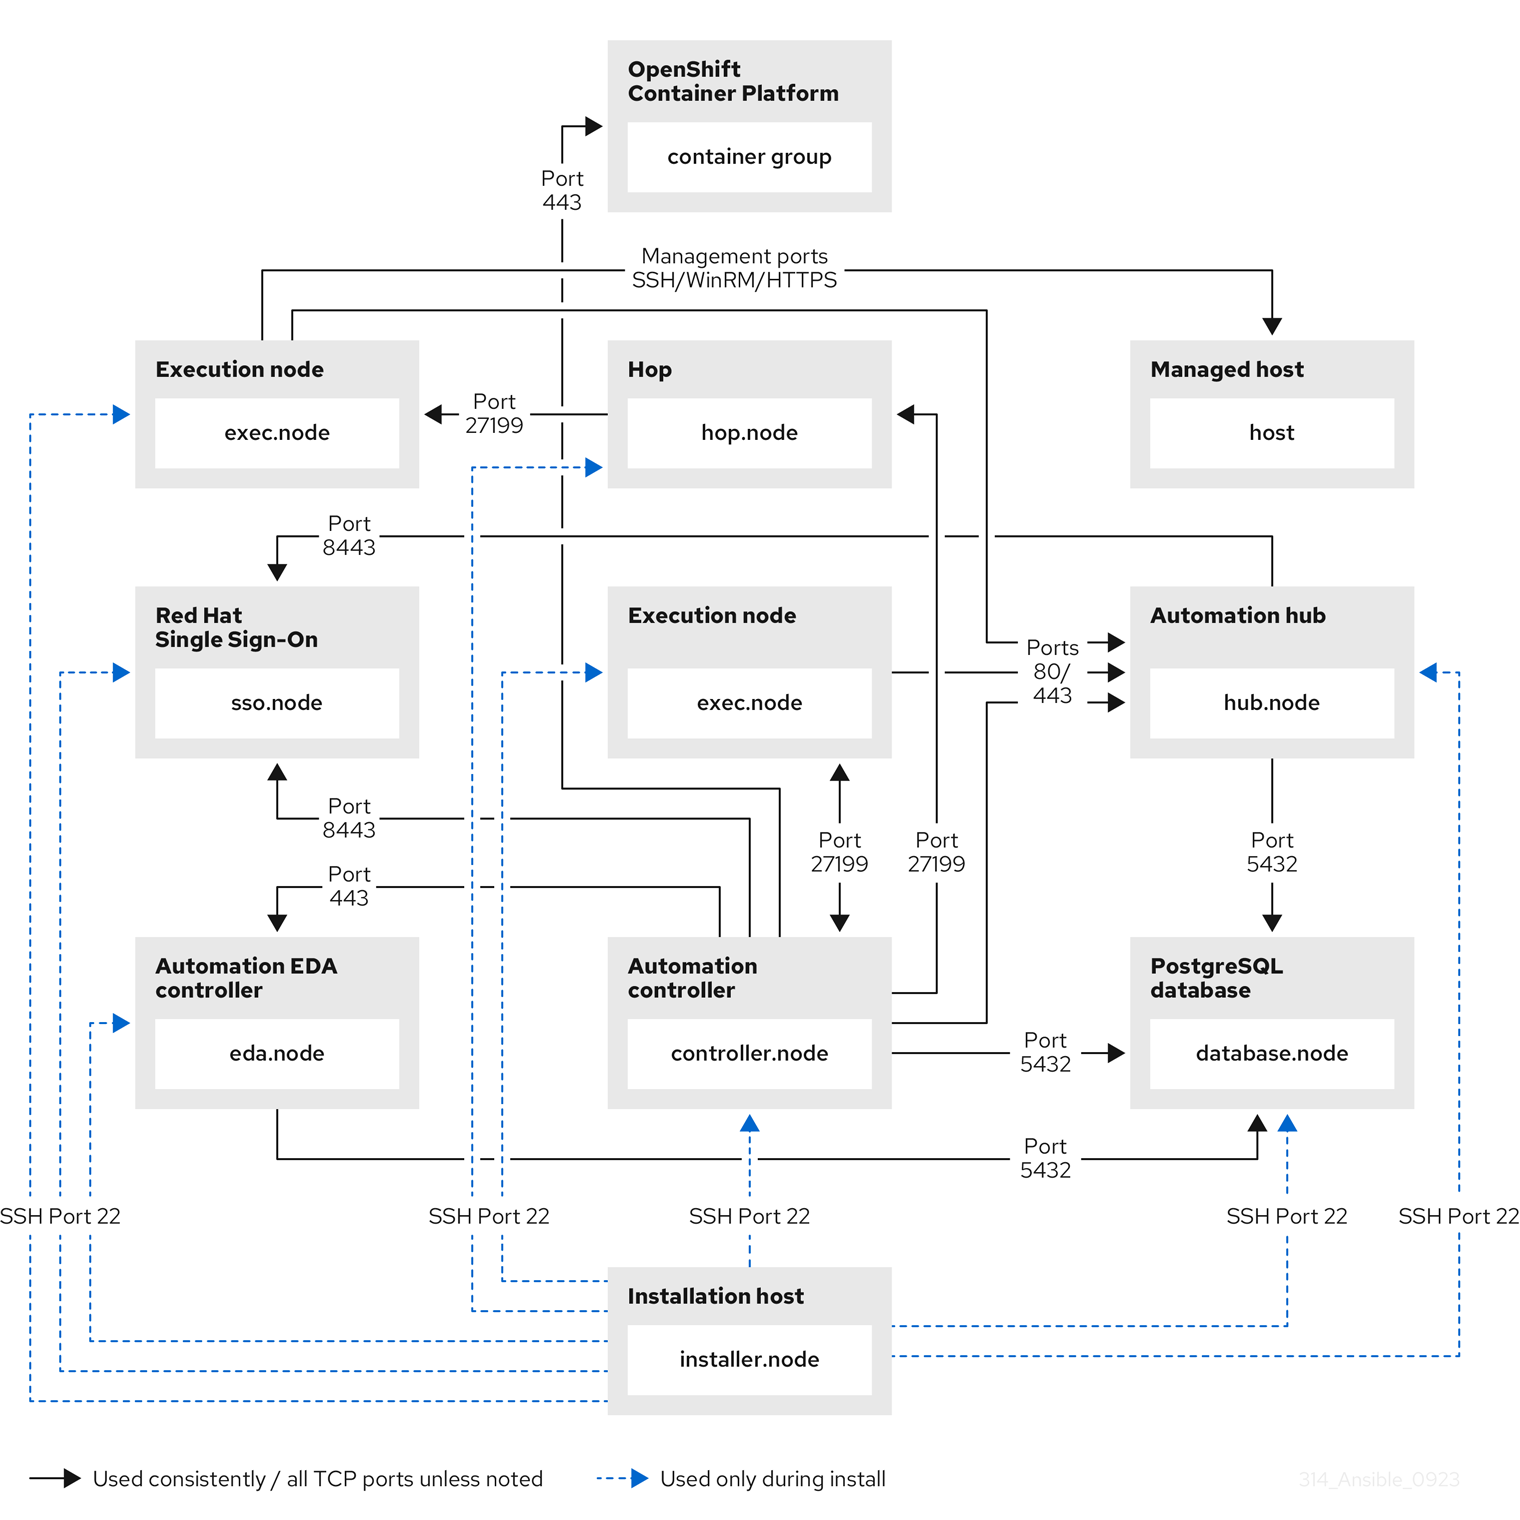
When planning firewall or cloud network security group configurations related to Ansible Automation Platform, see the Network ports and protocols section of the Ansible Automation Platform Planning Guide to understand what network ports need to be opened on a firewall or security group.
For more information on using a load balancer, and for outgoing traffic requirements for services compatible with Ansible Automation Platform. Consult the Red Hat Knowledgebase article What ports need to be opened in the firewall for Ansible Automation Platform 2 Services?. For internet-connected systems, this article also defines the outgoing traffic requirements for services that Ansible Automation Platform can be configured to use, such as Ansible automation hub, Red Hat Insights for Red Hat Ansible Automation Platform, Ansible Galaxy, the registry.redhat.io container image registry, and so on.
For internet-connected systems, this article also defines the outgoing traffic requirements for services that Ansible Automation Platform can be configured to use, such as Red Hat automation hub, Insights for Ansible Automation Platform, Ansible Galaxy, the registry.redhat.io container image registry, and so on.
Restrict access to the ports used by the Ansible Automation Platform components to protected networks and clients. The following restrictions are highly recommended:
- Restrict the PostgreSQL database port (5432) on the database servers so that only the other Ansible Automation Platform component servers (automation controller, automation hub, Event-Driven Ansible controller) are permitted access.
- Restrict SSH access to the Ansible Automation Platform servers from the installation host and other trusted systems used for maintenance access to the Ansible Automation Platform servers.
- Restrict HTTPS access to the automation controller, automation hub, and Event-Driven Ansible controller from trusted networks and clients.
2.1.3. DNS, NTP, and service planning
2.1.3.1. DNS
When installing Ansible Automation Platform, the installer script checks that certain infrastructure servers are defined with a Fully Qualified Domain Name (FQDN) in the installer inventory. This guide recommends that all Ansible Automation Platform infrastructure nodes have a valid FQDN defined in DNS which resolves to a routable IP address, and that these FQDNs be used in the installer inventory file.
2.1.3.2. DNS and load balancing
When using a load balancer with Ansible Automation Platform as described in the reference architecture, an additional FQDN is needed for each load-balanced component (automation controller and private automation hub).
For example, if the following hosts are defined in the Ansible Automation Platform installer inventory file:
[automationcontroller]
controller0.example.com
controller1.example.com
controller2.example.com

[automationhub]
hub0.example.com
hub1.example.com
hub2.example.com
Then the load balancer can use the FQDNs controller.example.com and hub.example.com for the user-facing name of these Ansible Automation Platform services.
When a load balancer is used in front of the private automation hub, the installer must be aware of the load balancer FQDN. Before installing Ansible Automation Platform, in the installation inventory file set the automationhub_main_url variable to the FQDN of the load balancer. For example, to match the previous example, you would set the variable to automationhub_main_url = hub.example.com.
2.1.3.3. NTP
Configure each server in the Ansible Automation Platform infrastructure to synchronize time with an NTP pool or your organization’s NTP service. This ensures that logging and auditing events generated by Ansible Automation Platform have an accurate time stamp, and that any scheduled jobs running from the automation controller execute at the correct time.
For information on configuring the chrony service for NTP synchronization, see Using Chrony in the Red Hat Enterprise Linux documentation.
2.1.4. User authentication planning
When planning for access to the Ansible Automation Platform user interface or API, be aware that user accounts can either be local or mapped to an external authentication source such as LDAP. This guide recommends that where possible, all primary user accounts should be mapped to an external authentication source. Using external account sources eliminates a source of error when working with permissions in this context and minimizes the amount of time devoted to maintaining a full set of users exclusively within Ansible Automation Platform. This includes accounts assigned to individual persons as well as for non-person entities such as service accounts used for external application integration. Reserve any local administrator accounts such as the default "admin" account for emergency access or "break glass" scenarios where the external authentication mechanism isn’t available.
The Event-Driven Ansible controller does not currently support external authentication, only local accounts.
For user accounts on the Red Hat Enterprise Linux servers that run the Ansible Automation Platform services, follow your organizational policies to determine if individual user accounts should be local or from an external authentication source. Only users who have a valid need to perform maintenance tasks on the Ansible Automation Platform components themselves should be granted access to the underlying Red Hat Enterprise Linux servers, as the servers will have configuration files that contain sensitive information such as encryption keys and service passwords. Because these individuals must have privileged access to maintain Ansible Automation Platform services, minimizing the access to the underlying Red Hat Enterprise Linux servers is critical. Do not grant sudo access to the root account or local Ansible Automation Platform service accounts (awx, pulp, postgres) to untrusted users.
The local Ansible Automation Platform service accounts such as awx, pulp, and postgres are created and managed by the Ansible Automation Platform installer. These particular accounts on the underlying Red Hat Enterprise Linux hosts cannot come from an external authentication source.
2.1.4.1. Automation controller authentication
Automation controller currently supports the following external authentication mechanisms:
- Azure Activity Directory
- GitHub single sign-on
- Google OAuth2 single sign-in
- LDAP
- RADIUS
- SAML
- TACACS+
- Generic OIDC
Choose an authentication mechanism that adheres to your organization’s authentication policies, and refer to the Controller Configuration - Authentication documentation to understand the prerequisites for the relevant authentication mechanism. The authentication mechanism used must ensure that the authentication-related traffic between Ansible Automation Platform and the authentication back-end is encrypted when the traffic occurs on a public or non-secure network (for example, LDAPS or LDAP over TLS, HTTPS for OAuth2 and SAML providers, etc.).
In automation controller, any “system administrator” account can edit, change, and update any inventory or automation definition. Restrict these account privileges to the minimum set of users possible for low-level automation controller configuration and disaster recovery.
2.1.4.2. Private automation hub authentication
Private automation hub currently supports the following external authentication mechanisms:
- Ansible Automation Platform central authentication (based on RHSSO)
- LDAP
For production use, LDAP is the preferred external authentication mechanism for private automation hub. Ansible Automation Platform central authentication is an option that can be deployed with the Ansible Automation Platform installer, but it only deploys one central authentication server instance, making it a potential single point of failure. Standalone mode for Ansible Automation Platform central authentication is not recommended in a production environment. However, if you already have the separate Red Hat Single Sign-On (RHSSO) product deployed in your production environment, it can be used as an external authentication source for private automation hub.
The Ansible Automation Platform Installer configures LDAP authentication for private automation hub during installation. For more information, see LDAP configuration on a private automation hub.
The following installer inventory file variables must be filled out prior to installation:
Table 2.1. Inventory variable for automation hub LDAP settings
| Variable | Details |
|---|---|
|
| Set to "ldap" in order to use LDAP authentication. |
|
| The LDAP server URI, for example "ldap://ldap-server.example.com" or "ldaps://ldap-server.example.com:636". |
|
| The account used to connect to the LDAP server. This account should be one with sufficient privileges to query the LDAP server for users and groups, but it should not be an administrator account or one with the ability to modify LDAP records. |
|
| The password used by the bind account to access the LDAP server. |
|
| The base DN used to search for users. |
|
| The base DN used to search for groups. |
In order to ensure that LDAP traffic is encrypted between the private automation hub and the LDAP server, the LDAP server must support LDAP over TLS or LDAP over SSL (LDAPS).
2.1.5. Credential management planning for Ansible Automation Platform
Automation controller uses credentials to authenticate requests to jobs against machines, synchronize with inventory sources, and import project content from a version control system. Automation controller manages three sets of secrets:
- User passwords for local automation controller users. See the User Authentication Planning section of this guide for additional details.
- Secrets for automation controller operational use (database password, message bus password, and so on).
- Secrets for automation use (SSH keys, cloud credentials, external password vault credentials, and so on).
Implementing a privileged access or credential management solution to protect credentials from compromise is a highly recommended practice. Organizations should audit the use of, and provide additional programmatic control over, access and privilege escalation.
You can further secure automation credentials by ensuring they are unique and stored only in automation controller. Services such as OpenSSH can be configured to allow credentials on connections only from specific addresses. Use different credentials for automation from those used by system administrators to log into a server. Although direct access should be limited where possible, it can be used for disaster recovery or other ad-hoc management purposes, allowing for easier auditing.
Different automation jobs might need to access a system at different levels. For example, you can have low-level system automation that applies patches and performs security baseline checking, while a higher-level piece of automation deploys applications. By using different keys or credentials for each piece of automation, the effect of any one key vulnerability is minimized. This also allows for easy baseline auditing.
2.1.5.1. Automation controller operational secrets
Automation controller contains the following secrets used operationally:
Table 2.2. Automation controller operational secrets
| File | Details |
|
|
A secret key used for encrypting automation secrets in the database. If the |
|
|
SSL certificate and key for the automation controller web service. A self-signed |
|
| Contains the password used by the automation controller to connect to the database. |
|
| Contains the secret used by the automation controller for websocket broadcasts. |
These secrets are stored unencrypted on the Automation controller server, as the automation controller service must read them all in an automated fashion at startup. All files are protected by Unix permissions, and restricted to the root user or the automation controller service user awx. These files should be routinely monitored to ensure there has been no unauthorized access or modification.
Automation controller was formerly named Ansible Tower. These file locations retain the previous product name.
2.1.5.2. Automation use secrets
Automation controller stores a variety of secrets in the database that are either used for automation or are a result of automation. Automation use secrets include:
- All secret fields of all credential types (passwords, secret keys, authentication tokens, secret cloud credentials).
- Secret tokens and passwords for external services defined in automation controller settings.
- “password” type survey field entries.
You can grant users and teams the ability to use these credentials without actually exposing the credential to the user. This means that if a user moves to a different team or leaves the organization, you don’t have to re-key all of your systems.
automation controller uses SSH (or the Windows equivalent) to connect to remote hosts . To pass the key from the automation controller to SSH, the key must be decrypted before it can be written to a named pipe. Automation controller then uses that pipe to send the key to SSH (so that it is never written to disk). If passwords are used, the automation controller handles those by responding directly to the password prompt and decrypting the password before writing it to the prompt.
As an administrator with superuser access, you can define a custom credential type in a standard format using a YAML/JSON-like definition, enabling the assignment of new credential types to jobs and inventory updates. This enables you to define a custom credential type that works in ways similar to existing credential types. For example, you can create a custom credential type that injects an API token for a third-party web service into an environment variable, which your playbook or custom inventory script can consume.
To encrypt secret fields, Ansible Automation Platform uses AES in CBC mode with a 256-bit key for encryption, PKCS7 padding, and HMAC using SHA256 for authentication. The encryption/decryption process derives the AES-256 bit encryption key from the SECRET_KEY, the field name of the model field, and the database-assigned auto-incremented record ID. Thus, if any attribute used in the key generation process changes, Ansible Automation Platform fails to correctly decrypt the secret. Ansible Automation Platform is designed such that the SECRET_KEY is never readable in playbooks Ansible Automation Platform launches, so that these secrets are never readable by Ansible Automation Platform users, and no secret field values are ever made available through the Ansible Automation Platform REST API. If a secret value is used in a playbook, you must use no_log on the task so that it is not accidentally logged. For more information, see Protecting sensitive data with no log.
2.1.6. Logging and log capture
Visibility and analytics is an important pillar of Enterprise Security and Zero Trust Architecture. Logging is key to capturing actions and auditing. You can manage logging and auditing by using the built-in audit support described in the Auditing the system section of the Security hardening for Red Hat Enterprise Linux guide. Controller’s built-in logging and activity stream support automation controller logs all changes within automation controller and automation logs for auditing purposes. More detailed information is available in the Logging and Aggregation section of the automation controller documentation.
This guide recommends that you configure Ansible Automation Platform and the underlying Red Hat Enterprise Linux systems to collect logging and auditing centrally, rather than reviewing it on the local system. Automation controller must be configured to use external logging to compile log records from multiple components within the controller server. The events occurring must be time-correlated to conduct accurate forensic analysis. This means that the controller server must be configured with an NTP server that is also used by the logging aggregator service, as well as the targets of the controller. The correlation must meet certain industry tolerance requirements. In other words, there might be a varying requirement that time stamps of different logged events must not differ by any amount greater than X seconds. This capability should be available in the external logging service.
Another critical capability of logging is the ability to use cryptography to protect the integrity of log tools. Log data includes all information (for example, log records, log settings, and log reports) needed to successfully log information system activity. It is common for attackers to replace the log tools or inject code into the existing tools to hide or erase system activity from the logs. To address this risk, log tools must be cryptographically signed so that you can identify when the log tools have been modified, manipulated, or replaced. For example, one way to validate that the log tool(s) have not been modified, manipulated or replaced is to use a checksum hash against the tool file(s). This ensures the integrity of the tool(s) has not been compromised.
2.1.7. Auditing and incident detection
Ansible Automation Platform should be used to fulfill security policy requirements by applying the NIST Cybersecurity Framework for common use cases, such as:
- Requiring HTTPS for web servers on Red Hat Enterprise Linux.
- Requiring TLS encryption for internal communication between web servers and database servers on Red Hat Enterprise Linux.
- Generating reports showing that the policy is properly deployed.
- Monitoring for drift that violates the policy.
- Automating correction of any policy violation.
This can be done through 5 steps of the cybersecurity framework:
- IDENTIFY
- Define the requirements to be implemented according to the security policy.
- PROTECT
- Implement and apply the requirements as an Ansible playbook.
- DETECT
- Monitor for drift and generate an audit report.
- RESPOND
- Explore actions that could be taken when an incident is detected.
- RECOVER
- Use Ansible to restore the systems to the known good configuration.
2.1.8. Red Hat Enterprise Linux host planning
The security of Ansible Automation Platform relies in part on the configuration of the underlying Red Hat Enterprise Linux servers. For this reason, the underlying Red Hat Enterprise Linux hosts for each Ansible Automation Platform component must be installed and configured in accordance with the Security hardening for Red Hat Enterprise Linux 8 or Security hardening for Red Hat Enterprise Linux 9 (depending on which operating system will be used), as well as any security profile requirements (CIS, STIG, HIPAA, and so on) used by your organization.
Note that applying certain security controls from the STIG or other security profiles may conflict with Ansible Automation Platform support requirements. Some examples are listed in the Automation controller STIG considerations section, although this is not an exhaustive list. To maintain a supported configuration, be sure to discuss any such conflicts with your security auditors so the Ansible Automation Platform requirements are understood and approved.
2.1.8.1. Ansible Automation Platform and additional software
When installing the Ansible Automation Platform components on Red Hat Enterprise Linux servers, the Red Hat Enterprise Linux servers should be dedicated to that use alone. Additional server capabilities should not be installed in addition to Ansible Automation Platform, as this is an unsupported configuration and may affect the security and performance of the Ansible Automation Platform software.
Similarly, when Ansible Automation Platform is deployed on a Red Hat Enterprise Linux host, it installs software like the nginx web server, the Pulp software repository, and the PostgreSQL database server. This software should not be modified or used in a more generic fashion (for example, do not use nginx to server additional web site content or PostgreSQL to host additional databases) as this is an unsupported configuration and may affect the security and performance of Ansible Automation Platform. The configuration of this software is managed by the Ansible Automation Platform installer, and any manual changes might be undone when performing upgrades.
2.2. Installation
There are installation-time decisions that affect the security posture of Ansible Automation Platform. The installation process includes setting a number of variables, some of which are relevant to the hardening of the Ansible Automation Platform infrastructure. Before installing Ansible Automation Platform, consider the guidance in the installation section of this guide.
2.2.1. Install from a dedicated installation host
The Ansible Automation Platform installer can be run from one of the infrastructure servers, such as an automation controller, or from an external system that has SSH access to the Ansible Automation Platform infrastructure servers. The Ansible Automation Platform installer is also used not just for installation, but for subsequent day-two operations, such as backup and restore, as well as upgrades. This guide recommends performing installation and day-two operations from a dedicated external server, hereafter referred to as the installation host. Doing so eliminates the need to log in to one of the infrastructure servers to run these functions. The installation host must only be used for management of Ansible Automation Platform and must not run any other services or software.
The installation host must be a Red Hat Enterprise Linux server that has been installed and configured in accordance with Security hardening for Red Hat Enterprise Linux and any security profile requirements relevant to your organization (CIS, STIG, and so on). Obtain the Ansible Automation Platform installer as described in the Automation Platform Planning Guide, and create the installer inventory file as describe in the Automation Platform Installation Guide. This inventory file is used for upgrades, adding infrastructure components, and day-two operations by the installer, so preserve the file after installation for future operational use.
Access to the installation host must be restricted only to those personnel who are responsible for managing the Ansible Automation Platform infrastructure. Over time, it will contain sensitive information, such as the installer inventory (which contains the initial login credentials for Ansible Automation Platform), copies of user-provided PKI keys and certificates, backup files, and so on. The installation host must also be used for logging in to the Ansible Automation Platform infrastructure servers through SSH when necessary for infrastructure management and maintenance.
2.2.2. Security-relevant variables in the installation inventory
The installation inventory file defines the architecture of the Ansible Automation Platform infrastructure, and provides a number of variables that can be used to modify the initial configuration of the infrastructure components. For more information on the installer inventory, see the Ansible Automation Platform Installation Guide.
The following table lists a number of security-relevant variables and their recommended values for creating the installation inventory.
Table 2.3. Security-relevant inventory variables
| Variable | Recommended Value | Details |
|
| true | The installer configures the installer-managed Postgres database to accept SSL-based connections when this variable is set. |
|
| verify-full |
By default, when the controller connects to the database, it tries an encrypted connection, but it is not enforced. Setting this variable to "verify-full" requires a mutual TLS negotiation between the controller and the database. The NOTE: If a third-party database is used instead of the installer-managed database, the third-party database must be set up independently to accept mTLS connections. |
|
| false | If set to "true", this variable disables HTTPS connections to the controller. The default is "false", so if this variable is absent from the installer inventory it is effectively the same as explicitly defining the variable to "false". |
|
| false | If set to "true", this variable disables HTTPS connections to the private automation hub. The default is "false", so if this variable is absent from the installer inventory it is effectively the same as explicitly defining the variable to "false". |
|
| false | If set to "true", this variable disables HTTPS connections to the Event-Driven Ansible controller. The default is "false", so if this variable is absent from the installer inventory it is effectively the same as explicitly defining the variable to "false". |
In scenarios such as the reference architecture where a load balancer is used with multiple controllers or hubs, SSL client connections can be terminated at the load balancer or passed through to the individual Ansible Automation Platform servers. If SSL is being terminated at the load balancer, this guide recommends that the traffic gets re-encrypted from the load balancer to the individual Ansible Automation Platform servers, to ensure that end-to-end encryption is in use. In this scenario, the *_disable_https variables listed in Table 2.3 would remain the default value of "false".
This guide recommends using an external database in production environments, but for development and testing scenarios the database could be co-located on the automation controller. Due to current PostgreSQL 13 limitations, setting pg_sslmode = verify-full when the database is co-located on the automation controller results in an error validating the host name during TLS negotiation. Until this issue is resolved, an external database must be used to ensure mutual TLS authentication between the automation controller and the database.
2.2.3. Installing with user-provided PKI certificates
By default, Ansible Automation Platform creates self-signed PKI certificates for the infrastructure components of the platform. Where an existing PKI infrastructure is available, certificates must be generated for the automation controller, private automation hub, Event-Driven Ansible controller, and the postgres database server. Copy the certificate files and their relevant key files to the installer directory, along with the CA certificate used to verify the certificates.
Use the following inventory variables to configure the infrastructure components with the new certificates.
Table 2.4. PKI certificate inventory variables
| Variable | Details |
|
| The file name of the CA certificate located in the installer directory. |
|
| The file name of the automation controller PKI certificate located in the installer directory. |
|
| The file name of the automation controller PKI key located in the installer directory. |
|
| The file name of the private automation hub PKI certificate located in the installer directory. |
|
| The file name of the private automation hub PKI key located in the installer directory. |
|
| The file name of the database server PKI certificate located in the installer directory. This variable is only needed for the installer-managed database server, not if a third-party database is used. |
|
| The file name of the database server PKI certificate located in the installer directory. This variable is only needed for the installer-managed database server, not if a third-party database is used. |
|
| The file name of the Event-Driven Ansible controller PKI certificate located in the installer directory. |
|
| The file name of the Event-Driven Ansible controller PKI key located in the installer directory. |
When multiple automation controller are deployed with a load balancer, the web_server_ssl_cert and web_server_ssl_key are shared by each controller. To prevent hostname mismatches, the certificate’s Common Name (CN) must match the DNS FQDN used by the load balancer. This also applies when deploying multiple private automation hub and the automationhub_ssl_cert and automationhub_ssl_key variables. If your organizational policies require unique certificates for each service, each certificate requires a Subject Alt Name (SAN) that matches the DNS FQDN used for the load-balanced service. To install unique certificates and keys on each automation controller, the certificate and key variables in the installation inventory file must be defined as per-host variables instead of in the [all:vars] section. For example:
[automationcontroller]
controller0.example.com web_server_ssl_cert=/path/to/cert0 web_server_ssl_key=/path/to/key0
controller1.example.com web_server_ssl_cert=/path/to/cert1 web_server_ssl_key=/path/to/key1
controller2.example.com web_server_ssl_cert=/path/to/cert2 web_server_ssl_key=/path/to/key2
[automationhub]
hub0.example.com automationhub_ssl_cert=/path/to/cert0 automationhub_ssl_key=/path/to/key0
hub1.example.com automationhub_ssl_cert=/path/to/cert1 automationhub_ssl_key=/path/to/key1
hub2.example.com automationhub_ssl_cert=/path/to/cert2 automationhub_ssl_key=/path/to/key2
2.2.4. Sensitive variables in the installation inventory
The installation inventory file contains a number of sensitive variables, mainly those used to set the initial passwords used by Ansible Automation Platform, that are normally kept in plain text in the inventory file. To prevent unauthorized viewing of these variables, you can keep these variables in an encrypted Ansible vault. To do this, go to the installer directory and create a vault file:
-
cd /path/to/ansible-automation-platform-setup-bundle-2.4-1-x86_64 -
ansible-vault create vault.yml
You will be prompted for a password to the new Ansible vault. Do not lose the vault password because it is required every time you need to access the vault file, including during day-two operations and performing backup procedures. You can secure the vault password by storing it in an encrypted password manager or in accordance with your organizational policy for storing passwords securely.
Add the sensitive variables to the vault, for example:
admin_password: <secure_controller_password>
pg_password: <secure_db_password>
automationhub_admin_password: <secure_hub_password>
automationhub_pg_password: <secure_hub_db_password>
automationhub_ldap_bind_password: <ldap_bind_password>
automationedacontroller_admin_password: <secure_eda_password>
automationedacontroller_pg_password: <secure_eda_db_password>
Make sure these variables are not also present in the installation inventory file. To use the new Ansible vault with the installer, run it with the command ./setup.sh -e @vault.yml — --ask-vault-pass.
2.2.5. Automation controller STIG considerations
For organizations that use the Defense Information Systems Agency (DISA) Security Technical Implementation Guides (STIGs) as a part of their overall security strategy, a STIG for the Ansible Automation Platform automation controller is now available. The STIG only covers the automation controller component of Ansible Automation Platform at this time. When applying the STIG to an automation controller, there are a number of considerations to keep in mind.
The automation controller STIG overview document states that it is meant to be used in conjunction with the STIG for Red Hat Enterprise Linux 8. This version of the automation controller STIG was released prior to a STIG for Red Hat Enterprise Linux 9 being available, so Red Hat Enterprise Linux 8 should be used as the underlying host OS when applying the automation controller STIG. Certain Red Hat Enterprise Linux 8 STIG controls will conflict with Ansible Automation Platform installation and operation, which can be mitigated as described in the following sections.
2.2.5.1. Fapolicyd
The Red Hat Enterprise Linux 8 STIG requires the fapolicyd daemon to be running. However, Ansible Automation Platform is not currently supported when fapolicyd enforcing policy, as this causes failures during the installation and operation of Ansible Automation Platform. Because of this, the installer runs a pre-flight check that will halt installation if it discovers that fapolicyd is enforcing policy. This guide recommends setting fapolicyd to permissive mode on the automation controller using the following steps:
-
Edit the file
/etc/fapolicyd/fapolicyd.confand set "permissive = 1". -
Restart the service with the command
sudo systemctl restart fapolicyd.service.
In environments where STIG controls are routinely audited, discuss waiving the fapolicy-related STIG controls with your security auditor.
If the Red Hat Enterprise Linux 8 STIG is also applied to the installation host, the default fapolicyd configuration causes the Ansible Automation Platform installer to fail. In this case, the recommendation is to set fapolicyd to permissive mode on the installation host.
2.2.5.2. File systems mounted with "noexec"
The Red Hat Enterprise Linux 8 STIG requires that a number of file systems are mounted with the noexec option to prevent execution of binaries located in these file systems. The Ansible Automation Platform installer runs a preflight check that will fail if any of the following file systems are mounted with the noexec option:
-
/tmp -
/var -
/var/tmp
To install Ansible Automation Platform, you must re-mount these file systems with the noexec option removed. Once installation is complete, proceed with the following steps:
-
Reapply the
noexecoption to the/tmpand/var/tmpfile systems. -
Change the automation controller job execution path from
/tmpto an alternate directory that does not have thenoexecoption enabled. - To make this change, log in to the automation controller UI as an administrator, navigate to → settings.
- Change the "Job execution path" setting to the alternate directory.
During normal operations, the file system which contains the /var/lib/awx subdirectory (typically /var) must not be mounted with the noexec option, or the automation controller cannot run automation jobs in execution environments.
In environments where STIG controls are routinely audited, discuss waiving the STIG controls related to file system noexec with your security auditor.
2.2.5.3. User namespaces
The Red Hat Enterprise Linux 8 STIG requires that the kernel setting user.max_user_namespaces is set to "0", but only if Linux containers are not in use. Because Ansible Automation Platform uses containers as part of its execution environment capability, this STIG control does not apply to the automation controller.
To check the user.max_user_namespaces kernel setting, complete the following steps:
- Log in to your automation controller at the command line.
-
Run the command
sudo sysctl user.max_user_namespaces. -
If the output indicates that the value is zero, look at the contents of the file
/etc/sysctl.confand all files under/etc/sysctl.d/, edit the file containing theuser.max_user_namespacessetting, and set the value to "65535". -
To apply this new value, run the command
sudo sysctl -p <file>, where<file>is the file just modified. -
Re-run the command
sudo sysctl user.max_user_namespacesand verify that the value is now set to "65535".
2.2.5.4. Sudo and NOPASSWD
The Red Hat Enterprise Linux 8 STIG requires that all users with sudo privileges must provide a password (that is, the "NOPASSWD" directive must not be used in a sudoers file). The Ansible Automation Platform installer runs many tasks as a privileged user, and by default expects to be able to elevate privileges without a password. To provide a password to the installer for elevating privileges, append the following options when launching the installer script: ./setup.sh <setup options> — –-ask-become-pass.
This also applies when running the installer script for day-two operations such as backup and restore.
2.3. Initial configuration
Granting access to certain parts of the system exposes security vulnerabilities. Apply the following practices to help secure access:
- Minimize access to system administrative accounts. There is a difference between the user interface (web interface) and access to the operating system that the automation controller is running on. A system administrator or root user can access, edit, and disrupt any system application. Anyone with root access to the controller has the potential ability to decrypt those credentials, and so minimizing access to system administrative accounts is crucial for maintaining a secure system.
- Minimize local system access. Automation controller should not require local user access except for administrative purposes. Non-administrator users should not have access to the controller system.
- Enforce separation of duties. Different components of automation may need to access a system at different levels. Use different keys or credentials for each component so that the effect of any one key or credential vulnerability is minimized.
- Restrict automation controller to the minimum set of users possible for low-level controller configuration and disaster recovery only. In a controller context, any controller ‘system administrator’ or ‘superuser’ account can edit, change, and update any inventory or automation definition in the controller.
2.3.1. Use infrastructure as code paradigm
The Red Hat Community of Practice has created a set of automation content available via collections to manage Ansible Automation Platform infrastructure and configuration as code. This enables automation of the platform itself through Infrastructure as Code (IaC) or Configuration as Code (CaC). While many of the benefits of this approach are clear, there are critical security implications to consider.
The following Ansible content collections are available for managing Ansible Automation Platform components using an infrastructure as code methodology, all of which are found on the Ansible Automation Hub:
Table 2.5. Ansible content collections
| Validated Collection | Collection Purpose |
|
| Ansible content for automating day 1 and day 2 operations of Ansible Automation Platform, including installation, backup and restore, certificate management, and more. |
|
| A collection of roles to manage automation controller components, including managing users and groups (RBAC), projects, job templates and workflows, credentials, and more. |
|
| Ansible content for interacting with automation hub, including users and groups (RBAC), collection upload and management, collection approval, managing the execution environment image registry, and more. |
|
| A collection of roles for creating and managing execution environment images, or migrating from the older Tower virtualenvs to execution environments. |
Many organizations use CI/CD platforms to configure pipelines or other methods to manage this type of infrastructure. However, using Ansible Automation Platform natively, a webhook can be configured to link a Git-based repository natively. In this way, Ansible can respond to git events to trigger Job Templates directly. This removes the need for external CI components from this overall process and thus reduces the attack surface.
These practices allow version control of all infrastructure and configuration. Apply Git best practices to ensure proper code quality inspection prior to being synchronized into Ansible Automation Platform. Relevant Git best practices include the following:
- Creating pull requests.
- Ensuring that inspection tools are in place.
- Ensuring that no plain text secrets are committed.
- Ensuring that pre-commit hooks and any other policies are followed.
IaC also encourages using external vault systems which removes the need to store any sensitive data in the repository, or deal with having to individually vault files as needed. For more information on using external vault systems, see section 2.3.2.3 External credential vault considerations within this guide.
2.3.2. Controller configuration
2.3.2.1. Configure centralized logging
A critical capability of logging is the ability for the automation controller to detect and take action to mitigate a failure, such as reaching storage capacity, which by default shuts down the controller. This guide recommends that the application server be part of a high availability system. When this is the case, automation controller will take the following steps to mitigate failure:
- If the failure was caused by the lack of log record storage capacity, the application must continue generating log records if possible (automatically restarting the log service if necessary), overwriting the oldest log records in a first-in-first-out manner.
- If log records are sent to a centralized collection server and communication with this server is lost or the server fails, the application must queue log records locally until communication is restored or until the log records are retrieved manually. Upon restoration of the connection to the centralized collection server, action must be taken to synchronize the local log data with the collection server.
To verify the rsyslog configuration for each automation controller host, complete the following steps for each automation controller:
The administrator must check the rsyslog configuration for each automation controller host to verify the log rollover against a organizationally defined log capture size. To do this, use the following steps, and correct using the configuration steps as required:
Check the
LOG_AGGREGATOR_MAX_DISK_USAGE_GBfield in the automation controller configuration. On the host, execute:awx-manage print_settings LOG_AGGREGATOR_MAX_DISK_USAGE_GB
If this field is not set to the organizationally defined log capture size, then follow the configuration steps.
Check
LOG_AGGREGATOR_MAX_DISK_USAGE_PATHfield in the automation controller configuration for the log file location to/var/lib/awx. On the host, execute:awx-manage print_settings LOG_AGGREGATOR_MAX_DISK_USAGE_PATH
If this field is not set to
/var/lib/awx, then follow these configuration steps:- Open a web browser and navigate to https://<automation controller server>/api/v2/settings/logging/, where <automation controller server> is the fully-qualified hostname of your automation controller. If the option is displayed, click it, log in as an automation controller adminstrator account, and continue.
In the Content section, modify the following values, then click :
- LOG_AGGREGATOR_MAX_DISK_USAGE_GB = <new log buffer in GB>
-
LOG_AGGREGATOR_MAX_DISK_USAGE_PATH =
/var/lib/awx
Note that this change will need to be made on each automation controller in a load-balanced scenario.
All user session data must be logged to support troubleshooting, debugging and forensic analysis for visibility and analytics. Without this data from the controller’s web server, important auditing and analysis for event investigations will be lost. To verify that the system is configured to ensure that user session data is logged, use the following steps:
For each automation controller host, navigate to console Settings >> System >> Miscellaneous System.
- Click .
Set the following:
- Enable Activity Stream = On
- Enable Activity Stream for Inventory Sync = On
- Organization Admins Can Manage Users and Teams = Off
- All Users Visible to Organization Admins = On
- Click
To set up logging to any of the aggregator types, read the documentation on supported log aggregators and configure your log aggregator using the following steps:
- Navigate to Ansible Automation Platform.
- Click .
- Under the list of System options, select Logging settings.
- At the bottom of the Logging settings screen, click .
Set the configurable options from the fields provided:
- Enable External Logging: Click the toggle button to if you want to send logs to an external log aggregator. The UI requires the Logging Aggregator and Logging Aggregator Port fields to be filled in before this can be done.
- Logging Aggregator: Enter the hostname or IP address you want to send logs.
- Logging Aggregator Port: Specify the port for the aggregator if it requires one.
Logging Aggregator Type: Select the aggregator service from the drop-down menu:
- Splunk
- Loggly
- Sumologic
- Elastic stack (formerly ELK stack)
- Logging Aggregator Username: Enter the username of the logging aggregator if required.
- Logging Aggregator Password/Token: Enter the password of the logging aggregator if required.
- Log System Tracking Facts Individually: Click the tooltip icon for additional information, whether or not you want to turn it on, or leave it off by default.
- Logging Aggregator Protocol: Select a connection type (protocol) to communicate with the log aggregator. Subsequent options vary depending on the selected protocol.
- Logging Aggregator Level Threshold: Select the level of severity you want the log handler to report.
- TCP Connection Timeout: Specify the connection timeout in seconds. This option is only applicable to HTTPS and TCP log aggregator protocols.
- Enable/disable HTTPS certificate verification: Certificate verification is enabled by default for HTTPS log protocol. Click the toggle button to if you do not want the log handler to verify the HTTPS certificate sent by the external log aggregator before establishing a connection.
- Loggers to Send Data to the Log Aggregator Form: All four types of data are pre-populated by default. Click the tooltip icon next to the field for additional information on each data type. Delete the data types you do not want.
- Log Format For API 4XX Errors: Configure a specific error message.
- Click to apply the settings or to abandon the changes.
- To verify if your configuration is set up correctly, first then click . This sends a test log message to the log aggregator using the current logging configuration in the automation controller. You should check to make sure this test message was received by your external log aggregator.
A automation controller account is automatically created for any user who logs in with an LDAP username and password. These users can automatically be placed into organizations as regular users or organization administrators. This means that logging should be turned on when LDAP integration is in use. You can enable logging messages for the SAML adapter the same way you can enable logging for LDAP.
The following steps enable the LDAP logging:
To enable logging for LDAP, you must set the level to DEBUG in the Settings configuration window.
- Click from the left navigation pane and select Logging settings from the System list of options.
- Click .
- Set the Logging Aggregator Level Threshold field to Debug.
- Click to save your changes.
2.3.2.2. Configure an external authentication source
As noted in the User authentication planning section, external authentication is recommended for user access to the automation controller. After you choose the authentication type that best suits your needs, navigate to → in the automation controller UI, click on the relevant link for your authentication back-end, and follow the relevant instructions for configuring the authentication connection.
When using LDAP for external authentication with the automation controller, navigate to → → settings on the automation controller and ensure that one of the following is configured:
-
For LDAP over SSL, the LDAP Server URI setting must begin with
ldaps://`and use port 636, for exampleldaps://ldap-server.example.com:636. - For LDAP over TLS, the LDAP Start TLS setting must be set to "On".
2.3.2.3. External credential vault considerations
Secrets management is an essential component of maintaining a secure automation platform. We recommend the following secrets management practices:
- Ensure that there are no unauthorized users with access to the system, and ensure that only users who require access are granted it. Automation controller encrypts sensitive information such as passwords and API tokens, but also stores the key to decryption. Authorized users potentially have access to everything.
- Use an external system to manage secrets. In cases where credentials need to be updated, an external system can retrieve updated credentials with less complexity than an internal system. External systems for managing secrets include CyberArk, HashiCorp Vault, Microsoft Azure Key Management, and others. For more information, see the Secret Management System section of the Automation controller User Guide v4.4.
2.4. Day two operations
Day 2 Operations include Cluster Health and Scaling Checks, including Host, Project, and environment level Sustainment. You should continually analyze configuration and security drift.
2.4.1. RBAC considerations
As an administrator, you can use the Role-Based Access Controls (RBAC) built into automation controller to delegate access to server inventories, organizations, and more. Administrators can also centralize the management of various credentials, allowing end users to leverage a needed secret without ever exposing that secret to the end user. RBAC controls allow the controller to help you increase security and streamline management.
RBAC is the practice of granting roles to users or teams. RBACs are easiest to think of in terms of Roles which define precisely who or what can see, change, or delete an “object” for which a specific capability is being set.
There are a few main concepts that you should become familiar with regarding automation controller’s RBAC design–roles, resources, and users. Users can be members of a role, which gives them certain access to any resources associated with that role, or any resources associated with “descendant” roles.
A role is essentially a collection of capabilities. Users are granted access to these capabilities and the controller’s resources through the roles to which they are assigned or through roles inherited through the role hierarchy.
Roles associate a group of capabilities with a group of users. All capabilities are derived from membership within a role. Users receive capabilities only through the roles to which they are assigned or through roles they inherit through the role hierarchy. All members of a role have all capabilities granted to that role. Within an organization, roles are relatively stable, while users and capabilities are both numerous and may change rapidly. Users can have many roles.
For further detail on Role Hierarchy, access inheritance, Built in Roles, permissions, personas, Role Creation, and so on see Role-Based Access Controls.
The following is an example of an organization with roles and resource permissions:
Figure 2.3. RBAC role scopes within automation controller
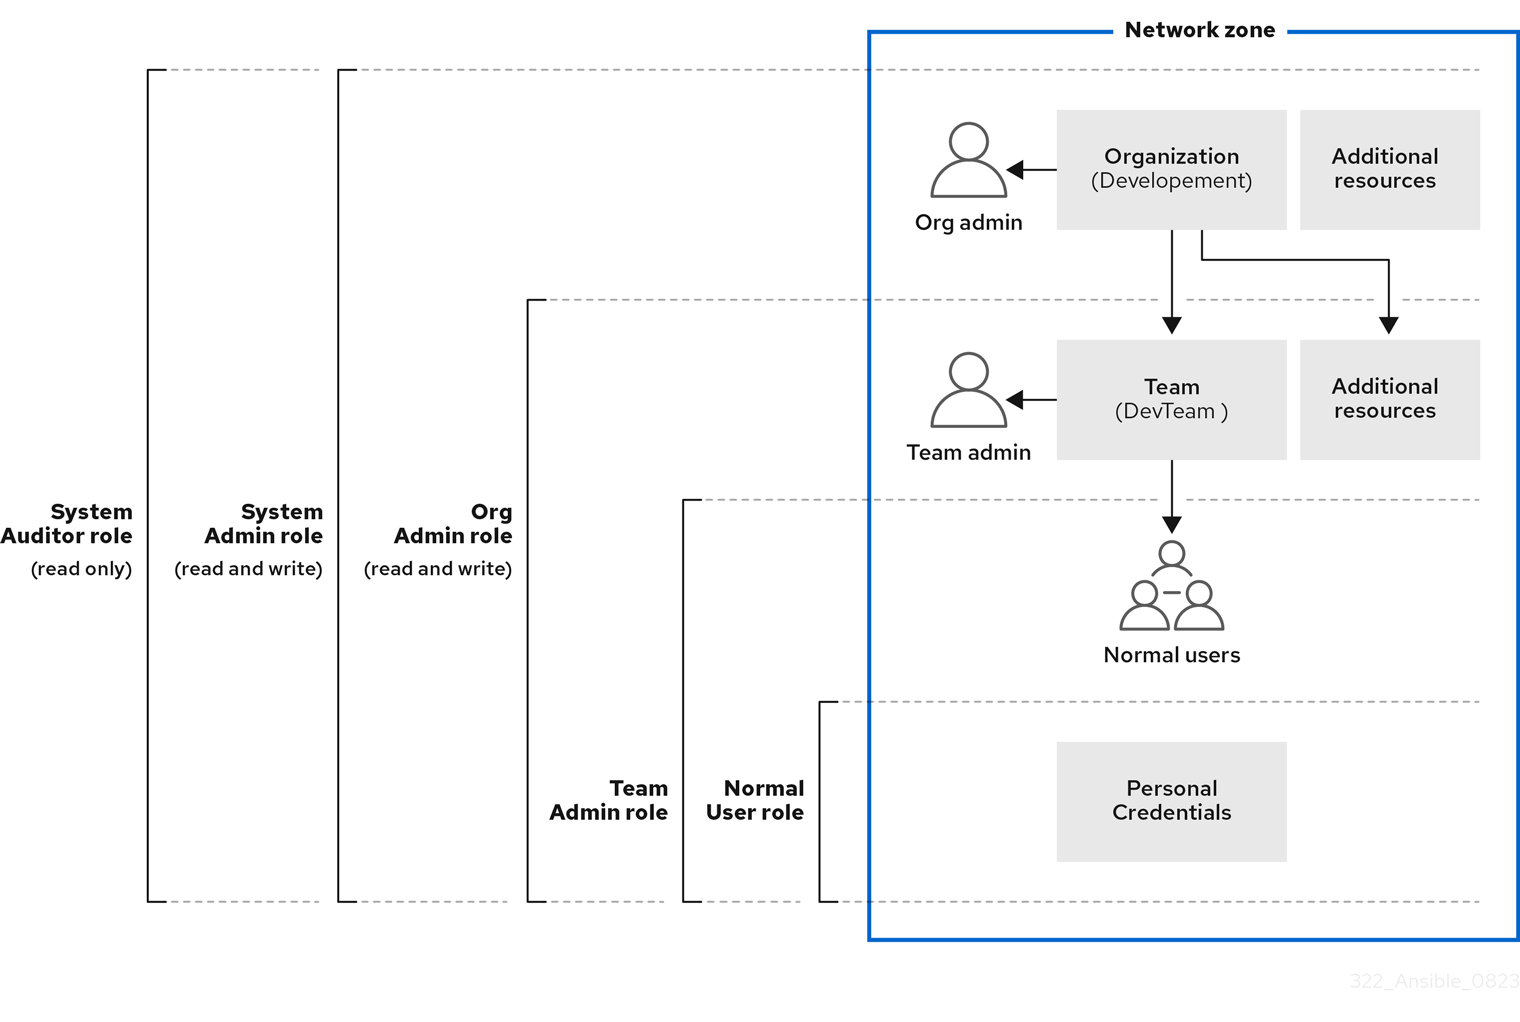
User access is based on managing permissions to system objects (users, groups, namespaces) rather than by assigning permissions individually to specific users. You can assign permissions to the groups you create. You can then assign users to these groups. This means that each user in a group has the permissions assigned to that group.
Groups created in Automation Hub can range from system administrators responsible for governing internal collections, configuring user access, and repository management to groups with access to organize and upload internally developed content to Automation Hub. For more information, see Automation hub permissions for consistency.
View-only access can be enabled for further lockdown of the private automation hub. By enabling view-only access, you can grant access for users to view collections or namespaces on your private automation hub without the need for them to log in. View-only access allows you to share content with unauthorized users while restricting their ability to only view or download source code, without permissions to edit anything on your private automation hub. Enable view-only access for your private automation hub by editing the inventory file found on your Red Hat Ansible Automation Platform installer.
2.4.2. Updates and upgrades
All upgrades should be no more than two major versions behind what you are currently upgrading to. For example, to upgrade to automation controller 4.3, you must first be on version 4.1.x because there is no direct upgrade path from version 3.8.x or earlier. Refer to Upgrading to Ansible Automation Platform for additional information. To run automation controller 4.3, you must also have Ansible 2.12 or later.
2.4.2.1. Automation controller STIG considerations
Automation controller must install security-relevant software updates within the time period specified by your organizational policy and any security profiles you require to maintain the integrity and confidentiality of the system and its orgainzational assets.
Security flaws with software applications are discovered daily. Red Hat constantly updates and patches automation controller to address newly discovered security vulnerabilities. Organizations (including any contractor to the organization) are required to promptly install security-relevant software updates (for example, patches, service packs, and hot fixes). Flaws discovered during security assessments, continuous monitoring, incident response activities, or information system error handling must also be addressed expeditiously.
As a system administrator for each automation controller host, perform the following:
Inspect the status of the DNF Automatic timer:
systemctl status dnf-automatic.timer
-
If
Active: activeis not included in the output, this is a finding. Inspect the configuration of DNF Automatic:
grep apply_updates /etc/dnf/automatic.conf
-
If
apply_updates = yesis not displayed, this is a finding. Install and enable DNF Automatic:
dnf install dnf-automatic (run the install) systemctl enable --now dnf-automatic.timer
-
Modify
/etc/dnf/automatic.confand setapply_updates = yes.
All automation controller nginx front-end web server files must be verified for their integrity (e.g., checksums and hashes) before becoming part of the production web server. Verifying that a patch, upgrade, certificate, and so on, being added to the web server is unchanged from the producer of the file is essential for file validation and nonrepudiation of the information. The automation controller nginx web server host must have a mechanism to verify that files are valid prior to installation.
As a System Administrator, for each automation controller nginx web server host, perform the following:
Verify the integrity of the automation controller nginx web server hosts files:
aide --check
- Verify the displayed checksums against previously reserved checksums of the Advanced Intrusion Detection Environment (AIDE) database.
- If there are any unauthorized or unexplained changes against previous checksums, this is a finding.
As a System Administrator, for each automation controller nginx web server host, perform the following:
Check for existing or install AIDE:
yum install -y aide
Create or update the AIDE database immediately after initial installation of each automation controller nginx web server host:
aide --init && mv /var/lib/aide/aide.db.new.gz /var/lib/aide/aide.db.gz
Accept any expected changes to the host by updating the AIDE database:
aide --update
- The output will provide checksums for the AIDE database. Save in a protected location.
All automation controller nginx web server accounts not utilized by installed features (for example, tools, utilities, specific services, and so on) must not be created and must be deleted when the web server feature is uninstalled. If web server accounts are not being used, they must be deleted when the web server is uninstalled. This is because the accounts become stale over time and are not tended to. Also, if accounts are not going to be used, they must not be created for the same reason. Both situations create an opportunity for web server exploitation.
When accounts used for web server features such as documentation, sample code, example applications, tutorials, utilities, and services are created, even though the feature is not installed, they become an exploitable threat to a web server. These accounts become inactive and are not monitored through regular use, and passwords for the accounts are not created or updated. An attacker can use these accounts to gain access to the web server and begin investigating ways to elevate the account privileges.
The accounts used for all automation controller nginx web server features not installed must not be created and must be deleted when these features are uninstalled.
As a System Administrator for each automation controller nginx web server, perform the following:
-
Examine nginx users in
/etc/passwd. Verify a single user nginx exists using the command:
[ grep -c nginx /etc/passwd == 1 ] || echo FAILED
-
If
FAILEDis displayed, this is a finding.
As a System Administrator for each automation controller nginx web server, perform the following:
-
Reinstall automation controller if no nginx users exist in
/etc/passwd -
Review all users enumerated in
/etc/passwd, and remove any that are not attributable to Red Hat Enterprise Linux or automation controller and/or organizationally disallowed.
The automation controller nginx web server is configured to check for and install security-relevant software updates from an authoritative source within an organizationally identified time period from the availability of the update. By default, this time period will be every 24 hours.
As a System Administrator for each automation controller nginx web server host, perform the following:
Verify the system is configured to receive updates from an organizationally defined source for authoritative system updates:
yum -v repolist
- If each URL is not valid and consistent with organizationally defined requirements, this is a finding.
- If each repository is not enabled in accordance with organizationally defined requirements, this is a finding.
- If the system is not configured to automatically receive and apply system updates from this source at least every 30 days, or manually receive and apply updates at least every 30 days, this is a finding.
As a system administrator, for each automation controller nginx web server host, perform the following:
- Either configure update repositories in accordance with organizationally defined requirements or subscribe to Red Hat update repositories for the underlying operating system.
Execute an update from these repositories:
$ yum update -y
Perform one of the following:
Schedule an update to occur every 30 days, or in accordance with organizationally defined policy:
$ yum install -y dnf-automatic && sed -i '/apply_updates/s/no/yes/' /etc/dnf/automatic.conf && sed -i '/OnCalendar/s/^OnCalendar\s*=./OnCalendar=-1-* 6:00/' /usr/lib/systemd/system/dnf-automatic.timer && systemctl enable --now dnf-automatic.timer
- Schedule manual updates to occur at least every 30 days, or in accordance with organizationally defined policy.
- Restart the automation controller nginx web server host.
2.4.2.2. Disaster recovery and continuity of operations
Taking regular backups of Ansible Automation Platform is a critical part of disaster recovery planning. Both backups and restores are performed using the installer, so these actions should be performed from the dedicated installation host described earlier in this document. Refer to the Backing Up and Restoring section of the automation controller documentation for further details on how to perform these operations.
An important aspect of backups is that they contain a copy of the database as well as the secret key used to decrypt credentials stored in the database, so the backup files should be stored in a secure encrypted location. This means that access to endpoint credentials are protected properly. Access to backups should be limited only to Ansible Automation Platform administrators who have root shell access to automation controller and the dedicated installation host.
The two main reasons an Ansible Automation Platform administrator needs to back up their Ansible Automation Platform environment are:
- To save a copy of the data from your Ansible Automation Platform environment, so you can restore it if needed.
- To use the backup to restore the environment into a different set of servers if you’re creating a new Ansible Automation Platform cluster or preparing for an upgrade.
In all cases, the recommended and safest process is to always use the same versions of PostgreSQL and Ansible Automation Platform to back up and restore the environment.
Using some redundancy on the system is highly recommended. If the secrets system is down, the automation controller cannot fetch the information and can fail in a way that would be recoverable once the service is restored. If you believe the SECRET_KEY automation controller generated for you has been compromised and has to be regenerated, you can run a tool from the installer that behaves much like the automation controller backup and restore tool.
To generate a new secret key, perform the following steps:
- Backup your Ansible Automation Platform database before you do anything else! Follow the procedure described in the Backing Up and Restoring Controller section.
-
Using the inventory from your install (same inventory with which you run backups/restores), run
setup.sh -k.
A backup copy of the prior key is saved in /etc/tower/.