
Red Hat Ansible Automation Platform Automation Mesh for operator-based installations
Automate at scale in a cloud-native way
Abstract
Preface
Thank you for your interest in Red Hat Ansible Automation Platform. Ansible Automation Platform is a commercial offering that helps teams manage complex multi-tier deployments by adding control, knowledge, and delegation to Ansible-powered environments.
This guide helps you to understand the requirements and processes behind setting up an automation mesh on a operator-based installation of Red Hat Ansible Automation Platform. This document has been updated to include information for the latest release of Ansible Automation Platform.
Making open source more inclusive
Red Hat is committed to replacing problematic language in our code, documentation, and web properties. We are beginning with these four terms: master, slave, blacklist, and whitelist. Because of the enormity of this endeavor, these changes will be implemented gradually over several upcoming releases. For more details, see our CTO Chris Wright’s message.
Providing feedback on Red Hat documentation
If you have a suggestion to improve this documentation, or find an error, please contact technical support at https://access.redhat.com to create an issue on the Ansible Automation Platform Jira project using the docs-product component.
Chapter 1. Planning for automation mesh in your operator-based Red Hat Ansible Automation Platform environment
The following topics contain information to help plan an automation mesh deployment in your operator-based Red Hat Ansible Automation Platform environment. The document covers the setting up of automation mesh on operator-based deployments, such as OpenShift Container Platform and Ansible Automation Platform on Microsoft Azure managed application.
1.1. About automation mesh
Automation mesh is an overlay network intended to ease the distribution of work across a large and dispersed collection of workers through nodes that establish peer-to-peer connections with each other using existing networks.
Red Hat Ansible Automation Platform 2 replaces Ansible Tower and isolated nodes with automation controller and automation hub. Automation controller provides the control plane for automation through its UI, RESTful API, RBAC, workflows and CI/CD integration, while automation mesh can be used for setting up, discovering, changing or modifying the nodes that form the control and execution layers. Automation mesh is useful for:
- traversing difficult network topologies
-
bringing execution capabilities (the machine running
ansible-playbook) closer to your target hosts
The nodes (control, hop, and execution instances) are interconnected through a receptor mesh, forming a virtual mesh.
Automation mesh uses TLS encryption for communication, so traffic that traverses external networks (the internet or other) is encrypted in transit.
Automation mesh introduces:
- Dynamic cluster capacity that scales independently, enabling you to create, register, group, ungroup and deregister nodes with minimal downtime.
- Control and execution plane separation that enables you to scale playbook execution capacity independently from control plane capacity.
- Deployment choices that are resilient to latency, reconfigurable without outage, and that dynamically re-reroute to choose a different path when outages occur.
- Connectivity that includes bi-directional, multi-hopped mesh communication possibilities which are Federal Information Processing Standards (FIPS) compliant.
1.2. Control and execution planes
Instances make up the network of devices that communicate with one another. They are the building blocks of an automation mesh. These building blocks serve as nodes in a mesh topology. Automation mesh makes use of unique node types to create both the control and execution plane. Learn more about the control and execution plane and their node types before designing your automation mesh topology.
1.2.1. Control plane
Instances in the control plane run persistent automation controller services such as the web server and task dispatcher, in addition to project updates, and management jobs. However, in the operator-based model, there are no hybrid or control nodes. There are container groups, which make up containers running on the Kubernetes cluster. That comprises the control plane. That control plane is local to the kubernetes cluster in which Red Hat Ansible Automation Platform is deployed.
1.2.2. Execution plane
The execution plane consists of execution nodes that execute automation on behalf of the control plane and have no control functions. Hop nodes serve to communicate. Nodes in the execution plane only run user-space jobs, and may be geographically separated, with high latency, from the control plane.
-
Execution nodes - Execution nodes run jobs under
ansible-runnerwithpodmanisolation. This node type is similar to isolated nodes. This is the default node type for execution plane nodes. - Hop nodes - similar to a jump host, hop nodes route traffic to other execution nodes. Hop nodes cannot execute automation.
Chapter 2. Automation mesh for operator-based Red Hat Ansible Automation Platform
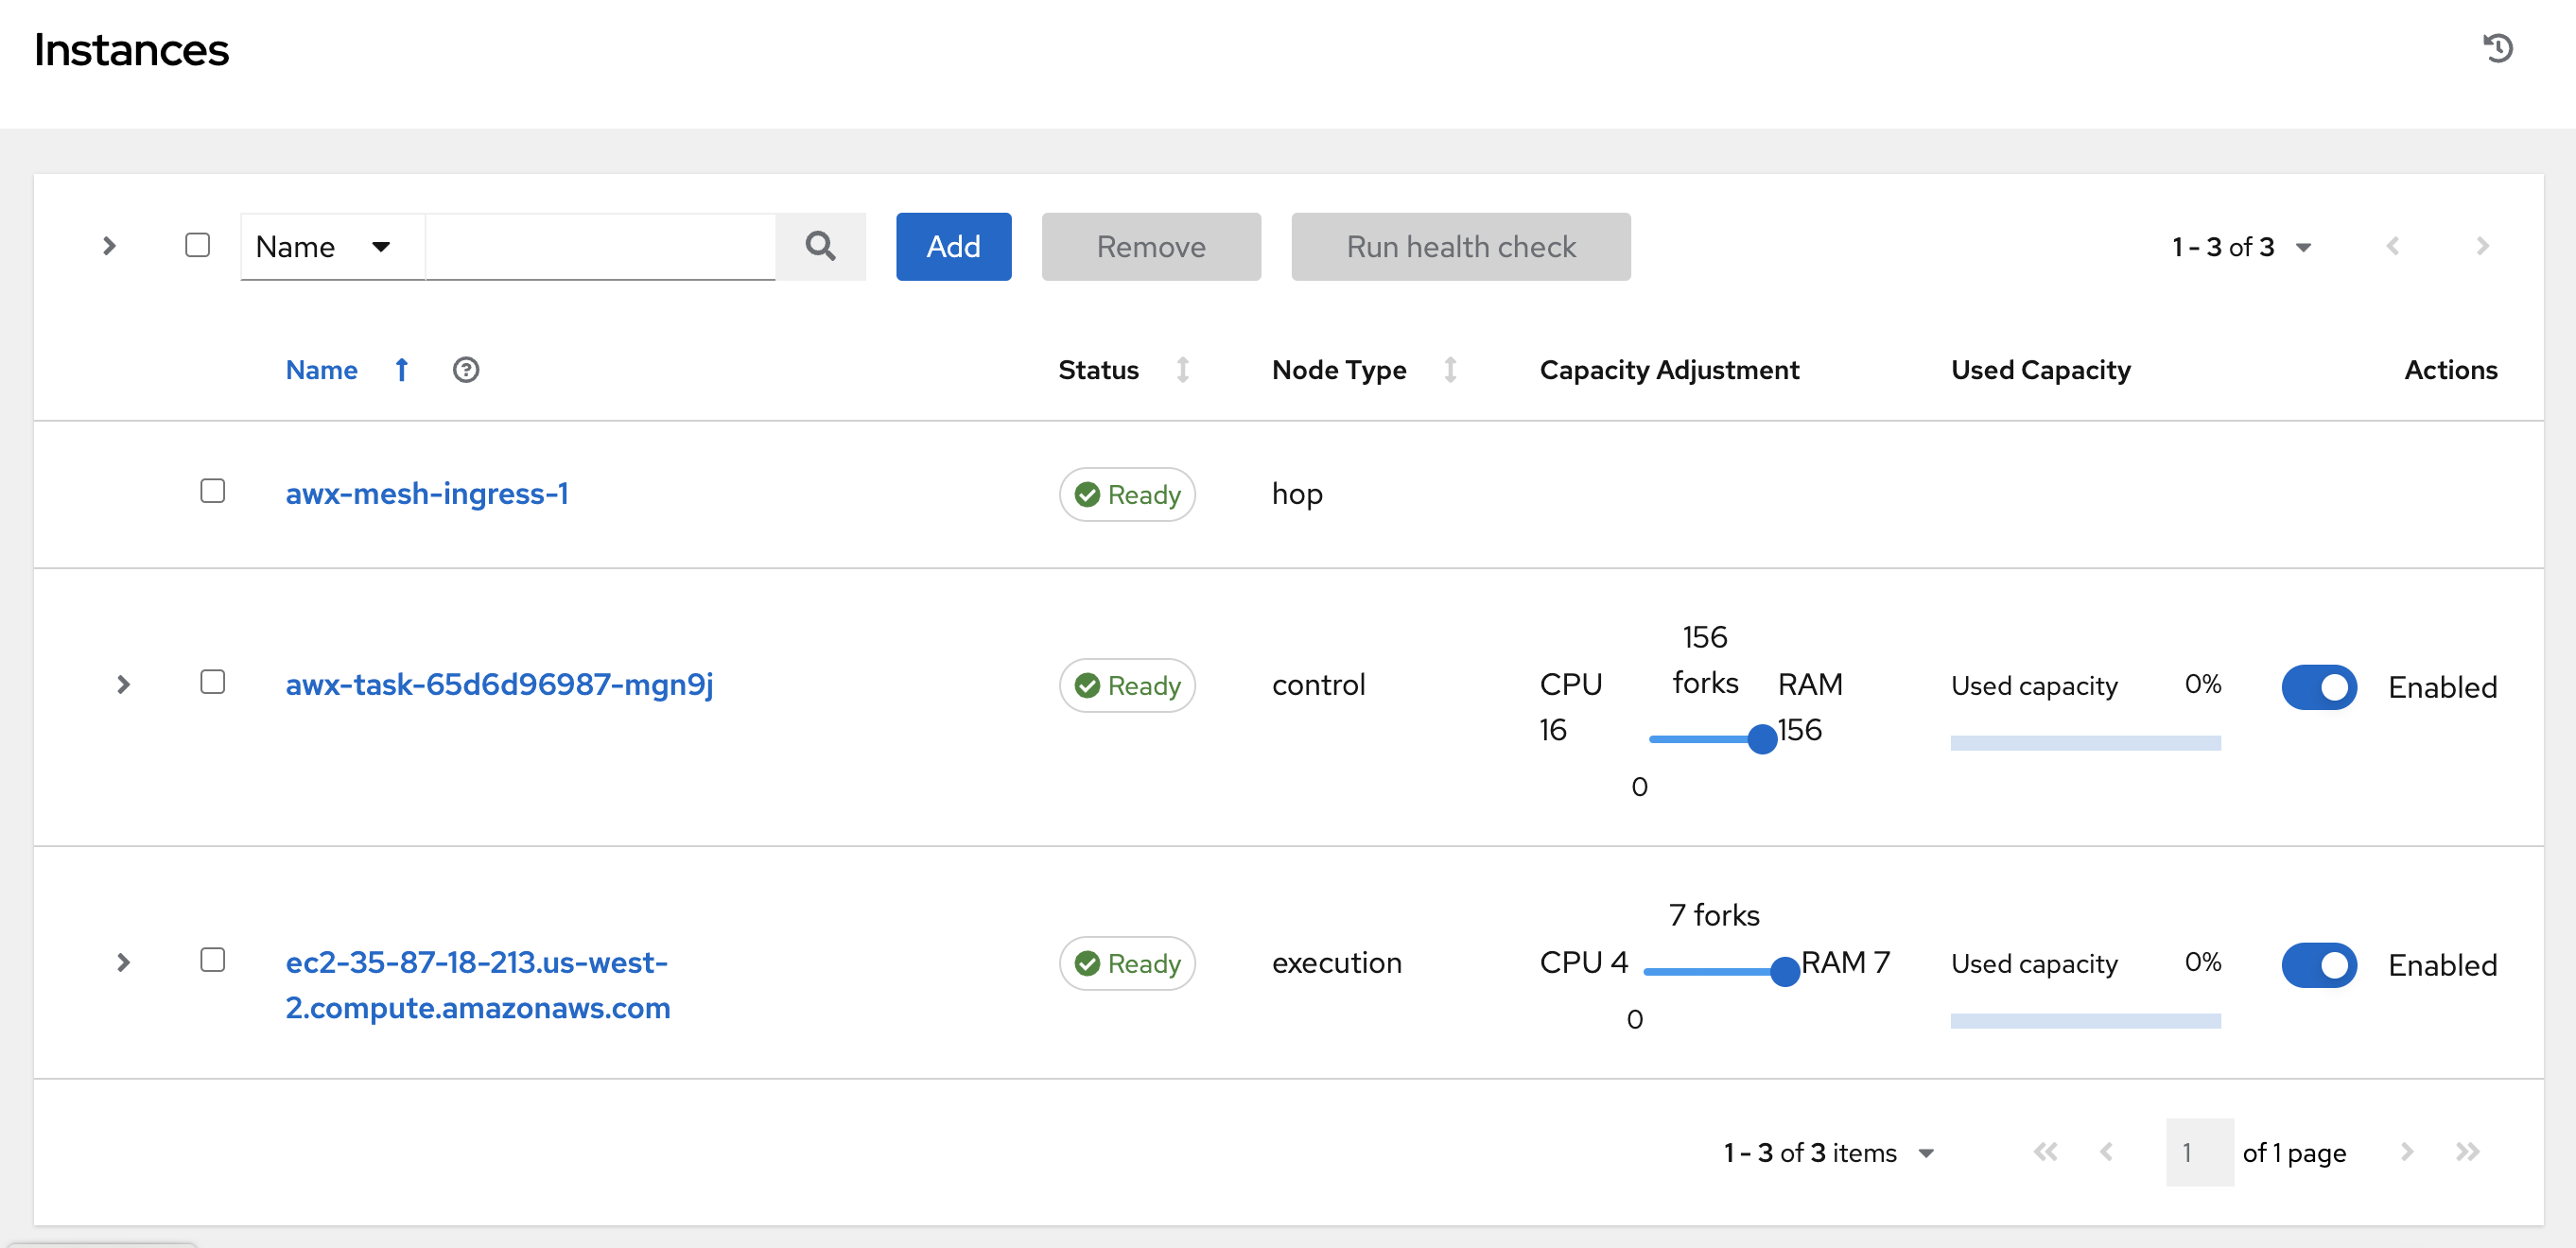
Scaling your automation mesh is available on OpenShift deployments of Red Hat Ansible Automation Platform and is possible through adding or removing nodes from your cluster dynamically, using the Instances resource of the automation controller UI, without running the installation script.
Instances serve as nodes in your mesh topology. Automation mesh enables you to extend the footprint of your automation. The location where you launch a job can be different from the location where the ansible-playbook runs.
To manage instances from the automation controller UI, you must have System Administrator or System Auditor permissions.
In general, the more processor cores (CPU) and memory (RAM) a node has, the more jobs that can be scheduled to run on that node at once.
For more information, see Automation controller capacity determination and job impact.
2.1. Prerequisites
The automation mesh is dependent on hop and execution nodes running on Red Hat Enterprise Linux (RHEL). Your Red Hat Ansible Automation Platform subscription grants you ten Red Hat Enterprise Linux licenses that can be used for running components of Ansible Automation Platform.
For additional information about Red Hat Enterprise Linux subscriptions, see Registering the system and managing subscriptions in the Red Hat Enterprise Linux documentation.
The following steps prepare the RHEL instances for deployment of the automation mesh.
- You require a Red Hat Enterprise Linux operating system. Each node in the mesh requires a static IP address, or a resolvable DNS hostname that automation controller can access.
- Ensure that you have the minimum requirements for the RHEL virtual machine before proceeding. For more information, see the Red Hat Ansible Automation Platform system requirements.
Deploy the RHEL instances within the remote networks where communication is required. For information about creating virtual machines, see Creating Virtual Machines in the Red Hat Enterprise Linux documentation. Remember to scale the capacity of your virtual machines sufficiently so that your proposed tasks can run on them.
- RHEL ISOs can be obtained from access.redhat.com.
- RHEL cloud images can be built using Image Builder from console.redhat.com.
2.2. Setting up Virtual Machines for use in an automation mesh
Procedure
SSH into each of the RHEL instances and perform the following steps. Depending on your network access and controls, SSH proxies or other access models might be required.
Use the following command:
ssh [username]@[host_ip_address]
For example, for an Ansible Automation Platform instance running on Amazon Web Services.
ssh ec2-user@10.0.0.6
- Create or copy an SSH key that can be used to connect from the hop node to the execution node in later steps. This can be a temporary key used just for the automation mesh configuration, or a long-lived key. The SSH user and key are used in later steps.
Enable your RHEL subscription with
baseosandappstreamrepositories. Ansible Automation Platform RPM repositories are only available through subscription-manager, not the Red Hat Update Infrastructure (RHUI). If you attempt to use any other Linux footprint, including RHEL with RHUI, this causes errors.sudo subscription-manager register --auto-attach
If Simple Content Access is enabled for your account, use:
sudo subscription-manager register
For more information about Simple Content Access, see Getting started with simple content access.
Enable Ansible Automation Platform subscriptions and the proper Red Hat Ansible Automation Platform channel:
# subscription-manager repos --enable ansible-automation-platform-2.4-for-rhel-8-x86_64-rpms for RHEL 8

# subscription-manager repos --enable ansible-automation-platform-2.4-for-rhel-9-x86_64-rpms for RHEL 9
Ensure the packages are up to date:
sudo dnf upgrade -y
Install the ansible-core packages:
sudo dnf install -y ansible-core
2.3. Defining automation mesh node types
To expand job capacity, create a standalone execution node that can be added to run alongside a deployment of automation controller. These execution nodes are not part of the automation controller Kubernetes cluster. The control nodes run in the cluster connect and submit work to the execution nodes through Receptor. These execution nodes are registered in automation controller as type execution instances, meaning they are only used to run jobs, not dispatch work or handle web requests as control nodes do.
Hop nodes can be added to sit between the control plane of automation controller and standalone execution nodes. These hop nodes are not part of the Kubernetes cluster and are registered in automation controller as an instance of type hop, meaning they only handle inbound and outbound traffic for otherwise unreachable nodes in different or more strict networks.
The following procedure demonstrates how to set the node type for the hosts.
Procedure
- From the navigation panel of automation controller, select .
On the Instances list page, click . The Create new Instance window opens.
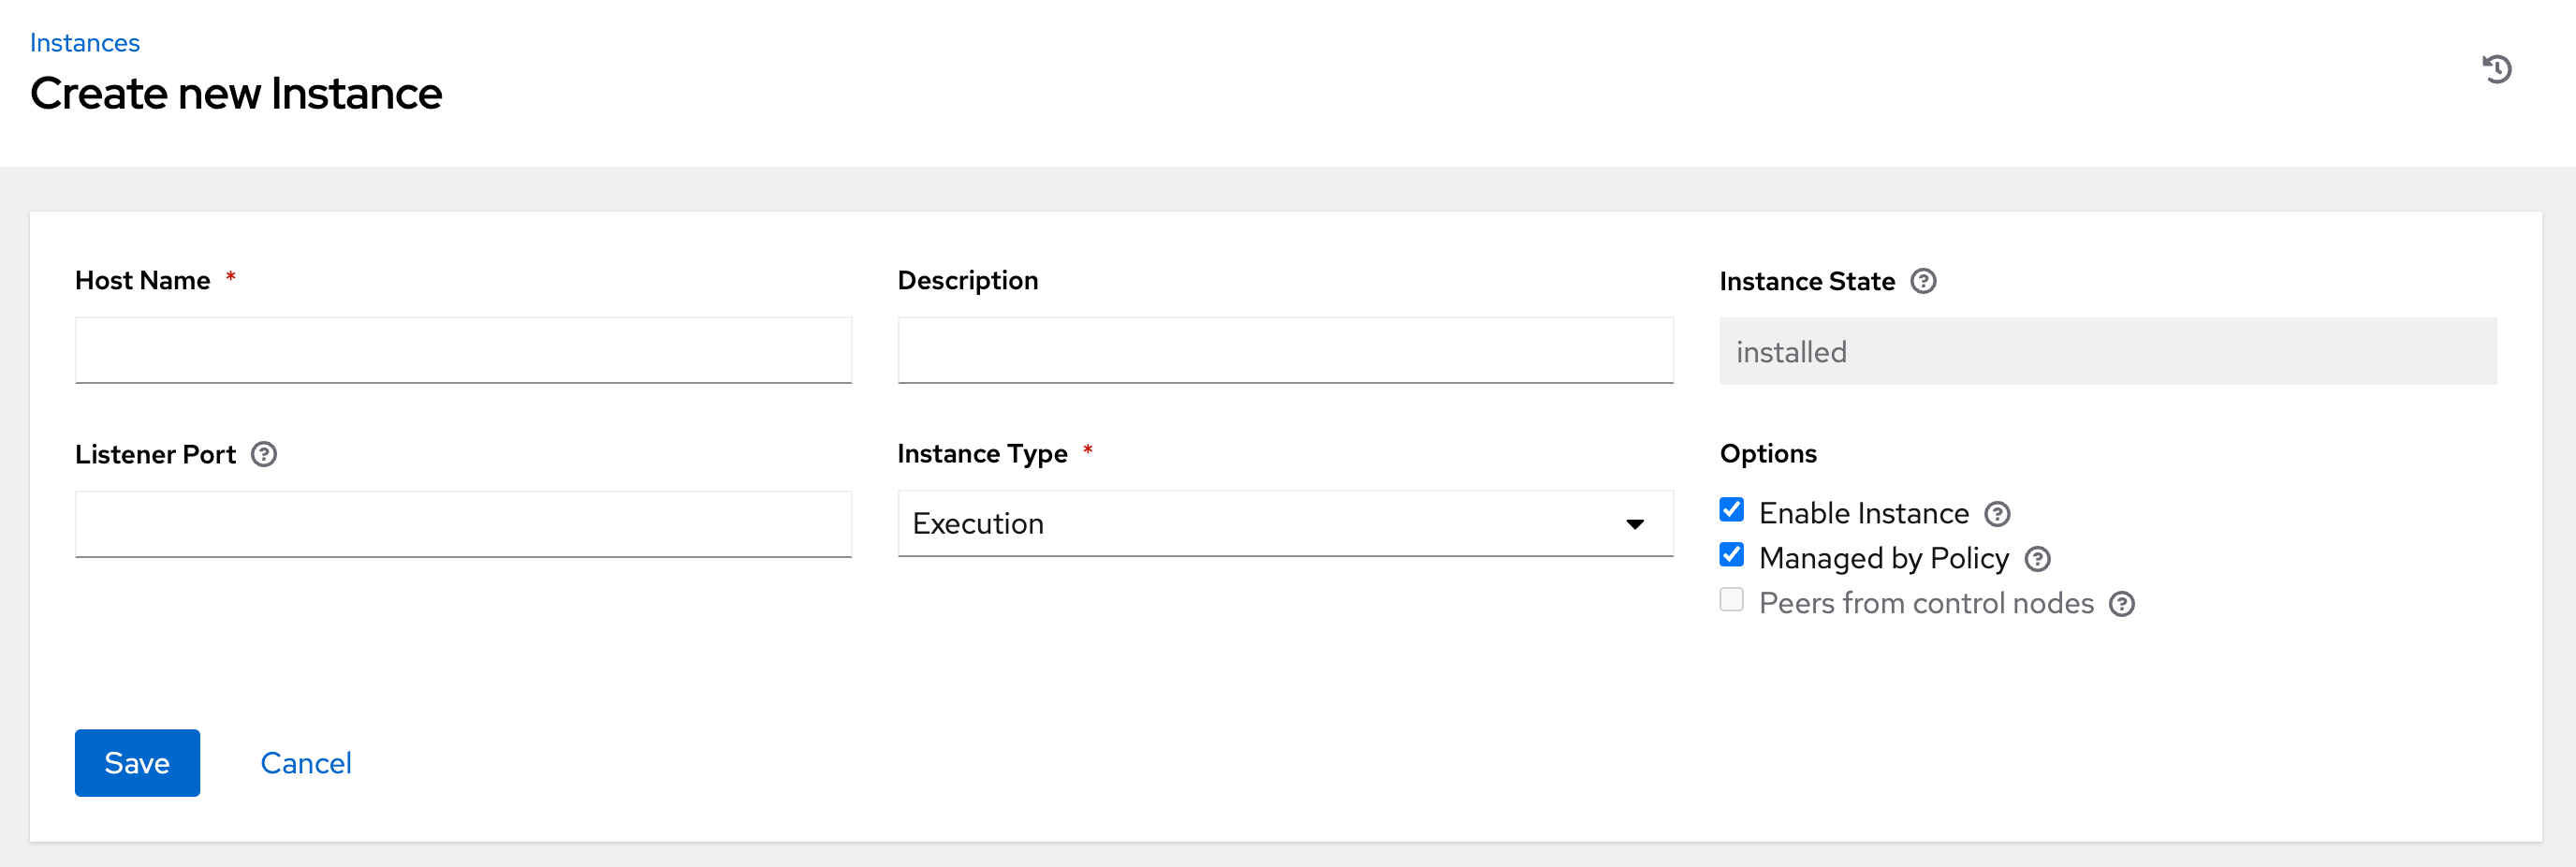
An instance requires the following attributes:
Host Name: (required) Enter a fully qualified domain name (public DNS) or IP address for your instance. This field is equivalent to
hostnamefor installer-based deployments.NoteIf the instance uses private DNS that cannot be resolved from the control cluster, DNS lookup routing fails, and the generated SSL certificates is invalid. Use the IP address instead.
- Optional: Description: Enter a description for the instance.
- Instance State: This field is auto-populated, indicating that it is being installed, and cannot be modified.
-
Listener Port: This port is used for the receptor to listen on for incoming connections. You can set the port to one that is appropriate for your configuration. This field is equivalent to
listener_portin the API. The default value is 27199, though you can set your own port value. Instance Type: Only
executionandhopnodes can be created. Operator based deployments do not support Control or Hybrid nodes.Options:
- Enable Instance: Check this box to make it available for jobs to run on an execution node.
- Check the Managed by Policy box to enable policy to dictate how the instance is assigned.
Check the Peers from control nodes box to enable control nodes to peer to this instance automatically. For nodes connected to automation controller, check the Peers from Control nodes box to create a direct communication link between that node and automation controller. For all other nodes:
- If you are not adding a hop node, make sure Peers from Control is checked.
- If you are adding a hop node, make sure Peers from Control is not checked.
- For execution nodes that communicate with hop nodes, do not check this box.
To peer an execution node with a hop node, click the
 icon next to the Peers field.
The Select Peers window is displayed.
Peer the execution node to the hop node.
Click .
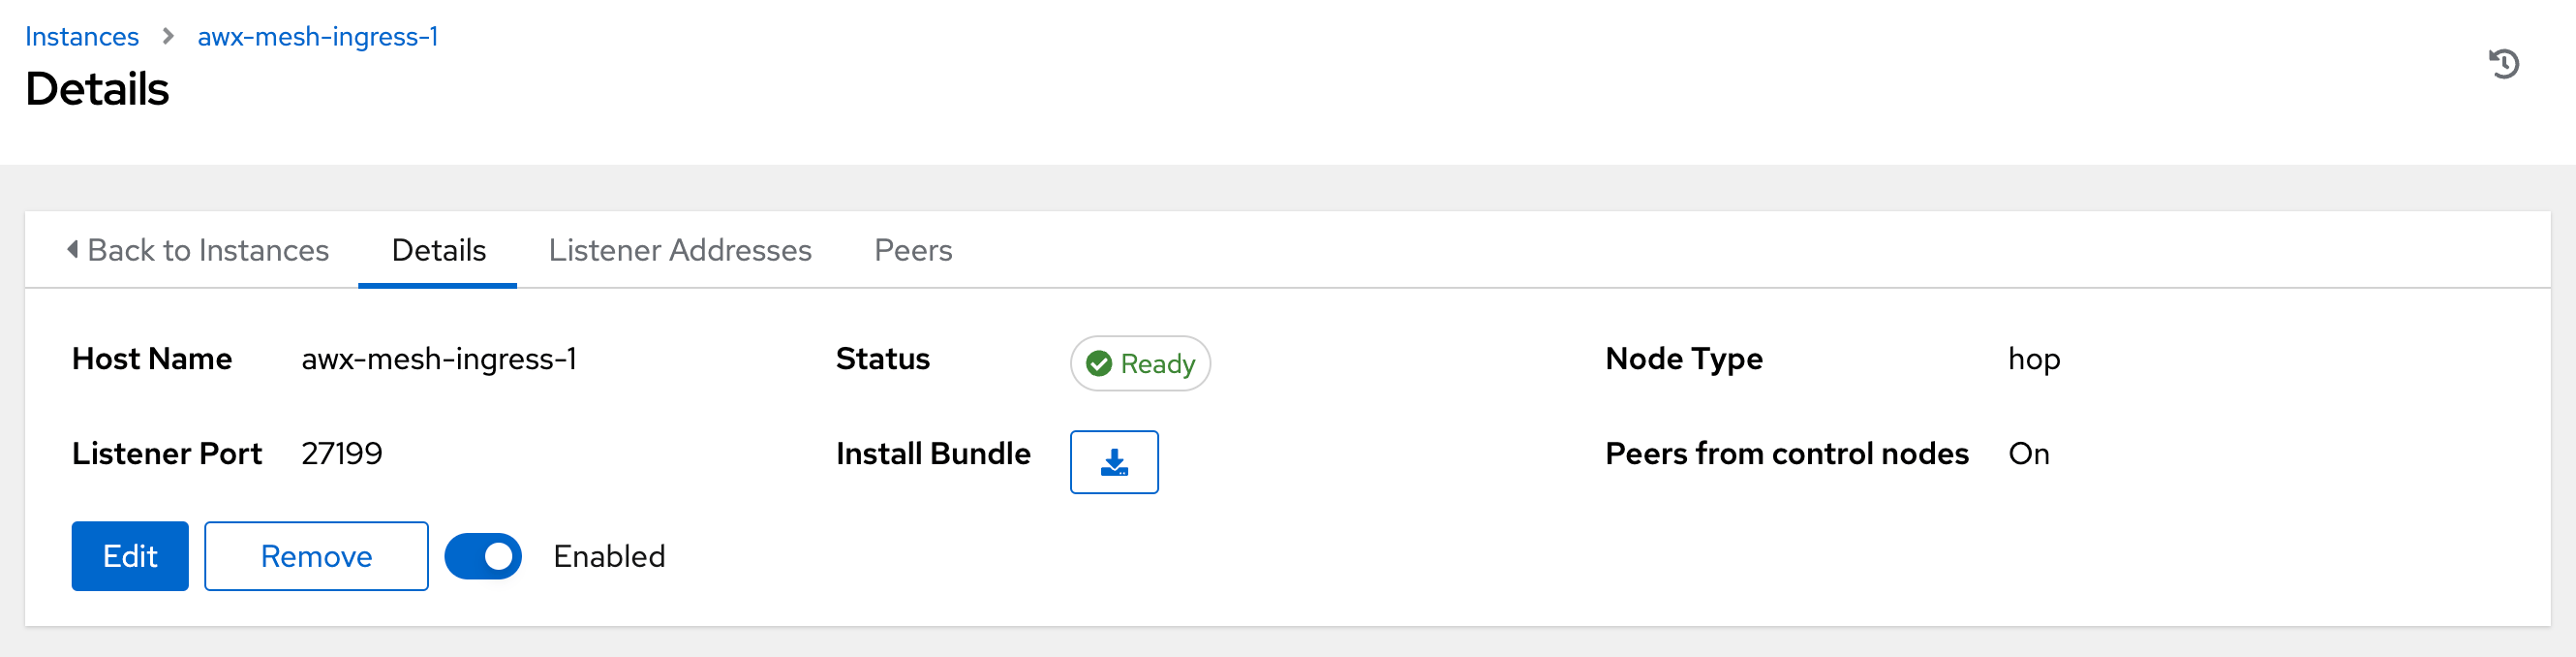
To view a graphical representation of your updated topology, see Topology viewer.
NoteExecute the following steps from any computer that has SSH access to the newly created instance.
Click the
 icon next to Install Bundle to download the tar file that includes this new instance and the files necessary to install the created node into the automation mesh.
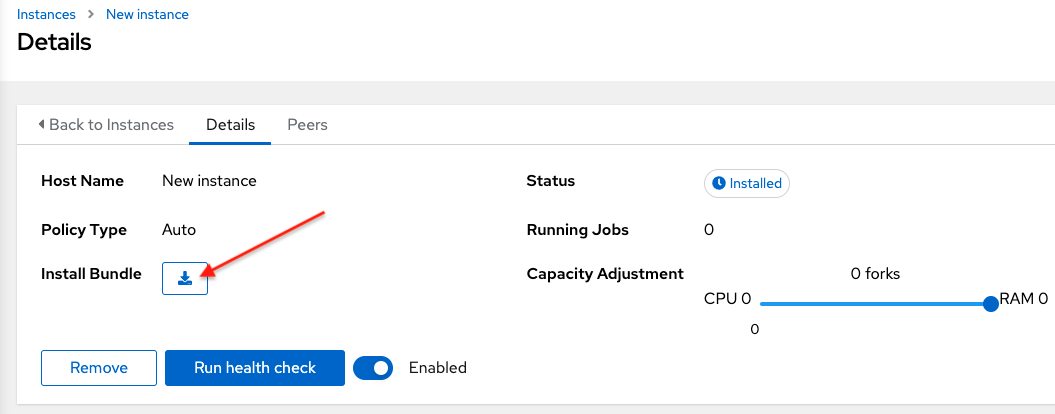
The install bundle contains TLS certificates and keys, a certificate authority, and a proper Receptor configuration file.
receptor-ca.crt
work-public-key.pem
receptor.key
install_receptor.yml
inventory.yml
group_vars/all.yml
requirements.yml
Extract the downloaded
tar.gzInstall Bundle from the location where you downloaded it. To ensure that these files are in the correct location on the remote machine, the install bundle includes theinstall_receptor.ymlplaybook. The playbook requires the Receptor collection. Run the following command to download the collection:ansible-galaxy collection install -r requirements.yml
Before running the
ansible-playbookcommand, edit the following fields in theinventory.ymlfile:all: hosts: remote-execution: ansible_host: 10.0.0.6 ansible_user: <username> # user provided ansible_ssh_private_key_file: ~/.ssh/<id_rsa>-
Ensure
ansible_hostis set to the IP address or DNS of the node. -
Set
ansible_userto the username running the installation. -
Set
ansible_ssh_private_key_fileto contain the filename of the private key used to connect to the instance. -
The content of the
inventory.ymlfile serves as a template and contains variables for roles that are applied during the installation and configuration of a receptor node in a mesh topology. You can modify some of the other fields, or replace the file in its entirety for advanced scenarios. For more information, see Role Variables.
-
Ensure
For a node that uses a private DNS, add the following line to
inventory.yml:ansible_ssh_common_args: <your ssh ProxyCommand setting>
This instructs the
install-receptor.ymlplaybook to use the proxy command to connect through the local DNS node to the private node.- When the attributes are configured, click . The Details page of the created instance opens.
- Save the file to continue.
The system that is going to run the install bundle to setup the remote node and run
ansible-playbookrequires theansible.receptorcollection to be installed:ansible-galaxy collection install ansible.receptor
or
ansible-galaxy install -r requirements.yml
-
Installing the receptor collection dependency from the
requirements.ymlfile consistently retrieves the receptor version specified there. Additionally, it retrieves any other collection dependencies that might be needed in the future. - Install the receptor collection on all nodes where your playbook will run, otherwise an error occurs.
-
Installing the receptor collection dependency from the
If
receptor_listener_portis defined, the machine also requires an available open port on which to establish inbound TCP connections, for example, 27199. Run the following command to open port 27199 for receptor communication:sudo firewall-cmd --permanent --zone=public --add-port=27199/tcp
Run the following playbook on the machine where you want to update your automation mesh:
ansible-playbook -i inventory.yml install_receptor.yml
After this playbook runs, your automation mesh is configured.
To remove an instance from the mesh, see Removing instances.
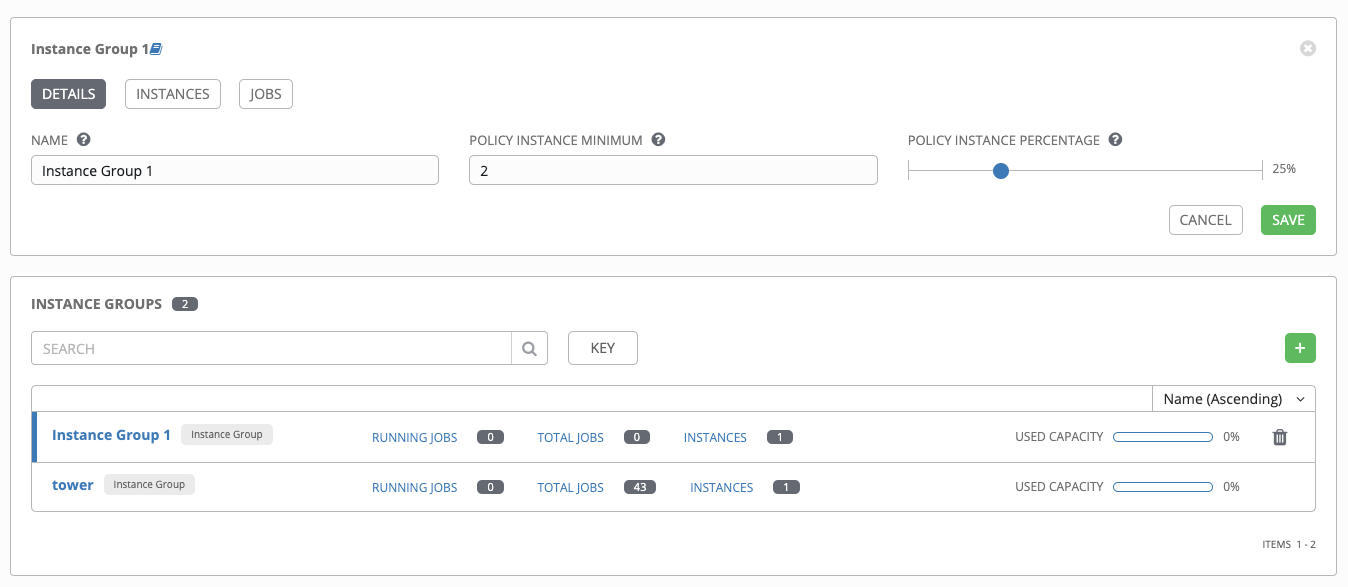
2.4. Creating an instance group
Use the following procedure to create a new instance group.
Procedure
- From the navigation panel, select → .
- Click → .
Enter the appropriate details into the following fields:
- Name: Names must be unique and must not be named "controller".
- Policy instance minimum: Enter the minimum number of instances to automatically assign to this group when new instances come online.
Policy instance percentage: Use the slider to select a minimum percentage of instances to automatically assign to this group when new instances come online.
NotePolicy instance fields are not required to create a new instance group. If you do not specify values, then the Policy instance minimum and Policy instance percentage default to 0.
- Max concurrent jobs: Specify the maximum number of forks that can be run for any given job.
Max forks: Specify the maximum number of concurrent jobs that can be run for any given job.
NoteThe default value of 0 for Max concurrent jobs and Max forks denotes no limit. For more information, see Instance group capacity limits in the Automation controller Administration Guide.
- Click .
When you have successfully created the instance group the Details tab of the newly created instance group remains, enabling you to review and edit your instance group information. This is the same screen that opens when you click the Edit
![]() icon from the Instance Groups list view. You can also edit Instances and review Jobs associated with this instance group:
icon from the Instance Groups list view. You can also edit Instances and review Jobs associated with this instance group:
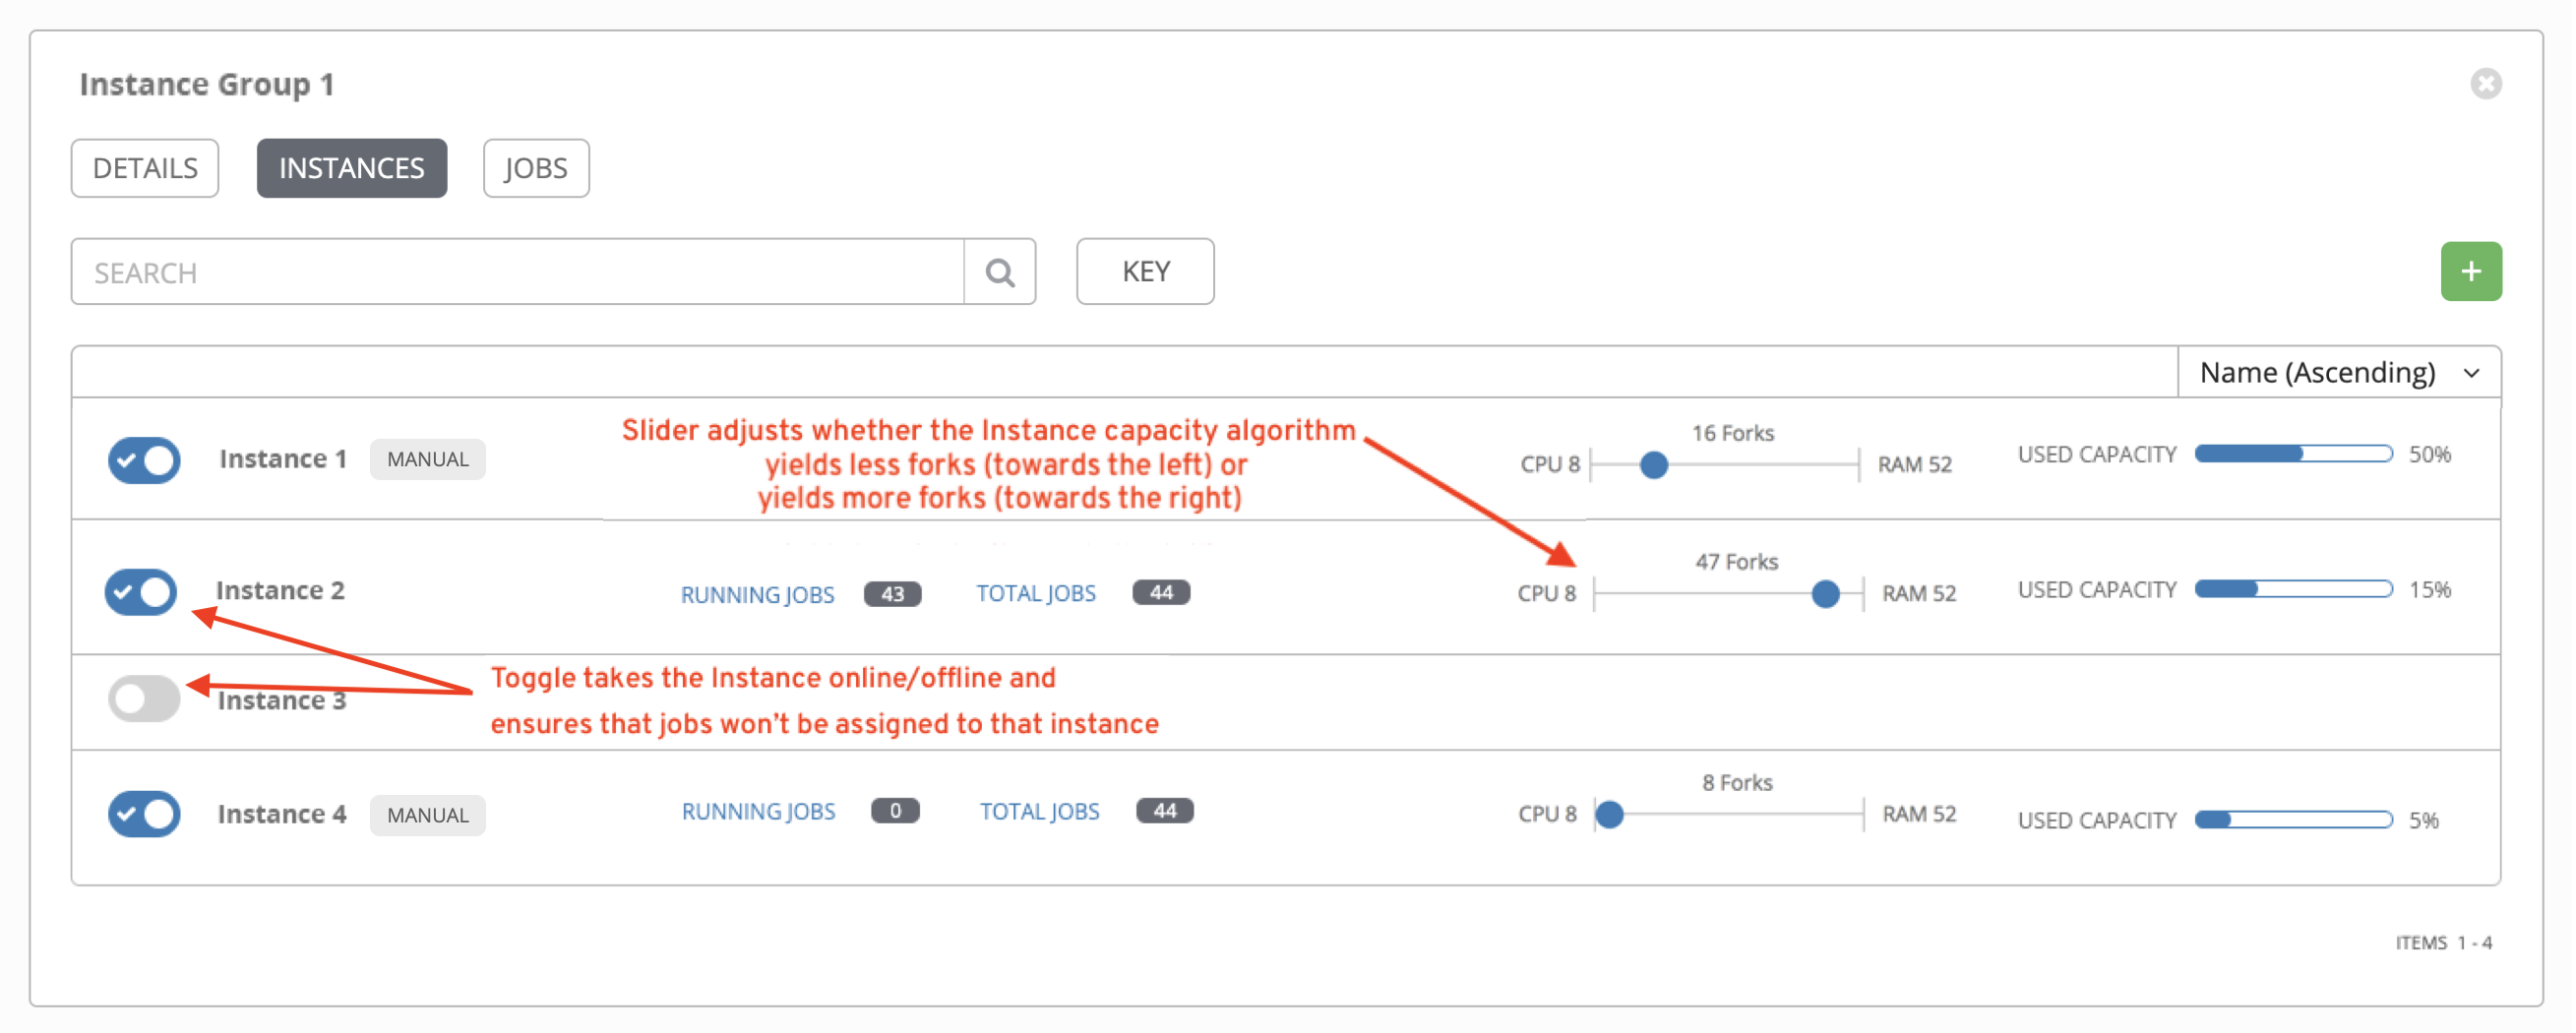
2.5. Associating instances to an instance group
Procedure
- Select the Instances tab of the Instance Groups window.
- Click .
Click the checkbox next to one or more available instances from the list to select the instances you want to associate with the instance group:
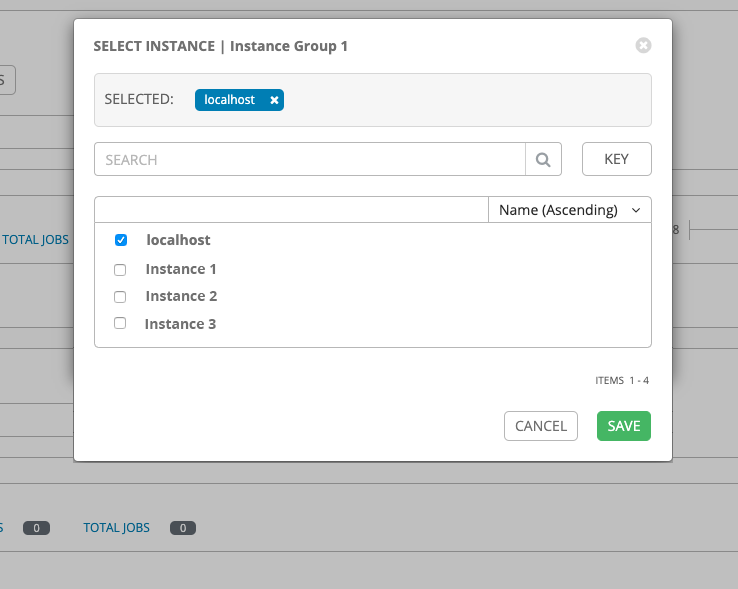
In the following example, the instances added to the instance group displays along with information about their capacity:
2.6. Running jobs on execution nodes
You must specify where jobs are run, or they default to running in the control cluster.
To do this, set up a Job Template.
For more information on Job Templates, see Job Templates in the Automation controller User Guide.
Procedure
-
The Templates list view shows job templates that are currently available. From this screen you can launch
 , edit
 , and copy
 a workflow job template.
-
Select the job you want and click the
icon.
- Select the Instance Group on which you want to run the job. Note that a System Administrator must grant you or your team permissions to be able to use an instance group in a job template. If you select multiple jobs templates, the order in which you select them sets the execution precedence.
- Click .
- Click .
2.7. Pulling the secret for OpenShift Container Platform deployments
This does not apply to Ansible Automation Platform on Microsoft Azure.
If you are using the default execution environment provided with automation controller to run on remote execution nodes, you must add a pull secret in automation controller that contains the credential for pulling the execution environment image.
To do this, create a pull secret on the automation controller namespace and configure the ee_pull_credentials_secret parameter in the Operator as follows:
Procedure
Create a secret using the following command:
oc create secret generic ee-pull-secret \
     --from-literal=username=<username> \
     --from-literal=password=<password> \
     --from-literal=url=registry.redhat.io

oc edit automationcontrollers <instance name>
Add
ee_pull_credentials_secretandee-pull-secretto the specification using:spec.ee_pull_credentials_secret=ee-pull-secret
- To manage instances from the automation controller UI, you must have System Administrator or System Auditor permissions.
2.8. Removing Instances
From the Add Instances page, you can add, remove or run health checks on your nodes.
You must follow the procedures for installing RHEL packages for any additional nodes you create. If you peer this additional node to an existing hop node, you must also install the Install Bundle on each node.
Use the check boxes next to an instance to select it to remove it, or run a health check against it.
- If a node is removed using the UI, then the node is "removed" and does not show a status. If you delete the VM of the node before it is removed in the UI, it will show an error.
- You only need to reinstall the Install Bundle if the topology changes the communication pattern, that is, hop nodes change or you add nodes.
When a button is disabled, you do not have permission for that particular action. Contact your Administrator to grant you the required level of access.
If you are able to remove an instance, you receive a prompt for confirmation.
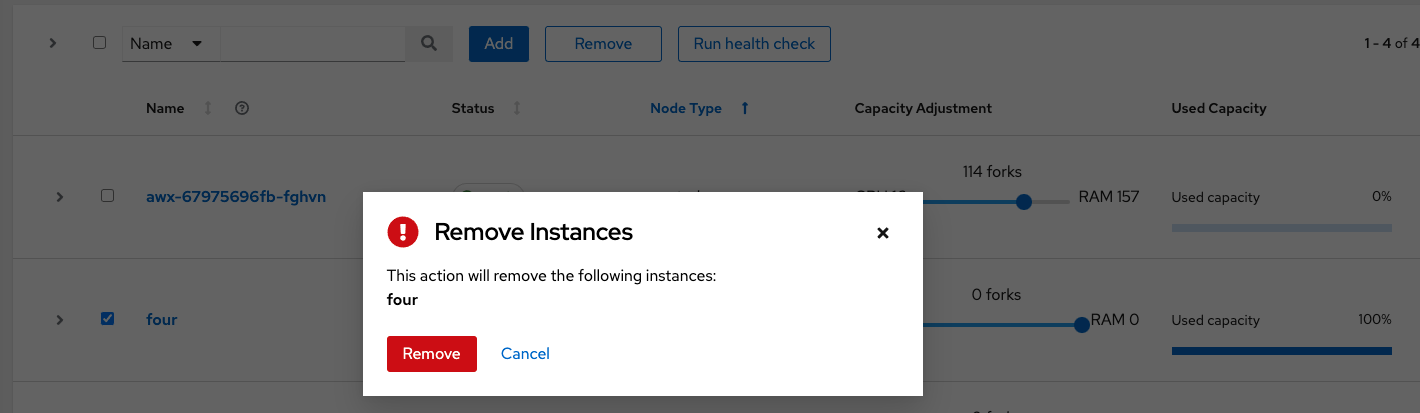
You can still remove an instance even if it is active and jobs are running on it. Automation controller waits for jobs running on this node to complete before removing it.