
Event-Driven Ansible controller user guide
Learn to configure and use Event-Driven Ansible controller to enhance and expand automation
Abstract
Preface
Event-Driven Ansible controller is a new way to enhance and expand automation by improving IT speed and agility while enabling consistency and resilience. Developed by Red Hat, this feature is designed for simplicity and flexibility.
Making open source more inclusive
Red Hat is committed to replacing problematic language in our code, documentation, and web properties. We are beginning with these four terms: master, slave, blacklist, and whitelist. Because of the enormity of this endeavor, these changes will be implemented gradually over several upcoming releases. For more details, see our CTO Chris Wright’s message.
Providing feedback on Red Hat documentation
If you have a suggestion to improve this documentation, or find an error, please contact technical support at https://access.redhat.com to create an issue on the Ansible Automation Platform Jira project using the docs-product component.
Chapter 1. Event-Driven Ansible controller overview
Event-Driven Ansible is a highly scalable, flexible automation capability that works with event sources such as other software vendors' monitoring tools. These tools monitor IT solutions and identify events and automatically implement the documented changes or response in a rulebook to handle that event.
The following procedures form the user configuration:
API documentation for Event-Driven Ansible controller is available at https://<eda-server-host>/api/eda/v1/docs
Chapter 2. Setting up credentials for Event-Driven Ansible controller
Credentials are used by Event-Driven Ansible for authentication when launching rulebooks.
2.1. Setting up credentials
Create a credential to use with a private repository (GitHub or GitLab) or a private container registry.
If you are using a GitHub or GitLab repository, use the basic auth method. Both SCM servers are officially supported. You can use any SCM provider that supports basic auth.
Procedure
- Log in to the Event-Driven Ansible controller Dashboard.
- From the navigation panel, select → .
- Click .
Insert the following:
- Name
- Insert the name.
- Description
- This field is optional.
- Credential type
- The options available are a GitHub personal access token, a GitLab personal access token, or a container registry.
- Username
- Insert the username.
- Token
Insert a token that allows you to authenticate to your destination.
NoteIf you are using a container registry, the token field can be a token or a password, depending on the registry provider. If you are using the Ansible Automation Platform hub registry, insert the password for that in the token field.
- Click .
After saving the credential, the credentials details page is displayed. From there or the Credentials list view, you can edit or delete it.
2.2. Credentials list view
On the Credentials page, you can view the list of created credentials that you have created along with the Type of credential.
From the menu bar, you can search for credentials in the Name field.
You also have the following options in the menu bar:
- Choose which columns are shown in the list view by clicking .
- Choose between a or a , by clicking the icons.
2.3. Editing a credential
Procedure
Edit the credential by using one of these methods:
- From the Credentials list view, click the icon next to the desired credential.
- From the Credentials list view, select the name of the credential, click .
- Edit the appropriate details and click .
2.4. Deleting a credential
Procedure
Delete the credential by using one of these methods:
- From the Credentials list view, click the icon ⋮ next to the desired credential and click .
- From the Credentials list view, select the name of the credential, click the icon ⋮ next to , and click .
- In the pop-up window, select Yes, I confirm that I want to delete this credential.
- Click .
You can delete multiple credentials at a time by selecting the checkbox next to each credential and clicking the icon ⋮ in the menu bar and then clicking .
Chapter 3. Projects
Projects are a logical collection of rulebooks. They must be a git repository and only http protocol is supported. The rulebooks of a project must be located in the path defined for Event-Driven Ansible content in Ansible collections: /extensions/eda/rulebooks at the root of the project.
3.1. Setting up a new project
Prerequisites
- You are logged in to the Event-Driven Ansible controller Dashboard as a Content Consumer.
- You have set up a credential, if necessary. For more information, see the Setting up credentials section.
- You have an existing repository containing rulebooks that are integrated with playbooks contained in a repository to be used by automation controller.
Procedure
- Log in to the Event-Driven Ansible controller Dashboard.
- From the navigation panel, select → .
Insert the following:
- Name
- Enter project name.
- Description
- This field is optional.
- SCM type
- Git is the only SCM type available for use.
- SCM URL
HTTP[S] protocol address of a repository, such as GitHub or GitLab.
NoteYou cannot edit the SCM URL after you create the project.
- Credential
- This field is optional. This is the token needed to utilize the SCM URL.
- Select .
Your project is now created and can be managed in the Projects screen.
After saving the new project, the project’s details page is displayed. From there or the Projects list view, you can edit or delete it.
3.2. Projects list view
On the Projects page, you can view the projects that you have created along with the Status and the Git hash.
If a rulebook changes in source control you can re-sync a project by selecting the sync icon next to the project from the Projects list view. The Git hash updates represent the latest commit on that repository. An activation must be restarted or recreated if you want to use the updated project.
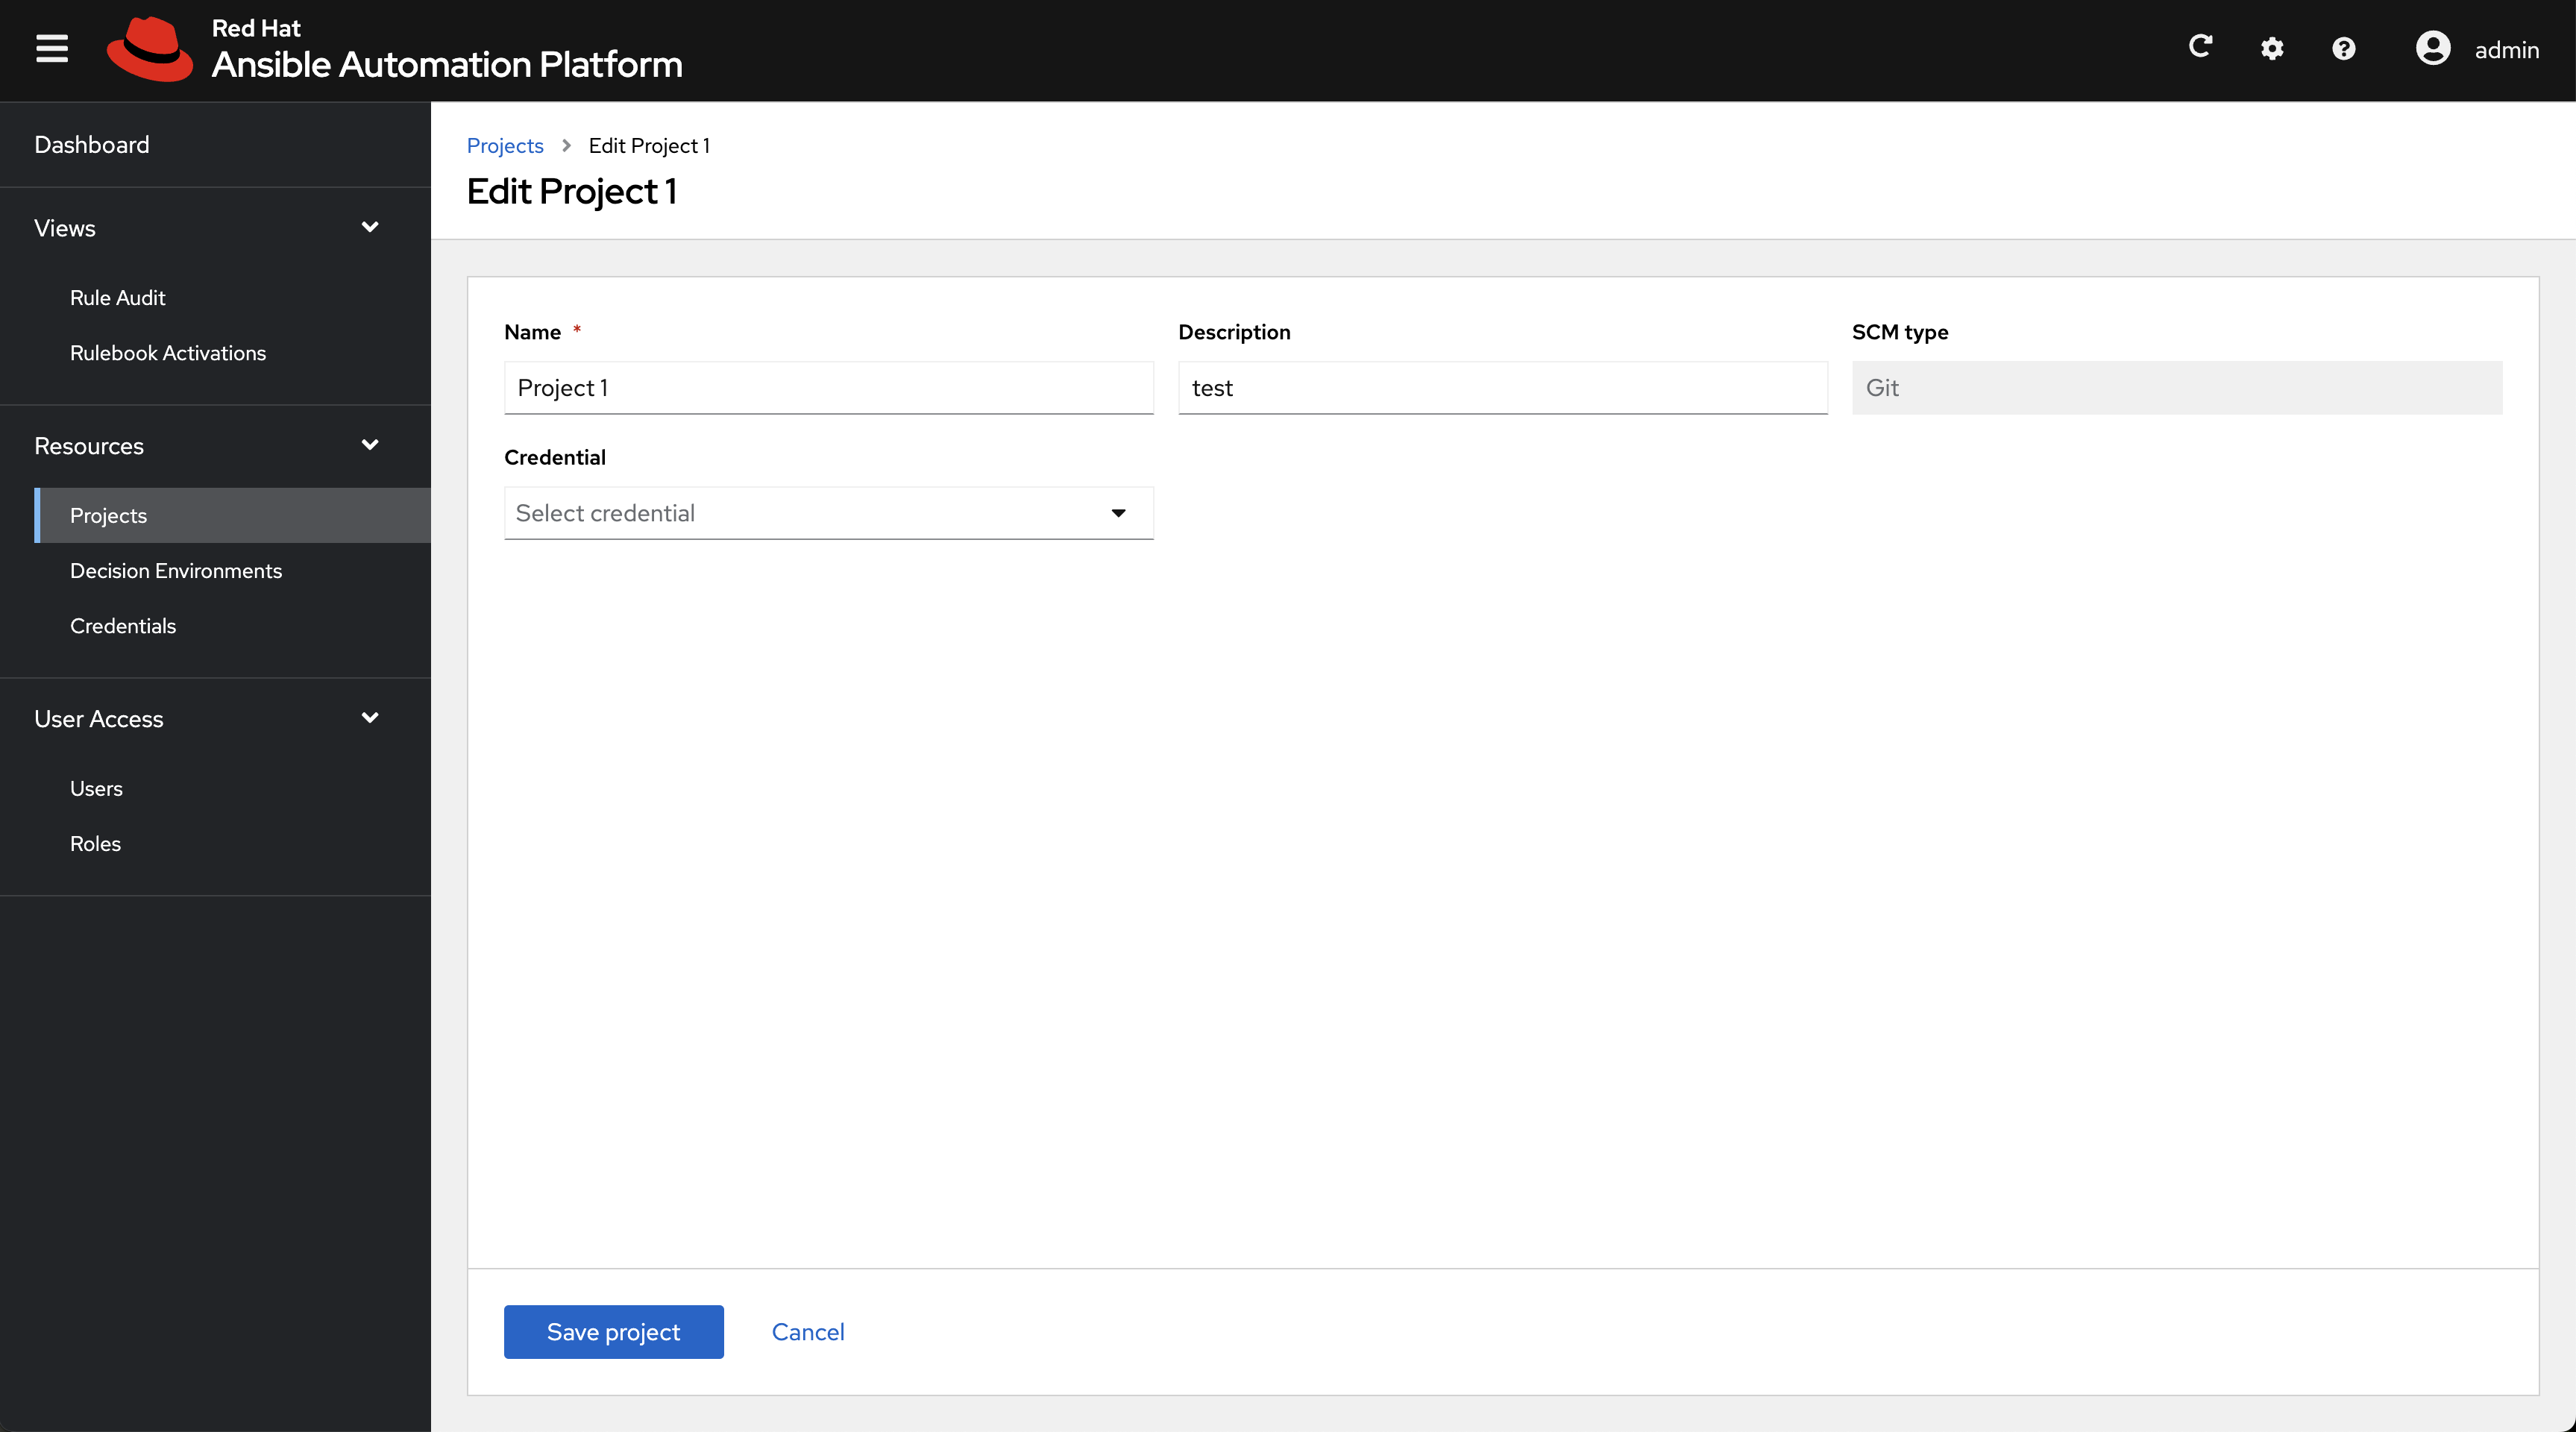
3.3. Editing a project
Procedure
- From the Projects list view, select the icon ⋮ next to the desired project.
- Select .
- Enter the required changes and select .
3.4. Deleting a project
Procedure
- From the Projects list view, select the icon ⋮ next to the desired project.
- Select .
- In the popup window, select .
- Select .
Chapter 4. Decision environments
Decision environments are a container image to run Ansible rulebooks. They create a common language for communicating automation dependencies, and provide a standard way to build and distribute the automation environment. The default decision environment is found in the Ansible-Rulebook.
To create your own decision environment refer to Building a custom decision environment for Event-Driven Ansible within Ansible Automation Platform.
4.1. Setting up a new decision environment
The following steps describe how to import a decision environment into your Event-Driven Ansible controller Dashboard.
Prerequisites
- You are logged in to the Event-Driven Ansible controller Dashboard as a Content Consumer.
- You have set up a credential, if necessary. For more information, see the Setting up credentials section.
-
You have pushed a decision environment image to an image repository or you chose to use the image
de-supportedprovided at registry.redhat.io.
Procedure
- Navigate to the Event-Driven Ansible controller Dashboard.
- From the navigation panel, select .
Insert the following:
- Name
- Insert the name.
- Description
- This field is optional.
- Image
- This is the full image location, including the container registry, image name, and version tag.
- Credential
- This field is optional. This is the token needed to utilize the decision environment image.
- Select .
Your decision environment is now created and can be managed on the Decision Environments screen.
After saving the new decision environment, the decision environment’s details page is displayed. From there or the Decision Environments list view, you can edit or delete it.
4.2. Building a custom decision environment for Event-Driven Ansible within Ansible Automation Platform
Use the following instructions if you need a custom decision environment to provide a custom maintained or third-party event source plugin that is not available in the default decision environment.
Prerequisites
- Ansible Automation Platform > = 2.4
- Event-Driven Ansible
- Ansible Builder > = 3.0
Procedure
Add the
de-supporteddecision environment. This image is built from a base image provided by Red Hat calledde-minimal.NoteRed Hat recommends using
de-minimalas the base image with Ansible Builder to build your custom decision environments.
The following is an example of the Ansible Builder definition file that uses de-minimal as a base image to build a custom decision environment with the ansible.eda collection:
version: 3

images:
  base_image:
    name: 'registry.redhat.io/ansible-automation-platform-24/de-minimal-rhel8:latest'

dependencies:
  galaxy:
    collections:
      - ansible.eda
  python_interpreter:
    package_system: "python39"

options:
  package_manager_path: /usr/bin/microdnf
Additionally, if you need other Python packages or RPMs, you can add the following to a single definition file:
version: 3

images:
  base_image:
    name: 'registry.redhat.io/ansible-automation-platform-24/de-minimal-rhel8:latest'

dependencies:
  galaxy:
    collections:
      - ansible.eda
  python:
    - six
    - psutil
  system:
    - iputils [platform:rpm]
  python_interpreter:
    package_system: "python39"

options:
  package_manager_path: /usr/bin/microdnf
Chapter 5. Setting up an automation controller token
Automation controller must contain a project based on a repository with certain playbooks designed to work with the Event-Driven Ansible rulebooks. Automation controller must also have corresponding job templates set up based on the playbooks in that project.
5.1. Setting up a token to authenticate to Ansible Automation Platform Controller
Prerequisites
- You are logged in to the Event-Driven Ansible controller Dashboard as a Content Consumer.
- You have created a user.
- You can log in to the Event-Driven Ansible controller Dashboard or you are added as a user in the organization.
Procedure
- Go to the Event-Driven Ansible controller Dashboard.
- From the top navigation panel, select your profile.
- Go to User details.
- Select → .
Insert the following:
- Name
- Insert the name.
- Description
- This field is optional.
- Token
Create the token in automation controller. For more information about creating the token, see the Users - Tokens section of the Automation controller User Guide.
NoteThe token must be in write-scope.
- Select .
After saving the new token, you are brought to the Controller Tokens tab where you can delete the token.
Chapter 6. Rulebook activations
A rulebook activation is a process running in the background defined by a decision environment executing a specific rulebook.
6.1. Setting up a rulebook activation
Prerequisites
- You are logged in to the Event-Driven Ansible controller Dashboard as a Content Consumer.
- You have set up a project.
- You have set up a decision environment.
- You have set up an automation controller token.
Procedure
- Navigate to the Event-Driven Ansible controller Dashboard.
- From the navigation panel, select .
Insert the following:
- Name
- Insert the name.
- Description
- This field is optional.
- Project
- Projects are a logical collection of rulebooks.
- Rulebook
- Rulebooks are shown according to the project selected.
- Decision environment
Decision environments are a container image to run Ansible rulebooks.
NoteIn Event-Driven Ansible controller, you cannot customize the pull policy of the decision environment. By default, it follows the behavior of the always policy. Every time an activation is started, the system tries to pull the most recent version of the image.
- Restart policy
This is a policy to decide when to restart a rulebook.
Policies:
- Always: Restarts when a rulebook finishes
- Never: Never restarts a rulebook when it finishes
- On failure: Only restarts when it fails
- Rulebook activation enabled?
- This automatically enables the rulebook activation to run.
- Variables
-
The variables for the rulebook are in a JSON/YAML format. The content would be equivalent to the file passed through the
--varsflag of ansible-rulebook command.
- Click .
Your rulebook activation is now created and can be managed in the Rulebook Activations screen.
After saving the new rulebook activation, the rulebook activation’s details page is displayed. From there or the Rulebook Activations list view you can edit or delete it.
6.2. Rulebook activation list view
On the Rulebook Activations page, you can view the rulebook activations that you have created along with the Activation status, Number of rules associated with the rulebook, the Fire count, and Restart count.
If the Activation Status is Running, it means that the rulebook activation is running in the background and executing the required actions according to the rules declared in the rulebook.
You can view more details by selecting the activation from the Rulebook Activations list view.
![Rulebook activation][width=25px](https://access.redhat.com/webassets/avalon/d/Red_Hat_Ansible_Automation_Platform-2.4-Event-Driven_Ansible_controller_user_guide-en-US/images/2b2fdf25e67d6f64b92e05f42a6918c4/eda-rulebook-activations-list-view.png)
For all activations that have run, you can view the Details and History tabs to get more information about what happened.
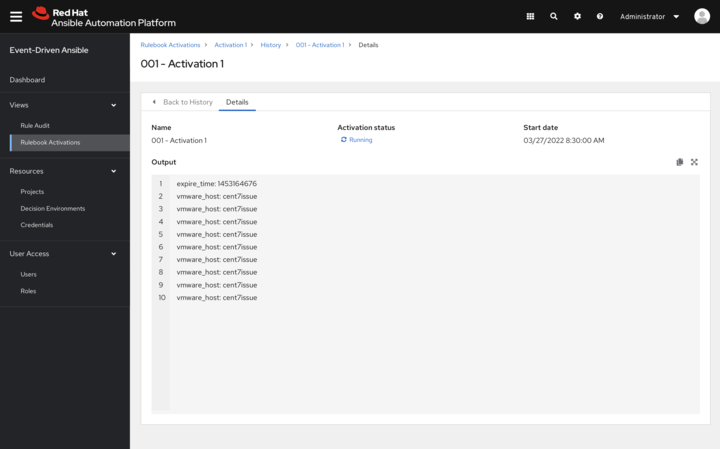
6.2.1. Viewing activation output
You can view the output of the activations in the History tab.
Procedure
- Select the tab to access the list of all the activation instances. An activation instance represents a single execution of the activation.
- Then select the activation instance in question, this will show you the Output produced by that specific execution.
To view events that came in and triggered an action, you can use the Rule Audit section in the Event-Driven Ansible controller Dashboard.
6.3. Enabling and disabling rulebook activations
- Select the switch on the row level to enable or disable your chosen rulebook.
- In the popup window, select .
- Select .
6.4. Restarting rulebook activations
You can only restart a rulebook activation if it is currently enabled and the restart policy was set to Always when it was created.
- Select the icon ⋮ next to Rulebook Activation enabled/disabled toggle.
- Select .
- In the popup window, select .
- Select .
6.5. Deleting rulebook activations
- Select the icon ⋮ next to the Rulebook Activation enabled/disabled toggle.
- Select .
- In the popup window, select .
- Select .
6.6. Activating webhook rulebooks
In Openshift environments, you can allow webhooks to reach an activation-job-pod over a given port by creating a Route that exposes that rulebook activation’s Kubernetes service.
Prerequisites
- You have created a rulebook activation in the Event-Driven Ansible controller Dashboard.
The following is an example of rulebook with a given webhook:
- name: Listen for storage-monitor events
  hosts: all
  sources:
    - ansible.eda.webhook:
        host: 0.0.0.0
        port: 5000
  rules:
    - name: Rule - Print event information
    condition: event.meta.headers is defined
    action:
      run_job_template:
        name: StorageRemediation
        organization: Default
        job_args:
          extra_vars:
             message: from eda
             sleep: 1
Procedure
Create a Route (on OpenShift Container Platform) to expose the service. The following is an example Route for an ansible-rulebook source that expects POST’s on port 5000 on the decision environment pod:
kind: Route
apiVersion: route.openshift.io/v1
metadata:
  name: test-sync-bug
  namespace: dynatrace
  labels:
    app: eda
    job-name: activation-job-1-5000
spec:
  host: test-sync-bug-dynatrace.apps.aap-dt.ocp4.testing.ansible.com
  to:
    kind: Service
    name: activation-job-1-5000
    weight: 100
  port:
    targetPort: 5000
  tls:
    termination: edge
    insecureEdgeTerminationPolicy: Redirect
  wildcardPolicy: None
When you create the Route, test it with a Post to the Route URL:
curl -H "Content-Type: application/json" -X POST test-sync-bug-dynatrace.apps.aap-dt.ocp4.testing.ansible.com -d '{}'NoteYou do not need the port as it is specified on the Route (targetPort).
6.7. Testing with Kubernetes
With Kubernetes you can create an Ingress, or expose the port, but not for production.
Procedure
Run the following command to expose the port on the cluster for a given service:
kubectl port-forward svc/<ACTIVATION_SVC_NAME> 5000:5000
Make the HTTP requests against the
localhost:5000to trigger the rulebook:curl -H "Content-Type: application/json" -X POST test-sync-bug-dynatrace.apps.aap-dt.ocp4.testing.ansible.com -d '{}'
Chapter 7. Rule Audit
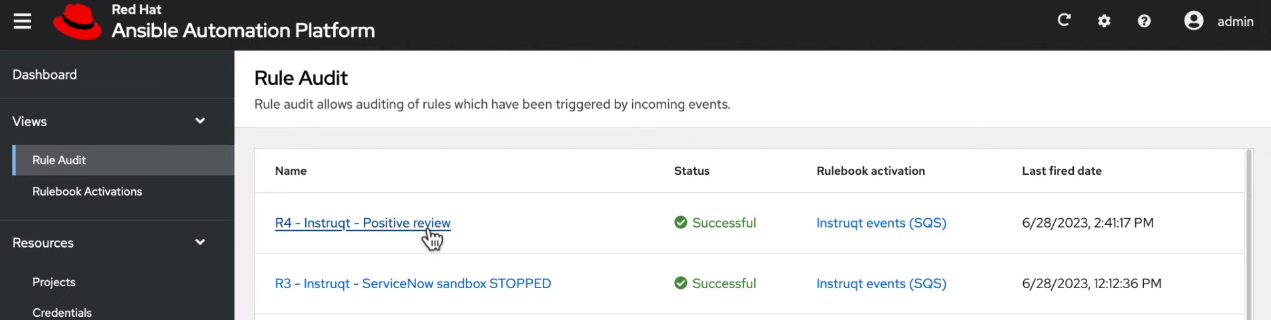
Rule audit allows the auditing of rules which have been triggered by all the rules that were activated at some point.
The Rule Audit list view shows you a list of every time an event came in that matched a condition within a rulebook and triggered an action. The list shows you rules within your rulebook and each heading matches up to a rule that has been executed.
7.1. Viewing rule audit details
From the Rule Audit list view you can check the event that triggered specific actions.
Procedure
- From the navigation panel select .
- Select the desired rule, this brings you to the Details tab.
From here you can view when it was created, when it was last fired, and the rulebook activation that it corresponds to.
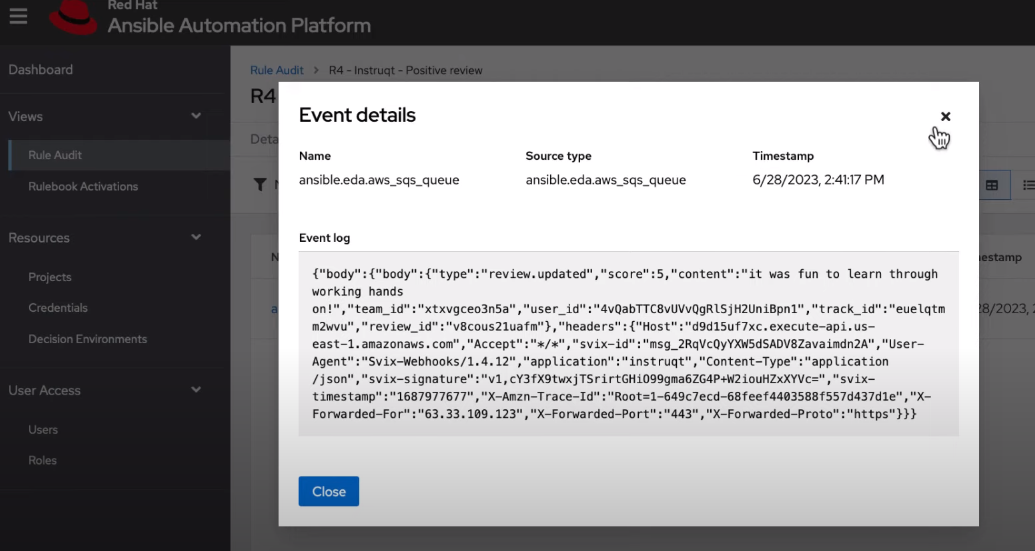
7.2. Viewing rule audit events
Procedure
- From the navigation panel select .
- Select the desired rule, this brings you to the Details tab. To view all the events that triggered an action, select the Events tab. This shows you the event that triggered actions.
- Select an event to view the Event log, along with the Source type and Timestamp.
7.3. Viewing rule audit actions
Procedure
- From the navigation panel select .
- Select the desired rule, this brings you to the Actions tab.
From here you can view executed actions that were taken. Some actions are linked out to automation controller where you can view the output.