
Automation Controller User Guide
User Guide for Automation Controller
Abstract
Preface
Thank you for your interest in Red Hat Ansible Automation Platform automation controller. Automation controller helps teams manage complex multitiered deployments by adding control, knowledge, and delegation to Ansible-powered environments.
The Automation controller User Guide describes all of the functionality available in automation controller. It assumes moderate familiarity with Ansible, including concepts such as playbooks, variables, and tags. For more information about these and other Ansible concepts, see the Ansible documentation.
Making open source more inclusive
Red Hat is committed to replacing problematic language in our code, documentation, and web properties. We are beginning with these four terms: master, slave, blacklist, and whitelist. Because of the enormity of this endeavor, these changes will be implemented gradually over several upcoming releases. For more details, see our CTO Chris Wright’s message.
Providing feedback on Red Hat documentation
If you have a suggestion to improve this documentation, or find an error, please contact technical support at https://access.redhat.com to create an issue on the Ansible Automation Platform Jira project using the docs-product component.
Chapter 1. Automation controller overview
With Ansible Automation Platform users across an organization can share, vet, and manage automation content by means of a simple, powerful, and agentless technical implementation. IT managers can provide guidelines on how automation is applied to individual teams. Automation developers can write tasks that use existing knowledge, without the operational overhead of conforming to complex tools and frameworks. It is a more secure and stable foundation for deploying end-to-end automation solutions, from hybrid cloud to the edge.
Ansible Automation Platform includes automation controller, which enables users to define, operate, scale, and delegate automation across their enterprise.
1.1. Real-time playbook output and exploration
Automation controller enables you to watch playbooks run in real time, seeing each host as they check in. You can go back and explore the results for specific tasks and hosts in great detail, search for specific plays or hosts and see just those results, or locate errors that need to be corrected.
1.2. "Push Button" automation
Automation controller enables you to access your favorite projects and re-trigger execution from the web interface. Automation controller asks for input variables, prompts for your credentials, starts and monitors jobs, and displays results and host history.
1.3. Simplified role-based access control and auditing
Automation controller enables you to:
- Grant permissions to perform a specific task to different teams or explicit users through role-based access control (RBAC). Example tasks include viewing, creating, or modifying a file.
- Keep some projects private, while enabling some users to edit inventories, and others to run playbooks against certain systems, either in check (dry run) or live mode.
- Enable certain users to use credentials without exposing the credentials to them.
Automation controller records the history of operations and who made them, including objects edited and jobs launched.
If you want to give any user or team permissions to use a job template, you can assign permissions directly on the job template. Credentials are full objects in the automation controller RBAC system, and can be assigned to multiple users or teams for use.
Automation controller includes an auditor type. A system-level auditor can see all aspects of the systems automation, but does not have permission to run or change automation. An auditor is useful for a service account that scrapes automation information from the REST API.
Additional resources
- For more information about user roles, see Role-Based Access Controls.
1.4. Cloud and autoscaling flexibility
Automation controller includes a powerful optional provisioning callback feature that enables nodes to request configuration on demand. This is an ideal solution for a cloud auto-scaling scenario and includes the following features:
- It integrates with provisioning servers like Cobbler and deals with managed systems with unpredictable uptimes.
- It requires no management software to be installed on remote nodes.
-
The callback solution can be triggered by a call to
curlorwget, and can be embedded ininitscripts, kickstarts, or preseeds. - You can control access so that only machines listed in the inventory can request configuration.
1.5. The ideal RESTful API
The automation controller REST API is the ideal RESTful API for a systems management application, with all resources fully discoverable, paginated, searchable, and well modeled. A styled API browser enables API exploration from the API root at http://<server name>/api/, showing off every resource and relation. Everything that can be done in the user interface can be done in the API.
1.6. Backup and restore
Ansible Automation Platform can backup and restore your systems or systems, making it easy for you to backup and replicate your instance as required.
1.7. Ansible Galaxy integration
By including an Ansible Galaxy requirements.yml file in your project directory, automation controller automatically fetches the roles your playbook needs from Galaxy, GitHub, or your local source control. For more information, see Ansible Galaxy Support.
1.8. Inventory support for OpenStack
Dynamic inventory support is available for OpenStack. This enables you to target any of the virtual machines or images running in your OpenStack cloud.
For more information, see Openstack.
1.9. Remote command execution
Use remote command execution to perform a simple tasks, such as adding a single user, updating a single security vulnerability, or restarting a failing service. Any task that you can describe as a single Ansible play can be run on a host or group of hosts in your inventory, enabling you to manage your systems quickly and easily. Because of an RBAC engine and detailed audit logging, you know which user has completed a specific task.
1.10. System tracking
You can collect facts using the fact caching feature. For more information, see Fact Caching.
1.11. Integrated notifications
Keep track of the status of your automation.
You can configure the following notifications:
- stackable notifications for job templates, projects, or entire organizations
- different notifications for job start, job success, job failure, and job approval (for workflow nodes)
The following notification sources are supported:
- Grafana
- IRC
- Mattermost
- PagerDuty
- Rocket.Chat
- Slack
- Twilio
- Webhook (post to an arbitrary webhook, for integration into other tools)
You can also customize notification messages for each of the preceding notification types.
1.12. Integrations
Automation controller supports the following integrations:
- Dynamic inventory sources for Red Hat Satellite 6.
For more information, see Red Hat Satellite 6.
- Red Hat Insights integration, enabling Insights playbooks to be used as an Ansible Automation Platform project.
For more information, see Setting up Insights Remediations.
- Automation hub acts as a content provider for automation controller, requiring both an automation controller deployment and an automation hub deployment running alongside each other.
1.13. Custom Virtual Environments
Custom Ansible environment support enables you to have different Ansible environments and specify custom paths for different teams and jobs.
1.14. Authentication enhancements
Automation controller supports:
- LDAP
- SAML
- token-based authentication
LDAP and SAML support enable you to integrate your enterprise account information in a more flexible manner.
Token-based authentication permits authentication of third-party tools and services with automation controller through integrated OAuth 2 token support.
1.15. Cluster management
Run-time management of cluster groups enables configurable scaling.
1.16. Workflow enhancements
To model your complex provisioning, deployment, and orchestration workflows, you can use automation controller expanded workflows in several ways:
- Inventory overrides for Workflows You can override an inventory across a workflow at workflow definition time, or at launch time. Automation controller enables you to define your application deployment workflows, and then re-use them in multiple environments.
- Convergence nodes for Workflows When modeling complex processes, you must sometimes wait for multiple steps to finish before proceeding. Automation controller workflows can replicate this; workflow steps can wait for any number of previous workflow steps to complete properly before proceeding.
- Workflow Nesting You can re-use individual workflows as components of a larger workflow. Examples include combining provisioning and application deployment workflows into a single workflow.
- Workflow Pause and Approval You can build workflows containing approval nodes that require user intervention. This makes it possible to pause workflows in between playbooks so that a user can give approval (or denial) for continuing on to the next step in the workflow.
For more information, see Workflows in automation controller
1.17. Job distribution
Take a fact gathering or configuration job running across thousands of machines and divide it into slices that can be distributed across your automation controller cluster for increased reliability, faster job completion, and improved cluster use.
For example, you can change a parameter across 15,000 switches at scale, or gather information across your multi-thousand-node RHEL estate.
For more information, see Job Slicing.
1.18. Support for deployment in a FIPS-enabled environment
Automation controller deploys and runs in restricted modes such as FIPS.
1.19. Limit the number of hosts per organization
Many large organizations have instances shared among many organizations. To ensure that one organization cannot use all the licensed hosts, this feature enables superusers to set a specified upper limit on how many licensed hosts can be allocated to each organization. The automation controller algorithm factors changes in the limit for an organization and the number of total hosts across all organizations. Inventory updates fail if an inventory synchronization brings an organization out of compliance with the policy. Additionally, superusers are able to over-allocate their licenses, with a warning.
1.20. Inventory plugins
The following inventory plugins are used from upstream collections:
-
amazon.aws.aws_ec2 -
community.vmware.vmware_vm_inventory -
azure.azcollection.azure_rm -
google.cloud.gcp_compute -
theforeman.foreman.foreman -
openstack.cloud.openstack -
ovirt.ovirt.ovirt -
awx.awx.tower
1.21. Secret management system
With a secret management system, external credentials are stored and supplied for use in automation controller so you need not provide them directly.
Chapter 2. Automation controller licensing, updates and support
Automation controller is provided as part of your annual Red Hat Ansible Automation Platform subscription.
Ansible is an open source software project and is licensed under the GNU General Public License version 3, as described in the Ansible Source Code
You must have valid subscriptions attached before installing Ansible Automation Platform.
For more information, see Attaching Subscriptions.
2.1. Trial and evaluation
You require a license to run automation controller. You can start by using a free trial license.
- Trial licenses for Ansible Automation Platform are available at: http://ansible.com/license
- Support is not included in a trial license or during an evaluation of the automation controller software.
2.2. Component licenses
To view the license information for the components included in automation controller, refer to /usr/share/doc/automation-controller-<version>/README.
where <version> refers to the version of automation controller you have installed.
To view a specific license, refer to /usr/share/doc/automation-controller-<version>/*.txt.
where * is the license file name to which you are referring.
2.3. Node counting in licenses
The automation controller license defines the number of Managed Nodes that can be managed as part of a Red Hat Ansible Automation Platform subscription.
A typical license says "License Count: 500", which sets the maximum number of Managed Nodes at 500.
For more information on managed node requirements for licensing, see https://access.redhat.com/articles/3331481.
Ansible does not recycle node counts or reset automated hosts.
Chapter 3. Logging into automation controller after installation
After you install automation controller, you must log in.
Procedure
- With the login information provided after your installation completed, open a web browser and log in to the automation controller by navigating to its server URL at: https://<CONTROLLER_SERVER_NAME>/
Use the credentials specified during the installation process to login:
- The default username is admin.
- The password for admin is the value specified.
- Click the icon ⋮ next to the desired user.
- Click .
- Edit the required details and click .
Chapter 4. Managing your Ansible automation controller subscription
Before you can use automation controller, you must have a valid subscription, which authorizes its use.
4.1. Subscription Types
Red Hat Ansible Automation Platform is provided at various levels of support and number of machines as an annual subscription.
Standard:
- Manage any size environment
- Enterprise 8x5 support and SLA
- Maintenance and upgrades included
- Review the SLA at Product Support Terms of Service
- Review the Red Hat Support Severity Level Definitions
Premium:
- Manage any size environment, including mission-critical environments
- Premium 24x7 support and SLA
- Maintenance and upgrades included
- Review the SLA at Product Support Terms of Service
- Review the Red Hat Support Severity Level Definitions
All subscription levels include regular updates and releases of automation controller, Ansible, and any other components of the Platform.
For more information, contact Ansible through the Red Hat Customer Portal or at http://www.ansible.com/contact-us/.
4.2. Obtaining an authorized Ansible automation controller subscription
If you already have a subscription to a Red Hat product, you can acquire an automation controller subscription through that subscription. If you do not have a subscription to Red Hat Ansible Automation Platform and Red Hat Satellite, you can request a trial subscription.
Procedure
- If you have a Red Hat Ansible Automation Platform subscription, use your Red Hat customer credentials when you launch the automation controller to access your subscription information. See Importing a subscription.
If you have a non-Ansible Red Hat or Satellite subscription, access automation controller with one of these methods:
- Enter your username and password on the license page.
- Obtain a subscriptions manifest from the Subscription Allocations page on the Red Hat Customer Portal. For more information, see Obtaining a subscriptions manifest.
- If you do not have a Red Hat Ansible Automation Platform subscription, go to Try Red Hat Ansible Automation Platform and request a trial subscription.
Additional resources
- To understand what is supported with your subscription, see Automation controller licensing, updates and support.
- If you have issues with your subscription, contact your Sales Account Manager or Red Hat Customer Service at: https://access.redhat.com/support/contact/customerService/.
4.3. Obtaining a subscriptions manifest
To upload a subscriptions manifest, first set up your subscription allocations:
Procedure
- Navigate to https://access.redhat.com/management/subscription_allocations. The Subscriptions Allocations page contains no subscriptions until you create one.
Click .
NoteIf Create New subscription allocation does not display, or is disabled, you do not have the proper permissions to create subscription allocations. To create a subscription allocation, you must either be an Administrator on the Customer Portal, or have the Manage Your Subscriptions role. Contact an
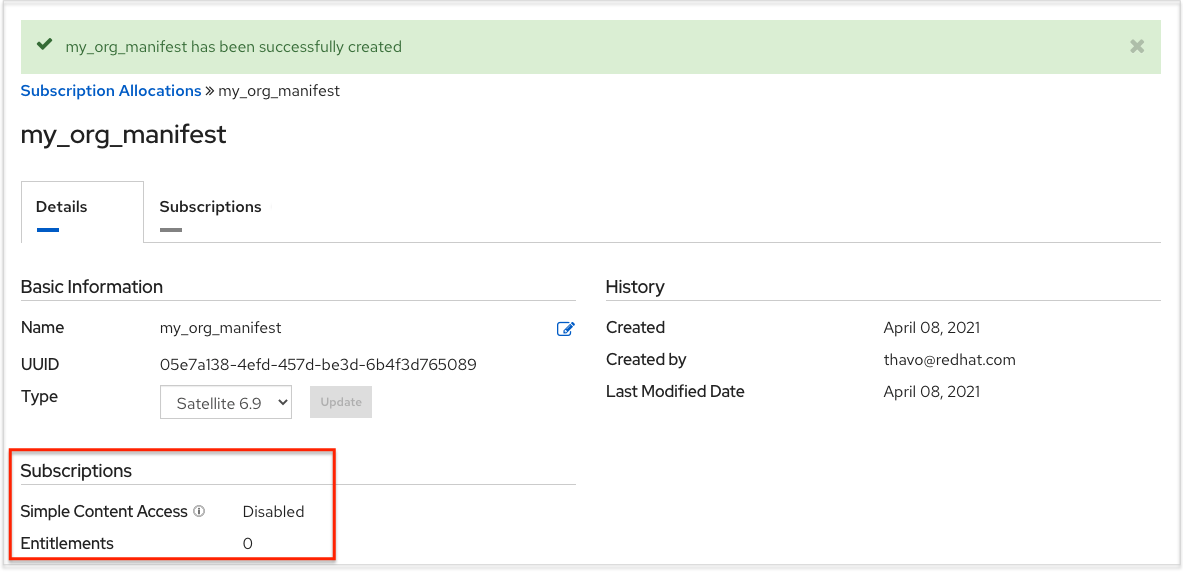
access.redhat.comadministrator, or organization administrator who can grant you permission to manage subscriptions.Enter a Name for your subscription and select 6.15 from the Type drop-down menu.
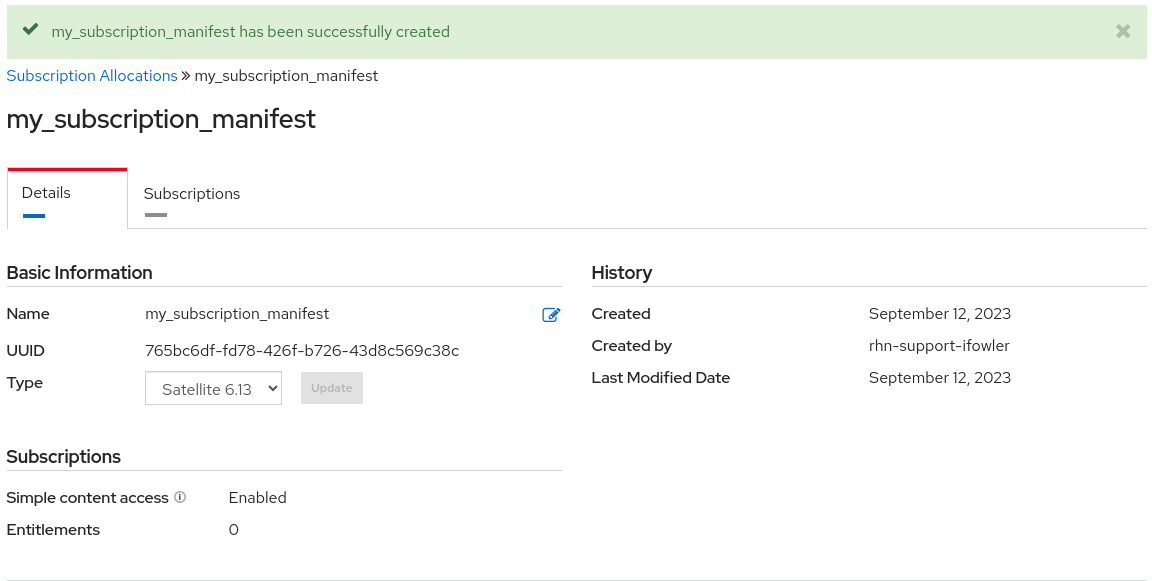
Click .
When your subscriptions manifest is successfully created, the number indicated next to Entitlements indicates the number of entitlements associated with your subscription.
4.3.1. Setting up a subscriptions manifest
To obtain a subscriptions manifest, you must add an entitlement to your subscriptions through the Subscriptions tab.
Procedure
- Click the tab.
- If there are no subscriptions to display, click .
The following screen enables you to select and add entitlements to put in the manifest file.

You can select multiple Ansible Automation Platform subscriptions in your subscription allocation. Valid Ansible Automation Platform subscriptions commonly go by the name "Red Hat Ansible Automation…".
Specify the number of entitlements or managed nodes to put in the manifest file. This enables you to split up a subscription, for example: 400 nodes on a development cluster and 600 nodes for the production cluster, out of a 1000 node subscription.
NoteYou can apply multiple subscriptions to a single installation by adding multiple subscriptions of the same type to a manifest file and uploading them. Similarly, a subset of a subscription can be applied by only allocating a portion of the subscription when creating the manifest.
Click .
The allocations you specified, when successfully added, are displayed in the Subscriptions tab.
- Click the Details tab to access the subscription manifest file.
-
Click to export the manifest file for this subscription. A folder pre-pended with
manifest_is downloaded to your local drive. Multiple subscriptions with the same SKU are aggregated. - When you have a subscription manifest, go to the Subscription screen.
- Click to upload the entire manifest file.
- Navigate to the location where the file is saved. Do not open it or upload individual parts of it.
4.4. Importing a subscription
After you have obtained an authorized Ansible Automation Platform subscription, you must import it into the automation controller system before you can use automation controller. .Prerequisites
- You have obtained a subscriptions manifest. For more information, see Obtaining a subscriptions manifest.
Procedure
Launch automation controller for the first time. The Subscription Management screen displays.
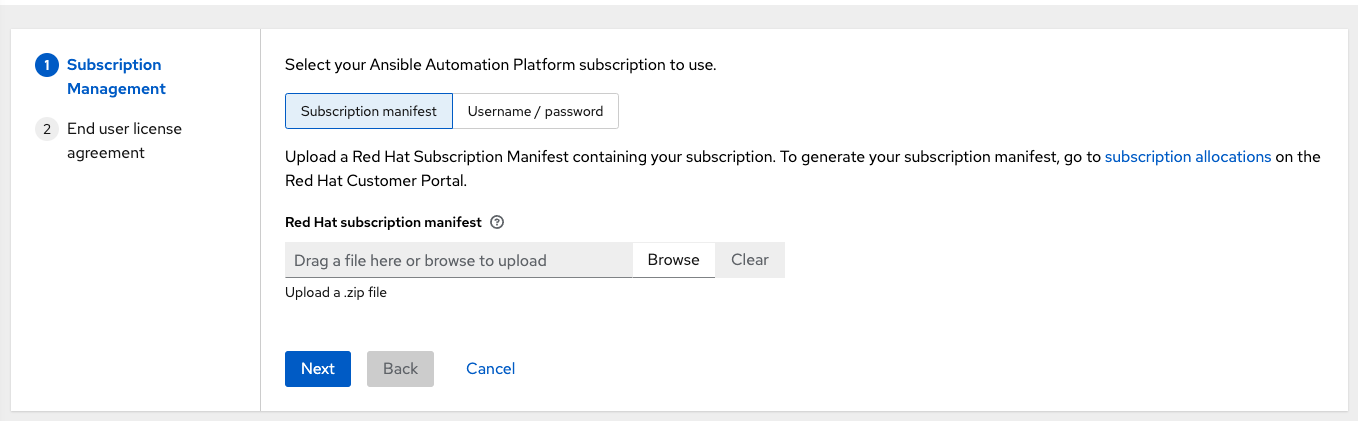
Retrieve and import your subscription by completing either of the following steps:
If you have obtained a subscription manifest, upload it by navigating to the location where the file is saved. The subscription manifest is the complete
.zipfile, and not only its component parts.NoteIf the Browse option in the Subscription manifest option is disabled, clear the username and password fields to enable it.
The subscription metadata is then retrieved from the RHSM/Satellite API, or from the manifest provided. If many subscription counts were applied in a single installation, automation controller combines the counts but uses the earliest expiration date as the expiry (at which point you must refresh your subscription).
If you are using your Red Hat customer credentials, enter your username and password on the license page. Use your Satellite username or password if your automation controller cluster nodes are registered to Satellite with Subscription Manager. After you enter your credentials, click .
Automation controller retrieves your configured subscription service. Then, it prompts you to select the subscription that you want to run and applies that metadata to automation controller. You can log in over time and retrieve new subscriptions if you have renewed.
Click to proceed to the Tracking and Insights page.
Tracking and insights collect data to help Red Hat improve the product and deliver a better user experience. For more information about data collection, see Usability Analytics and Data Collection of the Automation controller Administration Guide.
This option is checked by default, but you can opt out of any of the following:
- User analytics. Collects data from the controller UI.
Insights Analytics. Provides a high level analysis of your automation with automation controller. It helps you to identify trends and anomalous use of the controller. For opt-in of Automation Analytics to be effective, your instance of automation controller must be running on Red Hat Enterprise Linux. For more information, see the Automation Analytics section.
NoteYou can change your analytics data collection preferences at any time.
- After you have specified your tracking and Insights preferences, click to proceed to the End User Agreement.
Review and check the I agree to the End User License Agreement checkbox and click .
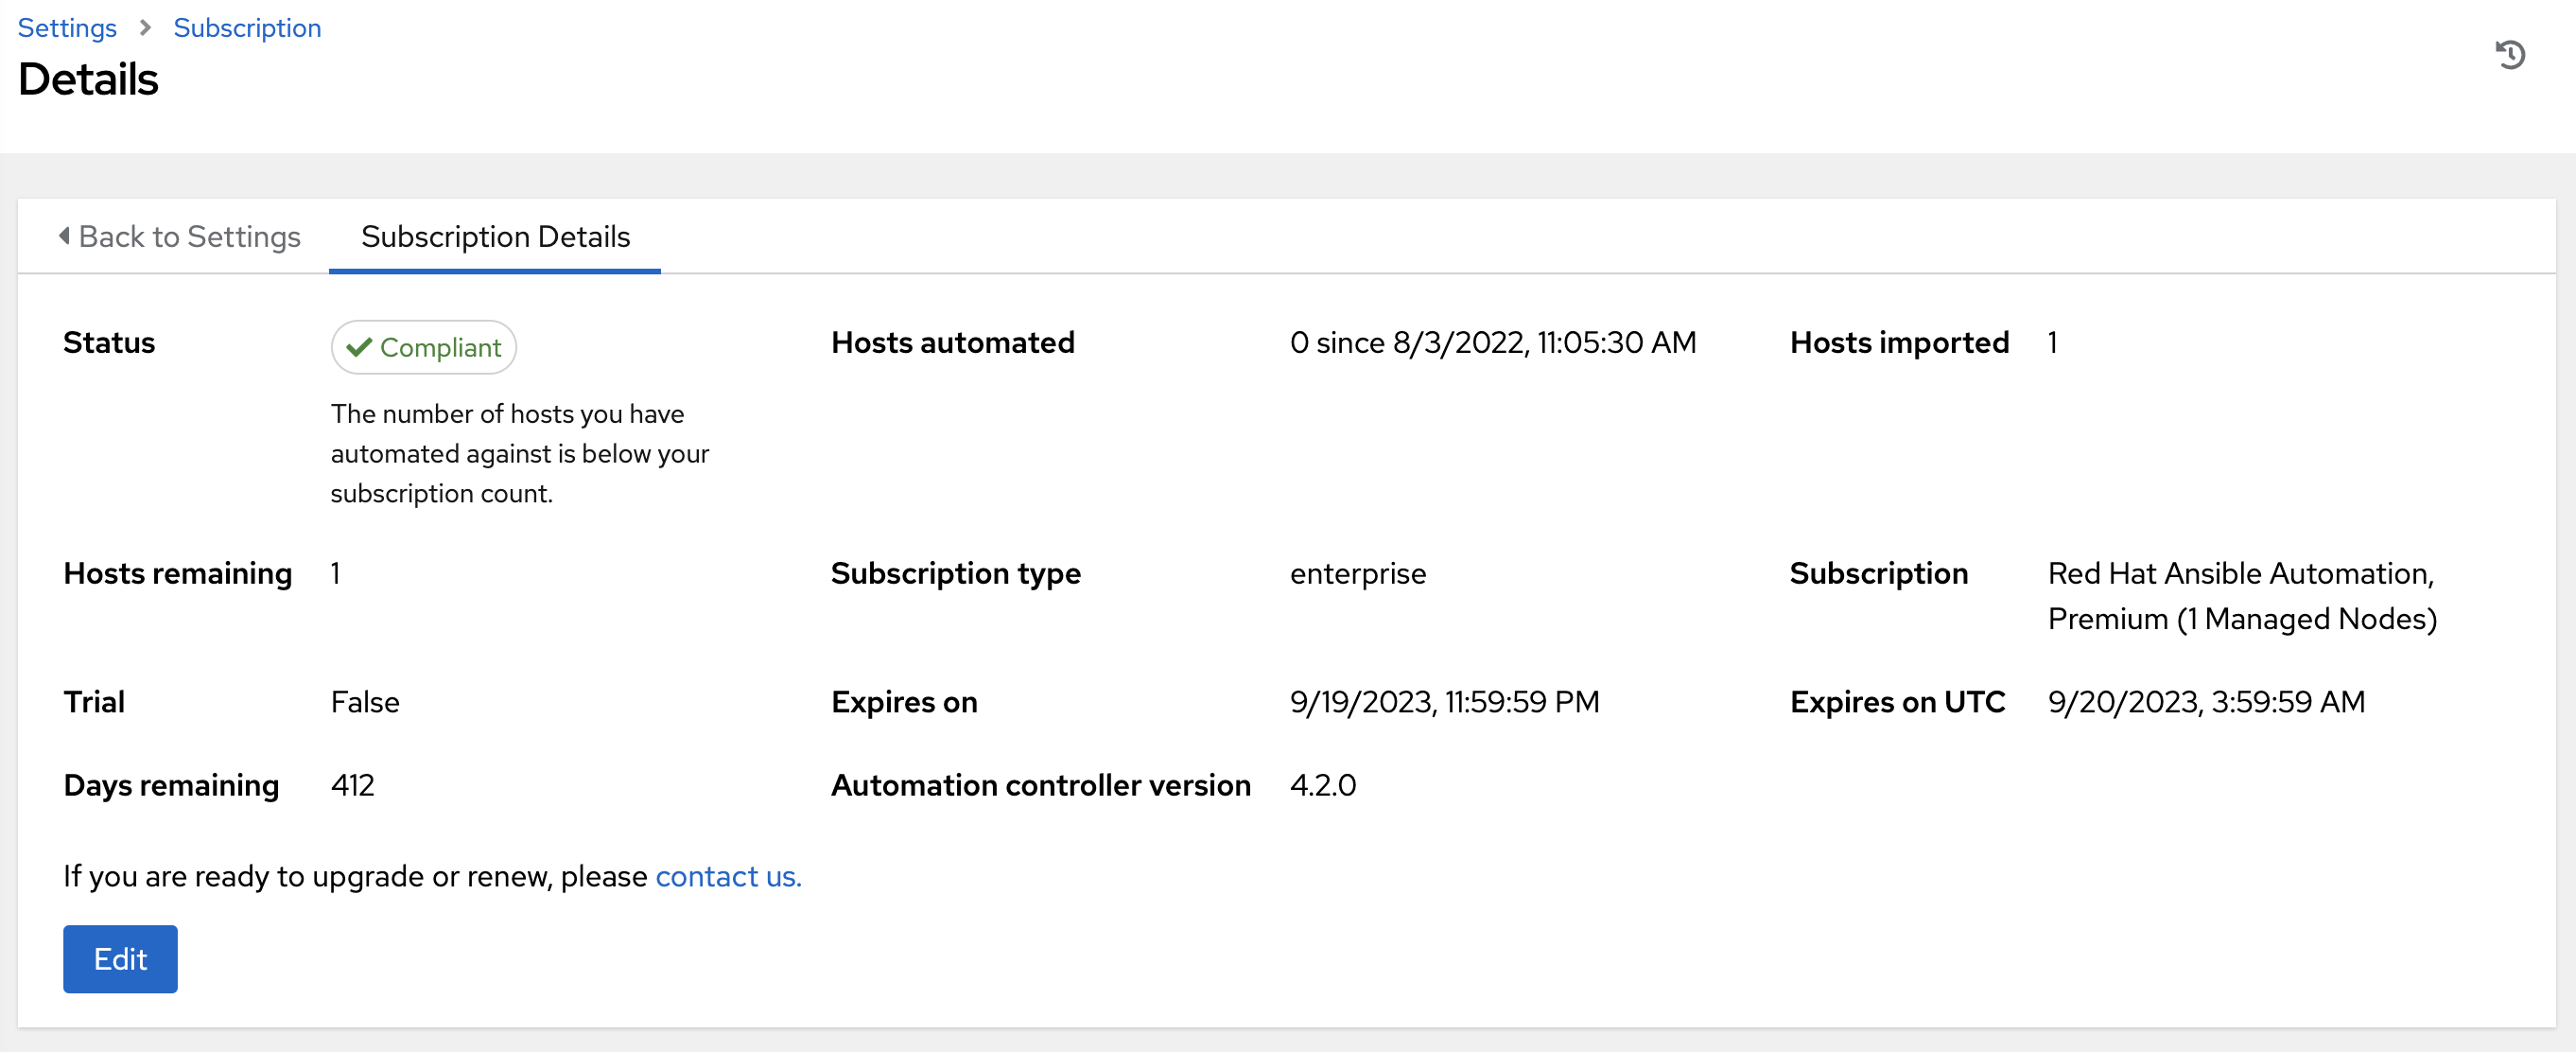
After your subscription is accepted, automation controller displays the subscription details and opens the Dashboard. To return to the Subscription settings screen from the Dashboard, select → from the option in the navigation panel.
Optional: To return to the Subscription settings screen from the Dashboard, select → option in the navigation panel.
Troubleshooting your subscription
When your subscription expires (you can check this in the Subscription details of the Subscription settings window), you must renew it in automation controller. You can do this by either importing a new subscription, or setting up a new subscription.
If you meet the "Error fetching licenses" message, check that you have the proper permissions required for the Satellite user. The automation controller administrator requires this to apply a subscription.
The Satellite username and password is used to query the Satellite API for existing subscriptions. From the Satellite API, the automation controller receives metadata about those subscriptions, then filters through to find valid subscriptions that you can apply. These are then displayed as valid subscription options in the UI.
The following Satellite roles grant proper access:
-
Custom with
view_subscriptionsandview_organizationsfilter - Viewer
- Administrator
- Organization Administrator
- Manager
Use the Custom role for your automation controller integration, as it is the most restrictive. For more information, see the Satellite documentation on managing users and roles.
The System Administrator role is not equal to the Administrator user checkbox, and does not offer enough permissions to access the subscriptions API page.
4.5. Add a subscription manually
If you are unable to apply or update the subscription information by using the automation controller user interface, you can upload the subscriptions manifest manually in an Ansible playbook.
Use the license module in the ansible.controller collection:
- name: Set the license using a file
  license:
  manifest: "/tmp/my_manifest.zip"
For more information, see the Automation controller license module.
4.6. Attaching Subscriptions
You must have valid Ansible Automation Platform subscriptions attached before installing Ansible Automation Platform.
Attaching subscriptions is unnecessary if your Red Hat account has enabled Simple Content Access Mode. However, you must register to Red Hat Subscription Management (RHSM) or Red Hat Satellite before installing Ansible Automation Platform.
Procedure
To find the
pool_idof your subscription, enter the following command:# subscription-manager list --available --all | grep "Ansible Automation Platform" -B 3 -A 6
The command returns the following:
Subscription Name: Red Hat Ansible Automation Platform, Premium (5000 Managed Nodes)
Provides: Red Hat Ansible Engine
Red Hat Single Sign-On
Red Hat Ansible Automation Platform
SKU: MCT3695
Contract: ********
Pool ID: ********************
Provides Management: No
Available: 4999
Suggested: 1
To attach this subscription, enter the following command:
# subscription-manager attach --pool=<pool_id>
If all nodes have attached, then the repositories are found.
To check whether the subscription attached successfully, enter the following command:
# subscription-manager list --consumed
To remove this subscription, enter the following command:
#subscription-manager remove --pool=<pool_id>
4.7. Troubleshooting: Keep your subscription in compliance
Your subscription has two possible statuses:
- Compliant: Indicates that your subscription is appropriate for the number of hosts that you have automated within your subscription count.
- Out of compliance: Indicates that you have exceeded the number of hosts in your subscription.
Compliance is computed as follows:
managed > manifest_limit    =>  non-compliant
managed =< manifest_limit   =>  compliant
Where: managed is the number of unique managed hosts without deletions, and manifest_limit is the number of managed hosts in the subscription manifest.
Other important information displayed are:
- Hosts automated: Host count automated by the job, which consumes the license count.
- Hosts imported: Host count considering unique host names across all inventory sources. This number does not impact hosts remaining.
- Hosts remaining: Total host count minus hosts automated.
- Hosts deleted: Hosts that were deleted, freeing the license capacity.
- Active hosts previously deleted: Number of hosts now active that were previously deleted.
For example, if you have a subscription capacity of 10 hosts:
- Starting with 9 hosts, 2 hosts were added and 3 hosts were deleted, you now have 8 hosts (compliant).
- 3 hosts were automated again, now you have 11 hosts, which puts you over the subscription limit of 10 (non-compliant).
- If you delete hosts, refresh the subscription details to see the change in count and status.
4.8. Viewing the host activity
Procedure
In the navigation panel, select to view the activity associated with hosts, such as those that have been automated and deleted.
Each unique hostname is listed and sorted by the user’s preference.
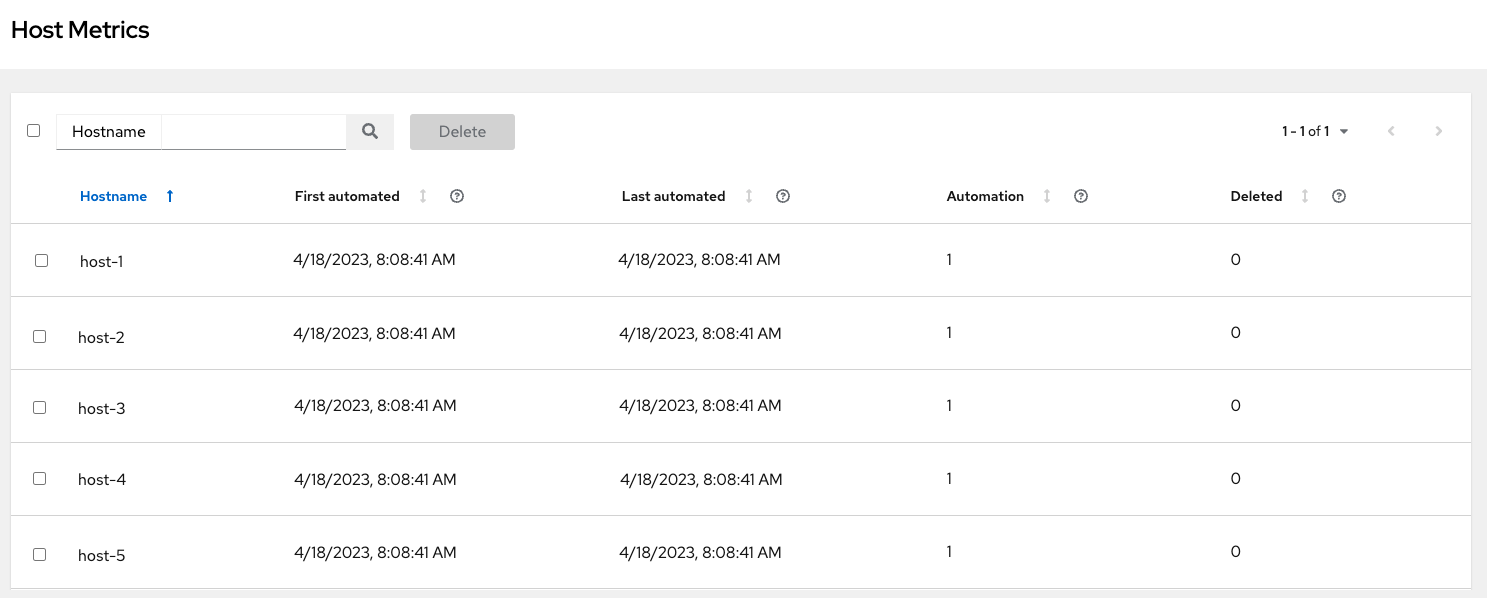 Note
NoteA scheduled task automatically updates these values on a weekly basis and deletes jobs with hosts that were last automated more than a year ago.
Delete unnecessary hosts directly from the Host Metrics view by selecting the desired hosts and clicking .
These are soft-deleted, meaning their records are not removed, but are not being used and thereby not counted towards your subscription.
4.9. Host metric utilities
Automation controller provides a way to generate a CSV output of the host metric data and host metric summary through the Command Line Interface (CLI). You can also soft delete hosts in bulk through the API.
4.9.1. awx-manage utility
The awx-manage utility supports the following options:
awx-manage host_metric --csv
This command produces host metric data, a host metrics summary file, and a cluster info file. To package all the files into a single tarball for distribution and sharing use:
awx-manage host_metric --tarball
To specify the number of rows (<n>) to output to each file:
awx-manage host_metric --tarball --rows_per_file <n>
The following is an example of a configuration file:

Automation Analytics receives and uses the JSON file.
4.9.2. API endpoint functions
The API lists only non-deleted records and are sortable by last_automation and used_in_inventories columns.
You can use the host metric API endpoint,api/v2/host_metric to soft delete hosts:
api/v2/host_metric <n> DELETE
A monthly scheduled task automatically deletes jobs that uses hosts from the Host Metric table that were last automated more than a year ago.
Chapter 5. The User Interface
The automation controller User Interface (UI) provides a graphical framework for your IT orchestration requirements. The navigation panel provides quick access to automation controller resources, such as Projects, Inventories, Job Templates, and Jobs.
The automation controller UI is also available as a technical preview and is subject to change in future releases. To preview the new UI, click the Enable Preview of New User Interface toggle to On from the Miscellaneous System option of the Settings menu.
After saving, logout and log back in to access the new UI from the preview banner. To return to the current UI, click the link on the top banner where indicated.
Access your user profile, the About page, view related documentation, or log out using the icons in the page header.
You can view the activity stream for that user by clicking the ![]() icon.
icon.
5.1. Views
The automation controller UI provides several options for viewing information.
5.1.1. Dashboard View
Use the navigation menu to complete the following tasks:
- Display different views
- Navigate to your resources
- Grant access to users
- Administer automation controller features in the UI
Procedure
- From the navigation panel, select to hide or display the Views options.
The dashboard displays a summary of your current Job status.
- You can filter the job status within a period of time or by job type.
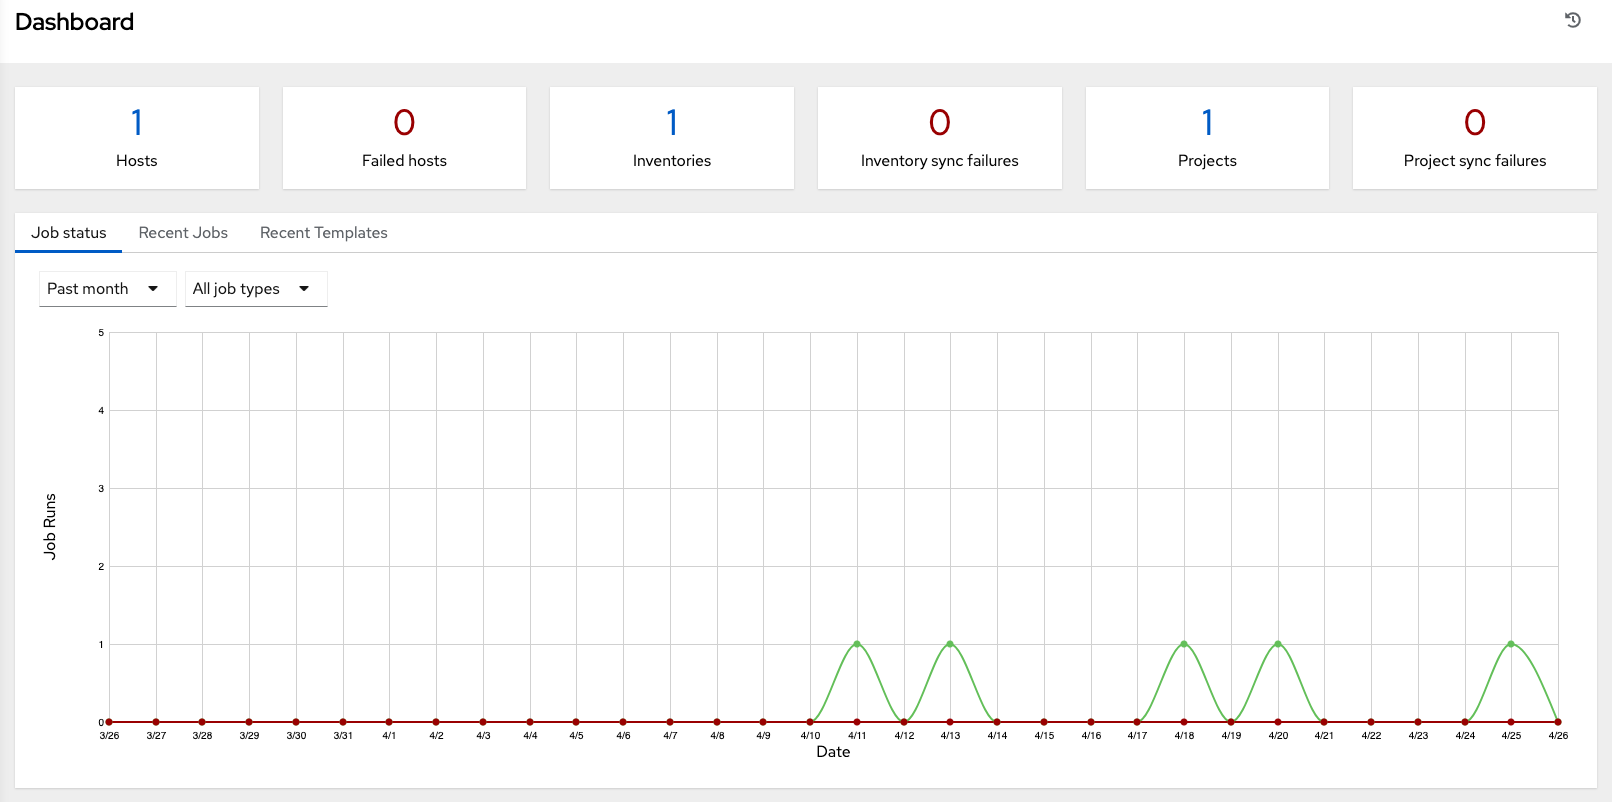
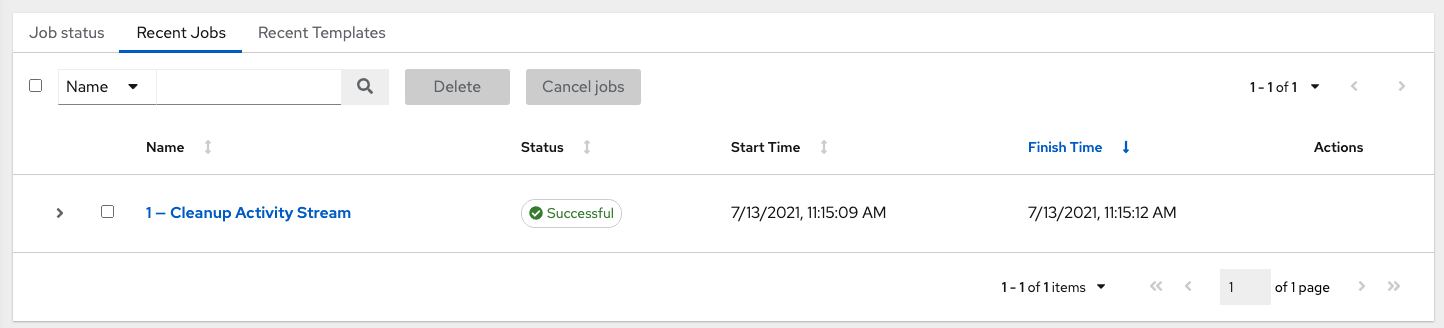
- You can also display summaries of Recent Jobs and Recent Templates.
The Recent Jobs tab displays which jobs were most recently run, their status, and the time at which they were run.
The Recent Templates tab displays a summary of the most recently used templates. You can also access this summary by selecting → from the navigation panel.
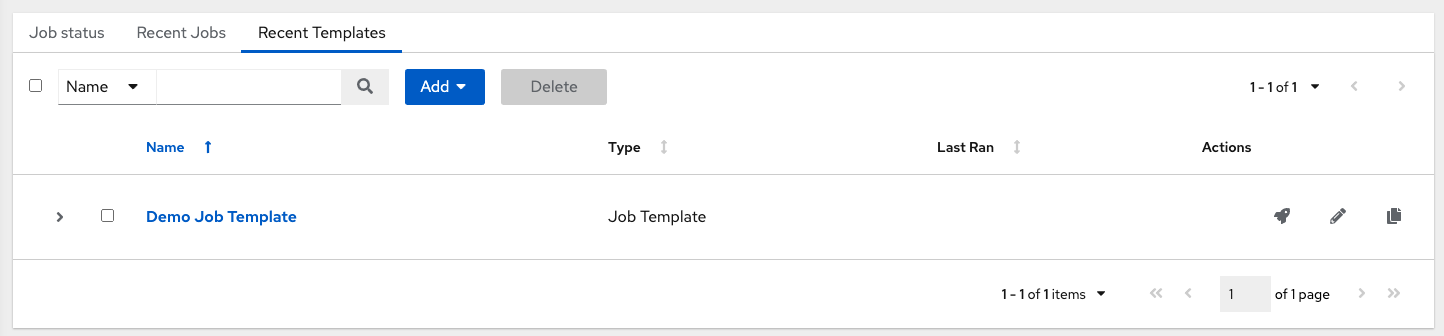
Click → on the navigation panel, or the Ansible Automation Platform logo at any time to return to the Dashboard.
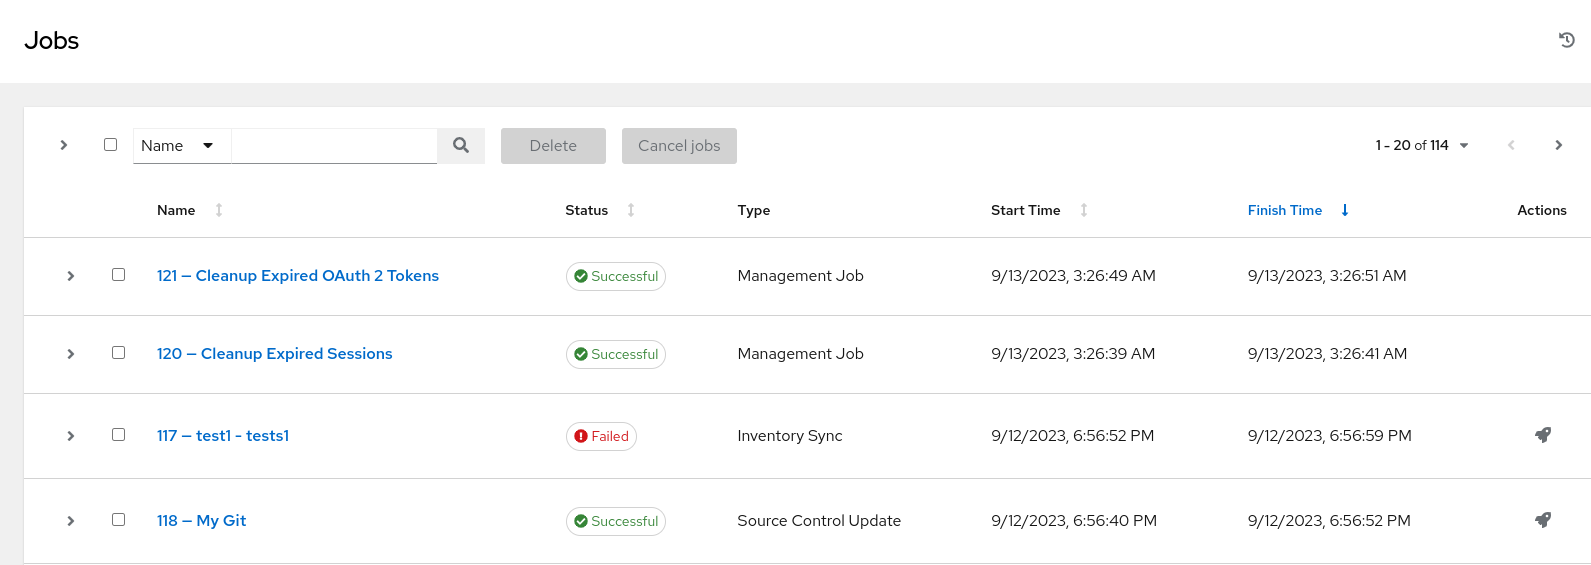
5.1.2. Jobs view
- From the navigation panel, select → . This view displays the jobs that have run, including projects, templates, management jobs, SCM updates, and playbook runs.
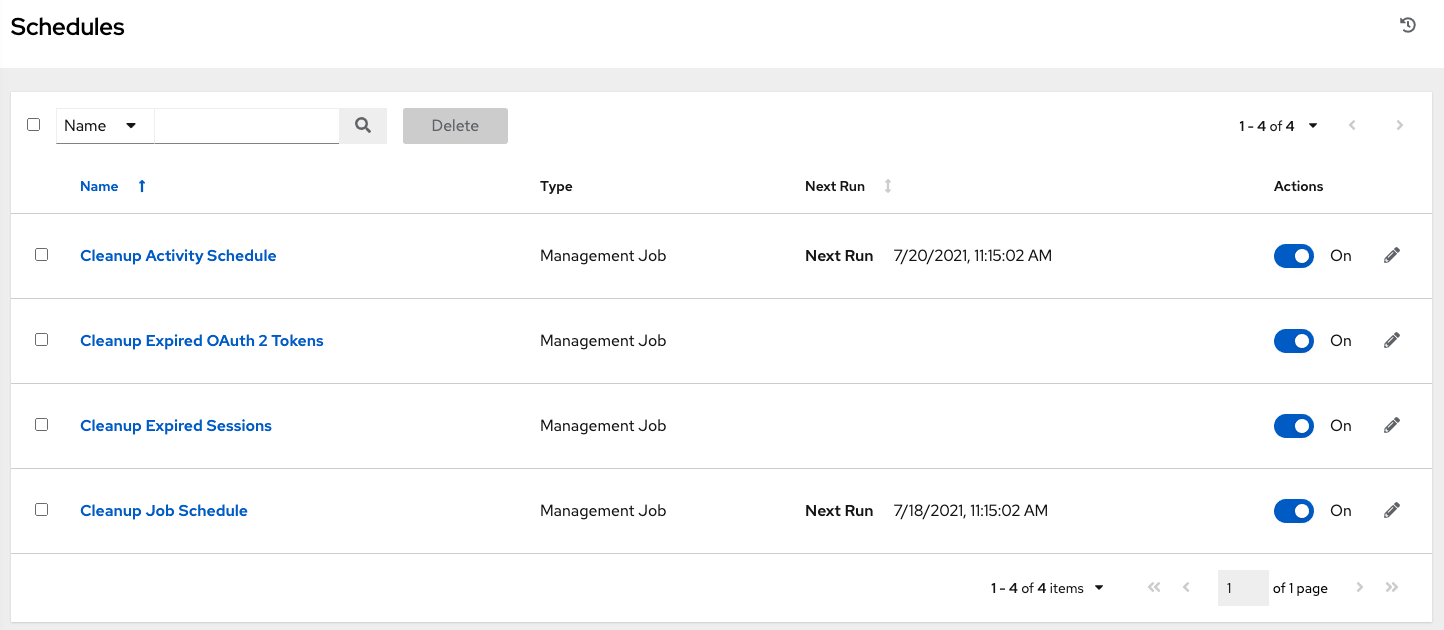
5.1.3. Schedules view
From the navigation panel, select → . This view shows all the scheduled jobs that are configured.
5.1.4. Activity Stream
-
From the navigation panel, select → to display Activity Streams. Most screens have an Activity Stream
 icon.
icon.
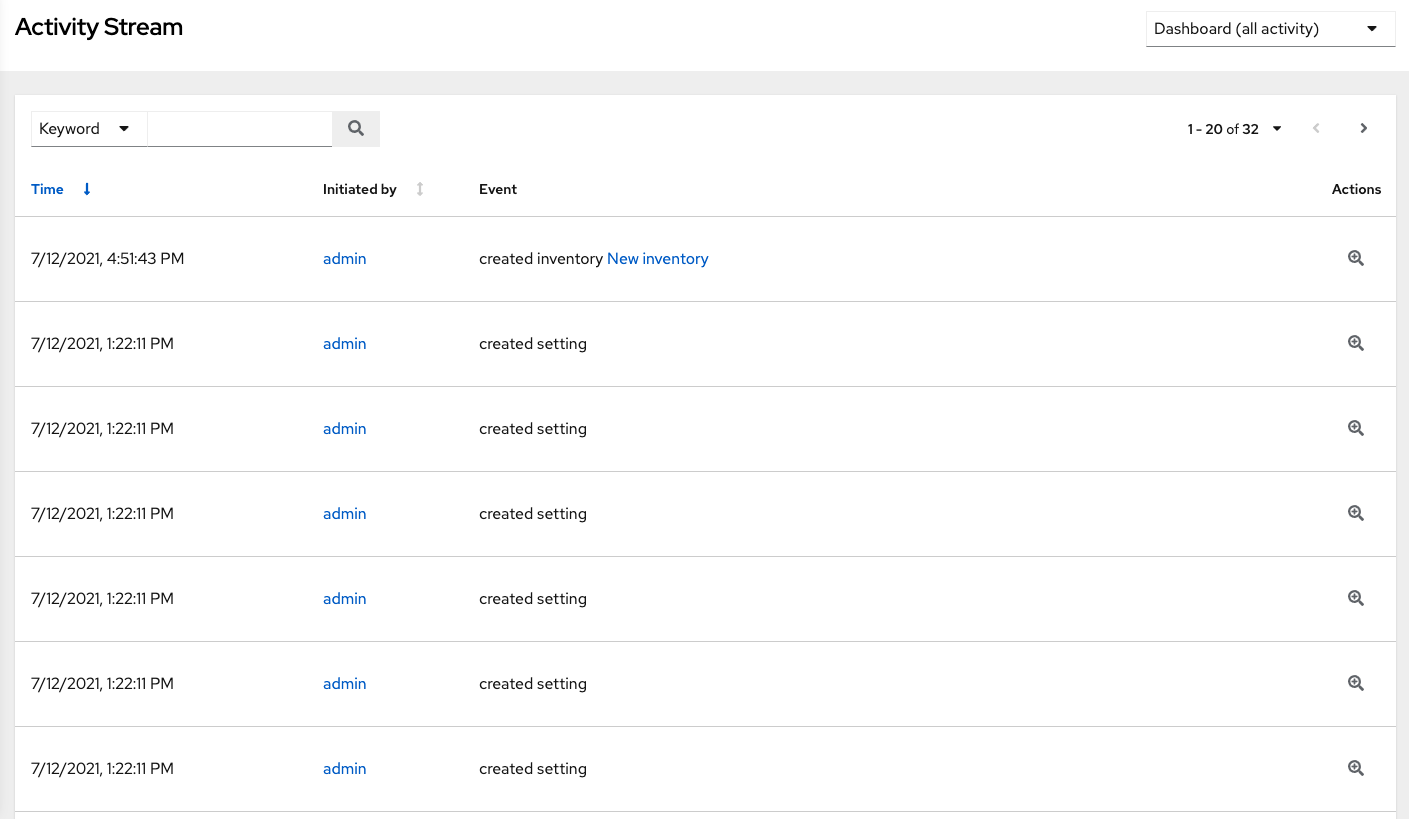
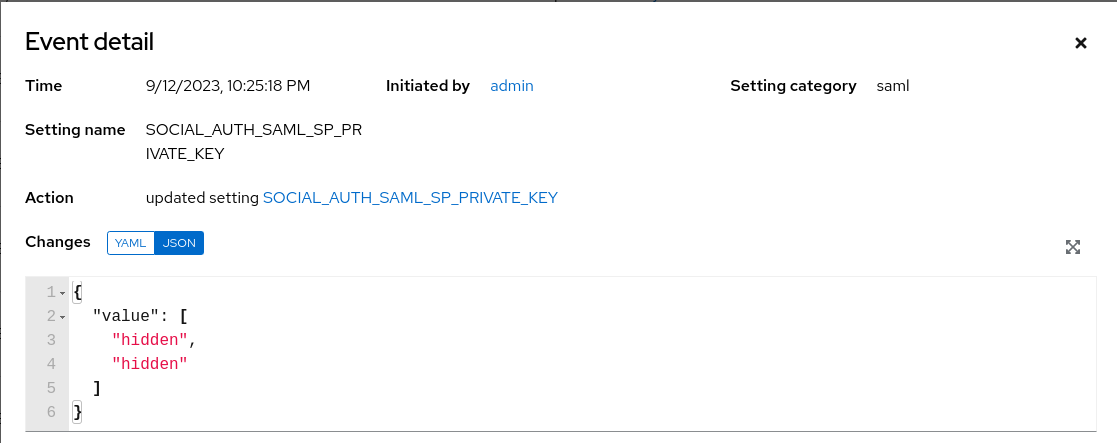
An Activity Stream shows all changes for a particular object. For each change, the Activity Stream shows the time of the event, the user that initiated the event, and the action. The information displayed varies depending on the type of event. Click the ![]() icon to display the event log for the change.
icon to display the event log for the change.
You can filter the Activity Stream by the initiating user, by system (if it was system initiated), or by any related object, such as a credential, job template, or schedule.
The Activity Stream on the main Dashboard shows the Activity Stream for the entire instance. Most pages permit viewing an activity stream filtered for that specific object.
5.1.5. Workflow Approvals
- From the navigation panel, select → to see your workflow approval queue. The list contains actions that require you to approve or deny before a job can proceed.
5.1.6. Host Metrics
- From the navigation panel, select to see the activity associated with hosts, which includes counts on those that have been automated, used in inventories, and deleted.
For further information, see Troubleshooting: Keeping your subscription in compliance.
5.2. Resources Menu
The Resources menu provides access to the following components of automation controller:
- Templates
- Credentials
- Projects
- Inventories
- Hosts
5.3. Access Menu
The Access menu enables you to configure who has permissions to automation controller resources:
5.4. Administration
The Administration menu provides access to the administrative options of automation controller. From here, you can create, view, and edit:
- Credential types
- Notifications
- Management_jobs
- Instance groups
- Instances
- Applications
- Execution environments
- Topology view
5.5. The Settings menu
Configure global and system-level settings using the Settings menu. The Settings menu provides access to automation controller configuration settings.
The Settings page enables administrators to configure the following:
- Authentication
- Jobs
- System-level attributes
- Customize the UI
- Product license information
Chapter 6. Search
Use automation controller’s search tool for search and filter capabilities across multiple functions. An expandable list of search conditions is available from the Advanced option from the Name menu in the search field.
From there, use the combination of Set Type, Key, and Lookup type to filter.

6.1. Rules for searching
These searching tips assume that you are not searching hosts. Most of this section still applies to hosts but with some subtle differences.
- The typical syntax of a search consists of a field (left-hand side) and a value (right-hand side).
- A colon is used to separate the field that you want to search from the value.
-
If the search has no colon (see example 3) it is treated as a simple string search where
?search=foobaris sent.
The following are examples of syntax used for searching:
-
name:localhostIn this example, the user is searching for the string `localhost' in the name attribute. If that string does not match something from Fields or Related Fields, the entire search is treated as a string. -
organization.name:DefaultThis example shows a Related Field Search. The period inorganization.nameseparates the model from the field. Depending on how deep or complex the search is, you can have multiple periods in that part of the query. -
foobarThis is a simple string (key term) search that finds all instances of the search term using anicontainssearch against the name and description fields. If you use a space between terms, for examplefoo bar, then results that contain both terms are returned. If the terms are wrapped in quotes, for example,"foo bar", automation controller searches for the string with the terms appearing together.
Specific name searches search against the API name. For example, Management job in the user interface is system_job in the API. . organization:Default This example shows a Related Field search but without specifying a field to go along with the organization. This is supported by the API and is analogous to a simple string search but carried out against the organization (does an icontains search against both the name and description).
6.1.1. Values for search fields
To find values for certain fields, refer to the API endpoint for extensive options and their valid values. For example, if you want to search against /api/v2/jobs > type field, you can find the values by performing an OPTIONS request to /api/v2/jobs and look for entries in the API for "type". Additionally, you can view the related searches by scrolling to the bottom of each screen. In the example for /api/v2/jobs, the related search shows:
"related_search_fields": [
       "modified_by__search",
       "project__search",
       "project_update__search",
       "credentials__search",
       "unified_job_template__search",
       "created_by__search",
       "inventory__search",
       "labels__search",
       "schedule__search",
       "webhook_credential__search",
       "job_template__search",
       "job_events__search",
       "dependent_jobs__search",
       "launch_config__search",
       "unifiedjob_ptr__search",
       "notifications__search",
       "unified_job_node__search",
       "instance_group__search",
       "hosts__search",
       "job_host_summaries__search"
The values for Fields come from the keys in a GET request. url, related, and summary_fields are not used. The values for Related Fields also come from the OPTIONS response, but from a different attribute. Related Fields is populated by taking all the values from related_search_fields and stripping off the __search from the end.
Any search that does not start with a value from Fields or a value from the Related Fields, is treated as a generic string search. Searching for localhost, for example, results in the UI sending ?search=localhost as a query parameter to the API endpoint. This is a shortcut for an icontains search on the name and description fields.
6.1.3. Other search considerations
Be aware of the following issues when searching in automation controller:
- There is currently no supported syntax for OR queries. All search terms are ANDed in the query parameters.
- The left-hand portion of a search parameter can be wrapped in quotes to support searching for strings with spaces. For more information, see Tips for searching.
-
Currently, the values in the Fields are direct attributes expected to be returned in a GET request. Whenever you search against one of the values, automation controller carries out an
__icontainssearch. So, for example,name:localhostsends back?name__icontains=localhost. Automation controller currently performs this search for every Field value, evenid.
6.2. Sort
Where applicable, use the arrows in each column to sort by ascending order. The following is an example from the schedules list:

The direction of the arrow indicates the sort order of the column.
Chapter 7. Organizations
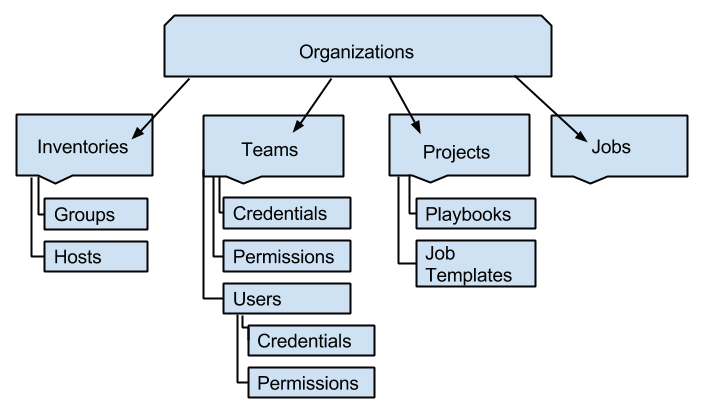
An organization is a logical collection of users, teams, projects, and inventories. It is the highest level object in the controller object hierarchy.
From the navigation menu, select to display the existing organizations for your installation.
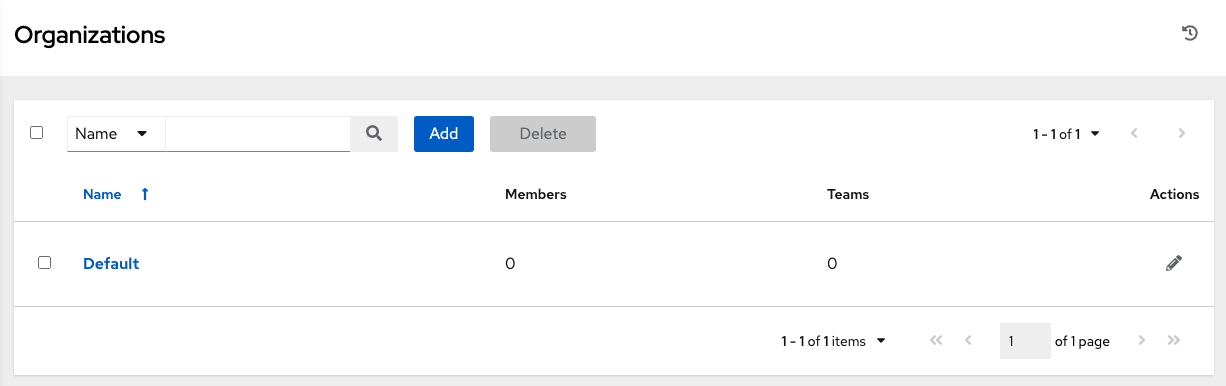
Organizations can be searched by Name or Description.
Modify organizations using the
![]() icon. Click to remove a selected organization.
icon. Click to remove a selected organization.
7.1. Creating an organization
Automation controller automatically creates a default organization. If you have a Self-support level license, you have only the default organization available and must not delete it.
You can use the default organization as it is initially set up and edit it later.
Click to create a new organization.
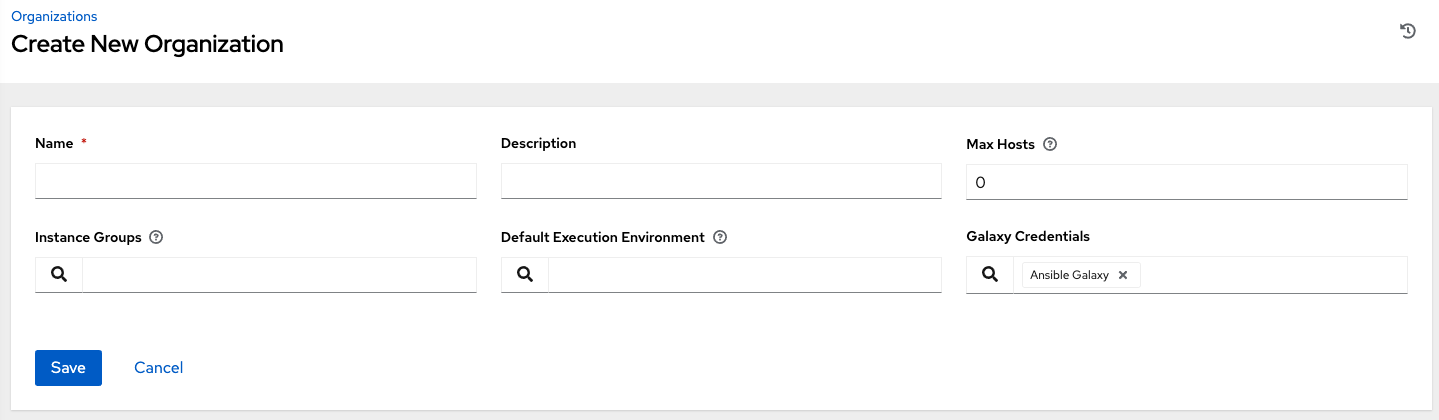
You can configure several attributes of an organization:
- Enter the Name for your organization (required).
- Enter a Description for the organization.
Max Hosts is only editable by a superuser to set an upper limit on the number of license hosts that an organization can have. Setting this value to 0 signifies no limit. If you try to add a host to an organization that has reached or exceeded its cap on hosts, an error message displays:
The inventory sync output view also shows the host limit error.
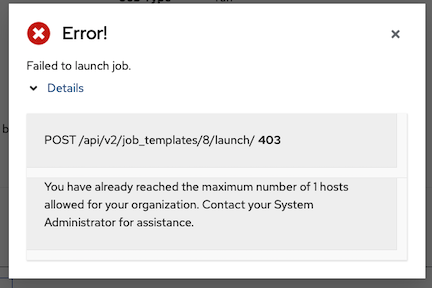
Click for additional information about the error.
- Enter the name of the Instance Groups on which to run this organization.
- Enter the name of the execution environment or search for one that exists on which to run this organization. For more information, see Upgrading to Execution Environments.
- Optional: Enter the Galaxy Credentials or search from a list of existing ones.
- Click to finish creating the organization.
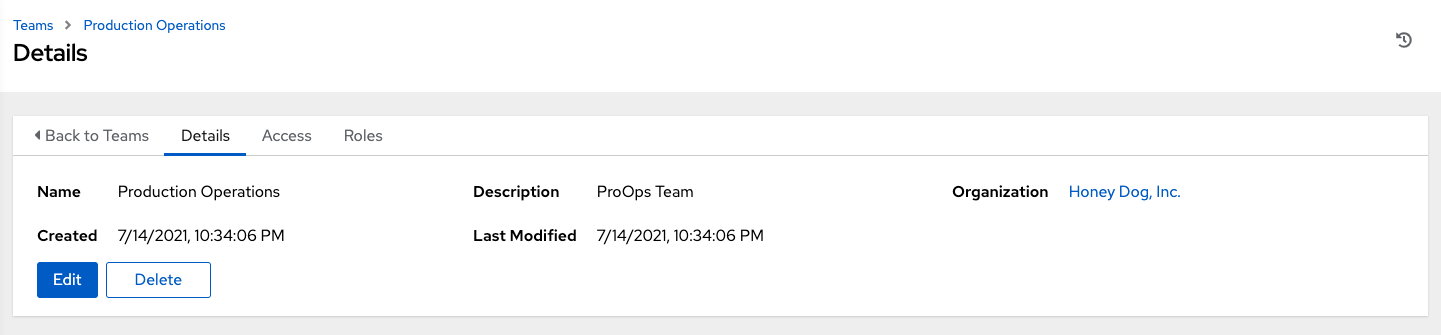
When the organization is created, automation controller displays the Organization details, and enables you to manage access and execution environments for the organization.
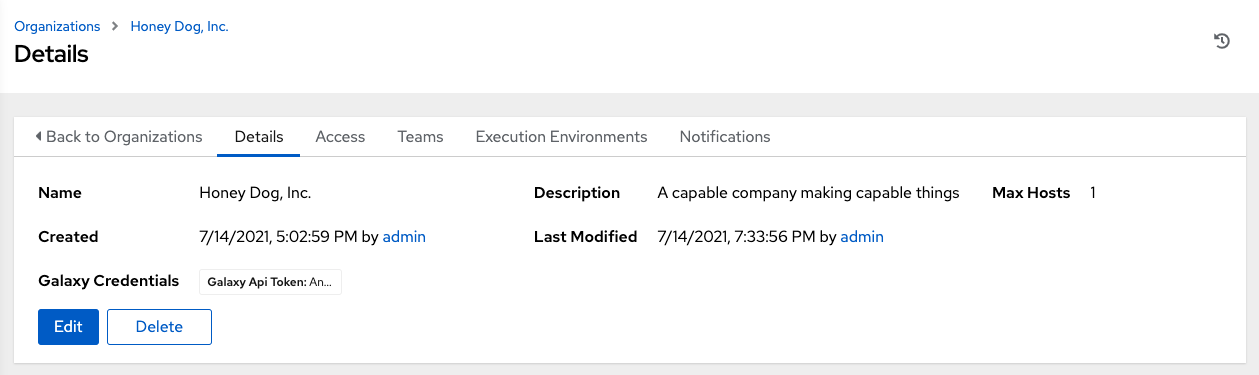
From the Details tab, you can edit or delete the organization.
If you attempt to delete items that are used by other work items, a message lists the items that are affected by the deletion and prompts you to confirm the deletion. Some screens contain items that are invalid or have been deleted previously, and will fail to run.
The following is an example of such a message:

7.2. Access to organizations
- Select when viewing your organization to display the users associated with this organization, and their roles.
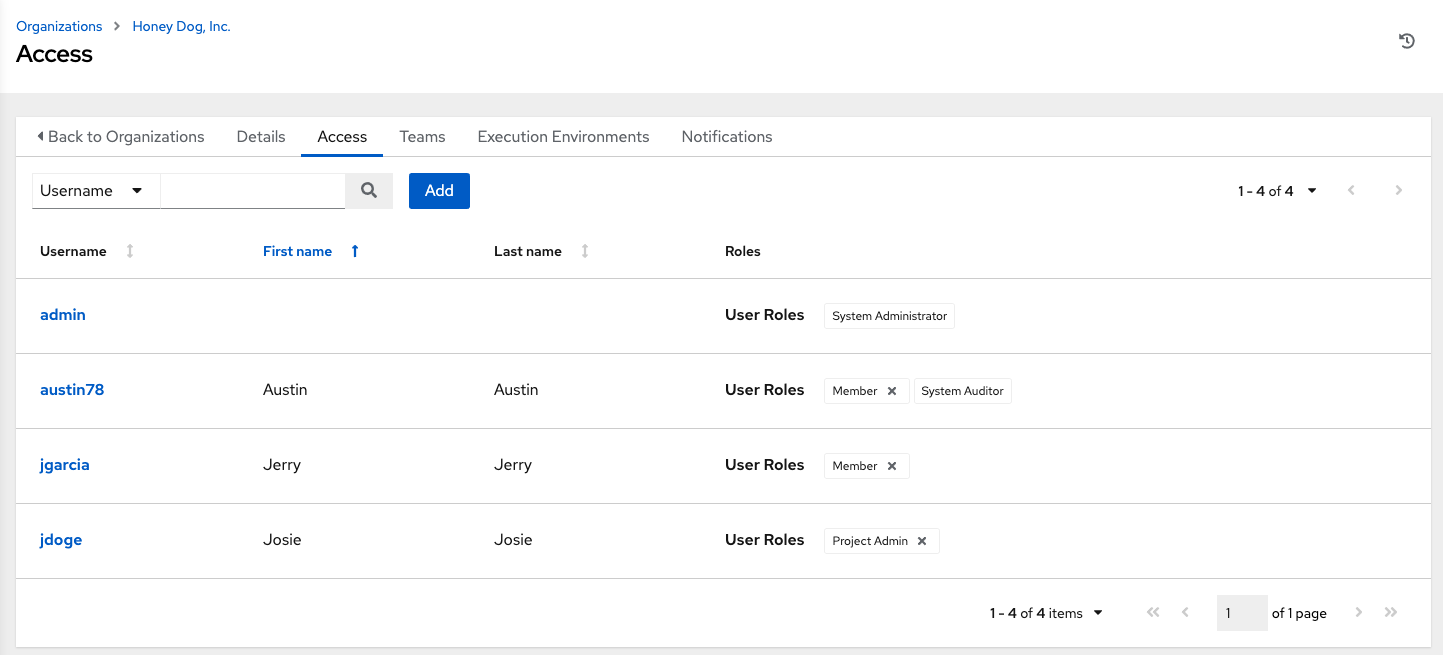
Use this page to complete the following tasks:
- Manage the user membership for this organization. Click on the navigation panel to manage user membership on a per-user basis from the Users page.
- Assign specific users certain levels of permissions within your organization.
- Enable them to act as an administrator for a particular resource. For more information, see Role-Based Access Controls.
Click a user to display that user’s details. You can review, grant, edit, and remove associated permissions for that user. For more information, see Users.
7.2.1. Add a User or Team
To add a user or team to an organization, the user or team must already exist.
For more information, see Creating a User and Creating a Team.
To add existing users or team to the Organization:
Procedure
- In the Access tab of the Organization page, click .
- Select a user or team to add.
- Click .
- Select one or more users or teams from the list by clicking the checkbox next to the name to add them as members.
Click .
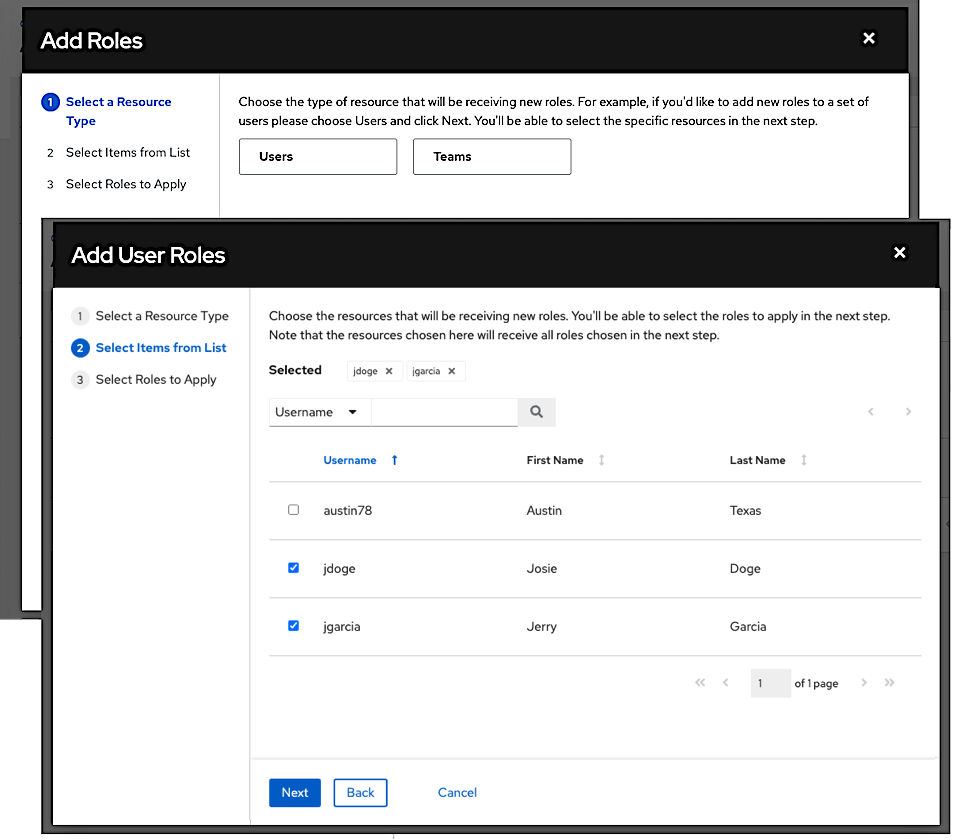
In this example, two users have been selected.
Select the role you want the selected user or team to have. Scroll down for a complete list of roles. Different resources have different options available.
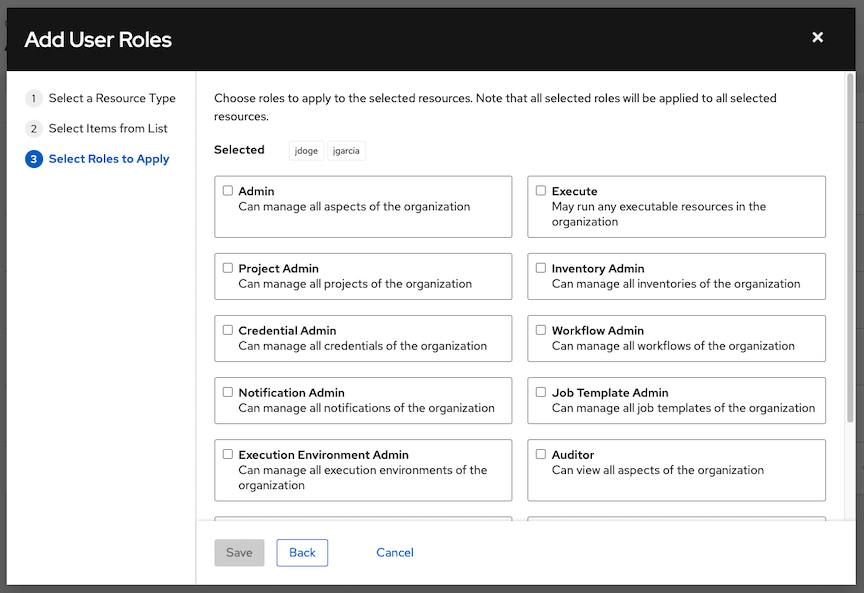
Click to apply the roles to the selected user or team, and to add them as members. The Add Users or Add Teams window displays the updated roles assigned for each user and team.
NoteA user or team with associated roles retains them if they are reassigned to another organization.
-
To remove roles for a particular user, click the disassociate
 icon next to its resource. This launches a confirmation dialog, asking you to confirm the disassociation.
7.2.2. Work with Notifications
Selecting the Notifications tab on the Organization details page enables you to review any notification integrations you have set up.
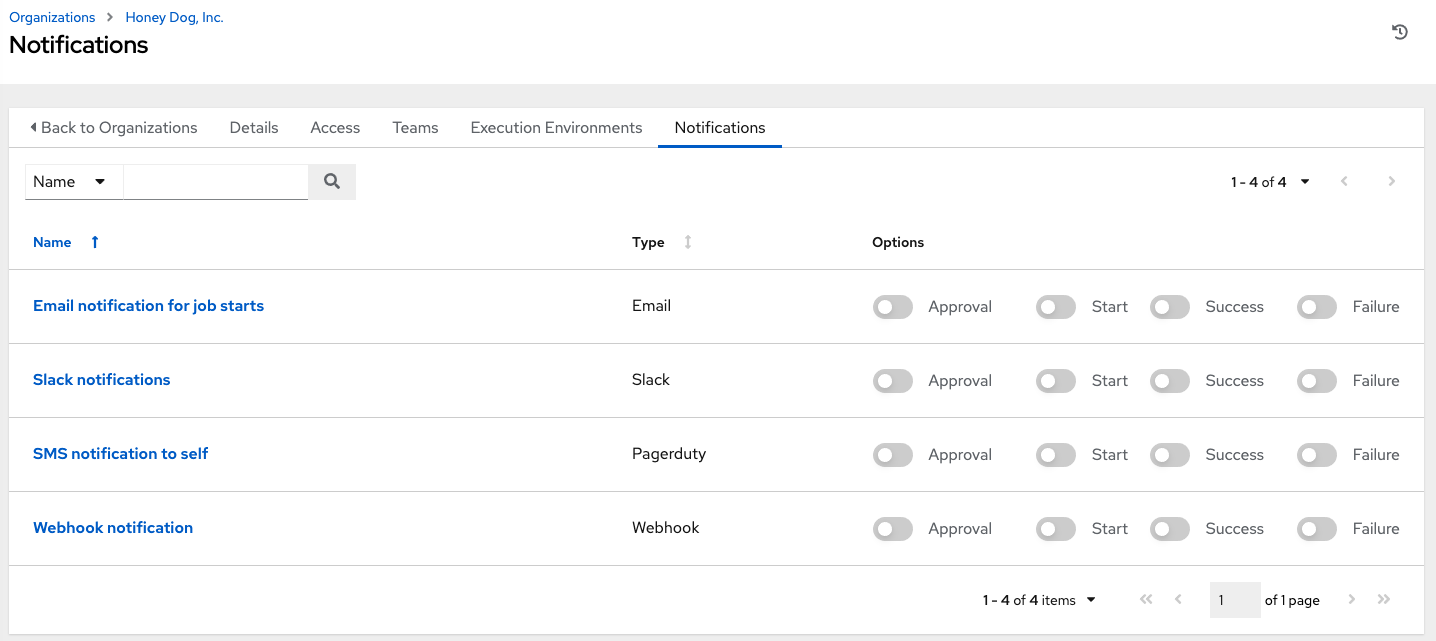
Use the toggles to enable or disable the notifications to use with your particular organization. For more information, see Enable and Disable Notifications.
If no notifications have been set up, select → from the navigation panel.
For information on configuring notification types, see Notification Types.
Chapter 8. Managing Users in automation controller
Users associated with an organization are shown in the Access tab of the organization.
Other users can be added to an organization, including a Normal User, System Auditor, or System Administrator, but they must be created first.
You can sort or search the User list by Username, First Name, or Last Name. Click the headers to toggle your sorting preference.
You can view user permissions and user type beside the user name on the Users page.
8.1. Creating a user
To create new users in automation controller and assign them a role.
Procedure
On the Users page, click .
The Create User dialog opens.
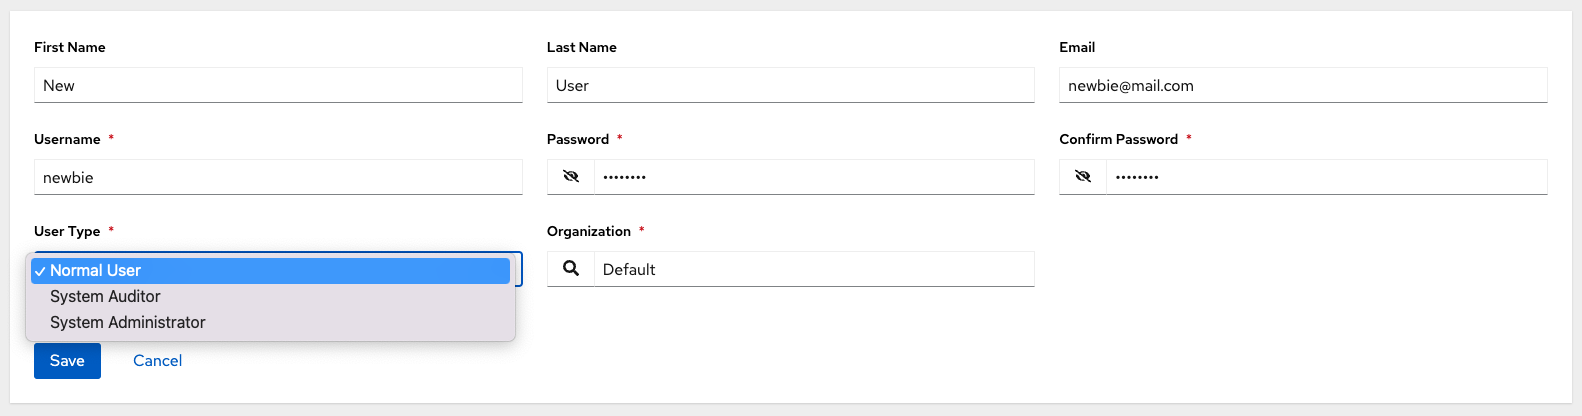
Enter the appropriate details about your new user. Fields marked with an asterisk (*) are required.
NoteIf you are modifying your own password, log out and log back in again for it to take effect.
You can assign three types of users:
- Normal User: Normal Users have read and write access limited to the resources (such as inventory, projects, and job templates) for which that user has been granted the appropriate roles and privileges.
- System Auditor: Auditors inherit the read-only capability for all objects within the environment.
System Administrator: A System Administrator (also known as a Superuser) has full system administration privileges — with full read and write privileges over the entire installation. A System Administrator is typically responsible for managing all aspects of and delegating responsibilities for day-to-day work to various users.
 Note
NoteA default administrator with the role of System Administrator is automatically created during the installation process and is available to all users of automation controller. One System Administrator must always exist. To delete the System Administrator account, you must first create another System Administrator account.
Click .
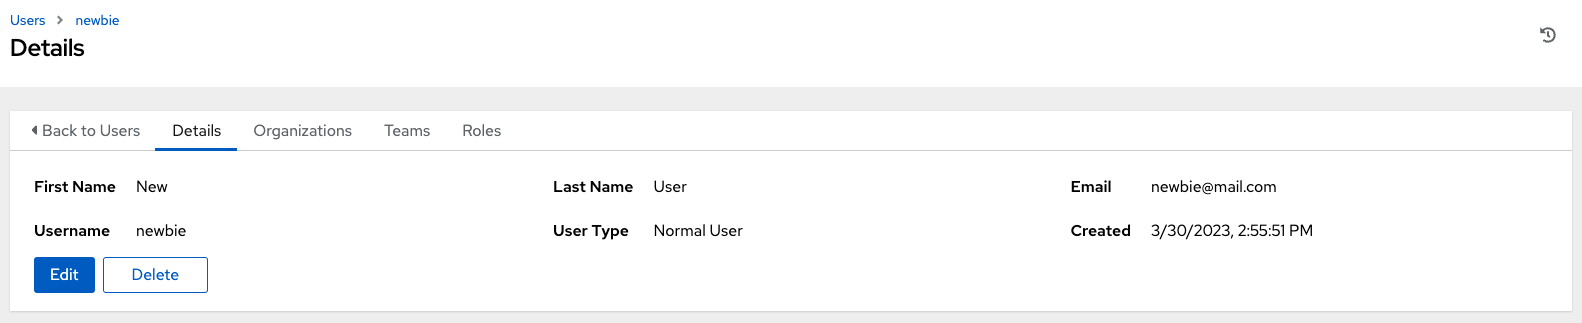
When the user is successfully created, the User dialog opens.
Click to delete the user, or you can delete users from a list of current users. For more information, see Deleting a user.
The same window opens whether you click the user’s name, or the Edit
 icon beside the user. You can use this window to review and modify the User’s Organizations, Teams, Roles, and other user membership details.
If the user is not newly-created, the details screen displays the last login activity of that user.
If you log in as yourself, and view the details of your user profile, you can manage tokens from your user profile.
For more information, see Adding a user token.
8.2. Deleting a user
Before you can delete a user, you must have user permissions. When you delete a user account, the name and email of the user are permanently removed from automation controller.
Procedure
- From the navigation panel, select → .
- Click to display a list of the current users.
- Select the check box for the user that you want to remove.
- Click .
- Click in the confirmation warning message to permanently delete the user.
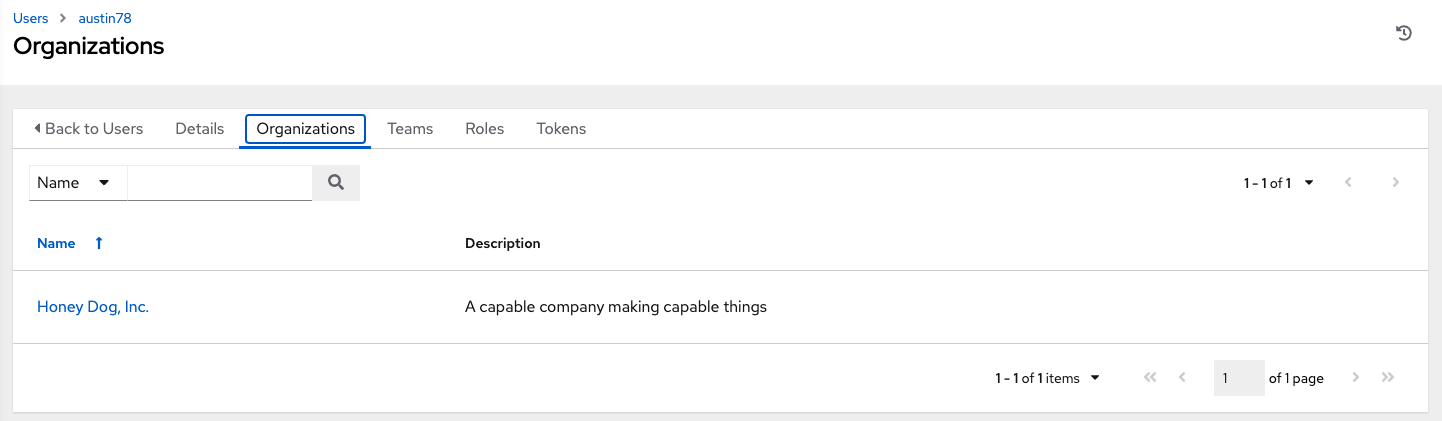
8.3. Displaying user organizations
Select a specific user to display the Details page, select the Organizations tab to display the list of organizations of which that user is a member.
Organization membership cannot be modified from this display panel.
8.4. Displaying a user’s teams
From the Users > Details page, select the Teams tab to display the list of teams of which that user is a member.
You cannot modify team membership from this display panel. For more information, see Teams.
Until you create a team and assign a user to that team, the assigned teams details for that user is displayed as empty.
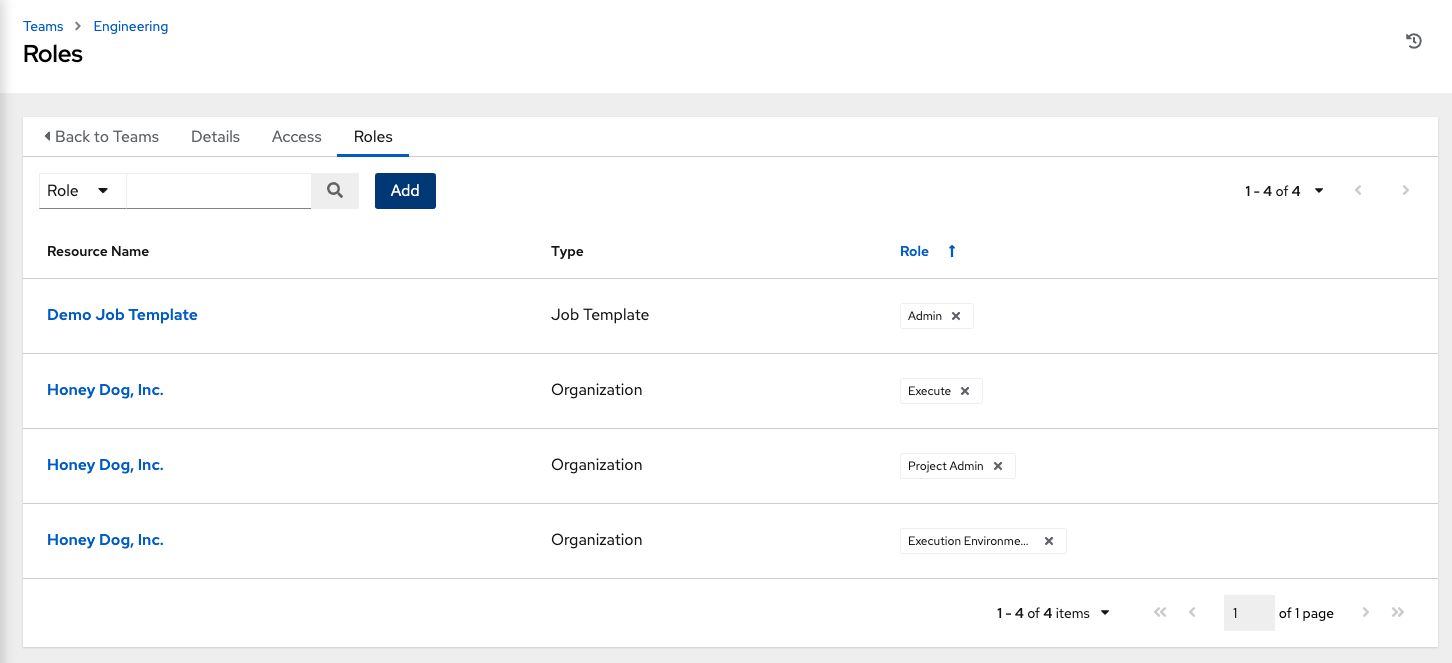
8.5. Displaying a user’s roles
From the Users > Details page, select the Roles tab to display the set of roles assigned to this user. These offer the ability to read, change, and administer projects, inventories, job templates, and other elements.
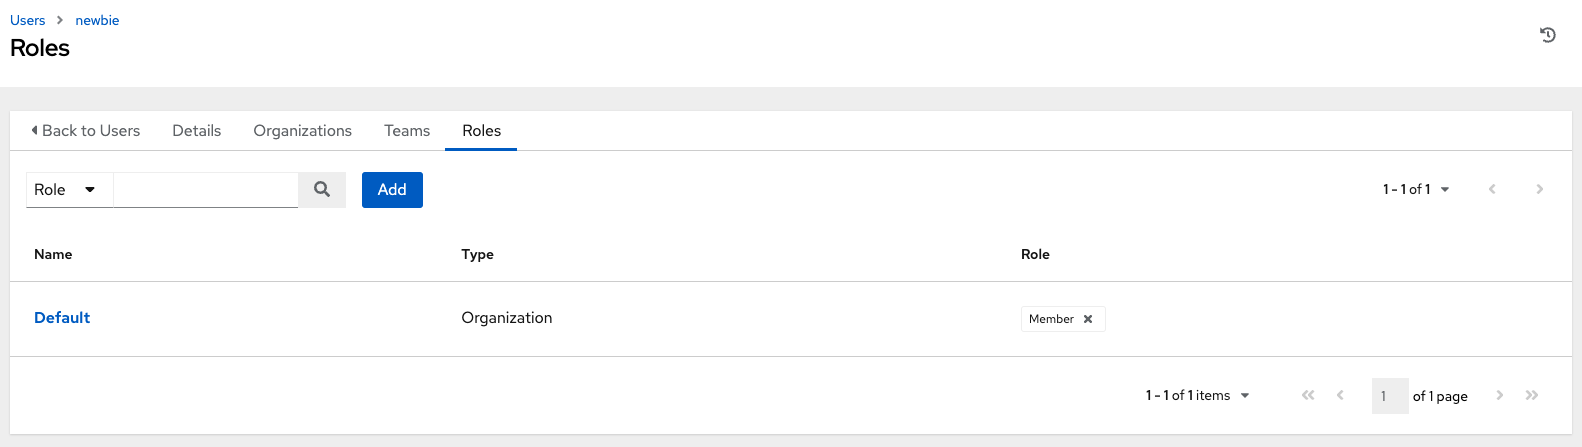
8.5.1. Adding and removing user permissions
To add permissions to a particular user:
Procedure
- From the Users list view, click on the name of a user.
On the Details page, click . This opens the Add user permissions wizard.
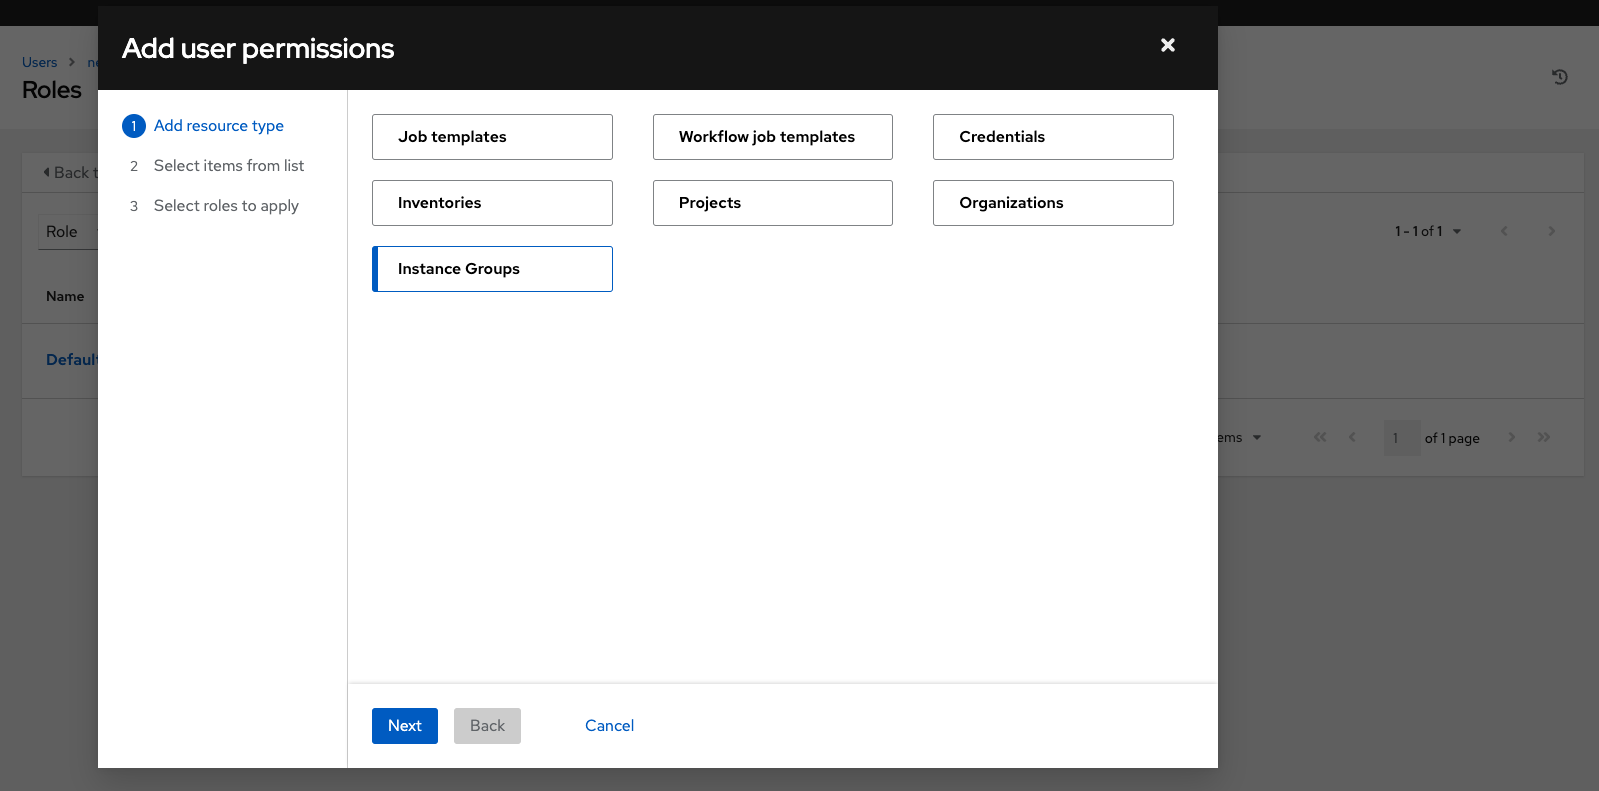
- Select the object to a assign permissions, for which the user will have access.
- Click .
Select the resource to assign team roles and click .
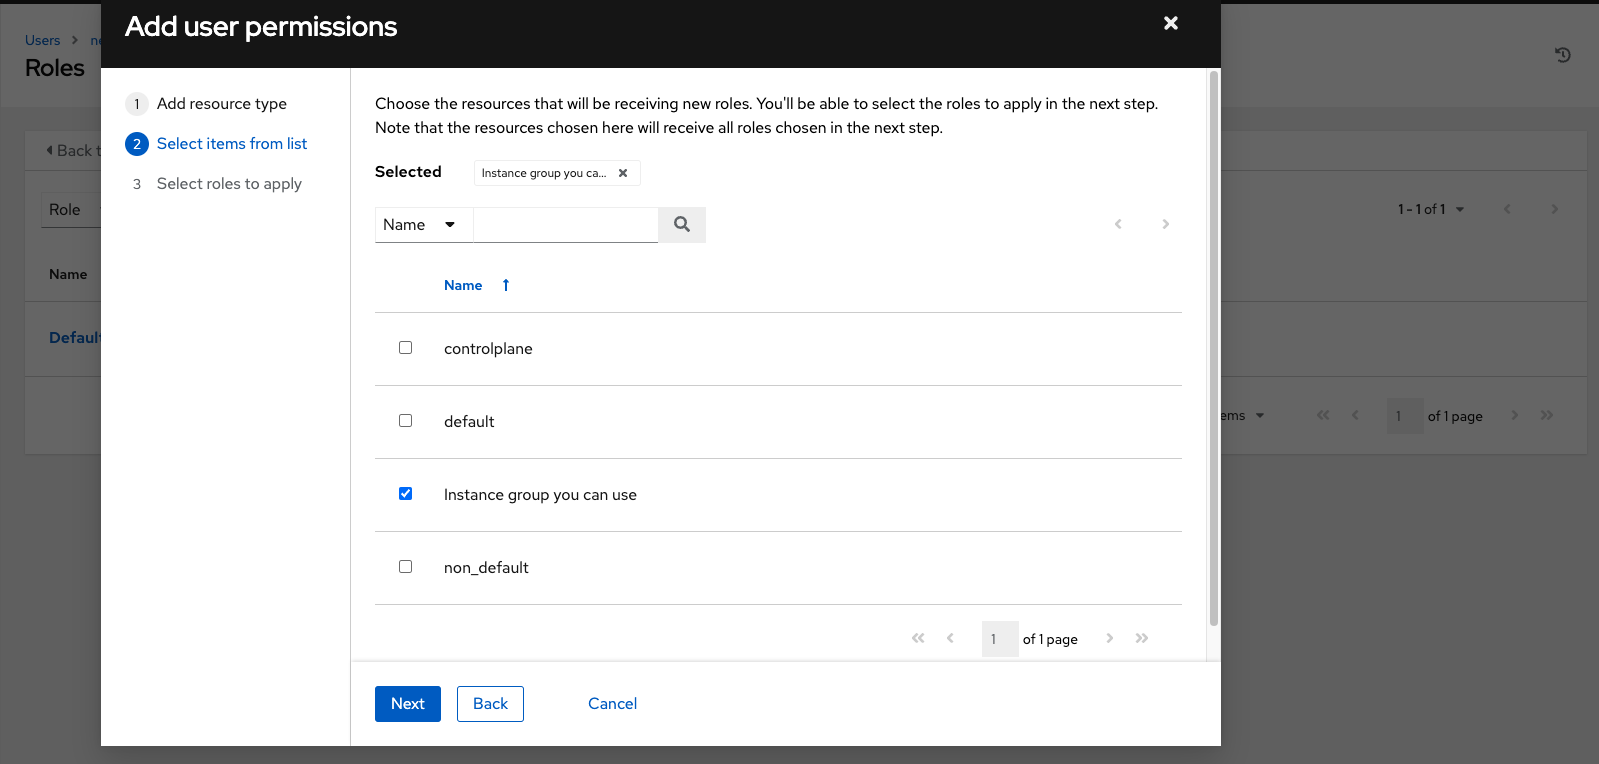
Select the resource you want to assign permissions to. Different resources have different options available.
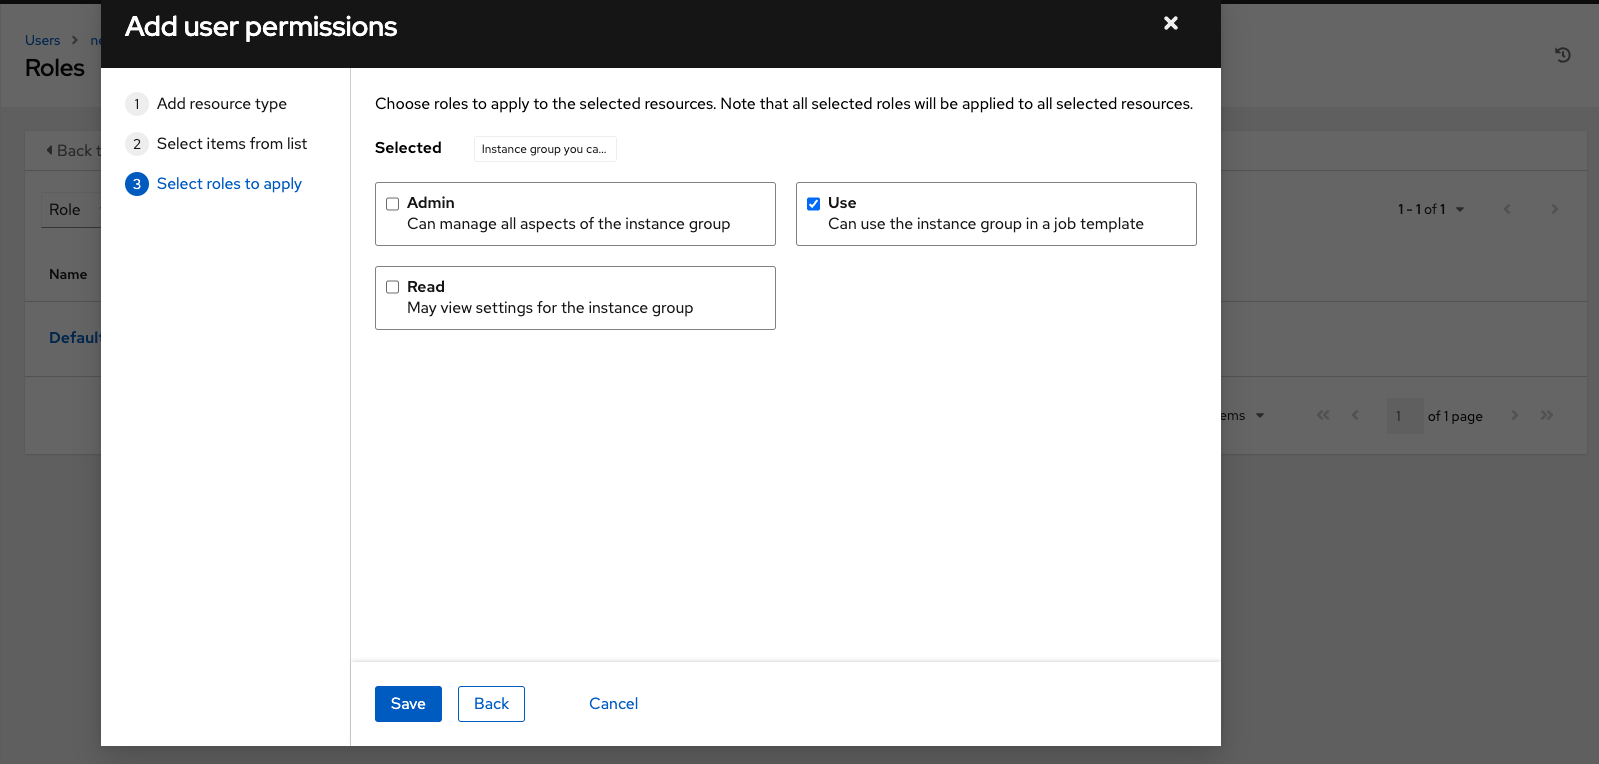
- Click .
- The Roles page displays the updated profile for the user with the permissions assigned for each selected resource.
You can also add teams, individual, or multiple users and assign them permissions at the object level. This includes templates, credentials, inventories, projects, organizations, or instance groups. This feature reduces the time for an organization to onboard many users at one time.
To remove permissions:
-
Click the
icon next to the resource. This launches a confirmation dialog asking you to confirm the disassociation.
8.6. Creating tokens for a user
The Tokens tab is only present for the user you created for yourself.
Before you add a token for your user, you might want to Create an application if you want to associate your token with it.
You can also create a Personal Access Token (PAT) without associating it with any application.
Procedure
- Select your user from the Users list view to configure your OAuth 2 tokens.
- Select the Tokens tab from your user’s profile.
- Click to open the Create Token window.
Enter the following information:
Application: Enter the name of the application with which you want to associate your token.
Alternatively, you can search for the application name clicking the
 icon. This opens a separate window that enables you to choose from the available options. Use the Search bar to filter by name if the list is extensive.
Leave this field blank if you want to create a PAT that is not linked to any application.
- Optional: Description: Provide a short description for your token.
- Scope: Specify the level of access you want this token to have.
- Click or to abandon your changes.
After the token is saved, the newly created token for the user is displayed.
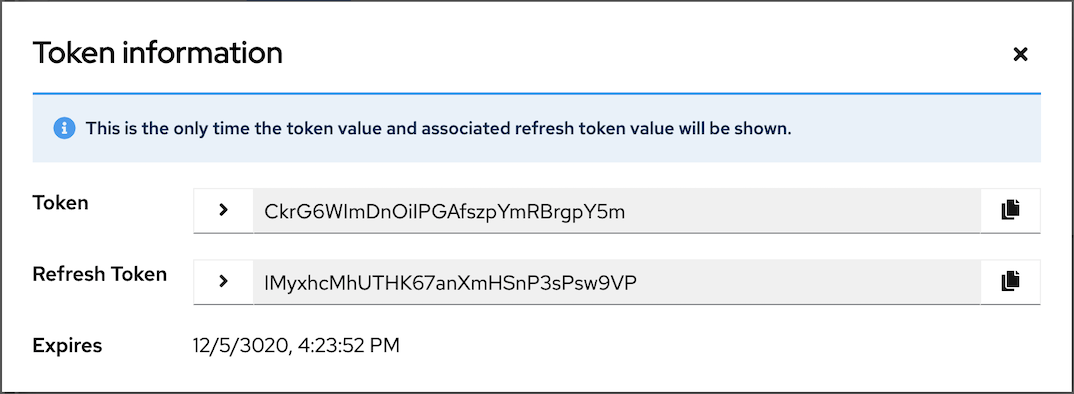 Important
This is the only time the token value and associated refresh token value are ever shown.
Chapter 9. Managing teams
A Team is a subdivision of an organization with associated users, projects, credentials, and permissions. Teams offer a means to implement role-based access control schemes and delegate responsibilities across organizations. For example, you can grant permissions to a whole team rather than to each user on the team.
From the navigation panel, select → .

You can sort and search the team list and searched by Name or Organization.
Click the Edit
![]() icon next to the entry to edit information about the team. You can also review Users and Permissions associated with this team.
icon next to the entry to edit information about the team. You can also review Users and Permissions associated with this team.
9.1. Creating a team
You can create as many teams of users as you need for your organization. You can assign permissions to each team, just as with users. Teams can also assign ownership for credentials, minimizing the steps to assign the same credentials to the same user.
Procedure
- On the Teams page, click .
Enter the appropriate details into the following fields:
- Name
- Optional: Description
- Organization: You must select an existing organization
- Click Save. The Details dialog opens.
Review and edit your team information.
9.1.1. Adding or removing a user to a team
To add a user to a team, the user must already have been created. For more information, see Creating a user. Adding a user to a team adds them as a member only. Use the Access tab to specify a role for the user on different resources.
Procedure
- In the Access tab of the Details page click .
- Follow the prompts to add a user and assign them to roles.
- Click .
9.1.2. Removing roles for a user
Procedure
-
To remove roles for a particular user, click the
icon next to its resource.
This launches a confirmation dialog, asking you to confirm the disassociation.
9.1.3. Team access
The Access tab displays the list of users that are members a specific team.
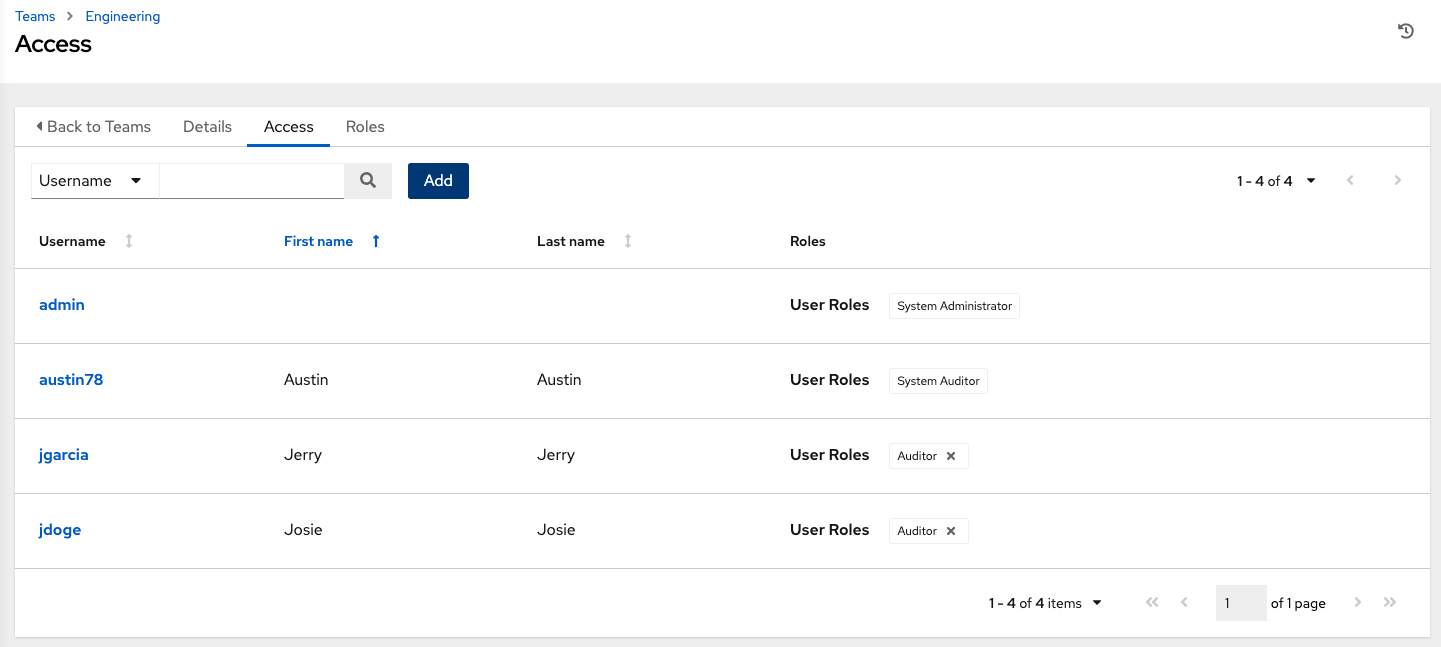
You can search this list by Username, First Name, or Last Name. For more information, see Users.
9.1.4. Team roles and permissions
Select the Roles tab on the Roles Details page to display a list of the permissions that are currently available for this team.
9.1.5. Adding and removing team permissions
By default, all teams that you create have read permissions. You can assign additional permissions, such as edit and administer projects, inventories, and other elements.
You can set permissions through an inventory, project, job template, or within the Organizations view.
Procedure
- From the Team list view , click the required user.
- On the Details page, click . This opens the Add team permissions wizard.
- Select the object to which the team requires access.
- Click .
- Select the resource to assign team roles.
- Click .
Click the checkbox beside the role to assign that role to your chosen type of resource. Different resources have different options available.
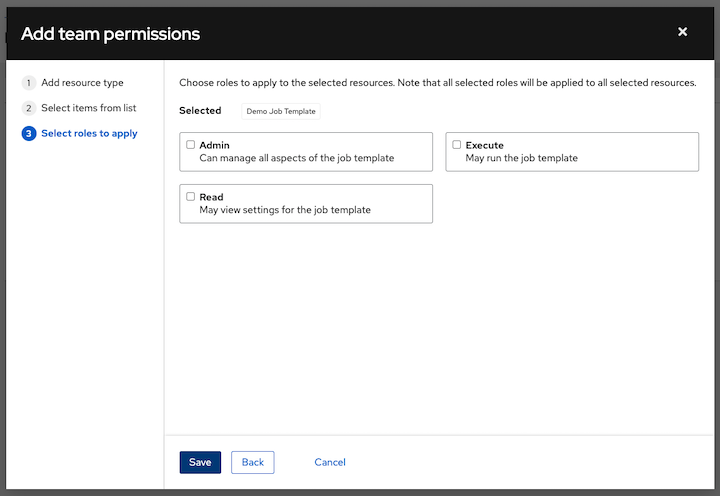
- Click .
The updated profile for the user with the roles assigned for each selected resource is displayed.
9.1.5.1. Removing team permissions
-
To remove Permissions for a particular resource, click the
icon next to its resource. This launches a confirmation dialog, asking you to confirm the disassociation.
You can also add teams, individual, or many users and assign them permissions at the object level. This includes projects, inventories, job templates, and workflow templates. This feature reduces the time for an organization to onboard many users at one time.
Chapter 10. Managing user credentials
Credentials authenticate the automation controller user when launching jobs against machines, synchronizing with inventory sources, and importing project content from a version control system.
You can grant users and teams the ability to use these credentials, without exposing the credential to the user. If a user moves to a different team or leaves the organization, you do not have to re-key all of your systems just because that credential was available in automation controller.
Automation controller encrypts passwords and key information in the database and never makes secret information visible through the API. For further information, see the Automation controller Administration Guide.
10.1. How credentials work
Automation controller uses SSH to connect to remote hosts. To pass the key from automation controller to SSH, the key must be decrypted before it can be written to a named pipe. Automation controller uses that pipe to send the key to SSH, so that the key is never written to disk. If passwords are used, automation controller handles them by responding directly to the password prompt and decrypting the password before writing it to the prompt.
10.2. Creating new credentials
Credentials added to a team are made available to all members of the team. You can also add credentials to individual users.
As part of the initial setup, two credentials are available for your use: Demo Credential and Ansible Galaxy. Use the Ansible Galaxy credential as a template. You can copy this credential, but not edit it. Add more credentials as needed.
Procedure
- From the navigation panel, select → .
- Click .
Enter the following information:
- The name for your new credential.
- Optional: a description for the new credential.
Optional: The name of the organization with which the credential is associated.
NoteA credential with a set of permissions associated with one organization persists if the credential is reassigned to another organization.
- In the Credential Type field, enter or select the credential type you want to create.
- Enter the appropriate details depending on the type of credential selected, as described in Credential types.
- Click .
10.3. Adding new users and job templates to existing credentials
Procedure
- From the navigation panel, select → .
- Select the credential that you want to assign to additional users.
- Click the Access tab. You can see users and teams associated with this credential and their roles.
- Choose a user and click . If no users exist, add them from the Users menu. For more information, see Users.
- Select Job Templates to display the job templates associated with this credential, and which jobs have run recently by using this credential.
- Choose a job template and click to assign the credential to additional job templates. For more information about creating new job templates, see the Job templates section.
10.4. Credential types
Automation controller supports the following credential types:
- Amazon Web Services
- Ansible Galaxy/Automation Hub API Token
- Centrify Vault Credential Provider Lookup
- Container Registry
- CyberArk Central Credential Provider Lookup
- CyberArk Conjur Secrets Manager Lookup
- GitHub Personal Access Token
- GitLab Personal Access Token
- Google Compute Engine
- GPG Public Key
- HashiCorp Vault Secret Lookup
- HashiCorp Vault Signed SSH
- Insights
- Machine
- Microsoft Azure Key Vault
- Microsoft Azure Resource Manager
- Network
- OpenShift or Kubernetes API Bearer Token
- OpenStack
- Red Hat Ansible Automation Platform
- Red Hat Satellite 6
- Red Hat Virtualization
- Source Control
- Thycotic DevOps Secrets Vault
- Thycotic Secret Server
- Vault
- VMware vCenter
The credential types associated with Centrify, CyberArk, HashiCorp Vault, Microsoft Azure Key Vault, and Thycotic are part of the credential plugins capability that enables an external system to lookup your secrets information.
For more information, see Secrets Management System.
10.4.1. Amazon Web Services credential type
Select this credential to enable synchronization of cloud inventory with Amazon Web Services.
Automation controller uses the following environment variables for AWS credentials:
AWS_ACCESS_KEY_ID
AWS_SECRET_ACCESS_KEY
AWS_SECURITY_TOKEN
These are fields prompted in the user interface.
Amazon Web Services credentials consist of the AWS Access Key and Secret Key.
Automation controller provides support for EC2 STS tokens, also known as Identity and Access Management (IAM) STS credentials. Security Token Service (STS) is a web service that enables you to request temporary, limited-privilege credentials for AWS IAM users.
If the value of your tags in EC2 contain Booleans (yes/no/true/false), you must quote them.
To use implicit IAM role credentials, do not attach AWS cloud credentials in automation controller when relying on IAM roles to access the AWS API.
Attaching your AWS cloud credential to your job template forces the use of your AWS credentials, not your IAM role credentials.
Additional resources
For more information about the IAM/EC2 STS Token, see Temporary security credentials in IAM.
10.4.1.1. Access Amazon EC2 credentials in an Ansible Playbook
You can get AWS credential parameters from a job runtime environment:
vars:
  aws:
    access_key: '{{ lookup("env", "AWS_ACCESS_KEY_ID") }}'
    secret_key: '{{ lookup("env", "AWS_SECRET_ACCESS_KEY") }}'
    security_token: '{{ lookup("env", "AWS_SECURITY_TOKEN") }}'
10.4.2. Ansible Galaxy/Automation Hub API token credential type
Select this credential to access Ansible Galaxy or use a collection published on an instance of private automation hub.
Entering the Galaxy server URL on this screen.
Populate the Galaxy Server URL field with the contents of the Server URL field at Red Hat Hybrid Cloud Console. Populate the Auth Server URL field with the contents of the SSO URL field at Red Hat Hybrid Cloud Console.
Additional resources
For more information, see Using Collections with automation hub.
10.4.3. Centrify Vault Credential Provider Lookup credential type
This is considered part of the secret management capability. For more information, see Centrify Vault Credential Provider Lookup.
10.4.4. Container Registry credential type
Select this credential to enable automation controller to access a collection of container images. For more information, see What is a container registry?.
You must specify a name. The Authentication URL field is pre-populated with a default value. You can change the value by specifying the authentication endpoint for a different container registry.
10.4.5. CyberArk Central Credential Provider Lookup credential type
This is considered part of the secret management capability.
For more information, see CyberArk Central Credential Provider (CCP) Lookup.
10.4.6. CyberArk Conjur Secrets Manager Lookup credential type
This is considered part of the secret management capability.
For more information, see CyberArk Conjur Secrets Manager Lookup.
10.4.7. GitHub Personal Access Token credential type
Select this credential to enable you to access GitHub by using a Personal Access Token (PAT), which you can get through GitHub.
For more information, see Working with Webhooks.
GitHub PAT credentials require a value in the Token field, which is provided in your GitHub profile settings.
Use this credential to establish an API connection to GitHub for use in webhook listener jobs, to post status updates.
10.4.8. GitLab Personal Access Token credential type
Select this credential to enable you to access GitLab by using a Personal Access Token (PAT), which you can get through GitLab.
For more information, see Working with Webhooks.
GitLab PAT credentials require a value in the Token field, which is provided in your GitLab profile settings.
Use this credential to establish an API connection to GitLab for use in webhook listener jobs, to post status updates.
10.4.9. Google Compute Engine credential type
Select this credential to enable synchronization of a cloud inventory with Google Compute Engine (GCE).
Automation controller uses the following environment variables for GCE credentials:
GCE_EMAIL
GCE_PROJECT
GCE_CREDENTIALS_FILE_PATH
These are fields prompted in the user interface:
GCE credentials require the following information:
- Service Account Email Address: The email address assigned to the Google Compute Engine service account.
- Optional: Project: Provide the GCE assigned identification or the unique project ID that you provided at project creation time.
- Optional: Service Account JSON File: Upload a GCE service account file. Click to browse for the file that has the special account information that can be used by services and applications running on your GCE instance to interact with other Google Cloud Platform APIs. This grants permissions to the service account and virtual machine instances.
- RSA Private Key: The PEM file associated with the service account email.
10.4.9.1. Access Google Compute Engine credentials in an Ansible Playbook
You can get GCE credential parameters from a job runtime environment:
vars:
  gce:
    email: '{{ lookup("env", "GCE_EMAIL") }}'
    project: '{{ lookup("env", "GCE_PROJECT") }}'
    pem_file_path: '{{ lookup("env", "GCE_PEM_FILE_PATH") }}'
10.4.10. GPG Public Key credential type
Select this credential type to enable automation controller to verify the integrity of the project when synchronizing from source control.
For more information about how to generate a valid keypair, use the CLI tool to sign content, and how to add the public key to the controller, see Project Signing and Verification.
10.4.11. HashiCorp Vault Secret Lookup credential type
This is considered part of the secret management capability.
For more information, see HashiCorp Vault Secret Lookup.
10.4.12. HashiCorp Vault Signed SSH credential type
This is considered part of the secret management capability.
For more information, see HashiCorp Vault Signed SSH.
10.4.13. Insights credential type
Select this credential type to enable synchronization of cloud inventory with Red Hat Insights.
Insights credentials are the Insights Username and Password, which are the user’s Red Hat Customer Portal Account username and password.
The extra_vars and env injectors for Insights are as follows:
ManagedCredentialType(
    namespace='insights',
....
....
....

injectors={
        'extra_vars': {
            "scm_username": "{{username}}",
            "scm_password": "{{password}}",
        },
        'env': {
            'INSIGHTS_USER': '{{username}}',
            'INSIGHTS_PASSWORD': '{{password}}',
        },
10.4.14. Machine credential type
Machine credentials enable automation controller to call Ansible on hosts under your management. You can specify the SSH username, optionally give a password, an SSH key, a key password, or have automation controller prompt the user for their password at deployment time. They define SSH and user-level privilege escalation access for playbooks, and are used when submitting jobs to run playbooks on a remote host.
The following network connections use Machine as the credential type: httpapi, netconf, and network_cli
Machine and SSH credentials do not use environment variables. They pass the username through the ansible -u flag, and interactively write the SSH password when the underlying SSH client prompts for it.
Machine credentials require the following inputs:
- Username: The username to use for SSH authentication.
- Password: The password to use for SSH authentication. This password is stored encrypted in the database, if entered. Alternatively, you can configure automation controller to ask the user for the password at launch time by selecting Prompt on launch. In these cases, a dialog opens when the job is launched, promoting the user to enter the password and password confirmation.
- SSH Private Key: Copy or drag-and-drop the SSH private key for the machine credential.
- Private Key Passphrase: If the SSH Private Key used is protected by a password, you can configure a Key Passphrase for the private key. This password is stored encrypted in the database, if entered. You can also configure automation controller to ask the user for the key passphrase at launch time by selecting Prompt on launch. In these cases, a dialog opens when the job is launched, prompting the user to enter the key passphrase and key passphrase confirmation.
-
Privilege Escalation Method: Specifies the type of escalation privilege to assign to specific users. This is the same as specifying the
--become-method=BECOME_METHODparameter, whereBECOME_METHODis any of the existing methods, or a custom method you have written. Begin entering the name of the method, and the appropriate name auto-populates.
-
empty selection: If a task or play has
becomeset toyesand is used with an empty selection, then it will default tosudo. - sudo: Performs single commands with superuser (root user) privileges.
- su: Switches to the superuser (root user) account (or to other user accounts).
- pbrun: Requests that an application or command be run in a controlled account and provides for advanced root privilege delegation and keylogging.
- pfexec: Executes commands with predefined process attributes, such as specific user or group IDs.
- dzdo: An enhanced version of sudo that uses RBAC information in Centrify’s Active Directory service. For more information, see Centrify’s site on DZDO.
- pmrun: Requests that an application is run in a controlled account. See Privilege Manager for Unix 6.0.
- runas: Enables you to run as the current user.
- enable: Switches to elevated permissions on a network device.
- doas: Enables your remote/login user to run commands as another user through the doas ("Do as user") utility.
- ksu: Enables your remote/login user to run commands as another user through Kerberos access.
-
machinectl: Enables you to manage containers through the
systemdmachine manager. - sesu: Enables your remote/login user to run commands as another user through the CA Privileged Access Manager.
Custom become plugins are available from Ansible 2.8+. For more information, see Understanding Privilege Escalation and the list of Become plugins
- Privilege Escalation Username: You see this field only if you selected an option for privilege escalation. Enter the username to use with escalation privileges on the remote system.
- Privilege Escalation Password: You see this field only if you selected an option for privilege escalation. Enter the password to use to authenticate the user through the selected privilege escalation type on the remote system. This password is stored encrypted in the database. You can also configure automation controller to ask the user for the password at launch time by selecting Prompt on launch. In these cases, a dialog opens when the job is launched, promoting the user to enter the password and password confirmation.
You must use sudo password must in combination with SSH passwords or SSH Private Keys, because automation controller must first establish an authenticated SSH connection with the host before invoking sudo to change to the sudo user.
Credentials that are used in scheduled jobs must not be configured as Prompt on launch.
10.4.14.1. Access machine credentials in an ansible playbook
You can get username and password from Ansible facts:
vars:
  machine:
    username: '{{ ansible_user }}'
    password: '{{ ansible_password }}'
10.4.15. Microsoft Azure Key Vault credential type
This is considered part of the secret management capability.
For more information, see Microsoft Azure Key Vault.
10.4.16. Microsoft Azure Resource Manager credential type
Select this credential type to enable synchronization of cloud inventory with Microsoft Azure Resource Manager.
Microsoft Azure Resource Manager credentials require the following inputs:
- Subscription ID: The Subscription UUID for the Microsoft Azure account.
- Username: The username to use to connect to the Microsoft Azure account.
- Password: The password to use to connect to the Microsoft Azure account.
- Client ID: The Client ID for the Microsoft Azure account.
- Client Secret: The Client Secret for the Microsoft Azure account.
- Tenant ID: The Tenant ID for the Microsoft Azure account.
- Azure Cloud Environment: The variable associated with Azure cloud or Azure stack environments.
These fields are equal to the variables in the API.
To pass service principal credentials, define the following variables:
AZURE_CLIENT_ID
AZURE_SECRET
AZURE_SUBSCRIPTION_ID
AZURE_TENANT
AZURE_CLOUD_ENVIRONMENT
To pass an Active Directory username and password pair, define the following variables:
AZURE_AD_USER
AZURE_PASSWORD
AZURE_SUBSCRIPTION_ID
You can also pass credentials as parameters to a task within a playbook. The order of precedence is parameters, then environment variables, and finally a file found in your home directory.
To pass credentials as parameters to a task, use the following parameters for service principal credentials:
client_id
secret
subscription_id
tenant
azure_cloud_environment
Alternatively, pass the following parameters for Active Directory username/password:
ad_user
password
subscription_id
10.4.16.1. Access Microsoft Azure resource manager credentials in an ansible playbook
You can get Microsoft Azure credential parameters from a job runtime environment:
vars:
  azure:
    client_id: '{{ lookup("env", "AZURE_CLIENT_ID") }}'
    secret: '{{ lookup("env", "AZURE_SECRET") }}'
    tenant: '{{ lookup("env", "AZURE_TENANT") }}'
    subscription_id: '{{ lookup("env", "AZURE_SUBSCRIPTION_ID") }}'
10.4.17. Network credential type
Select the Network credential type if you are using a local connection with provider to use Ansible networking modules to connect to and manage networking devices.
When connecting to network devices, the credential type must match the connection type:
-
For
localconnections usingprovider, credential type should be Network. -
For all other network connections (
httpapi,netconf, andnetwork_cli), the credential type should be Machine.
For more information about connection types available for network devices, see Multiple Communication Protocols.
Automation controller uses the following environment variables for Network credentials:
ANSIBLE_NET_USERNAME
ANSIBLE_NET_PASSWORD
Provide the following information for network credentials:
- Username: The username to use in conjunction with the network device.
- Password: The password to use in conjunction with the network device.
- SSH Private Key: Copy or drag-and-drop the actual SSH Private Key to be used to authenticate the user to the network through SSH.
- Private Key Passphrase: The passphrase for the private key to authenticate the user to the network through SSH.
- Authorize: Select this from the Options field to control whether or not to enter privileged mode.
- If Authorize is checked, enter a password in the Authorize Password field to access privileged mode.
For more information, see Porting Ansible Network Playbooks with New Connection Plugins.
10.4.18. Access network credentials in an ansible playbook
You can get the username and password parameters from a job runtime environment:
vars:
  network:
    username: '{{ lookup("env", "ANSIBLE_NET_USERNAME") }}'
    password: '{{ lookup("env", "ANSIBLE_NET_PASSWORD") }}'
10.4.19. OpenShift or Kubernetes API Bearer Token credential type
Select this credential type to create instance groups that point to a Kubernetes or OpenShift container.
For more information, see Container and Instance Groups in the Automation controller Administration Guide.
Provide the following information for container credentials:
- OpenShift or Kubernetes API Endpoint (required): The endpoint used to connect to an OpenShift or Kubernetes container.
- API Authentication Bearer Token (required): The token used to authenticate the connection.
- Optional: Verify SSL: You can check this option to verify the server’s SSL/TLS certificate is valid and trusted. Environments that use internal or private Certificate Authority (CA) must leave this option unchecked to disable verification.
-
Certificate Authority Data: Include the
BEGIN CERTIFICATEandEND CERTIFICATElines when pasting the certificate, if provided.
A container group is a type of instance group that has an associated credential that enables connection to an OpenShift cluster. To set up a container group, you must have the following items:
- A namespace you can start into. Although every cluster has a default namespace, you can use a specific namespace.
- A service account that has the roles that enable it to start and manage pods in this namespace.
If you use execution environments in a private registry, and have a container registry credential associated with them in automation controller, the service account also requires the roles to get, create, and delete secrets in the namespace.
If you do not want to give these roles to the service account, you can pre-create the
ImagePullSecretsand specify them on the pod spec for the container group. In this case, the execution environment must not have a Container Registry credential associated, or automation controller attempts to create the secret for you in the namespace.- A token associated with that service account (OpenShift or Kubernetes Bearer Token)
- A CA certificate associated with the cluster
10.4.19.1. Creating a service account in an Openshift cluster
Creating a service account in an Openshift or Kubernetes cluster to be used to run jobs in a container group through automation controller. After you create the service account, its credentials are provided to automation controller in the form of an Openshift or Kubernetes API bearer token credential.
After you create a service account, use the information in the new service account to configure automation controller.
Procedure
- To create a service account, download and use the sample service account and change it as required to obtain the previous credentials.
Apply the configuration from the sample service account:
oc apply -f containergroup-sa.yml
Get the secret name associated with the service account:
export SA_SECRET=$(oc get sa containergroup-service-account -o json | jq '.secrets[0].name' | tr -d '"')
Get the token from the secret:
oc get secret $(echo ${SA_SECRET}) -o json | jq '.data.token' | xargs | base64 --decode > containergroup-sa.tokenGet the CA cert:
oc get secret $SA_SECRET -o json | jq '.data["ca.crt"]' | xargs | base64 --decode > containergroup-ca.crt
-
Use the contents of
containergroup-sa.tokenandcontainergroup-ca.crtto provide the information for the OpenShift or Kubernetes API Bearer Token required for the container group.
10.4.20. OpenStack credential type
Select this credential type to enable synchronization of cloud inventory with OpenStack.
Provide the following information for OpenStack credentials:
- Username: The username to use to connect to OpenStack.
- Password (API Key): The password or API key to use to connect to OpenStack.
- Host (Authentication URL): The host to be used for authentication.
- Project (Tenant Name): The Tenant name or Tenant ID used for OpenStack. This value is usually the same as the username.
- Optional: Project (Domain Name): Provide the project name associated with your domain.
- Optional: Domain name: Provide the FQDN to be used to connect to OpenStack.
If you are interested in using OpenStack Cloud Credentials, see Use Cloud Credentials with a cloud inventory, which includes a sample playbook.
10.4.21. Red Hat Ansible Automation Platform credential type
Select this credential to access another automation controller instance.
Ansible Automation Platform credentials require the following inputs:
- Red Hat Ansible Automation Platform: The base URL or IP address of the other instance to connect to.
- Username: The username to use to connect to it.
- Password: The password to use to connect to it.
- Oauth Token: If username and password are not used, provide an OAuth token to use to authenticate.
The env injectors for Ansible Automation Platform are as follows:
ManagedCredentialType(
    namespace='controller',

....
....
....

injectors={
        'env': {
            'TOWER_HOST': '{{host}}',
            'TOWER_USERNAME': '{{username}}',
            'TOWER_PASSWORD': '{{password}}',
            'TOWER_VERIFY_SSL': '{{verify_ssl}}',
            'TOWER_OAUTH_TOKEN': '{{oauth_token}}',
            'CONTROLLER_HOST': '{{host}}',
            'CONTROLLER_USERNAME': '{{username}}',
            'CONTROLLER_PASSWORD': '{{password}}',
            'CONTROLLER_VERIFY_SSL': '{{verify_ssl}}',
            'CONTROLLER_OAUTH_TOKEN': '{{oauth_token}}',
        }
10.4.21.1. Access automation controller credentials in an Ansible Playbook
You can get the host, username, and password parameters from a job runtime environment:
vars:
  controller:
    host: '{{ lookup("env", "CONTROLLER_HOST") }}'
    username: '{{ lookup("env", "CONTROLLER_USERNAME") }}'
    password: '{{ lookup("env", "CONTROLLER_PASSWORD") }}'
10.4.22. Red Hat Satellite 6 credential type
Select this credential type to enable synchronization of cloud inventory with Red Hat Satellite 6.
Automation controller writes a Satellite configuration file based on fields prompted in the user interface. The absolute path to the file is set in the following environment variable:
FOREMAN_INI_PATH
Satellite credentials have the following required inputs:
- Satellite 6 URL: The Satellite 6 URL or IP address to connect to.
- Username: The username to use to connect to Satellite 6.
- Password: The password to use to connect to Satellite 6.
10.4.23. Red Hat Virtualization credential type
Select this credential to enable automation controller to access Ansible’s oVirt4.py dynamic inventory plugin, which is managed by Red Hat Virtualization.
Automation controller uses the following environment variables for Red Hat Virtualization credentials. These are fields in the user interface:
OVIRT_URL
OVIRT_USERNAME
OVIRT_PASSWORD
Provide the following information for Red Hat Virtualization credentials:
-
Host (Authentication URL): The host URL or IP address to connect to. To sync with the inventory, the credential URL needs to include the
ovirt-engine/apipath. -
Username: The username to use to connect to oVirt4. This must include the domain profile to succeed, for example
username@ovirt.host.com. - Password: The password to use to connect to it.
-
Optional: CA File: Provide an absolute path to the oVirt certificate file (it might end in
.pem,.cerand.crtextensions, but preferably.pemfor consistency)
10.4.23.1. Access virtualization credentials in an Ansible Playbook
You can get the Red Hat Virtualization credential parameter from a job runtime environment:
vars:
  ovirt:
    ovirt_url: '{{ lookup("env", "OVIRT_URL") }}'
    ovirt_username: '{{ lookup("env", "OVIRT_USERNAME") }}'
    ovirt_password: '{{ lookup("env", "OVIRT_PASSWORD") }}'
The file and env injectors for Red Hat Virtualization are as follows:
ManagedCredentialType(
    namespace='rhv',

....
....
....

injectors={
        # The duplication here is intentional; the ovirt4 inventory plugin
        # writes a .ini file for authentication, while the ansible modules for
        # ovirt4 use a separate authentication process that support
        # environment variables; by injecting both, we support both
        'file': {
            'template': '\n'.join(
                [
                    '[ovirt]',
                    'ovirt_url={{host}}',
                    'ovirt_username={{username}}',
                    'ovirt_password={{password}}',
                    '{% if ca_file %}ovirt_ca_file={{ca_file}}{% endif %}',
                ]
            )
        },
        'env': {'OVIRT_INI_PATH': '{{tower.filename}}', 'OVIRT_URL': '{{host}}', 'OVIRT_USERNAME': '{{username}}', 'OVIRT_PASSWORD': '{{password}}'},
    },
)
10.4.24. Source Control credential type
Source Control credentials are used with projects to clone and update local source code repositories from a remote revision control system such as Git or Subversion.
Source Control credentials require the following inputs:
- Username: The username to use in conjunction with the source control system.
- Password: The password to use in conjunction with the source control system.
- SCM Private Key: Copy or drag-and-drop the actual SSH Private Key to be used to authenticate the user to the source control system through SSH.
- Private Key Passphrase: If the SSH Private Key used is protected by a passphrase, you can configure a Key Passphrase for the private key.
You cannot configure Source Control credentials as Prompt on launch.
If you are using a GitHub account for a Source Control credential and you have Two Factor Authentication (2FA) enabled on your account, you must use your Personal Access Token in the password field rather than your account password.
10.4.25. Thycotic DevOps Secrets Vault credential type
This is considered part of the secret management capability.
For more information, see Thycotic DevOps Secrets Vault.
10.4.26. Thycotic secret server credential type
This is considered part of the secret management capability.
For more information, see Thycotic Secret Server.
10.4.27. Ansible Vault credential type
Select this credential type to enable synchronization of inventory with Ansible Vault.
Vault credentials require the Vault Password and an optional Vault Identifier if applying multi-Vault credentialing.
For more information on the Multi-Vault support, refer to the Multi-Vault Credentials section of the Automation controller Administration Guide.
You can configure automation controller to ask the user for the password at launch time by selecting Prompt on launch.
When you select Prompt on Launch, a dialog opens when the job is launched, prompting the user to enter the password.
Credentials that are used in scheduled jobs must not be configured as Prompt on launch.
For more information about Ansible Vault, see Protecting sensitive data with Ansible vault.
10.4.28. VMware vCenter credential type
Select this credential type to enable synchronization of inventory with VMware vCenter.
Automation controller uses the following environment variables for VMware vCenter credentials:
VMWARE_HOST
VMWARE_USER
VMWARE_PASSWORD
VMWARE_VALIDATE_CERTS
These are fields prompted in the user interface.
VMware credentials require the following inputs:
- vCenter Host: The vCenter hostname or IP address to connect to.
- Username: The username to use to connect to vCenter.
- Password: The password to use to connect to vCenter.
If the VMware guest tools are not running on the instance, VMware inventory synchronization does not return an IP address for that instance.
10.4.28.1. Access VMware vCenter credentials in an ansible playbook
You can get VMware vCenter credential parameters from a job runtime environment:
vars:
  vmware:
    host: '{{ lookup("env", "VMWARE_HOST") }}'
    username: '{{ lookup("env", "VMWARE_USER") }}'
    password: '{{ lookup("env", "VMWARE_PASSWORD") }}'
10.5. Use automation controller credentials in a playbook
The following playbook is an example of how to use automation controller credentials in your playbook.
- hosts: all

  vars:
    machine:
      username: '{{ ansible_user }}'
      password: '{{ ansible_password }}'
    controller:
      host: '{{ lookup("env", "CONTROLLER_HOST") }}'
      username: '{{ lookup("env", "CONTROLLER_USERNAME") }}'
      password: '{{ lookup("env", "CONTROLLER_PASSWORD") }}'
    network:
      username: '{{ lookup("env", "ANSIBLE_NET_USERNAME") }}'
      password: '{{ lookup("env", "ANSIBLE_NET_PASSWORD") }}'
    aws:
      access_key: '{{ lookup("env", "AWS_ACCESS_KEY_ID") }}'
      secret_key: '{{ lookup("env", "AWS_SECRET_ACCESS_KEY") }}'
      security_token: '{{ lookup("env", "AWS_SECURITY_TOKEN") }}'
    vmware:
      host: '{{ lookup("env", "VMWARE_HOST") }}'
      username: '{{ lookup("env", "VMWARE_USER") }}'
      password: '{{ lookup("env", "VMWARE_PASSWORD") }}'
    gce:
      email: '{{ lookup("env", "GCE_EMAIL") }}'
      project: '{{ lookup("env", "GCE_PROJECT") }}'
    azure:
      client_id: '{{ lookup("env", "AZURE_CLIENT_ID") }}'
      secret: '{{ lookup("env", "AZURE_SECRET") }}'
      tenant: '{{ lookup("env", "AZURE_TENANT") }}'
      subscription_id: '{{ lookup("env", "AZURE_SUBSCRIPTION_ID") }}'

  tasks:
    - debug:
        var: machine

    - debug:
        var: controller

    - debug:
        var: network

    - debug:
        var: aws

    - debug:
        var: vmware

    - debug:
        var: gce

    - shell: 'cat {{ gce.pem_file_path }}'
      delegate_to: localhost

    - debug:
        var: azure
Use 'delegate_to' and any lookup variable
- command: somecommand
  environment:
    USERNAME: '{{ lookup("env", "USERNAME") }}'
    PASSWORD: '{{ lookup("env", "PASSWORD") }}'
  delegate_to: somehost
Chapter 11. Custom credential types
As a system administrator, you can define a custom credential type in a standard format by using a YAML or JSON-like definition. You can define a custom credential type that works in ways similar to existing credential types. For example, a custom credential type can inject an API token for a third-party web service into an environment variable, for your playbook or custom inventory script to consume.
Custom credentials support the following ways of injecting their authentication information:
- Environment variables
- Ansible extra variables
-
File-based templating, which means generating
.inior.conffiles that contain credential values
You can attach one SSH and multiple cloud credentials to a job template. Each cloud credential must be of a different type. Only one of each type of credential is permitted. Vault credentials and machine credentials are separate entities.
-
When creating a new credential type, you must avoid collisions in the
extra_vars,env, and file namespaces. -
Environment variable or extra variable names must not start with
ANSIBLE_because they are reserved. -
You must have System administrator (superuser) permissions to be able to create and edit a credential type (
CredentialType) and to be able to view theCredentialType.injectionfield.
11.1. Content sourcing from collections
A "managed" credential type of kind=galaxy represents a content source for fetching collections defined in requirements.yml when project updates are run. Examples of content sources are galaxy.ansible.com, console.redhat.com, or on-premise automation hub. This new credential type represents a URL and (optional) authentication details necessary to construct the environment variables when a project update runs ansible-galaxy collection install as described in the Ansible documentation, Configuring the ansible-galaxy client. It has fields that map directly to the configuration options exposed to the Ansible Galaxy CLI, for example, per-server.
An endpoint in the API reflects an ordered list of these credentials at the Organization level:
/api/v2/organizations/N/galaxy_credentials/
When installations of automation controller migrate existing Galaxy-oriented setting values, post-upgrade proper credentials are created and attached to every Organization. After upgrading to the latest version, every organization that existed before upgrade now has a list of one or more "Galaxy" credentials associated with it.
Additionally, post-upgrade, these settings are not visible (or editable) from the /api/v2/settings/jobs/ endpoint.
Automation controller continues to fetch roles directly from public Galaxy even if galaxy.ansible.com is not the first credential in the list for the organization. The global Galaxy settings are no longer configured at the jobs level, but at the organization level in the user interface.
The organization’s Add and Edit windows have an optional Credential lookup field for credentials of kind=galaxy.
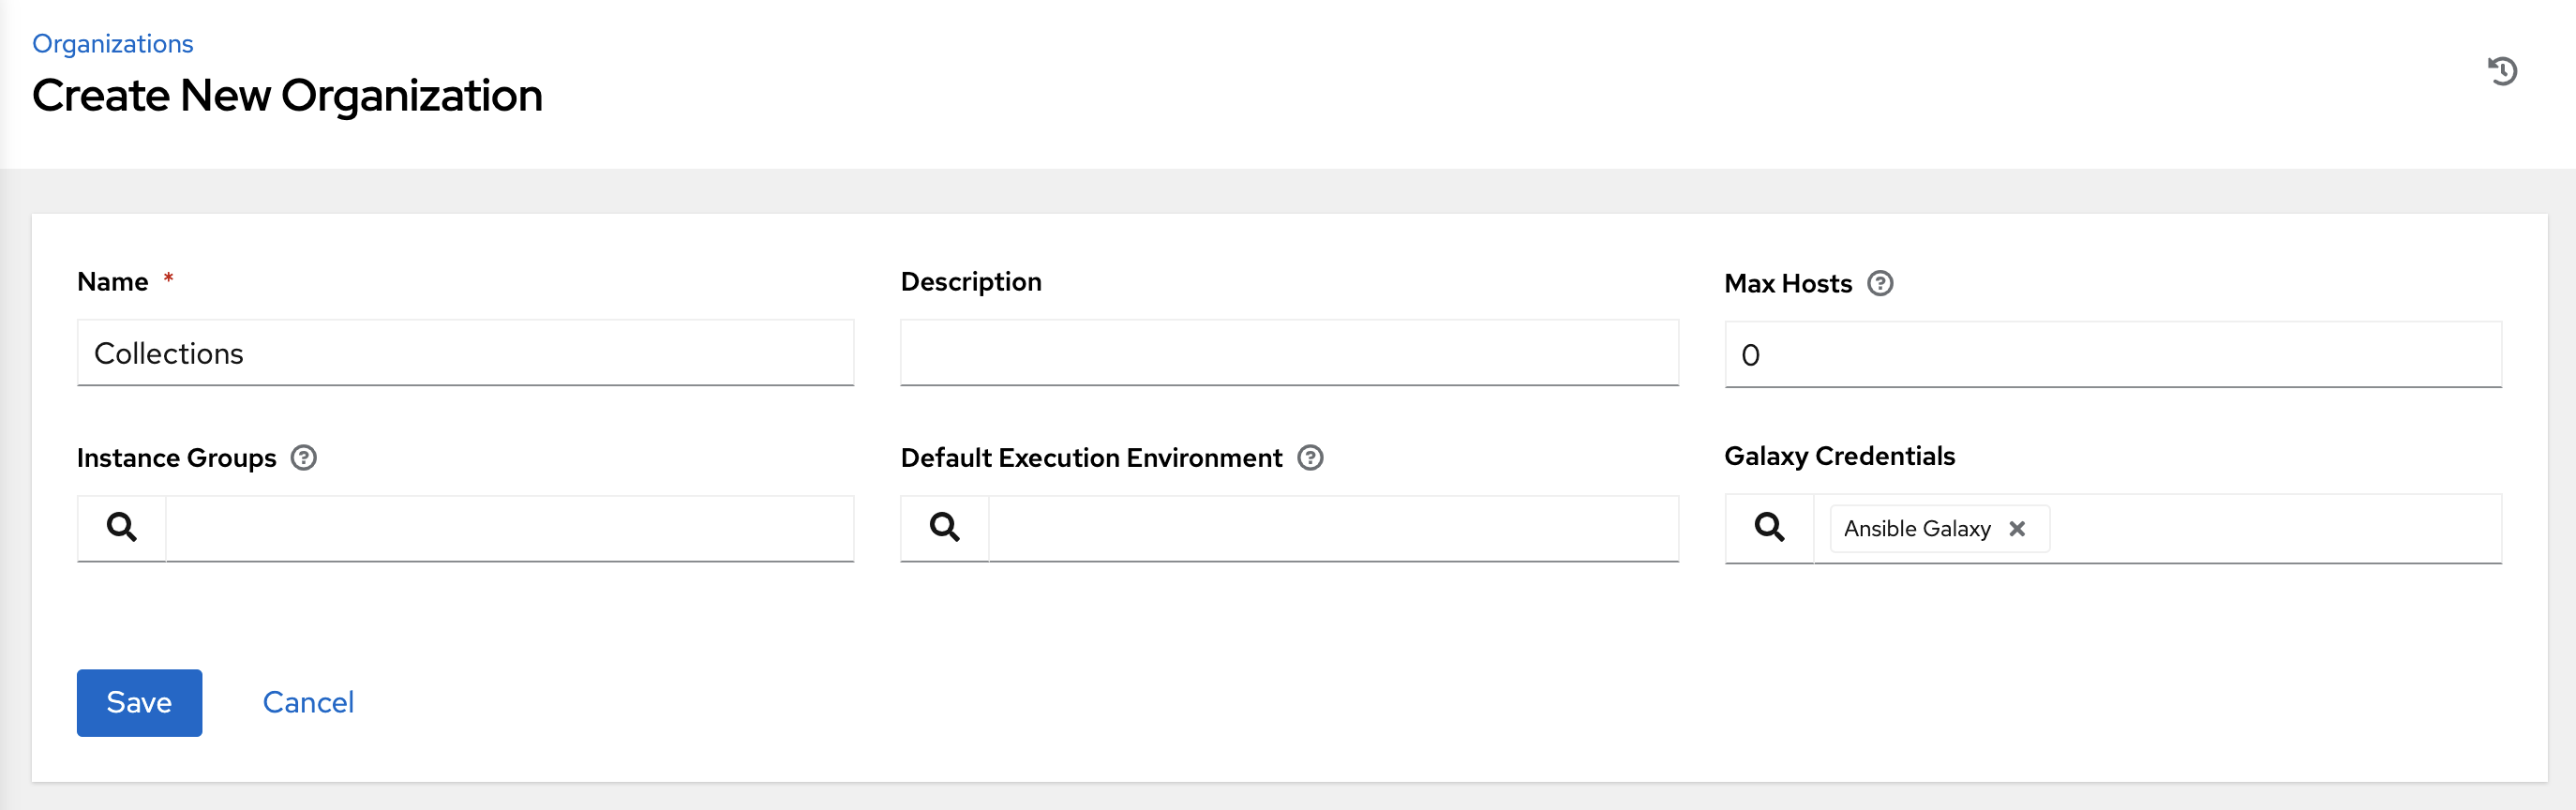
It is important to specify the order of these credentials as order sets precedence for the sync and lookup of the content. For more information, see Creating an organization.
For more information about how to set up a project by using collections, see Using Collections with automation hub.
11.2. Backwards-Compatible API considerations
Support for version 2 of the API (api/v2/) means a one-to-many relationship for job templates to credentials (including multicloud support).
You can filter credentials the v2 API:
curl "https://controller.example.org/api/v2/credentials/?credential_type__namespace=aws"
In the V2 Credential Type model, the relationships are defined as follows:
| Machine | SSH |
|---|---|
| Vault | Vault |
| Network |
Sets environment variables, for example |
| SCM | Source Control |
| Cloud | EC2, AWS |
| Cloud | Lots of others |
| Insights | Insights |
| Galaxy | galaxy.ansible.com, console.redhat.com |
| Galaxy | on-premise automation hub |
11.3. Content verification
Automation controller uses GNU Privacy Guard (GPG) to verify content.
For more information, see The GNU Privacy Handbook.
11.4. Getting started with credential types
From the navigation panel, select → . If no custom credential types have been created, the Credential Types prompts you to add one.
If credential types have been created, this page displays a list of existing and available Credential Types.
To view more information about a credential type, click the name of a credential or the Edit
![]() icon.
icon.
Each credential type displays its own unique configurations in the Input Configuration field and the Injector Configuration field, if applicable. Both YAML and JSON formats are supported in the configuration fields.
11.5. Creating a new credential type
To create a new credential type:
Procedure
In the Credential Types view, click .
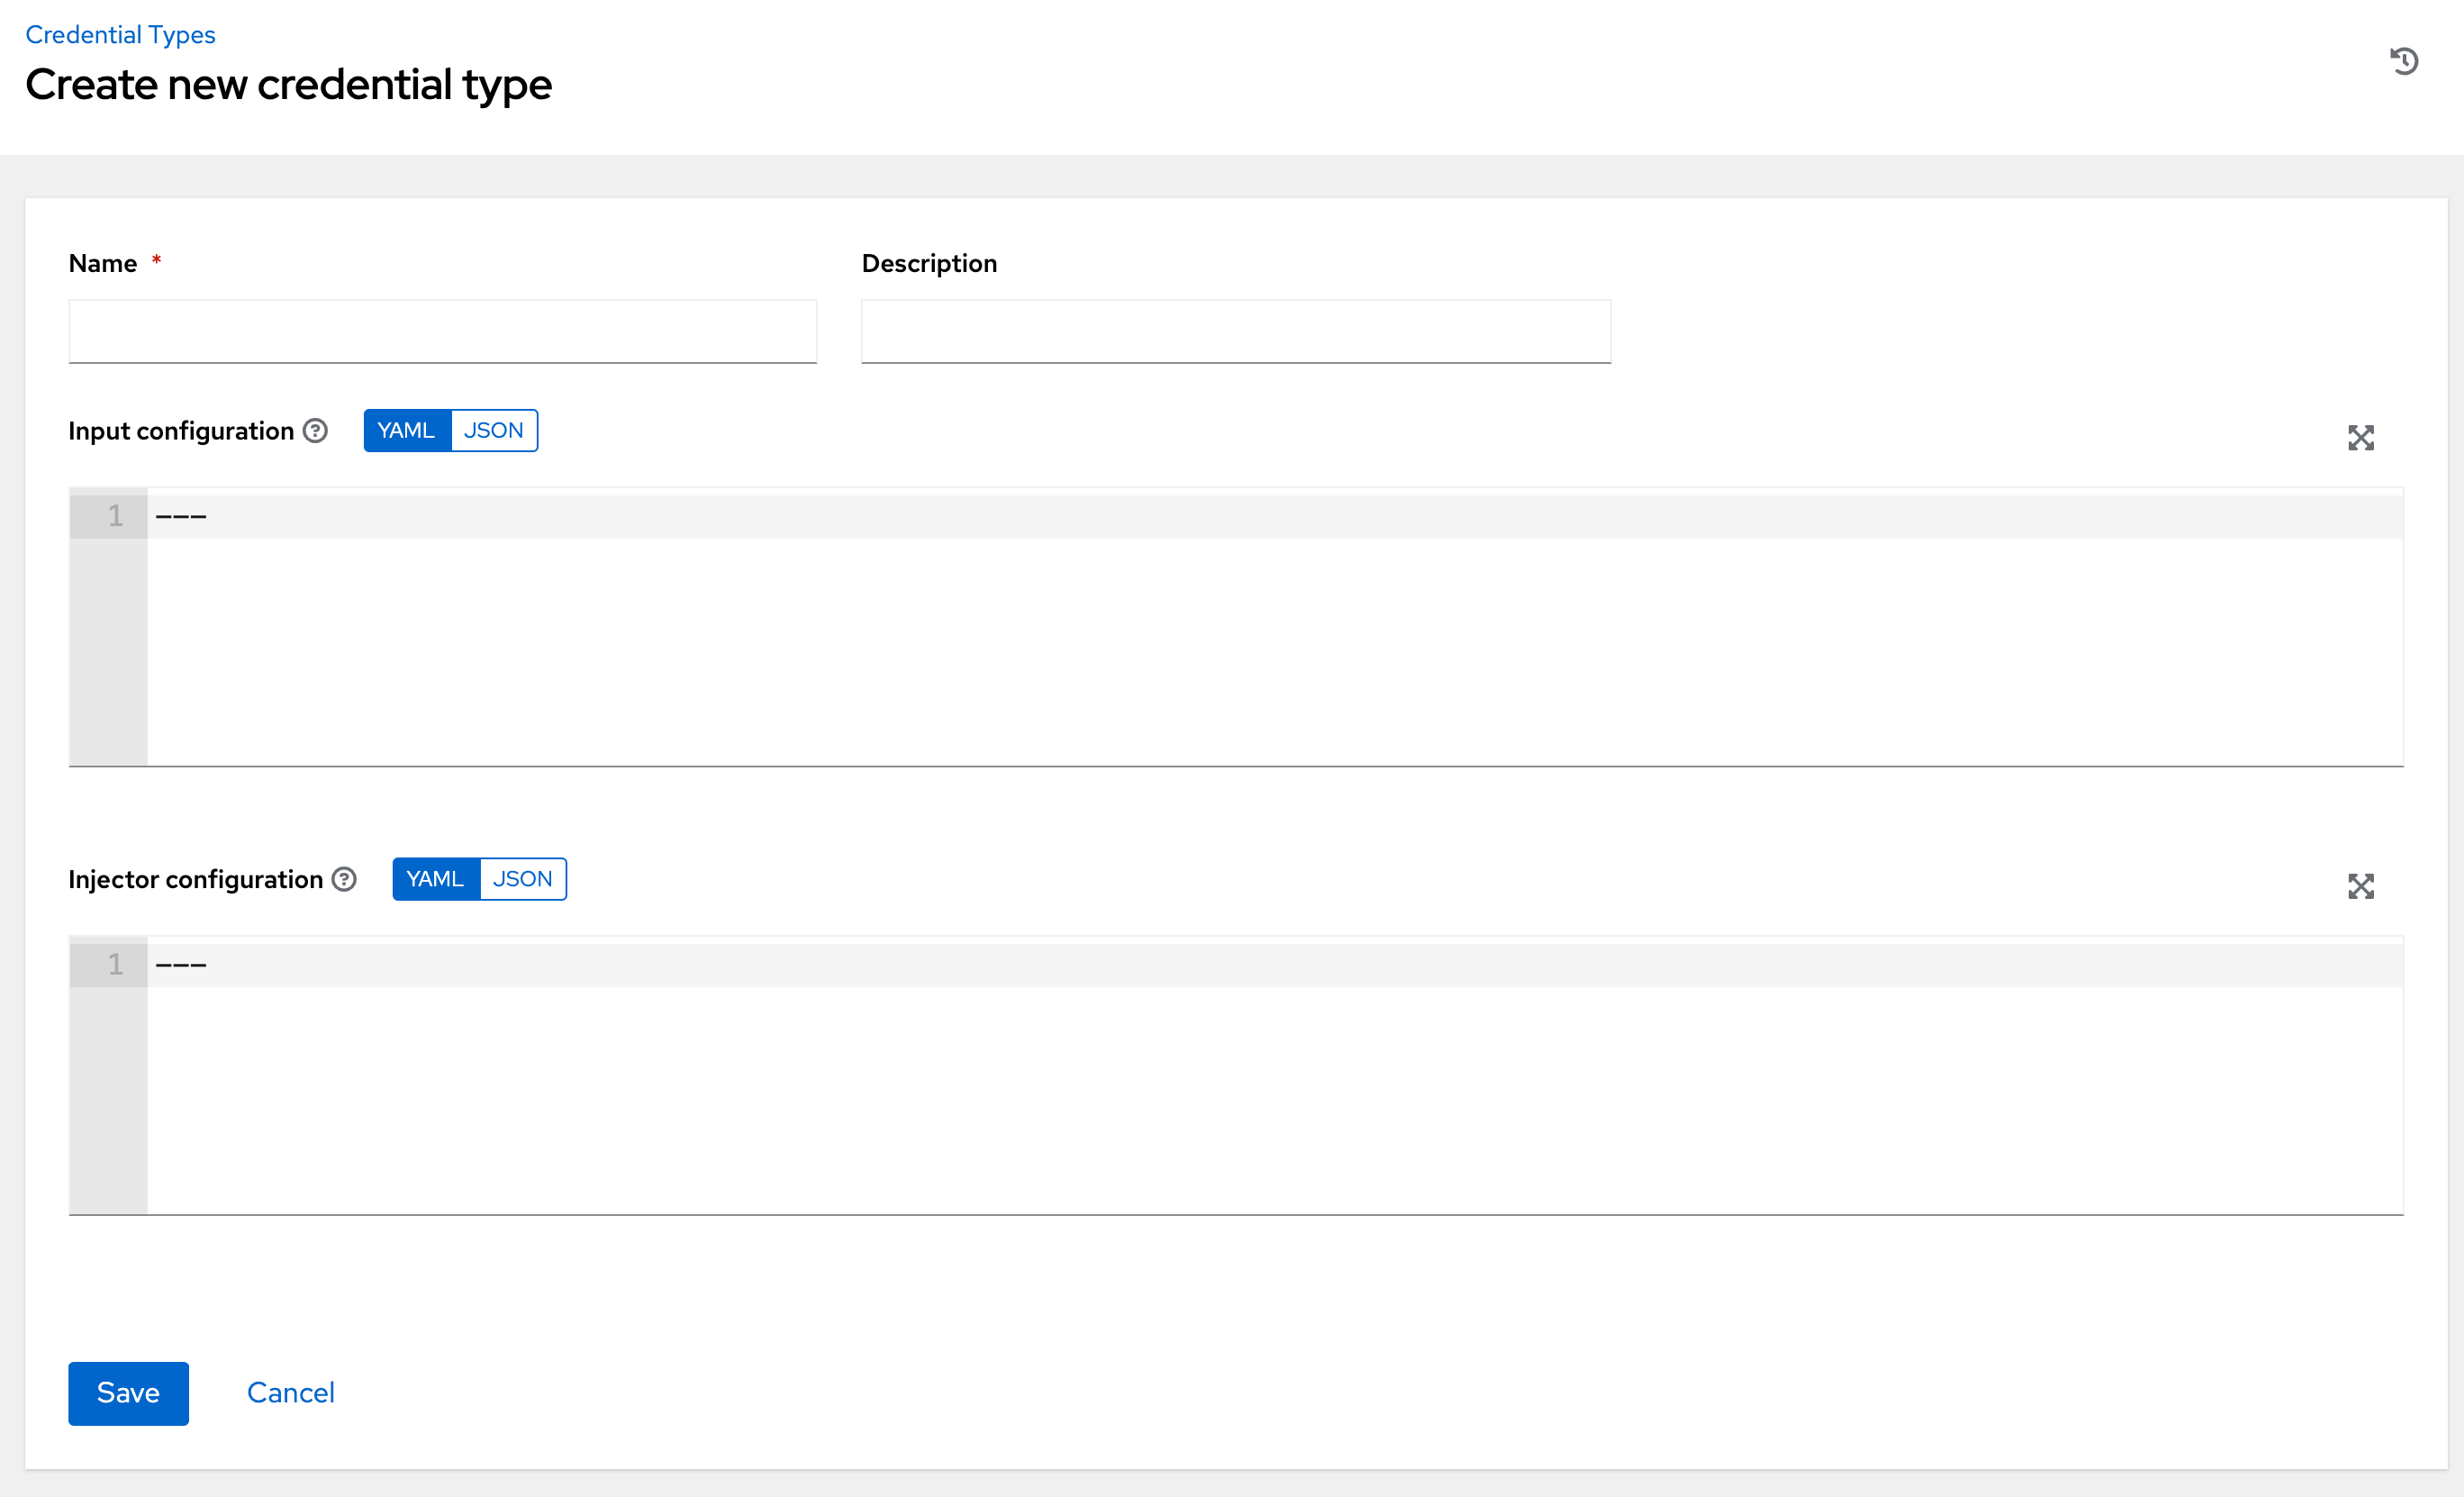
Enter the appropriate details in the Name and Description field.
NoteWhen creating a new credential type, do not use reserved variable names that start with
ANSIBLE_for the INPUT and INJECTOR names and IDs, as they are invalid for custom credential types.In the Input Configuration field, specify an input schema that defines a set of ordered fields for that type. The format can be in YAML or JSON:
YAML
fields:
  - type: string
    id: username
    label: Username
  - type: string
    id: password
    label: Password
    secret: true
required:
  - username
  - password
View more YAML examples at the YAML page.
JSON
{
"fields": [
  {
  "type": "string",
  "id": "username",
  "label": "Username"
  },
  {
  "secret": true,
  "type": "string",
  "id": "password",
  "label": "Password"
   }
  ],
 "required": ["username", "password"]
}
View more JSON examples at The JSON website.
The following configuration in JSON format shows each field and how they are used:
{
  "fields": [{
    "id": "api_token",    # required - a unique name used to reference the field value

    "label": "API Token", # required - a unique label for the field

    "help_text": "User-facing short text describing the field.",

    "type": ("string" | "boolean")   # defaults to 'string'

    "choices": ["A", "B", "C"]   # (only applicable to `type=string`)

    "format": "ssh_private_key"  # optional, can be used to enforce data format validity
                                 for SSH private key data (only applicable to `type=string`)

    "secret": true,       # if true, the field value will be encrypted

    "multiline": false    # if true, the field should be rendered as multi-line for input entry
                          # (only applicable to `type=string`)
},{
    # field 2...
},{
    # field 3...
}],

"required": ["api_token"]   # optional; one or more fields can be marked as required
},
When
type=string, fields can optionally specify multiple choice options:{ "fields": [{ "id": "api_token", # required - a unique name used to reference the field value "label": "API Token", # required - a unique label for the field "type": "string", "choices": ["A", "B", "C"] }] },In the Injector Configuration field, enter environment variables or extra variables that specify the values a credential type can inject. The format can be in YAML or JSON (see examples in the previous step).
The following configuration in JSON format shows each field and how they are used:
{
  "file": {
      "template": "[mycloud]\ntoken={{ api_token }}"
  },
  "env": {
      "THIRD_PARTY_CLOUD_API_TOKEN": "{{ api_token }}"
  },
  "extra_vars": {
      "some_extra_var": "{{ username }}:{{ password }}"
  }
}
Credential Types can also generate temporary files to support
.inifiles or certificate or key data:{ "file": { "template": "[mycloud]\ntoken={{ api_token }}" }, "env": { "MY_CLOUD_INI_FILE": "{{ tower.filename }}" } }In this example, automation controller writes a temporary file that has:
[mycloud]\ntoken=SOME_TOKEN_VALUE
The absolute file path to the generated file is stored in an environment variable named
MY_CLOUD_INI_FILE.The following is an example of referencing many files in a custom credential template:
Inputs
{
  "fields": [{
    "id": "cert",
    "label": "Certificate",
    "type": "string"
  },{
    "id": "key",
    "label": "Key",
    "type": "string"
  }]
}
Injectors
{
  "file": {
    "template.cert_file": "[mycert]\n{{ cert }}",
    "template.key_file": "[mykey]\n{{ key }}"
},
"env": {
    "MY_CERT_INI_FILE": "{{ tower.filename.cert_file }}",
    "MY_KEY_INI_FILE": "{{ tower.filename.key_file }}"
}
}
Click .
Your newly created credential type is displayed on the list of credential types:
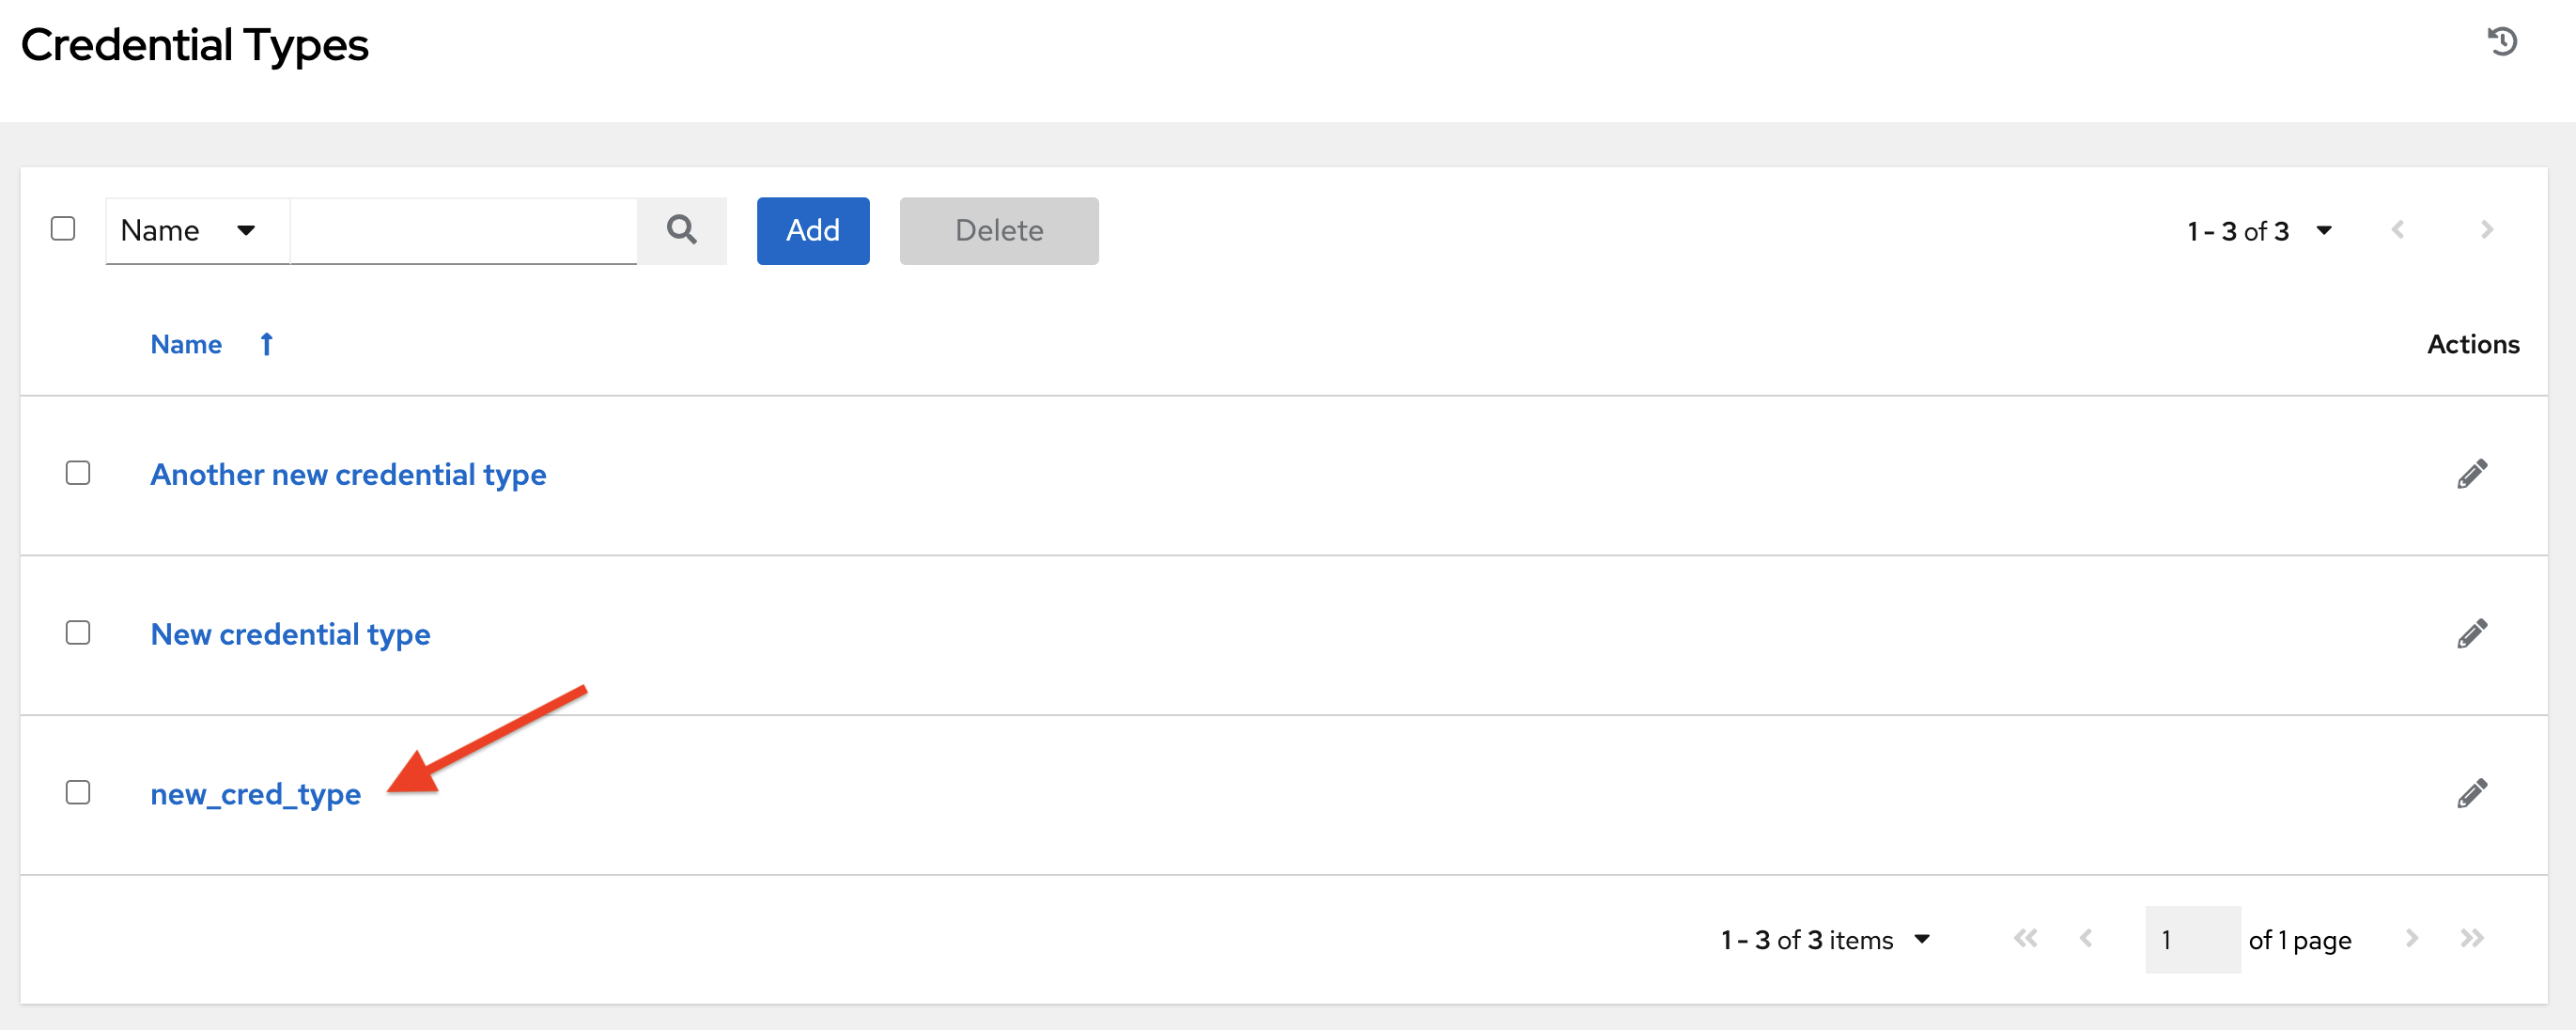
Click the Edit
icon to modify the credential type options.
NoteIn the Edit screen, you can modify the details or delete the credential. If the Delete option is disabled, this means that the credential type is being used by a credential, and you must delete the credential type from all the credentials that use it before you can delete it.
Verification
- Verify that the newly created credential type can be selected from the Credential Type selection window when creating a new credential:
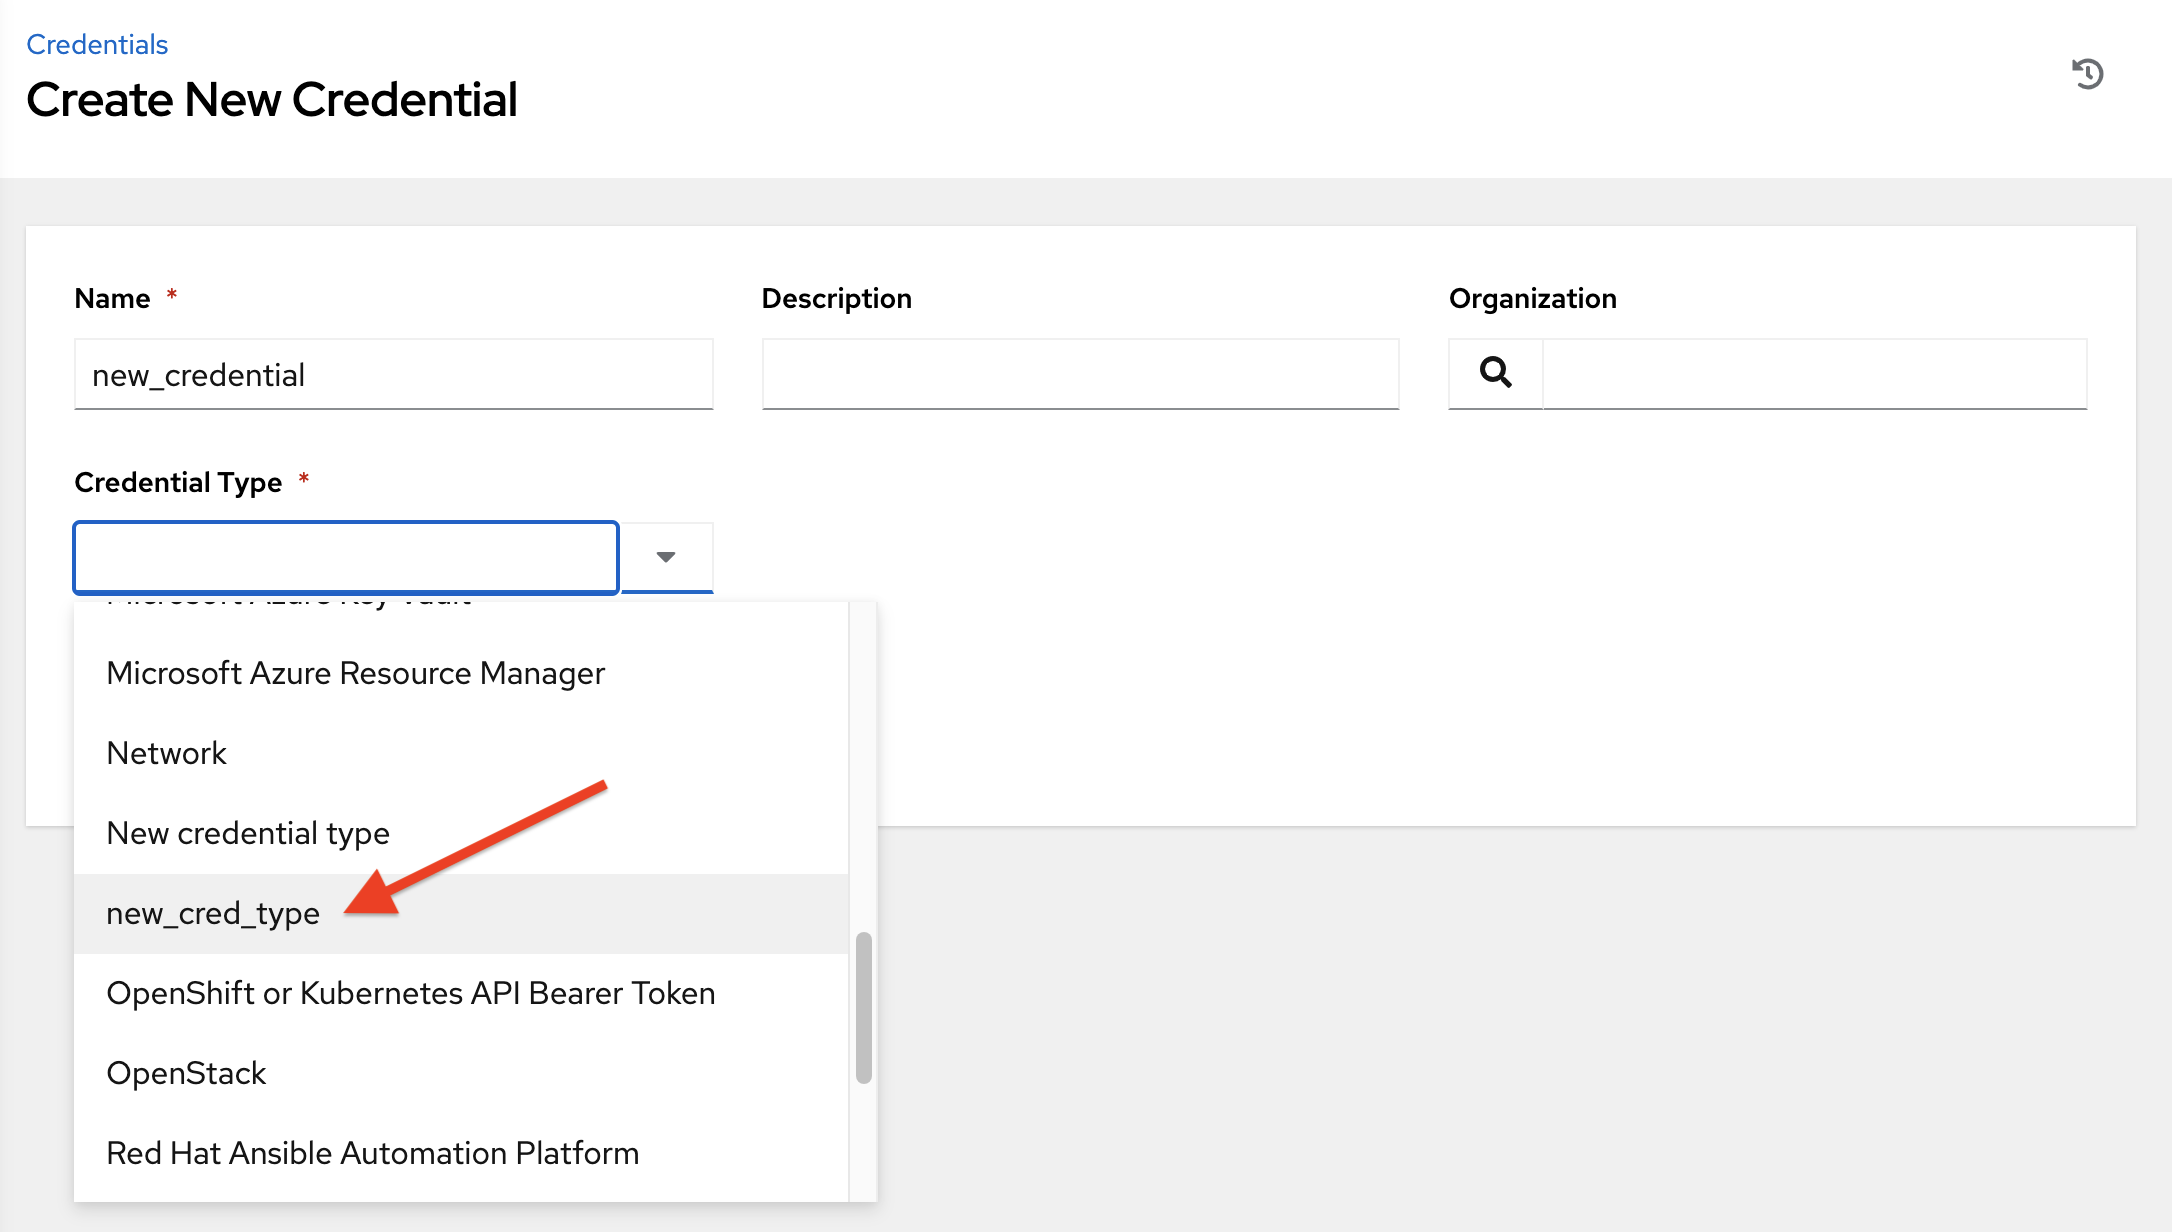
Additional resources
For information about how to create a new credential, see Creating a credential.
Chapter 12. Secret management system
Users and system administrators upload machine and cloud credentials so that automation can access machines and external services on their behalf. By default, sensitive credential values such as SSH passwords, SSH private keys, and API tokens for cloud services are stored in the database after being encrypted.
With external credentials backed by credential plugins, you can map credential fields (such as a password or an SSH Private key) to values stored in a secret management system instead of providing them to automation controller directly.
Automation controller provides a secret management system that include integrations for:
- AWS Secrets Manager Lookup
- Centrify Vault Credential Provider Lookup
- CyberArk Central Credential Provider Lookup (CCP)
- CyberArk Conjur Secrets Manager Lookup
- HashiCorp Vault Key-Value Store (KV)
- HashiCorp Vault SSH Secrets Engine
- Microsoft Azure Key Management System (KMS)
- Thycotic DevOps Secrets Vault
- Thycotic Secret Server
These external secret values are fetched before running a playbook that needs them.
Additional resources
For more information about specifying secret management system credentials in the user interface, see Credentials.
12.1. Configuring and linking secret lookups
When pulling a secret from a third-party system, you are linking credential fields to external systems. To link a credential field to a value stored in an external system, select the external credential corresponding to that system and provide metadata to look up the required value. The metadata input fields are part of the external credential type definition of the source credential.
Automation controller provides a credential plugin interface for developers, integrators, system administrators, and power-users with the ability to add new external credential types to extend it to support other secret management systems.
Use the following procedure to use automation controller to configure and use each of the supported third-party secret management systems.
Procedure
Create an external credential for authenticating with the secret management system. At minimum, give a name for the external credential and select one of the following for the Credential Type field:
- AWS Secrets Manager Lookup
- Centrify Vault Credential Provider Lookup
- CyberArk Central Credential Provider (CCP) Lookup
- CyberArk Conjur Secrets Manager Lookup
- HashiCorp Vault Secret Lookup
- HashiCorp Vault Signed SSH
- Microsoft Azure Key Vault
- Thycotic DevOps Secrets Vault
In this example, the Demo Credential is the target credential.
For any of the fields that follow the Type Details area that you want to link to the external credential, click the key
 icon in the input field to link one or more input fields to the external credential along with metadata for locating the secret in the external system.

Select the input source to use to retrieve your secret information.
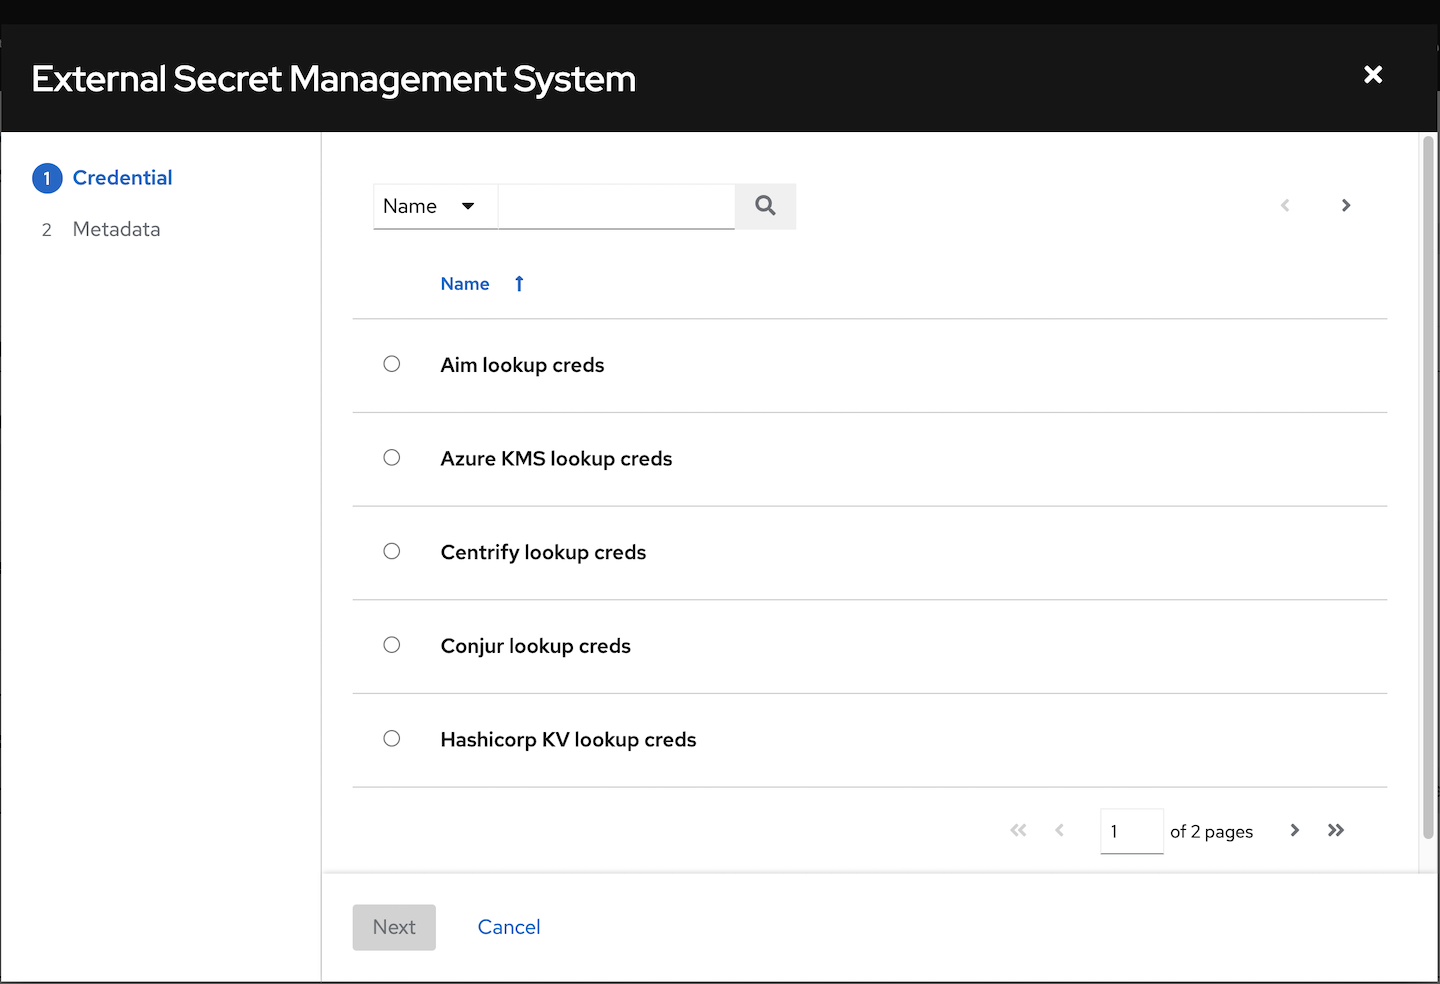
Select the credential you want to link to, and click . This takes you to the Metadata tab of the input source. This example shows the Metadata prompt for HashiVault Secret Lookup. Metadata is specific to the input source you select.
For more information, see the Metadata for credential input sources table.
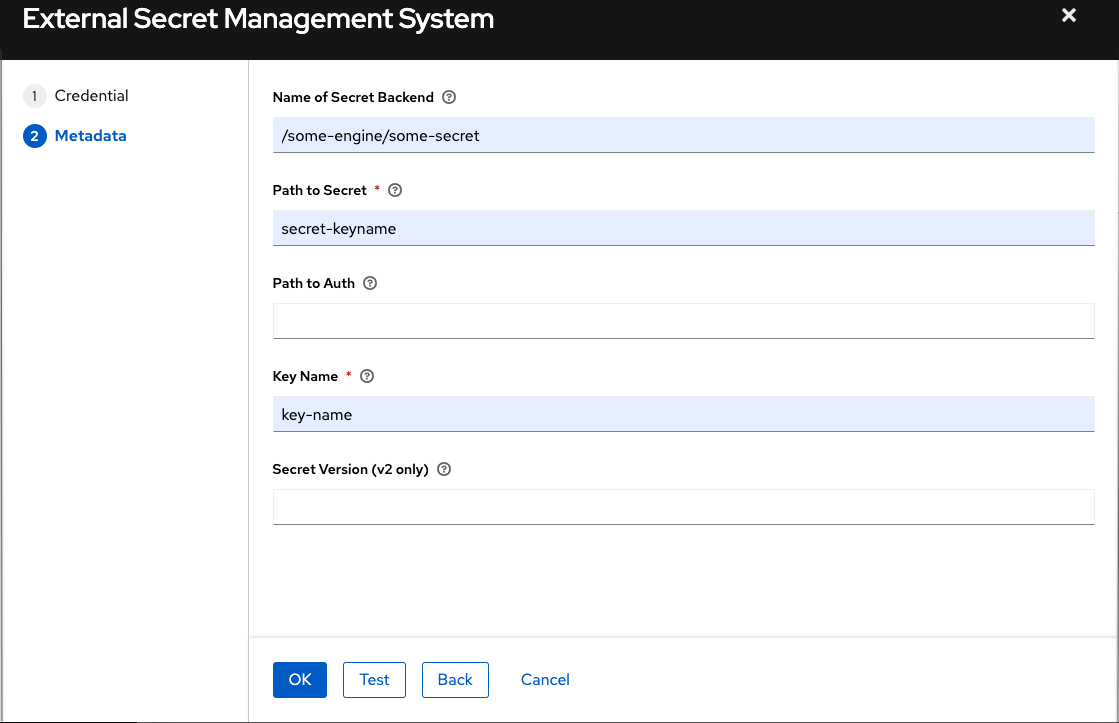
Click to verify connection to the secret management system. If the lookup is unsuccessful, an error message similar to the following displays:

- Click . You return to the Details screen of your target credential.
- Repeat these steps, starting with Step 3 to complete the remaining input fields for the target credential. By linking the information in this manner, automation controller retrieves sensitive information, such as username, password, keys, certificates, and tokens from the third-party management systems and populates the remaining fields of the target credential form with that data.
- If necessary, supply any information manually for those fields that do not use linking as a way of retrieving sensitive information. For more information about each of the fields, see the appropriate Credential Types.
- Click .
Additional resources
For more information, see the development documents for Credential plugins.
12.1.1. Metadata for credential input sources
The information required for the Metadata tab of the input source.
AWS Secrets Manager Lookup
| Metadata | Description |
|---|---|
| AWS Secrets Manager Region (required) | The region where the secrets manager is located. |
| AWS Secret Name (required) | Specify the AWS secret name that was generated by the AWS access key. |
Centrify Vault Credential Provider Lookup
| Metadata | Description |
|---|---|
| Account name (required) | Name of the system account or domain associated with Centrify Vault. |
| System Name | Specify the name used by the Centrify portal. |
CyberArk Central Credential Provider Lookup
| Metadata | Description |
|---|---|
| Object Query (Required) | Lookup query for the object. |
| Object Query Format |
Select |
| Object Property |
Specifies the name of the property to return. For example, |
| Reason | If required for the object’s policy, supply a reason for checking out the secret, as CyberArk logs those. |
CyberArk Conjur Secrets Lookup
| Metadata | Description |
|---|---|
| Secret Identifier | The identifier for the secret. |
| Secret Version | Specify a version of the secret, if necessary, otherwise, leave it empty to use the latest version. |
HashiVault Secret Lookup
| Metadata | Description |
|---|---|
| Name of Secret Backend | Specify the name of the KV backend to use. Leave it blank to use the first path segment of the Path to Secret field instead. |
| Path to Secret (required) |
Specify the path to where the secret information is stored; for example, |
| Key Name (required) | Specify the name of the key to look up the secret information. |
| Secret Version (V2 Only) | Specify a version if necessary, otherwise, leave it empty to use the latest version. |
HashiCorp Signed SSH
| Metadata | Description |
|---|---|
| Unsigned Public Key (required) | Specify the public key of the certificate you want to have signed. It needs to be present in the authorized keys file of the target hosts. |
| Path to Secret (required) |
Specify the path to where the secret information is stored; for example, |
| Role Name (required) | A role is a collection of SSH settings and parameters that are stored in Hashi vault. Typically, you can specify some with different privileges or timeouts, for example. So you could have a role that is permitted to get a certificate signed for root, and other less privileged ones, for example. |
| Valid Principals | Specify a user (or users) other than the default, that you are requesting vault to authorize the cert for the stored key. Hashi vault has a default user for whom it signs, for example, ec2-user. |
Microsoft Azure KMS
| Metadata | Description |
|---|---|
| Secret Name (required) | The name of the secret as it is referenced in Microsoft Azure’s Key vault app. |
| Secret Version | Specify a version of the secret, if necessary, otherwise, leave it empty to use the latest version. |
Thycotic DevOps Secrets Vault
| Metadata | Description |
|---|---|
| Secret Path (required) | Specify the path to where the secret information is stored, for example, /path/username. |
Thycotic Secret Server
| Metadata | Description |
|---|---|
| Secret ID (required) | The identifier for the secret. |
| Secret Field | Specify the field to be used from the secret. |
12.1.2. AWS Secrets Manager Lookup
This plugin enables Amazon Web Services to be used as a credential input source to pull secrets from the Amazon Web Services Secrets Manager. The AWS Secrets Manager provides similar service to Microsoft Azure Key Vault, and the AWS collection provides a lookup plugin for it.
When AWS Secrets Manager lookup is selected for Credential Type, provide the following metadata to configure your lookup:
- AWS Access Key (required): provide the access key used for communicating with AWS key management system
- AWS Secret Key (required): provide the secret as obtained by the AWS IAM console
The following is an example of a configured AWS Secret Manager credential.
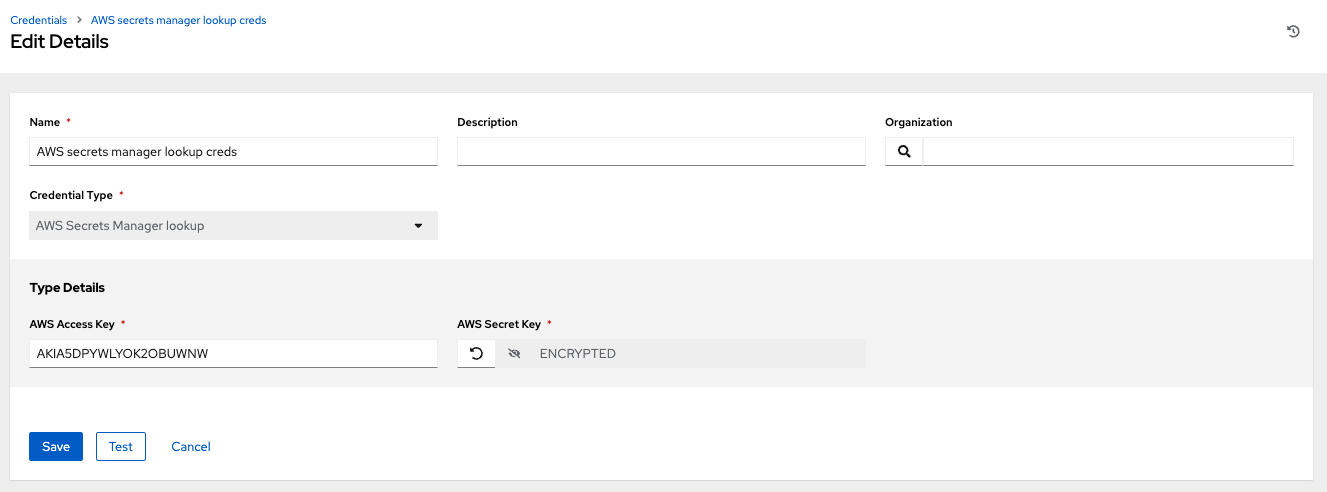
12.1.3. Centrify Vault Credential Provider Lookup
You need the Centrify Vault web service running to store secrets for this integration to work. When you select Centrify Vault Credential Provider Lookup for Credential Type, give the following metadata to configure your lookup:
- Centrify Tenant URL (required): give the URL used for communicating with Centrify’s secret management system
- Centrify API User (required): give the username
- Centrify API Password (required): give the password
- OAuth2 Application ID : specify the identifier given associated with the OAuth2 client
- OAuth2 Scope : specify the scope of the OAuth2 client
12.1.4. CyberArk Central Credential Provider (CCP) Lookup
The CyberArk Central Credential Provider web service must be running to store secrets for this integration to work. When you select CyberArk Central Credential Provider Lookup for Credential Type, give the following metadata to configure your lookup:
- CyberArk CCP URL (required): give the URL used for communicating with CyberArk CCP’s secret management system. It must include the URL scheme such as http or https.
- Optional: Web Service ID: specify the identifier for the web service. Leaving this blank defaults to AIMWebService.
- Application ID (required): specify the identifier given by CyberArk CCP services.
- Client Key: paste the client key if provided by CyberArk.
-
Client Certificate: include the
BEGIN CERTIFICATEandEND CERTIFICATElines when pasting the certificate, if provided by CyberArk. - Verify SSL Certificates: this option is only available when the URL uses HTTPS. Check this option to verify that the server’s SSL/TLS certificate is valid and trusted. For environments that use internal or private CA’s, leave this option unchecked to disable verification.
12.1.5. CyberArk Conjur Secrets Manager Lookup
With a Conjur Cloud tenant available to target, configure the CyberArk Conjur Secrets Lookup external management system credential plugin.
When you select CyberArk Conjur Secrets Manager Lookup for Credential Type, give the following metadata to configure your lookup:
- Conjur URL (required): provide the URL used for communicating with CyberArk Conjur’s secret management system. This must include the URL scheme, such as http or https.
- API Key (required): provide the key given by your Conjur admin
- Account (required): the organization’s account name
- Username (required): the specific authenticated user for this service
-
Public Key Certificate: include the
BEGIN CERTIFICATEandEND CERTIFICATElines when pasting the public key, if provided by CyberArk
The following is an example of a configured CyberArk Conjur credential.
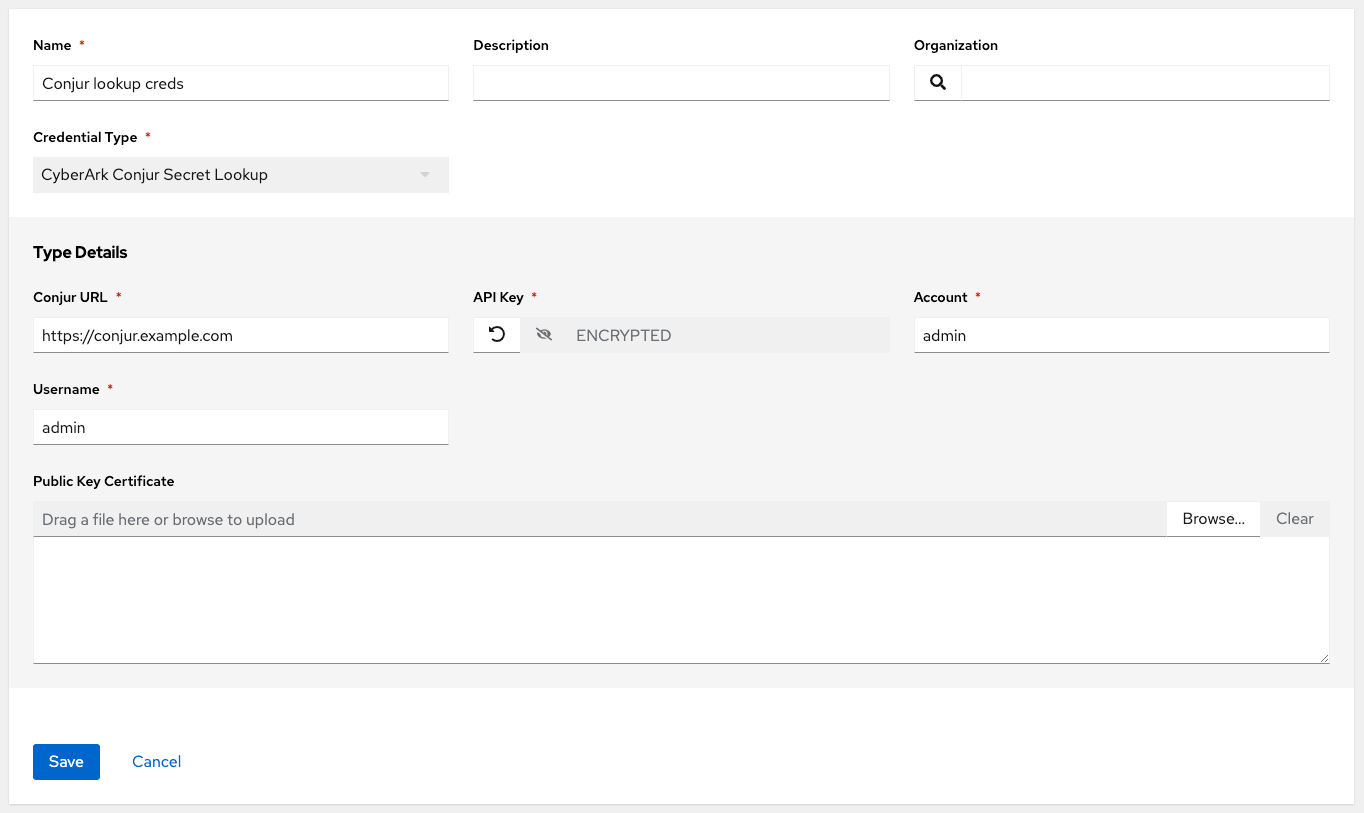
12.1.6. HashiCorp Vault Secret Lookup
When you select HashiCorp Vault Secret Lookup for Credential Type, give the following metadata to configure your lookup:
- Server URL (required): give the URL used for communicating with HashiCorp Vault’s secret management system.
- Token: specify the access token used to authenticate HashiCorp’s server.
- CA Certificate: specify the CA certificate used to verify HashiCorp’s server.
- Approle Role_ID: specify the ID if using Appprole for authentication.
- Approle Secret_ID: specify the corresponding secret ID for Approle authentication.
- Client Certificate: specify a PEM-encoded client certificate when using the TLS authentication method, including any required intermediate certificates expected by Hashicorp Vault.
- Client Certificate Key: specify a PEM-encoded certificate private key when using the TLS authentication method.
- TLS Authentication Role: specify the role or certificate name in Hashicorp Vault that corresponds to your client certificate when using the TLS authentication method. If it is not provided, Hashicorp Vault attempts to match the certificate automatically.
- Namespace name: specify the Namespace name (Hashicorp Vault enterprise only).
- Kubernetes role: specify the role name when using Kubernetes authentication.
- Username: enter the username of the user to be used to authenticate this service.
- Password: enter the password associated with the user to be used to authenticate this service.
-
Path to Auth: specify a path if other than the default path of
/approle. - API Version (required): select v1 for static lookups and v2 for versioned lookups.
LDAP authentication requires LDAP to be configured in HashiCorp’s Vault UI and a policy added to the user. Cubbyhole is the name of the default secret mount. If you have proper permissions, you can create other mounts and write key values to those.
To test the lookup, create another credential that uses Hashicorp Vault lookup.
Additional resources
For more detail about the LDAP authentication method and its fields, see the Vault documentation for LDAP auth method.
For more information about Approle authentication method and its fields, see the Vault documentation for AppRole auth method.
For more information about the userpass authentication method and its fields, see the Vault documentation for userpass auth method.
For more information about the Kubernetes auth method and its fields, see the Vault documentation for Kubernetes auth method.
For more information about the TLS certificate auth method and its fields, see the Vault documentation for TLS certificates auth method.
12.1.7. HashiCorp Vault Signed SSH
When you select HashiCorp Vault Signed SSH for Credential Type, give the following metadata to configure your lookup:
- Server URL (required): give the URL used for communicating with HashiCorp Signed SSH’s secret management system.
- Token: specify the access token used to authenticate HashiCorp’s server.
- CA Certificate: specify the CA certificate used to verify HashiCorp’s server.
- Approle Role_ID: specify the ID for Approle authentication.
- Approle Secret_ID: specify the corresponding secret ID for Approle authentication.
- Client Certificate: specify a PEM-encoded client certificate when using the TLS authentication method, including any required intermediate certificates expected by Hashicorp Vault.
- Client Certificate Key: specify a PEM-encoded certificate private key when using the TLS authentication method.
- TLS Authentication Role: specify the role or certificate name in Hashicorp Vault that corresponds to your client certificate when using the TLS authentication method. If it is not provided, Hashicorp Vault attempts to match the certificate automatically.
- Namespace name: specify the Namespace name (Hashicorp Vault enterprise only).
- Kubernetes role: specify the role name when using Kubernetes authentication.
- Username: enter the username of the user to be used to authenticate this service.
- Password: enter the password associated with the user to be used to authenticate this service.
-
Path to Auth: specify a path if other than the default path of
/approle.
Additional resources
For more information about Approle authentication method and its fields, see the Vault documentation for Approle Auth Method.
For more information about the Kubernetes authtication method and its fields, see the Vault documentation for Kubernetes auth method.
For more information about the TLS certificate auth method and its fields, see the Vault documentation for TLS certificates auth method.
12.1.8. Microsoft Azure Key Vault
When you select Microsoft Azure Key Vault for Credential Type, give the following metadata to configure your lookup:
- Vault URL (DNS Name) (required): give the URL used for communicating with Microsoft Azure’s key management system
- Client ID (required): give the identifier as obtained by the Microsoft Azure Active Directory
- Client Secret (required): give the secret as obtained by the Microsoft Azure Active Directory
- Tenant ID (required): give the unique identifier that is associated with an Microsoft Azure Active Directory instance within an Azure subscription
- Cloud Environment: select the applicable cloud environment to apply
12.1.9. Thycotic DevOps Secrets Vault
When you select Thycotic DevOps Secrets Vault for Credential Type, give the following metadata to configure your lookup:
- Tenant (required): give the URL used for communicating with Thycotic’s secret management system
- Top-level Domain (TLD): give the top-level domain designation, for example .com, .edu, or .org, associated with the secret vault you want to integrate
- Client ID (required): give the identifier as obtained by the Thycotic secret management system
- Client Secret (required): give the secret as obtained by the Thycotic secret management system
12.1.10. Thycotic Secret Server
When you select Thycotic Secrets Server for Credential Type, give the following metadata to configure your lookup:
- Secret Server URL (required): give the URL used for communicating with the Thycotic Secrets Server management system
- Username (required): specify the authenticated user for this service
- Password (required): give the password associated with the user
Chapter 13. Applications
Create and configure token-based authentication for external applications such as ServiceNow and Jenkins. With token-based authentication, external applications can easily integrate with automation controller.
With OAuth 2 you can use tokens to share data with an application without disclosing login information. You can configure these tokens as read-only.
You can create an application that is representative of the external application you are integrating with, then use it to create tokens for the application to use on behalf of its users.
Associating these tokens with an application resource enables you to manage all tokens issued for a particular application. By separating the issue of tokens under Applications, you can revoke all tokens based on the Application without having to revoke all tokens in the system.
13.1. Getting Started with Applications
From the navigation panel, select → . The Applications page displays a searchable list of all available Applications currently managed by automation controller and can be sorted by Name.
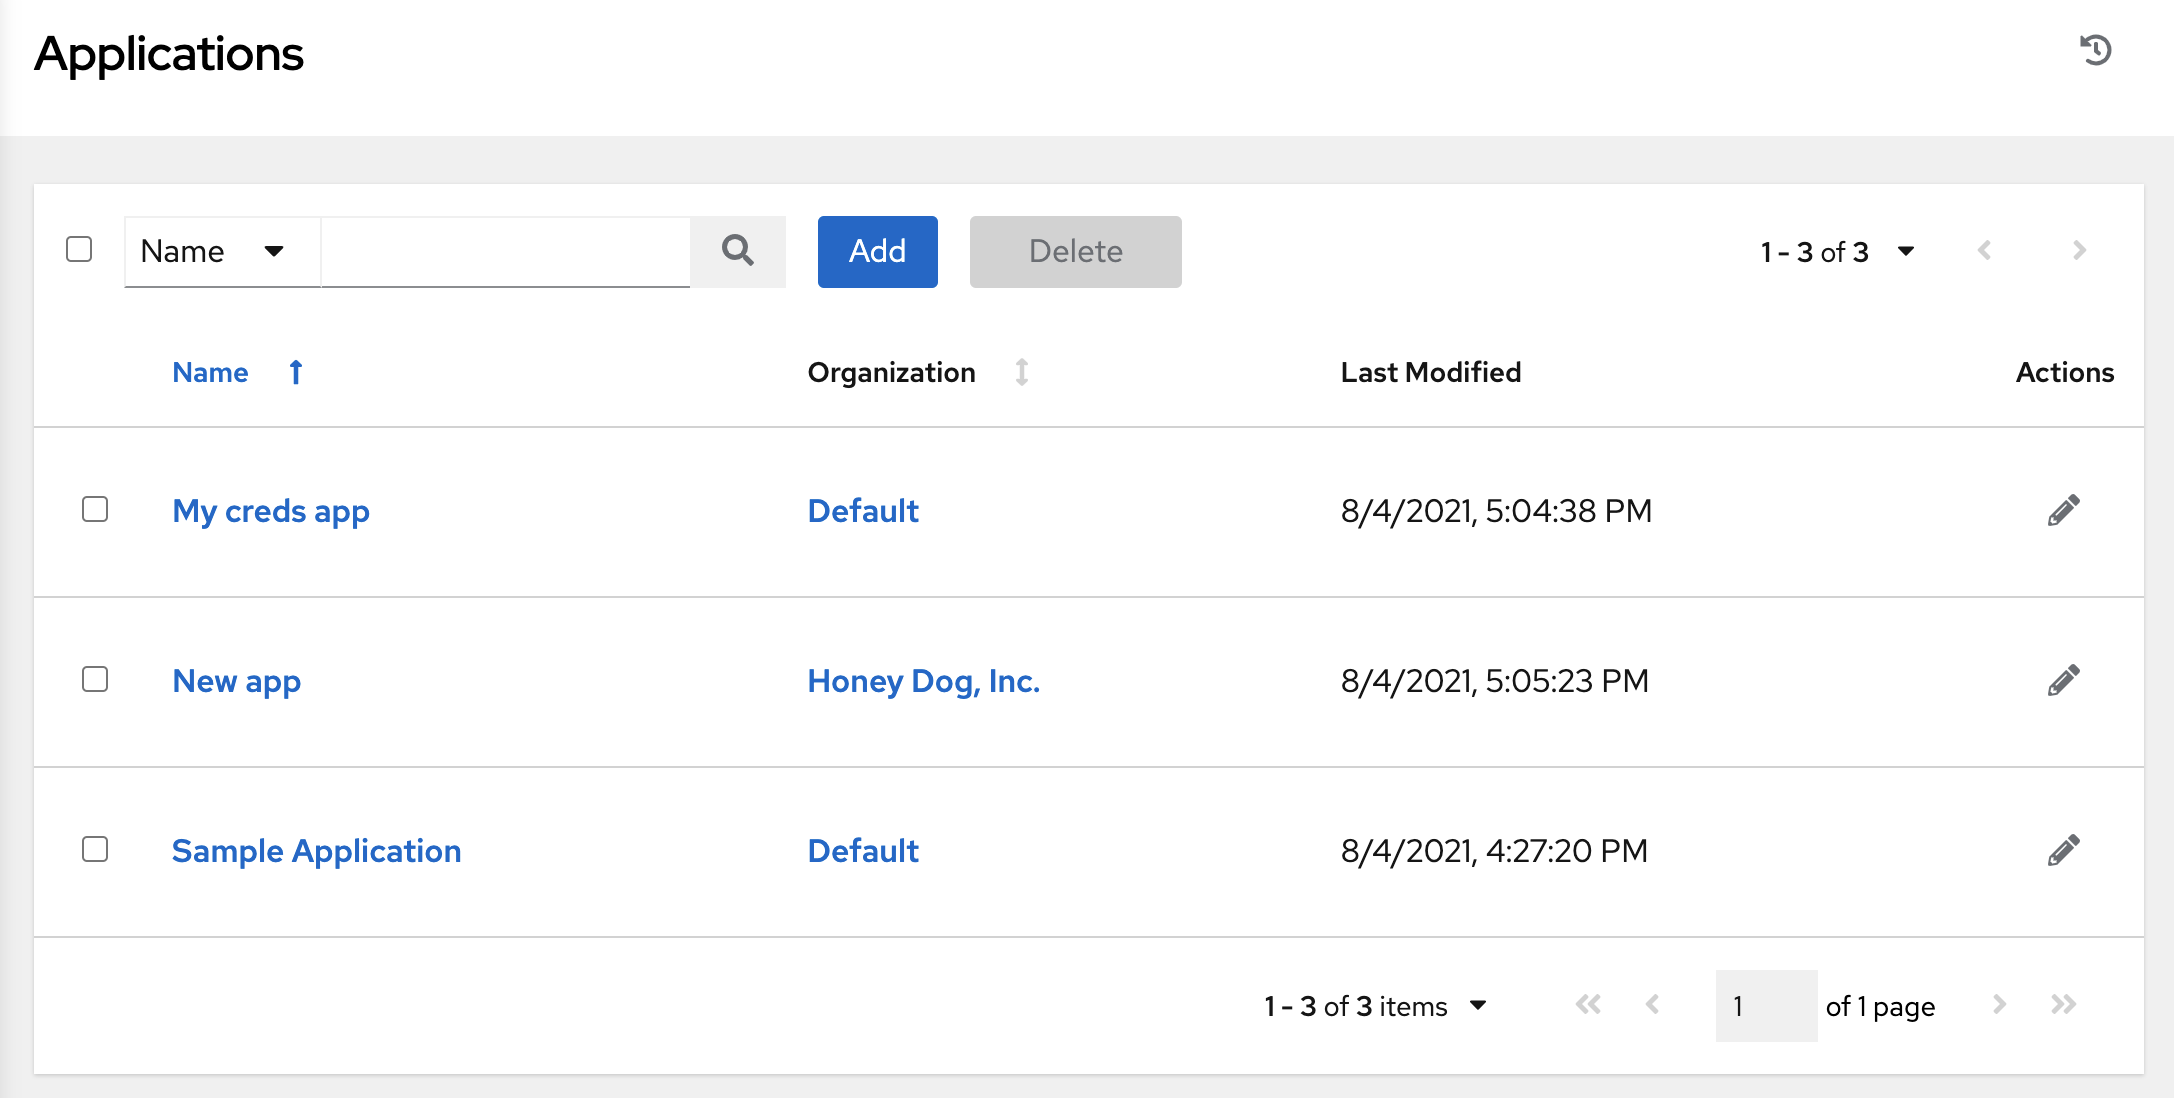
If no applications exist, you are requested to add applications.
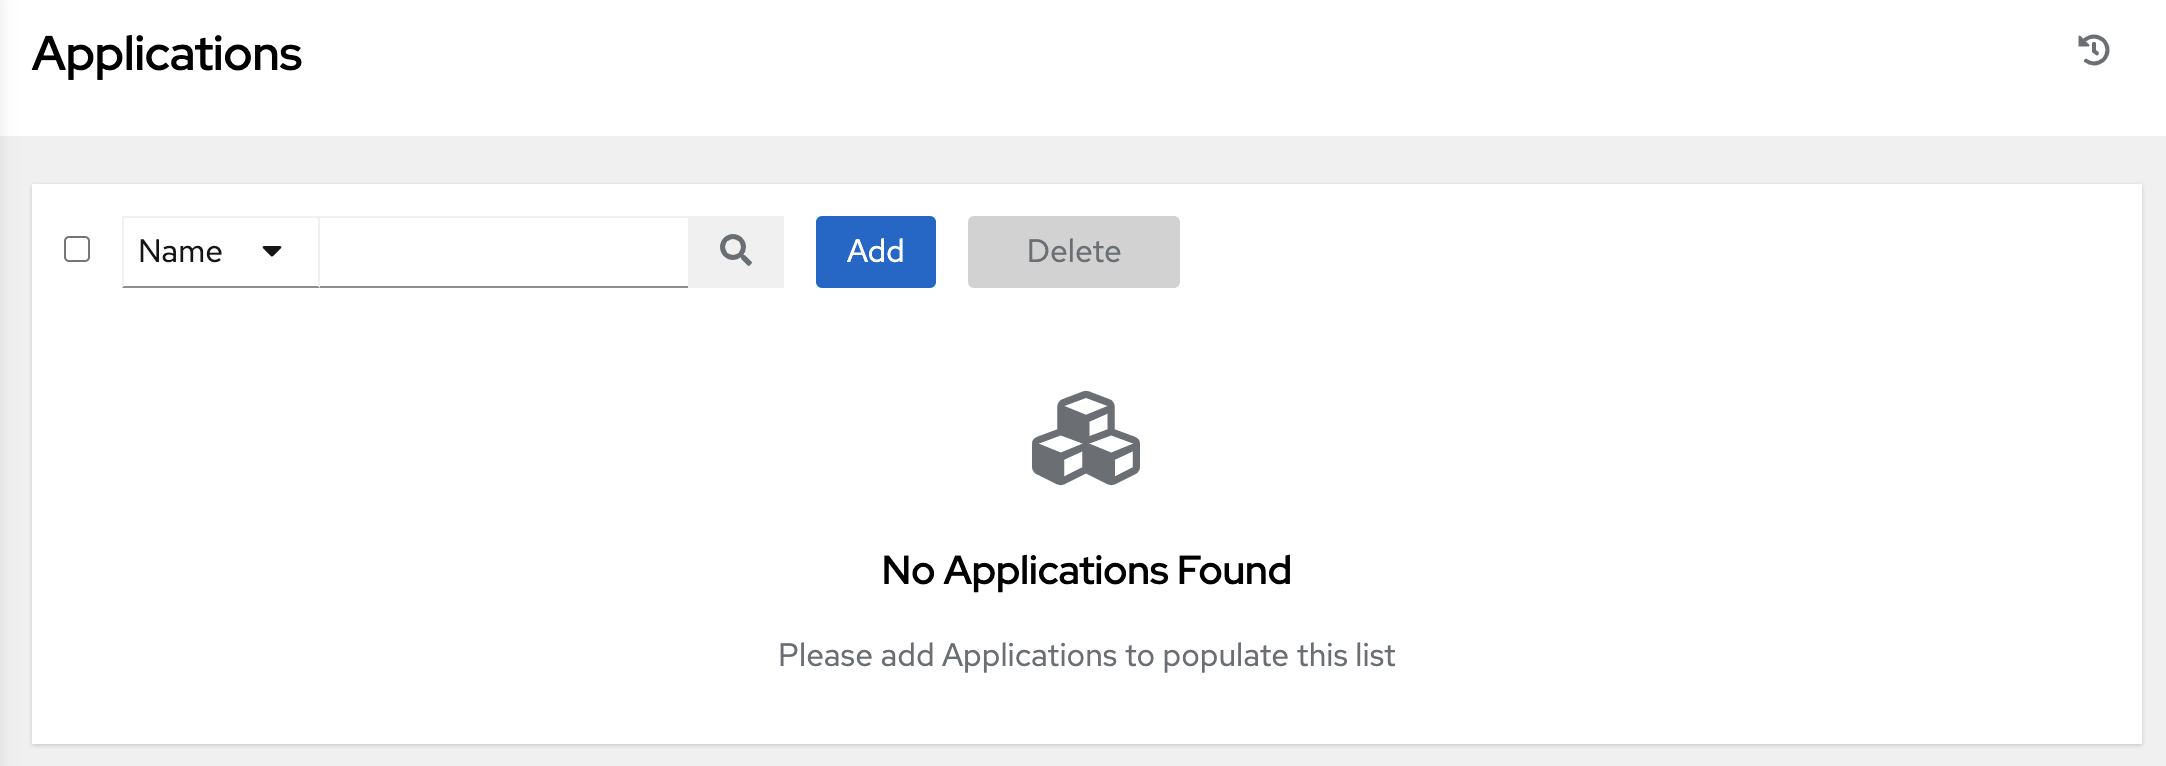
13.2. Creating a new application
When integrating an external web application with automation controller the web application might need to create OAuth2 Tokens on behalf of users of the web application. Creating an application with the Authorization Code grant type is the preferred way to do this for the following reasons:
- External applications can obtain a token for users, using their credentials.
- Compartmentalized tokens issued for a particular application, enables those tokens to be easily managed. For example, revoking all tokens associated with that application.
Procedure
- From the navigation panel, select → .
Click . The Create New Application page opens.

Enter the following details:
- Name (required): give a name for the application you want to create
- Optional: Description: give a short description for your application
- Organization (required): give an organization with which this application is associated
- Authorization Grant Type (required): select one of the grant types to use for the user to get tokens for this application. For more information, see Application Functions in the Applications section of the Automation controller Administration Guide.
- Redirect URIS: give a list of allowed URIs, separated by spaces. You need this if you specified the grant type to be Authorization code.
- Client Type (required): select the level of security of the client device.
Click , or click to abandon your changes.
The client ID displays in a window.
13.2.1. Adding tokens
You can view a list of users that have tokens to access an application by selecting the Tokens tab Application details page.
Configure authentication tokens for your users. You can select the application to which the token is associated and the level of access that the token has.
You can only create OAuth 2 Tokens for your user through the API or UI, which means you can only access your own user profile to configure or view your tokens.
Procedure
- From the navigation panel, select → .
- Select the user for which you want to configure the OAuth 2 tokens.
Select the Tokens tab on the user’s profile.
When no tokens are present, the Tokens screen prompts you to add them.
- Click to open the Create Token window.
Enter the following details:
-
Application: enter the name of the application with which you want to associate your token. Alternatively, you can search for it by clicking the
icon. This opens a separate window that enables you to choose from the available options. Use the Search bar to filter by name if the list is extensive. Leave this field blank if you want to create a Personal Access Token (PAT) that is not linked to any application.
- Optional: Description: provide a short description for your token.
- Scope (required): specify the level of access you want this token to have.
-
Application: enter the name of the application with which you want to associate your token. Alternatively, you can search for it by clicking the
Click , or click to abandon your changes.
After you save the token, the newly created token for the user is displayed with the token information and when it expires.
To view the application to which the token is associated and the token expiration date, go to the token list view.
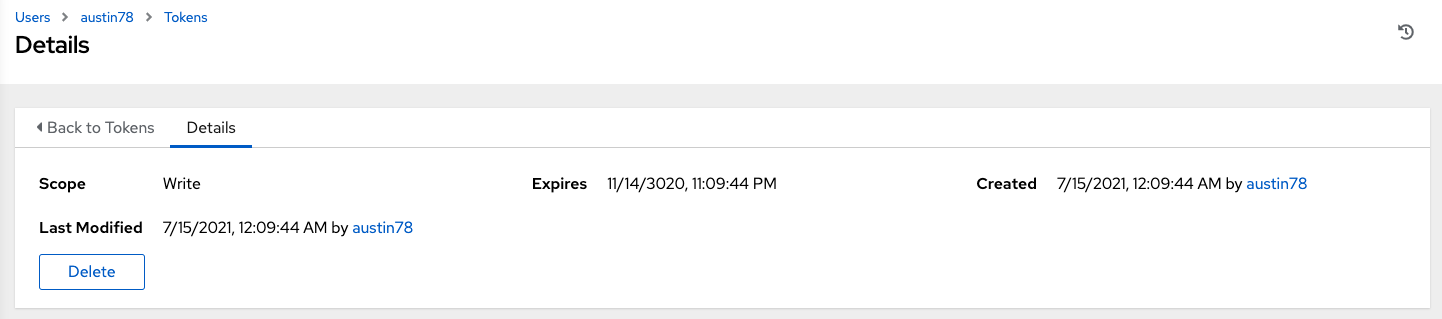
Verification
To verify that the application now shows the user with the appropriate token, open the Tokens tab of the Applications window:
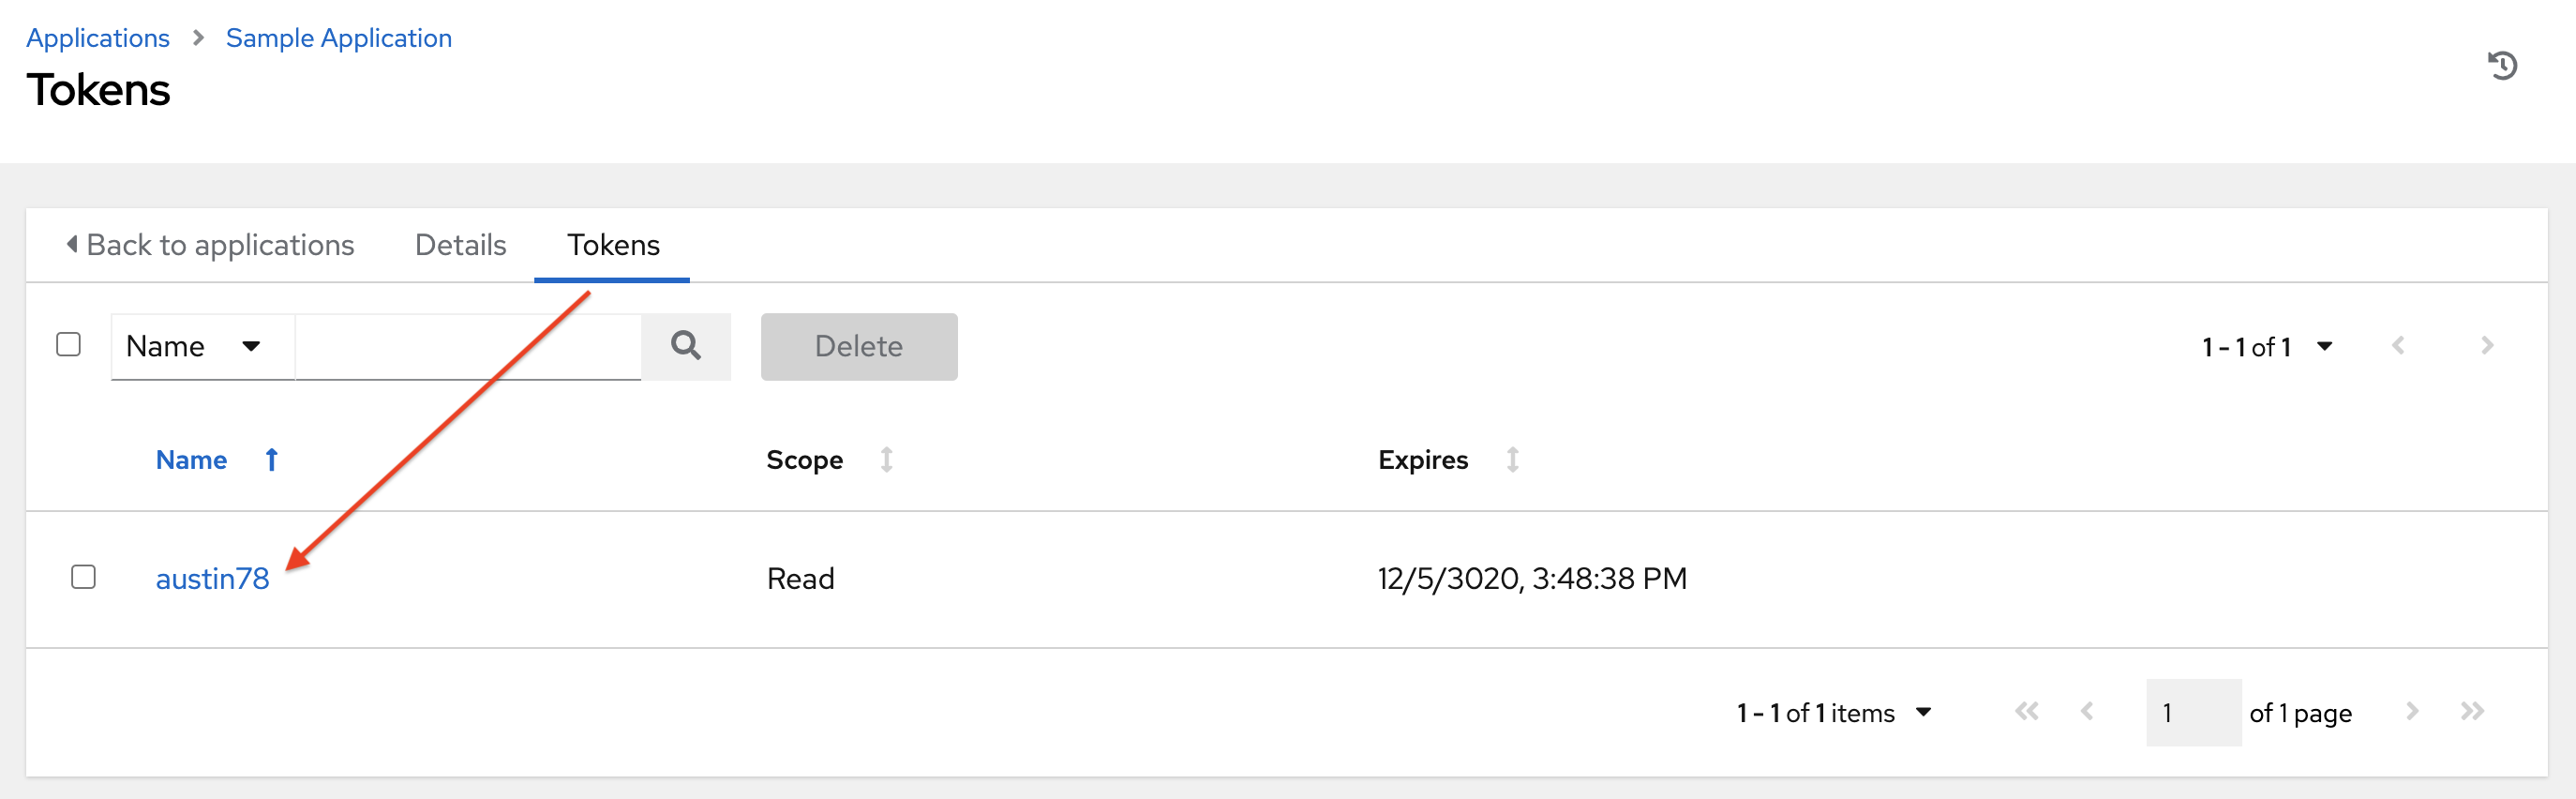
Additional resources
If you are a system administrator and have to create or remove tokens for other users, see the revoke and create commands in the Token and session management section of the Automation controller Administration Guide.
Chapter 14. Execution environments
Unlike legacy virtual environments, execution environments are container images that make it possible to incorporate system-level dependencies and collection-based content. Each execution environment enables you to have a customized image to run jobs and has only what is necessary when running the job.
14.1. Building an execution environment
If your Ansible content depends on custom virtual environments instead of a default environment, you must take additional steps. You must install packages on each node, interact well with other software installed on the host system, and keep them in synchronization.
To simplify this process, you can build container images that serve as Ansible Control nodes. These container images are referred to as automation execution environments, which you can create with ansible-builder. Ansible-runner can then make use of those images.
14.1.1. Install ansible-builder
To build images, you must have Podman or Docker installed, along with the ansible-builder Python package.
The --container-runtime option must correspond to the Podman or Docker executable you intend to use.
For more information, see Quickstart for Ansible Builder, or Creating and consuming execution environments.
14.1.2. Content needed for an execution environment
Ansible-builder is used to create an execution environment.
An execution environment must contain:
- Ansible
- Ansible Runner
- Ansible Collections
Python and system dependencies of:
- modules or plugins in collections
- content in ansible-base
- custom user needs
Building a new execution environment involves a definition that specifies which content you want to include in your execution environment, such as collections, Python requirements, and system-level packages. The definition must be a .yml file
The content from the output generated from migrating to execution environments has some of the required data that can be piped to a file or pasted into this definition file.
Additional resources
For more information, see Migrate legacy venvs to execution environments. If you did not migrate from a virtual environment, you can create a definition file with the required data described in the Execution Environment Setup Reference.
Collection developers can declare requirements for their content by providing the appropriate metadata.
For more information, see Dependencies.
14.1.3. Example YAML file to build an image
The ansible-builder build command takes an execution environment definition as an input. It outputs the build context necessary for building an execution environment image, and then builds that image. The image can be re-built with the build context elsewhere, and produces the same result. By default, the builder searches for a file named execution-environment.yml in the current directory.
The following example execution-environment.yml file can be used as a starting point:
---
version: 3
dependencies:
  galaxy: requirements.yml
The content of requirements.yml:
---
collections:
  - name: awx.awx
To build an execution environment using the preceding files and run the following command:
ansible-builder build
...
STEP 7: COMMIT my-awx-ee
--> 09c930f5f6a
09c930f5f6ac329b7ddb321b144a029dbbfcc83bdfc77103968b7f6cdfc7bea2
Complete! The build context can be found at: context
In addition to producing a ready-to-use container image, the build context is preserved. This can be rebuilt at a different time or location with the tools of your choice, such as docker build or podman build.
Additional resources
For additional information about the ansible-builder build command, see Ansible’s CLI Usage documentation.
14.1.4. Execution environment mount options
Rebuilding an execution environment is one way to add certificates, but inheriting certificates from the host provides a more convenient solution. For VM-based installations, automation controller automatically mounts the system truststore in the execution environment when jobs run.
You can customize execution environment mount options and mount paths in the Paths to expose to isolated jobs field of the Job Settings page, where Podman-style volume mount syntax is supported.
Additional resources
For more information, see the Podman documentation.
14.1.4.1. Troubleshooting execution environment mount options
In some cases where the /etc/ssh/* files were added to the execution environment image due to customization of an execution environment, an SSH error can occur. For example, exposing the /etc/ssh/ssh_config.d:/etc/ssh/ssh_config.d:O path enables the container to be mounted, but the ownership permissions are not mapped correctly.
Use the following procedure if you meet this error, or have upgraded from an older version of automation controller:
Procedure
-
Change the container ownership on the mounted volume to
root. - From the navigation panel, select .
- Select Jobs settings from the Jobs option.
Expose the path in the Paths to expose to isolated jobs field, using the current example:
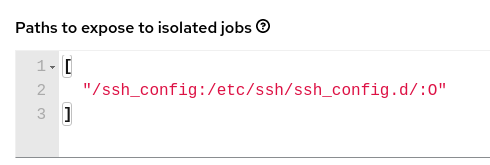 Note
NoteThe
:Ooption is only supported for directories. Be as detailed as possible, especially when specifying system paths. Mounting/etcor/usrdirectly has an impact that makes it difficult to troubleshoot.This informs Podman to run a command similar to the following example, where the configuration is mounted and the
sshcommand works as expected:podman run -v /ssh_config:/etc/ssh/ssh_config.d/:O ...
To expose isolated paths in OpenShift or Kubernetes containers as HostPath, use the following configuration:
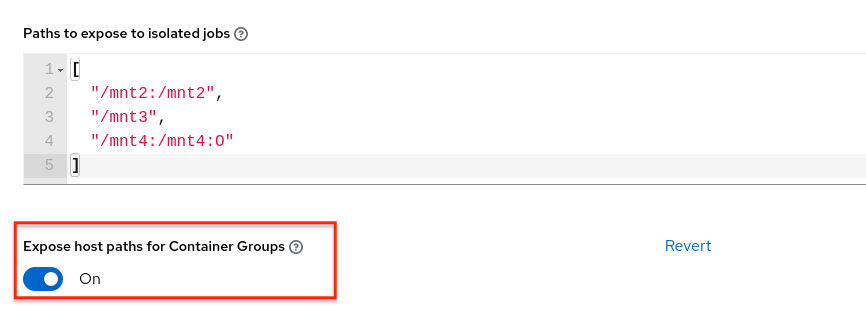
Set Expose host paths for Container Groups to On to enable it.
When the playbook runs, the resulting Pod specification is similar to the following example. Note the details of the volumeMounts and volumes sections.
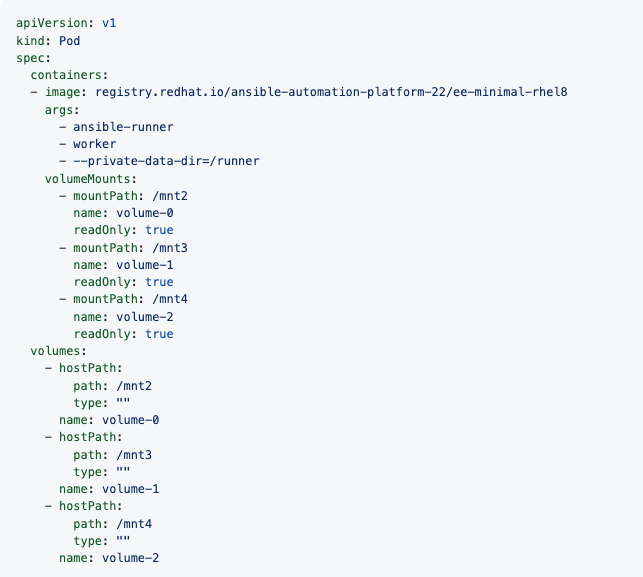
14.1.4.2. Mounting the directory in the execution node to the execution environment container
With Ansible Automation Platform 2.1.2, only O and z options were available. Since Ansible Automation Platform 2.2, further options such as rw are available. This is useful when using NFS storage.
Procedure
- From the navigation panel, select .
- Select Jobs settings from the Jobs option.
Edit the Paths to expose to isolated jobs field:
- Enter a list of paths that volumes are mounted from the execution node or the hybrid node to the container.
- Enter one path per line.
The supported format is
HOST-DIR[:CONTAINER-DIR[:OPTIONS]. The allowed paths arez,O,ro, andrw.Example
[
  "/var/lib/awx/.ssh:/root/.ssh:O"
]
For the
rwoption, configure the SELinux label correctly. For example, to mount the/foodirectory, complete the following commands:sudo su
mkdir /foo
chmod 777 /foo
semanage fcontext -a -t container_file_t "/foo(/.*)?"
restorecon -vvFR /foo
The awx user must be permitted to read or write in this directory at least. Set the permissions as 777 at this time.
Additional resources
For more information about mount volumes, see the --volume option of the podman-run(1) section of the Podman documentation.
14.2. Adding an execution environment to a job template
Prerequisites
- An execution environment must have been created using ansible-builder as described in Build an execution environment. When an execution environment has been created, you can use it to run jobs. Use the automation controller UI to specify the execution environment to use in your job templates.
- Depending on whether an execution environment is made available for global use or tied to an organization, you must have the appropriate level of administrator privileges to use an execution environment in a job. Execution environments tied to an organization require Organization administrators to be able to run jobs with those execution environments.
- Before running a job or job template that uses an execution environment that has a credential assigned to it, ensure that the credential contains a username, host, and password.
Procedure
- From the navigation panel, select → .
- Click to add an execution environment.
Enter the appropriate details into the following fields:
- Name (required): Enter a name for the execution environment.
-
Image (required): Enter the image name. The image name requires its full location (repository), the registry, image name, and version tag in the example format of
quay.io/ansible/awx-ee:latestrepo/project/image-name:tag. Optional: Pull: Choose the type of pull when running jobs:
- Always pull container before running: Pulls the latest image file for the container.
- Only pull the image if not present before running: Only pulls the latest image if none is specified.
Never pull container before running: Never pull the latest version of the container image.
NoteIf you do not set a typo for pull, the value defaults to Only pull the image if not present before running.
- Optional: Description:
- Optional: Organization: Assign the organization to specifically use this execution environment. To make the execution environment available for use across multiple organizations, leave this field blank.
Registry credential: If the image has a protected container registry, provide the credential to access it.
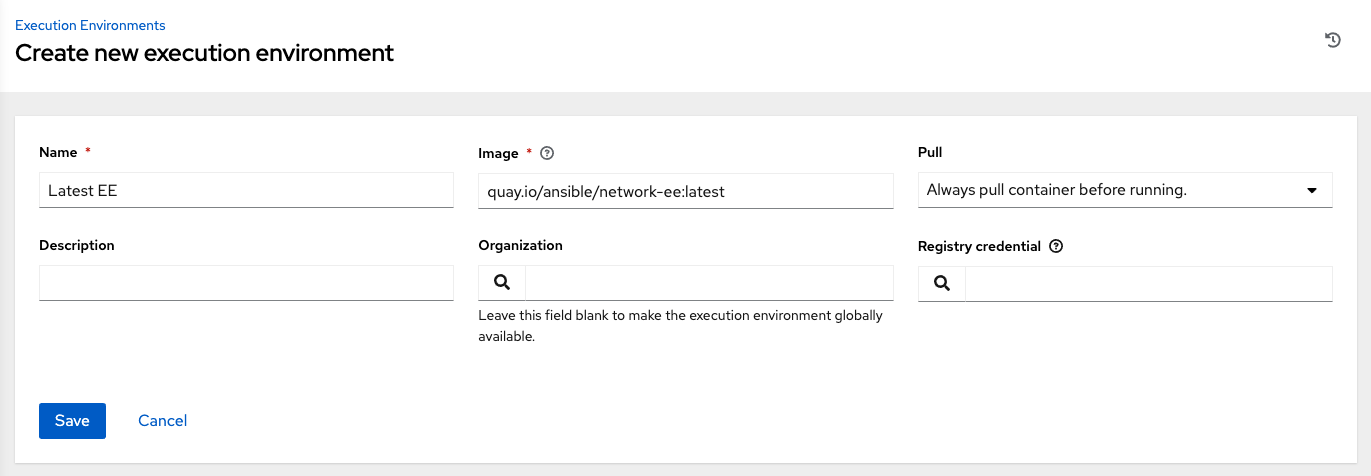
Click .
Your newly added execution environment is ready to be used in a job template.
- To add an execution environment to a job template, specify it in the Execution Environment field of the job template, as shown in the following example:
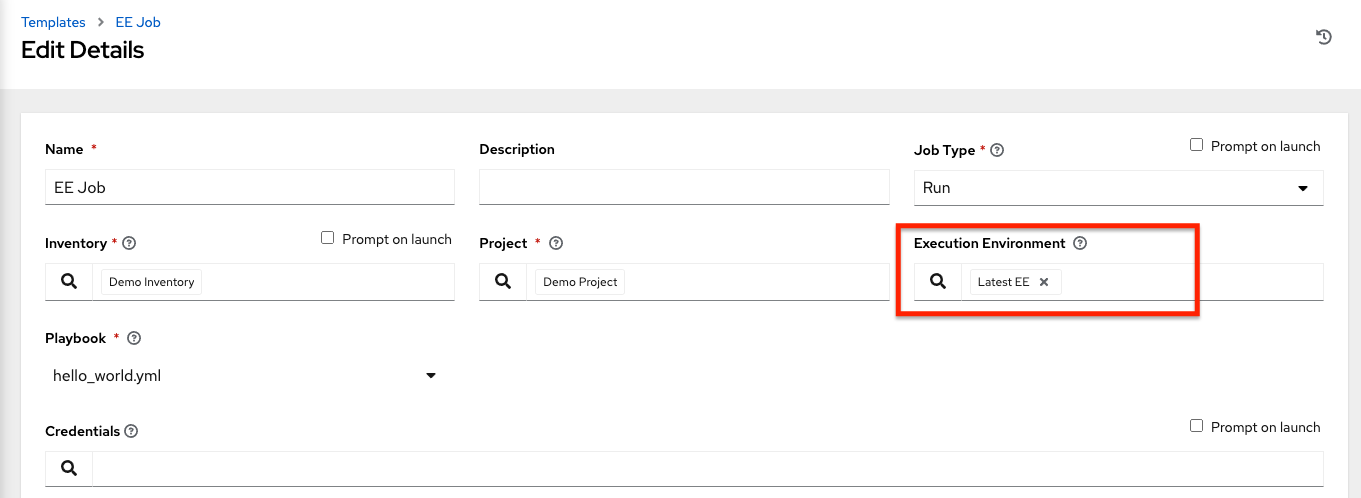
When you have added an execution environment to a job template, those templates are listed in the Templates tab of the execution environment:
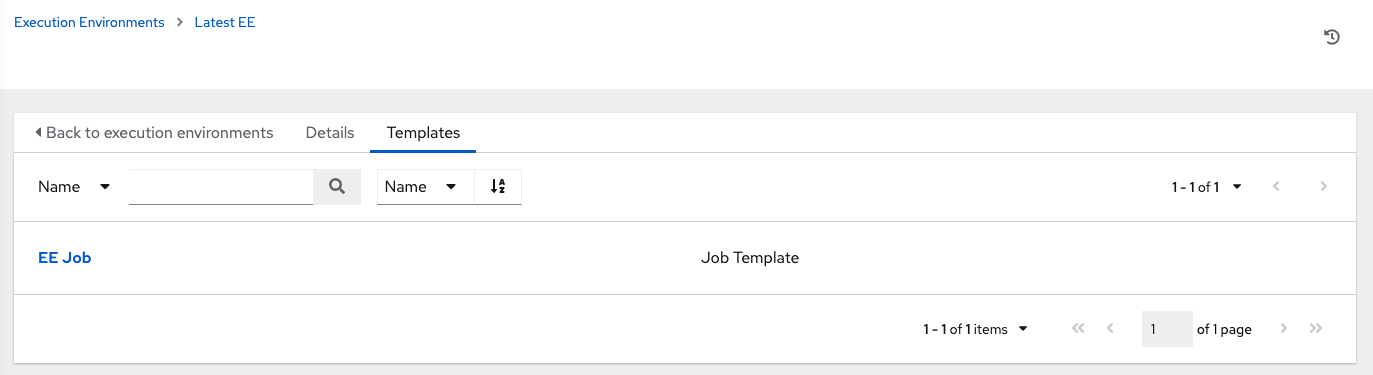
Chapter 15. Execution Environment Setup Reference
This section contains reference information associated with the definition of an execution environment. You define the content of your execution environment in a YAML file. By default, this file is called execution_environment.yml. This file tells Ansible Builder how to create the build instruction file (Containerfile for Podman, Dockerfile for Docker) and build context for your container image.
The definition schema for Ansible Builder 3.x is documented here. If you are running an older version of Ansible Builder, you need an older schema version. For more information, see older versions of this documentation. We recommend using version 3, which offers substantially more configurable options and functionality than previous versions.
15.1. Execution environment definition example
You must create a definition file to build an image for an execution environment. The file is in YAML format.
You must specify the version of Ansible Builder in the definition file. The default version is 1.
The following definition file is using Ansible Builder version 3:
version: 3
build_arg_defaults:
  ANSIBLE_GALAXY_CLI_COLLECTION_OPTS: '--pre'
dependencies:
  galaxy: requirements.yml
  python:
    - six
    - psutil
  system: bindep.txt
images:
  base_image:
    name: registry.redhat.io/ansible-automation-platform-24/ee-minimal-rhel8:latest
additional_build_files:
    - src: files/ansible.cfg
      dest: configs
additional_build_steps:
  prepend_galaxy:
    - ADD _build/configs/ansible.cfg /home/runner/.ansible.cfg
  prepend_final: |
    RUN whoami
    RUN cat /etc/os-release
  append_final:
    - RUN echo This is a post-install command!
    - RUN ls -la /etc
15.2. Configuration options
Use the following configuration YAML keys in your definition file.
The Ansible Builder 3.x execution environment definition file accepts seven top-level sections:
15.2.1. additional_build_files
The build files specify what are to be added to the build context directory. These can then be referenced or copied by additional_build_steps during any build stage.
The format is a list of dictionary values, each with a src and dest key and value.
Each list item must be a dictionary containing the following required keys:
| src | Specifies the source files to copy into the build context directory.
This can be an absolute path, for example, |
| dest |
Specifies a subdirectory path underneath the
This cannot be an absolute path or contain Note
When using an |
15.2.2. additional_build_steps
The build steps specify custom build commands for any build phase. These commands are inserted directly into the build instruction file for the container runtime, for example, Containerfile or Dockerfile. The commands must conform to any rules required by the containerization tool.
You can add build steps before or after any stage of the image creation process. For example, if you need git to be installed before you install your dependencies, you can add a build step at the end of the base build stage.
The following are the valid keys. Each supports either a multi-line string, or a list of strings.
| append_base | Commands to insert after building of the base image. |
| append_builder | Commands to insert after building of the builder image. |
| append_final | Commands to insert after building of the final image. |
| append_galaxy | Commands to insert after building of the galaxy image. |
| prepend_base | Commands to insert before building of the base image. |
| prepend_builder | Commands to insert before building of the builder image. |
| prepend_final | Commands to insert before building of the final image. |
| prepend_galaxy | Commands to insert before building of the galaxy image. |
15.2.3. build_arg_defaults
This specifies the default values for build arguments as a dictionary.
This is an alternative to using the --build-arg CLI flag.
Ansible Builder uses the following build arguments:
| ANSIBLE_GALAXY_CLI_COLLECTION_OPTS |
Enables the user to pass the |
| ANSIBLE_GALAXY_CLI_ROLE_OPTS |
This enables the user to pass any flags, such as |
| PKGMGR_PRESERVE_CACHE | This controls how often the package manager cache is cleared during the image build process.
If this value is not set, which is the default, the cache is cleared frequently. If the value is |
Ansible Builder hard-codes values given inside of build_arg_defaults into the build instruction file, so they persist if you run your container build manually.
If you specify the same variable in the definition and at the command line with the CLI build-arg flag, the CLI value overrides the value in the definition.
15.2.4. Dependencies
Specifies dependencies to install into the final image, including ansible-core, ansible-runner, Python packages, system packages, and collections. Ansible Builder automatically installs dependencies for any Ansible collections you install.
In general, you can use standard syntax to constrain package versions. Use the same syntax you would pass to dnf, pip, ansible-galaxy, or any other package management utility. You can also define your packages or collections in separate files and reference those files in the dependencies section of your definition file.
The following keys are valid:
| ansible_core |
The version of the
This value is a dictionary with a single key, ansible_core:
package_pip: ansible-core
ansible_core:
package_pip: ansible-core==2.14.3
ansible_core:
package_pip: https://github.com/example_user/ansible/archive/refs/heads/ansible.tar.gz
|
| ansible_runner | The version of the Ansible Runner Python package to be installed.
This value is a dictionary with a single key, ansible_runner:
package_pip: ansible-runner
ansible_runner:
package_pip: ansible-runner==2.3.2
ansible_runner:
package_pip: https://github.com/example_user/ansible-runner/archive/refs/heads/ansible-runner.tar.gz
|
| galaxy | Collections to be installed from Ansible Galaxy.
This can be a filename, a dictionary, or a multi-line string representation of an Ansible Galaxy |
| python | The Python installation requirements.
This can be a filename, or a list of requirements. Ansible Builder combines all the Python requirements files from all collections into a single file using the This library supports complex syntax, including references to other files. If many collections require the same package name, Ansible Builder combines them into a single entry and combines the constraints.
Ansible Builder excludes some packages in the combined file of Python dependencies even if a collection lists them as dependencies. These include test packages and packages that provide Ansible itself. The full list can is available under
If you need to include one of these excluded package names, use the Packages supplied this way are not processed against the list of excluded Python packages. |
| python_interpreter |
A dictionary that defines the Python system package name to be installed by dnf ( |
| system | The system packages to be installed, in bindep format. This can be a filename or a list of requirements. For more information about bindep, see the OpenDev documentation.
For system packages, use the |
The following example uses filenames that contain the various dependencies:
dependencies:
  python: requirements.txt
  system: bindep.txt
  galaxy: requirements.yml
  ansible_core:
      package_pip: ansible-core==2.14.2
  ansible_runner:
      package_pip: ansible-runner==2.3.1
  python_interpreter:
      package_system: "python310"
      python_path: "/usr/bin/python3.10"
This example uses inline values:
dependencies:
  python:
    - pywinrm
  system:
    - iputils [platform:rpm]
  galaxy:
    collections:
      - name: community.windows
      - name: ansible.utils
        version: 2.10.1
  ansible_core:
      package_pip: ansible-core==2.14.2
  ansible_runner:
      package_pip: ansible-runner==2.3.1
  python_interpreter:
      package_system: "python310"
      python_path: "/usr/bin/python3.10"
If any of these dependency files (requirements.txt, bindep.txt, and requirements.yml) are in the build_ignore of the collection, the build fails.
Collection maintainers can verify that ansible-builder recognizes the requirements they expect by using the introspect command:
ansible-builder introspect --sanitize ~/.ansible/collections/
The --sanitize option reviews all of the collection requirements and removes duplicates. It also removes any Python requirements that are normally excluded (see python dependencies).
Use the -v3 option to introspect to see logging messages about requirements that are being excluded.
15.2.5. images
Specifies the base image to be used. At a minimum you must specify a source, image, and tag for the base image. The base image provides the operating system and can also provide some packages. Use the standard host/namespace/container:tag syntax to specify images. You can use Podman or Docker shortcut syntax instead, but the full definition is more reliable and portable.
Valid keys for this section are:
| base_image | A dictionary defining the parent image for the execution environment.
A |
15.2.6. Image verification
You can verify signed container images if you are using the podman container runtime.
Set the container-policy CLI option to control how this data is used in relation to a Podman policy.json file for container image signature validation.
-
ignore_allpolicy: Generate apolicy.jsonfile in the buildcontext directory <context>where no signature validation is performed. -
systempolicy: Signature validation is performed using pre-existingpolicy.jsonfiles in standard system locations.ansible-builderassumes no responsibility for the content within these files, and the user has complete control over the content. -
signature_requiredpolicy:ansible-builderuses the container image definitions to generate apolicy.jsonfile in the buildcontext directory <context>that is used during the build to validate the images.
15.2.7. options
A dictionary of keywords or options that can affect the runtime functionality Ansible Builder.
Valid keys for this section are:
container_init: A dictionary with keys that allow for customization of the container
ENTRYPOINTandCMDdirectives (and related behaviors). Customizing these behaviors is an advanced task, and can result failures that are difficult to debug. Because the provided defaults control several intertwined behaviors, overriding any value skips all remaining defaults in this dictionary.Valid keys are:
-
cmd: Literal value for the
CMDContainerfile directive. The default value is["bash"]. entrypoint: Literal value for the
ENTRYPOINTContainerfile directive. The default entrypoint behavior handles signal propagation to subprocesses, as well as attempting to ensure at runtime that the container user has a proper environment with a valid writeable home directory, represented in/etc/passwd, with theHOMEenvironment variable set to match. The default entrypoint script can emit warnings tostderrin cases where it is unable to suitably adjust the user runtime environment. This behavior can be ignored or elevated to a fatal error; consult the source for theentrypointtarget script for more details.The default value is
["/opt/builder/bin/entrypoint", "dumb-init"].package_pip: Package to install with pip for entrypoint support. This package is installed in the final build image.
The default value is
dumb-init==1.2.5.
-
cmd: Literal value for the
-
package_manager_path: string with the path to the package manager (dnf or microdnf) to use. The default is
/usr/bin/dnf. This value is used to install a Python interpreter, if specified independencies, and during the build phase by theassemblescript. skip_ansible_check: This boolean value controls whether or not the check for an installation of Ansible and Ansible Runner is performed on the final image.
Set this value to
Trueto not perform this check.The default is
False.relax_passwd_permissions: This boolean value controls whether the
rootgroup (GID 0) is explicitly granted write permission to/etc/passwdin the final container image. The default entrypoint script can attempt to update/etc/passwdunder some container runtimes with dynamically created users to ensure a fully-functional POSIX user environment and home directory. Disabling this capability can cause failures of software features that require users to be listed in/etc/passwdwith a valid and writeable home directory, for example,asyncin ansible-core, and the~usernameshell expansion.The default is
True.workdir: Default current working directory for new processes started under the final container image. Some container runtimes also use this value as
HOMEfor dynamically-created users in theroot(GID 0) group. When this value is specified, if the directory does not already exist, it is created, set torootgroup ownership, andrwxgroup permissions are recursively applied to it.The default value is
/runner.user: This sets the username or UID to use as the default user for the final container image.
The default value is
1000.
Example options:
options:
    container_init:
        package_pip: dumb-init>=1.2.5
        entrypoint: '["dumb-init"]'
        cmd: '["csh"]'
    package_manager_path: /usr/bin/microdnf
    relax_password_permissions: false
    skip_ansible_check: true
    workdir: /myworkdir
    user: bob
15.2.8. version
An integer value that sets the schema version of the execution environment definition file.
Defaults to 1.
The value must be 3 if you are using Ansible Builder 3.x.
15.3. Default execution environment for AWX
The example in test/data/pytz requires the awx.awx collection in the definition. The lookup plugin awx.awx.tower_schedule_rrule requires the PyPI pytz and another library to work. If the test/data/pytz/execution-environment.yml file is provided to the ansible-builder build command, it installs the collection inside the image, reads the requirements.txt file inside of the collection, and then installs pytz into the image.
The image produced can be used inside of an ansible-runner project by placing these variables inside the env/settings file, inside the private data directory.
---
container_image: image-name
process_isolation_executable: podman # or docker
process_isolation: true
The awx.awx collection is a subset of content included in the default AWX .
For further information, see the awx-ee repository.
Chapter 16. Projects
A Project is a logical collection of Ansible playbooks, represented in automation controller. You can manage playbooks and playbook directories different ways:
- By placing them manually under the Project Base Path on your automation controller server.
- By placing your playbooks into a source code management (SCM) system supported by the automation controller. These include Git, Subversion, Mercurial and Red Hat Insights.
For more information on creating a Red Hat Insights project, see Setting up insights remediations.
The Project Base Path is /var/lib/awx/projects. However, this can be modified by the system administrator. It is configured in /etc/tower/conf.d/custom.py.
Use caution when editing this file, as incorrect settings can disable your installation.
The Projects page displays the list of the projects that are currently available.
Automation controller provides you with a Demo Project that you can work with initially.
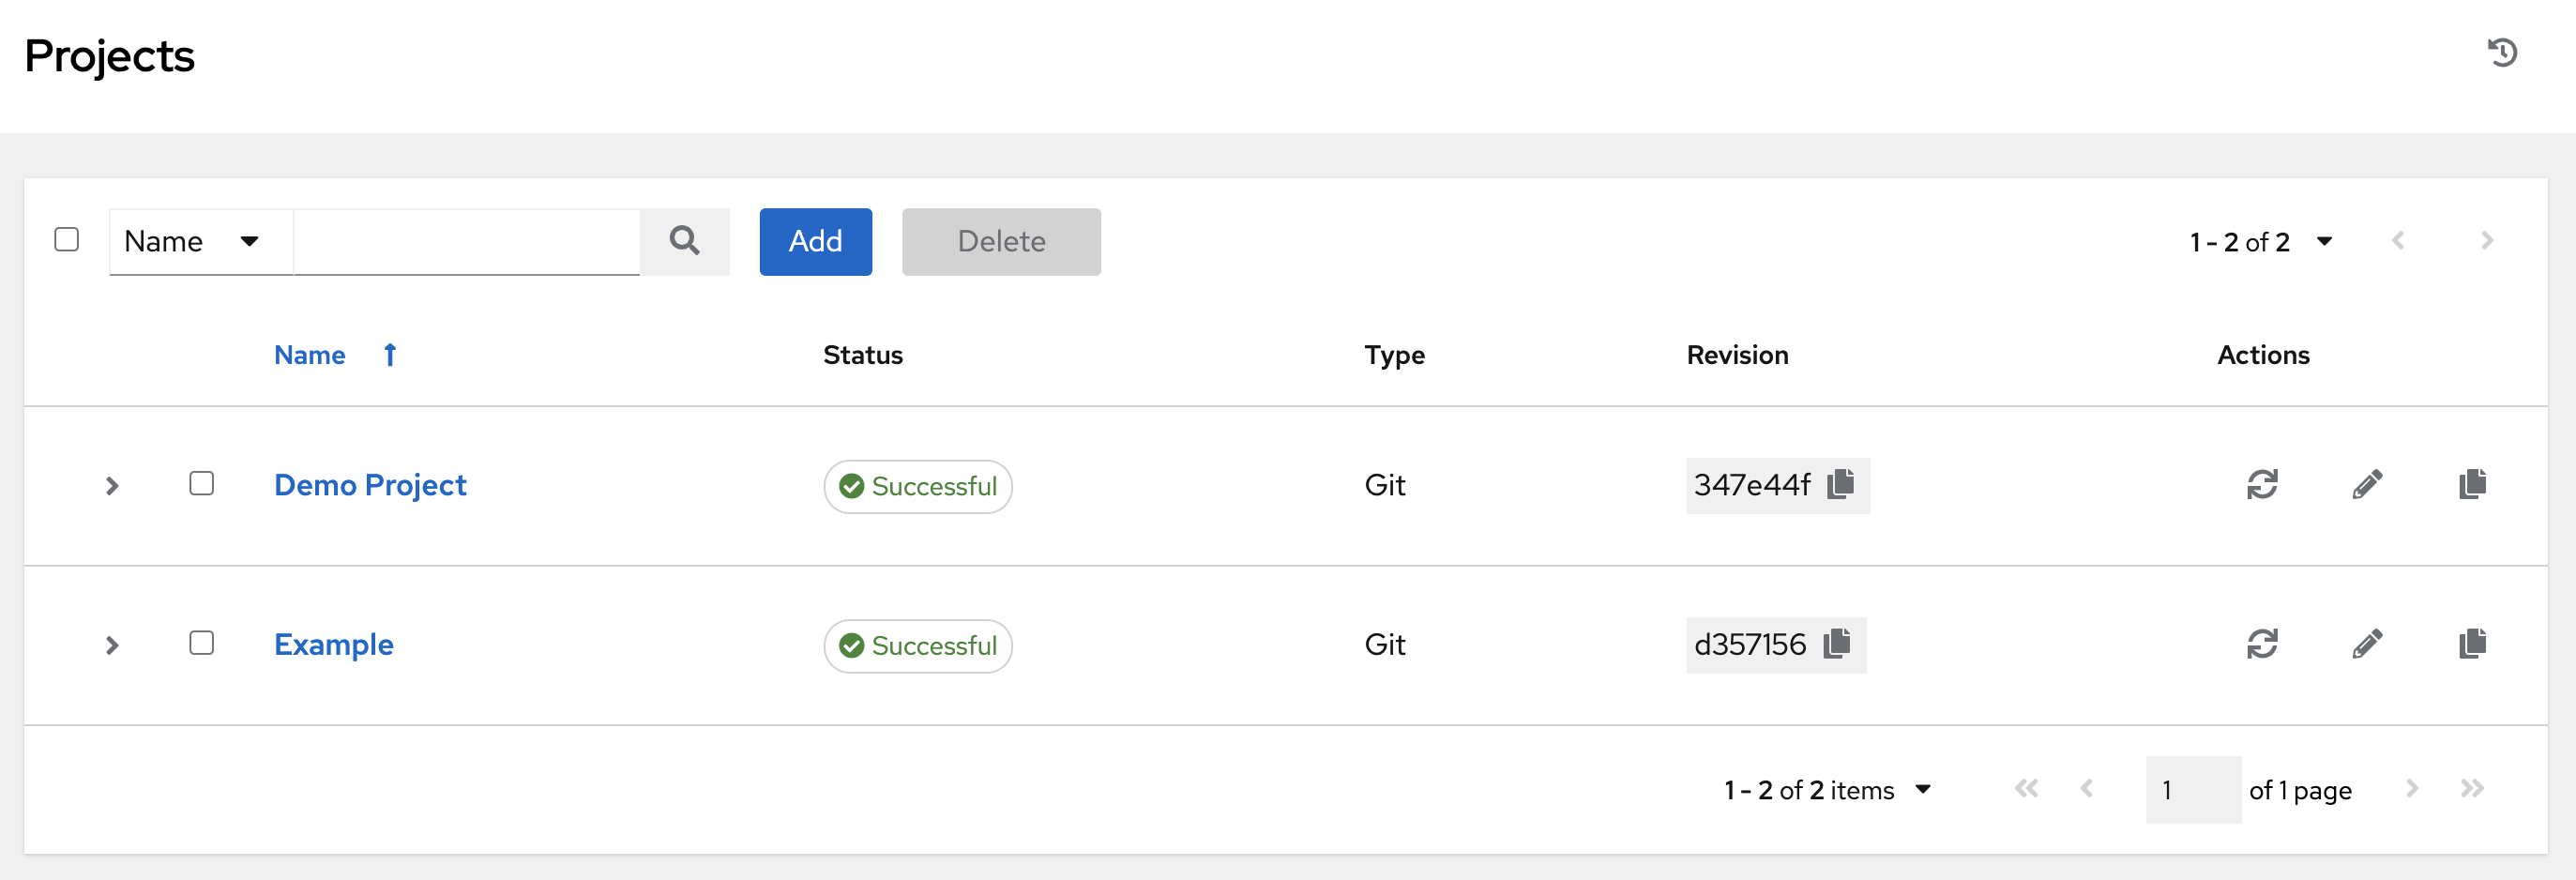
The default view is collapsed (Compact) with project name and its status, but you can use the
![]() next to each entry to expand for more information.
next to each entry to expand for more information.
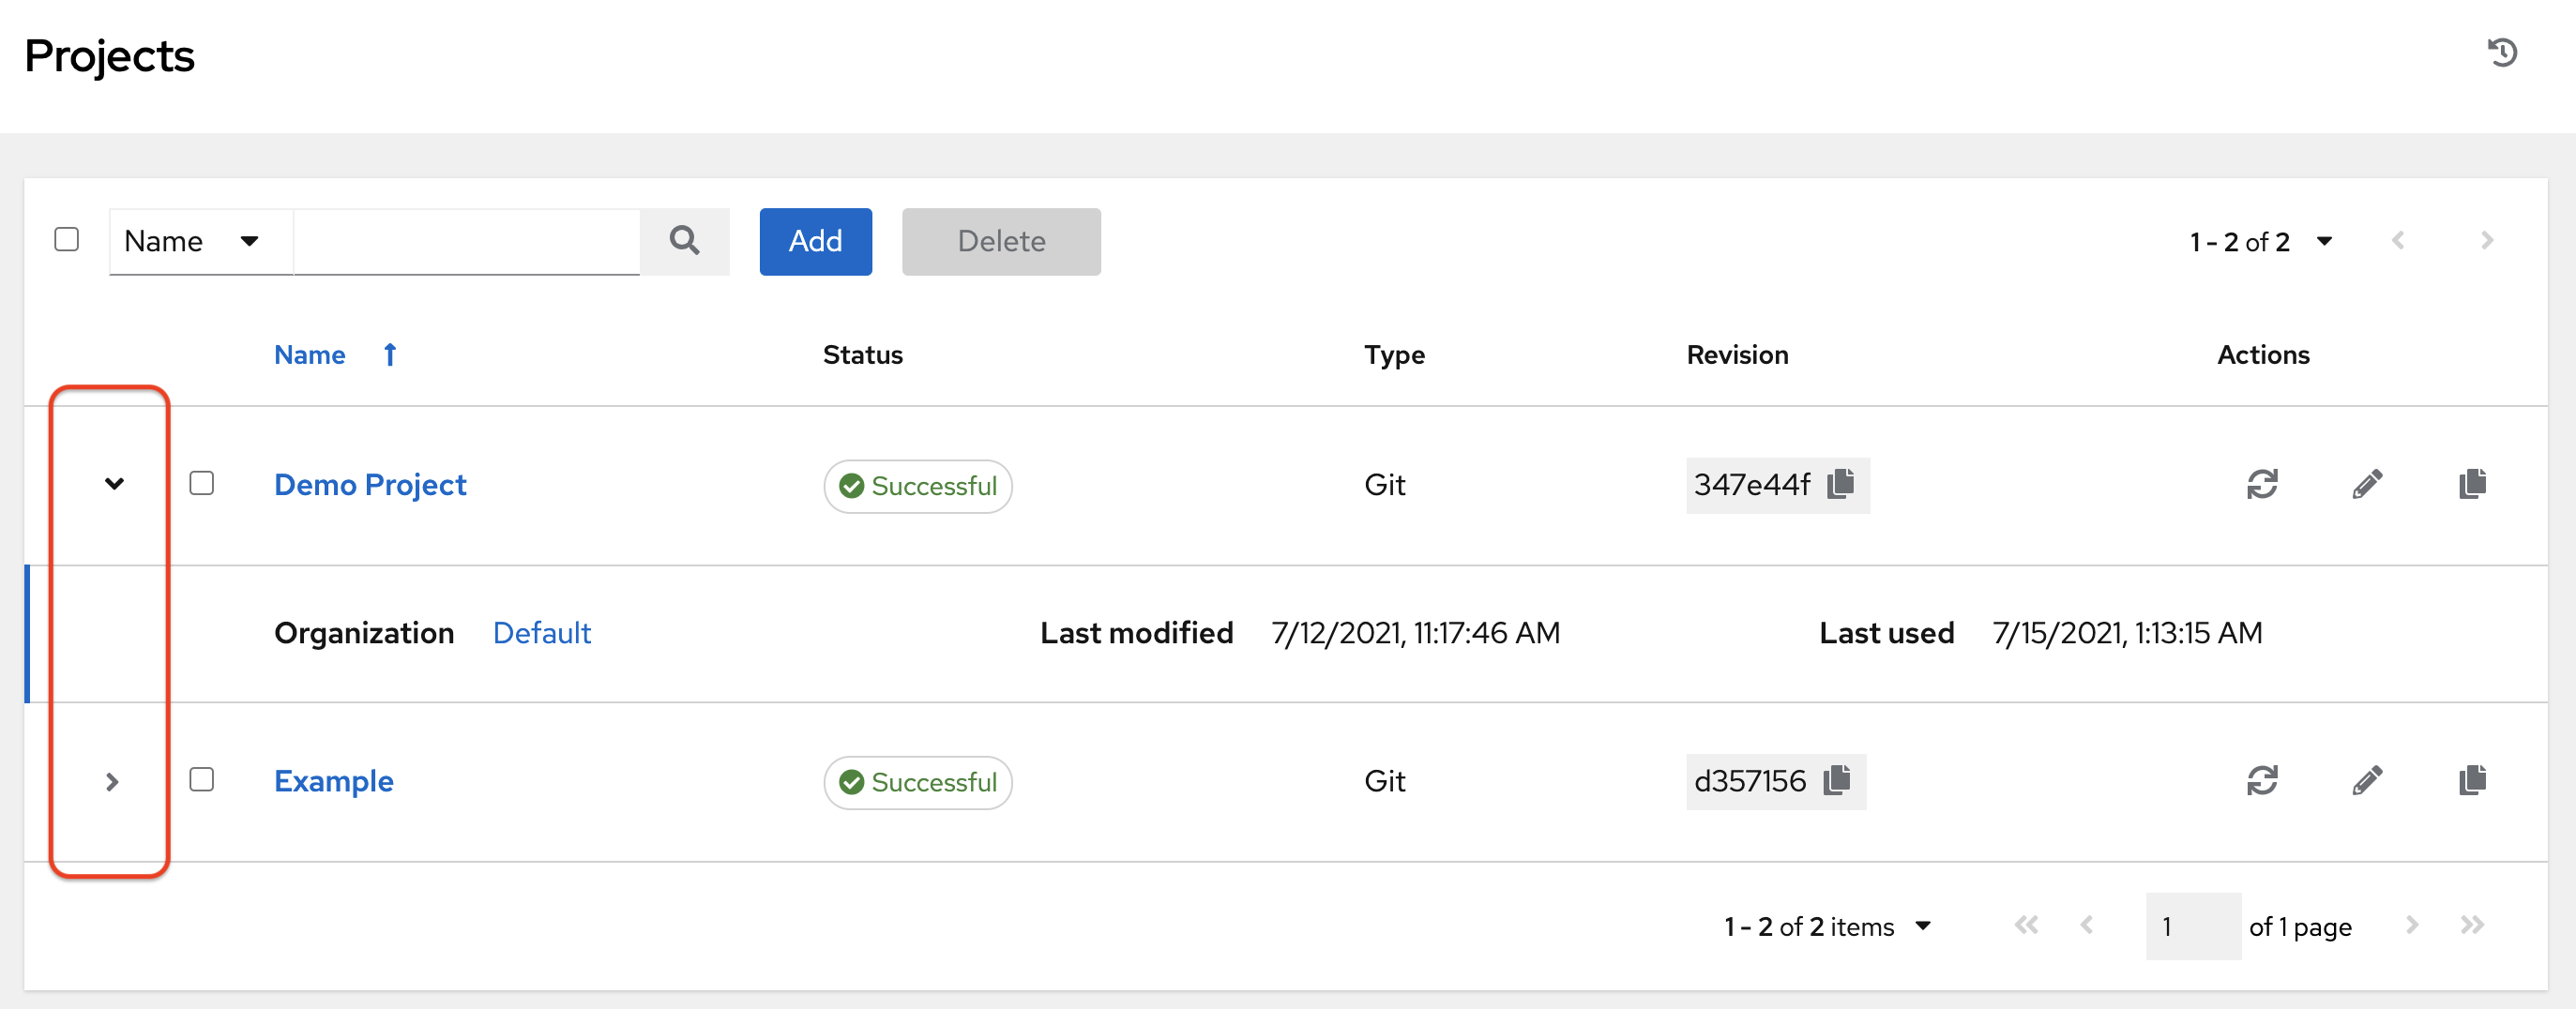
For each project listed, you can get the latest SCM revision
![]() , edit
, edit
![]() the project, or copy
the project, or copy
![]() the project attributes, using the icons next to each project.
the project attributes, using the icons next to each project.
Projects can be updated while a related job is running.
In cases where you have a large project (around 10 GB), disk space on /tmp may be an issue.
Status indicates the state of the project and may be one of the following (note that you can also filter your view by specific status types):
Pending - The source control update has been created, but not queued or started yet. Any job (not just source control updates) stays in pending until it is ready to be run by the system. Possible reasons for it not being ready are:
- It has dependencies that are currently running so it has to wait until they are done.
- There is not enough capacity to run in the locations it is configured to.
- Waiting - The source control update is in the queue waiting to be executed.
- Running - The source control update is currently in progress.
- Successful - The last source control update for this project succeeded.
- Failed - The last source control update for this project failed.
- Error - The last source control update job failed to run at all.
- Canceled - The last source control update for the project was canceled.
- Never updated - The project is configured for source control, but has never been updated.
- OK - The project is not configured for source control, and is correctly in place.
-
Missing - Projects are absent from the project base path of
/var/lib/awx/projects. This is applicable for manual or source control managed projects.
Projects of credential type Manual cannot update or schedule source control-based actions without being reconfigured as an SCM type credential.
16.1. Adding a new project
You can create a logical collection of playbooks, called projects in automation controller.
Procedure
- From the navigation panel, select → .
On the Projects page, click to launch the Create Project window.
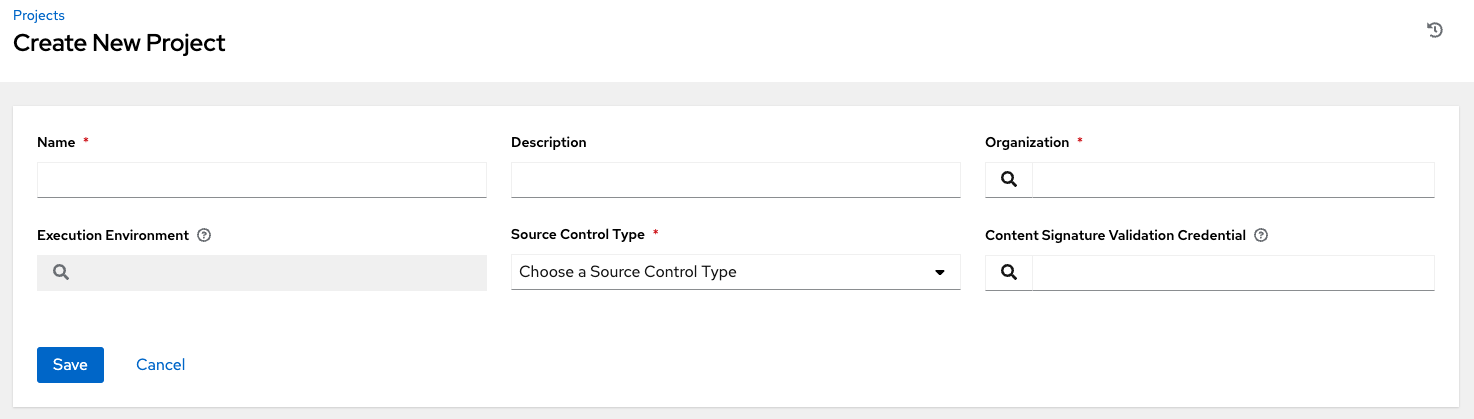
Enter the appropriate details into the following required fields:
- Name (required)
- Optional: Description
- Organization (required): A project must have at least one organization. Select one organization now to create the project. When the project is created you can add additional organizations.
- Optional: Execution Environment: Enter the name of the execution environment or search from a list of existing ones to run this project. For more information, see Migrating to Execution Environments in the Red Hat Ansible Automation Platform Upgrade and Migration Guide.
- Source Control Type (required): Select an SCM type associated with this project from the menu. Options in the following sections become available depending on the type chosen. For more information, see Manage playbooks manually or Manage playbooks using source control.
- Optional: Content Signature Validation Credential: Use this field to enable content verification. Specify the GPG key to use for validating content signature during project synchronization. If the content has been tampered with, the job will not run. For more information, see Project signing and verification.
- Click .
Additional resources
The following describe the ways projects are sourced:
16.1.1. Managing playbooks manually
Procedure
-
Create one or more directories to store playbooks under the Project Base Path, for example,
/var/lib/awx/projects/. - Create or copy playbook files into the playbook directory.
- Ensure that the playbook directory and files are owned by the same UNIX user and group that the service runs as.
- Ensure that the permissions are appropriate for the playbook directories and files.
Troubleshooting
If you have not added any Ansible Playbook directories to the base project path an error message is displayed. Choose one of the following options to troubleshoot this error:
- Create the appropriate playbook directories and check out playbooks from your SCM (spell this*).
- Copy playbooks into the appropriate playbook directories.
16.1.2. Managing playbooks using source control
Choose one of the following options when managing playbooks using source control:
16.1.2.1. SCM Types - Configuring playbooks to use Git and Subversion
Procedure
In the Project Details tab, select the appropriate option (Git or Subversion) from the SCM Type menu.
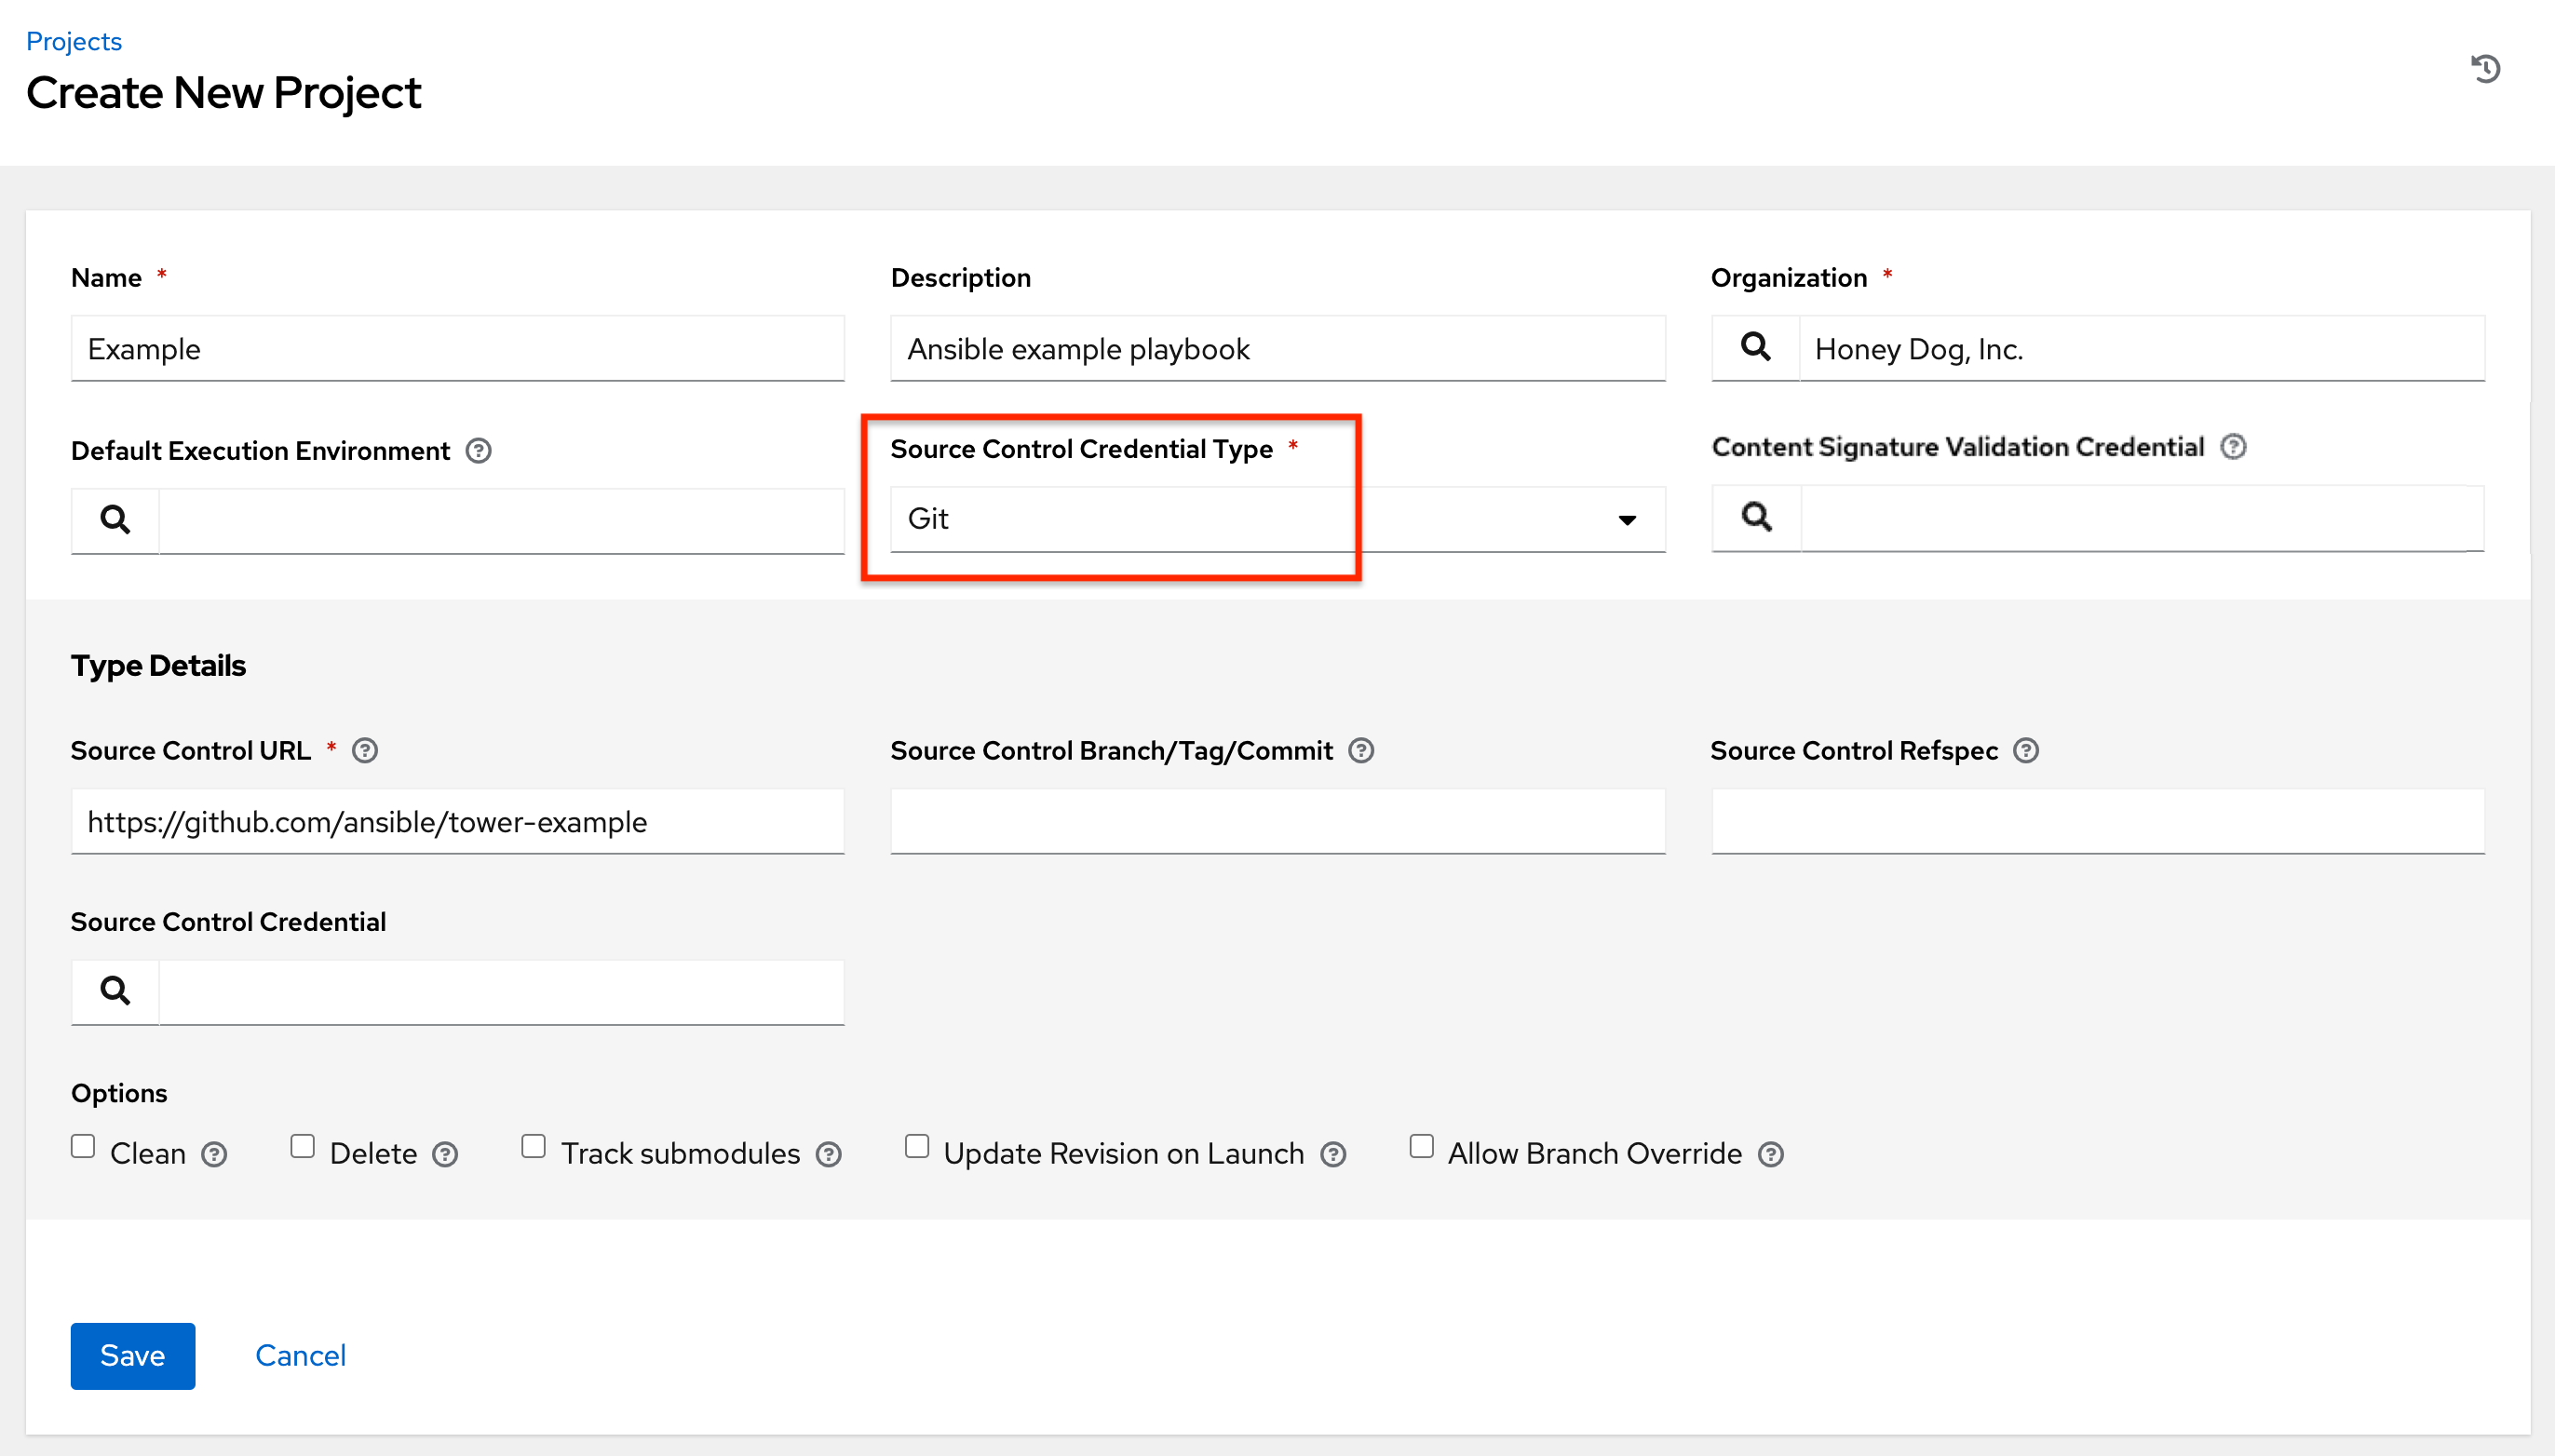
Enter the appropriate details into the following fields:
- SCM URL - See an example in the tooltip .
-
Optional: SCM Branch/Tag/Commit: Enter the SCM branch, tags, commit hashes, arbitrary refs, or revision number (if applicable) from the source control (Git or Subversion) to checkout. Some commit hashes and references might not be available unless you also provide a custom refspec in the next field. If left blank, the default is
HEADwhich is the last checked out Branch, Tag, or Commit for this project. - SCM Refspec - This field is an option specific to git source control and only advanced users familiar and comfortable with git should specify which references to download from the remote repository. For more information, see Job branch overriding.
- Source Control Credential - If authentication is required, select the appropriate source control credential
Optional: SCM Update Options - select the launch behavior, if applicable:
- Clean - Removes any local modifications before performing an update.
- Delete - Deletes the local repository in its entirety before performing an update. Depending on the size of the repository this can significantly increase the amount of time required to complete an update.
-
Track submodules - Tracks the latest commit. There is more information in the tooltip
 .
.
- Update Revision on Launch - Updates the revision of the project to the current revision in the remote source control, and caching the roles directory from Galaxy or Collections support. Automation controller ensures that the local revision matches and that the roles and collections are up-to-date with the last update. In addition, to avoid job overflows if jobs are spawned faster than the project can synchronize, selecting this enables you to configure a Cache Timeout to cache previous project synchronizations for a given number of seconds.
Allow Branch Override - Enables a job template or an inventory source that uses this project to start with a specified SCM branch or revision other than that of the project. For more information, see Job branch overriding.

- Click Save to save your project.
Using a GitHub link is an easy way to use a playbook. To help get you started, use the helloworld.yml file available here.
This link offers a very similar playbook to the one created manually in the instructions found in Automation controller User Guide. Using it will not alter or harm your system in any way.
16.1.2.2. SCM Type - Configuring playbooks to use Red Hat Insights
Procedure
- In the Project Details page, select Red Hat Insights from the SCM Type menu.
- In the Credential field, select the appropriate credential for use with Insights, as Red Hat Insights requires a credential for authentication.
Optional: In the SCM Update Options field, select the launch behavior, if applicable.
- Clean - Removes any local modifications before performing an update.
- Delete - Deletes the local repository in its entirety before performing an update. Depending on the size of the repository this can significantly increase the amount of time required to complete an update.
Update Revision on Launch - Updates the revision of the project to the current revision in the remote source control, and caches the roles directory from Ansible Galaxy support or Collections support. Automation controller ensures that the local revision matches, and that the roles and collections are up-to-date. If jobs are spawned faster than the project can synchronize, selecting this enables you to configure a Cache Timeout to cache previous project synchronizations for a certain number of seconds, to avoid job overflow.
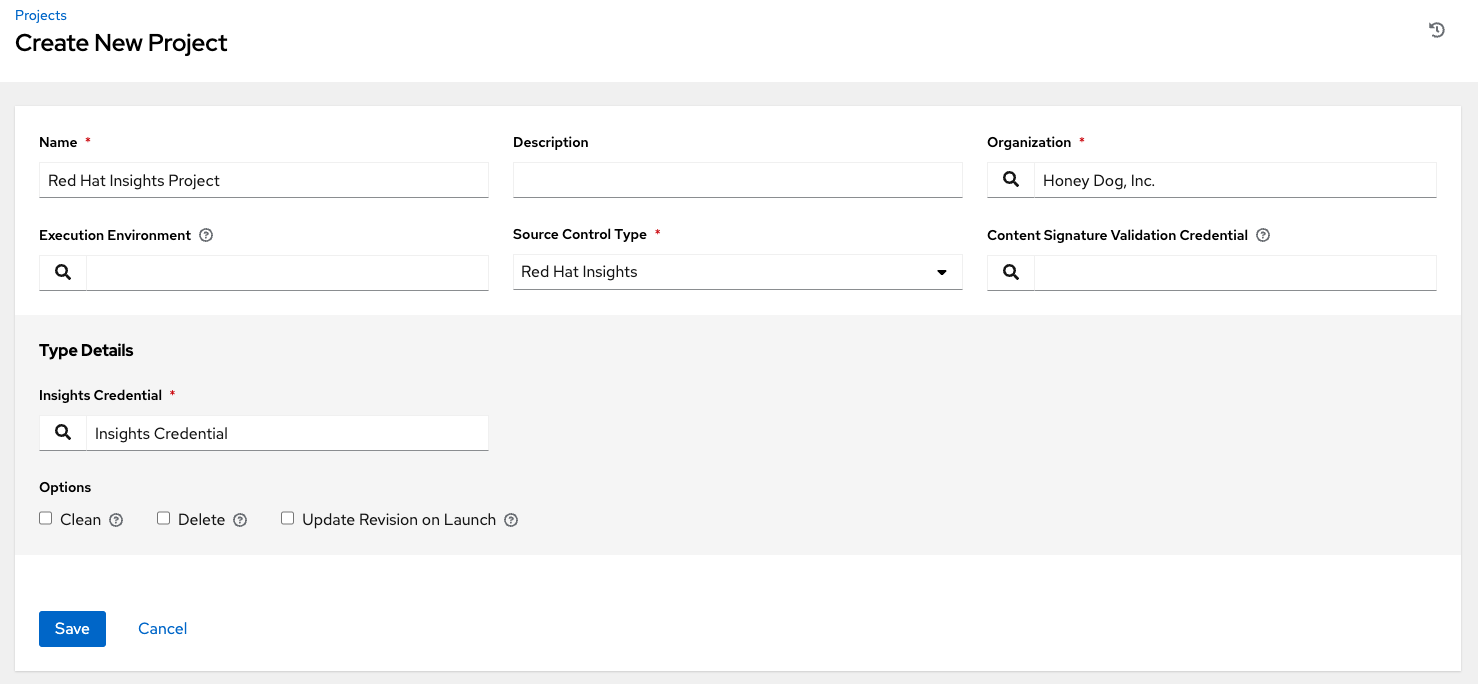
- Click .
16.1.2.3. SCM Type - Configuring playbooks to use a remote archive
Playbooks that use a remote archive enable projects to be based on a build process that produces a versioned artifact, or release, containing all the requirements for that project in a single archive.
Procedure
- In the Project Details page, select Remote Archive from the SCM Type menu.
Enter the appropriate details into the following fields:
- SCM URL - requires a URL to a remote archive, such as a GitHub Release or a build artifact stored in Artifactory and unpacks it into the project path for use.
- SCM Credential - If authentication is required, select the appropriate SCM credential.
Optional: In the SCM Update Options field, select the launch behavior, if applicable:
- Clean - Removes any local modifications before performing an update.
- Delete - Deletes the local repository in its entirety before performing an update. Depending on the size of the repository this can significantly increase the amount of time required to complete an update.
- Update Revision on Launch - Not recommended. This option updates the revision of the project to the current revision in the remote source control, and caches the roles directory from Ansible Galaxy support or Collections support.
Allow Branch Override - Not recommended. This option enables a job template that uses this project to launch with a specified SCM branch or revision other than that of the project’s.
 Note
NoteSince this SCM type is intended to support the concept of unchanging artifacts, it is advisable to disable Galaxy integration (for roles, at a minimum).
- Click .
16.2. Updating projects from source control
Procedure
- From the navigation panel, select → .
Click the sync
 icon next to the project that you want to update.
Note
icon next to the project that you want to update.
NoteImmediately after adding a project setup to use source control, a sync starts that fetches the project details from the configured source control.
Click the project’s status under the Status column for further information about the update process. This brings you to the Output tab of the Jobs section.
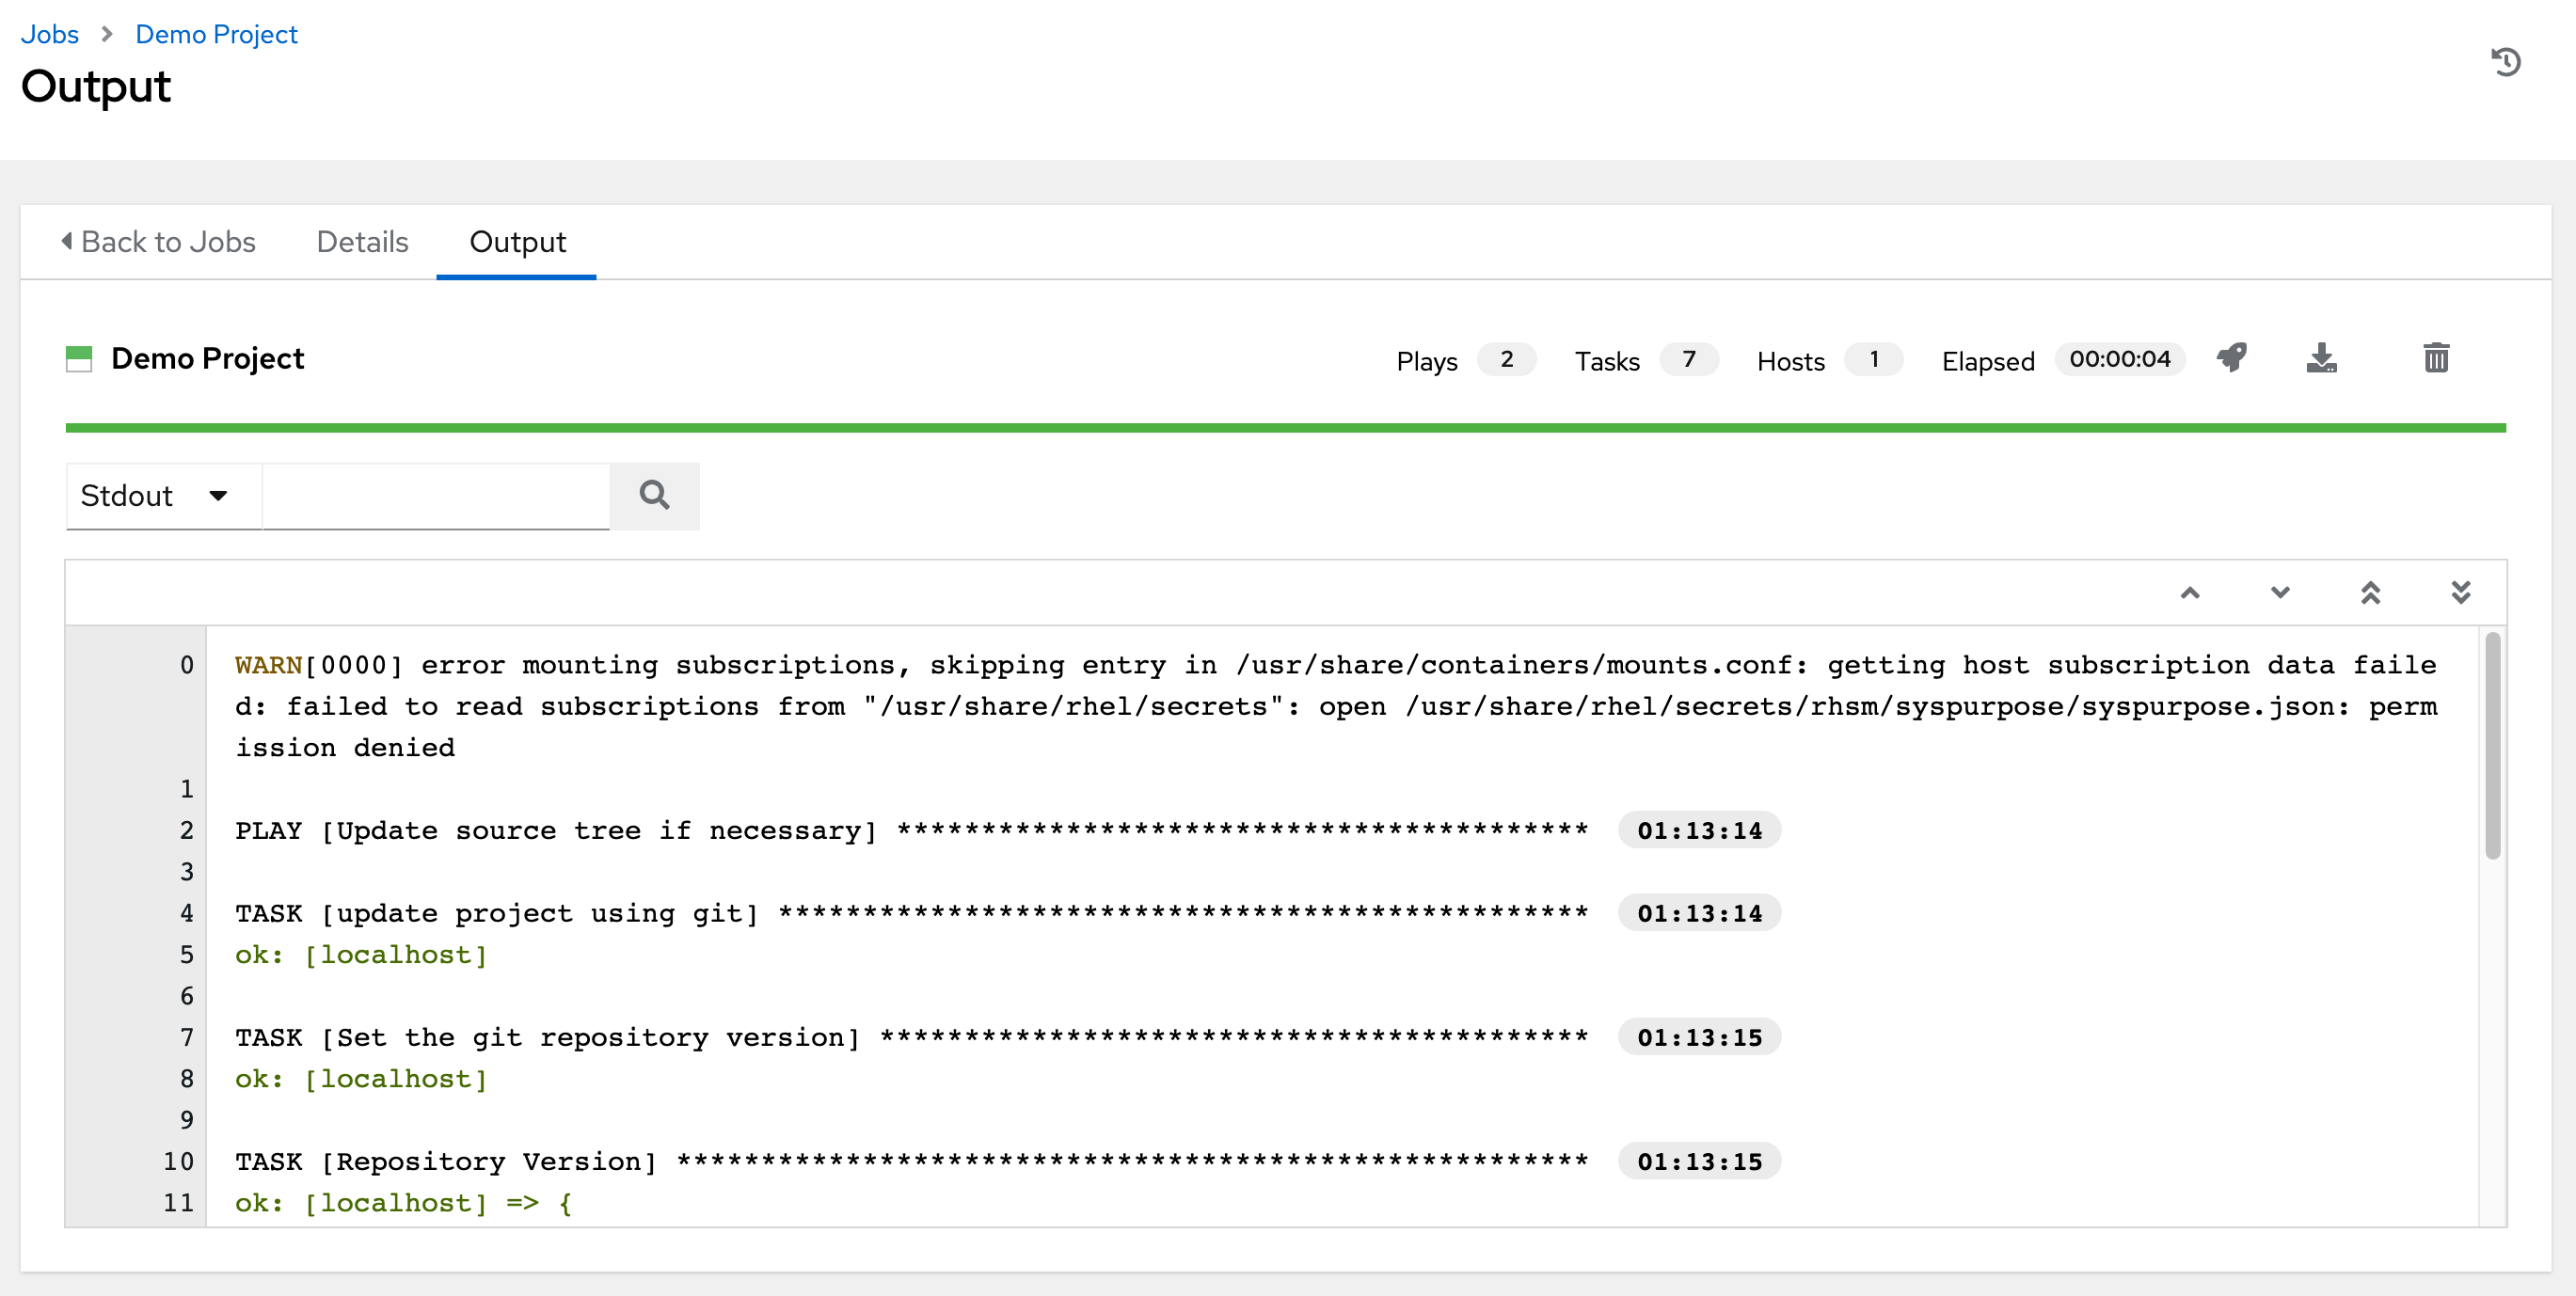
16.3. Work with permissions
The set of permissions assigned to a project (role-based access controls) that provide the ability to read, change, and administer projects, inventories, job templates, and other elements are privileges.
To access the project permissions, select the Access tab of the Projects page. This screen displays a list of users that currently have permissions to this project.
You can sort and search this list by Username, First Name, or Last Name.
16.3.1. Adding project permissions
Manage the permissions that users and teams have to access a project.
Procedure
- From the navigation panel, select → .
- Select the project that you want to update and click the Access tab.
- Click .
- Select a user or team to add and click .
- Select one or more users or teams from the list by clicking the checkbox next to the name to add them as members.
- Click .
Select the roles you want the selected users or teams to have. Be sure to scroll down for a complete list of roles. Different resources have different options available.
Click to apply the roles to the selected users or teams and to add them as members. The updated roles assigned for each user and team are displayed.
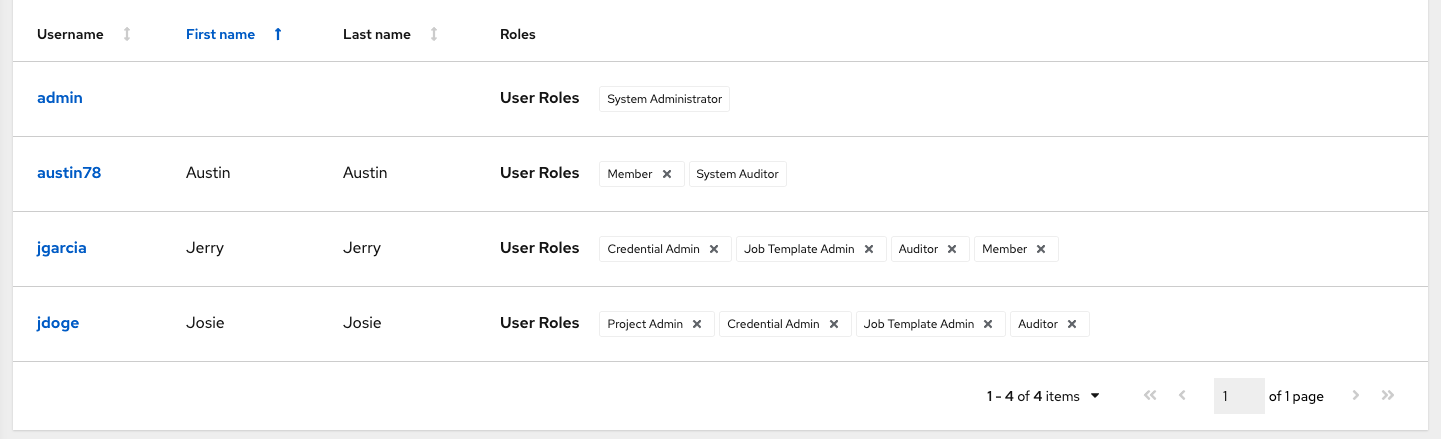
16.3.2. Removing permissions from a project
Remove roles for a particular user.
Procedure
- From the navigation panel, select → .
- Select the project that you want to update and click the Access tab.
-
Click the
icon next to the user role in the Roles column.
- Click in the confirmation window to confirm the disassociation.
16.4. Ansible Galaxy support
At the end of a project update, automation controller searches for the requirements.yml file in the roles directory, located at <project-top-level-directory>/roles/requirements.yml.
If this file is found, the following command automatically runs:
ansible-galaxy role install -r roles/requirements.yml -p <project-specific cache location>/requirements_roles -vvv
This file enables you to reference Ansible Galaxy roles or roles within other repositories which can be checked out in conjunction with your own project. The addition of Ansible Galaxy access eliminates the need to create git submodules to achieve this result. Given that SCM projects, along with roles or collections, are pulled into and executed from a private job environment, a <private job directory> specific to the project within /tmp is created by default. However, you can specify another Job Execution Path based on your environment in the Jobs Settings tab of the Settings window:
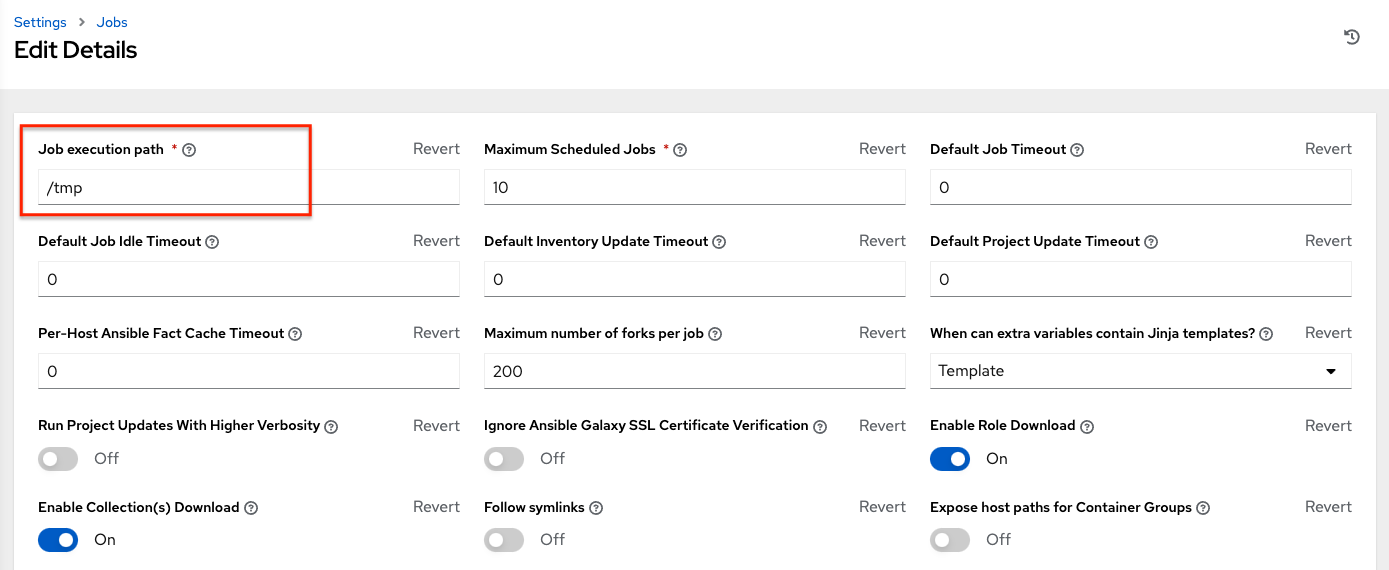
The cache directory is a subdirectory inside the global projects folder. The content can be copied from the cache location to <job private directory>/requirements_roles.
By default, automation controller has a system-wide setting that enables you to dynamically download roles from the roles/requirements.yml file for SCM projects. You can turn off this setting in the Jobs settings screen of the Settings menu by switching the Enable Role Download toggle button to Off.
Whenever a project synchronization runs, automation controller determines if the project source and any roles from Galaxy or Collections are out of date with the project. Project updates download the roles inside the update.
If jobs need to pick up a change made to an upstream role, updating the project ensures that this happens. A change to the role means that a new commit was pushed to the provision-role source control.
To make this change take effect in a job, you do not have to push a new commit to the playbooks repository. You must update the project, which downloads roles to a local cache.
For instance, say you have two git repositories in source control. The first one is playbooks and the project in automation controller points to this URL. The second one is provision-role and it is referenced by the roles/requirements.yml file inside of the playbooks git repository.
Jobs download the most recent roles before every job run. Roles and collections are locally cached for performance reasons. You must select Update Revision on Launch in the project SCM Update Options to ensure that the upstream role is re-downloaded before each job run:

The update happens much earlier in the process than the sync, so this identifies errors and details faster and in a more logical location.
For more information and examples on the syntax of the requirements.yml file, see the role requirements section in the Ansible documentation.
If there are any directories that must be specifically exposed, you can specify those in the Jobs section of the Settings screen in Paths to Expose to Isolated Jobs. You can also update the following entry in the settings file:
AWX_ISOLATION_SHOW_PATHS = ['/list/of/', '/paths']
If your playbooks need to use keys or settings defined in AWX_ISOLATION_SHOW_PATHS, you must add AWX_ISOLATION_SHOW_PATHS to /var/lib/awx/.ssh.
If you made changes in the settings file, be sure to restart services with the automation-controller-service restart command after your changes have been saved.
In the UI, you can configure these settings in the Jobs settings window.

16.5. Collections support
Automation controller supports project-specific Ansible collections in job runs. If you specify a collections requirements file in the SCM at collections/requirements.yml, automation controller installs collections in that file in the implicit project synchronization before a job run.
Automation controller has a system-wide setting that enables collections to be dynamically downloaded from the collections/requirements.yml file for SCM projects. You can turn off this setting in the Jobs settings tab of the Settings menu by switching the Enable Collections Download toggle button to Off.
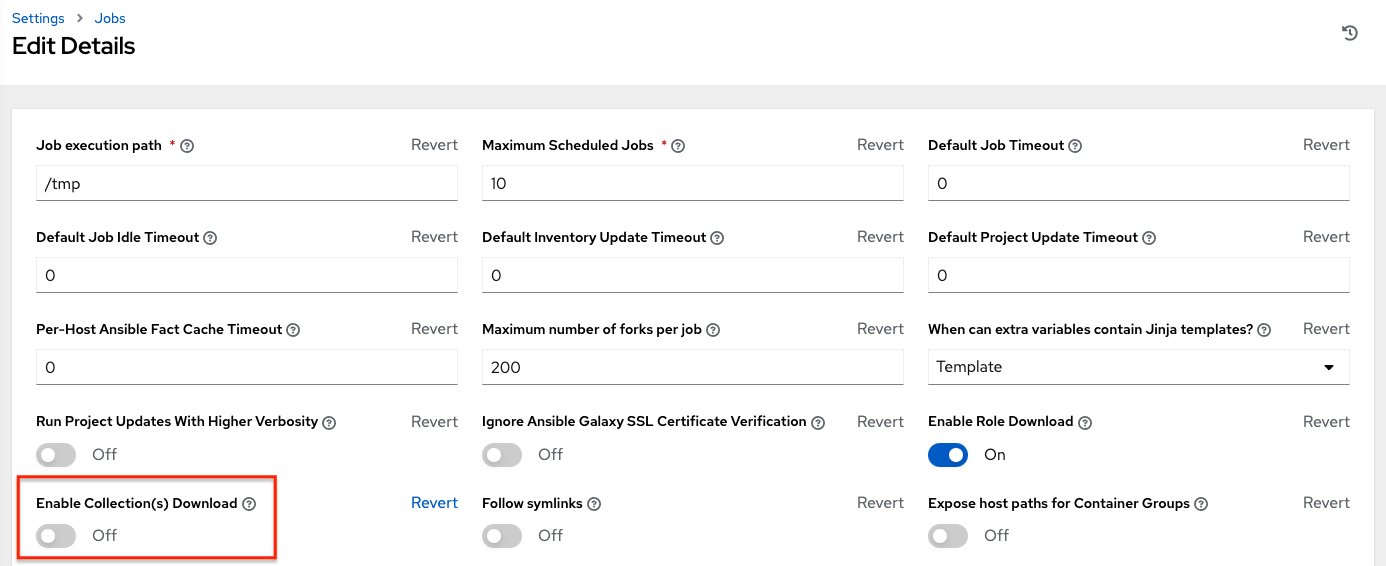
Roles and collections are locally cached for performance reasons, and you select Update Revision on Launch in the project SCM Update Options to ensure this:
16.5.1. Using collections with automation hub
Before automation controller can use automation hub as the default source for collections content, you must create an API token in the automation hub UI. You then specify this token in automation controller.
Use the following procedure to connect to private automation hub or automation hub, the only difference is which URL you specify.
Procedure
- Go to https://console.redhat.com/ansible/automation-hub/token.
- Click .
-
Click the copy
 icon to copy the API token to the clipboard.
Create a credential by choosing one of the following options:
To use automation hub, create an automation hub credential using the copied token and pointing to the URLs shown in the Server URL and SSO URL fields of the token page:
-
Galaxy Server URL =
https://console.redhat.com/api/automation-hub/ -
AUTH SEVER URL =
https://sso.redhat.com/auth/realms/redhat-external/protocol/openid-connect/token
-
Galaxy Server URL =
To use private automation hub, create an automation hub credential using a token retrieved from the Repo Management dashboard of your private automation hub and pointing to the published repository URL as shown:
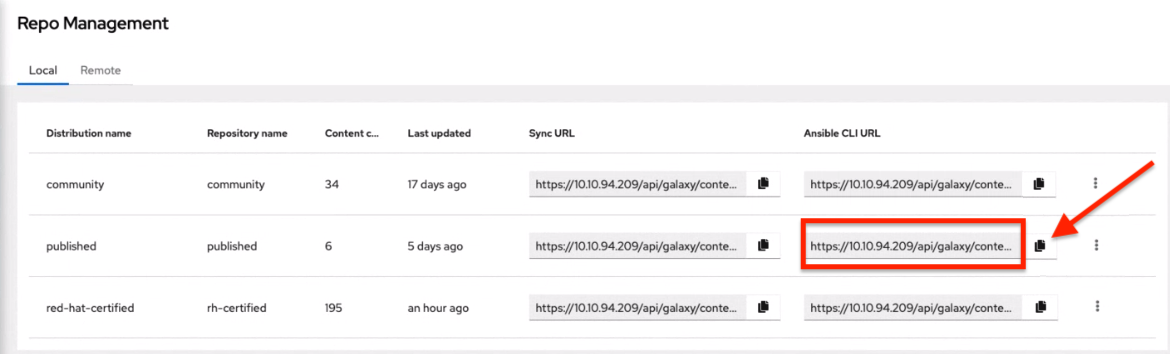
You can create different repositories with different namespaces or collections in them. For each repository in automation hub you must create a different credential.
Copy the Ansible CLI URL from the UI in the format of
/https://$<hub_url>/api/galaxy/content/<repo you want to pull from>into the Galaxy Server URL field of the Create Credential form: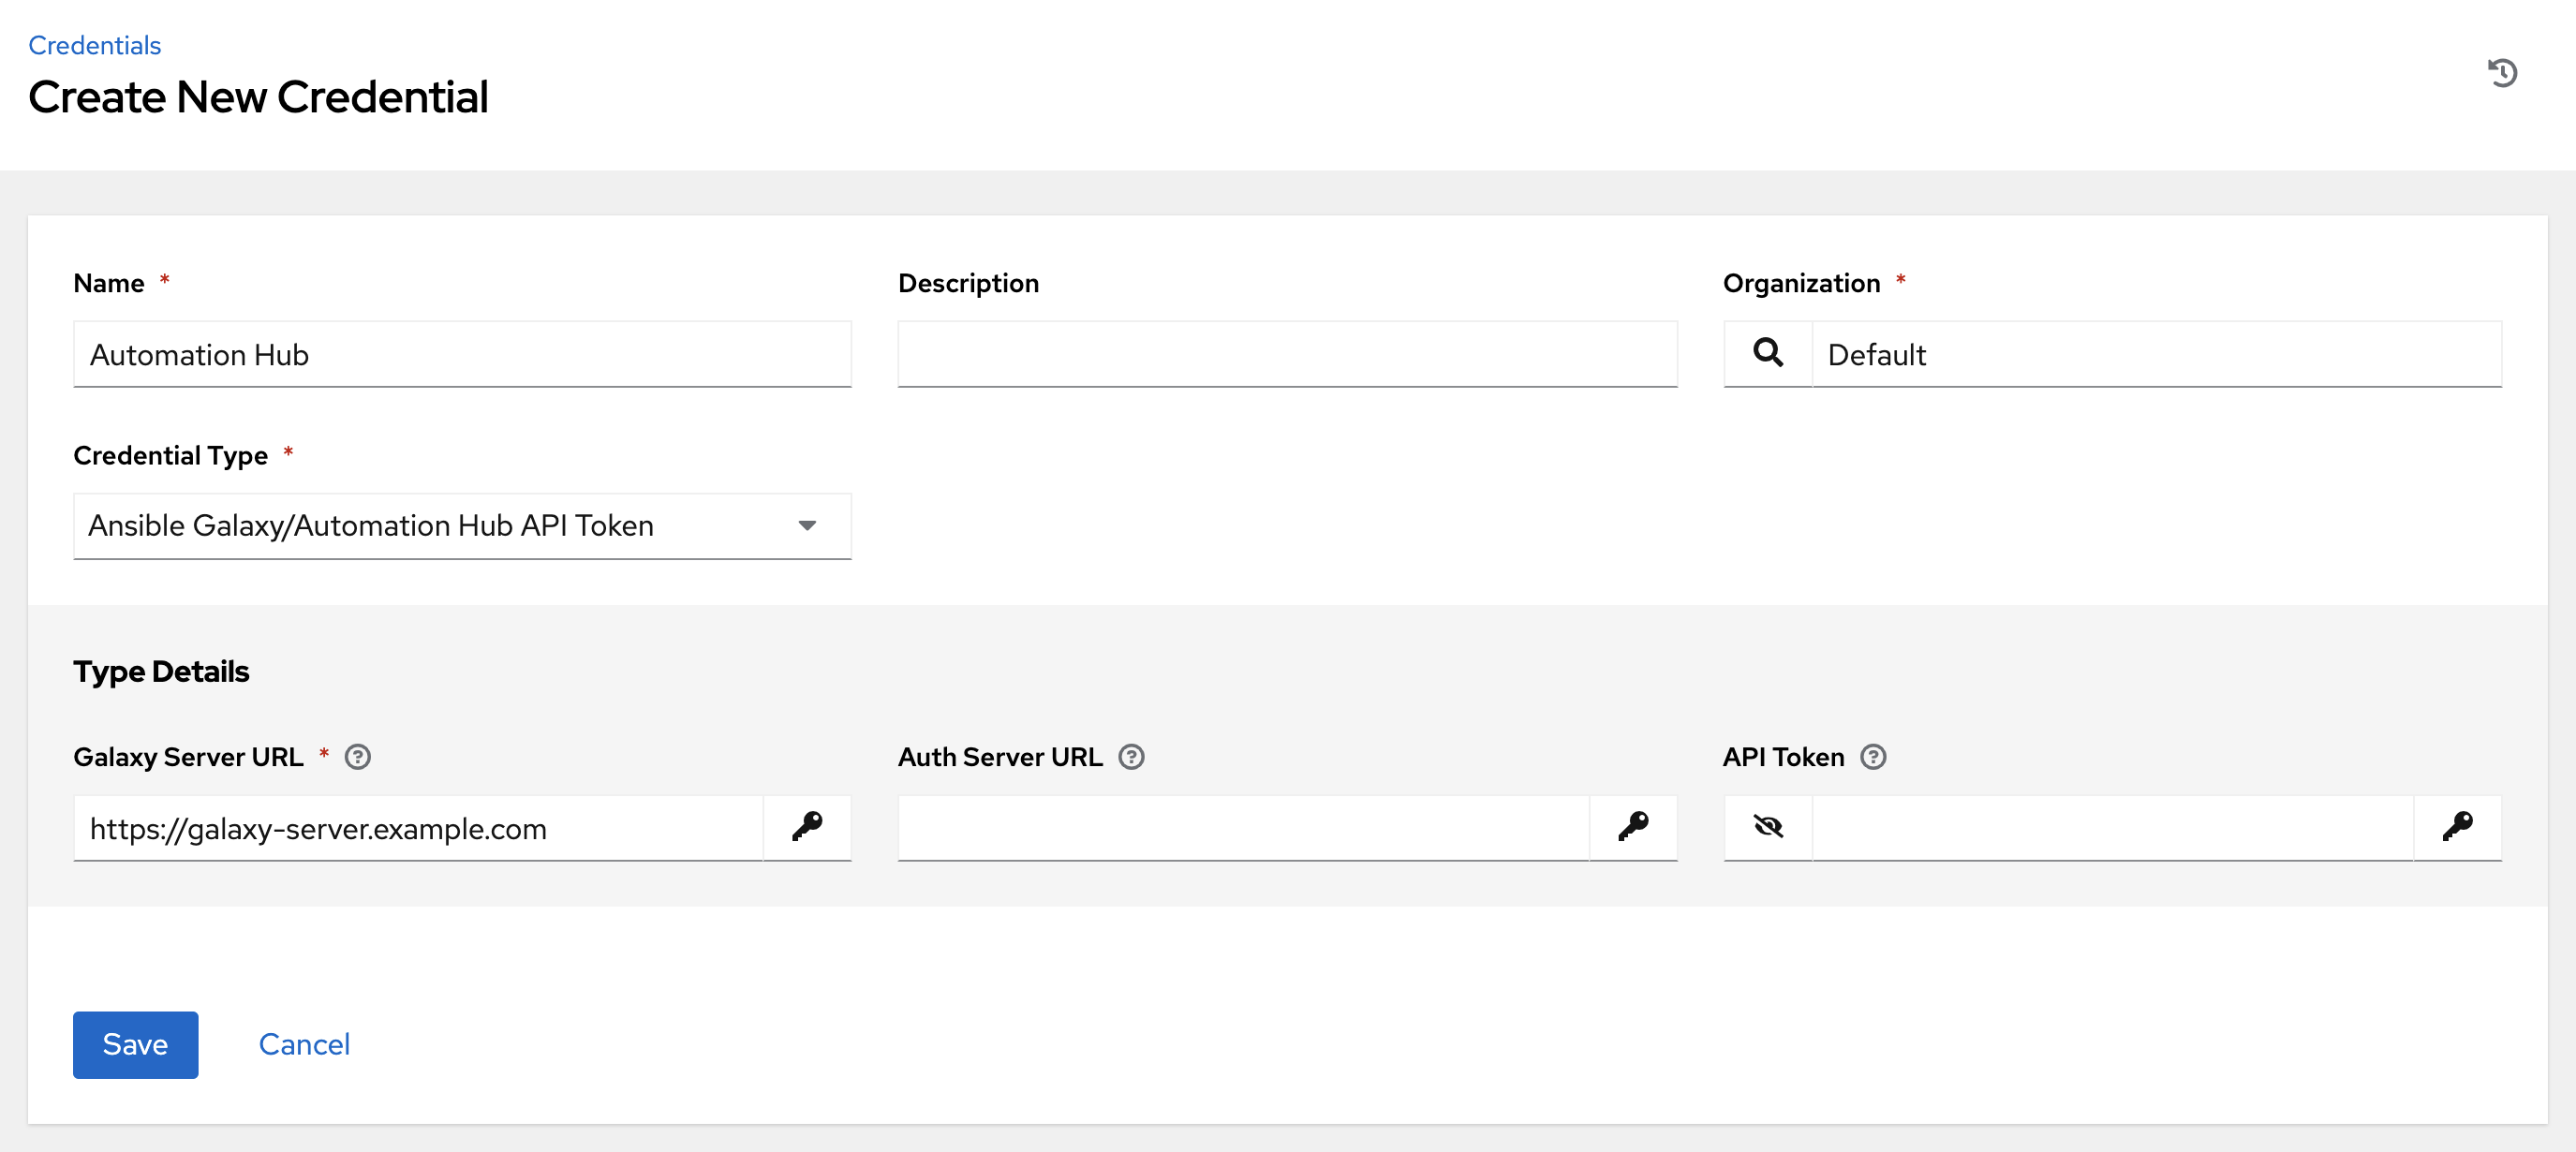
For UI specific instructions, see Red Hat Certified, validated, and Ansible Galaxy content in automation hub.
Go to the organization for which you want to synchronize content from and add the new credential to the organization. This enables you to associate each organization with the credential, or repository, that you want to use content from.
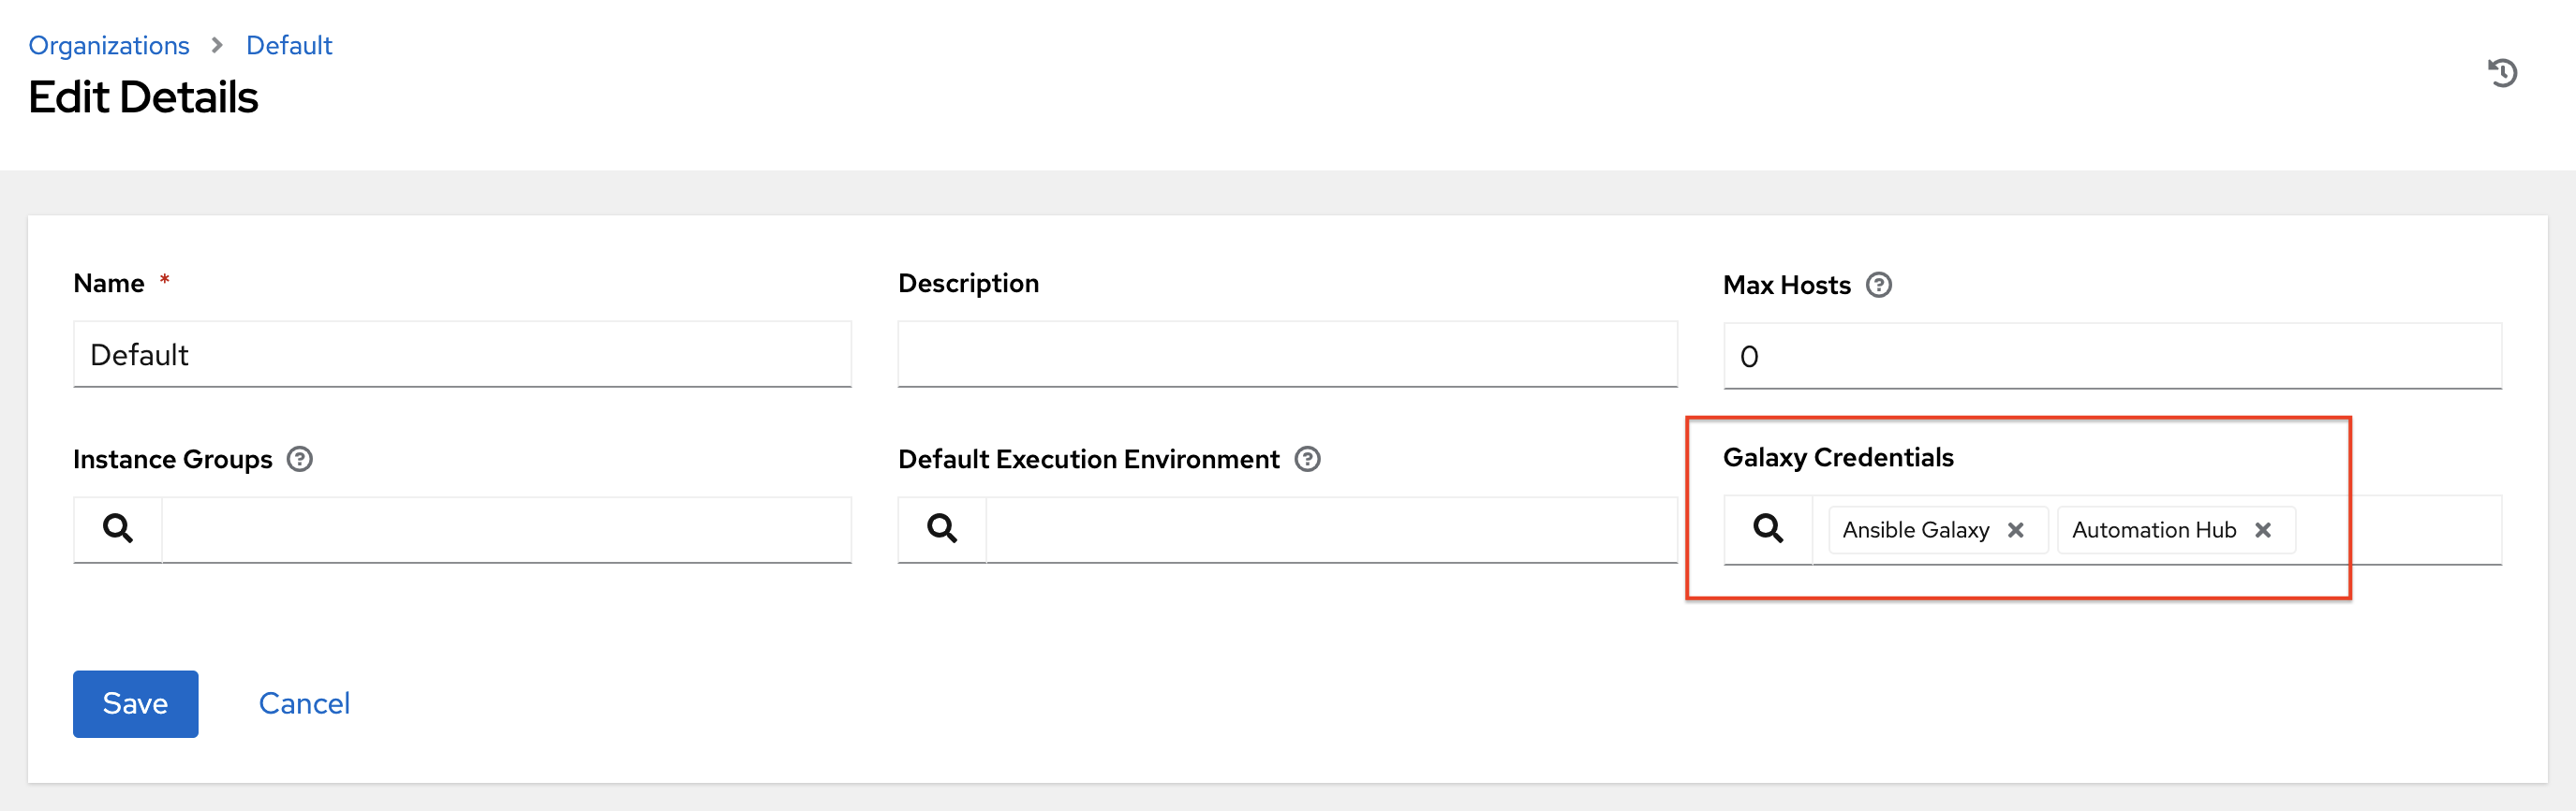
Example
You have two repositories:
-
Prod:
Namespace 1andNamespace 2, each with collectionAandBso:namespace1.collectionA:v2.0.0andnamespace2.collectionB:v2.0.0 Stage:
Namespace 1with only collectionAso:namespace1.collectionA:v1.5.0on , you have a repository URL for Prod and Stage.You can create a credential for each one.
Then you can assign different levels of access to different organizations. For example, you can create a
Developersorganization that has access to both repository, while an Operations organization just has access to the Prod repository only.For UI specific instructions, see Configuring user access for container repositories in private automation hub.
-
Prod:
If automation hub has self-signed certificates, use the toggle to enable the setting Ignore Ansible Galaxy SSL Certificate Verification. For automation hub, which uses a signed certificate, use the toggle to disable it instead. This is a global setting:
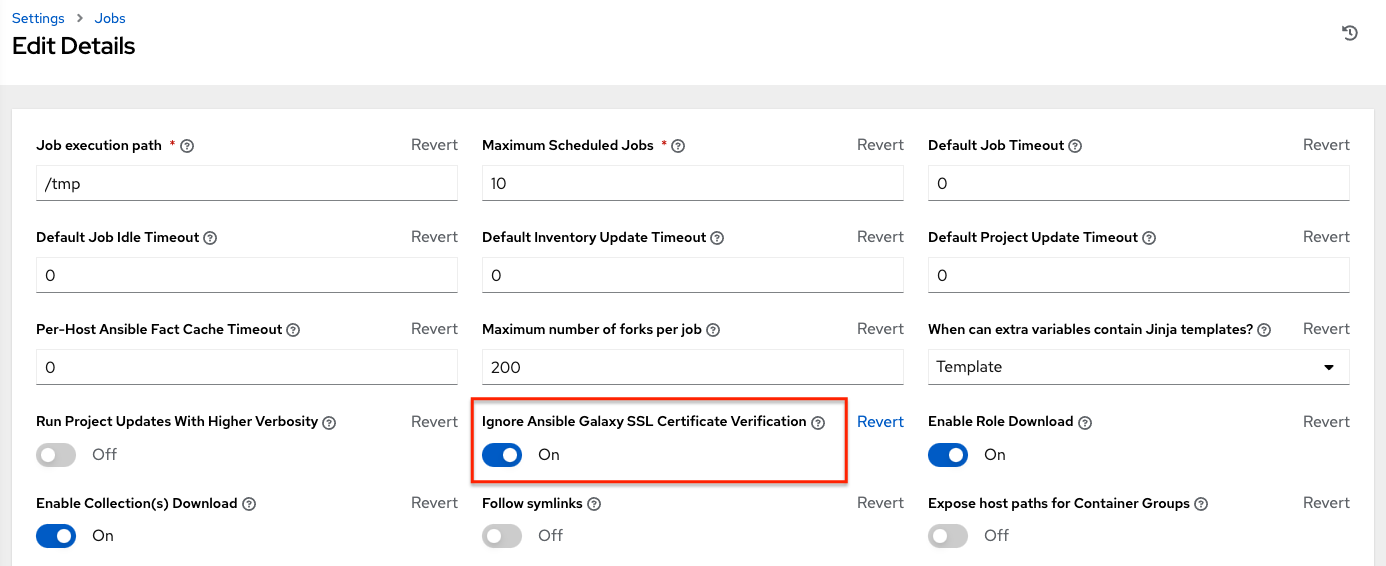
Create a project, where the source repository specifies the necessary collections in a requirements file located in the
collections/requirements.ymlfile. For information about the syntax to use, see Using Ansible collections in the Ansible documentation.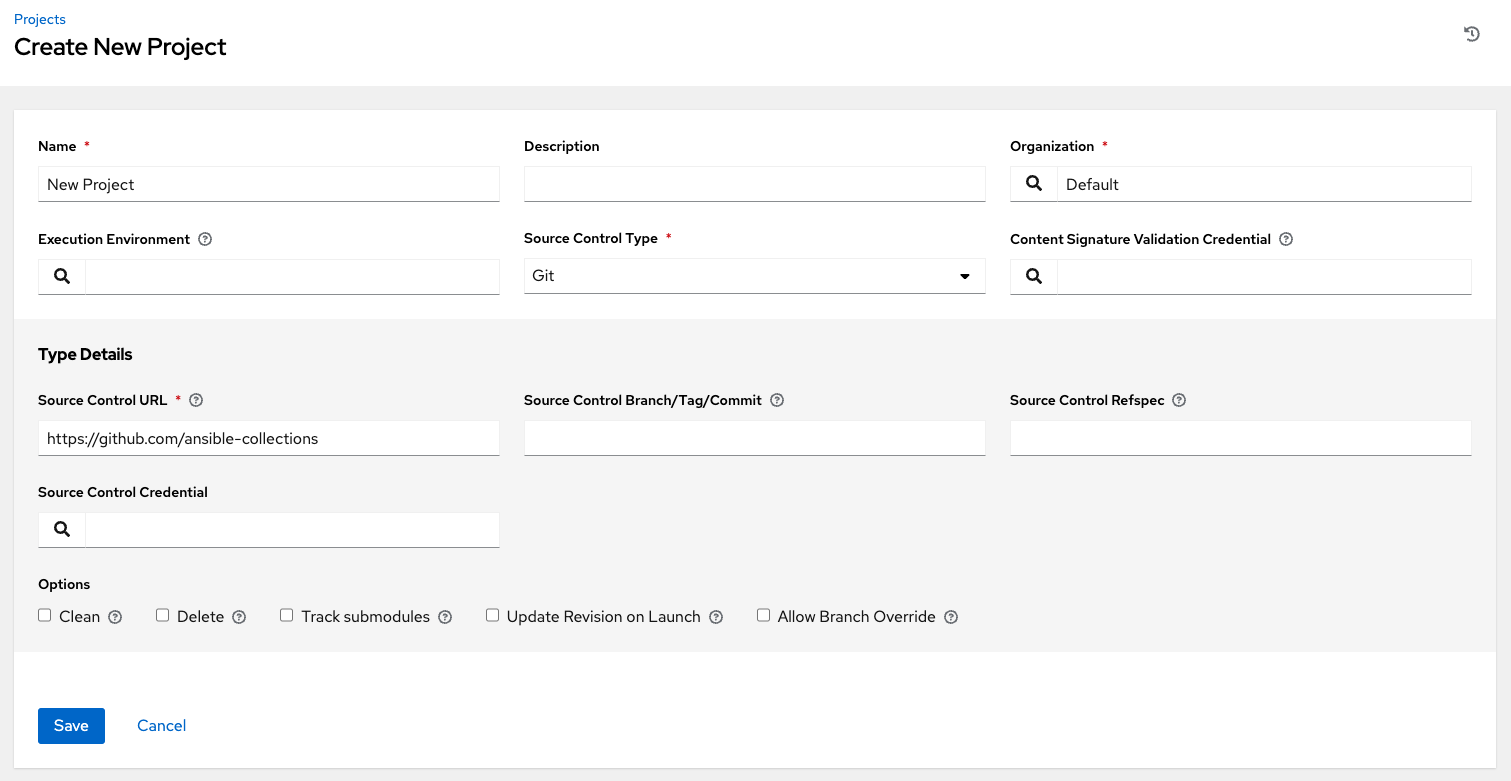
-
In the Projects list view, click the sync
icon to update this project. Automation controller fetches the Galaxy collections from the
collections/requirements.ymlfile and reports it as changed. The collections are installed for any job template using this project.
If updates are required from Galaxy or Collections, a sync is performed that downloads the required roles, consuming that much more space in your /tmp file. In cases where you have a large project (around 10 GB), disk space on /tmp may be an issue.
Additional resources
For more information about collections, see Using Collections.
For more information about how Red Hat publishes one of these official collections, which can be used to automate your install directly, see the AWX Ansible Collection documentation.
Chapter 17. Project Signing and Verification
Project signing and verification lets you sign files in your project directory, then verify whether or not that content has changed in any way, or files have been added or removed from the project unexpectedly. To do this, you require a private key for signing and a matching public key for verifying.
For project maintainers, the supported way to sign content is to use the ansible-sign utility, using the command-line interface (CLI) supplied with it.
The CLI aims to make it easy to use cryptographic technology such as GNU Privacy Guard (GPG) to validate that files within a project have not been tampered with in any way. Currently, GPG is the only supported means of signing and validation.
Automation controller is used to verify the signed content. After a matching public key has been associated with the signed project, automation controller verifies that the files included during signing have not changed, and that files have been added or removed unexpectedly. If the signature is not valid or a file has changed, the project fails to update, and jobs making use of the project will not launch. Verification status of the project ensures that only secure, untampered content can be run in jobs.
If the repository has already been configured for signing and verification, the usual workflow for altering the project becomes the following:
- You have a project repository set up already and want to make a change to a file.
You make the change, and run the following command:
ansible-sign project gpg-sign /path/to/project
This command updates a checksum manifest and signs it.
- You commit the change, the updated checksum manifest, and the signature to the repository.
- When you synchronize the project, automation controller pulls in the new changes, checks that the public key associated with the project in automation controller matches the private key that the checksum manifest was signed with (this prevents tampering with the checksum manifest itself), then re-calculates the checksums of each file in the manifest to ensure that the checksum matches (and thus that no file has changed). It also ensures that all files are accounted for:
Files must be included in, or excluded from, the MANIFEST.in file. For more information on this file, see Sign a project If files have been added or removed unexpectedly, verification fails.
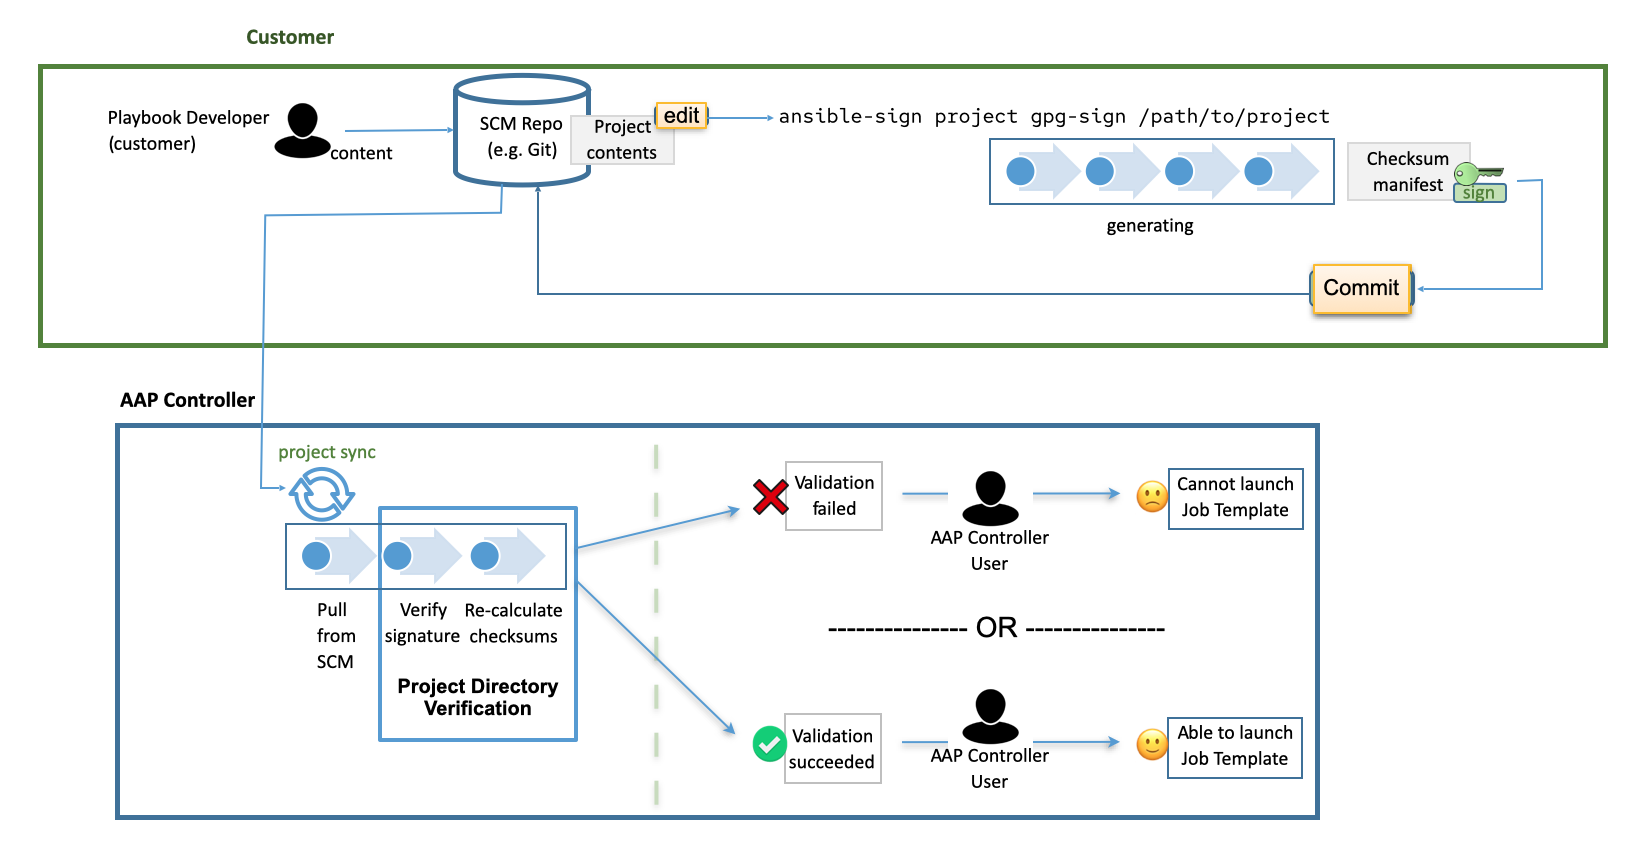
17.1. Prerequisites
RHEL nodes must properly be subscribed to:
- RHEL subscription with baseos and appstream repositories must be enabled.
Your Red Hat Ansible Automation Platform subscription and the proper channel must be enabled:
ansible-automation-platform-2.4-for-rhel-8-x86_64-rpms for RHEL 8
ansible-automation-platform-2.4-for-rhel-9-x86_64-rpms for RHEL 9
A valid GPG public or private keypair is required for signing content. For more information, see How to create GPG keypairs.
For more information about GPG keys, see the GnuPG documentation.
Verify that you have a valid GPG keypair in your default GnuPG keyring, with the following command:
gpg --list-secret-keys
If this command produces no output, or one line of output that states,
trustdb was created, then you do not have a secret key in your default keyring. In this case, refer to How to create GPG keypairs to learn how to create a new keypair before proceeding. If it produces any other output, you have a valid secret key and are ready to useansible-sign.
17.2. Adding a GPG key to automation controller
To use the GPG key for content signing and validation in automation controller, add it by running the following command in the CLI:
$ gpg --list-keys
$ gpg --export --armour <key fingerprint> > my_public_key.asc
- From the navigation panel, select → .
- Click .
- Provide a meaningful name for the new credential, for example, "Infrastructure team public GPG key".
- In the Credential Type field, select GPG Public Key.
-
Click Browse to locate and select the public key file, for example,
my_public_key.asc. Click .
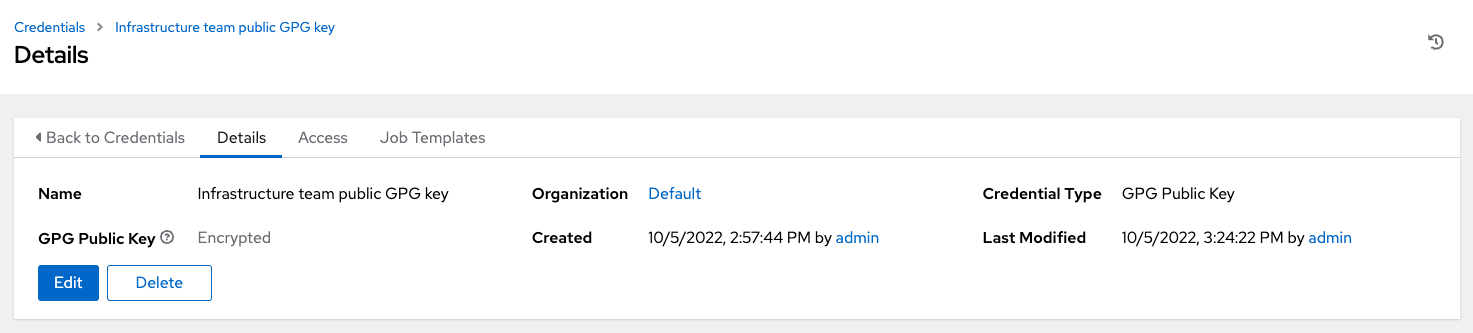
This credential can now be selected in
projects <ug_projects_add>, and content verification automatically takes place on future project synchronizations.
Use the project cache SCM timeout to control how often you want automation controller to re-validate the signed content. When a project is configured to update on launch (of any job template configured to use that project), you can enable the cache timeout setting, which sets it to update after N seconds have passed since the last update. If validation is running too frequently, you can slow down how often project updates occur by specifying the time in the Cache Timeout field of the Option Details pane of the project.
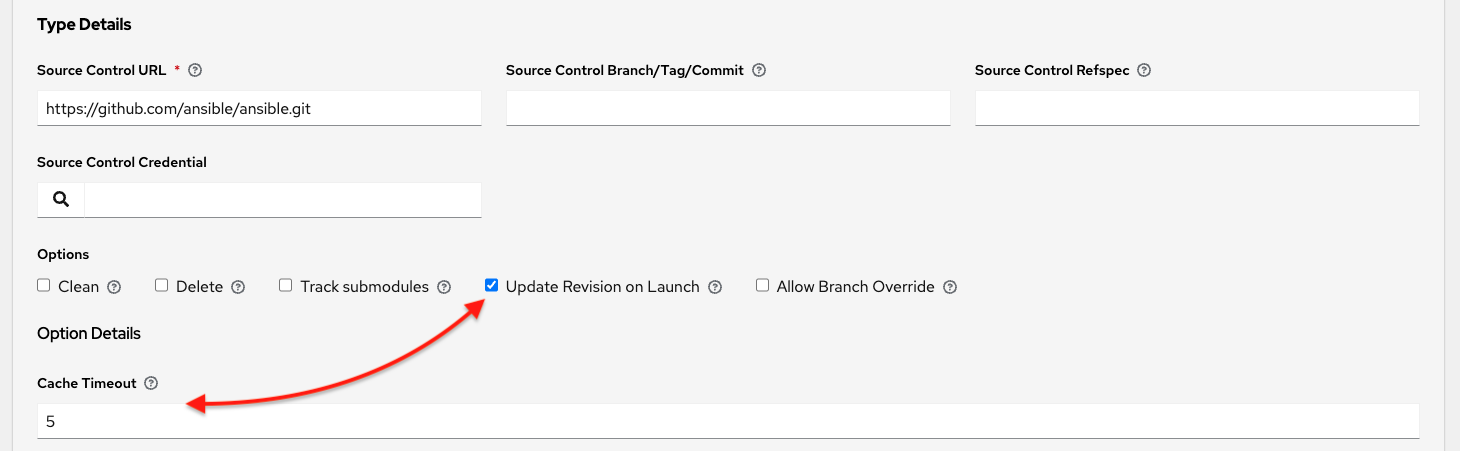
17.3. Installing the ansible-sign CLI utility
Use the ansible-sign utility to provide options for the user to sign and verify whether the project is signed.
Procedure
Run the following command to install
ansible-sign:$ dnf install ansible-sign
Verify that
ansible-signwas successfully installed using the following command:$ ansible-sign --version
Output similar to the following indicates that you have successfully installed
ansible-sign:ansible-sign 0.1
17.4. Sign a project
Signing a project involves an Ansible project directory. For more information on project directory structures, see Sample Ansible setup in the Ansible documentation.
The following sample project has a very simple structure: an inventory file, and two small playbooks under a playbooks directory:
$ cd sample-project/
$ tree -a .
.
├── inventory
└── playbooks
    └── get_uptime.yml
    └── hello.yml

    1 directory, 3 files
The commands used assume that your working directory is the root of your project. ansible-sign project commands take the project root directory as their last argument.
Use . to indicate the current working directory.
ansible-sign protects content from tampering by taking checksums (SHA256) of all of the secured files in the project, compiling those into a checksum manifest file, and then signing that manifest file.
To sign content, create a MANIFEST.in file in the project root directory that tells ansible-sign which files to protect.
Internally, ansible-sign uses the distlib.manifest module of Python’s distlib library, therefore MANIFEST.in must follow the syntax that this library specifies. For an explanation of the 'MANIFEST.in` file directives, see the Python Packaging User Guide.
In the sample project, two directives are included, resulting in the following MANIFEST.in file:
include inventory
recursive-include playbooks *.yml
With this file in place, generate your checksum manifest file and sign it. Both of these steps are achieved in a single ansible-sign command:
$ ansible-sign project gpg-sign .
Successful execution displays output similar to the following:
[OK   ] GPG signing successful!
[NOTE ] Checksum manifest: ./.ansible-sign/sha256sum.txt
[NOTE ] GPG summary: signature created
The project has now been signed.
Note that the gpg-sign subcommand resides under the project subcommand.
For signing project content, every command starts with ansible-sign project.
Every ansible-sign project command takes the project root directory . as its final argument.
ansible-sign makes use of your default keyring and looks for the first available secret key that it can find, to sign your project. You can specify a specific secret key to use with the --fingerprint option, or even a completely independent GPG home directory with the --gnupg-home option.
If you are using a desktop environment, GnuPG automatically prompts you for your secret key’s passphrase.
If this functionality does not work, or you are working without a desktop environment, for example, through SSH, you can use the -p --prompt-passphrase flag after gpg-sign , which causes ansible-sign to prompt for the password instead.
Note that an .ansible-sign directory was created in the project directory. This directory contains the checksum manifest and a detached GPG signature for it.
$ tree -a .
.
├── .ansible-sign
│   ├── sha256sum.txt
│   └── sha256sum.txt.sig
├── inventory
├── MANIFEST.in
└── playbooks
    ├── get_uptime.yml
    └── hello.yml
17.5. Verify your project
To verify that a signed Ansible project has not been altered, you can use ansible-sign to check whether the signature is valid and that the checksums of the files match what the checksum manifest says they should be. The ansible-sign project gpg-verify command can be used to automatically verify both of these conditions.
$ ansible-sign project gpg-verify .
[OK   ] GPG signature verification succeeded.
[OK   ] Checksum validation succeeded.
By default, ansible-sign makes use of your default GPG keyring to look for a matching public key. You can specify a keyring file with the --keyring option, or a different GPG home with the --gnugpg-home option.
If verification fails for any reason, information is displayed to help you debug the cause. More verbosity can be enabled by passing the global --debug flag, immediately after ansible-sign in your commands.
When a GPG credential is used in a project, content verification automatically takes place on future project synchronizations.
17.6. Automate signing
In environments with highly-trusted Continuous Integration (CI) environments such as OpenShift or Jenkins, it is possible to automate the signing process.
For example, you can store your GPG private key in a CI platform of choice as a secret, and import that into GnuPG in the CI environment. You can then run through the signing workflow within the normal CI environment.
When signing a project using GPG, the environment variable ANSIBLE_SIGN_GPG_PASSPHRASE can be set to the passphrase of the signing key. This can be injected and masked or secured in a CI pipeline.
Depending on the scenario, ansible-sign returns with a different exit-code, during both signing and verification. This can also be useful in the context of CI and automation, as a CI environment can act differently based on the failure. For example, it can send alerts for some errors, but fail silently for others.
These are the current exit codes used in ansible-sign, which can be considered stable:
| Exit code | Approximate meaning | Example scenarios |
|---|---|---|
| 0 | Success |
|
| 1 | General failure |
|
| 2 | Checksum verification failure |
|
| 3 | Signature verification failure |
|
| 4 | Signing process failure |
|
Chapter 18. Inventories
Red Hat Ansible Automation Platform works against a list of managed nodes or hosts in your infrastructure that are logically organized, using an inventory file. You can use the Red Hat Ansible Automation Platform installer inventory file to specify your installation scenario and describe host deployments to Ansible. By using an inventory file, Ansible can manage a large number of hosts with a single command. Inventories also help you use Ansible more efficiently by reducing the number of command line options you have to specify. Inventories are divided into groups and these groups contain the hosts.
Groups may be sourced manually, by entering host names into automation controller, or from one of its supported cloud providers.
If you have a custom dynamic inventory script, or a cloud provider that is not yet supported natively in automation controller, you can also import that into automation controller.
For more information, see Inventory file importing in the Automation controller Administration Guide.
From the navigation panel, select → . The Inventories window displays a list of the inventories that are currently available. You can sort the inventory list by Name, Type, or Organization.
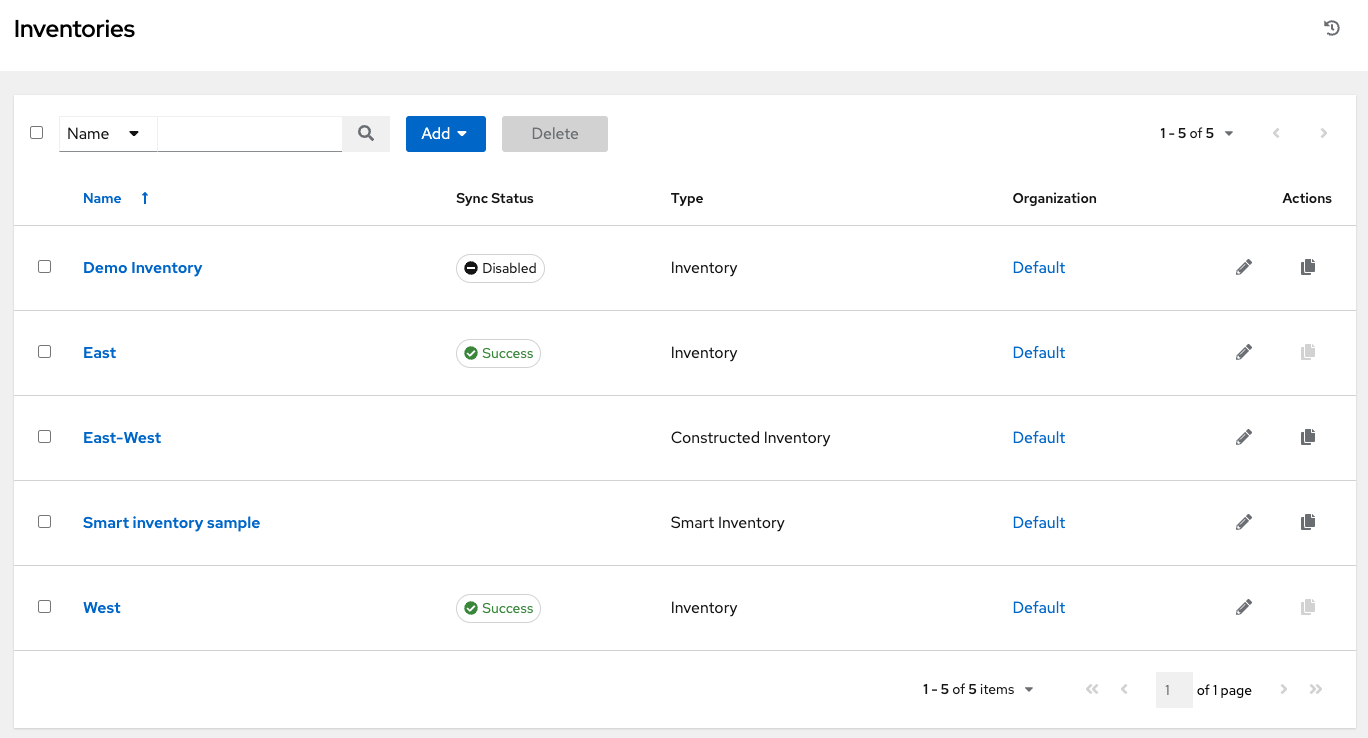
The Inventory details page includes:
- Name: The inventory name.
- Status
The statuses are:
- Success: When the inventory source sync completed successfully
- Disabled: No inventory source added to the inventory
Error: When the inventory source sync completed with error
- Type: Identifies whether it is a standard inventory, a Smart inventory, or a constructed inventory.
- Organization: The organization to which the inventory belongs.
- Actions: The following actions are available for the selected inventory:
-
Edit
: Edit the properties for the selected inventory
-
Copy
: Makes a copy of an existing inventory as a template for creating a new one
Click the Inventory name to display the Details page for the selected inventory, which shows the inventory’s groups and hosts.
18.1. Smart Inventories
Smart Inventories are collections of hosts defined by a stored search that can be viewed like a standard inventory and can be easily used with job runs. Organization administrators have admin permission for inventories in their organization and can create Smart Inventories.
A Smart Inventory is identified by KIND=smart.
You can define a Smart Inventory using the same method being used with Search. InventorySource is directly associated with an Inventory.
Smart inventories are deprecated and will be removed in a future release. Consider moving to constructed inventories for enhancements and replacement.
The Inventory model has the following new fields that are blank by default but are set accordingly for Smart Inventories:
-
kindis set tosmartfor Smart Inventories. -
host_filteris set ANDkindis set tosmartfor Smart Inventories.
The host model has a related endpoint, smart_inventories that identifies a set of all the Smart Inventories a host is associated with. The membership table is updated every time a job runs against a smart inventory.
To update the memberships more frequently, you can change the AWX_REBUILD_SMART_MEMBERSHIP file-based setting to True. (The default is False). This updates memberships if the following events occur:
- A new host is added
- An existing host is modified (updated or deleted)
- A new Smart Inventory is added
- An existing Smart Inventory is modified (updated or deleted)
You can view inventories without being editable:
- Names of Host and Group created as a result of an inventory source synchronization.
- Group records cannot be edited or moved.
You cannot create hosts from a Smart Inventory host endpoint (/inventories/N/hosts/) as with a normal inventory. The administrator of a Smart Inventory has permission to edit fields such as the name, description, variables, and the ability to delete, but does not have the permission to modify the host_filter, because that affects which hosts (that have a primary membership inside another inventory) are included in the smart inventory.
host_filter only applies to hosts inside of inventories inside the Smart Inventory’s organization.
To modify host_filter, you must be the organization administrator of the inventory’s organization. Organization administrators have implicit "admin" access to all inventories inside the organization, therefore, this does not convey any permissions they did not already possess.
Administrators of the Smart Inventory can grant other users (who are not also admins of your organization) permissions such as "use" and "adhoc" to the smart inventory. These permit the actions indicated by the role, as with other standard inventories. However, this does not grant any special permissions to hosts (which live in a different inventory). It does not permit direct read permission to hosts, or permit them to see additional hosts under /#/hosts/, although they can still view the hosts under the smart inventory host list.
In some situations, you can modify the following:
- A new Host created manually on Inventory with Inventory sources.
- Groups that were created as a result of inventory source synchronizations.
- Variables on Host and Group are not changeable, even as the local System Administrator.
Hosts associated with the Smart Inventory are manifested at view time. If the results of a Smart Inventory contains more than one host with identical hostnames, only one of the matching hosts is included as part of the Smart Inventory, ordered by Host ID.
18.1.1. Smart Host Filters
You can use a search filter to populate hosts for an inventory. This feature uses the fact searching feature.
Automation controller stores facts generated by an Ansible playbook during a Job Template in the database whenever use_fact_cache=True is set per-Job Template. New facts are merged with existing facts and are per-host. These stored facts can be used to filter hosts with the /api/v2/hosts endpoint, using the GET query parameter host_filter.
For example:
/api/v2/hosts?host_filter=ansible_facts__ansible_processor_vcpus=8
The host_filter parameter permits:
- grouping with ()
use of the boolean and operator:
-
__to reference related fields in relational fields -
__is used on ansible_facts to separate keys in a JSON key path - `[] is used to denote a json array in the path specification
-
""can be used in the value when spaces are wanted in the value
-
-
"classic" Django queries may be embedded in the
host_filter
Examples:
/api/v2/hosts/?host_filter=name=localhost
/api/v2/hosts/?host_filter=ansible_facts__ansible_date_time__weekday_number="3"
/api/v2/hosts/?host_filter=ansible_facts__ansible_processor[]="GenuineIntel"
/api/v2/hosts/?host_filter=ansible_facts__ansible_lo__ipv6[]__scope="host"
/api/v2/hosts/?host_filter=ansible_facts__ansible_processor_vcpus=8
/api/v2/hosts/?host_filter=ansible_facts__ansible_env__PYTHONUNBUFFERED="true"
/api/v2/hosts/?host_filter=(name=localhost or name=database) and (groups__name=east or groups__name="west coast") and ansible_facts__an
You can search host_filter by host name, group name, and Ansible facts.
Group search has the following format:
groups.name:groupA
Fact search has the following format:
ansible_facts.ansible_fips:false
You can also perform Smart Search searches, which consist of a host name and host description.
host_filter=name=my_host
If a search term in host_filter is of string type, to make the value a number (for example, 2.66) or a JSON keyword (for example, null, true or false) valid, add double quotations around the value to prevent the controller from parsing it as a non-string:
host_filter=ansible_facts__packages__dnsmasq[]__version="2.66"
18.1.2. Defining a host filter with ansible_facts
Use the following procedure to use ansible_facts to define the host filter when creating Smart Inventories.
Procedure
- From the navigation panel, select → .
- Select Add Smart Inventory from Add list.
In the Create new smart inventory page, click the
icon in the Smart host filter field. This opens a window to filter hosts for this inventory.
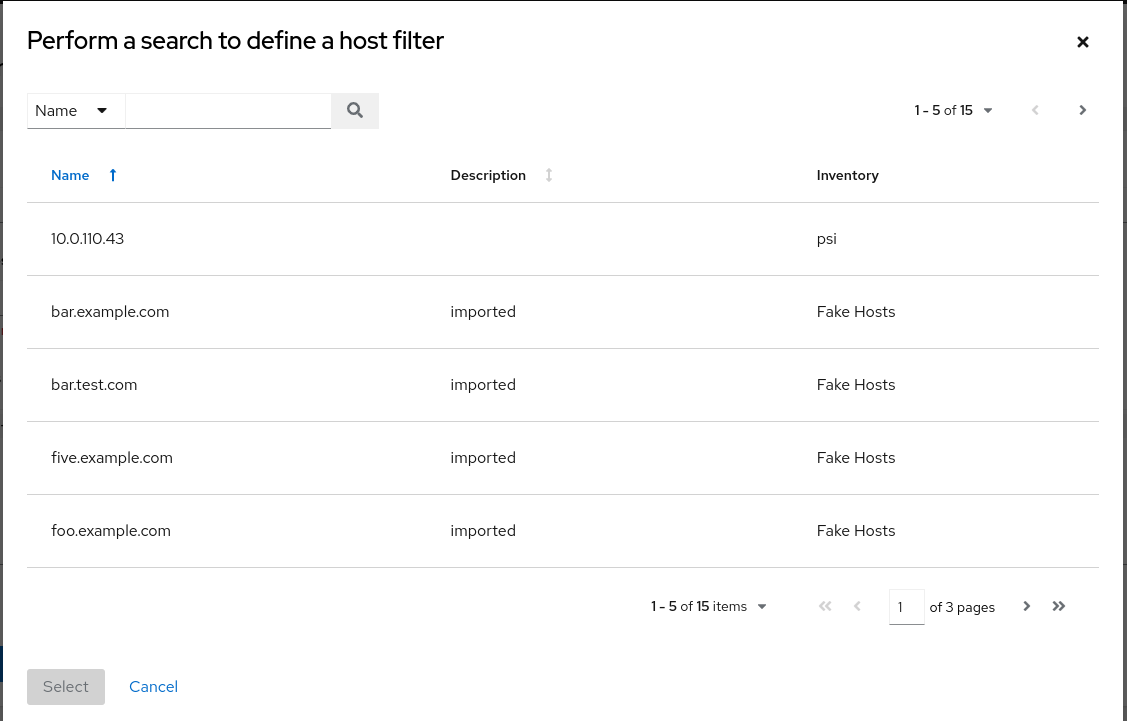
In the search menu, change the search criteria from Name to Advanced and select ansible_facts from the Key field.
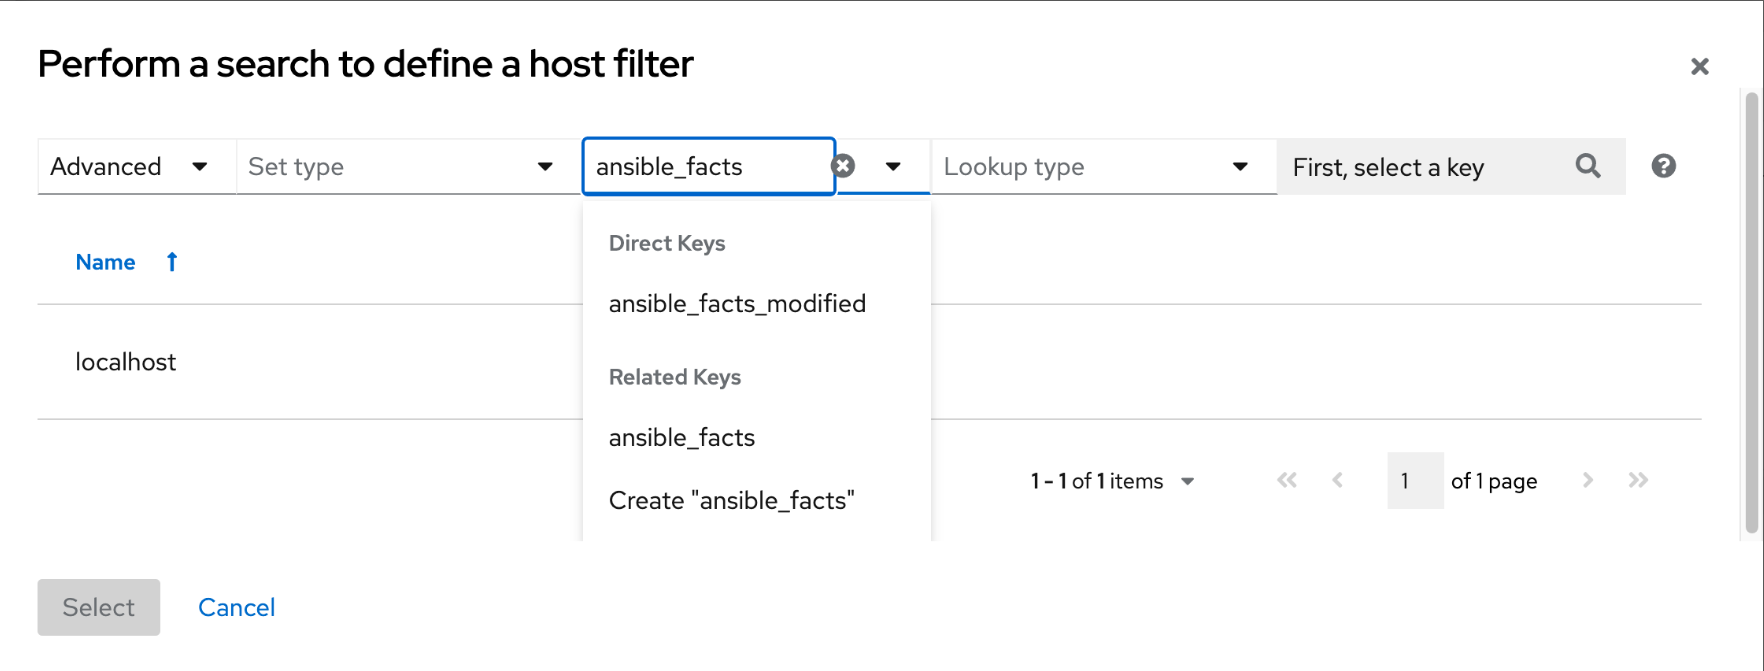
If you wanted to add the following ansible fact:
/api/v2/hosts/?host_filter=ansible_facts__ansible_processor[]="GenuineIntel"
In the search field, enter
ansible_processor[]="GenuineIntel"(no extra spaces or__before the value) and click .
The search criteria for the specified ansible fact is displayed.
- Click to add it to the Smart host filter field.
- Click .
- The Details tab of the new Smart Inventory opens and displays the specified ansible facts in the Smart host filter field.
From the Details view, you can edit the Smart host filter field by clicking Edit and delete existing filters, clear all existing filters, or add new ones.
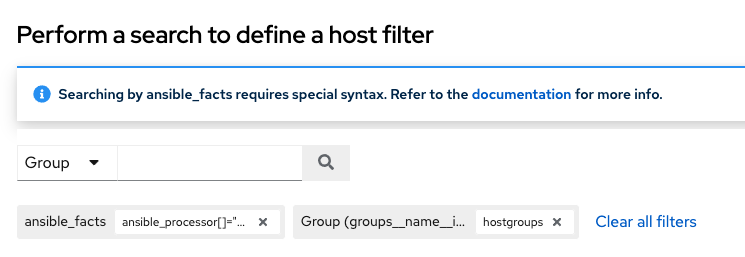
18.2. Constructed Inventories
You can create a new inventory (called a constructed inventory) from a list of input inventories.
A constructed inventory contains copies of hosts and groups in its input inventories, permitting jobs to target groups of servers across multiple inventories. Groups and hostvars can be added to the inventory content, and hosts can be filtered to limit the size of the constructed inventory.
Constructed inventories use the ansible.builtin.constructed inventory model.
The key factors of a constructed inventory are:
- The normal Ansible hostvars namespace is available
- They provide groups
Constructed inventories take source_vars and limit as inputs and transform its input_inventories into a new inventory, complete with groups. Groups (existing or constructed) can then be referenced in the limit field to reduce the number of hosts produced.
You can construct groups based on these host properties:
- RHEL major or minor versions
- Windows hosts
- Cloud based instances tagged in a certain region
- other
The following is an example of a constructed inventory details view:
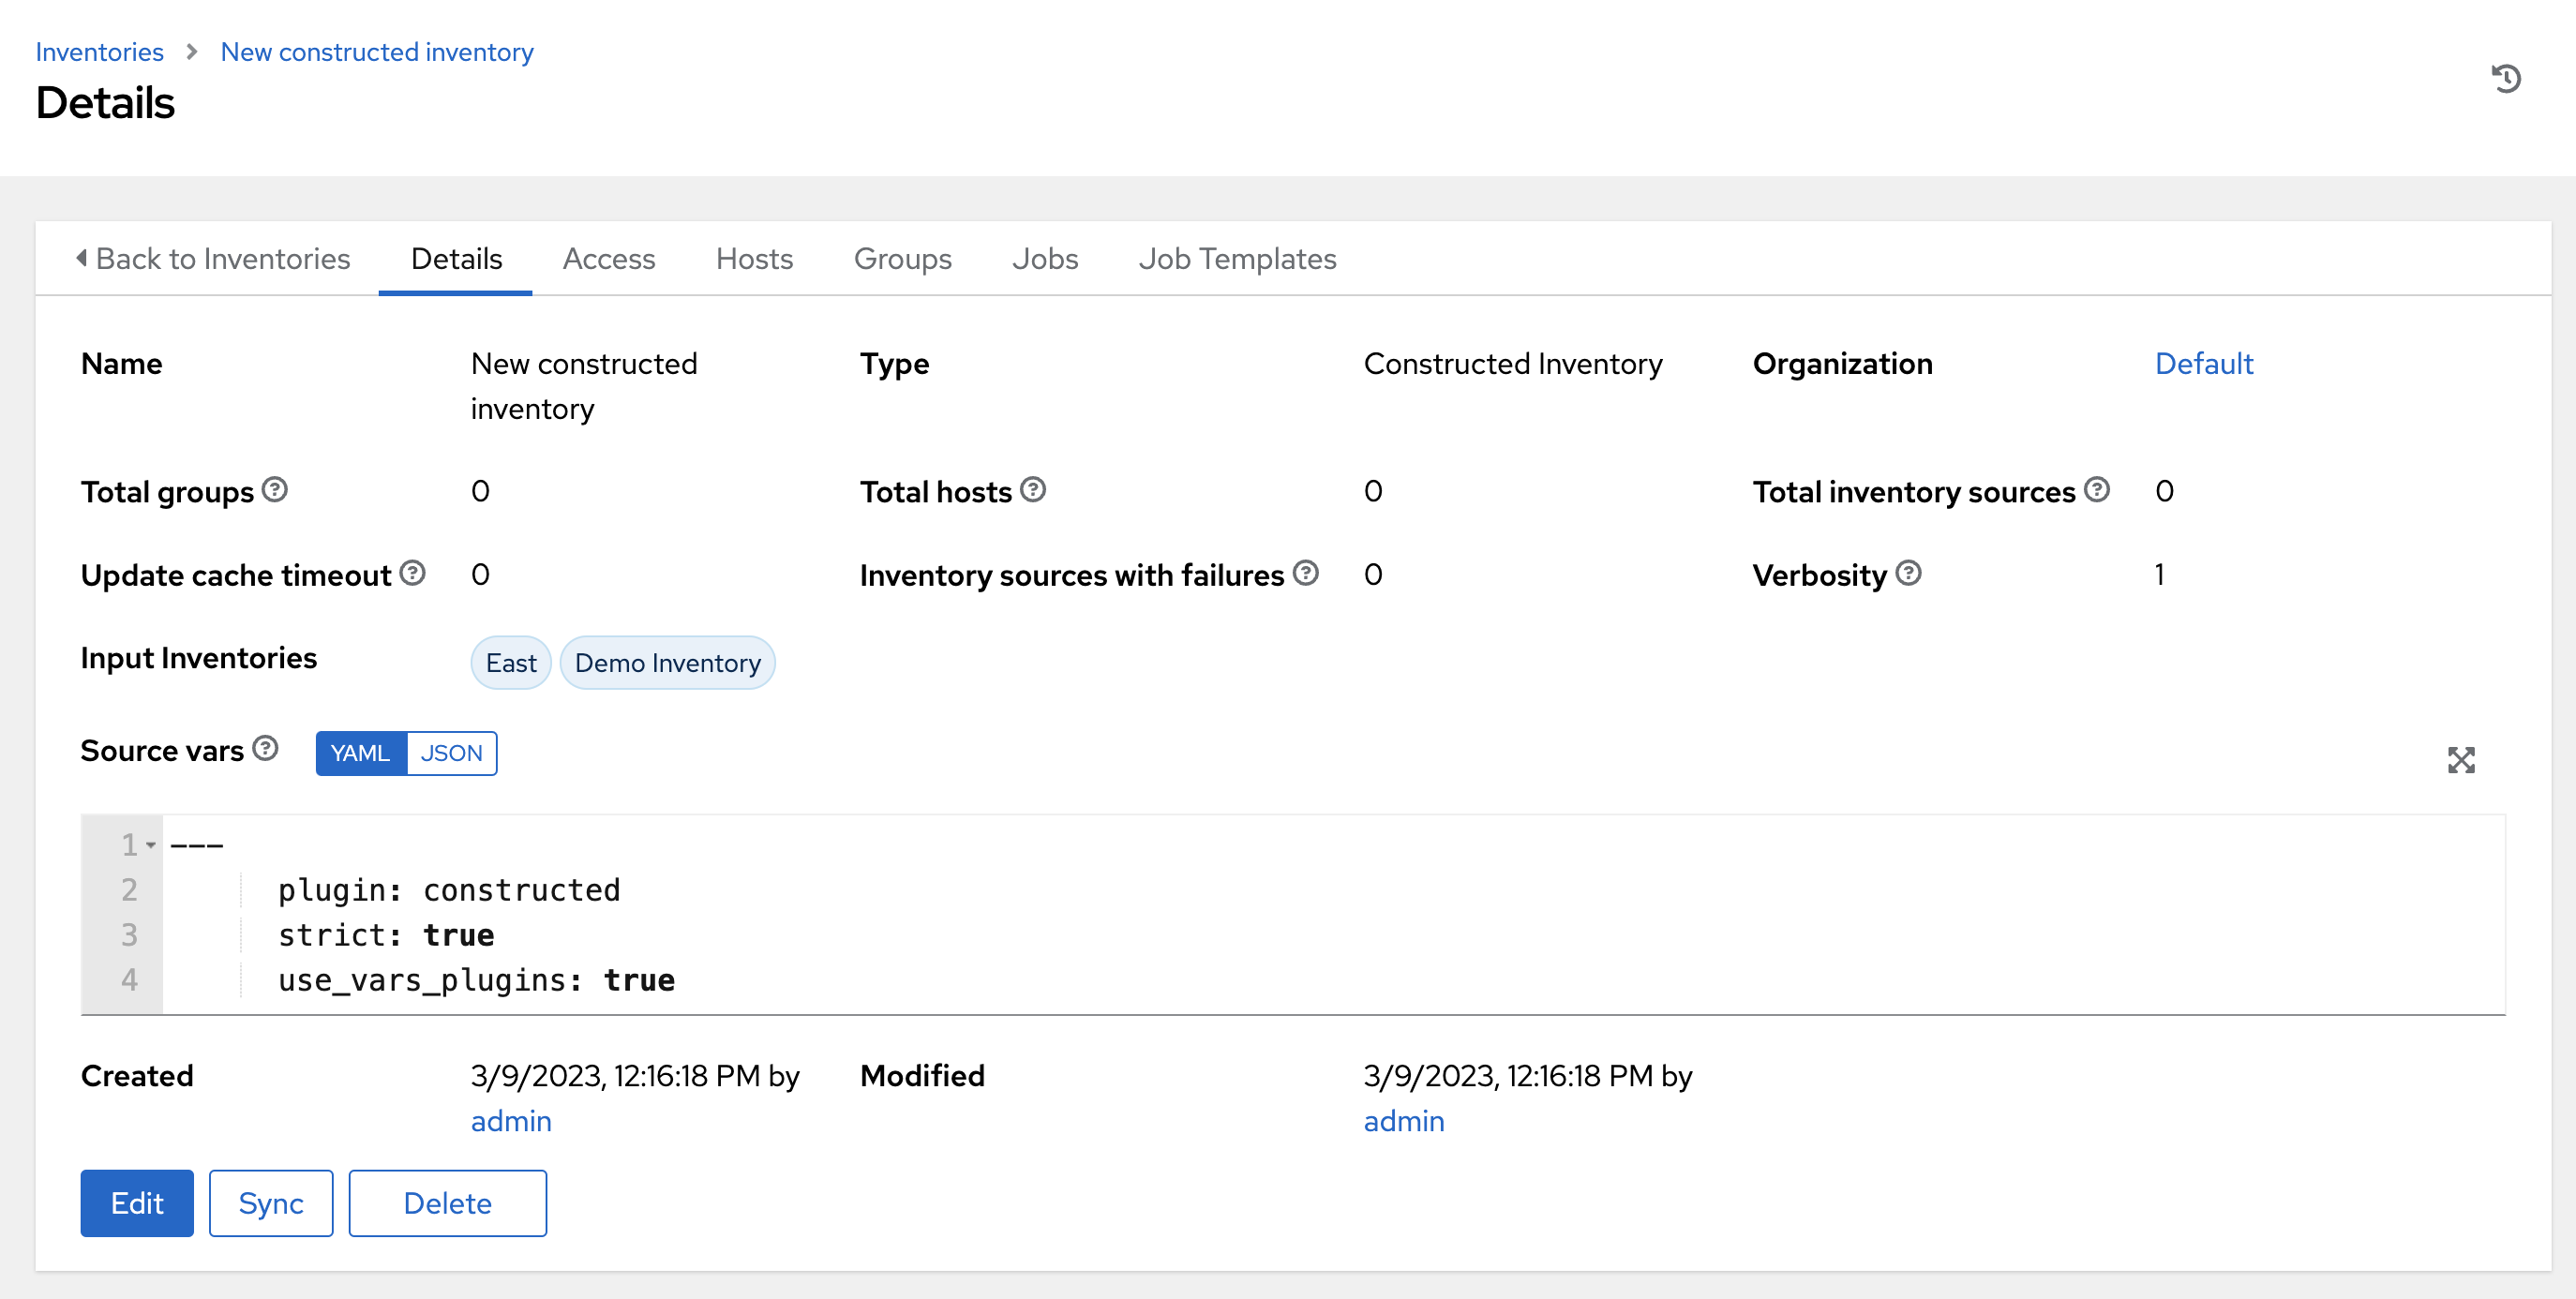
The examples described in subsequent sections are organized by the structure of the input inventories.
18.2.1. Filtering on group name and variables
You can filter on a combination of groups and variables. For example, you can filter hosts that match a group variable value and also match a host variable value.
There are two approaches to executing this filter:
-
Define two groups: one group to match the group variable and the other group to match the host variable value. Use the
limitpattern to return the hosts that are in both groups. This is the recommended approach. -
Define one group. In the definition, include the condition that the group and host variables must match specific values. Use the
limitpattern to return all the hosts in the new group.
Example:
The following inventory file defines four hosts and sets group and host variables. It defines a product group, a sustaining group, and it sets two hosts to a shutdown state.
The goal is to create a filter that returns only production hosts that are shutdown.
[account_1234]
host1
host2 state=shutdown

[account_4321]
host3
host4 state=shutdown

[account_1234:vars]
account_alias=product_dev

[account_4321:vars]
account_alias=sustaining
The goal here is to return only shutdown hosts that are present in the group with the account_alias variable equal to product_dev. There are two approaches to this, both shown in YAML format. The first one suggested is recommended.
Construct 2 groups, limit to intersection:
source_vars:plugin: constructed strict: true groups: is_shutdown: state | default("running") == "shutdown" product_dev: account_alias == "product_dev"limit:is_shutdown:&product_devThis constructed inventory input creates a group for both categories and uses the
limit(host pattern) to only return hosts that are in the intersection of those two groups, which is documented in Patterns:targeting hosts and groups.When a variable is or is not defined (depending on the host), you can give a default. For example, use
| default("running")if you know what value it should have when it is not defined. This helps with debugging, as described in Debugging tips.Construct 1 group, limit to group:
source_vars:plugin: constructed strict: true groups: shutdown_in_product_dev: state | default("running") == "shutdown" and account_alias == "product_dev"limit:shutdown_in_product_devThis input creates one group that only includes hosts that match both criteria. The limit is then just the group name by itself, returning host2. The same as the earlier approach.
18.2.2. Debugging tips
It is important to set the strict parameter to true so that you can debug problems with your templates. If the template fails to render, an error occurs in the associated inventory update for that constructed inventory.
When encountering errors, increase verbosity to get more details.
Giving a default, such as | default("running") is a generic use of Jinja2 templates in Ansible. Doing this avoids errors from the template when you set strict: true.
You can also set strict: false, and so enable the template to produce an error, which results in the host not getting included in that group. However, doing this makes it difficult to debug issues in the future if your templates continue to grow in complexity.
You might still have to debug the intended function of the templates if they are not producing the expected inventory content. For example, if a groups group has a complex filter (like shutdown_in_product_dev) but does not contain any hosts in the resultant constructed inventory, then use the compose parameter to help debug.
For example:
source_vars:
plugin: constructed
strict: true
groups:
  shutdown_in_product_dev: state | default("running") == "shutdown" and account_alias == "product_dev"
compose:
resolved_state: state | default("running")
is_in_product_dev: account_alias == "product_dev"
limit: ``
Running with a blank limit returns all hosts. You can use this to inspect specific variables on specific hosts, giving insight into where problems in the groups lie.
18.2.3. Nested groups
A nested group consists of two groups where one is a child of the other. In the following example, the child group has another host inside of it, and the parent group has a variable defined.
Because of the way Ansible core operates, the variable of the parent group is available in the namespace as a playbook is running, and can be used for filtering.
The following example inventory file, nested.yml is in YAML format:
all:
  children:
    groupA:
      vars:
        filter_var: filter_val
      children:
        groupB:
          hosts:
            host1: {}
    ungrouped:
      hosts:
        host2: {}
Because host1 is in groupB, it is also in groupA.
Filter on nested group names
Use the following YAML format to filter on nested group names:
`source_vars`:

plugin: constructed

`limit`: `groupA`
Filter on nested group property
Use the following YAML format to filter on a group variable, even if the host is indirectly a member of that group.
In the inventory content, note that host2 is not expected to have the variable filter_var defined, because it is not in any of the groups. Because strict: true is used, use a default value so that hosts without that variable are defined. Using this, host2, returns false from the expression, instead of producing an error. host1 inherits the variable from its groups, and is returned.
source_vars:

plugin: constructed
strict: true
groups:
  filter_var_is_filter_val: filter_var | default("") == "filter_val"

limit: filter_var_is_filter_val
18.2.4. Ansible facts
To create an inventory with Ansible facts, you must run a playbook against the inventory that has the setting gather_facts: true. The facts differ system-to-system. The following examples are not intended to address all known scenarios.
18.2.4.1. Filter on environment variables
The following example involves filtering on environmental variables using the YAML format:
source_vars:

plugin: constructed
strict: true
groups:
  hosts_using_xterm: ansible_env.TERM == "xterm"

limit: hosts_using_xterm
18.2.4.2. Filter hosts by processor type
The following example involves filtering hosts by processor type (Intel) using the YAML format:
source_vars:

plugin: constructed
strict: true
groups:
  intel_hosts: "GenuineIntel" in ansible_processor

limit: intel_hosts
Hosts in constructed inventories are not counted against your license allotment because they are referencing the original inventory host. Additionally, hosts that are disabled in the original inventories are not included in the constructed inventory.
An inventory update run using ansible-inventory creates the constructed inventory contents.
This is always configured to update-on-launch before a job, but you can still select a cache timeout value in case this takes too long.
When creating a constructed inventory, the API ensures that it always has one inventory source associated with it. All inventory updates have an associated inventory source, and the fields needed for constructed inventory (source_vars and limit) are fields already present on the inventory source model.
18.3. Inventory Plugins
Inventory updates use dynamically-generated YAML files which are parsed by their respective inventory plugin. In automation controller v4.4, you can provide the inventory plugin configuration directly to automation controller using the inventory source source_vars for the following inventory sources:
Newly created configurations for inventory sources contain the default plugin configuration values. If you want your newly created inventory sources to match the output of a legacy source, you must apply a specific set of configuration values for that source. To ensure backward compatibility, automation controller uses "templates" for each of these sources to force the output of inventory plugins into the legacy format.
For more information on sources and their respective templates, see Supported inventory plugin templates.
source_vars that contain plugin: foo.bar.baz as a top-level key are replaced with the fully-qualified inventory plugin name at runtime based on the InventorySource source. For example, if ec2 is selected for the InventorySource then, at run-time, plugin is set to amazon.aws.aws_ec2.
18.4. Add a new inventory
Adding a new inventory involves the following components:
Use the following procedure to create a inventory:
Procedure
- From the navigation panel, select → . The Inventories window displays a list of the inventories that are currently available.
- Click , and select the type of inventory to create.
Enter the appropriate details into the following fields:
- Name: Enter a name appropriate for this inventory.
- Optional: Description: Enter an arbitrary description as appropriate.
- Organization: Required. Choose among the available organizations.
Only applicable to Smart Inventories: Smart Host Filter: Click the
icon to open a separate window to filter hosts for this inventory. These options are based on the organization you chose.
Filters are similar to tags in that tags are used to filter certain hosts that contain those names. Therefore, to populate the Smart Host Filter field, specify a tag that contains the hosts you want, not the hosts themselves. Enter the tag in the Search field and click . Filters are case-sensitive. For more information, see Smart host filters.
Instance Groups: Click the
icon to open a separate window. Select the instance group or groups for this inventory to run on. If the list is extensive, use the search to narrow the options. You can select multiple instance groups and sort them in the order that you want them run.
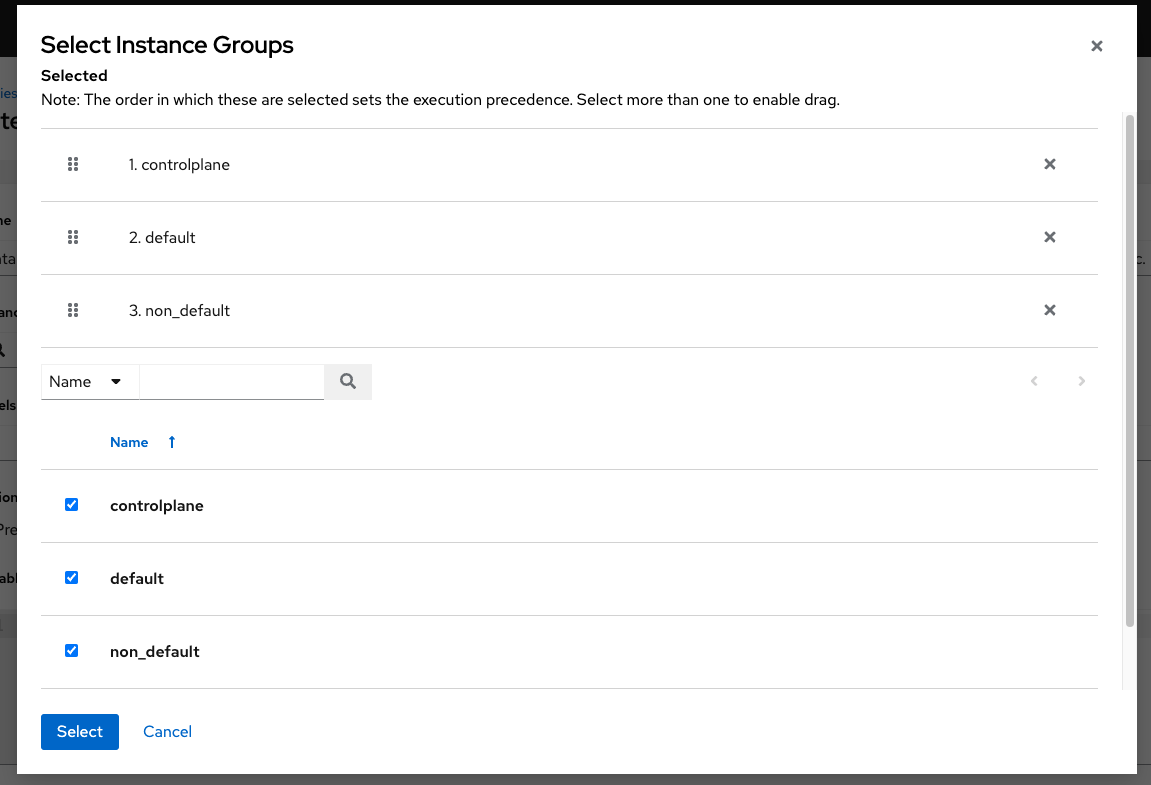
- Optional: Labels: Supply labels that describe this inventory, so they can be used to group and filter inventories and jobs.
-
Only applicable to constructed inventories: Input inventories: Specify the source inventories to include in this constructed inventory. Click the
icon to select from available inventories. Empty groups from input inventories are copied into the constructed inventory.
- Optional:(Only applicable to constructed inventories): Cached timeout (seconds): Set the length of time you want the cache plugin data to timeout.
Only applicable to constructed inventories: Verbosity: Control the level of output that Ansible produces as the playbook executes related to inventory sources associated with constructed inventories. Select the verbosity from Normal to various Verbose or Debug settings. This only appears in the "details" report view.
- Verbose logging includes the output of all commands.
- Debug logging is exceedingly verbose and includes information on SSH operations that can be useful in certain support instances. Most users do not need to see debug mode output.
- Only applicable to constructed inventories: Limit: Restricts the number of returned hosts for the inventory source associated with the constructed inventory. You can paste a group name into the limit field to only include hosts in that group. For more information, ses the Source vars setting.
Only applicable to standard inventories: Options: Check the Prevent Instance Group Fallback option to enable only the instance groups listed in the Instance Groups field to execute the job. If unchecked, all available instances in the execution pool will be used based on the hierarchy described in Control where a job runs in the Automation controller Administration Guide. Click the
icon for additional information.
NoteSet the
prevent_instance_group_fallbackoption for Smart Inventories through the API.Variables (Source vars for constructed inventories):
- Variables Variable definitions and values to apply to all hosts in this inventory. Enter variables using either JSON or YAML syntax. Use the radio button to toggle between the two.
-
Source vars for constructed inventories creates groups, specifically under the
groupskey of the data. It accepts Jinja2 template syntax, renders it for every host, makes atrueorfalseevaluation, and includes the host in the group (from the key of the entry) if the result istrue. This is particularly useful because you can paste that group name into the limit field to only include hosts in that group. See Example 1 in Smart host filters.
- Click .
After saving the new inventory, you can proceed with configuring permissions, groups, hosts, sources, and view completed jobs, if applicable to the type of inventory.
18.4.1. Adding permissions to inventories
Use the following procedure to add permissions to inventories:
Procedure
- From the navigation panel, select → .
- Select a template, and in the Access tab, click .
- Select a user or team to add and click .
- Select the check box next to a name to add one or more users or teams from the list as members.
Click .
In this example, two users have been selected to be added.
Select the roles you want the selected users or teams to have. Scroll down for a complete list of roles. Different resources have different options available.
- Click to apply the roles to the selected users or teams and to add them as members.
The Add Users or Teams window closes to display the updated roles assigned for each user and team.
Removing a permission
-
To remove roles for a particular user, click the
icon next to its resource.
This launches a confirmation window, asking you to confirm the disassociation.
18.4.2. Adding groups to inventories
Inventories are divided into groups, which can contain hosts and other groups. Groups are only applicable to standard inventories and are not a configurable directly through a Smart Inventory. You can associate an existing group through hosts that are used with standard inventories.
The following actions are available for standard inventories:
- Create a new Group
- Create a new Host
- Run a command on the selected Inventory
- Edit Inventory properties
- View activity streams for Groups and Hosts
- Obtain help building your Inventory
Inventory sources are not associated with groups. Spawned groups are top-level and can still have child groups. All of these spawned groups can have hosts.
Use the following procedure to create a new group for an inventory:
Procedure
- Select the Inventory name you want to add groups to.
- In the Inventory Details page, select the Groups tab.
- Click to open the Create Group window.
Enter the appropriate details:
- Name: Required
- Optional: Description: Enter a description as appropriate.
- Variables: Enter definitions and values to be applied to all hosts in this group. Enter variables using either JSON or YAML syntax. Use the radio button to toggle between the two.
- Click .
- When you have added a group to a template, the Group details page is displayed.
18.4.2.1. Adding groups within groups
Use the following procedure to add groups within groups:
Procedure
- When you have added a group to a template, the Group details page is displayed.
- Select the Related Groups tab.
- Click .
- Select whether to add a group that already exists in your configuration or create a new group.
If creating a new group, enter the appropriate details into the required and optional fields:
- Name (required):
- Optional: Description: Enter a description as appropriate.
- Variables: Enter definitions and values to be applied to all hosts in this group. Enter variables using either JSON or YAML syntax. Use the radio button to toggle between the two.
- Click .
- The Create Group window closes and the newly created group is displayed as an entry in the list of groups associated with the group that it was created for.
If you choose to add an existing group, available groups appear in a separate selection window.
When a group is selected, it is displayed in the list of groups associated with the group.
- To configure additional groups and hosts under the subgroup, click the name of the subgroup from the list of groups and repeat the steps listed in this section.
18.4.2.2. View or edit inventory groups
The groups list view displays all your inventory groups, or you can filter it to only display the root groups. An inventory group is considered a root group if it is not a subset of another group.
You can delete a subgroup without concern for dependencies, because automation controller looks for dependencies such as child groups or hosts. If any exist, a confirmation window displays for you to choose whether to delete the root group and all of its subgroups and hosts; or to promote the subgroups so they become the top-level inventory groups, along with their hosts.
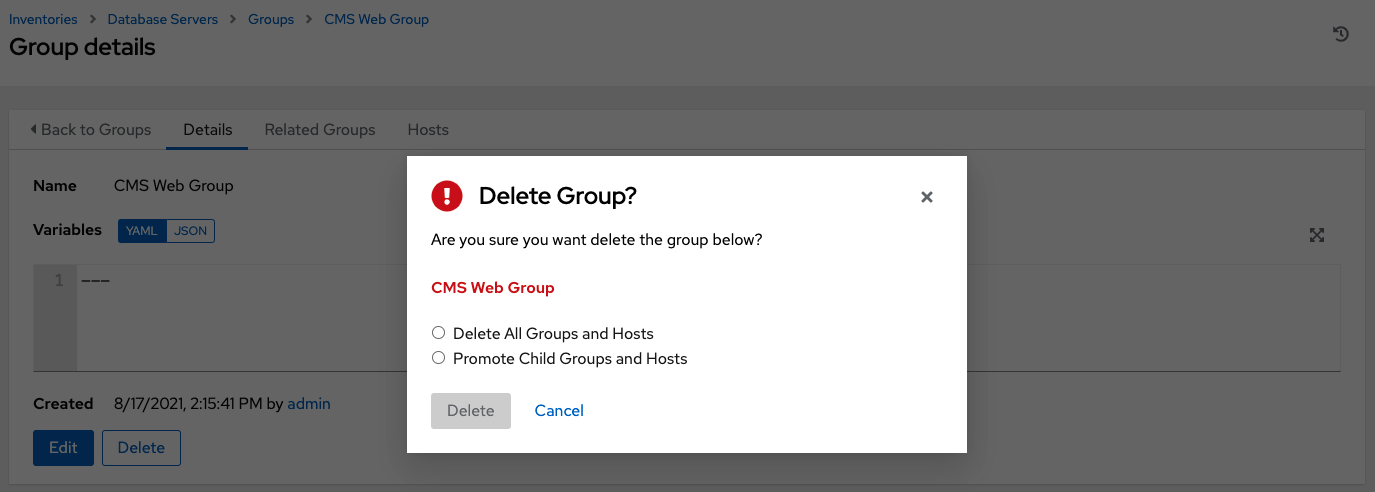
18.4.3. Adding hosts to an inventory
You can configure hosts for the inventory as well as for groups and groups within groups.
Use the following procedure to add hosts:
Procedure
- Select the Inventory name you want to add groups to.
- In the Inventory Details page, select the Hosts tab.
- Click .
- Select whether to add a host that already exists in your configuration or create a new host.
- If creating a new host, set the toggle to On to include this host while running jobs.
Enter the appropriate details:
- Host Name (required):
- Optional: Description: Enter a description as appropriate.
Variables: Enter definitions and values to be applied to all hosts in this group, as in the following example:
{
  ansible_user : <username to ssh into>
  ansible_ssh_pass : <password for the username>
  ansible_become_pass: <password for becoming the root>
}
Enter variables using either JSON or YAML syntax. Use the radio button to toggle between the two.
- Click .
The Create Host window closes and the newly created host is displayed in the list of hosts associated with the group that it was created for.
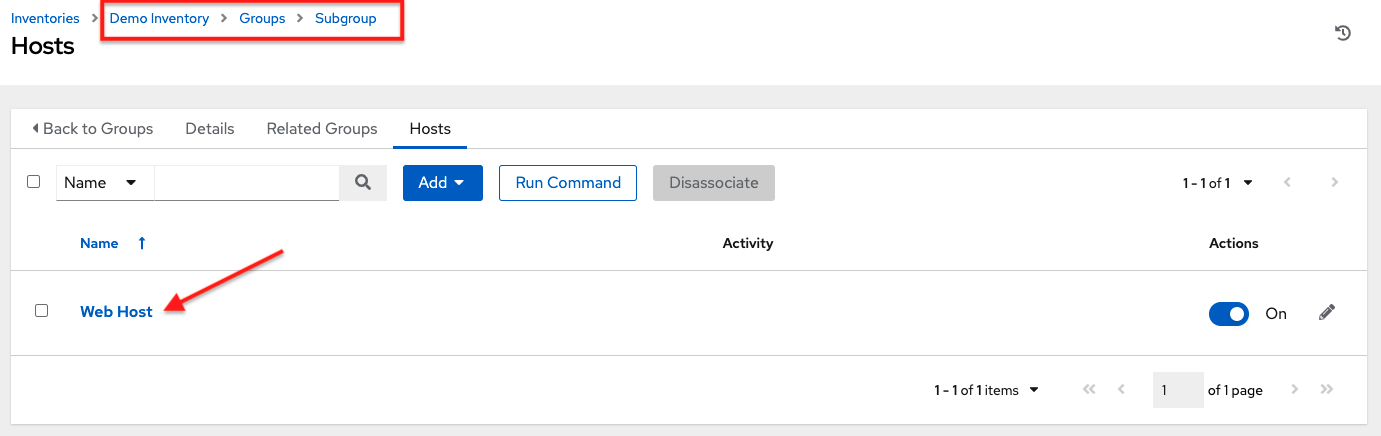
If you choose to add an existing host, available hosts appear in a separate selection window.
When a host is selected, it is displayed in the list of hosts associated with the group.
You can disassociate a host from this screen by selecting the host and clicking the
icon.
NoteYou can also run ad hoc commands from this screen. For more information, see [Running ad hoc commands].
To configure additional groups for the host, click the name of the host from the list of hosts.
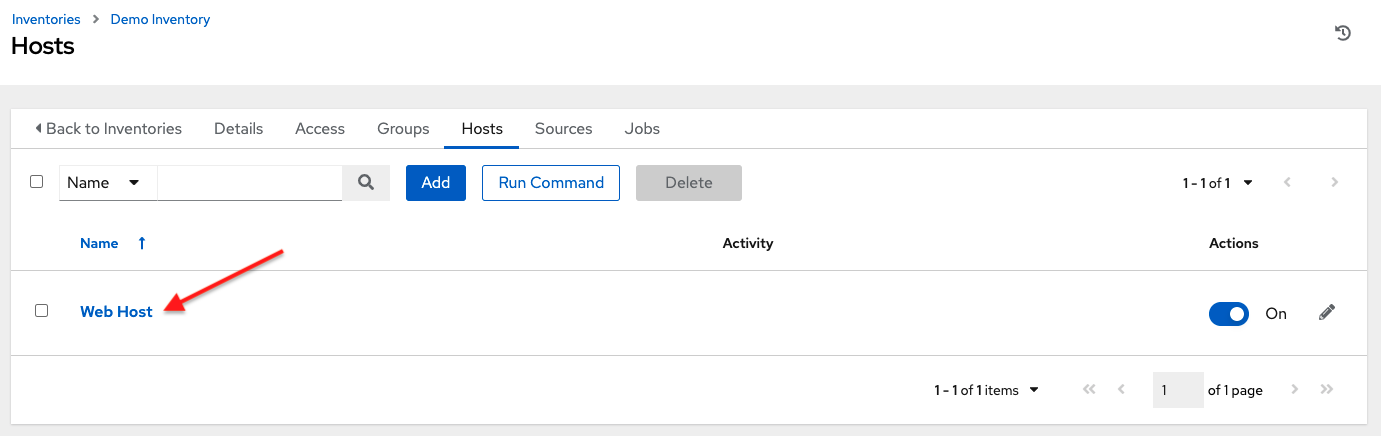
This opens the Details tab of the selected host.
- Select the Groups tab to configure groups for the host.
Click to associate the host with an existing group. Available groups appear in a separate selection window.
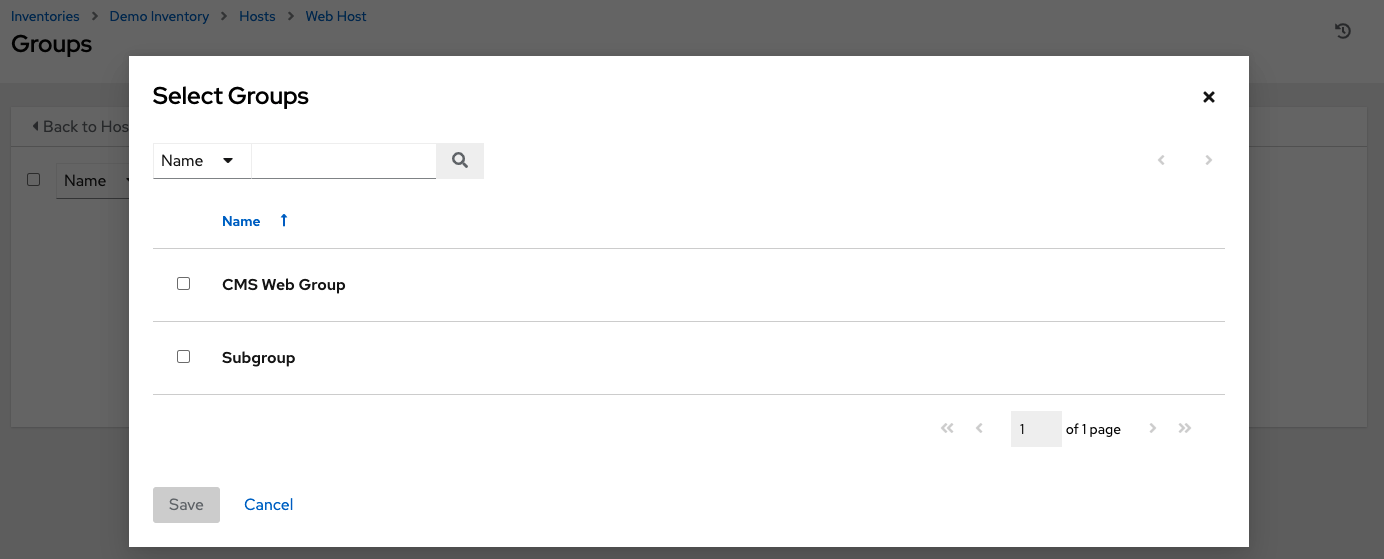
Select the groups to associate with the host and click .
When a group is associated, it is displayed in the list of groups associated with the host.
- If a host was used to run a job, you can view details about those jobs in the Completed Jobs tab of the host.
Click to view details about each job.

You can create hosts in bulk using the newly added endpoint in the API, /api/v2/bulk/host_create. This endpoint accepts JSON and you can specify the target inventory and a list of hosts to add to the inventory. These hosts must be unique within the inventory. Either all hosts are added, or an error is returned indicating why the operation was not able to complete. Use the OPTIONS request to return the relevant schema.
For more information, see Bulk endpoints in the Automation Controller API Guide.
18.4.4. Adding a source
Inventory sources are not associated with groups. Spawned groups are top-level and can still have child groups. All of these spawned groups can have hosts. Adding a source to an inventory only applies to standard inventories. Smart inventories inherit their source from the standard inventories they are associated with.
Use the following procedure to configure the source for the inventory:
Procedure
- Select the Inventory name you want to add a source to.
- In the Inventory Details page, select the Sources tab.
Click . This opens the Create Source window.
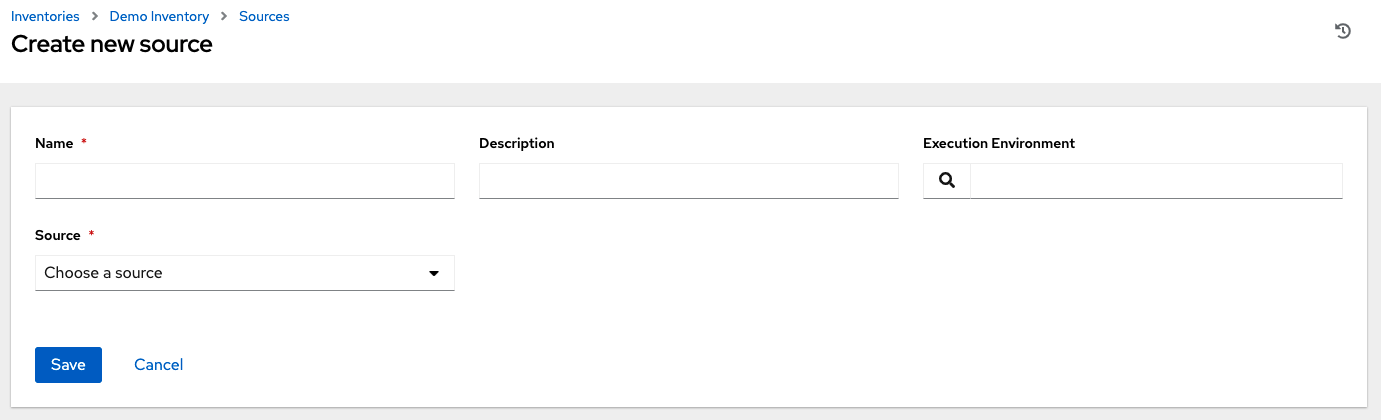
Enter the appropriate details:
- Name (required):
- Optional: Description: Enter a description as appropriate.
-
Optional: Execution Environment: Click the
icon or enter the name of the execution environment with which you want to run your inventory imports. For more information on building an execution environment, see Execution environments.
- Source: Choose a source for your inventory. For more information on sources, and supplying the appropriate information, see Inventory sources.
- When the information for your chosen Inventory sources is complete, you can optionally specify other common parameters, such as verbosity, host filters, and variables.
- Use the Verbosity menu to select the level of output on any inventory source’s update jobs.
- Use the Host Filter field to specify only matching host names to be imported into automation controller.
-
In the Enabled Variable field, specify that automation controller retrieves the enabled state from the dictionary of host variables. You can specify the enabled variable using dot notation as 'foo.bar', in which case the lookup searches nested dictionaries, equivalent to:
from_dict.get('foo', {}).get('bar', default). If you specified a dictionary of host variables in the Enabled Variable field, you can provide a value to enable on import. For example, for
enabled_var='status.power_state'and'enabled_value='powered_on'in the following host variables, the host is markedenabled:{ "status": { "power_state": "powered_on", "created": "2020-08-04T18:13:04+00:00", "healthy": true }, "name": "foobar", "ip_address": "192.168.2.1" }If
power_stateis any value other thanpowered_on, then the host is disabled when imported into automation controller. If the key is not found, then the host is enabled.All cloud inventory sources have the following update options:
Overwrite: If checked, any hosts and groups that were previously present on the external source but are now removed, are removed from the automation controller inventory. Hosts and groups that were not managed by the inventory source are promoted to the next manually created group, or, if there is no manually created group to promote them into, they are left in the "all" default group for the inventory.
When not checked, local child hosts and groups not found on the external source remain untouched by the inventory update process.
Overwrite Variables: If checked, all variables for child groups and hosts are removed and replaced by those found on the external source.
When not checked, a merge is performed, combining local variables with those found on the external source.
Update on Launch: Each time a job runs using this inventory, refresh the inventory from the selected source before executing job tasks.
To avoid job overflows if jobs are spawned faster than the inventory can synchronize, selecting this enables you to configure a Cache Timeout to previous cache inventory synchronizations for a certain number of seconds.
The Update on Launch setting refers to a dependency system for projects and inventory, and does not specifically exclude two jobs from running at the same time.
If a cache timeout is specified, then the dependencies for the second job are created, and it uses the project and inventory update that the first job spawned.
Both jobs then wait for that project or inventory update to finish before proceeding. If they are different job templates, they can then both start and run at the same time, if the system has the capacity to do so. If you intend to use automation controller’s provisioning callback feature with a dynamic inventory source, Update on Launch must be set for the inventory group.
If you synchronize an inventory source that uses a project that has Update On Launch set, then the project might automatically update (according to cache timeout rules) before the inventory update starts.
You can create a job template that uses an inventory that sources from the same project that the template uses. In such a case, the project updates and then the inventory updates (if updates are not already in progress, or if the cache timeout has not already expired).
- Review your entries and selections. This enables you to configure additional details, such as schedules and notifications.
To configure schedules associated with this inventory source, click the Schedules tab:
- If schedules are already set up, then review, edit, enable or disable your schedule preferences.
- If schedules have not been set up, for more information about setting up schedules, see Schedules.
18.4.5. Configuring notifications for the source
Use the following procedure to configure notifications for the source:
In the Inventory Details page, select the Notifications tab.
NoteThe Notifications tab is only present when you have saved the newly-created source.
- If notifications are already set up, use the toggles to enable or disable the notifications to use with your particular source. For more information, see Enable and Disable Notifications.
- If notifications have not been set up, see Notifications for more information.
- Review your entries and selections.
- Click .
When a source is defined, it is displayed in the list of sources associated with the inventory. From the Sources tab you can perform a sync on a single source, or sync all of them at once. You can also perform additional actions such as scheduling a sync process, and edit or delete the source.
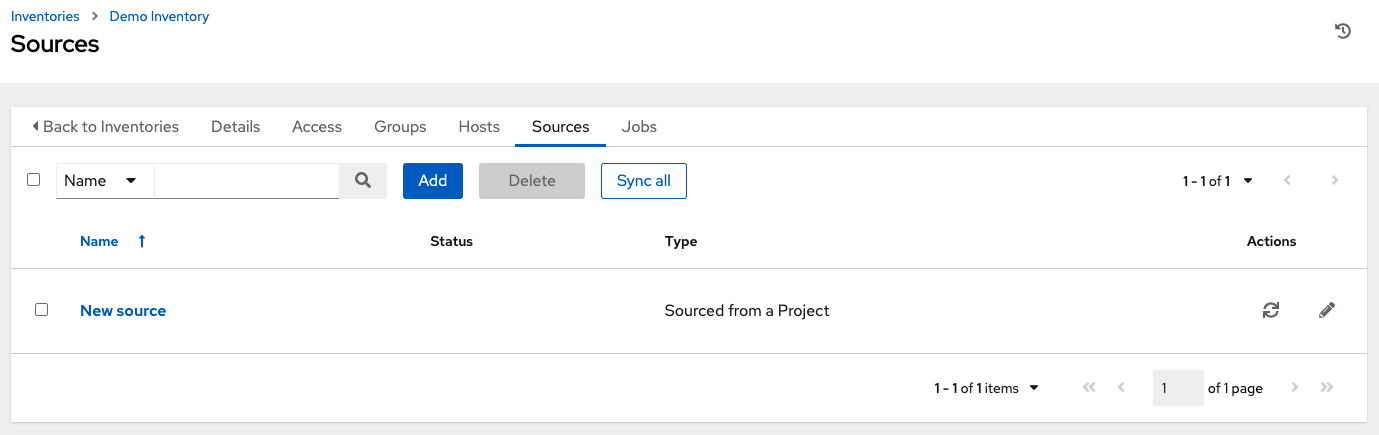
18.4.5.1. Inventory sources
Choose a source which matches the inventory type against which a host can be entered:
18.4.5.1.1. Sourcing from a Project
An inventory that is sourced from a project means that it uses the SCM type from the project it is tied to. For example, if the project’s source is from GitHub, then the inventory uses the same source.
Use the following procedure to configure a project-sourced inventory:
Procedure
- In the Create new source page, select Sourced from a Project from the Source list.
The Create Source window expands with additional fields. Enter the following details:
Optional: Source Control Branch/Tag/Commit: Enter the SCM branch, tags, commit hashes, arbitrary refs, or revision number (if applicable) from the source control (Git or Subversion) to checkout.
This field only displays if the sourced project has the Allow Branch Override option checked. For further information, see SCM Types - Git and Subversion.
Some commit hashes and refs might not be available unless you also provide a custom refspec in the next field. If left blank, the default is HEAD which is the last checked out Branch/Tag/Commit for this project.
- Optional: Credential: Specify the credential to use for this source.
-
Project (required): Pre-populates with a default project, otherwise, specify the project this inventory is using as its source. Click the
icon to choose from a list of projects. If the list is extensive, use the search to narrow the options.
Inventory File (required): Select an inventory file associated with the sourced project. If not already populated, you can type it into the text field within the menu to filter extraneous file types. In addition to a flat file inventory, you can point to a directory or an inventory script.
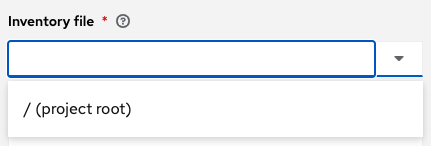
- Optional: You can specify the verbosity, host filter, enabled variable/value, and update options as described in Adding a source.
- Optional: To pass to the custom inventory script, you can set environment variables in the Environment Variables field. You can also place inventory scripts in source control and then run it from a project. For more information, see Inventory File Importing in Automation controller Administration Guide.
If you are executing a custom inventory script from SCM, ensure that you set the execution bit (chmod +x) for the script in your upstream source control.
If you do not, automation controller throws a [Errno 13] Permission denied error on execution.
18.4.5.1.2. Amazon Web Services EC2
Use the following procedure to configure an AWS EC2-sourced inventory,
Procedure
- In the Create new source page, select Amazon EC2 from the Source list.
The Create Source window expands with additional fields. Enter the following details:
Optional: Credential: Choose from an existing AWS credential (for more information, see Credentials).
If automation controller is running on an EC2 instance with an assigned IAM Role, the credential can be omitted, and the security credentials from the instance metadata are used instead. For more information on using IAM Roles, see IAM_Roles_for_Amazon_EC2_documentation_at_Amazon.
- Optional: You can specify the verbosity, host filter, enabled variables or values, and update options as described in Adding a source.
-
Use the Source Variables field to override variables used by the
aws_ec2inventory plugin. Enter variables using either JSON or YAML syntax. Use the radio button to toggle between the two. For more information on these variables, see the aws inventory plugin documentation.
If you only use include_filters, the AWS plugin always returns all the hosts. To use this correctly, the first condition on the or must be on filters and then build the rest of the OR conditions on a list of include_filters.
18.4.5.1.3. Google Compute Engine
Use the following procedure to configure a Google-sourced inventory.
Procedure
- In the Create new source page, select Google Compute Engine from the Source.
- The Create Source window expands with the required Credential field. Choose from an existing GCE Credential. For more information, see Credentials.
- Optional: You can specify the verbosity, host filter, enabled variables or values, and update options as described in Adding a source.
-
Use the Source Variables field to override variables used by the
gcp_computeinventory plugin. Enter variables using either JSON or YAML syntax. Use the radio button to toggle between the two. For more information on these variables, see the gcp_compute inventory plugin documentation.
18.4.5.1.4. Microsoft Azure resource manager
Use the following procedure to configure an Azure Resource Manager-sourced inventory:
Procedure
- In the Create new source page, select Microsoft Azure Resource Manager from the Source list.
- The Create Source window expands with the required Credential field. Choose from an existing Azure Credential. For more information, see Credentials.
- Optional: You can specify the verbosity, host filter, enabled variables or values, and update options as described in Adding a source.
-
Use the Source Variables field to override variables used by the
azure_rminventory plugin. Enter variables using either JSON or YAML syntax. Use the radio button to toggle between the two. For more information on these variables, see the azure_rm inventory plugin documentation.
18.4.5.1.5. VMware vCenter
Use the following procedure to configure a VMWare-sourced inventory.
Procedure
- In the Create new source page, select VMware vCenter from the Source list.
- The Create Source window expands with the required Credential field. Choose from an existing VMware Credential. For more information, see Credentials.
- Optional: You can specify the verbosity, host filter, enabled variables or values, and update options as described in Adding a source.
-
Use the Source Variables field to override variables used by the
vmware_inventoryinventory plugin. Enter variables using either JSON or YAML syntax. Use the radio button to toggle between the two. For more information on these variables, see the vmware_inventory inventory plugin.
VMWare properties have changed from lower case to camelCase. Automation controller provides aliases for the top-level keys, but lower case keys in nested properties have been discontinued. For a list of valid and supported properties, refer to Using Virtual machine attributes in VMware dynamic inventory plugin.
18.4.5.1.6. Red Hat Satellite 6
Use the following procedure to configure a Red Hat Satellite-sourced inventory.
Procedure
- In the Create new source page, select Red Hat Satellite from the Source list.
- The Create Source window expands with the required Credential field. Choose from an existing Satellite Credential. For more information, see Credentials.
- Optional: You can specify the verbosity, host filter, enabled variables or values, and update options as described in Adding a source.
-
Use the Source Variables field to specify parameters used by the
foremaninventory source. Enter variables using either JSON or YAML syntax. Use the radio button to toggle between the two. For more information on these variables, see the Foreman inventory source in the Ansible documentation.
If you encounter an issue with the automation controller inventory not having the "related groups" from Satellite, you might need to define these variables in the inventory source. For more information, see Red Hat Satellite 6.
If you see the message, "no foreman.id" variable(s) when syncing the inventory, refer to the solution on the Red Hat Customer Portal at: https://access.redhat.com/solutions/5826451. Be sure to login with your customer credentials to access the full article.
18.4.5.1.7. Red Hat Insights
Use the following procedure to configure a Red Hat Insights-sourced inventory.
Procedure
- In the Create new source page, select Red Hat Insights from the Source list.
- The Create Source window expands with the required Credential field. Choose from an existing GCE Credential. For more information, refer to Credentials.
- Optional: You can specify the verbosity, host filter, enabled variables or values, and update options as described in Adding a source.
-
Use the Source Variables field to override variables used by the
gcp_computeinventory plugin. Enter variables using either JSON or YAML syntax. Use the radio button to toggle between the two. For more information on these variables, see insights inventory plugin.
18.4.5.1.8. OpenStack
Use the following procedure to configure an OpenStack-sourced inventory.
Procedure
- In the Create new source page, select Openstack from the Source list.
- The Create Source window expands with the required Credential field. Choose from an existing GCE Credential. For more information, refer to Credentials.
- Optional: You can specify the verbosity, host filter, enabled variables or values, and update options as described in Adding a source.
-
Use the Source Variables field to override variables used by the
gcp_computeinventory plugin. Enter variables using either JSON or YAML syntax. Use the radio button to toggle between the two. For more information on these variables, see openstack inventory plugin.
18.4.5.1.9. Red hat virtualization
Use the following procedure to configure a Red Hat virtualization-sourced inventory.
Procedure
- In the Create new source page, select Red Hat Virtualization from the Source list.
- The Create Source window expands with the required Credential field. Choose from an existing GCE Credential. For more information, see Credentials.
- Optional: You can specify the verbosity, host filter, enabled variables or values, and update options as described in Adding a source.
-
Use the Source Variables field to override variables used by the
gcp_computeinventory plugin. Enter variables using either JSON or YAML syntax. Use the radio button to toggle between the two. For more information on these variables, see ovirt inventory plugin
Red Hat Virtualization (ovirt) inventory source requests are secure by default. To change this default setting, set the key ovirt_insecure to true in source_variables, which is only available from the API details of the inventory source at the /api/v2/inventory_sources/N/ endpoint.
18.4.5.1.10. Red Hat Ansible Automation Platform
Use the following procedure to configure an automation controller-sourced inventory.
Procedure
- In the Create new source page, select Red Hat Ansible Automation Platform from the *Source list.
- The Create Source window expands with the required Credential field. Choose from an existing GCE Credential. For more information, refer to Credentials.
- Optional: You can specify the verbosity, host filter, enabled variables or values, and update options as described in Adding a source.
-
Use the Source Variables field to override variables used by the
gcp_computeinventory plugin. Enter variables using either JSON or YAML syntax. Use the radio button to toggle between the two. For more information on these variables, see Controller inventory plugin. This requires your Red Hat Customer login.
18.4.5.2. Export old inventory scripts
Despite the removal of the custom inventory scripts API, the scripts are still saved in the database. The commands described in this section enable you to recover the scripts from the database in a format that is suitable for you to subsequently check into source control.
Use the following commands:
$ awx-manage export_custom_scripts --filename=my_scripts.tar

Dump of old custom inventory scripts at my_scripts.tar
Making use of the output:
$ mkdir my_scripts
$ tar -xf my_scripts.tar -C my_scripts
The name of the scripts has the form: <pk>_<name>. This is the naming scheme used for project folders.
$ ls my_scripts
10inventory_script_rawhook _19 _30inventory_script_listenhospital _11inventory_script_upperorder _1inventory_script_commercialinternet45 _4inventory_script_whitestring _12inventory_script_eastplant _22inventory_script_pinexchange _5inventory_script_literaturepossession _13inventory_script_governmentculture _23inventory_script_brainluck _6inventory_script_opportunitytelephone _14inventory_script_bottomguess _25inventory_script_buyerleague _7inventory_script_letjury _15inventory_script_wallisland _26inventory_script_lifesport _8random_inventory_script
16inventory_script_wallisland _27inventory_script_exchangesomewhere _9random_inventory_script _17inventory_script_bidstory            _28inventory_script_boxchild _18p                                    _29__inventory_script_wearstress
Each file contains a script. Scripts can be bash/python/ruby/more, so the extension is not included. They are all directly executable. Executing the script dumps the inventory data.
$ ./my_scripts/11__inventory_script_upperorder {"group\ud801\udcb0\uc20e\u7b0e\ud81c\udfeb\ub12b\ub4d0\u9ac6\ud81e\udf07\u6ff9\uc17b": {"hosts":
["host_\ud821\udcad\u68b6\u7a51\u93b4\u69cf\uc3c2\ud81f\uddbe\ud820\udc92\u3143\u62c7",
"host_\u6057\u3985\u1f60\ufefb\u1b22\ubd2d\ua90c\ud81a\udc69\u1344\u9d15",
"host_\u78a0\ud820\udef3\u925e\u69da\ua549\ud80c\ude7e\ud81e\udc91\ud808\uddd1\u57d6\ud801\ude57",
"host_\ud83a\udc2d\ud7f7\ua18a\u779a\ud800\udf8b\u7903\ud820\udead\u4154\ud808\ude15\u9711",
"host_\u18a1\u9d6f\u08ac\u74c2\u54e2\u740e\u5f02\ud81d\uddee\ufbd6\u4506"], "vars": {"ansible_host": "127.0.0.1", "ansible_connection":
"local"}}}
You can verify functionality with ansible-inventory. This gives the same data, but reformatted.
$ ansible-inventory -i ./my_scripts/_11__inventory_script_upperorder --list --export
In the preceding example, you can cd into my_scripts and then issue a git init command, add the scripts you want, push it to source control, and then create an SCM inventory source in the user interface.
For more information on syncing or using custom inventory scripts, see Inventory file importing in the Automation controller Administration Guide.
18.5. View completed jobs
If an inventory was used to run a job, you can view details about those jobs in the Completed Jobs tab of the inventory and click Expanded to view details about each job.
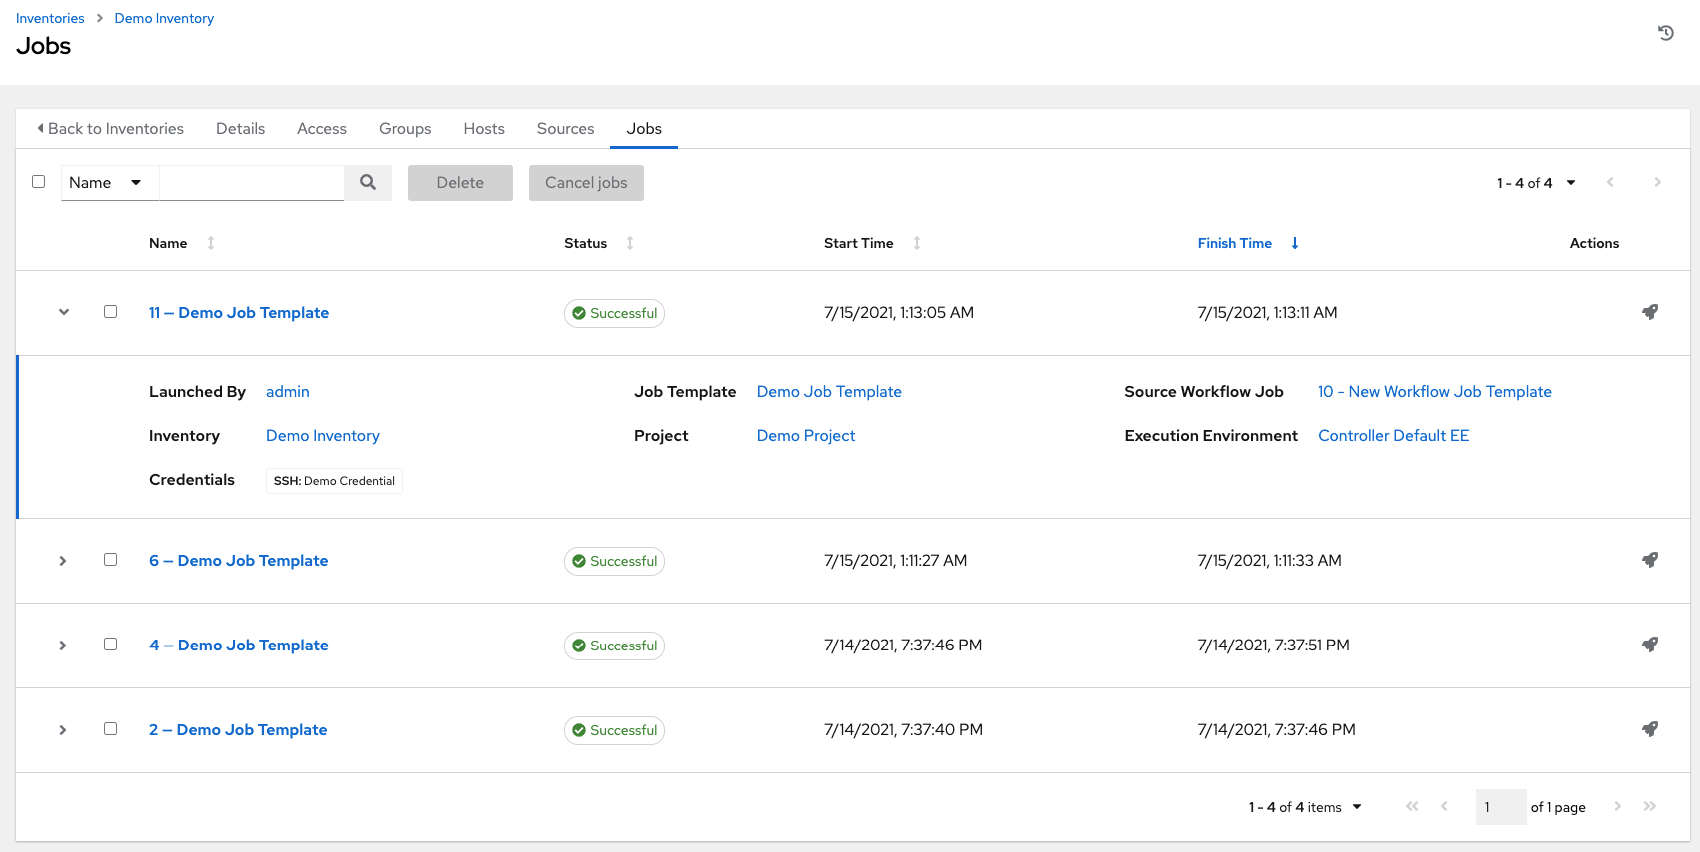
18.6. Running Ad Hoc commands
Ad hoc refers to using Ansible to perform a quick command, using /usr/bin/ansible, rather than the orchestration language, which is /usr/bin/ansible-playbook. An example of an ad hoc command might be rebooting 50 machines in your infrastructure. Anything you can do ad hoc can be accomplished by writing a Playbook. Playbooks can also glue lots of other operations together.
Use the following procedure to run an ad hoc command:
Procedure
Select an inventory source from the list of hosts or groups. The inventory source can be a single group or host, a selection of multiple hosts, or a selection of multiple groups.
Click . The Run command window opens.
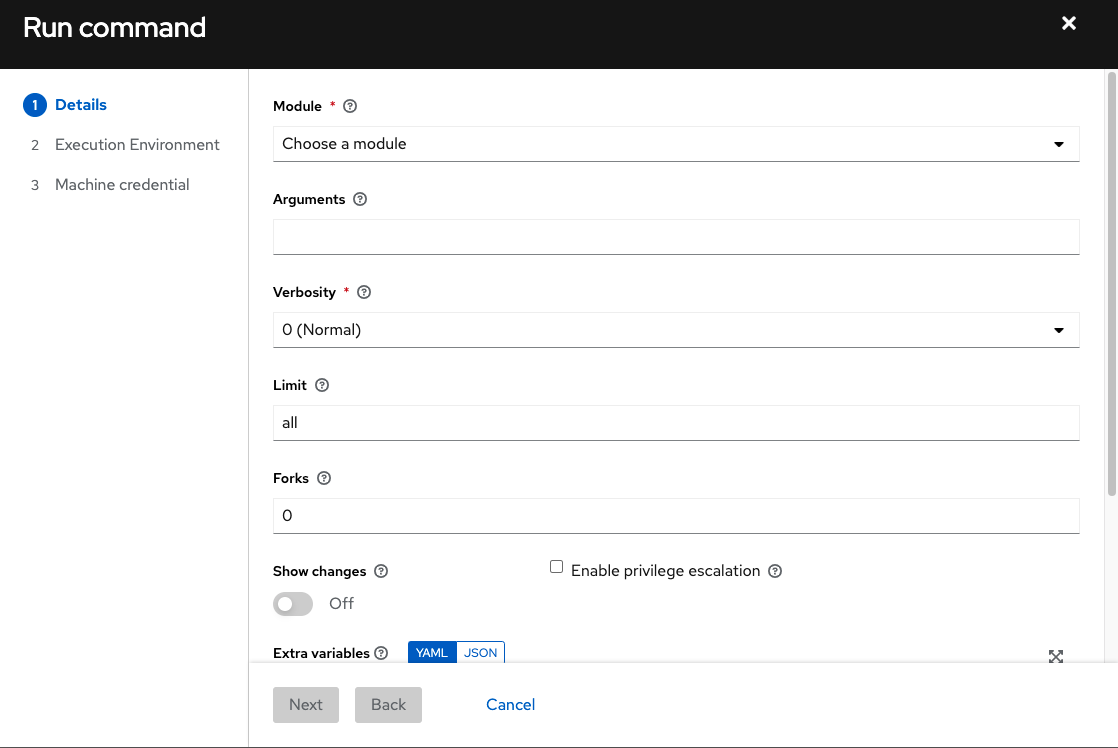
Enter the following information:
Module: Select one of the modules that the supports running commands against.
command
apt_repository
mount
win_service
shell
apt_rpm
ping
win_updates
yum
service
selinux
win_group
apt
group
setup
win_user
apt_key
user
win_ping
win_user
- Arguments: Provide arguments to be used with the module you selected.
-
Limit: Enter the limit used to target hosts in the inventory. To target all hosts in the inventory enter
allor*, or leave the field blank. This is automatically populated with whatever was selected in the previous view before clicking the launch button. - Machine Credential: Select the credential to use when accessing the remote hosts to run the command. Choose the credential containing the username and SSH key or password that Ansible needs to log into the remote hosts.
- Verbosity: Select a verbosity level for the standard output.
- Forks: If needed, select the number of parallel or simultaneous processes to use while executing the command.
- Show Changes: Select to enable the display of Ansible changes in the standard output. The default is OFF.
-
Enable Privilege Escalation: If enabled, the playbook is run with administrator privileges. This is the equivalent of passing the
--becomeoption to theansiblecommand. Extra Variables: Provide extra command line variables to be applied when running this inventory. Enter variables using either JSON or YAML syntax. Use the radio button to toggle between the two.
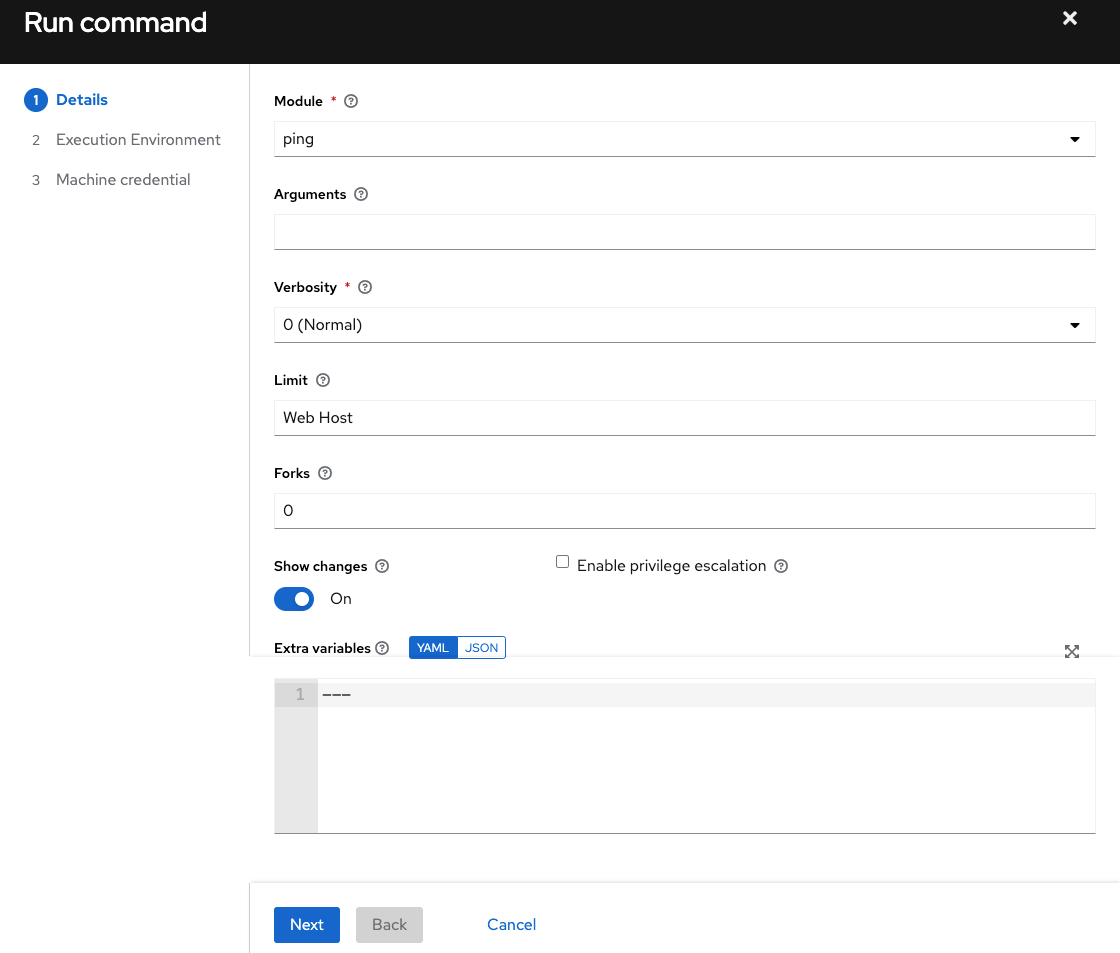
Click to choose the execution environment you want the ad hoc command to be run against.
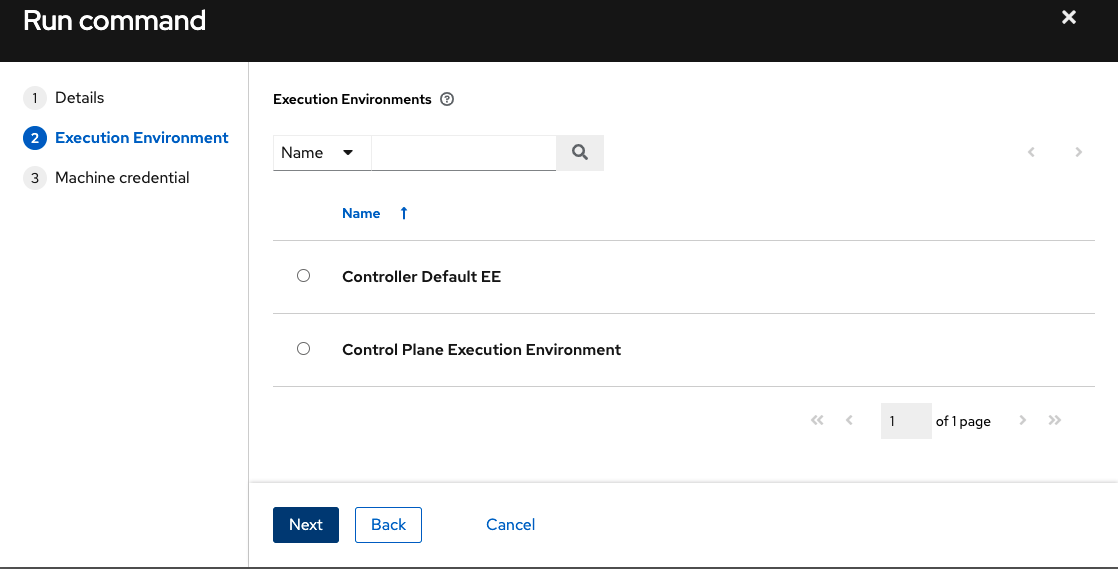
- Click to choose the credential you want to use.
Click . The results display in the Output tab of the module’s job window.
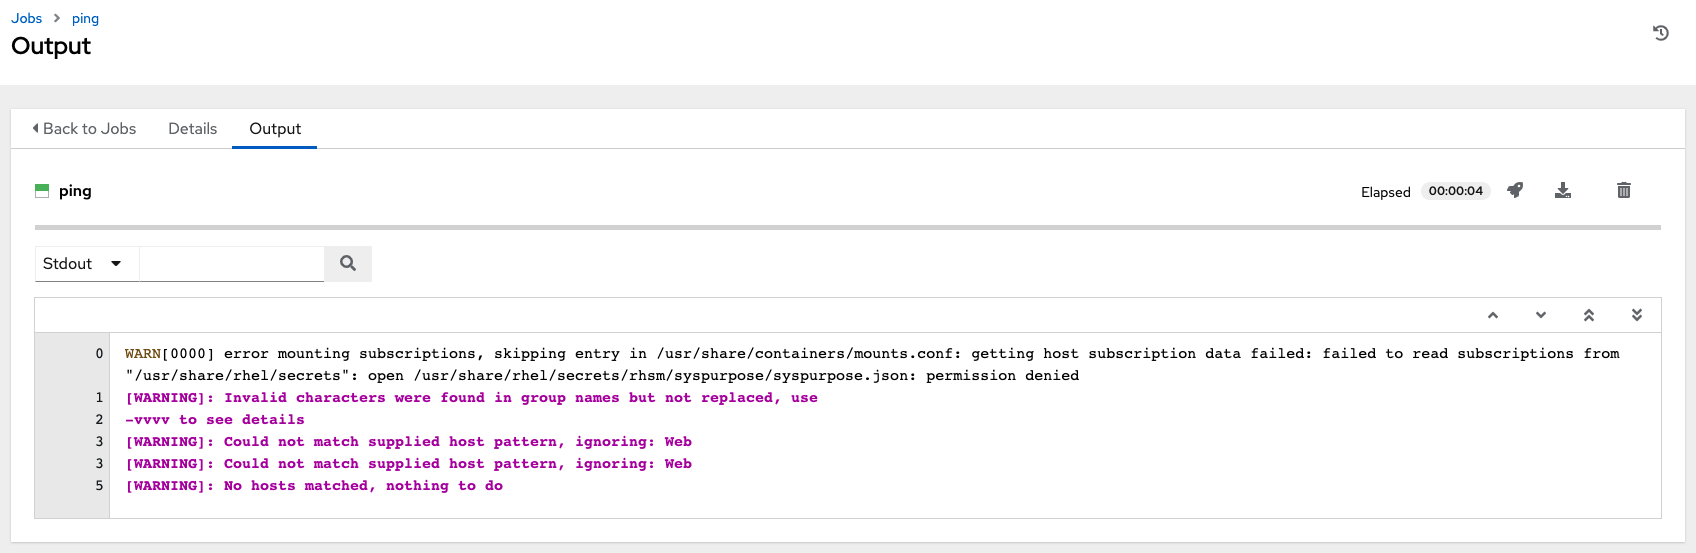
Chapter 19. Supported Inventory plugin templates
After upgrade to 4.x, existing configurations are migrated to the new format that produces a backwards compatible inventory output. Use the following templates to aid in migrating your inventories to the new style inventory plugin output.
19.1. Amazon Web Services EC2
compose:
  ansible_host: public_ip_address
  ec2_account_id: owner_id
  ec2_ami_launch_index: ami_launch_index | string
  ec2_architecture: architecture
  ec2_block_devices: dict(block_device_mappings | map(attribute='device_name') | list | zip(block_device_mappings | map(attribute='ebs.volume_id') | list))
  ec2_client_token: client_token
  ec2_dns_name: public_dns_name
  ec2_ebs_optimized: ebs_optimized
  ec2_eventsSet: events | default("")
  ec2_group_name: placement.group_name
  ec2_hypervisor: hypervisor
  ec2_id: instance_id
  ec2_image_id: image_id
  ec2_instance_profile: iam_instance_profile | default("")
  ec2_instance_type: instance_type
  ec2_ip_address: public_ip_address
  ec2_kernel: kernel_id | default("")
  ec2_key_name: key_name
  ec2_launch_time: launch_time | regex_replace(" ", "T") | regex_replace("(\+)(\d\d):(\d)(\d)$", ".\g<2>\g<3>Z")
  ec2_monitored: monitoring.state in ['enabled', 'pending']
  ec2_monitoring_state: monitoring.state
  ec2_persistent: persistent | default(false)
  ec2_placement: placement.availability_zone
  ec2_platform: platform | default("")
  ec2_private_dns_name: private_dns_name
  ec2_private_ip_address: private_ip_address
  ec2_public_dns_name: public_dns_name
  ec2_ramdisk: ramdisk_id | default("")
  ec2_reason: state_transition_reason
  ec2_region: placement.region
  ec2_requester_id: requester_id | default("")
  ec2_root_device_name: root_device_name
  ec2_root_device_type: root_device_type
  ec2_security_group_ids: security_groups | map(attribute='group_id') | list |  join(',')
  ec2_security_group_names: security_groups | map(attribute='group_name') | list |  join(',')
  ec2_sourceDestCheck: source_dest_check | default(false) | lower | string
  ec2_spot_instance_request_id: spot_instance_request_id | default("")
  ec2_state: state.name
  ec2_state_code: state.code
  ec2_state_reason: state_reason.message if state_reason is defined else ""
  ec2_subnet_id: subnet_id | default("")
  ec2_tag_Name: tags.Name
  ec2_virtualization_type: virtualization_type
  ec2_vpc_id: vpc_id | default("")
filters:
  instance-state-name:
  - running
groups:
  ec2: true
hostnames:
  - network-interface.addresses.association.public-ip
  - dns-name
  - private-dns-name
keyed_groups:
  - key: image_id | regex_replace("[^A-Za-z0-9\_]", "_")
    parent_group: images
    prefix: ''
    separator: ''
  - key: placement.availability_zone
    parent_group: zones
    prefix: ''
    separator: ''
  - key: ec2_account_id | regex_replace("[^A-Za-z0-9\_]", "_")
    parent_group: accounts
    prefix: ''
    separator: ''
  - key: ec2_state | regex_replace("[^A-Za-z0-9\_]", "_")
    parent_group: instance_states
    prefix: instance_state
  - key: platform | default("undefined") | regex_replace("[^A-Za-z0-9\_]", "_")
    parent_group: platforms
    prefix: platform
  - key: instance_type | regex_replace("[^A-Za-z0-9\_]", "_")
    parent_group: types
    prefix: type
  - key: key_name | regex_replace("[^A-Za-z0-9\_]", "_")
    parent_group: keys
    prefix: key
  - key: placement.region
    parent_group: regions
    prefix: ''
    separator: ''
  - key: security_groups | map(attribute="group_name") | map("regex_replace", "[^A-Za-z0-9\_]", "_") | list
    parent_group: security_groups
    prefix: security_group
  - key: dict(tags.keys() | map("regex_replace", "[^A-Za-z0-9\_]", "_") | list | zip(tags.values()
      | map("regex_replace", "[^A-Za-z0-9\_]", "_") | list))
    parent_group: tags
    prefix: tag
  - key: tags.keys() | map("regex_replace", "[^A-Za-z0-9\_]", "_") | list
    parent_group: tags
    prefix: tag
  - key: vpc_id | regex_replace("[^A-Za-z0-9\_]", "_")
    parent_group: vpcs
    prefix: vpc_id
  - key: placement.availability_zone
    parent_group: '{{ placement.region }}'
    prefix: ''
    separator: ''
plugin: amazon.aws.aws_ec2
use_contrib_script_compatible_sanitization: true
19.2. Google Compute Engine
auth_kind: serviceaccount
compose:
  ansible_ssh_host: networkInterfaces[0].accessConfigs[0].natIP | default(networkInterfaces[0].networkIP)
  gce_description: description if description else None
  gce_id: id
  gce_image: image
  gce_machine_type: machineType
  gce_metadata: metadata.get("items", []) | items2dict(key_name="key", value_name="value")
  gce_name: name
  gce_network: networkInterfaces[0].network.name
  gce_private_ip: networkInterfaces[0].networkIP
  gce_public_ip: networkInterfaces[0].accessConfigs[0].natIP | default(None)
  gce_status: status
  gce_subnetwork: networkInterfaces[0].subnetwork.name
  gce_tags: tags.get("items", [])
  gce_zone: zone
hostnames:
- name
- public_ip
- private_ip
keyed_groups:
- key: gce_subnetwork
  prefix: network
- key: gce_private_ip
  prefix: ''
  separator: ''
- key: gce_public_ip
  prefix: ''
  separator: ''
- key: machineType
  prefix: ''
  separator: ''
- key: zone
  prefix: ''
  separator: ''
- key: gce_tags
  prefix: tag
- key: status | lower
  prefix: status
- key: image
  prefix: ''
  separator: ''
plugin: google.cloud.gcp_compute
retrieve_image_info: true
use_contrib_script_compatible_sanitization: true
19.3. Microsoft Azure Resource Manager
conditional_groups:
  azure: true
default_host_filters: []
fail_on_template_errors: false
hostvar_expressions:
  computer_name: name
  private_ip: private_ipv4_addresses[0] if private_ipv4_addresses else None
  provisioning_state: provisioning_state | title
  public_ip: public_ipv4_addresses[0] if public_ipv4_addresses else None
  public_ip_id: public_ip_id if public_ip_id is defined else None
  public_ip_name: public_ip_name if public_ip_name is defined else None
  tags: tags if tags else None
  type: resource_type
keyed_groups:
- key: location
  prefix: ''
  separator: ''
- key: tags.keys() | list if tags else []
  prefix: ''
  separator: ''
- key: security_group
  prefix: ''
  separator: ''
- key: resource_group
  prefix: ''
  separator: ''
- key: os_disk.operating_system_type
  prefix: ''
  separator: ''
- key: dict(tags.keys() | map("regex_replace", "^(.*)$", "\1_") | list | zip(tags.values() | list)) if tags else []
  prefix: ''
  separator: ''
plain_host_names: true
plugin: azure.azcollection.azure_rm
use_contrib_script_compatible_sanitization: true
19.4. VMware vCenter
compose:
  ansible_host: guest.ipAddress
  ansible_ssh_host: guest.ipAddress
  ansible_uuid: 99999999 | random | to_uuid
  availablefield: availableField
  configissue: configIssue
  configstatus: configStatus
  customvalue: customValue
  effectiverole: effectiveRole
  guestheartbeatstatus: guestHeartbeatStatus
  layoutex: layoutEx
  overallstatus: overallStatus
  parentvapp: parentVApp
  recenttask: recentTask
  resourcepool: resourcePool
  rootsnapshot: rootSnapshot
  triggeredalarmstate: triggeredAlarmState
filters:
- runtime.powerState == "poweredOn"
keyed_groups:
- key: config.guestId
  prefix: ''
  separator: ''
- key: '"templates" if config.template else "guests"'
  prefix: ''
  separator: ''
plugin: community.vmware.vmware_vm_inventory
properties:
- availableField
- configIssue
- configStatus
- customValue
- datastore
- effectiveRole
- guestHeartbeatStatus
- layout
- layoutEx
- name
- network
- overallStatus
- parentVApp
- permission
- recentTask
- resourcePool
- rootSnapshot
- snapshot
- triggeredAlarmState
- value
- capability
- config
- guest
- runtime
- storage
- summary
strict: false
with_nested_properties: true
19.5. Red Hat Satellite 6
group_prefix: foreman_
keyed_groups:
- key: foreman['environment_name'] | lower | regex_replace(' ', '') | regex_replace('[^A-Za-z0-9_]', '_') | regex_replace('none', '')
  prefix: foreman_environment_
  separator: ''
- key: foreman['location_name'] | lower | regex_replace(' ', '') | regex_replace('[^A-Za-z0-9_]', '_')
  prefix: foreman_location_
  separator: ''
- key: foreman['organization_name'] | lower | regex_replace(' ', '') | regex_replace('[^A-Za-z0-9_]', '_')
  prefix: foreman_organization_
  separator: ''
- key: foreman['content_facet_attributes']['lifecycle_environment_name'] | lower | regex_replace(' ', '') | regex_replace('[^A-Za-z0-9_]', '_')
  prefix: foreman_lifecycle_environment_
  separator: ''
- key: foreman['content_facet_attributes']['content_view_name'] | lower | regex_replace(' ', '') | regex_replace('[^A-Za-z0-9_]', '_')
  prefix: foreman_content_view_
  separator: ''
legacy_hostvars: true
plugin: theforeman.foreman.foreman
validate_certs: false
want_facts: true
want_hostcollections: false
want_params: true
19.6. OpenStack
expand_hostvars: true
fail_on_errors: true
inventory_hostname: uuid
plugin: openstack.cloud.openstack
19.7. Red Hat Virtualization
compose:
  ansible_host: (devices.values() | list)[0][0] if devices else None
keyed_groups:
- key: cluster
  prefix: cluster
  separator: _
- key: status
  prefix: status
  separator: _
- key: tags
  prefix: tag
  separator: _
ovirt_hostname_preference:
- name
- fqdn
ovirt_insecure: false
plugin: ovirt.ovirt.ovirt
19.8. Red Hat Ansible Automation Platform
include_metadata: true
inventory_id: <inventory_id or url_quoted_named_url>
plugin: awx.awx.tower
validate_certs: <true or false>
Chapter 20. Job templates
A job template is a definition and set of parameters for running an Ansible job. Job templates are useful to run the same job many times. They also encourage the reuse of Ansible playbook content and collaboration between teams.
The Templates list view shows job templates that are currently available. The default view is collapsed (Compact), showing the template name, template type, and the timestamp of the last job that ran using that template. You can click the arrow
![]() icon next to each entry to expand and view more information. This list is sorted alphabetically by name, but you can sort by other criteria, or search by various fields and attributes of a template.
icon next to each entry to expand and view more information. This list is sorted alphabetically by name, but you can sort by other criteria, or search by various fields and attributes of a template.
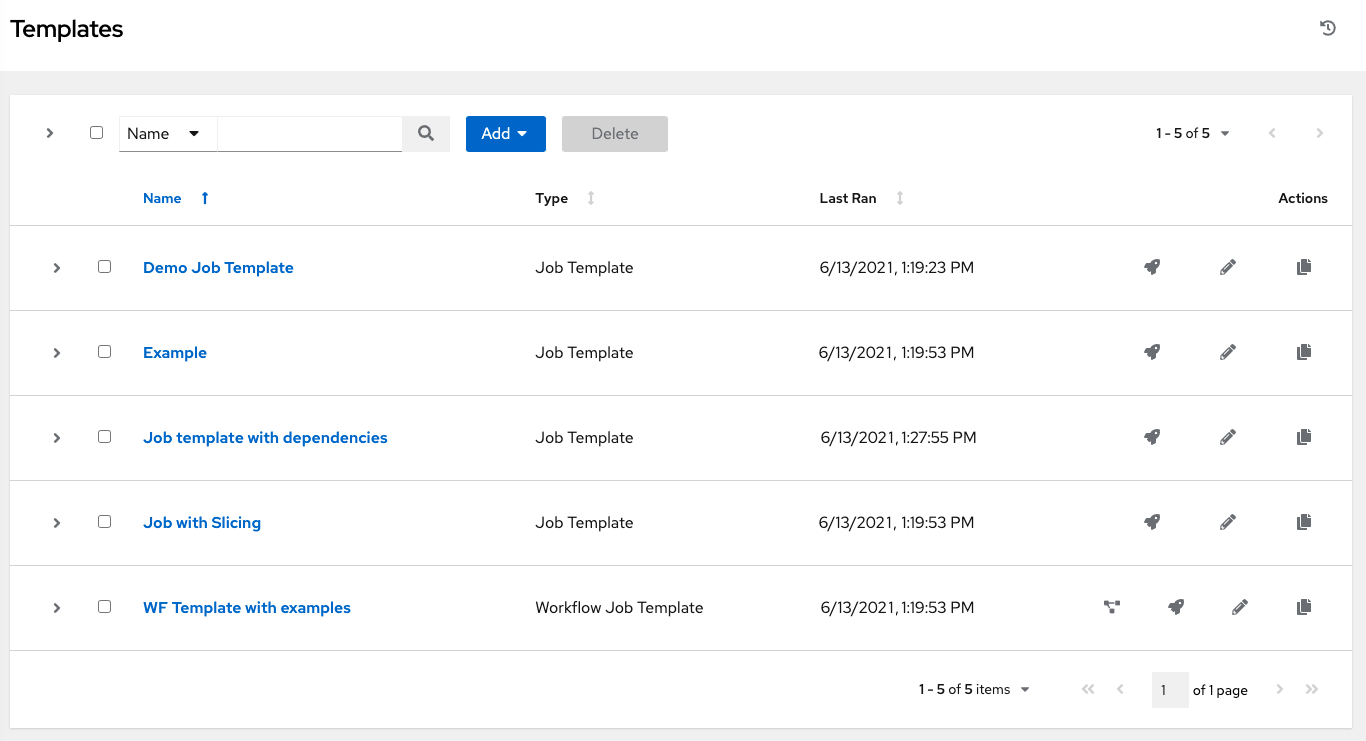
From this screen you can launch
![]() , edit
, edit
![]() , and copy
, and copy
![]() a workflow job template.
a workflow job template.
Job templates can be used to build a workflow template. Templates that show the Workflow Visualizer ![]() icon next to them are workflow templates. Clicking the icon allows you to build a workflow graphically. Many parameters in a job template enable you to select Prompt on Launch that you can change at the workflow level, and do not affect the values assigned at the job template level. For instructions, see the Workflow Visualizer section.
icon next to them are workflow templates. Clicking the icon allows you to build a workflow graphically. Many parameters in a job template enable you to select Prompt on Launch that you can change at the workflow level, and do not affect the values assigned at the job template level. For instructions, see the Workflow Visualizer section.
20.1. Creating a job template
Procedure
- On the Templates list view, select Add job template from the Add list.
Enter the appropriate details in the following fields:
NoteIf a field has the Prompt on launch checkbox selected, launching the job prompts you for the value for that field when launching. Most prompted values override any values set in the job template. Exceptions are noted in the following table.
Field Options Prompt on Launch Name
Enter a name for the job.
N/A
Description
Enter an arbitrary description as appropriate (optional).
N/A
Job Type
Choose a job type:
- Run: Start the playbook when launched, running Ansible tasks on the selected hosts.
- Check: Perform a "dry run" of the playbook and report changes that would be made without actually making them. Tasks that do not support check mode are missed and do not report potential changes.
For more information about job types see the Playbooks section of the Ansible documentation.
Yes
Inventory
Choose the inventory to be used with this job template from the inventories available to the logged in user.
A System Administrator must grant you or your team permissions to be able to use certain inventories in a job template.
Yes.
Inventory prompts show up as its own step in a later prompt window.
Project
Select the project to use with this job template from the projects available to the user that is logged in.
N/A
SCM branch
This field is only present if you chose a project that allows branch override. Specify the overriding branch to use in your job run. If left blank, the specified SCM branch (or commit hash or tag) from the project is used.
For more information, see Job branch overriding.
Yes
Execution Environment
Select the container image to be used to run this job. You must select a project before you can select an execution environment.
Yes.
Execution environment prompts show up as its own step in a later prompt window.
Playbook
Choose the playbook to be launched with this job template from the available playbooks. This field automatically populates with the names of the playbooks found in the project base path for the selected project. Alternatively, you can enter the name of the playbook if it is not listed, such as the name of a file (such as foo.yml) you want to use to run with that playbook. If you enter a filename that is not valid, the template displays an error, or causes the job to fail.
N/A
Credentials
Select the
 icon to open a separate window.
Choose the credential from the available options to use with this job template.
Use the drop-down menu list to filter by credential type if the list is extensive. Some credential types are not listed because they do not apply to certain job templates.
- If selected, when launching a job template that has a default credential and supplying another credential replaces the default credential if it is the same type. The following is an example this message:
Job Template default credentials must be replaced with one of the same type. Please select a credential for the following types in order to proceed: Machine.- Alternatively, you can add more credentials as you see fit.
- Credential prompts show up as its own step in a later prompt window.
Labels
-
Optionally supply labels that describe this job template, such as
devortest. - Use labels to group and filter job templates and completed jobs in the display.
- Labels are created when they are added to the job template. Labels are associated with a single Organization by using the Project that is provided in the job template. Members of the Organization can create labels on a job template if they have edit permissions (such as the admin role).
- Once you save the job template, the labels appear in the Job Templates overview in the Expanded view.
-
Select
beside a label to remove it. When a label is removed, it is no longer associated with that particular Job or Job Template, but it remains associated with any other jobs that reference it.
- Jobs inherit labels from the Job Template at the time of launch. If you delete a label from a Job Template, it is also deleted from the Job.
- If selected, even if a default value is supplied, you are prompted when launching to supply additional labels, if needed.
-
You cannot delete existing labels, selecting
only removes the newly added labels, not existing default labels.
Variables
- Pass extra command line variables to the playbook. This is the "-e" or "-extra-vars" command line parameter for ansible-playbook that is documented in the Ansible documentation at Defining variables at runtime.
-
Provide key or value pairs by using either YAML or JSON. These variables have a maximum value of precedence and overrides other variables specified elsewhere. The following is an example value:
git_branch: production release_version: 1.5
Yes.
If you want to be able to specify
extra_varson a schedule, you must select Prompt on launch for Variables on the job template, or enable a survey on the job template. Those answered survey questions becomeextra_vars.Forks
The number of parallel or simultaneous processes to use while executing the playbook. A value of zero uses the Ansible default setting, which is five parallel processes unless overridden in
/etc/ansible/ansible.cfg.Yes
Limit
A host pattern to further constrain the list of hosts managed or affected by the playbook. You can separate many patterns by colons (:). As with core Ansible:
- a:b means "in group a or b"
- a:b:&c means "in a or b but must be in c"
- a:!b means "in a, and definitely not in b"
For more information, see Patterns: targeting hosts and groups in the Ansible documentation.
Yes
If not selected, the job template executes against all nodes in the inventory or only the nodes predefined on the Limit field. When running as part of a workflow, the workflow job template limit is used instead.
Verbosity
Control the level of output Ansible produces as the playbook executes. Choose the verbosity from Normal to various Verbose or Debug settings. This only appears in the details report view. Verbose logging includes the output of all commands. Debug logging is exceedingly verbose and includes information about SSH operations that can be useful in certain support instances.
Verbosity
5causes automation controller to block heavily when jobs are running, which could delay reporting that the job has finished (even though it has) and can cause the browser tab to lock up.Yes
Job Slicing
Specify the number of slices you want this job template to run. Each slice runs the same tasks against a part of the inventory. For more information about job slices, see Job Slicing.
Yes
Timeout
This enables you to specify the length of time (in seconds) that the job can run before it is canceled. Consider the following for setting the timeout value:
- There is a global timeout defined in the settings which defaults to 0, indicating no timeout.
- A negative timeout (<0) on a job template is a true "no timeout" on the job.
- A timeout of 0 on a job template defaults the job to the global timeout (which is no timeout by default).
- A positive timeout sets the timeout for that job template.
Yes
Show Changes
Enables you to see the changes made by Ansible tasks.
Yes
Instance Groups
Choose Instance and Container Groups to associate with this job template. If the list is extensive, use the
icon to narrow the options. Job template instance groups contribute to the job scheduling criteria, see Job Runtime Behavior and Control where a job runs for rules. A System Administrator must grant you or your team permissions to be able to use an instance group in a job template. Use of a container group requires admin rights.
- Yes.
If selected, you are providing the jobs preferred instance groups in order of preference. If the first group is out of capacity, later groups in the list are considered until one with capacity is available, at which point that is selected to run the job.
- If you prompt for an instance group, what you enter replaces the normal instance group hierarchy and overrides all of the organizations' and inventories' instance groups.
- The Instance Groups prompt shows up as its own step in a later prompt window.
Job Tags
Type and select the Create menu to specify which parts of the playbook should be executed. For more information and examples see Tags in the Ansible documentation.
Yes
Skip Tags
Type and select the Create menu to specify certain tasks or parts of the playbook to skip. For more information and examples see Tags in the Ansible documentation.
Yes
Specify the following Options for launching this template, if necessary:
-
Privilege Escalation: If checked, you enable this playbook to run as an administrator. This is the equivalent of passing the
--becomeoption to theansible-playbookcommand. - Provisioning Callbacks: If checked, you enable a host to call back to automation controller through the REST API and start a job from this job template. For more information, see Provisioning Callbacks.
Enable Webhook: If checked, you turn on the ability to interface with a predefined SCM system web service that is used to launch a job template. GitHub and GitLab are the supported SCM systems.
If you enable webhooks, other fields display, prompting for additional information:

- Webhook Service: Select which service to listen for webhooks from.
- Webhook URL: Automatically populated with the URL for the webhook service to POST requests to.
- Webhook Key: Generated shared secret to be used by the webhook service to sign payloads sent to automation controller. You must configure this in the settings on the webhook service in order for automation controller to accept webhooks from this service.
- Webhook Credential: Optionally, provide a GitHub or GitLab personal access token (PAT) as a credential to use to send status updates back to the webhook service. Before you can select it, the credential must exist. See Credential Types to create one.
- For additional information about setting up webhooks, see Working with Webhooks.
- Concurrent Jobs: If checked, you are allowing jobs in the queue to run simultaneously if not dependent on one another. Check this box if you want to run job slices simultaneously. For more information, see Automation controller capacity determination and job impact.
- Enable Fact Storage: If checked, automation controller stores gathered facts for all hosts in an inventory related to the job running.
- Prevent Instance Group Fallback: Check this option to allow only the instance groups listed in the Instance Groups field to run the job. If clear, all available instances in the execution pool are used based on the hierarchy described in Control where a job runs.
-
Privilege Escalation: If checked, you enable this playbook to run as an administrator. This is the equivalent of passing the
- Click , when you have completed configuring the details of the job template.
Saving the template does not exit the job template page but advances to the Job Template Details tab. After saving the template, you can click to launch the job, or click to add or change the attributes of the template, such as permissions, notifications, view completed jobs, and add a survey (if the job type is not a scan). You must first save the template before launching, otherwise, remains disabled.

Verification
- From the navigation panel, select → .
- Verify that the newly created template appears on the Templates list view.
20.2. Adding permissions to templates
Use the following steps to add permissions for the team.
Procedure
- From the navigation panel, select → .
- Select a template, and in the Access tab, click .
- Select Users or Teams and click .
Select one or more users or teams from the list by clicking the check boxes next to the names to add them as members and click .
The following example shows two users have been selected to be added:

- Choose the roles that you want users or teams to have. Ensure that you scroll down for a complete list of roles. Each resource has different options available.
- Click to apply the roles to the selected users or teams and to add them as members.
The window to add users and teams closes to display the the updated roles assigned for each user and team:

To remove roles for a particular user, click the
![]() icon next to its resource.
icon next to its resource.
This launches a confirmation dialog, asking you to confirm the disassociation.
20.3. Deleting a job template
Before deleting a job template, ensure that it is not used in a workflow job template.
Procedure
Delete a job template by using one of these methods:
- Select the checkbox next to one or more job templates and click .
- Click the desired job template and click , on the Details page.
If deleting items that are used by other work items, a message opens listing the items that are affected by the deletion and prompts you to confirm the deletion. Some screens contain items that are invalid or previously deleted, and will fail to run. The following is an example of that message:

20.4. Work with notifications
From the navigation panel, select → . This enables you to review any notification integrations you have set up and their statuses, if they have run.
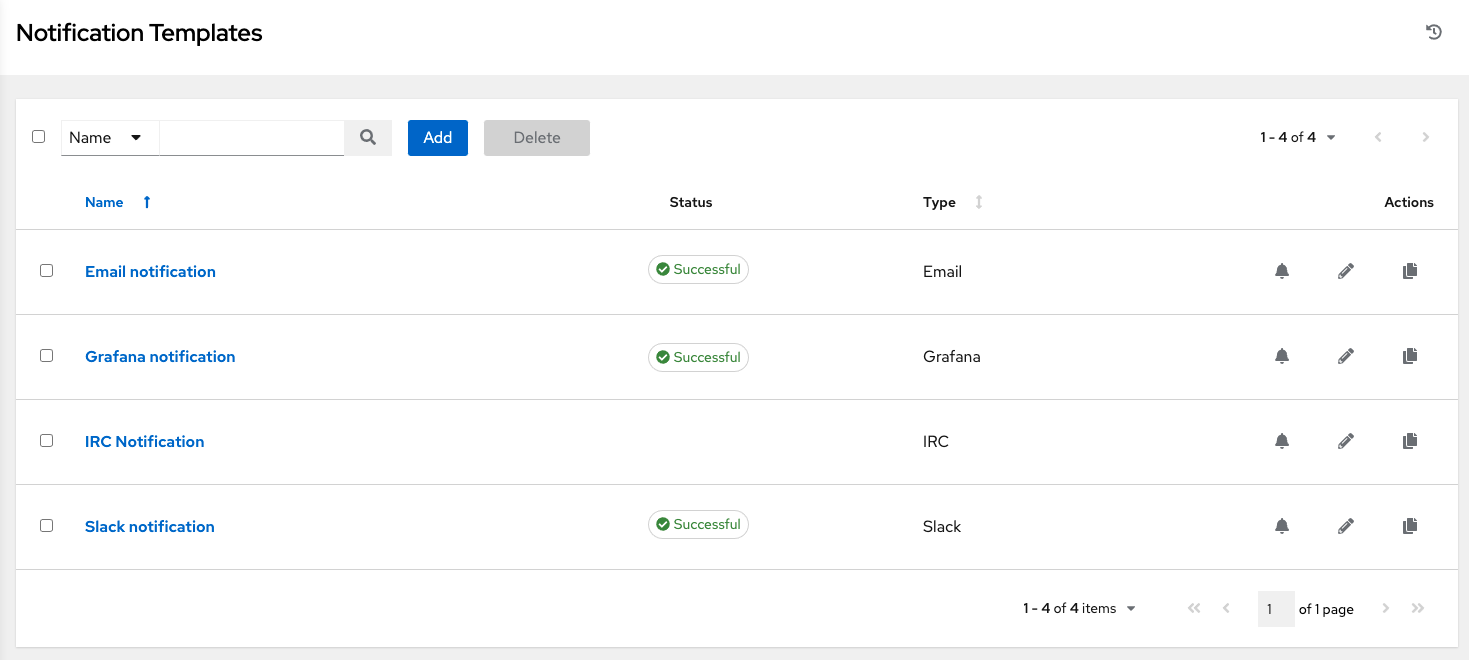
Use the toggles to enable or disable the notifications to use with your particular template. For more information, see Enable and Disable Notifications.
If no notifications have been set up, click to create a new notification. For more information on configuring various notification types and extended messaging, see Notification Types.
20.5. View completed jobs
The Jobs tab provides the list of job templates that have run. Click the expand icon next to each job to view the following details:
- Status
- ID and name
- Type of job
- Time started and completed
- Who started the job and which template, inventory, project, and credential were used.
You can filter the list of completed jobs using any of these criteria.
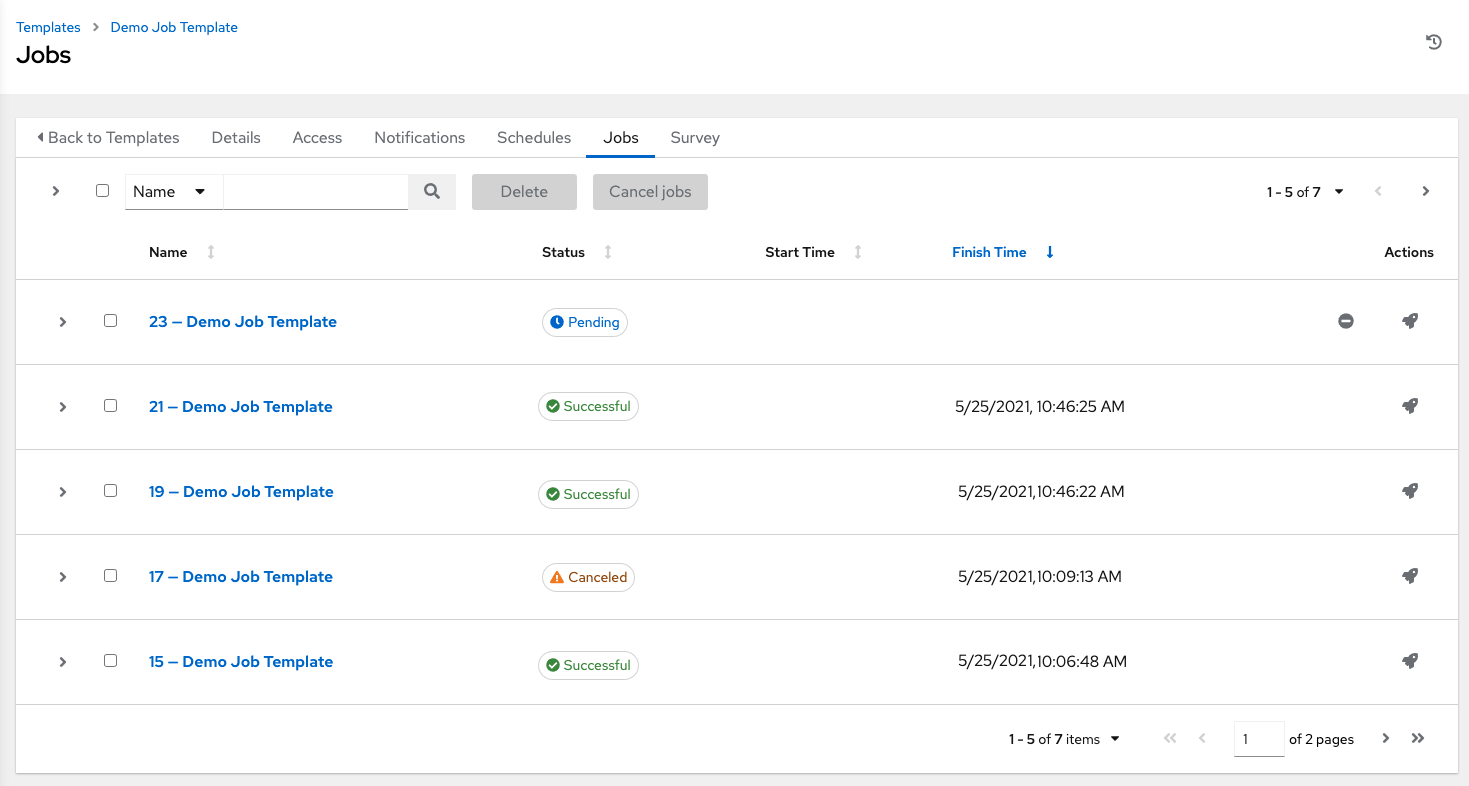
Sliced jobs that display on this list are labeled accordingly, with the number of sliced jobs that have run:
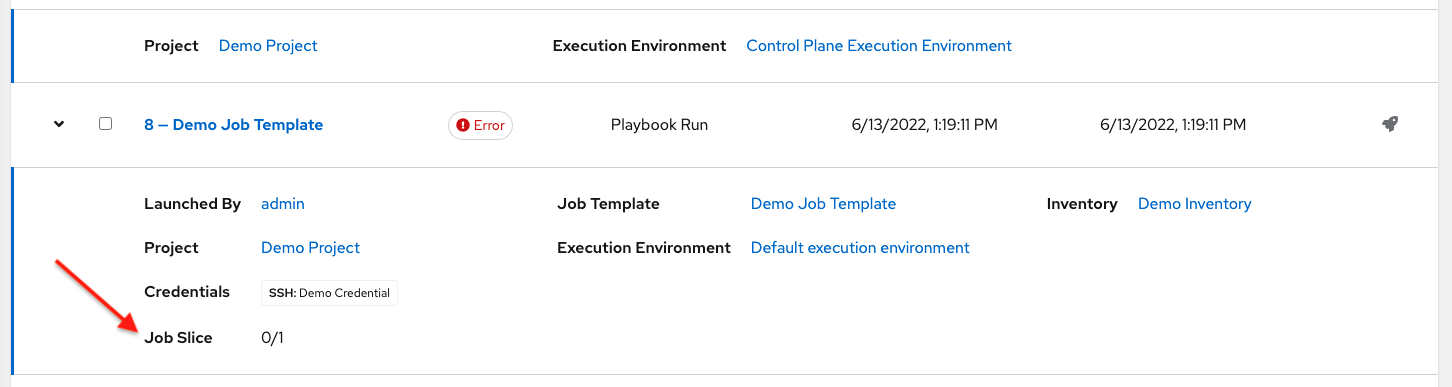
20.6. Scheduling job templates
Access the schedules for a particular job template from the Schedules tab.
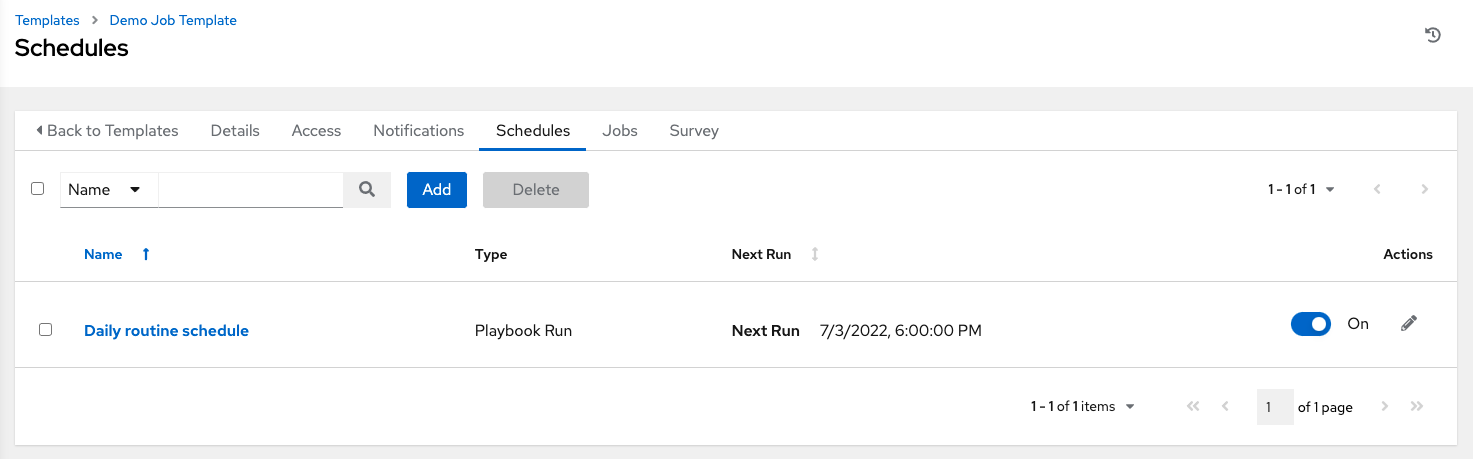
Procedure
To schedule a job template, select the Schedules tab, and choose the appropriate method:
- If schedules are already set up, review, edit, enable or disable your schedule preferences.
- If schedules have not been set up, see Schedules for more information.
If you select Prompt on Launch for the Credentials field, and you create or edit scheduling information for your job template, a Prompt option displays on the Schedules form.
You cannot remove the default machine credential in the Prompt dialog without replacing it with another machine credential before you can save it.
To set extra_vars on schedules, you must select Prompt on Launch for Variables on the job template, or configure and enable a survey on the job template.
The answered survey questions then become extra_vars.
20.7. Surveys in job templates
Job types of Run or Check provide a way to set up surveys in the Job Template creation or editing screens. Surveys set extra variables for the playbook similar to Prompt for Extra Variables does, but in a user-friendly question and answer way. Surveys also permit for validation of user input. Select the Survey tab to create a survey.
Example
Surveys can be used for a number of situations. For example, operations want to give developers a "push to stage" button that they can run without advance knowledge of Ansible. When launched, this task could prompt for answers to questions such as "What tag should we release?".
Many types of questions can be asked, including multiple-choice questions.
20.7.1. Creating a survey
Procedure
- From the Survey tab, click .
A survey can consist of any number of questions. For each question, enter the following information:
- Question: The question to ask the user.
- Optional: Description: A description of what is being asked of the user.
- Answer variable name: The Ansible variable name to store the user’s response in. This is the variable to be used by the playbook. Variable names cannot contain spaces.
Answer type: Choose from the following question types:
- Text: A single line of text. You can set the minimum and maximum length (in characters) for this answer.
- Textarea: A multi-line text field. You can set the minimum and maximum length (in characters) for this answer.
- Password: Responses are treated as sensitive information, much like an actual password is treated. You can set the minimum and maximum length (in characters) for this answer.
- Multiple Choice (single select): A list of options, of which only one can be selected at a time. Enter the options, one per line, in the Multiple Choice Options field.
- Multiple Choice (multiple select): A list of options, any number of which can be selected at a time. Enter the options, one per line, in the Multiple Choice Options field.
- Integer: An integer number. You can set the minimum and maximum length (in characters) for this answer.
- Float: A decimal number. You can set the minimum and maximum length (in characters) for this answer.
- Required: Whether or not an answer to this question is required from the user.
- Minimum length and Maximum length: Specify if a certain length in the answer is required.
Default answer: The default answer to the question. This value is pre-filled in the interface and is used if the answer is not provided by the user.
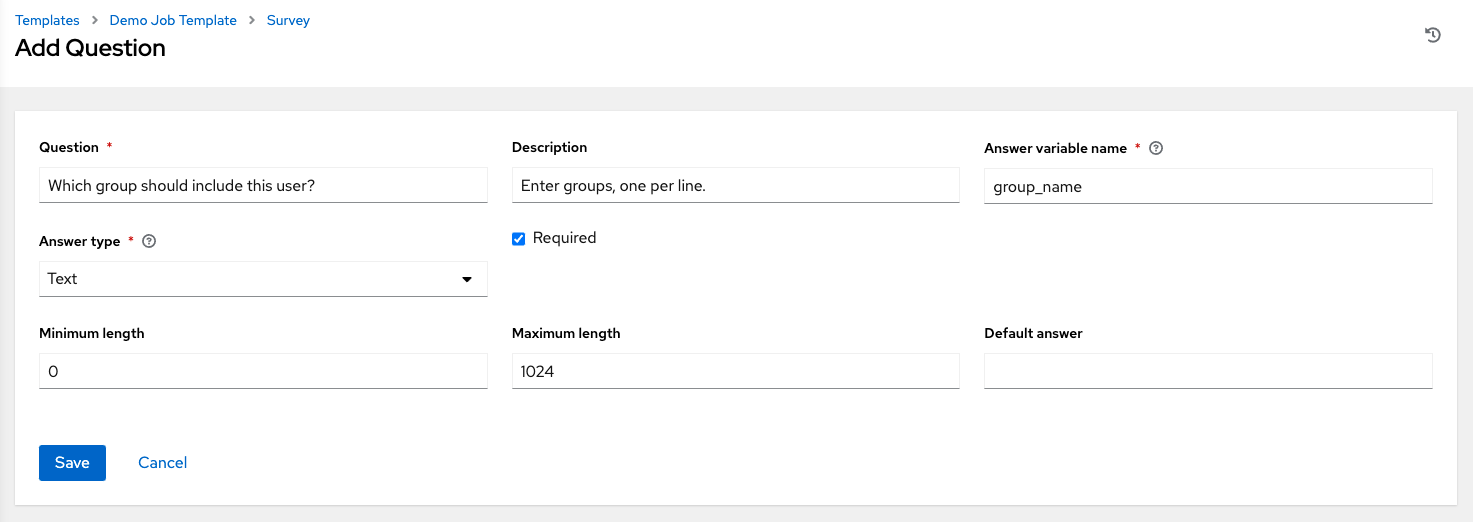
Once you have entered the question information, click to add the question.
The survey question displays in the Survey list. For any question, you can click
to edit it.
Check the box next to each question and click to delete the question, or use the toggle option in the menu bar to enable or disable the survey prompts.
If you have more than one survey question, click to rearrange the order of the questions by clicking and dragging on the grid icon.
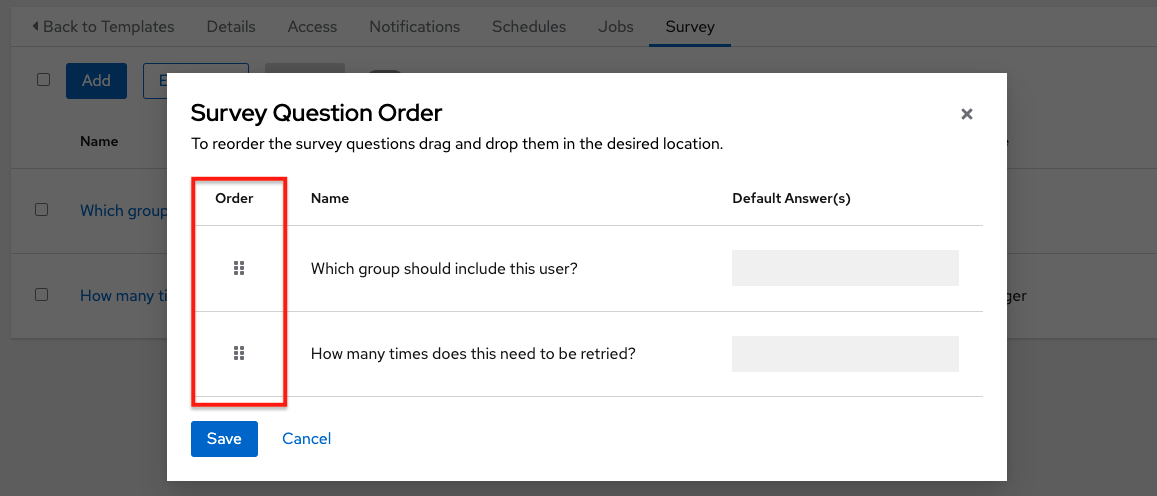
- To add more questions, click .
20.7.2. Optional survey questions
The Required setting on a survey question determines whether the answer is optional or not for the user interacting with it.
Optional survey variables can also be passed to the playbook in extra_vars.
-
If a non-text variable (input type) is marked as optional, and is not filled in, no survey
extra_varis passed to the playbook. -
If a text input or text area input is marked as optional, is not filled in, and has a minimum
length > 0, no surveyextra_varis passed to the playbook. -
If a text input or text area input is marked as optional, is not filled in, and has a minimum
length === 0, that surveyextra_varis passed to the playbook, with the value set to an empty string ("").
20.8. Launching a job template
A benefit of automation controller is the push-button deployment of Ansible playbooks. You can configure a template to store all the parameters that you would normally pass to the Ansible playbook on the command line. In addition to the playbooks, the template passes the inventory, credentials, extra variables, and all options and settings that you can specify on the command line.
Easier deployments drive consistency, by running your playbooks the same way each time, and allowing you to delegate responsibilities.
Procedure
Launch a job template by using one of these methods:
From the navigation panel, select → and click next to the job template.
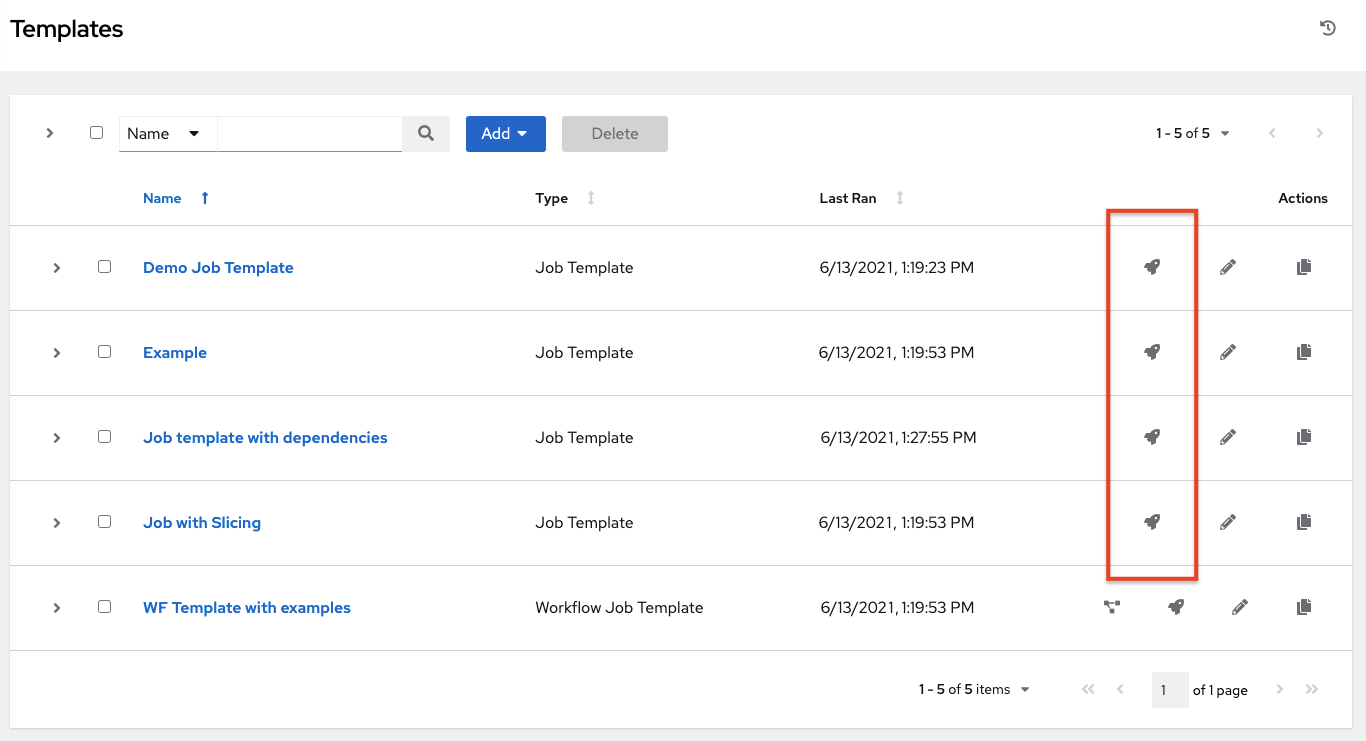
- In the job template Details view of the job template you want to launch, click .
A job can require additional information to run. The following data can be requested at launch:
- Credentials that were setup
- The option Prompt on Launch is selected for any parameter
- Passwords or passphrases that have been set to Ask
- A survey, if one has been configured for the job templates
- Extra variables, if requested by the job template
If a job has user-provided values, then those are respected upon relaunch. If the user did not specify a value, then the job uses the default value from the job template. Jobs are not relaunched as-is. They are relaunched with the user prompts re-applied to the job template.
If you provide values on one tab, return to a previous tab, continuing to the next tab results in having to re-provide values on the rest of the tabs. Ensure that you fill in the tabs in the order that the prompts appear.
When launching, automation controller automatically redirects the web browser to the Job Status page for this job under the Jobs tab.
You can re-launch the most recent job from the list view to re-run on all hosts or just failed hosts in the specified inventory. For more information, see the Jobs section.
When slice jobs are running, job lists display the workflow and job slices, as well as a link to view their details individually.
You can launch jobs in bulk using the newly added endpoint in the API, /api/v2/bulk/job_launch. This endpoint accepts JSON and you can specify a list of unified job templates (such as job templates and project updates) to launch. The user must have the appropriate permission to launch all the jobs. If all jobs are not launched an error is returned indicating why the operation was not able to complete. Use the OPTIONS request to return relevant schema. For more information, see the Bulk endpoint of the Reference section of the Automation Controller API Guide.
20.9. Copying a job template
If you copy a job template, it does not copy any associated schedule, notifications, or permissions. Schedules and notifications must be recreated by the user or administrator creating the copy of the job template. The user copying the Job Template is be granted administrator permission, but no permissions are assigned (copied) to the job template.
Procedure
- From the navigation panel, select → .
Click the
icon associated with the template that you want to copy.
- The new template with the name of the template from which you copied and a timestamp displays in the list of templates.
- Click to open the new template and click .
- Replace the contents of the Name field with a new name, and provide or modify the entries in the other fields to complete this page.
- Click .
20.10. Scan job templates
Scan jobs are no longer supported starting with automation controller 3.2. This system tracking feature was used as a way to capture and store facts as historical data. Facts are now stored in the controller through fact caching. For more information, see Fact Caching.
Job template scan jobs in your system before automation controller 3.2, are converted to type run, like normal job templates. They retain their associated resources, such as inventories and credentials. By default, job template scan jobs that do not have a related project are assigned a special playbook. You can also specify a project with your own scan playbook. A project is created for each organization that points to awx-facts-playbooks and the job template was set to the playbook: https://github.com/ansible/tower-fact-modules/blob/master/scan_facts.yml.
20.10.1. Fact scan playbooks
The scan job playbook, scan_facts.yml, contains invocations of three fact scan modules - packages, services, and files, along with Ansible’s standard fact gathering. The scan_facts.yml playbook file is similar to this:
- hosts: all
  vars:
    scan_use_checksum: false
    scan_use_recursive: false
  tasks:
    - scan_packages:
    - scan_services:
    - scan_files:
        paths: '{{ scan_file_paths }}'
        get_checksum: '{{ scan_use_checksum }}'
        recursive: '{{ scan_use_recursive }}'
      when: scan_file_paths is defined
The scan_files fact module is the only module that accepts parameters, passed through extra_vars on the scan job template:
scan_file_paths: /tmp/scan_use_checksum: true scan_use_recursive: true
-
The
scan_file_pathsparameter can have multiple settings (such as/tmp/or/var/log). -
The
scan_use_checksumandscan_use_recursiveparameters can also be set to false or omitted. An omission is the same as a false setting.
Scan job templates should enable become and use credentials for which become is a possibility. You can enable become by checking Privilege Escalation from the options list:

20.10.2. Supported OSes for scan_facts.yml
If you use the scan_facts.yml playbook with use fact cache, ensure that you are using one of the following supported operating systems:
- Red Hat Enterprise Linux 5, 6, 7, 8, and 9
- Ubuntu 23.04 (Support for Ubuntu is deprecated and will be removed in a future release)
- OEL 6 and 7
- SLES 11 and 12
- Debian 6, 7, 8, 9, 10, 11, and 12
- Fedora 22, 23, and 24
- Amazon Linux 2023.1.20230912
Some of these operating systems require initial configuration to run python or have access to the python packages, such as python-apt, which the scan modules depend on.
20.10.3. Pre-scan setup
The following are examples of playbooks that configure certain distributions so that scan jobs can be run against them:
Bootstrap Ubuntu (16.04)
---
- name: Get Ubuntu 16, and on ready
 hosts: all
 sudo: yes
 gather_facts: no
 tasks:
 - name: install python-simplejson
   raw: sudo apt-get -y update
   raw: sudo apt-get -y install python-simplejson
   raw: sudo apt-get install python-apt

Bootstrap Fedora (23, 24)
---
- name: Get Fedora ready
 hosts: all
 sudo: yes
 gather_facts: no
 tasks:
 - name: install python-simplejson
   raw: sudo dnf -y update
   raw: sudo dnf -y install python-simplejson
   raw: sudo dnf -y install rpm-python
20.10.4. Custom fact scans
A playbook for a custom fact scan is similar to the example in the Fact scan playbooks section. For example, a playbook that only uses a custom scan_foo Ansible fact module looks similar to this:
scan_foo.py:
def main():
    module = AnsibleModule(
        argument_spec = dict())


    foo = [
      {
        "hello": "world"
      },
      {
        "foo": "bar"
      }
    ]
    results = dict(ansible_facts=dict(foo=foo))
    module.exit_json(**results)


main()
To use a custom fact module, ensure that it lives in the /library/ subdirectory of the Ansible project used in the scan job template. This fact scan module returns a hard-coded set of facts:
[
   {
     "hello": "world"
   },
   {
     "foo": "bar"
   }
 ]
For more information, see the Developing modules section of the Ansible documentation.
20.10.5. Fact caching
Automation controller can store and retrieve facts on a per-host basis through an Ansible Fact Cache plugin. This behavior is configurable on a per-job template basis. Fact caching is turned off by default but can be enabled to serve fact requests for all hosts in an inventory related to the job running. This enables you to use job templates with --limit while still having access to the entire inventory of host facts. A global timeout setting that the plugin enforces per-host, can be specified (in seconds) by going to and selecting Job settings from the Jobs option:

After launching a job that uses fact cache (use_fact_cache=True), each host’s ansible_facts are all stored by the controller in the job’s inventory.
The Ansible Fact Cache plugin that ships with automation controller is enabled on jobs with fact cache enabled (use_fact_cache=True).
When a job that has fact cache enabled (use_fact_cache=True) has run, automation controller restores all records for the hosts in the inventory. Any records with update times newer than the currently stored facts per-host are updated in the database.
New and changed facts are logged through automation controller’s logging facility. Specifically, to the system_tracking namespace or logger. The logging payload includes the following fields:
-
host_name -
inventory_id -
ansible_facts
ansible facts is a dictionary of all Ansible facts for host_name in the automation controller inventory, inventory_id.
If a hostname includes a forward slash (/), fact cache does not work for that host. If you have an inventory with 100 hosts and one host has a / in the name, the remaining 99 hosts still collect facts.
20.10.6. Benefits of fact caching
Fact caching saves you time over running fact gathering. If you have a playbook in a job that runs against a thousand hosts and forks, you can spend 10 minutes gathering facts across all of those hosts. However, if you run a job on a regular basis, the first run of it caches these facts and the next run pulls them from the database. This reduces the runtime of jobs against large inventories, including Smart Inventories.
Do not modify the ansible.cfg file to apply fact caching. Custom fact caching could conflict with the controller’s fact caching feature. You must use the fact caching module that comes with automation controller.
You can choose to use cached facts in your job by enabling it in the Options field of the job templates window.

To clear facts, run the Ansible clear_facts meta task. The following is an example playbook that uses the Ansible clear_facts meta task.
- hosts: all
  gather_facts: false
  tasks:
    - name: Clear gathered facts from all currently targeted hosts
      meta: clear_facts
You can find the API endpoint for fact caching at:
http://<controller server name>/api/v2/hosts/x/ansible_facts
20.11. Use Cloud Credentials with a cloud inventory
Cloud Credentials can be used when syncing a cloud inventory. They can also be associated with a job template and included in the runtime environment for use by a playbook. The following Cloud Credentials are supported:
20.11.1. OpenStack
The following sample playbook invokes the nova_compute Ansible OpenStack cloud module and requires credentials:
-
auth_url -
username -
password -
project name
These fields are made available to the playbook through the environmental variable OS_CLIENT_CONFIG_FILE, which points to a YAML file written by the controller based on the contents of the cloud credential. The following sample playbooks load the YAML file into the Ansible variable space:
- OS_CLIENT_CONFIG_FILE example:
clouds:
  devstack:
    auth:
      auth_url: http://devstack.yoursite.com:5000/v2.0/
      username: admin
      password: your_password_here
project_name: demo- Playbook example:
- hosts: all
  gather_facts: false
  vars:
    config_file: "{{ lookup('env', 'OS_CLIENT_CONFIG_FILE') }}"
    nova_tenant_name: demo
    nova_image_name: "cirros-0.3.2-x86_64-uec"
    nova_instance_name: autobot
    nova_instance_state: 'present'
    nova_flavor_name: m1.nano


    nova_group:
      group_name: antarctica
      instance_name: deceptacon
      instance_count: 3
  tasks:
    - debug: msg="{{ config_file }}"
    - stat: path="{{ config_file }}"
      register: st
    - include_vars: "{{ config_file }}"
      when: st.stat.exists and st.stat.isreg


    - name: "Print out clouds variable"
      debug: msg="{{ clouds|default('No clouds found') }}"


    - name: "Setting nova instance state to: {{ nova_instance_state }}"
      local_action:
        module: nova_compute
        login_username: "{{ clouds.devstack.auth.username }}"
        login_password: "{{ clouds.devstack.auth.password }}"
20.11.2. Amazon Web Services
Amazon Web Services (AWS) cloud credentials are exposed as the following environment variables during playbook execution (in the job template, choose the cloud credential needed for your setup):
-
AWS_ACCESS_KEY_ID -
AWS-SECRET_ACCESS_KEY
Each AWS module implicitly uses these credentials when run through the controller without having to set the aws_access_key_id or aws_secret_access_key module options.
20.11.3. Google
Google cloud credentials are exposed as the following environment variables during playbook execution (in the job template, choose the cloud credential needed for your setup):
-
GCE_EMAIL -
GCE_PROJECT -
GCE_CREDENTIALS_FILE_PATH
Each Google module implicitly uses these credentials when run through the controller without having to set the service_account_email, project_id, or pem_file module options.
20.11.4. Azure
Azure cloud credentials are exposed as the following environment variables during playbook execution (in the job template, choose the cloud credential needed for your setup):
-
AZURE_SUBSCRIPTION_ID -
AZURE_CERT_PATH
Each Azure module implicitly uses these credentials when run via the controller without having to set the subscription_id or management_cert_path module options.
20.11.5. VMware
VMware cloud credentials are exposed as the following environment variables during playbook execution (in the job template, choose the cloud credential needed for your setup):
-
VMWARE_USER -
VMWARE_PASSWORD -
VMWARE_HOST
The following sample playbook demonstrates the usage of these credentials:
- vsphere_guest:
    vcenter_hostname: "{{ lookup('env', 'VMWARE_HOST') }}"
    username: "{{ lookup('env', 'VMWARE_USER') }}"
    password: "{{ lookup('env', 'VMWARE_PASSWORD') }}"
    guest: newvm001
    from_template: yes
    template_src: linuxTemplate
    cluster: MainCluster
    resource_pool: "/Resources"
    vm_extra_config:
      folder: MyFolder
20.12. Provisioning Callbacks
Provisioning Callbacks are a feature of automation controller that enable a host to initiate a playbook run against itself, rather than waiting for a user to launch a job to manage the host from the automation controller console.
Provisioning Callbacks are only used to run playbooks on the calling host and are meant for cloud bursting. Cloud bursting is a cloud computing configuration that enables a private cloud to access public cloud resources by "bursting" into a public cloud when computing demand spikes.
Example
New instances with a need for client to server communication for configuration, such as transmitting an authorization key, not to run a job against another host. This provides for automatically configuring the following:
- A system after it has been provisioned by another system (such as AWS auto-scaling, or an OS provisioning system like kickstart or preseed).
- Launching a job programmatically without invoking the automation controller API directly.
The job template launched only runs against the host requesting the provisioning.
This is often accessed with a firstboot type script or from cron.
20.12.1. Enabling Provisioning Callbacks
Procedure
To enable callbacks, check the Provisioning Callbacks checkbox in the job template. This displays Provisioning Callback URL for the job template.
NoteIf you intend to use automation controller’s provisioning callback feature with a dynamic inventory, set Update on Launch for the inventory group used in the job template.
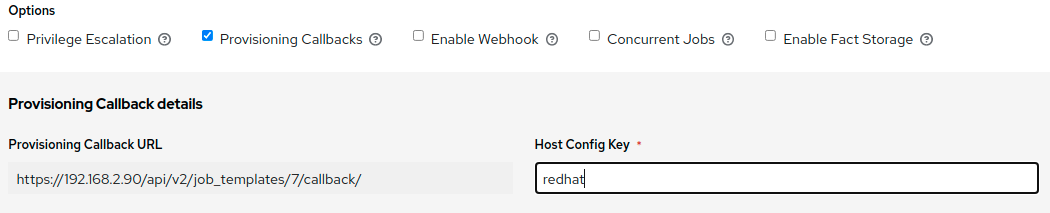
Callbacks also require a Host Config Key, to ensure that foreign hosts with the URL cannot request configuration. Provide a custom value for Host Config Key. The host key can be reused across multiple hosts to apply this job template against multiple hosts. If you want to control what hosts are able to request configuration, the key may be changed at any time.
To callback manually using REST:
Procedure
Look at the callback URL in the UI, in the form: https://<CONTROLLER_SERVER_NAME>/api/v2/job_templates/7/callback/
- The "7" in the sample URL is the job template ID in automation controller.
Ensure that the request from the host is a POST. The following is an example using
curl(all on a single line):curl -k -f -i -H 'Content-Type:application/json' -XPOST -d '{"host_config_key": "redhat"}' \ https://<CONTROLLER_SERVER_NAME>/api/v2/job_templates/7/callback/- Ensure that the requesting host is defined in your inventory for the callback to succeed.
Troubleshooting
If automation controller fails to locate the host either by name or IP address in one of your defined inventories, the request is denied. When running a job template in this way, ensure that the host initiating the playbook run against itself is in the inventory. If the host is missing from the inventory, the job template fails with a No Hosts Matched type error message.
If your host is not in the inventory and Update on Launch is set for the inventory group automation controller attempts to update cloud based inventory sources before running the callback.
Verification
Successful requests result in an entry on the Jobs tab, where you can view the results and history. You can access the callback using REST, but the suggested method of using the callback is to use one of the example scripts that ships with automation controller:
-
/usr/share/awx/request_tower_configuration.sh(Linux/UNIX) -
/usr/share/awx/request_tower_configuration.ps1(Windows)
Their usage is described in the source code of the file by passing the -h flag, as the following shows:
./request_tower_configuration.sh -h
Usage: ./request_tower_configuration.sh <options>


Request server configuration from Ansible Tower.


OPTIONS:
 -h      Show this message
 -s      Controller server (e.g. https://ac.example.com) (required)
 -k      Allow insecure SSL connections and transfers
 -c      Host config key (required)
 -t      Job template ID (required)
 -e      Extra variables
This script can retry commands and is therefore a more robust way to use callbacks than a simple curl request. The script retries once per minute for up to ten minutes.
This is an example script. Edit this script if you need more dynamic behavior when detecting failure scenarios, as any non-200 error code may not be a transient error requiring retry.
You can use callbacks with dynamic inventory in automation controller. For example, when pulling cloud inventory from one of the supported cloud providers. In these cases, along with setting Update On Launch, ensure that you configure an inventory cache timeout for the inventory source, to avoid hammering of your cloud’s API endpoints. Since the request_tower_configuration.sh script polls once per minute for up to ten minutes, a suggested cache invalidation time for inventory (configured on the inventory source itself) would be one or two minutes.
Running the request_tower_configuration.sh script from a cron job is not recommended, however, a suggested cron interval is every 30 minutes. Repeated configuration can be handled by scheduling automation controller so that the primary use of callbacks by most users is to enable a base image that is bootstrapped into the latest configuration when coming online. Running at first boot is best practice. First boot scripts are init scripts that typically self-delete, so you set up an init script that calls a copy of the request_tower_configuration.sh script and make that into an auto scaling image.
20.12.2. Passing extra variables to Provisioning Callbacks
You can pass extra_vars in Provisioning Callbacks the same way you can in a regular job template. To pass extra_vars, the data sent must be part of the body of the POST as application or JSON, as the content type.
Procedure
Pass extra variables by using one of these methods:
Use the following JSON format as an example when adding your own
extra_varsto be passed:'{"extra_vars": {"variable1":"value1","variable2":"value2",...}}'Pass extra variables to the job template call using
curl:root@localhost:~$ curl -f -H 'Content-Type: application/json' -XPOST \ -d '{"host_config_key": "redhat", "extra_vars": "{\"foo\": \"bar\"}"}' \ https://<CONTROLLER_SERVER_NAME>/api/v2/job_templates/7/callback
For more information, see Launching Jobs with Curl in the Automation controller Administration Guide.
20.13. Extra variables
When you pass survey variables, they are passed as extra variables (extra_vars) within automation controller. However, passing extra variables to a job template (as you would do with a survey) can override other variables being passed from the inventory and project.
By default, extra_vars are marked as !unsafe unless you specify them on the Job Template’s Extra Variables section. These are trusted, because they can only be added by users with enough privileges to add or edit a Job Template. For example, nested variables do not expand when entered as a prompt, as the Jinja brackets are treated as a string. For more information about unsafe variables, see Unsafe or raw strings.
extra_vars passed to the job launch API are only honored if one of the following is true:
- They correspond to variables in an enabled survey.
-
ask_variables_on_launchis set to True.
Example
You have a defined variable for an inventory for debug = true. It is possible that this variable, debug = true, can be overridden in a job template survey.
To ensure the variables that you pass are not overridden, ensure they are included by redefining them in the survey. Extra variables can be defined at the inventory, group, and host levels.
If you are specifying the ALLOW_JINJA_IN_EXTRA_VARS parameter, see the Controller Tips and Tricks section of the Automation controller Administration Guide to configure it in the Jobs Settings screen of the controller UI.
The job template extra variables dictionary is merged with the survey variables.
The following are some simplified examples of extra_vars in YAML and JSON formats:
- The configuration in YAML format:
launch_to_orbit: true
satellites:
  - sputnik
  - explorer
  - satcom
- The configuration in JSON format:
{
  "launch_to_orbit": true,
  "satellites": ["sputnik", "explorer", "satcom"]
}
The following table notes the behavior (hierarchy) of variable precedence in automation controller as it compares to variable precedence in Ansible.
Table 20.1. Automation controller Variable Precedence Hierarchy (last listed wins)
| Ansible | automation controller |
|---|---|
| role defaults | role defaults |
| dynamic inventory variables | dynamic inventory variables |
| inventory variables | automation controller inventory variables |
|
inventory | automation controller group variables |
|
inventory | automation controller host variables |
|
playbook |
playbook |
|
playbook |
playbook |
| host facts | host facts |
| registered variables | registered variables |
| set facts | set facts |
| play variables | play variables |
|
play | (not supported) |
|
play |
play |
| role and include variables | role and include variables |
| block variables | block variables |
| task variables | task variables |
| extra variables | Job Template extra variables |
| Job Template Survey (defaults) | |
| Job Launch extra variables |
20.13.1. Relaunch a job template
Instead of manually relaunching a job, a relaunch is denoted by setting launch_type to relaunch. The relaunch behavior deviates from the launch behavior in that it does not inherit extra_vars.
Job relaunching does not go through the inherit logic. It uses the same extra_vars that were calculated for the job being relaunched.
Example
You launch a job template with no extra_vars which results in the creation of a job called j1. Then you edit the job template and add extra_vars (such as adding "{ "hello": "world" }").
Relaunching j1 results in the creation of j2, but because there is no inherit logic and j1 has no extra_vars, j2 does not have any extra_vars.
If you launch the job template with the extra_vars that you added after the creation of j1, the relaunch job created (j3) includes the extra_vars. Relaunching j3 results in the creation of j4, which also includes extra_vars.
Chapter 21. Job slicing
A sliced job refers to the concept of a distributed job. Distributed jobs are used for running a job across a large number of hosts, enabling you to run multiple ansible-playbooks, each on a subset of an inventory, that can be scheduled in parallel across a cluster.
By default, Ansible runs jobs from a single control instance. For jobs that do not require cross-host orchestration, job slicing takes advantage of automation controller’s ability to distribute work to multiple nodes in a cluster.
Job slicing works by adding a Job Template field job_slice_count, which specifies the number of jobs into which to slice the Ansible run. When this number is greater than 1, automation controller generates a workflow from a job template instead of a job. The inventory is distributed evenly amongst the slice jobs. The workflow job is then started, and proceeds as though it were a normal workflow.
When launching a job, the API returns either a job resource (if job_slice_count = 1) or a workflow job resource. The corresponding User Interface (UI) redirects to the appropriate screen to display the status of the run.
21.1. Job slice considerations
When setting up job slices, consider the following:
- A sliced job creates a workflow job, which then creates jobs.
- A job slice consists of a job template, an inventory, and a slice count.
When executed, a sliced job splits each inventory into a number of "slice size" chunks. It then queues jobs of ansible-playbook runs on each chunk of the appropriate inventory. The inventory fed into ansible-playbook is a shortened version of the original inventory that only contains the hosts in that particular slice. The completed sliced job that displays on the Jobs list are labeled accordingly, with the number of sliced jobs that have run:
These sliced jobs follow normal scheduling behavior (number of forks, queuing due to capacity, assignation to instance groups based on inventory mapping).
NoteJob slicing is intended to scale job executions horizontally. Enabling job slicing on a job template divides an inventory to be acted upon in the number of slices configured at launch time and then starts a job for each slice.
Normally, the number of slices is equal to or less than the number of automation controller nodes. Setting an extremely high number of job slices, such as thousands, while permitted, can cause performance degradation as the job scheduler is not designed to simultaneously schedule thousands of workflow nodes, which are what the sliced jobs become.
- Sliced job templates with prompts or extra variables behave the same as standard job templates, applying all variables and limits to the entire set of slice jobs in the resulting workflow job. However, when passing a limit to a sliced job, if the limit causes slices to have no hosts assigned, those slices will fail, causing the overall job to fail.
- A job slice job status of a distributed job is calculated in the same manner as workflow jobs. It fails if there are any unhandled failures in its sub-jobs.
- Any job that intends to orchestrate across hosts (rather than just applying changes to individual hosts) must not be configured as a slice job.
- Any job that does, can fail, and automation controller does not attempt to discover or account for playbooks that fail when run as slice jobs.
21.2. Job slice execution behavior
When jobs are sliced, they can run on any node. Insufficient capacity in the system can cause some to run at a different time. When slice jobs are running, job details display the workflow and job slices currently running, as well as a link to view their details individually.
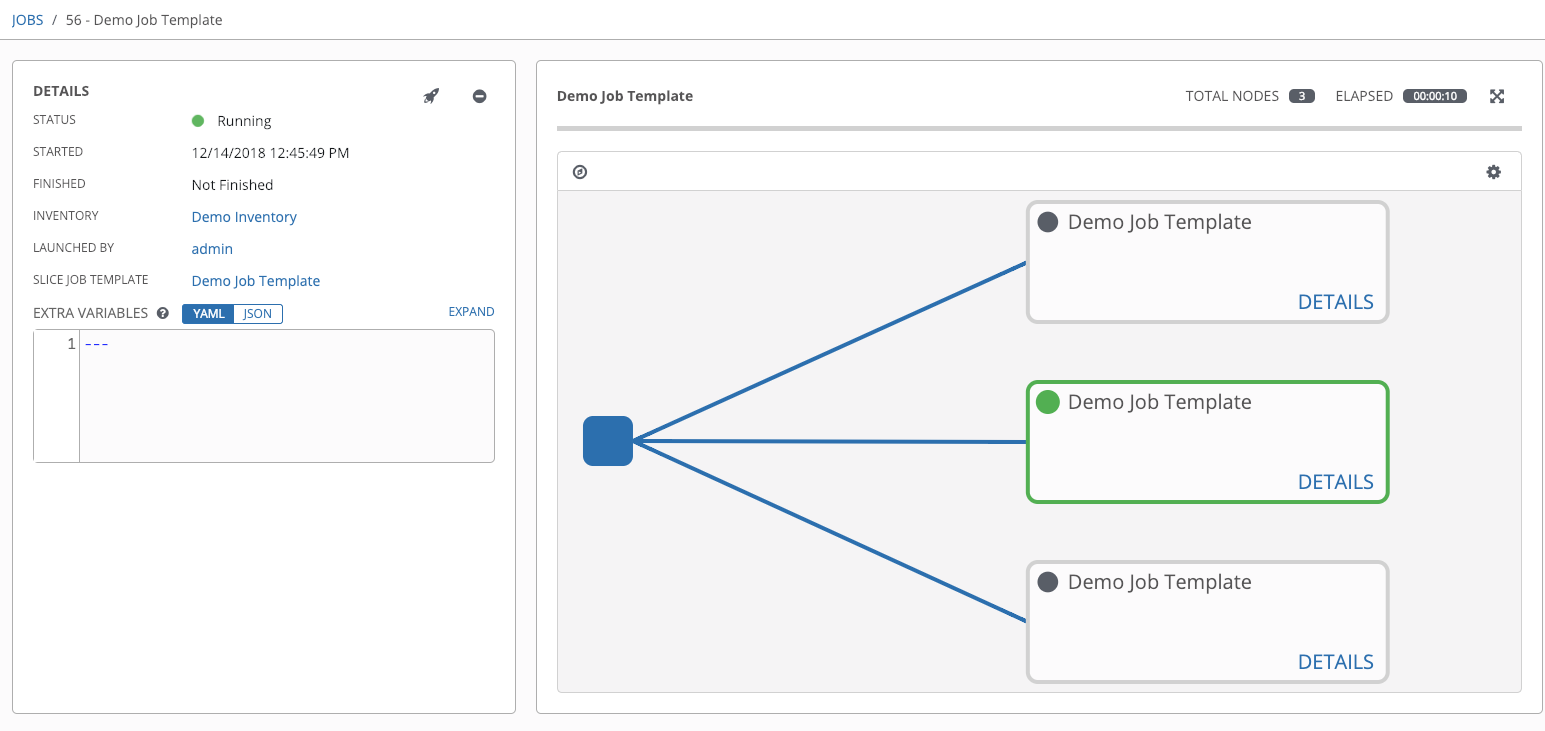
By default, job templates are not normally configured to execute simultaneously (allow_simultaneous must be checked in the API or Enable Concurrent Jobs in the UI). Slicing overrides this behavior and implies allow_simultaneous even if that setting is clear. See Job templates for information on how to specify this, as well as the number of job slices on your job template configuration.
The Job templates section provides additional detail on performing the following operations in the UI:
- Launch workflow jobs with a job template that has a slice number greater than one.
- Cancel the whole workflow or individual jobs after launching a slice job template.
- Relaunch the whole workflow or individual jobs after slice jobs finish running.
- View the details about the workflow and slice jobs after launching a job template.
- Search slice jobs specifically after you create them, as per the subsequent section, "Search job slices").
21.3. Searching job slices
To make it easier to find slice jobs, use the search functionality to apply a search filter to:
- Job lists to show only slice jobs
- Job lists to show only parent workflow jobs of job slices
- Job template lists to only show job templates that produce slice jobs
Procedure
Search for slice jobs by using one of the following methods:
To show only slice jobs in job lists, as with most cases, you can filter either on the type (jobs here) or
unified_jobs:/api/v2/jobs/?job_slice_count__gt=1
To show only parent workflow jobs of job slices:
/api/v2/workflow_jobs/?job_template__isnull=false
To show only job templates that produce slice jobs:
/api/v2/job_templates/?job_slice_count__gt=1
Chapter 22. Workflows in automation controller
Workflows enable you to configure a sequence of disparate job templates (or workflow templates) that may or may not share inventory, playbooks, or permissions.
Workflows have admin and execute permissions, similar to job templates. A workflow accomplishes the task of tracking the full set of jobs that were part of the release process as a single unit.
Job or workflow templates are linked together using a graph-like structure called nodes. These nodes can be jobs, project syncs, or inventory syncs. A template can be part of different workflows or used multiple times in the same workflow. A copy of the graph structure is saved to a workflow job when you launch the workflow.
The following example shows a workflow that contains all three, as well as a workflow job template:
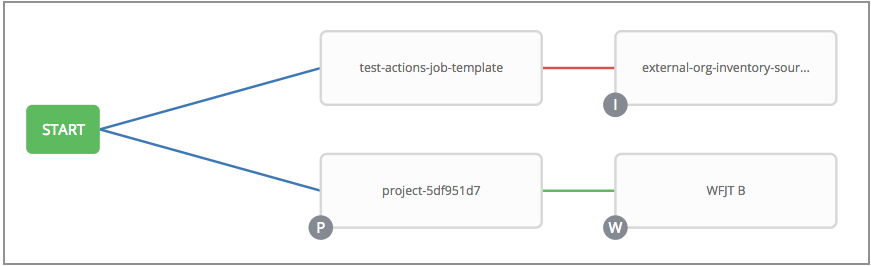
As the workflow runs, jobs are spawned from the node’s linked template. Nodes linking to a job template which has prompt-driven fields (job_type, job_tags, skip_tags, limit) can contain those fields, and is not prompted on launch. Job templates that prompt for a credential or inventory, without defaults, are not available for inclusion in a workflow.
22.1. Workflow scenarios and considerations
When building workflows, consider the following:
- A root node is set to ALWAYS by default and cannot be edited.
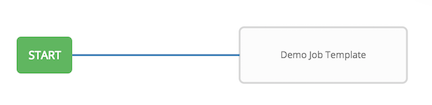
- A node can have multiple parents, and children can be linked to any of the states of success, failure, or always. If always, then the state is neither success nor failure. States apply at the node level, not at the workflow job template level. A workflow job is marked as successful unless it is canceled or encounters an error.
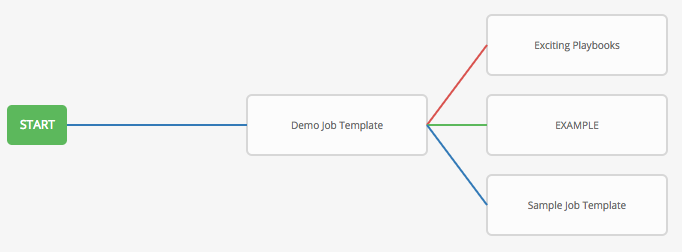
- If you remove a job or workflow template within the workflow, the nodes previously connected to those deleted, automatically get connected upstream and retain the edge type as in the following example:
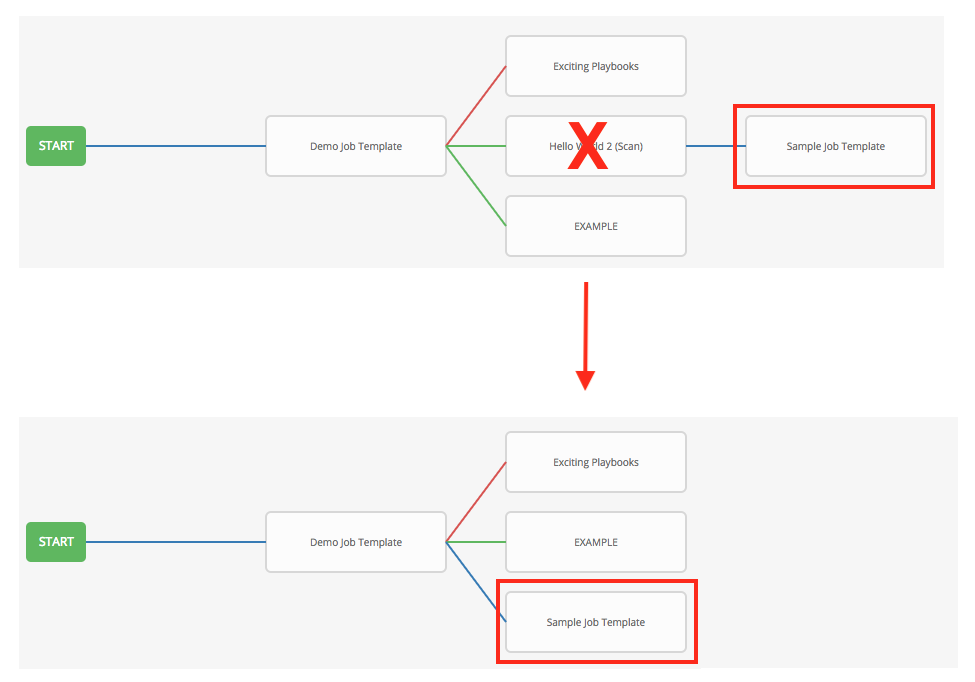
You can have a convergent workflow, where multiple jobs converge into one. In this scenario, any of the jobs or all of them must complete before the next one runs, as shown in the following example:
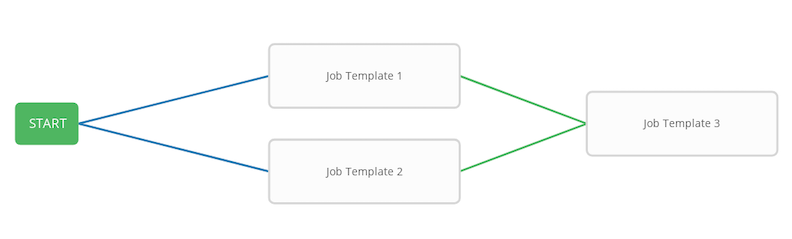
- In this example, automation controller runs the first two job templates in parallel. When they both finish and succeed as specified, the third downstream (convergence node), triggers.
- Prompts for inventory and surveys apply to workflow nodes in workflow job templates.
-
If you launch from the API, running a
getcommand displays a list of warnings and highlights missing components. The following image illustrates a basic workflow for a workflow job template:
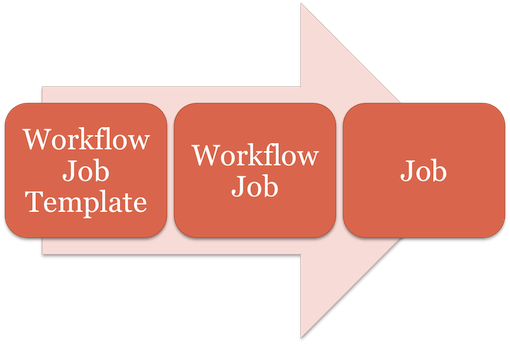
- It is possible to launch several workflows simultaneously, and set a schedule for when to launch them. You can set notifications on workflows, such as when a job completes, similar to that of job templates.
Job slicing is intended to scale job executions horizontally.
If you enable job slicing on a job template, it divides the inventory to be acted on in the number of slices configured at launch time. Then starts a job for each slice.
For more information see the Job slicing section.
- You can build a recursive workflow, but if automation controller detects an error, it stops at the time the nested workflow attempts to run.
- Artifacts gathered in jobs in the sub-workflow are passed to downstream nodes.
- An inventory can be set at the workflow level, or prompt for inventory on launch.
-
When launched, all job templates in the workflow that have
ask_inventory_on_launch=trueuse the workflow level inventory. - Job templates that do not prompt for inventory ignore the workflow inventory and run against their own inventory.
- If a workflow prompts for inventory, schedules and other workflow nodes can provide the inventory.
-
In a workflow convergence scenario,
set_statsdata is merged in an undefined way, therefore you must set unique keys.
22.2. Workflow extra variables
Workflows use surveys to specify variables to be used in the playbooks in the workflow, called extra_vars. Survey variables are combined with extra_vars defined on the workflow job template, and saved to the workflow job extra_vars. extra_vars in the workflow job are combined with job template variables when spawning jobs within the workflow.
Workflows use the same behavior (hierarchy) of variable precedence as job templates with the exception of three additional variables. See the Automation controller Variable Precedence Hierarchy in the Extra variables section of Job templates. The three additional variables include:
- Workflow job template extra variables
- Workflow job template survey (defaults)
- Workflow job launch extra variables
Workflows included in a workflow follow the same variable precedence, they only inherit variables if they are specifically prompted for, or defined as part of a survey.
In addition to the workflow extra_vars, jobs and workflows run as part of a workflow can inherit variables in the artifacts dictionary of a parent job in the workflow (also combining with ancestors further upstream in its branch). These can be defined by the set_stats Ansible module.
If you use the set_stats module in your playbook, you can produce results that can be consumed downstream by another job.
Example
Notifying users as to the success or failure of an integration run. In this example, there are two playbooks that can be combined in a workflow to exercise artifact passing:
- invoke_set_stats.yml: first playbook in the workflow:
---
- hosts: localhost
  tasks:
    - name: "Artifact integration test results to the web"
      local_action: 'shell curl -F "file=@integration_results.txt" https://file.io'
      register: result


    - name: "Artifact URL of test results to Workflows"
      set_stats:
        data:
integration_results_url: "{{ (result.stdout|from_json).link }}"- use_set_stats.yml: second playbook in the workflow:
---
- hosts: localhost
  tasks:
    - name: "Get test results from the web"
      uri:
        url: "{{ integration_results_url }}"
        return_content: true
      register: results


    - name: "Output test results"
      debug:
        msg: "{{ results.content }}"
The set_stats module processes this workflow as follows:
- The contents of an integration result is uploaded to the web.
-
Through the
invoke_set_statsplaybook,set_statsis then invoked to artifact the URL of the uploadedintegration_results.txtinto the Ansible variable "integration_results_url". - The second playbook in the workflow consumes the Ansible extra variable "integration_results_url". It calls out to the web using the uri module to get the contents of the file uploaded by the previous job template job. Then, it prints out the contents of the obtained file.
For artifacts to work, keep the default setting, per_host = False in the set_stats module.
22.3. Workflow states
The workflow job can have the following states (no Failed state):
- Waiting
- Running
- Success (finished)
- Cancel
- Error
- Failed
In the workflow scheme, canceling a job cancels the branch, while canceling the workflow job cancels the entire workflow.
22.4. Role-based access controls
To edit and delete a workflow job template, you must have the administrator role. To create a workflow job template, you must be an organization administrator or a system administrator. However, you can run a workflow job template that contains job templates that you do not have permissions for. System administrators can create a blank workflow and then grant an admin_role to a low-level user, after which they can delegate more access and build the graph. You must have execute access to a job template to add it to a workflow job template.
You can also perform other tasks, such as making a duplicate copy or re-launching a workflow, depending on which permissions are granted to a user. You must have permissions to all the resources used in a workflow, such as job templates, before relaunching or making a copy.
For more information, see Role-based access controls.
For more information on performing the tasks described in this section, see the Administration Guide.
Chapter 23. Workflow job templates
A workflow job template links together a sequence of disparate resources that tracks the full set of jobs that were part of the release process as a single unit. These resources include the following:
- Job templates
- Workflow job templates
- Project syncs
- Inventory source syncs
The Templates list view shows the workflow and job templates that are currently available. The default view is collapsed (Compact), showing the template name, template type, and the statuses of the jobs that have run by using that template. You can click the arrow next to each entry to expand and view more information. This list is sorted alphabetically by name, but you can sort by other criteria, or search by various fields and attributes of a template. From this screen you can launch
![]() , edit
, edit
![]() , and copy
, and copy
![]() a workflow job template.
a workflow job template.
Only workflow templates have the workflow visualizer
![]() icon as a shortcut for accessing the workflow editor.
icon as a shortcut for accessing the workflow editor.
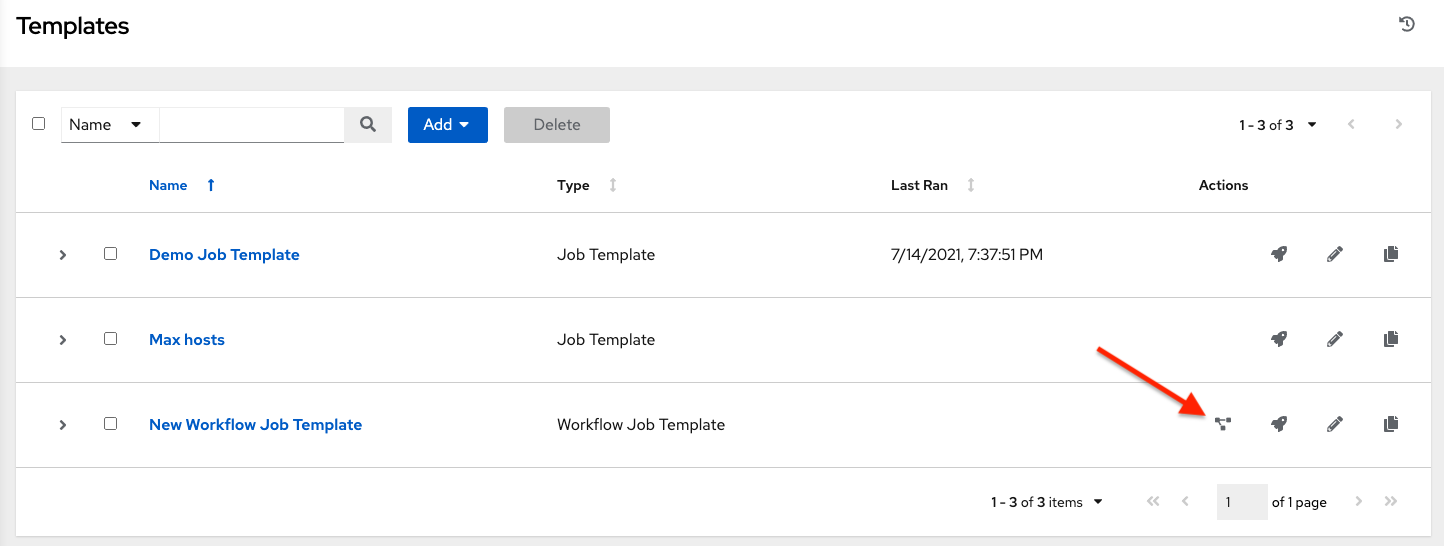
Workflow templates can be used as building blocks for another workflow template. You can enable Prompt on Launch by setting up several settings in a workflow template, which you can edit at the workflow job template level. These do not affect the values assigned at the individual workflow template level. For further instructions, see the Workflow Visualizer section.
23.1. Creating a workflow template
To create a new workflow job template, complete the following steps:
If you set a limit to a workflow template, it is not passed down to the job template unless you check Prompt on launch for the limit. This can lead to playbook failures if the limit is mandatory for the playbook that you are running.
Procedure
On the Templates list view, select Add workflow template from the Add list.
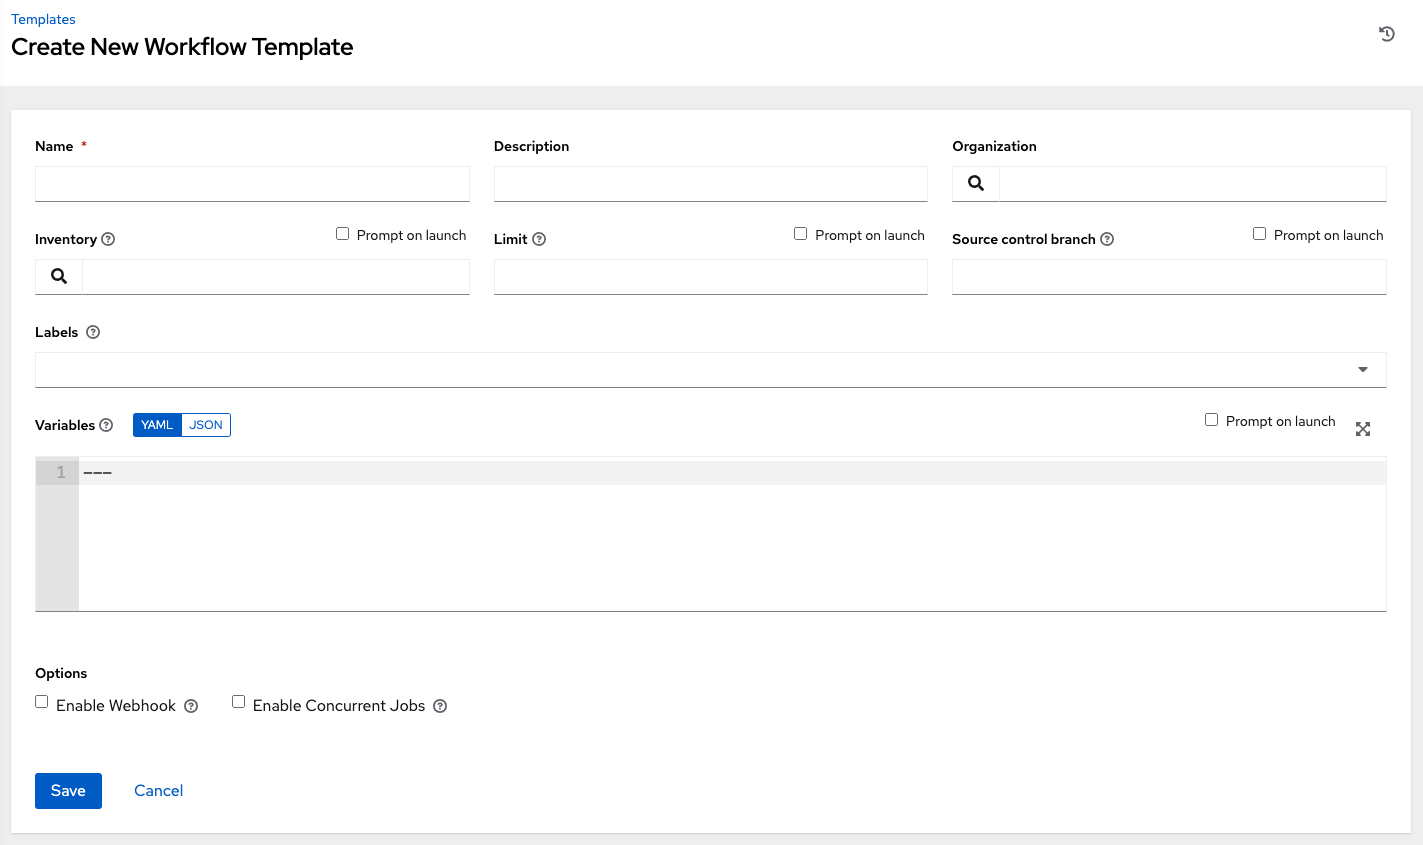
Enter the appropriate details in the following fields:
NoteIf a field has the Prompt on launch checkbox selected, either launching the workflow template, or using the workflow template within another workflow template, you are prompted for the value for that field. Most prompted values override any values set in the job template. Exceptions are noted in the following table.
Field Options Prompt on Launch Name
Enter a name for the job.
N/A
Description
Enter an arbitrary description as appropriate (optional).
N/A
Organization
Choose the organization to use with this template from the organizations available to the logged in user.
N/A
Inventory
Optionally, select the inventory to use with this template from the inventories available to the logged in user.
Yes
Limit
A host pattern to further constrain the list of hosts managed or affected by the playbook. You can separate many patterns by colons (:). As with core Ansible:
- a:b means "in group a or b"
- a:b:&c means "in a or b but must be in c"
- a:!b means "in a, and definitely not in b"
For more information see, Patterns: targeting hosts and groups in the Ansible documentation.
Yes
If selected, even if a default value is supplied, you are prompted upon launch to select a limit.
Source control branch
Select a branch for the workflow. This branch is applied to all workflow job template nodes that prompt for a branch.
Yes
Labels
-
Optionally, supply labels that describe this workflow job template, such as
devortest. Use labels to group and filter workflow job templates and completed jobs in the display. - Labels are created when they are added to the workflow template. Labels are associated to a single Organization using the Project that is provided in the workflow template. Members of the Organization can create labels on a workflow template if they have edit permissions (such as the admin role).
- Once you save the job template, the labels appear in the workflow job templates Details view.
- Labels are only applied to the workflow templates not the job template nodes that are used in the workflow.
-
Select
beside a label to remove it. When a label is removed, it is no longer associated with that particular Job or Job Template, but it remains associated with any other jobs that reference it.
Yes
If selected, even if a default value is supplied, you are prompted when launching to supply additional labels, if needed. - You cannot delete existing labels, selecting
only removes the newly added labels, not existing default labels.
Variables
- Pass extra command line variables to the playbook.
This is the "-e" or "-extra-vars" command line parameter for ansible-playbook that is documented in the Ansible documentation at Controlling how Ansible behaves: precedence rules. - Provide key or value pairs by using either YAML or JSON. These variables have a maximum value of precedence and overrides other variables specified elsewhere. The following is an example value:
git_branch: production release_version: 1.5Yes
If you want to be able to specify extra_vars on a schedule, you must select Prompt on launch for Variables on the workflow job template, or enable a survey on the job template. Those answered survey questions become
extra_vars. For more information about extra variables, see Extra Variables.Job tags
Type and select the Create drop-down to specify which parts of the playbook should run. For more information and examples see Tags in the Ansible documentation.
Yes
Skip Tags
Type and select the Create drop-down to specify certain tasks or parts of the playbook to skip. For more information and examples see Tags in the Ansible documentation.
Yes
Specify the following Options for launching this template, if necessary:
Check Enable Webhooks to turn on the ability to interface with a predefined SCM system web service that is used to launch a workflow job template. GitHub and GitLab are the supported SCM systems.
If you enable webhooks, other fields display, prompting for additional information:
- Webhook Service: Select which service to listen for webhooks from.
- Webhook Credential: Optionally, provide a GitHub or GitLab personal access token (PAT) as a credential to use to send status updates back to the webhook service. For more information, see Credential Types to create one.
When you click , additional fields populate and the workflow visualizer automatically opens.
- Webhook URL: Automatically populated with the URL for the webhook service to POST requests to.
Webhook Key: Generated shared secret to be used by the webhook service to sign payloads sent to automation controller. You must configure this in the settings on the webhook service so that webhooks from this service are accepted in automation controller. For additional information about setting up webhooks, see Working with Webhooks.
Check Enable Concurrent Jobs to allow simultaneous runs of this workflow. For more information, see Automation controller capacity determination and job impact.
- When you have completed configuring the workflow template, click .
Saving the template exits the workflow template page and the workflow visualizer opens to allow you to build a workflow. For more information, see the Workflow visualizer section. Otherwise, select one of these methods:
Close the workflow visualizer to return to the Details tab of the newly saved template. There you can complete the following tasks:
- Review, edit, add permissions, notifications, schedules, and surveys
- View completed jobs
- Build a workflow template
Click to start the workflow.
NoteSave the template before launching, or remains disabled. The Notifications tab is only present after you save the template.
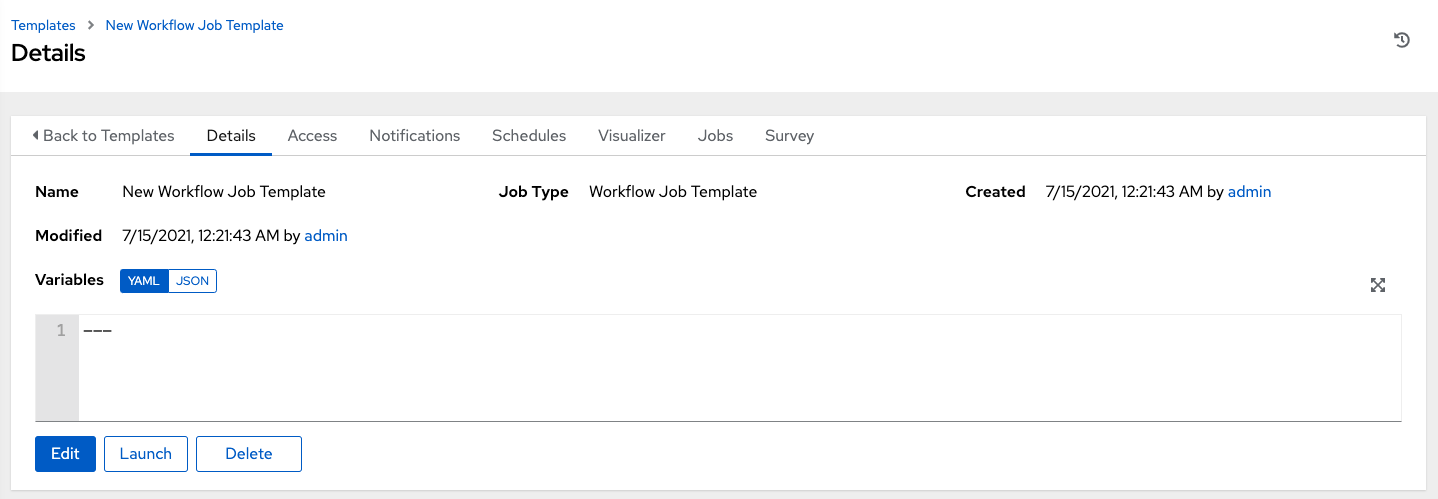
23.2. Work with permissions
Click the Access tab to review, grand, edit, and remove associated permissions for users as well as team members.
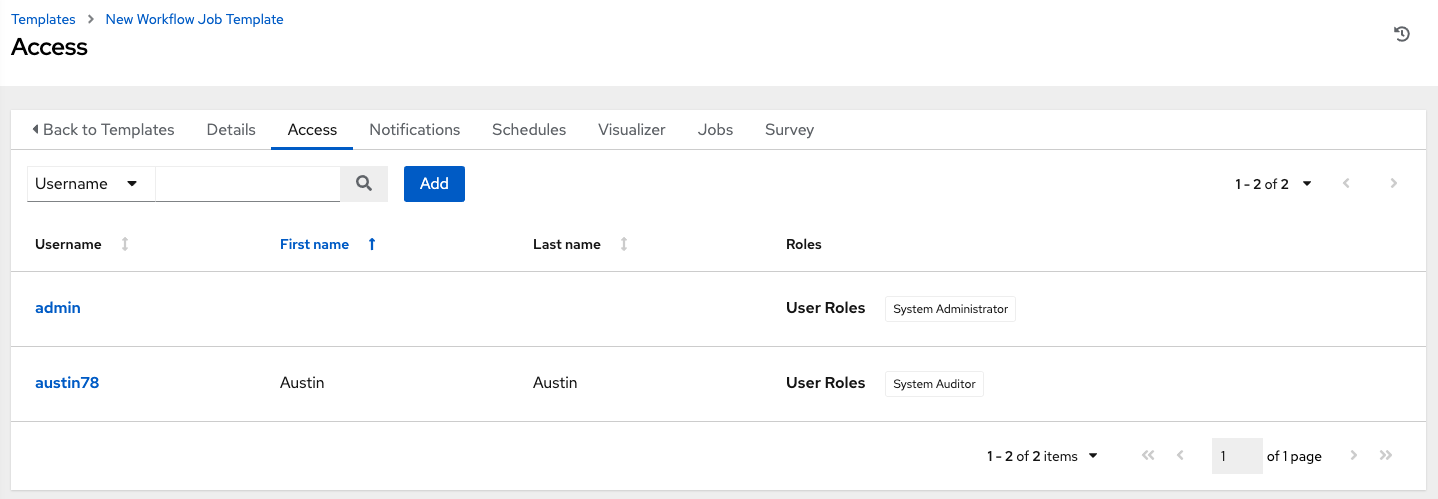
Click to create new permissions for this workflow template by following the prompts to assign them accordingly.
23.3. Work with notifications
For information on working with notifications in workflow job templates, see Work with notifications.
23.4. View completed workflow jobs
The Jobs tab provides the list of job templates that have run. Click the expand
![]() icon next to each job to view the details of each job.
icon next to each job to view the details of each job.
From this view, you can click the job ID, name of the workflow job and see its graphical representation. The following example shows the job details of a workflow job:
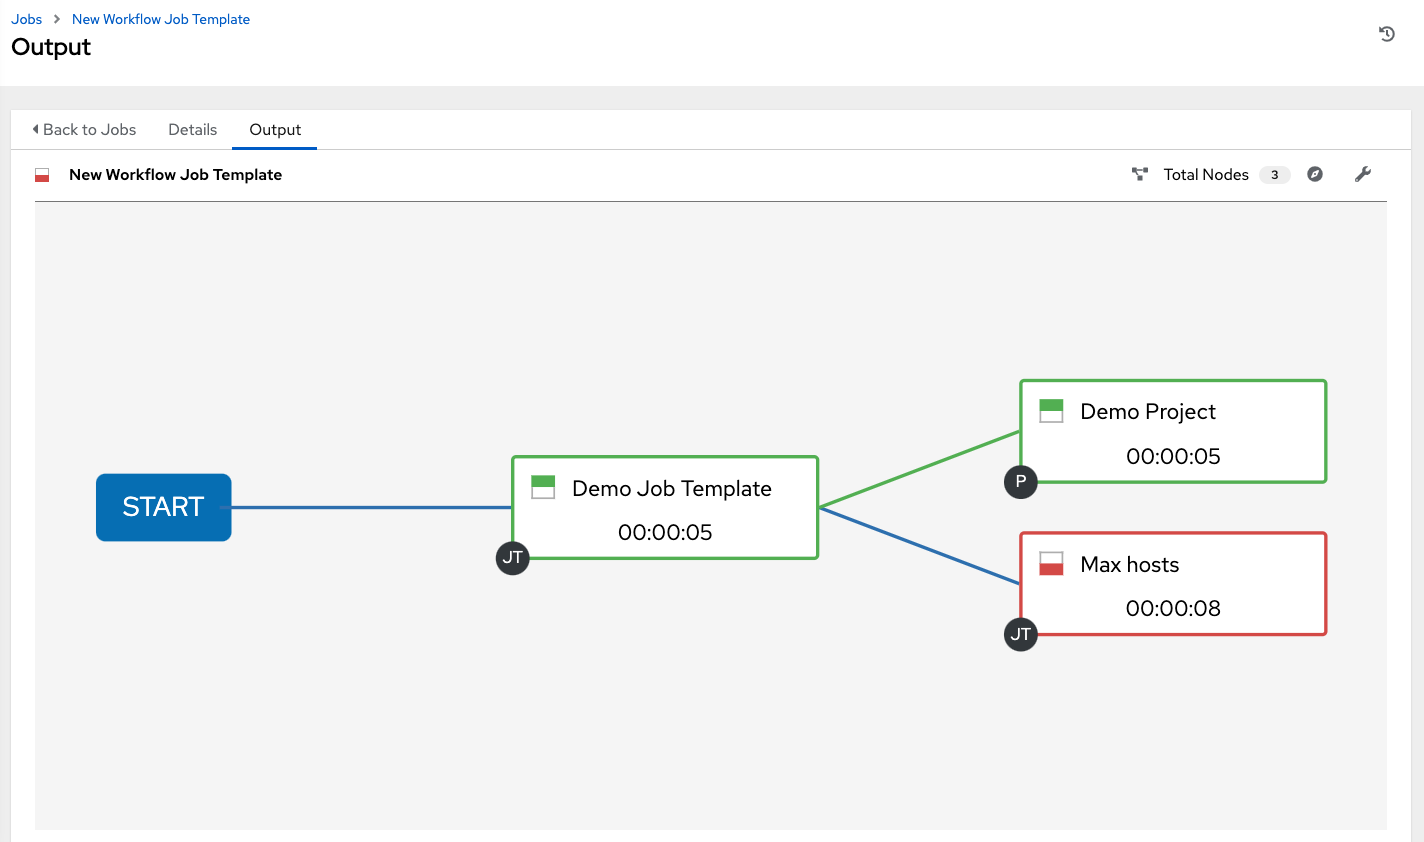
The nodes are marked with labels to help you identify them. For more information, see the legend in the Workflow visualizer section.
23.5. Scheduling a workflow job template
Select the Schedules tab to access the schedules for a particular workflow job template..
For more information on scheduling a workflow job template run, see the Scheduling job templates section.
If a workflow job template used in a nested workflow has a survey, or the Prompt on Launch is selected for the inventory option, the option displays next to the and options on the schedule form. Click to show an optional INVENTORY step where you can provide or remove an inventory or skip this step without any changes.
23.6. Surveys in workflow job templates
Workflows containing job types of Run or Check provide a way to set up surveys in the workflow job template creation or editing screens.
For more information on job surveys, including how to create a survey and optional survey questions in workflow job templates, see the Surveys in job templates section.
23.7. Workflow visualizer
The Workflow Visualizer provides a graphical way of linking together job templates, workflow templates, project syncs, and inventory syncs to build a workflow template. Before you build a workflow template, see the Workflows section for considerations associated with various scenarios on parent, child, and sibling nodes.
23.7.1. Building a workflow
You can set up any combination of two or more of the following node types to build a workflow:
- Template (Job Template or Workflow Job Template)
- Project Sync
- Inventory Sync
- Approval
Each node is represented by a rectangle while the relationships and their associated edge types are represented by a line (or link) that connects them.
Procedure
To launch the workflow visualizer, use one of these methods:
From the navigation panel, select → .
- Select a workflow template, in the Details tab click .
- Select the Visualizer tab.
From the Templates list view, click the
 icon.
icon.
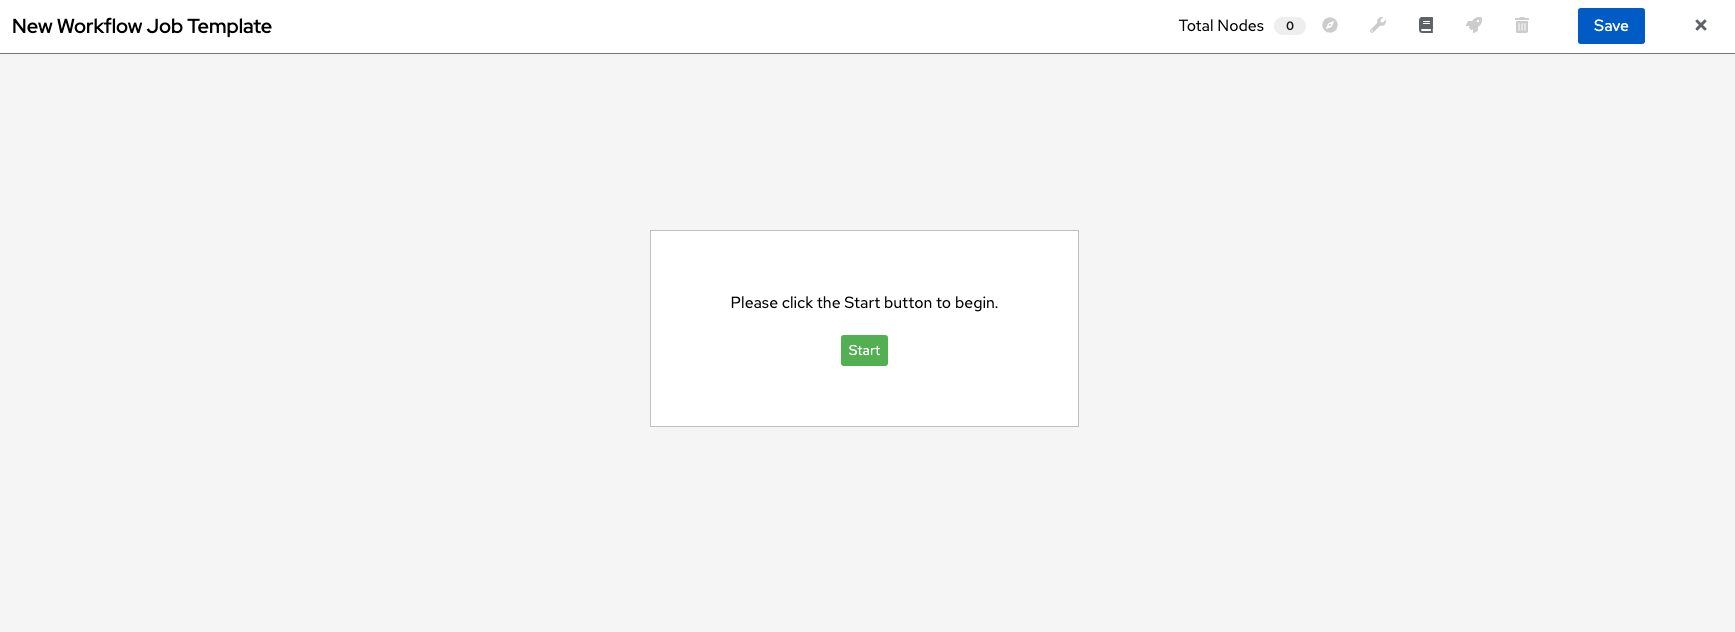
Click to display a list of nodes to add to your workflow.
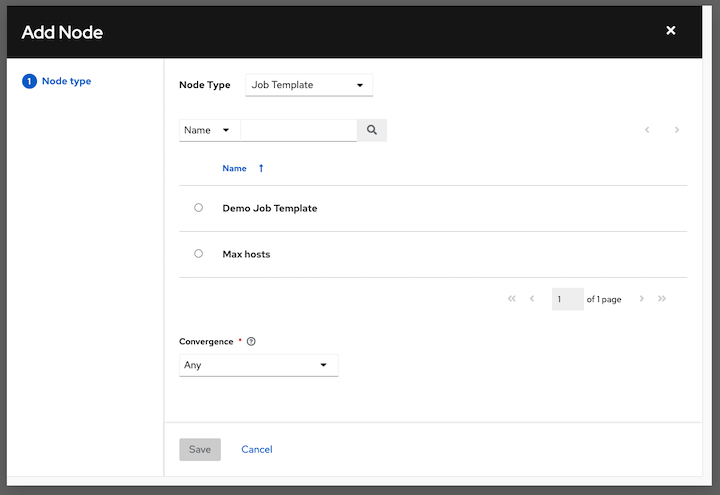
From the Node Type list, select the type of node that you want to add:
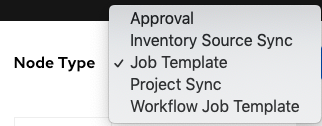
If you select an Approval node, see Approval nodes for more information.
Selecting a node provides the available valid options associated with it.
NoteIf you select a job template that does not have a default inventory when populating a workflow graph, the inventory of the parent workflow is used. Though a credential is not required in a job template, you cannot choose a job template for your workflow if it has a credential that requires a password, unless the credential is replaced by a prompted credential.
- When you select a node type, the workflow begins to build, and you must specify the type of action to be taken for the selected node. This action is also referred to as edge type.
If the node is a root node, the edge type defaults to Always and is non-editable. For subsequent nodes, you can select one of the following scenarios (edge type) to apply to each:
- Always: Continue to execute regardless of success or failure.
- On Success: After successful completion, execute the next template.
- On Failure: After failure, execute a different template.
Select the behavior of the node if it is a convergent node from the Convergence field:
- Any is the default behavior, allowing any of the nodes to complete as specified, before triggering the next converging node. As long as the status of one parent meets one of those run conditions, an any child node will run. An any node requires all nodes to complete, but only one node must complete with the expected outcome.
Choose All to ensure that all nodes complete as specified, before converging and triggering the next node. The purpose of all* nodes is to make sure that every parent meets its expected outcome in order to run the child node. The workflow checks to make sure every parent behaves as expected in order to run the child node. Otherwise, it will not run the child node.
If selected, the node is labeled as ALL in the graphical view:
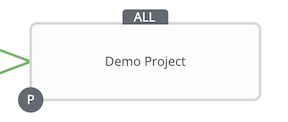 Note
NoteIf a node is a root node, or a node that does not have any nodes converging into it, setting the Convergence rule does not apply, as its behavior is dictated by the action that triggers it.
If a job template used in the workflow has Prompt on Launch selected for any of its parameters, a option appears, enabling you to change those values at the node level. Use the wizard to change the values in each of the tabs and click in the Preview tab.
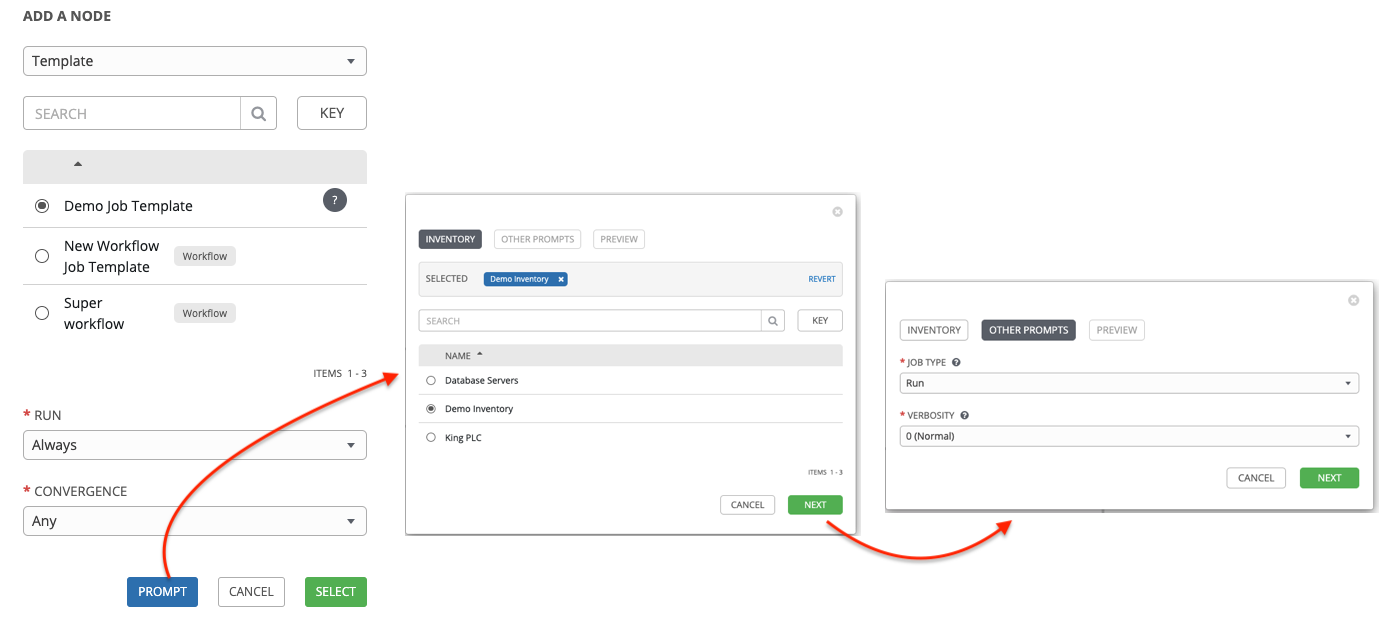
If a workflow template used in the workflow has Prompt on Launch selected for the inventory option, use the wizard to supply the inventory at the prompt. If the parent workflow has its own inventory, it overrides any inventory that is supplied here.
 Note
NoteFor workflow job templates with required fields that prompt details, but do not have a default, you must provide those values when creating a node before the Select option is enabled.
The following two cases disable the option until a value is provided by the option:
- When you select the Prompt on Launch checkbox in a workflow job template, but do not provide a default.
- When you create a survey question that is required but do not provide a default answer.
However, this is not the case with credentials. Credentials that require a password on launch are not permitted when creating a workflow node, because everything required to launch the node must be provided when the node is created. If you are prompted for credentials in a workflow job template, it is not possible to select a credential that requires a password in automation controller.
You must also click when the prompt wizard closes, to apply the changes at that node. Otherwise, any changes you make revert back to the values set in the job template.
When the node is created, it is labeled with its job type. A template that is associated with each workflow node runs based on the selected run scenario as it proceeds. Click the compass (
 ) icon to display the legend for each run scenario and their job types.
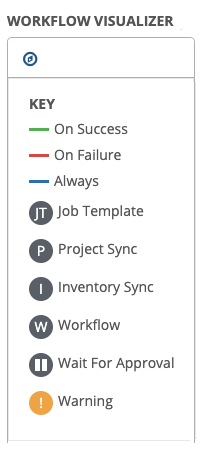
Hover over a node to add another node, view info about the node, edit the node details, edit an existing link, or delete the selected node:
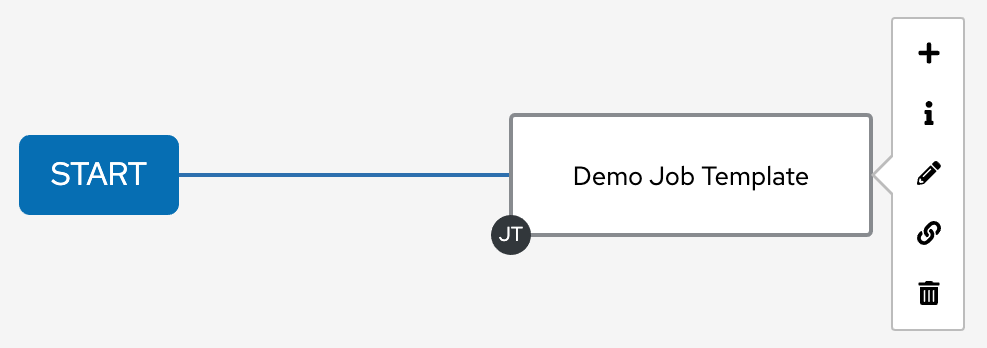
- When you have added or edited a node, click to save any modifications and render it on the graphical view. For possible ways to build your workflow, see Building nodes scenarios.
- When you have built your workflow job template, click to save your entire workflow template and return to the new workflow job template details page.
Clicking does not save your work, but instead, it closes the entire Workflow Visualizer so that you have to start again.
23.7.2. Approval nodes
Choosing an Approval node requires your intervention in order to advance the workflow. This functions as a means to pause the workflow in between playbooks so that you can give approval to continue on to the next playbook in the workflow. This gives the user a specified amount of time to intervene, but also enables you to continue as quickly as possible without having to wait on another trigger.
The default for the timeout is none, but you can specify the length of time before the request expires and is automatically denied. After you select and supply the information for the approval node, it displays on the graphical view with a pause icon beside it.
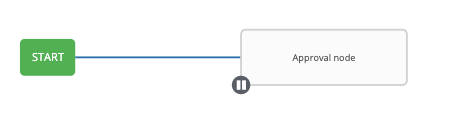
The approver is anyone who meets the following criteria:
- A user that can execute the workflow job template containing the approval nodes.
- A user who has organization administrator or above privileges (for the organization associated with that workflow job template).
- A user who has the Approve permission explicitly assigned to them within that specific workflow job template.
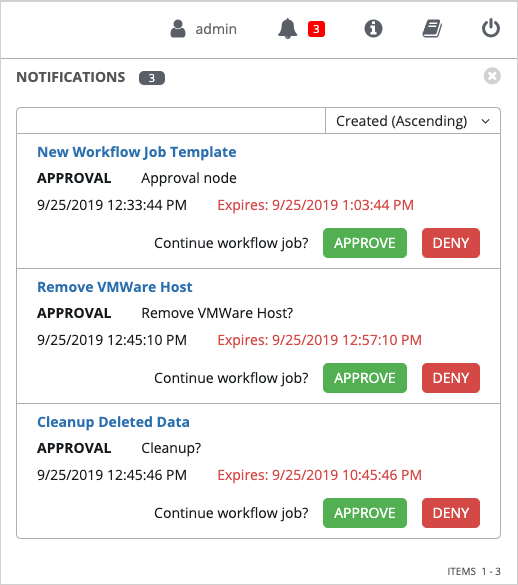
If pending approval nodes are not approved within the specified time limit (if an expiration was assigned) or they are denied, then they are marked as "timed out" or "failed", and move on to the next "on fail node" or "always node". If approved, the "on success" path is taken. If you try to POST in the API to a node that has already been approved, denied or timed out, an error message notifies you that this action is redundant, and no further steps are taken.
The following table shows the various levels of permissions allowed on approval workflows:
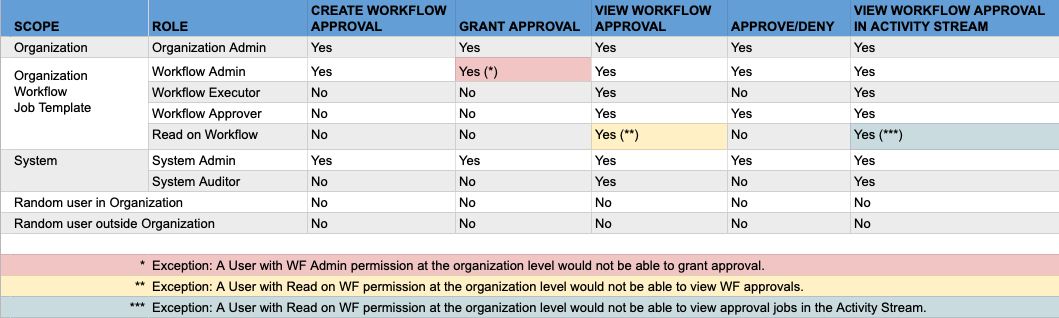
23.7.3. Building nodes scenarios
Learn how to manage nodes in the following scenarios.
Procedure
-
Click the (
 ) icon on the parent node to add a sibling node:
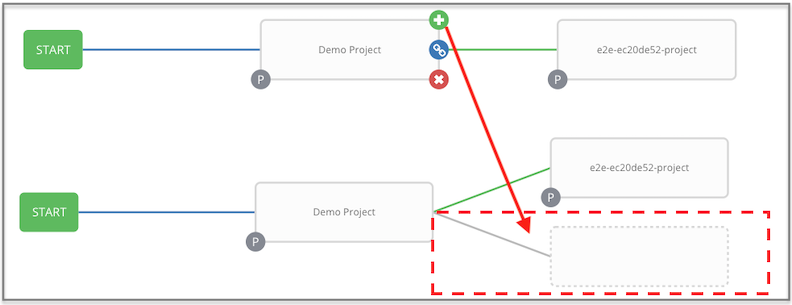
-
Hover over the line that connects two nodes and click the plus (
), to insert another node in between nodes. Clicking the plus (
) icon automatically inserts the node between the two nodes:
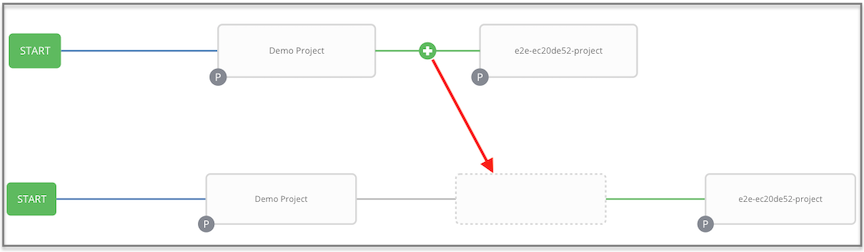
- Click again, to add a root node to depict a split scenario:
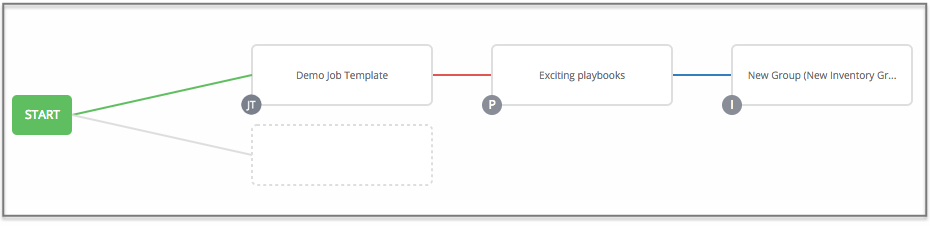
-
At any node where you want to create a split scenario, hover over the node from which the split scenario begins and click the plus (
) icon. This adds multiple nodes from the same parent node, creating sibling nodes:
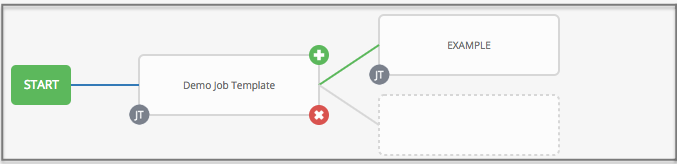
When adding a new node, the option also applies to workflow templates. Workflow templates prompt for inventory and surveys.
You can undo the last inserted node by using one of these methods:
- Click on another node without making a selection.
- Click .
The following example workflow contains all three types of jobs initiated by a job template. If it fails to run, you must protect the sync job. Regardless of whether it fails or succeeds, proceed to the inventory sync job:

Refer to the key by clicking the compass (
![]() ) icon to identify the meaning of the symbols and colors associated with the graphical depiction.
) icon to identify the meaning of the symbols and colors associated with the graphical depiction.
If you remove a node that has a follow-on node attached to it in a workflow with a set of sibling nodes that has varying edge types, the attached node automatically joins the set of sibling nodes and retains its edge type:
23.7.4. Editing a node
Procedure
Edit a node by using one of these methods:
- If you want to edit a node, click on the node you want to edit. The pane displays the current selections. Make your changes and click to apply them to the graphical view.
- To edit the edge type for an existing link, (success, failure, always), click the link. The pane displays the current selection. Make your changes and click to apply them to the graphical view.
Click the link (
 ) icon that appears on each node, to add a new link from one node to another. Doing this highlights the nodes that are possible to link to. These options are indicated by the dotted lines. Invalid options are indicated by disabled boxes (nodes) that would otherwise produce an invalid link. The following example shows the Demo Project as a possible option for the e2e-ec20de52-project to link to, indicated by the arrows:
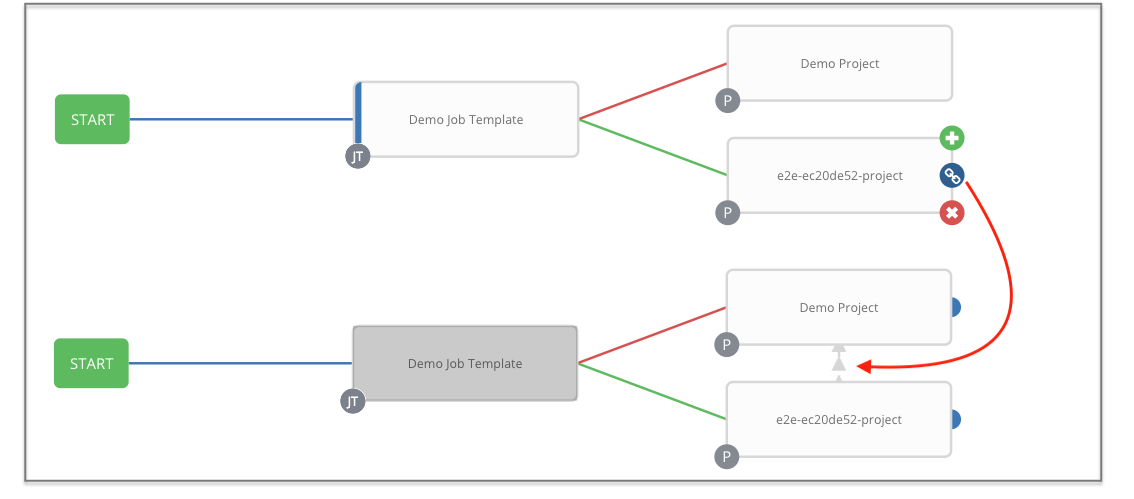
- To remove a link, click the link and click . This option only appears in the pane if the target or child node has more than one parent. All nodes must be linked to at least one other node at all times so you must create a new link before removing an old one.
Edit the view of the workflow diagram by using one of these methods:
- Click the settings icon to zoom, pan, or reposition the view.
- Drag the workflow diagram to reposition it on the screen or use the scroll on your mouse to zoom.
23.8. Launching a workflow job template
Procedure
Launch a workflow job template by using one of these methods:
From the navigation panel, select → and click next to the job template:
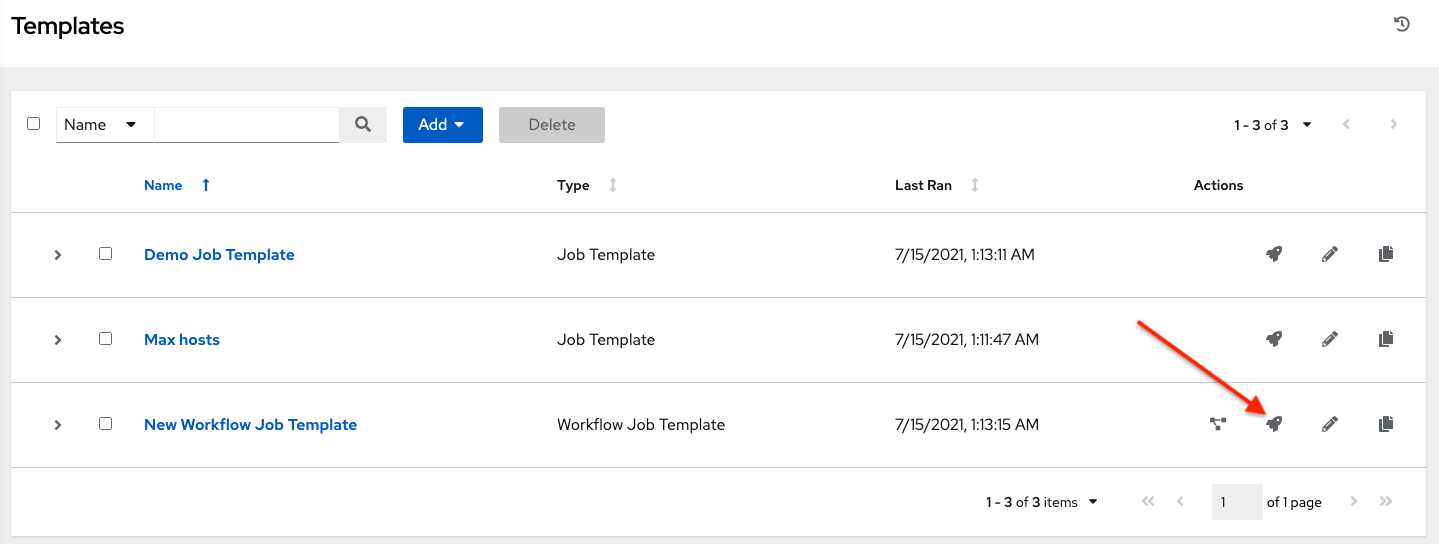
- Click in the Details tab of the workflow job template that you want to launch.
Variables added for a workflow job template are automatically added in automation controller when launching, along with any extra variables set in the workflow job template and survey.
Events related to approvals on workflows are displayed in the activity stream (
![]() ) with detailed information about the approval requests, if any.
) with detailed information about the approval requests, if any.
23.9. Copying a workflow job template
With automation controller you can copy a workflow job template. When you copy a workflow job template, it does not copy any associated schedule, notifications, or permissions. Schedules and notifications must be recreated by the user or system administrator creating the copy of the workflow template. The user copying the workflow template is granted the administrator permission, but no permissions are assigned (copied) to the workflow template.
Procedure
Open the workflow job template that you want to copy by using one of these methods:
- From the navigation panel, select → .
In the workflow job template Details view, scroll down to access it from a list of templates.
Click the copy (
) icon.
A new template opens with the name of the template from which you copied and a timestamp:
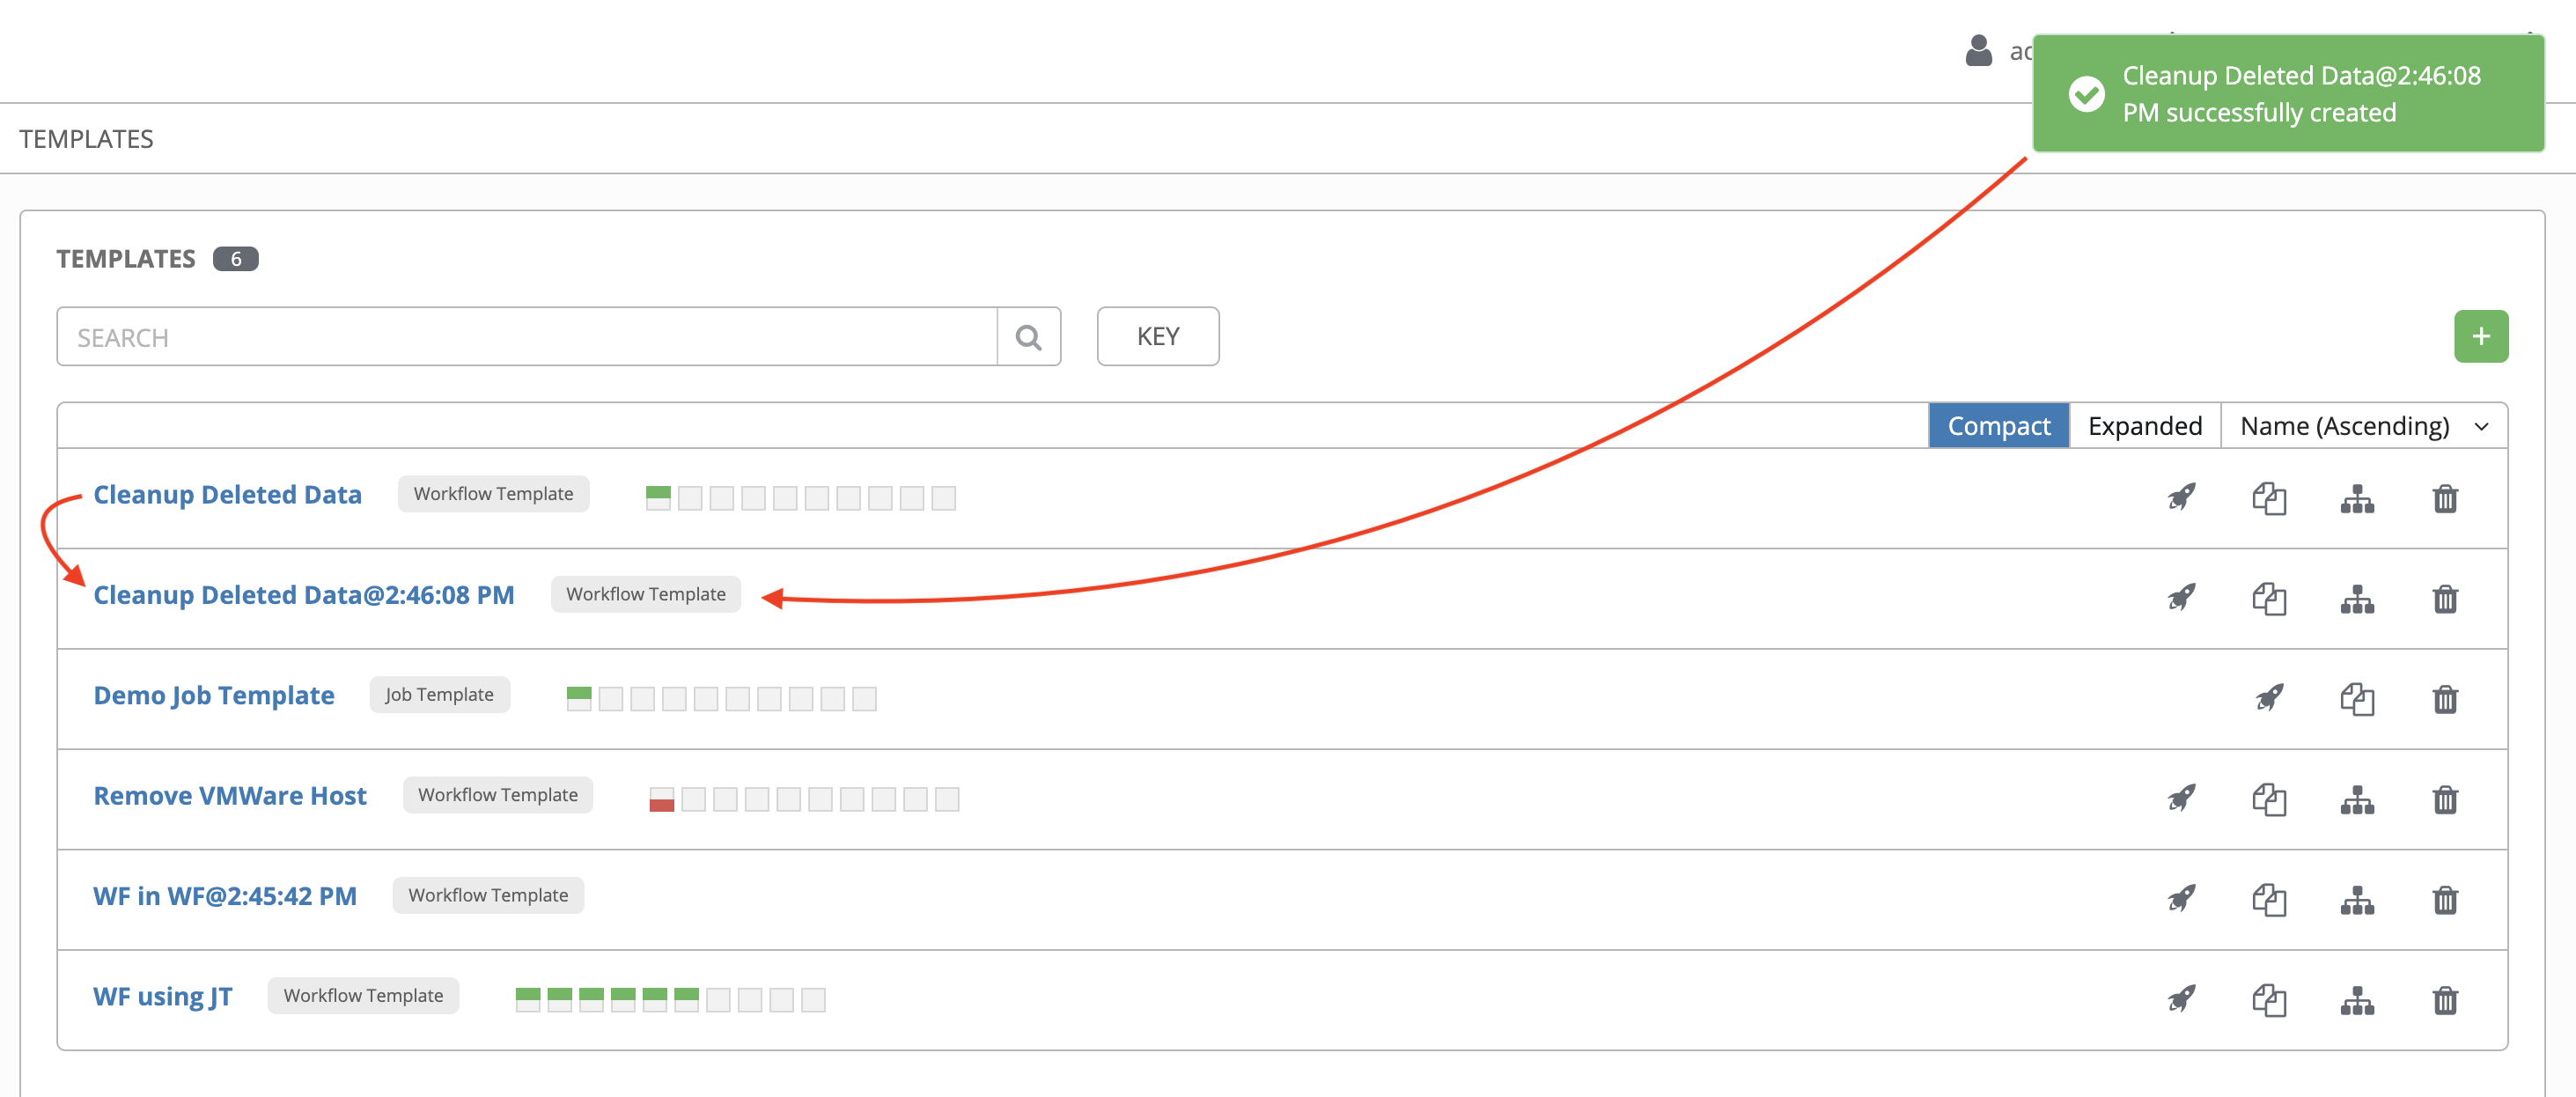
- Select the copied template and replace the contents of the Name field with a new name, and provide or modify the entries in the other fields to complete this template.
- Click .
If a resource has a related resource that you do not have the right level of permission to, you cannot copy the resource. For example, in the case where a project uses a credential that a current user only has Read access. However, for a workflow job template, if any of its nodes use an unauthorized job template, inventory, or credential, the workflow template can still be copied. But in the copied workflow job template, the corresponding fields in the workflow template node are absent.
23.10. Workflow job template extra variables
For more information see the Extra variables section.
Chapter 24. Managing Instance Groups
An Instance Group enables you to group instances in a clustered environment. Policies dictate how instance groups behave and how jobs are executed. The following view displays the capacity levels based on policy algorithms:
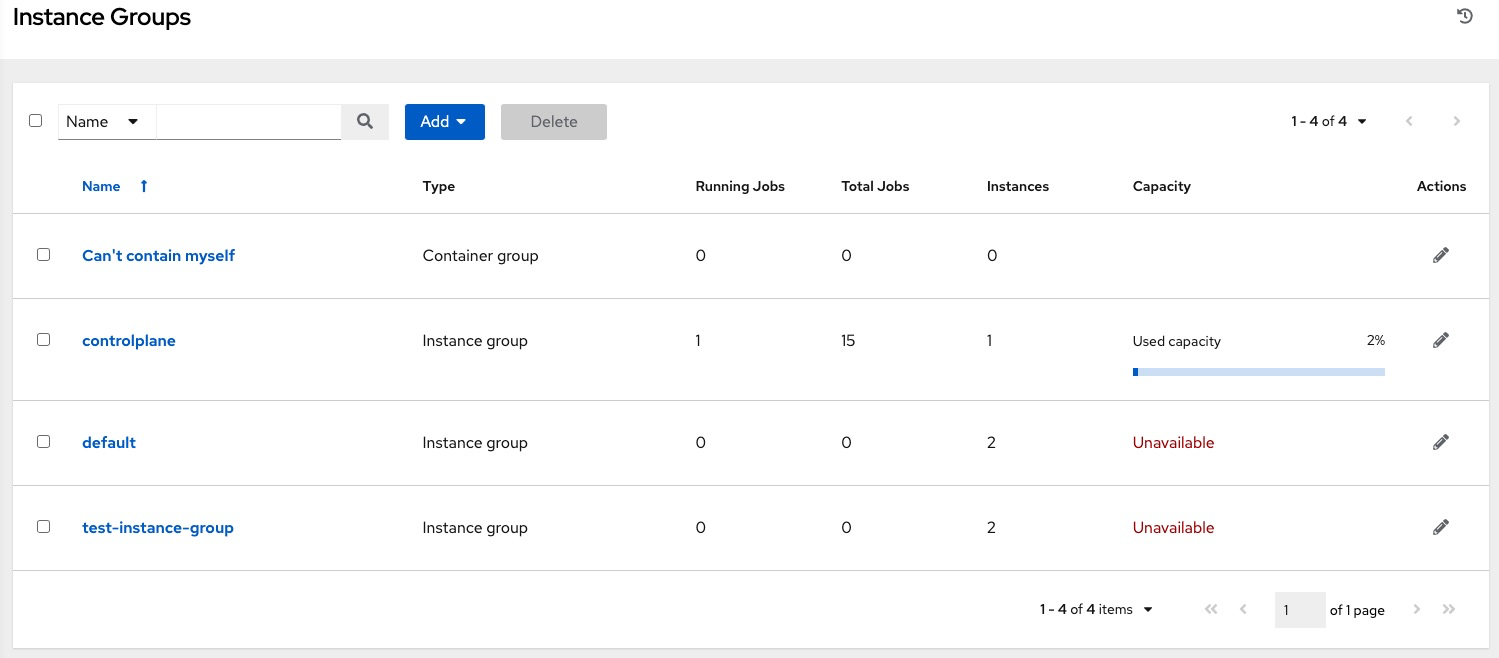
Additional resources
- For more information about the policy or rules associated with instance groups, see the Instance Groups section of the Automation controller Administration Guide.
- For more information on connecting your instance group to a container, see Container Groups.
24.1. Creating an instance group
Use the following procedure to create a new instance group.
Procedure
- From the navigation panel, select → .
- Select Add from the Add instance group list.
Enter the appropriate details into the following fields:
- Name: Names must be unique and must not be named "controller".
- Policy instance minimum: Enter the minimum number of instances to automatically assign to this group when new instances come online.
Policy instance percentage: Use the slider to select a minimum percentage of instances to automatically assign to this group when new instances come online.
NotePolicy instance fields are not required to create a new instance group. If you do not specify values, then the Policy instance minimum and Policy instance percentage default to 0.
- Max concurrent jobs: Specify the maximum number of forks that can be run for any given job.
Max forks: Specify the maximum number of concurrent jobs that can be run for any given job.
NoteThe default value of 0 for Max concurrent jobs and Max forks denotes no limit. For more information, see Instance group capacity limits in the Automation controller Administration Guide.
- Click .
When you have successfully created the instance group the Details tab of the newly created instance group remains, enabling you to review and edit your instance group information. This is the same screen that opens when you click the Edit
![]() icon from the Instance Groups list view. You can also edit Instances and review Jobs associated with this instance group:
icon from the Instance Groups list view. You can also edit Instances and review Jobs associated with this instance group:
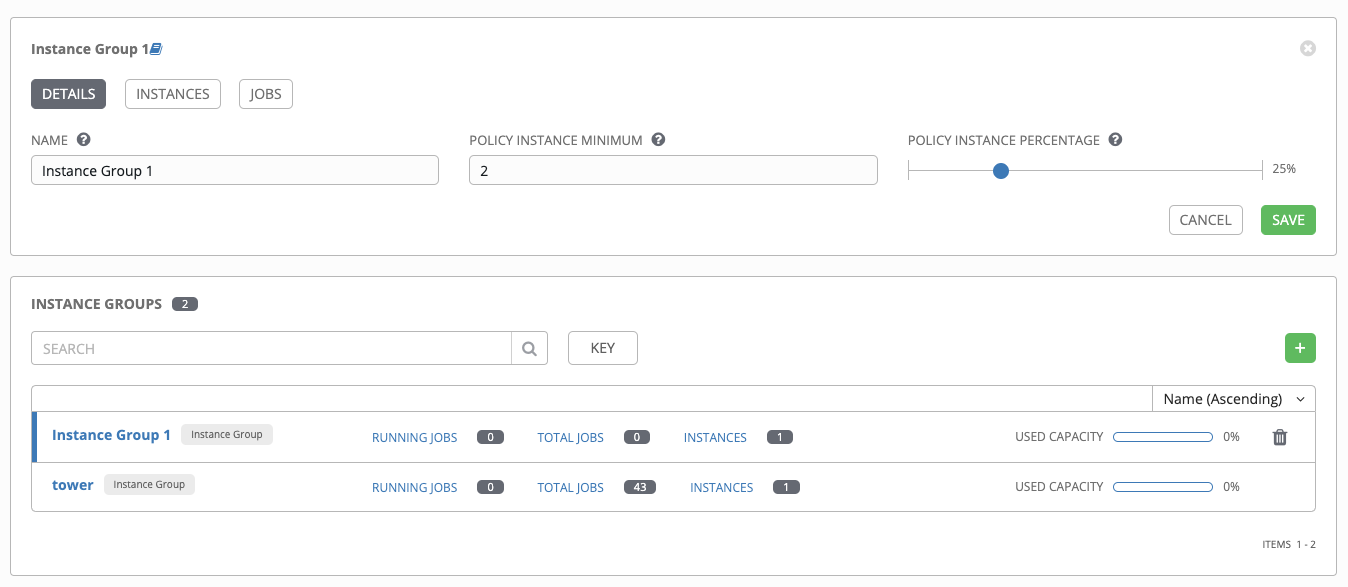
24.1.1. Associating instances to an instance group
Procedure
- Select the Instances tab of the Instance Groups window.
- Click .
Click the checkbox next to one or more available instances from the list to select the instances you want to associate with the instance group:
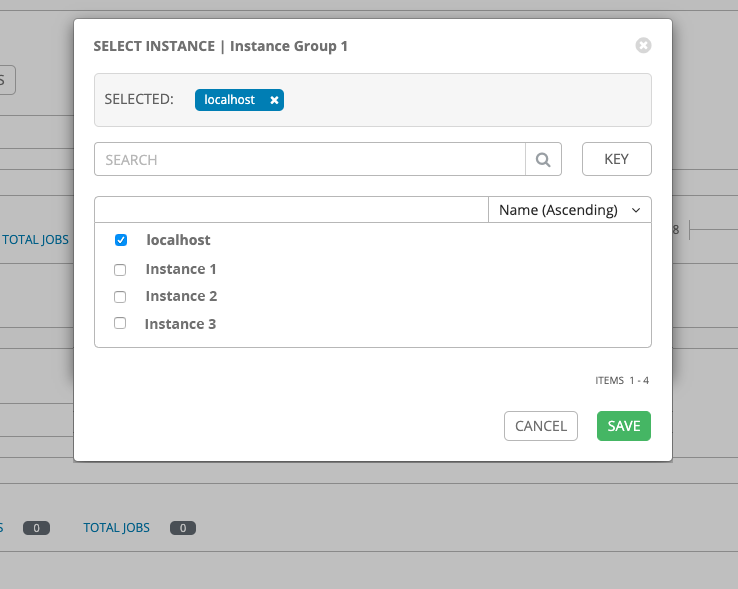
In the following example, the instances added to the instance group displays along with information about their capacity:
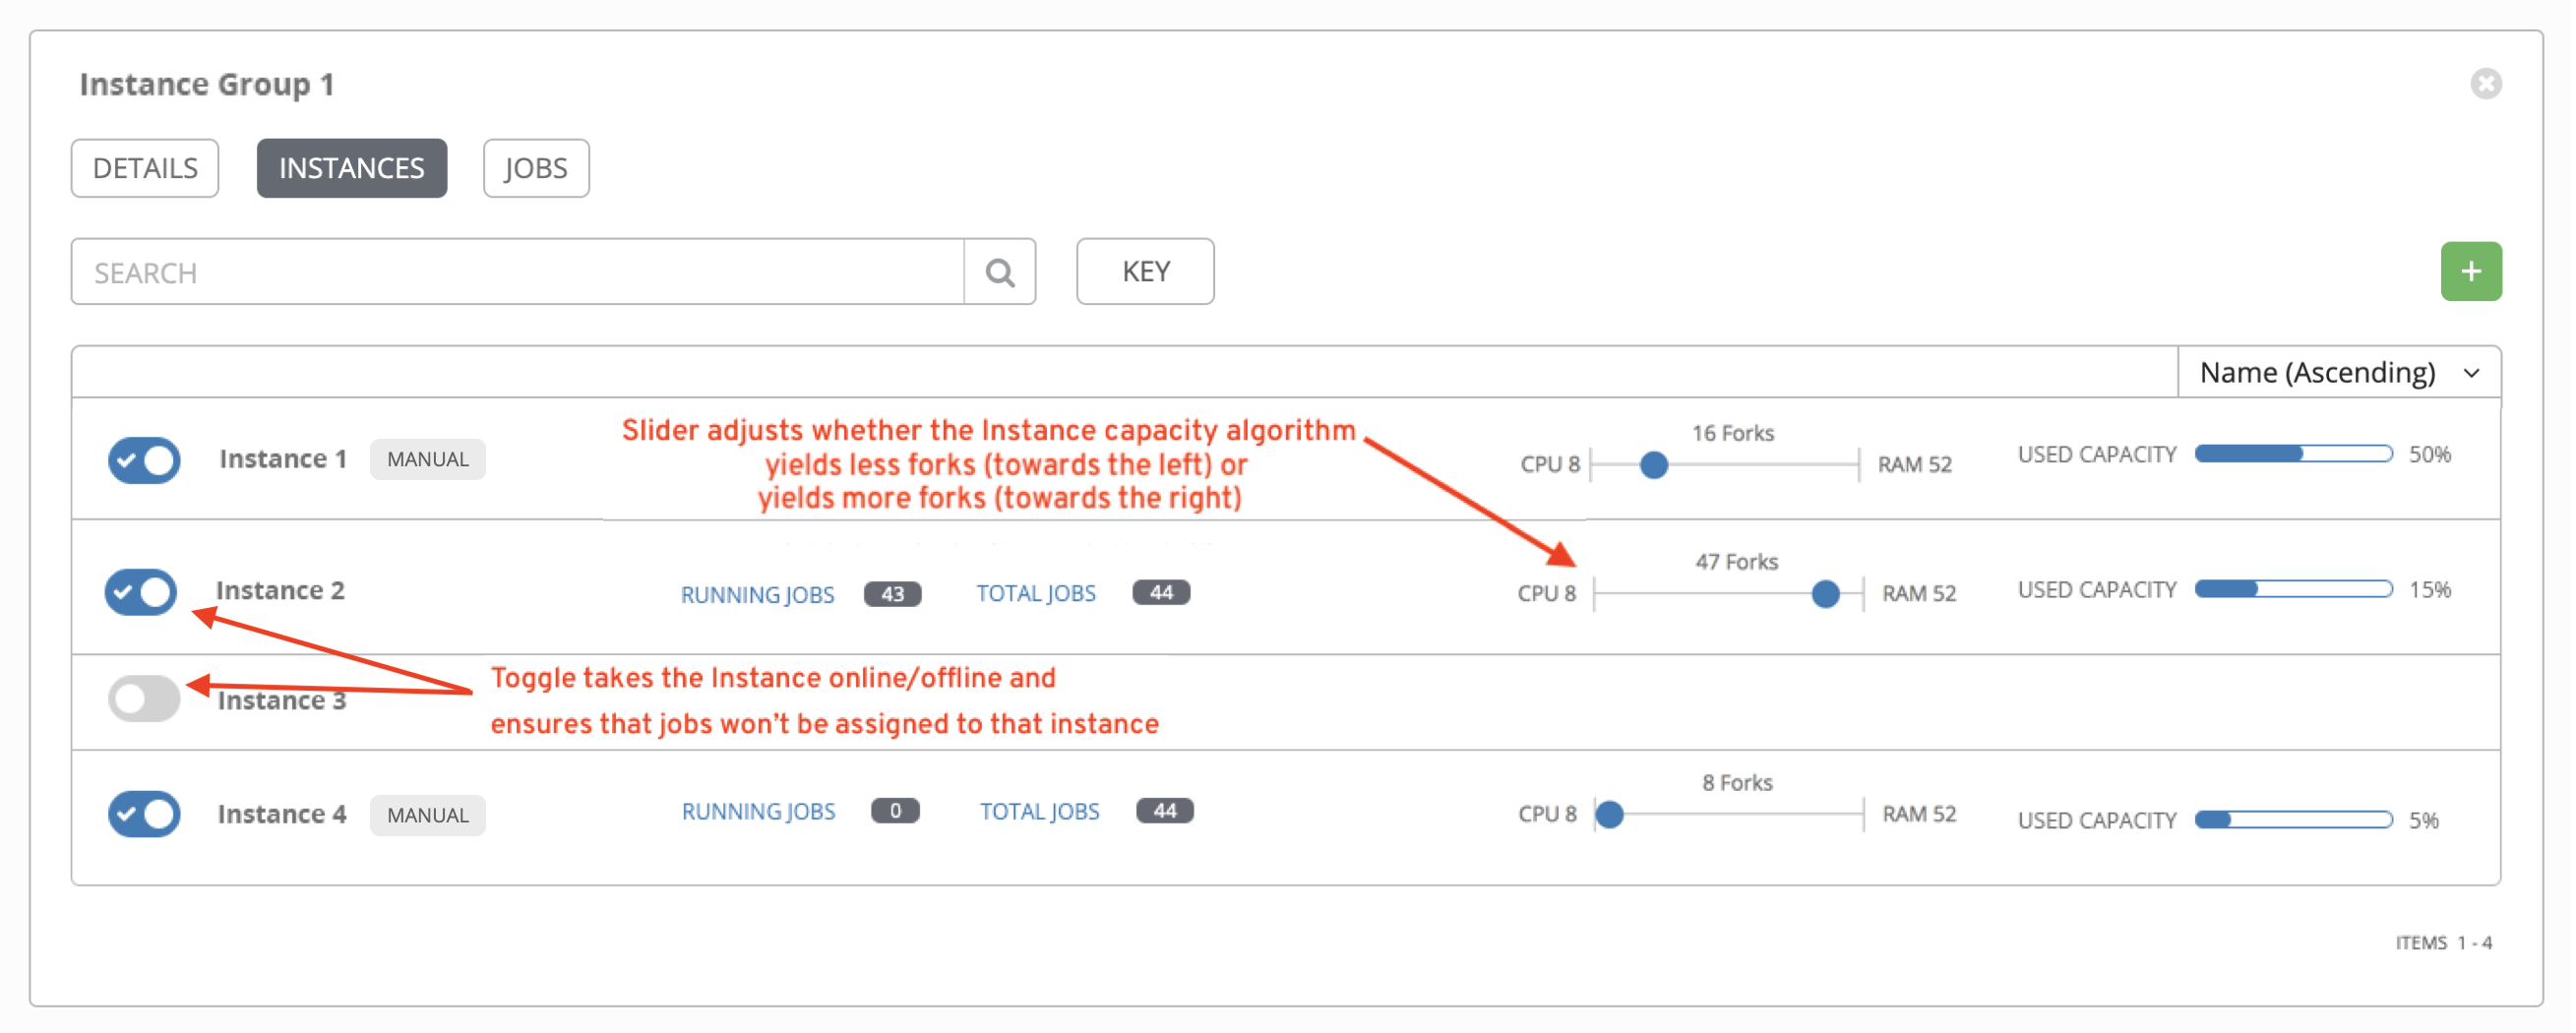
24.1.2. Viewing jobs associated with an instance group
Procedure
- Select the Jobs tab of the Instance Group window.
Click the arrow
 icon next to a job to expand the view and show details about each job.
Each job displays the following details:
- The job status
- The ID and name
- The type of job
- The time it started and completed
- Who started the job and applicable resources associated with it, such as the template, inventory, project, and execution environment
Additional resources
The instances are run in accordance with instance group policies. For more information, see Instance Group Policies in the Automation controller Administration Guide.
Chapter 25. Jobs in automation controller
A job is an instance of automation controller launching an Ansible playbook against an inventory of hosts.
The Jobs list view displays a list of jobs and their statuses, shown as completed successfully, failed, or as an active (running) job. The default view is collapsed (Compact) with the job name, status, job type, start, and finish times. You can click the arrow
![]() icon to expand and see more information. You can sort this list by various criteria, and perform a search to filter the jobs of interest.
icon to expand and see more information. You can sort this list by various criteria, and perform a search to filter the jobs of interest.
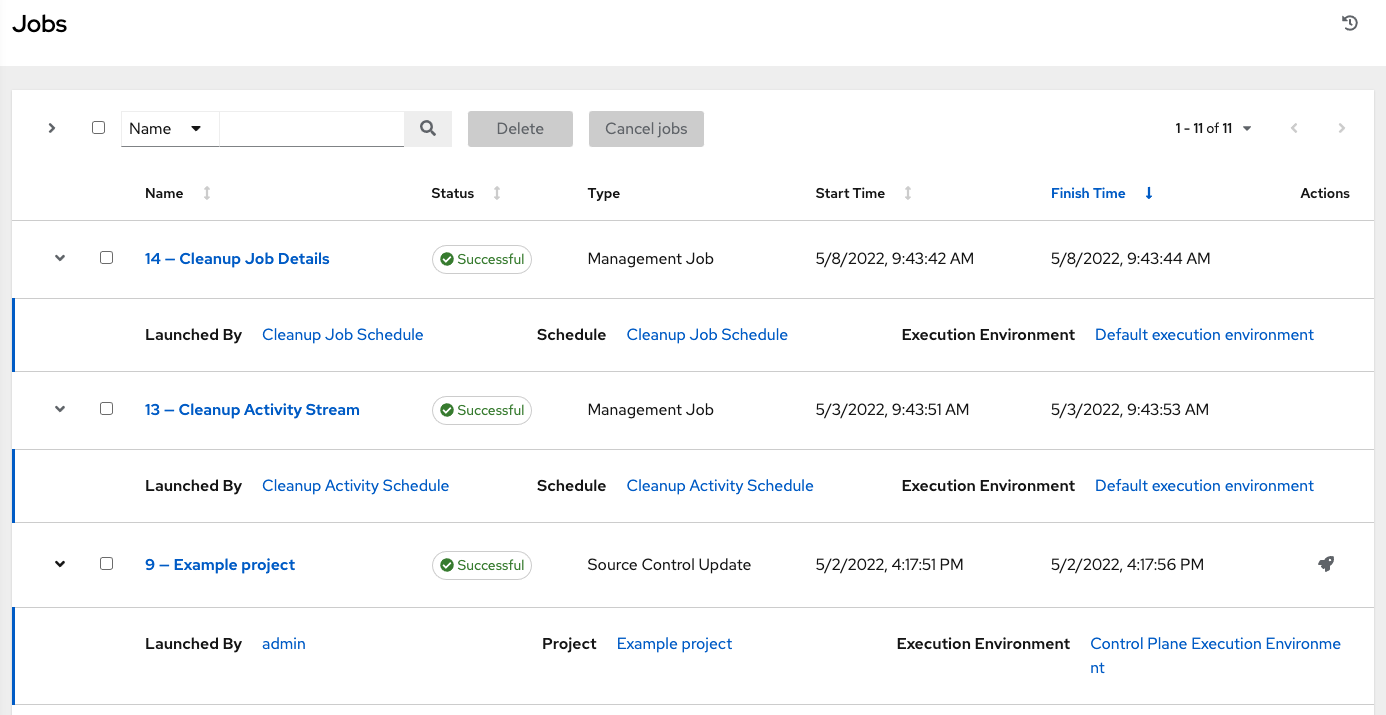
From this screen you can complete the following tasks:
- View details and standard output of a particular job
-
Re-launch
 jobs
jobs
- Remove selected jobs
The relaunch operation only applies to relaunches of playbook runs and does not apply to project or inventory updates, system jobs, and workflow jobs. When a job relaunches, the Jobs Output view is displayed. Selecting any type of job also takes you to the Job Output view for that job, where you can filter jobs by various criteria:
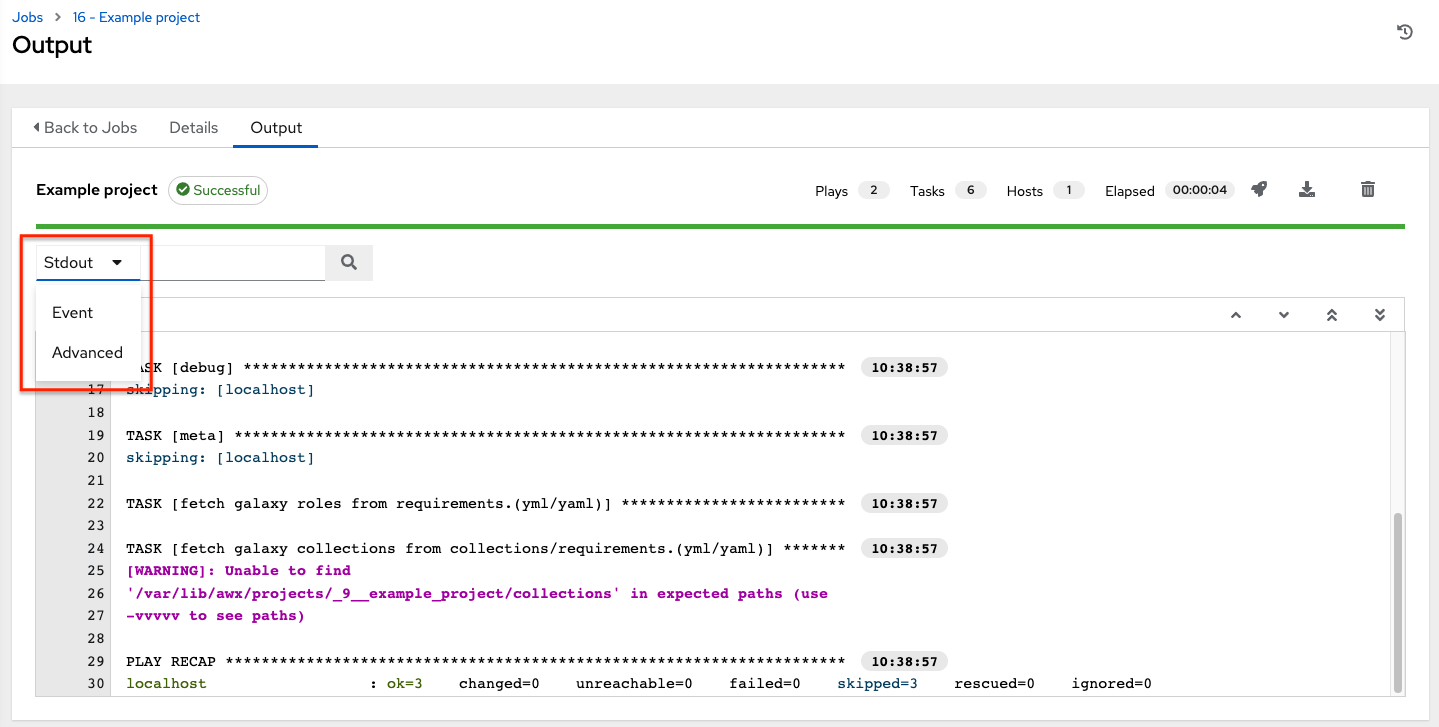
- The Stdout option is the default display that shows the job processes and output.
- The Event option enables you to filter by the events of interest, such as errors, host failures, host retries, and items skipped. You can include as many events in the filter as necessary.
- The Advanced option is a refined search that gives you a combination of including or excluding criteria, searching by key, or by lookup type. For more information on using the search, refer to the Search section.
25.1. Inventory sync jobs
When an inventory synchronization is executed, the results display in the Output tab. If used, the Ansible CLI displays the same information. This can be useful for debugging. The ANSIBLE_DISPLAY_ARGS_TO_STDOUT parameter is set to False for all playbook runs. This parameter matches Ansible’s default behavior and does not display task arguments in task headers in the Job Detail interface to avoid leaking certain sensitive module parameters to stdout. To restore the previous behavior, set ANSIBLE_DISPLAY_ARGS_TO_STDOUT to True through the AWX_TASK_ENV configuration setting.
For more information, see ANSIBLE_DISPLAY_ARGS_TO_STDOUT.
Use the icons to relaunch
![]() , download
, download
![]() the job output, or delete
the job output, or delete
![]() the job.
the job.
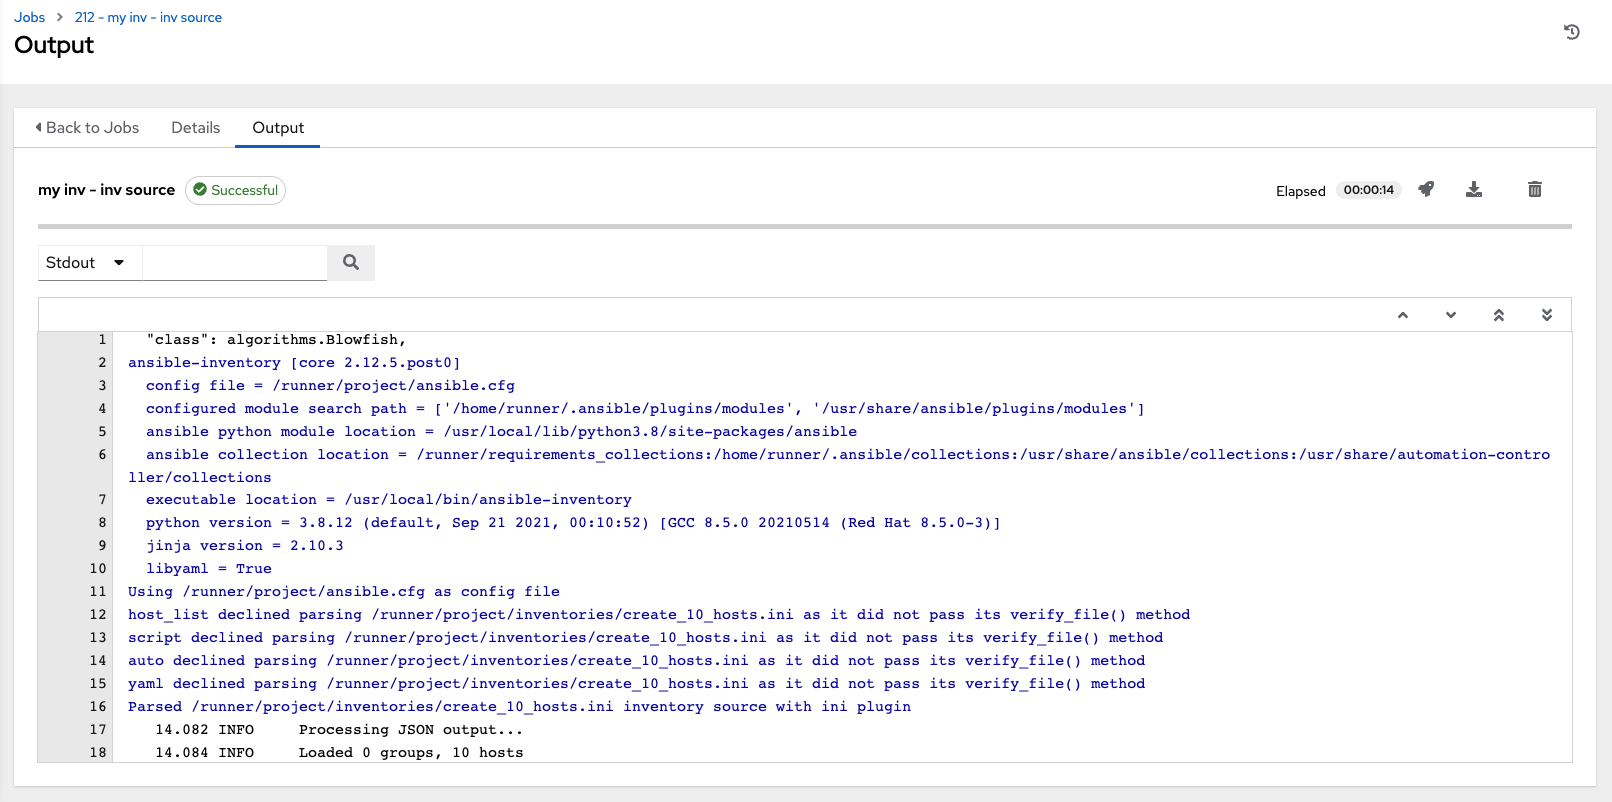
You can perform an inventory update while a related job is running. In cases where you have a large project (around 10 GB), disk space on /tmp can be an issue.
25.1.1. Inventory sync details
Access the Details tab to view details about the job execution:
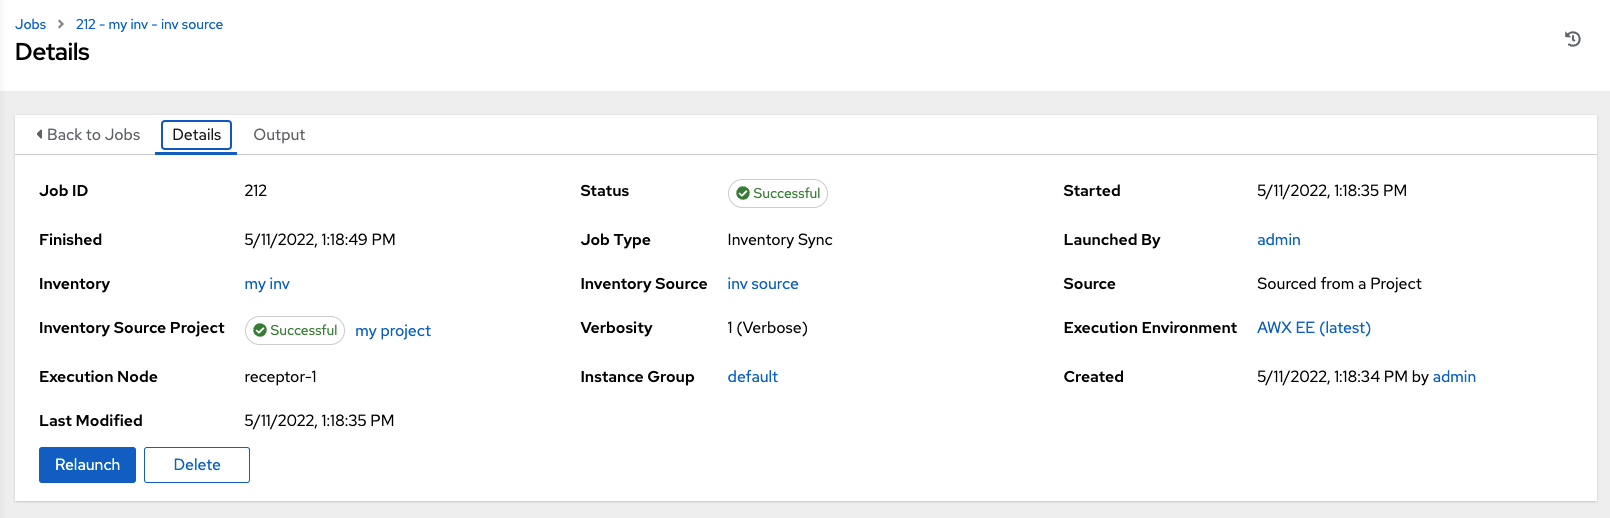
You can view the following details for an executed job:
Status: It can be any of the following:
Pending: The inventory sync has been created, but not queued or started yet. Any job, not just inventory source syncs, stays in pending until it is ready to be run by the system. Reasons for inventory source syncs not being ready include:
- Dependencies that are currently running (all dependencies must be completed before the next step can execute).
- Insufficient capacity to run in the locations it is configured for.
- Waiting: The inventory sync is in the queue waiting to be executed.
- Running: The inventory sync is currently in progress.
- Successful: The inventory sync job succeeded.
- Failed: The inventory sync job failed.
- Inventory: The name of the associated inventory group.
- Source: The type of cloud inventory.
- Inventory Source Project: The project used as the source of this inventory sync job.
- Execution Environment: The execution environment used.
- Execution node: The node used to execute the job.
- Instance Group: The name of the instance group used with this job (automation controller is the default instance group).
Selecting these items enables you to view the corresponding job templates, projects, and other objects.
25.2. SCM inventory jobs
When an inventory sourced from an SCM, for example git, is executed, the results are displayed in the Output tab. If used, the Ansible CLI displays the same information. This can be useful for debugging. Use the icons in the navigation menu to relaunch (
![]() ), download (
), download (
![]() ) the job output, or delete (
) the job output, or delete (
![]() ) the job.
) the job.
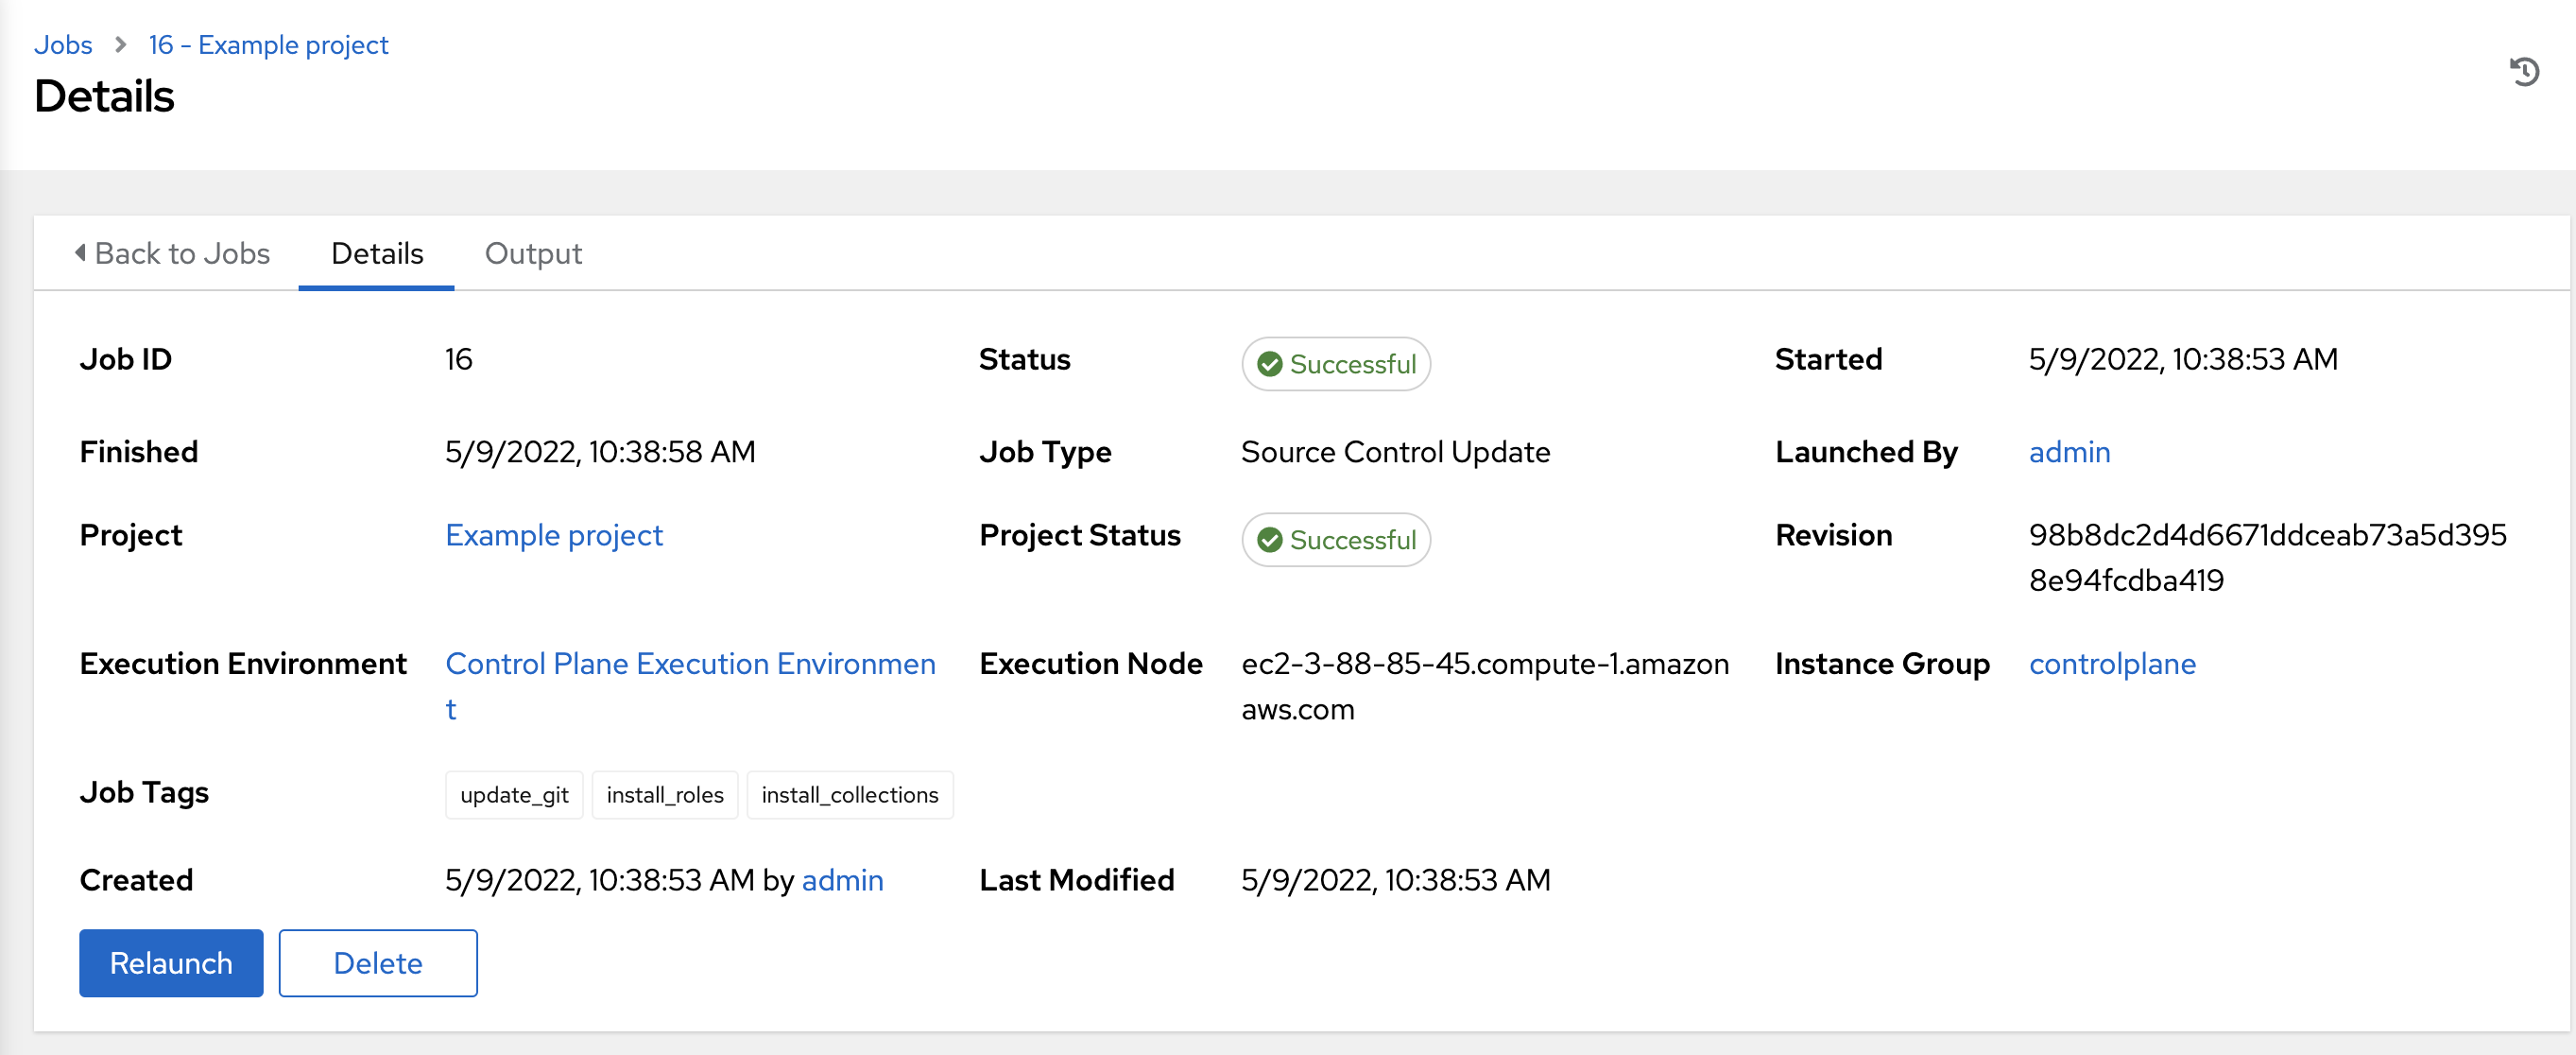
25.2.1. SCM inventory details
To view details about the job execution and its associated project, select the Access tab.
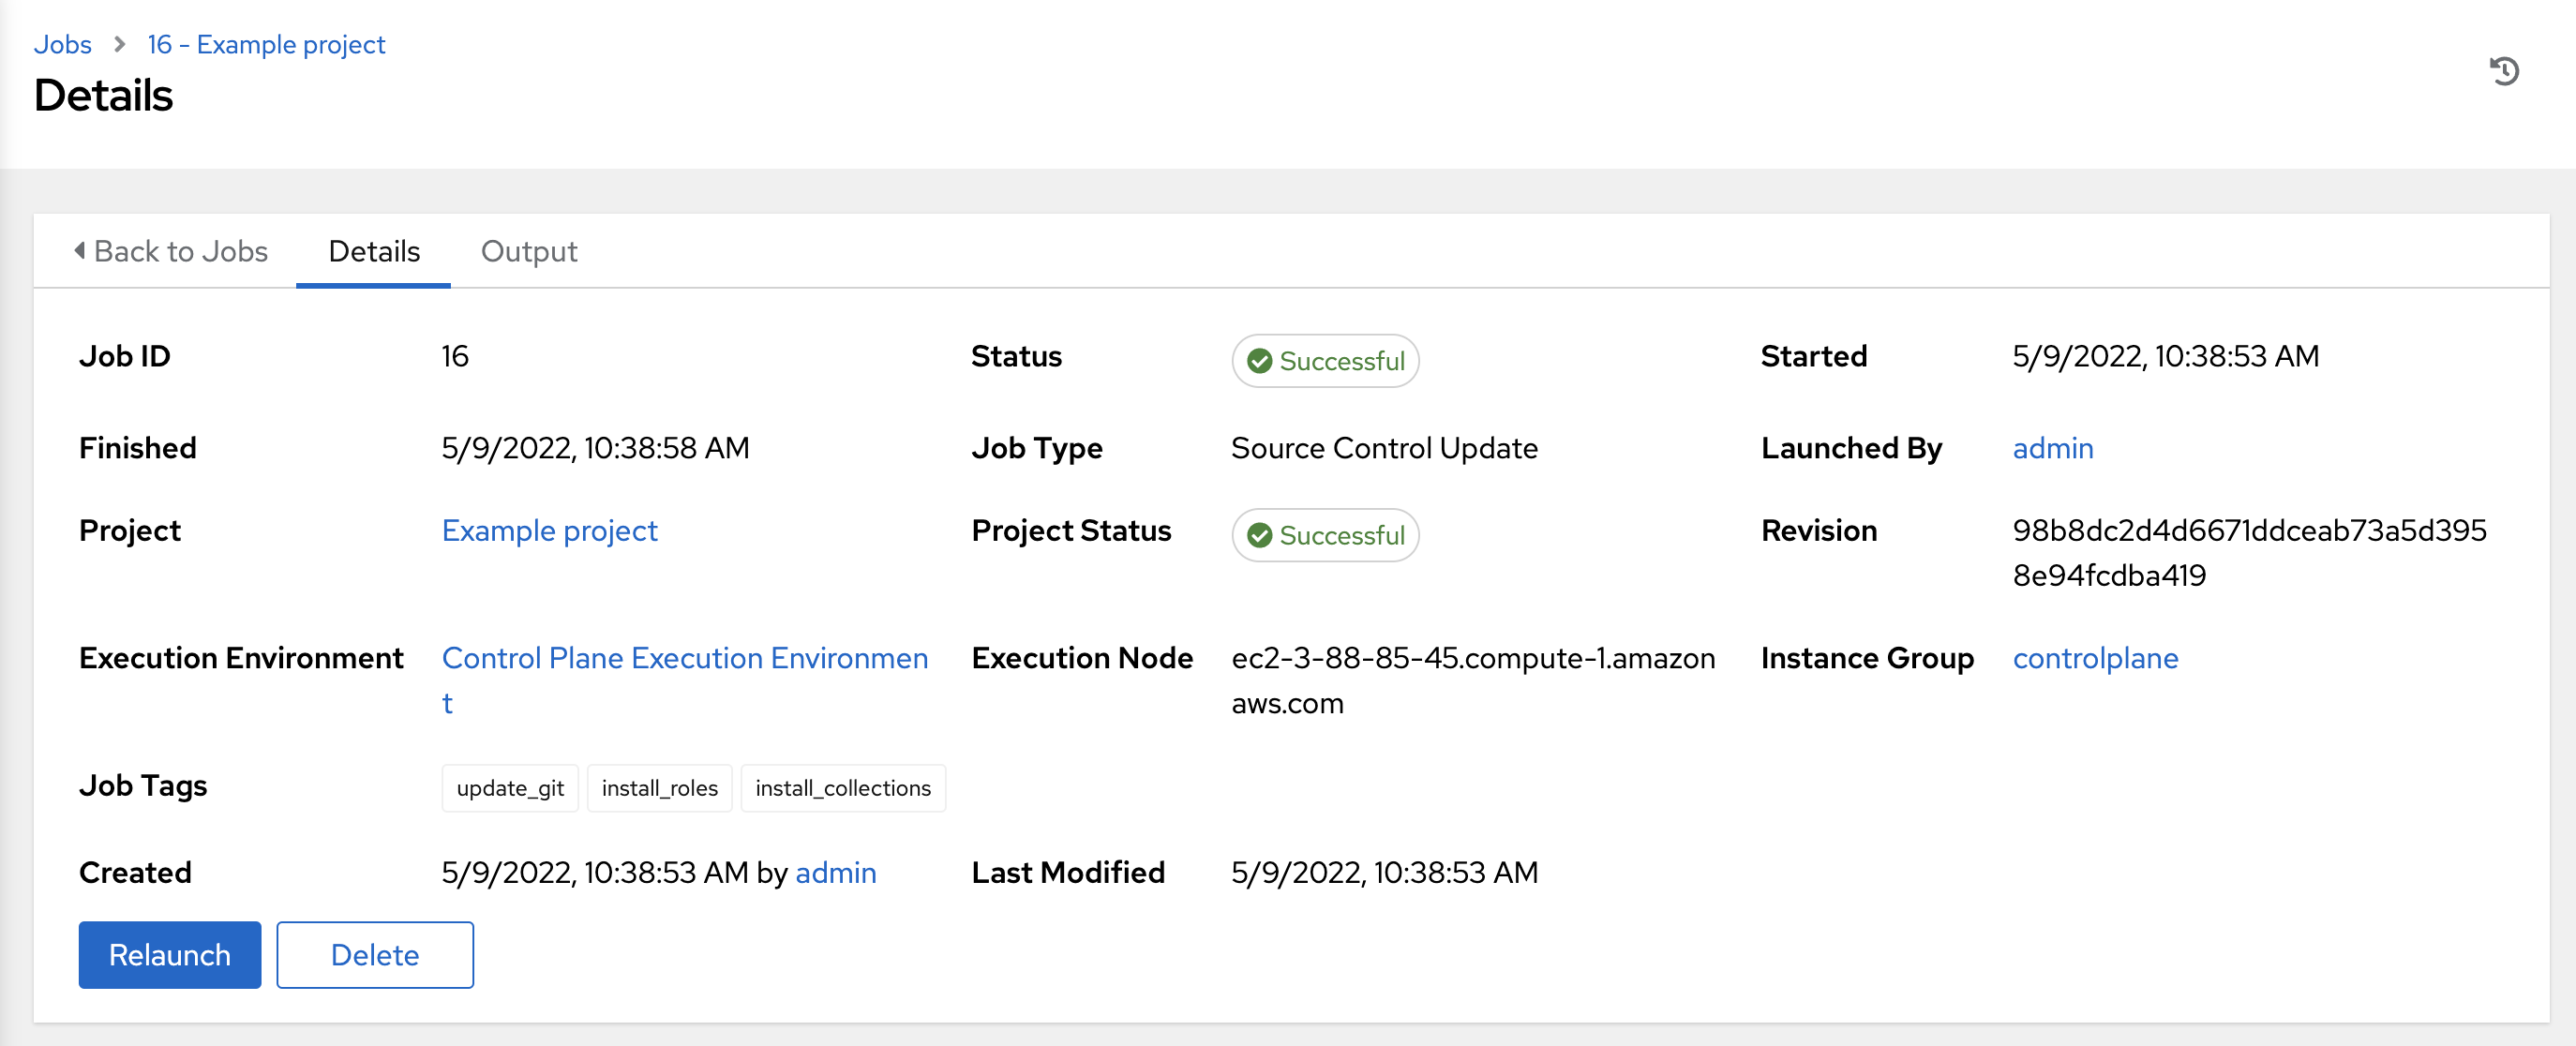
You can view the following details for an executed job:
Status: It can be any of the following:
- Pending: The SCM job has been created, but not queued or started yet. Any job, not just SCM jobs, stay in pending until it is ready to be run by the system. Reasons for SCM jobs not being ready include dependencies that are currently running (all dependencies must be completed before the next step can execute), or there is not enough capacity to run in the locations it is configured to.
- Waiting: The SCM job is in the queue waiting to be executed.
- Running: The SCM job is currently in progress.
- Successful: The last SCM job succeeded.
- Failed: The last SCM job failed.
- Job Type: SCM jobs display Source Control Update.
- Project: The name of the project.
- Project Status: Indicates whether the associated project was successfully updated.
- Revision: Indicates the revision number of the sourced project that was used in this job.
- Execution Environment: Specifies the execution environment used to run this job.
- Execution Node: Indicates the node on which the job ran.
- Instance Group: Indicates the instance group on which the job ran, if specified.
- Job Tags: Tags show the various job operations executed.
Selecting these items enables you to view the corresponding job templates, projects, and other objects.
25.3. Playbook run jobs
When a playbook is executed, the results display in the Output tab. If used, the Ansible CLI displays the same information. This can be useful for debugging.
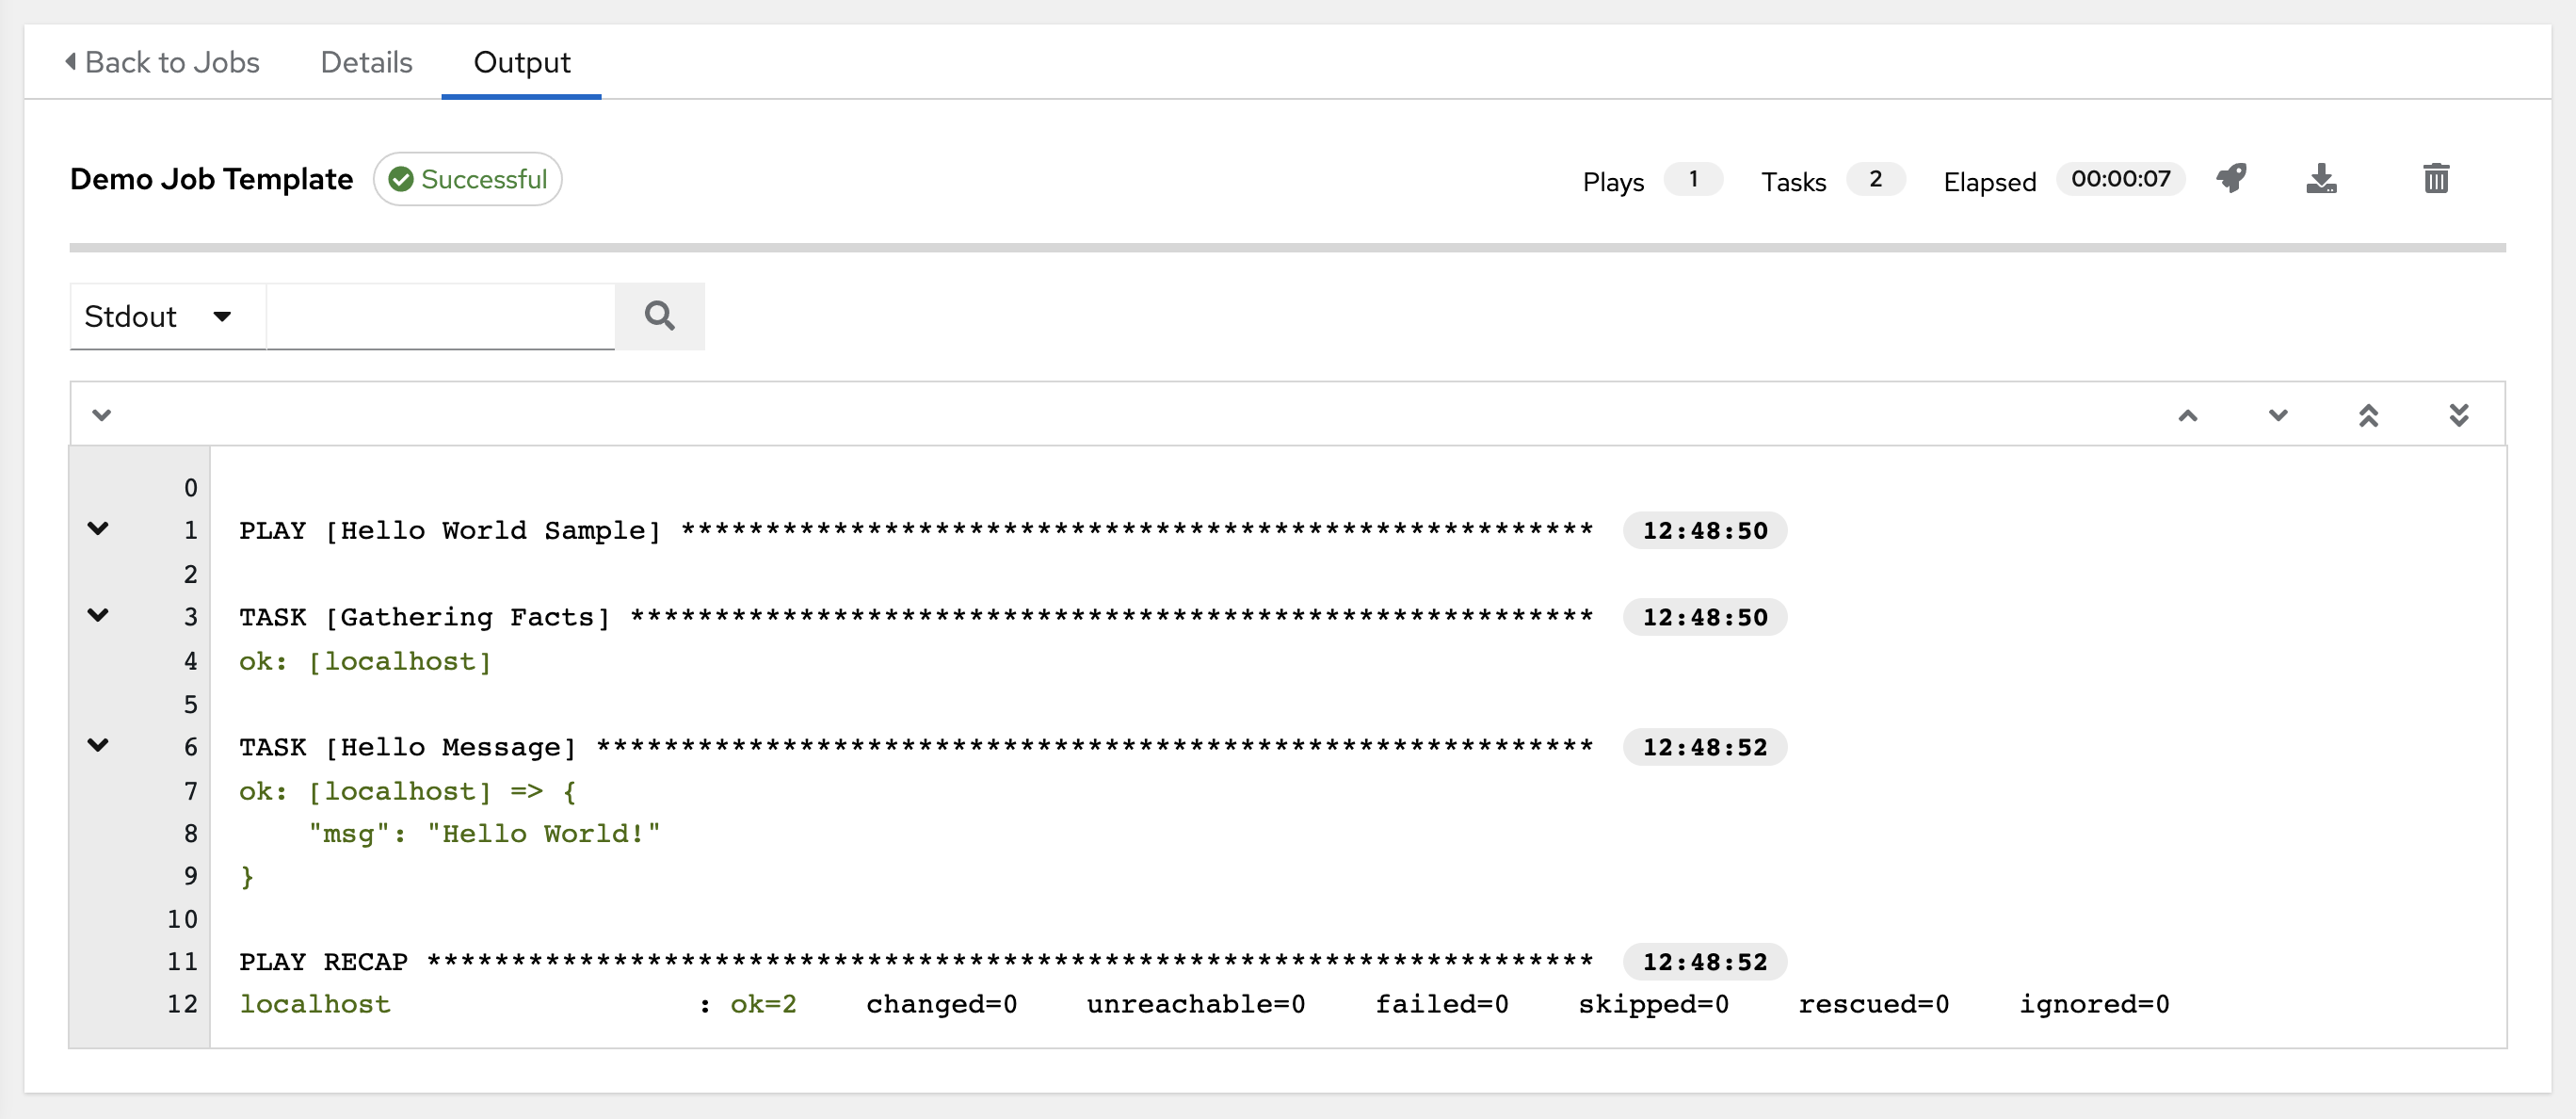
The events summary displays the following events that are run as part of this playbook:
- The number of times this playbook has run is shown in the Plays field
- The number of tasks associated with this playbook is shown in the Tasks field
- The number of hosts associated with this playbook is shown in the Hosts field
- The amount of time it took to complete the playbook run is shown in the Elapsed field

Use the icons next to the events to relaunch (
![]() ), download (
), download (
![]() ) the job output, or delete (
) the job output, or delete (
![]() ) the job.
) the job.
Hover over a section of the host status bar in the Output view and the number of hosts associated with that status displays.
The output for a playbook job is also available after launching a job from the Jobs tab of its Jobs Templates page. View its host details by clicking on the line item tasks in the output.
25.3.1. Search
Use Search to look up specific events, hostnames, and their statuses. To filter only certain hosts with a particular status, specify one of the following valid statuses:
- ok
- Indicates that a task completed successfully but no change was executed on the host.
- changed
- The playbook task executed. Since Ansible tasks should be written to be idempotent, tasks may exit successfully without executing anything on the host. In these cases, the task returns ok, but not changed.
- failed
- The task failed. Further playbook execution stopped for this host.
- unreachable
- The host is unreachable from the network or has another fatal error associated with it.
- skipped
- The playbook task skipped because no change was necessary for the host to reach the target state.
- rescued
- This shows the tasks that failed and then executes a rescue section.
- ignored
-
This shows the tasks that failed and have
ignore_errors: yes configured.
These statuses also display in each Stdout pane, in a group of "stats" called the host summary fields:
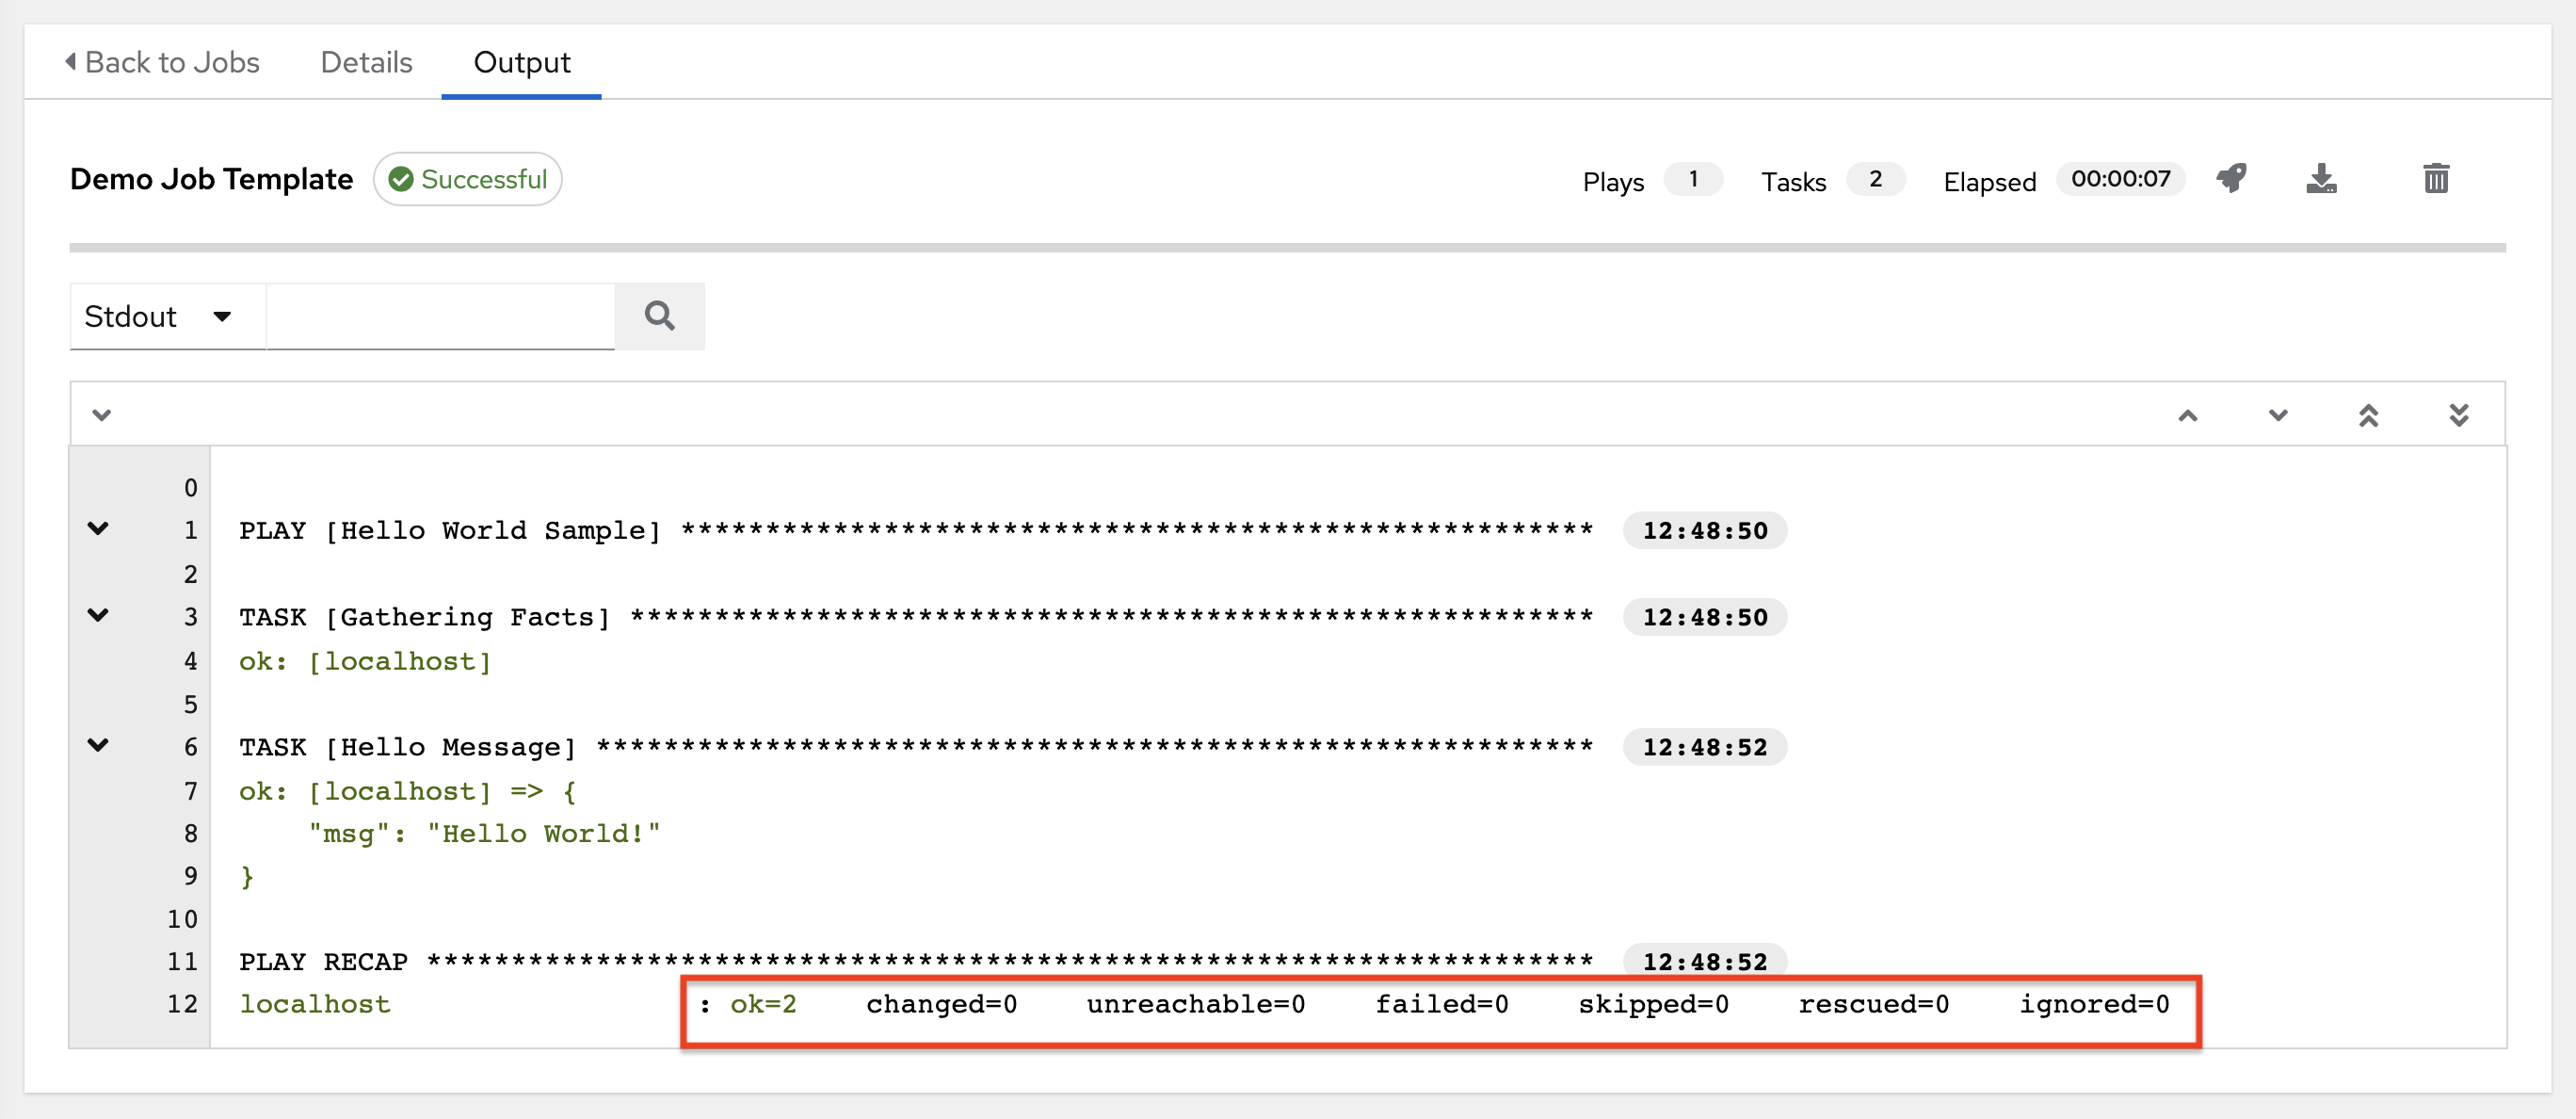
The following example shows a search with only unreachable hosts:
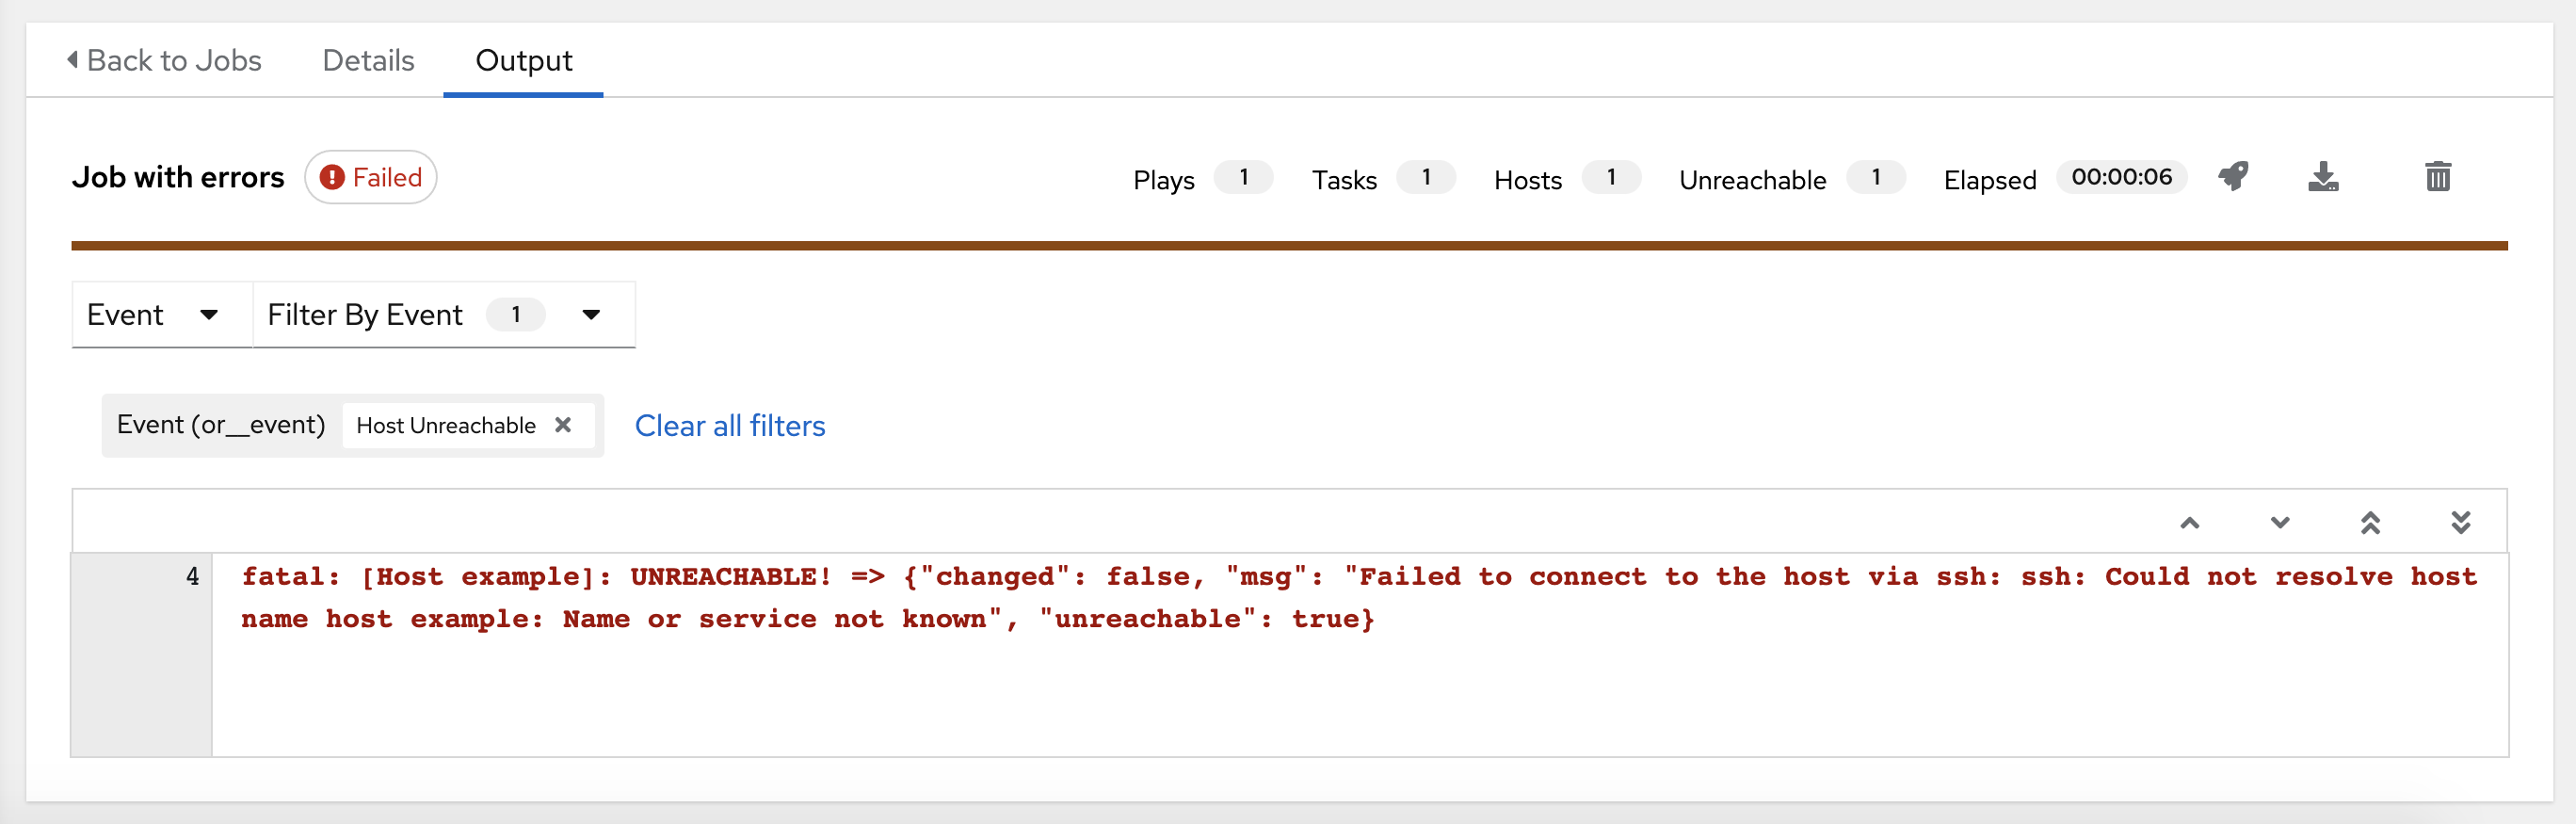
For more information on using the search, see the Search section.
The standard output view displays the events that occur on a particular job. By default, all rows are expanded so that the details are displayed. Use the collapse-all (
![]() ) icon to switch to a view that only contains the headers for plays and tasks. Click the plus (
) icon to switch to a view that only contains the headers for plays and tasks. Click the plus (
![]() ) icon to view all the lines of the standard output.
) icon to view all the lines of the standard output.
You can display all the details of a specific play or task by clicking the arrow icons next to them. Click an arrow from sideways to downward to expand the lines associated with that play or task. Click the arrow back to the sideways position to collapse and hide the lines.
When viewing details in the expand or collapse mode, note the following:
- Each displayed line that is not collapsed has a corresponding line number and start time.
- An expand or collapse icon is at the start of any play or task after the play or task has completed.
- If querying for a particular play or task, it appears collapsed at the end of its completed process.
- In some cases, an error message appears, stating that the output may be too large to display. This occurs when there are more than 4000 events. Use the search and filter for specific events to bypass the error.
Click on a line of an event from the Stdout pane and a Host Events window displays in a separate window. This window shows the host that was affected by that particular event.
Upgrading to the latest versions of Ansible Automation Platform involves progressively migrating all historical playbook output and events. This migration process is gradual, and happens automatically in the background after installation is complete. Installations with very large amounts of historical job output (tens or hundreds of GB of output) can have missing job output until migration is complete. The most recent data shows up at the top of the output, followed by older events.
25.3.2. Host Details
The Host Details window displays the following information about the host affected by the selected event and its associated play and task:
- The Host.
- The Status.
- The type of run in the Play field.
- The type of Task.
- If applicable, the Ansible Module task, and any arguments for that module.

To view the results in JSON format, click the JSON tab. To view the output of the task, click Standard Out. To view errors from the output, click Standard Error.
25.3.3. Playbook run details
Access the Details tab to view details about the job execution:
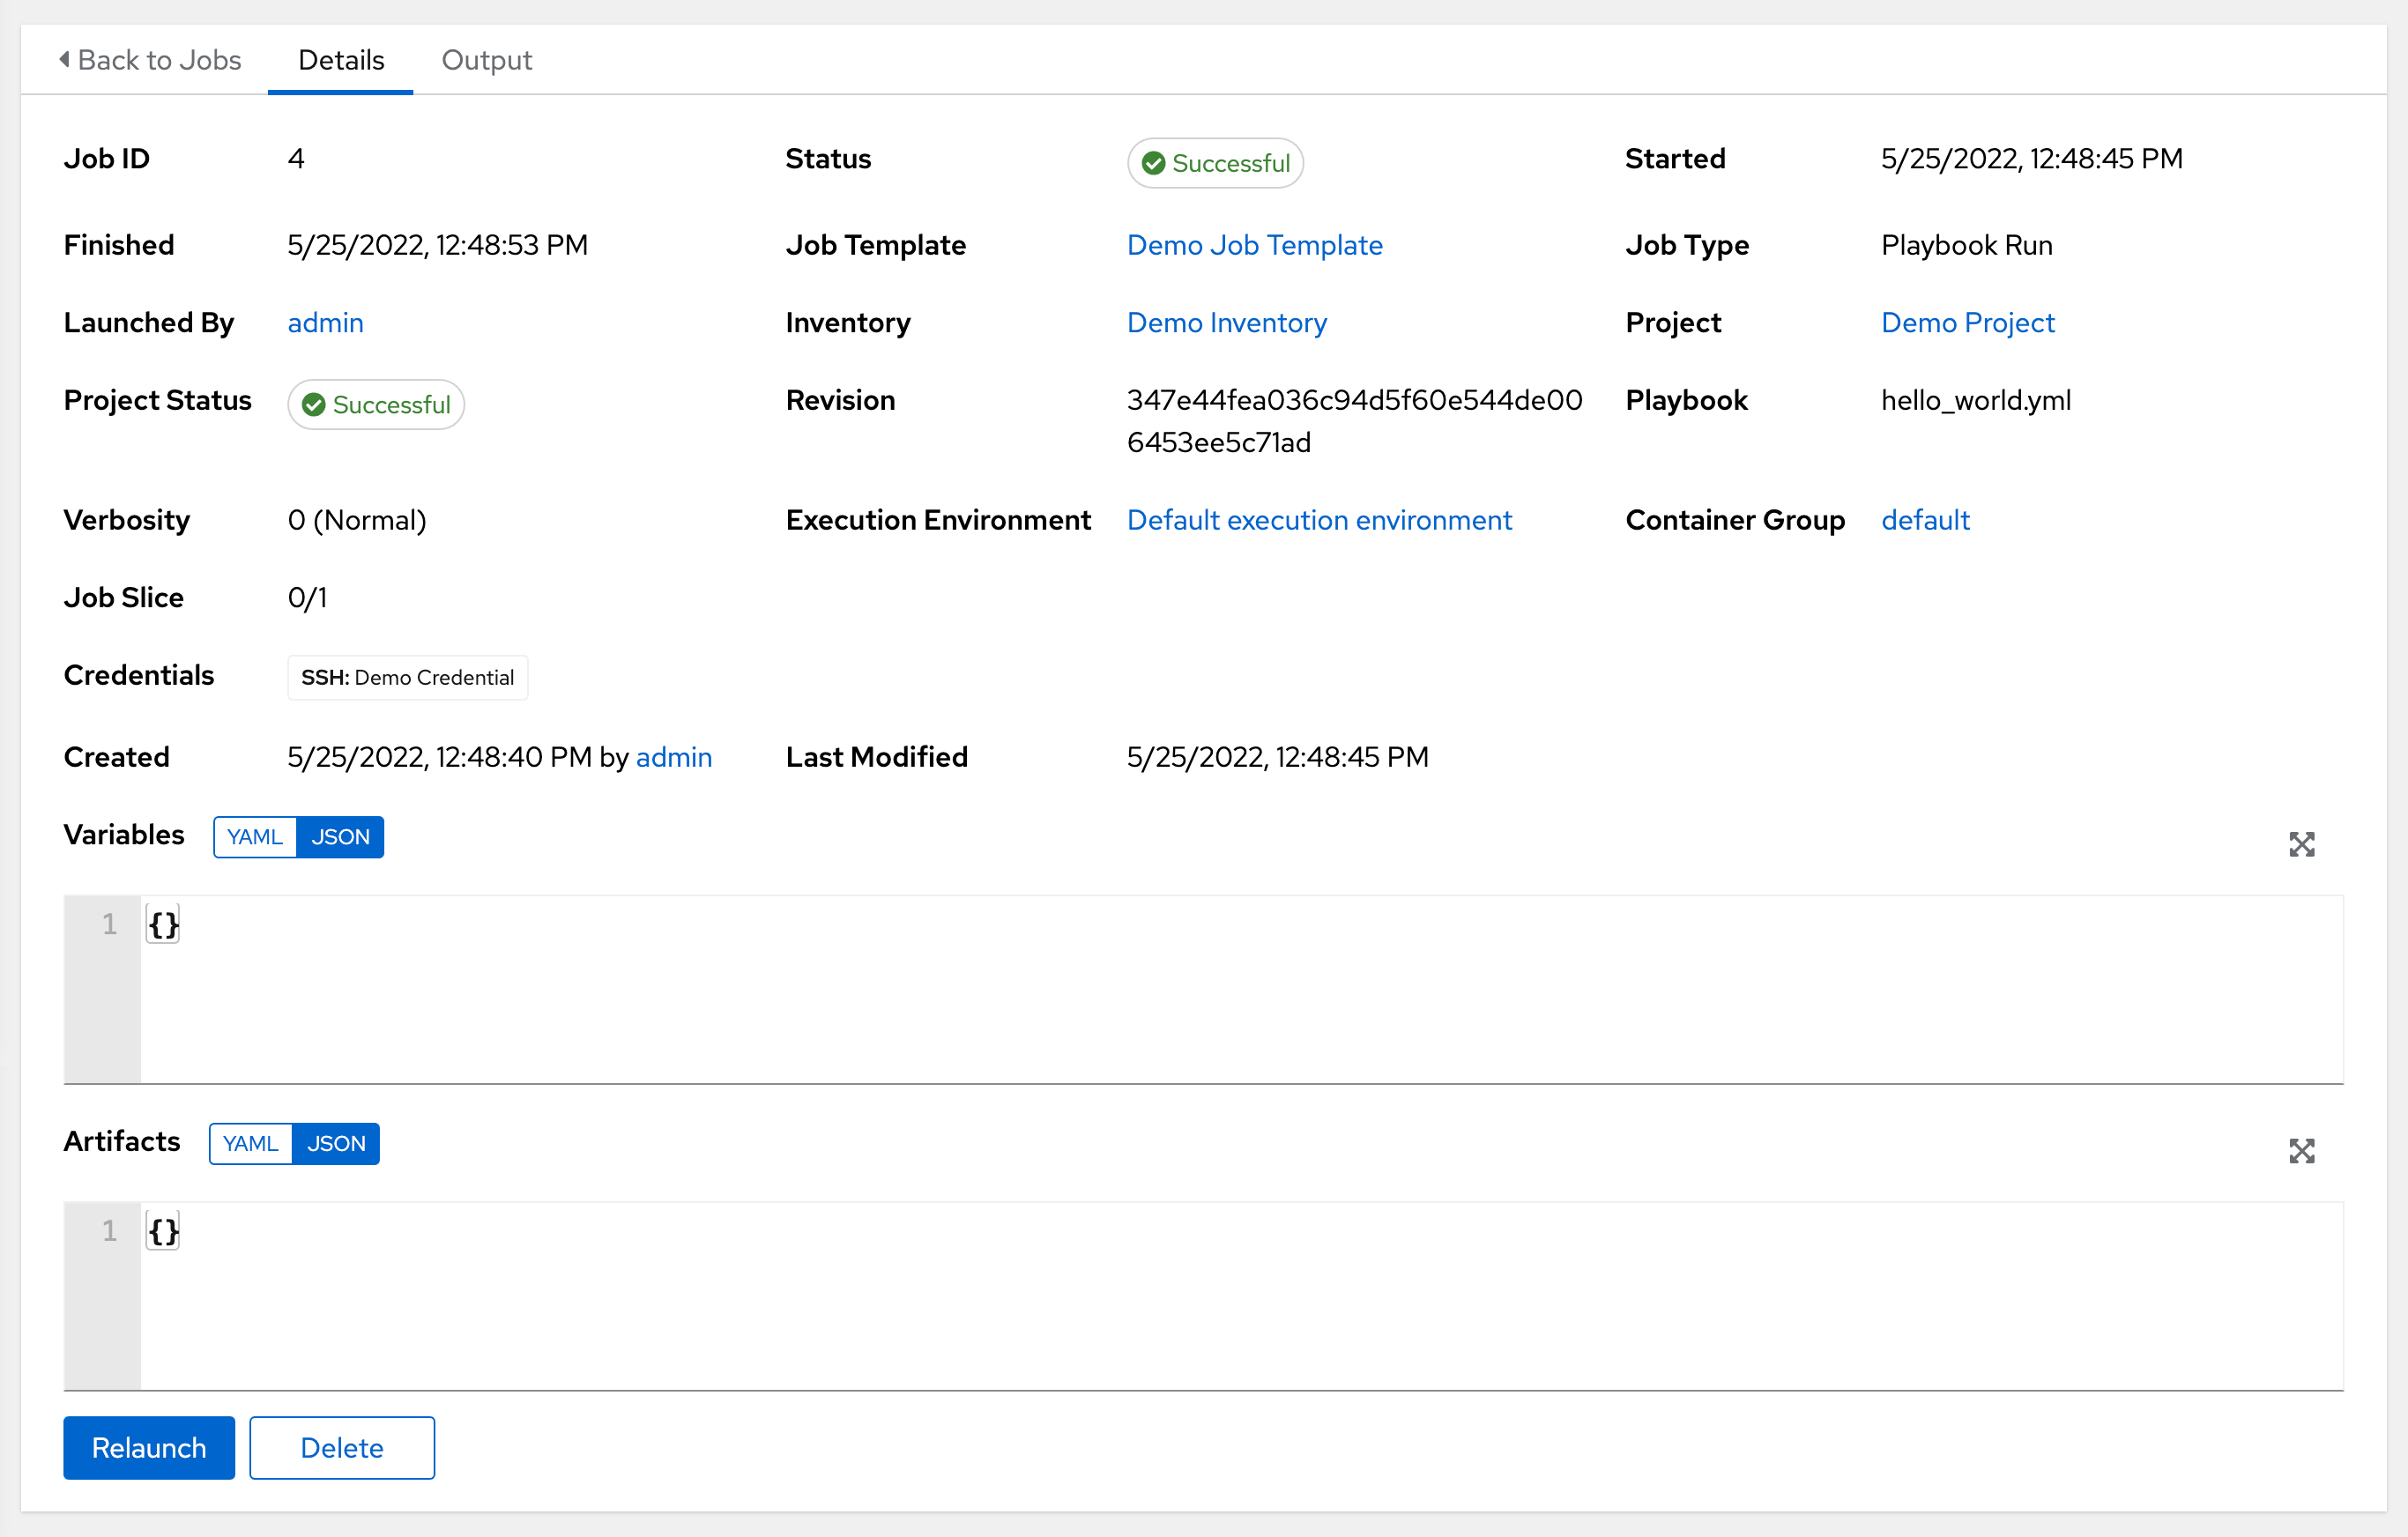
You can view the following details for an executed job:
Status: It can be any of the following:
- Pending: The playbook run has been created, but not queued or started yet. Any job, not just playbook runs, stay in pending until it is ready to be run by the system. Reasons for playbook runs not being ready include dependencies that are currently running (all dependencies must be completed before the next step can execute), or there is not enough capacity to run in the locations it is configured to.
- Waiting: The playbook run is in the queue waiting to be executed.
- Running: The playbook run is currently in progress.
- Successful: The last playbook run succeeded.
- Failed: The last playbook run failed.
- Job Template: The name of the job template from which this job launched.
- Inventory: The inventory selected to run this job against.
- Project: The name of the project associated with the launched job.
- Project Status: The status of the project associated with the launched job.
- Playbook: The playbook used to launch this job.
- Execution Environment: The name of the execution environment used in this job.
- Container Group: The name of the container group used in this job.
- Credentials: The credentials used in this job.
- Extra Variables: Any extra variables passed when creating the job template are displayed here.
Select one of these items to view the corresponding job templates, projects, and other objects.
25.4. Automation controller capacity determination and job impact
The Automation controller capacity system determines how many jobs can run on an instance given the amount of resources available to the instance and the size of the jobs that are running (referred to as Impact). The algorithm used to determine this is based on the following two things:
-
How much memory is available to the system (
mem_capacity) -
How much processing capacity is available to the system (
cpu_capacity)
Capacity also impacts instance groups. Since groups are made up of instances, instances can also be assigned to multiple groups. This means that impact to one instance can affect the overall capacity of other groups.
Instance groups, not instances themselves, can be assigned to be used by jobs at various levels. For more information, see Clustering in the Automation controller Administration Guide.
When the Task Manager prepares its graph to determine which group a job runs on, it commits the capacity of an instance group to a job that is not ready to start yet.
In smaller configurations, if only one instance is available for a job to run, the Task Manager enables that job to run on the instance even if it pushes the instance over capacity. This guarantees that jobs do not get stuck as a result of an under-provisioned system.
Additional resources
- For information on container groups, see Container capacity limits in the Automation controller Administration Guide.
- For information on sliced jobs and their impact to capacity, see Job slice execution behavior.
25.4.1. Resource determination for capacity algorithm
Capacity algorithms determine how many forks a system is capable of running simultaneously. These algorithms control how many systems Ansible can communicate with simultaneously. Increasing the number of forks an automation controller system is running enables jobs to run faster by performing more work in parallel. However, this increases the load on the system, which can cause work to slow down.
The default, mem_capacity, enables you to over-commit processing resources while protecting the system from running out of memory. If most of your work is not processor-bound, then selecting this mode maximizes the number of forks.
25.4.1.1. Memory relative capacity
mem_capacity is calculated relative to the amount of memory needed per fork. Taking into account the overhead for internal components, this is approximately 100MB per fork. When considering the amount of memory available to Ansible jobs, the capacity algorithm reserves 2GB of memory to account for the presence of other services. The algorithm formula for this is:
(mem - 2048) / mem_per_fork
The following is an example:
(4096 - 2048) / 100 == ~20
A system with 4GB of memory is capable of running 20 forks. The value mem_per_fork is controlled by setting the value of SYSTEM_TASK_FORKS_MEM, which defaults to 100.
25.4.1.2. CPU relative capacity
Ansible workloads are often processor-bound. In such cases, you can reduce the simultaneous workload to enable more tasks to run faster and reduce the average time-to-completion of those jobs.
Just as the mem_capacity algorithm adjusts the amount of memory required per fork, the cpu_capacity algorithm adjusts the amount of processing resources required per fork. The baseline value for this is four forks per core. The algorithm formula for this is:
cpus * fork_per_cpu
For example, a 4-core system looks like the following:
4 * 4 == 16
You can control the value of fork_per_cpu by setting the value of SYSTEM_TASK_FORKS_CPU which defaults to 4.
25.4.2. Capacity job impacts
When selecting the capacity, it is important to understand how each job type affects capacity.
The default forks value for Ansible is five. However, if you set up automation controller to run against fewer systems than that, then the actual concurrency value is lower.
When a job is run in automation controller, the number of forks selected is incremented by 1, to compensate for the Ansible parent process.
Example
If you run a playbook against five systems with forks value of 5, then the actual forks value from the Job Impact perspective is 6.
25.4.2.1. Impact of job types in automation controller
Jobs and ad hoc jobs follow the preceding model, forks +1. If you set a fork value on your job template, your job capacity value is the minimum of the forks value supplied and the number of hosts that you have, plus one. The +1 is to account for the parent Ansible process.
Instance capacity determines which jobs get assigned to any specific instance. Jobs and ad hoc commands use more capacity if they have a higher forks value.
Job types including the following, have a fixed impact:
- Inventory updates: 1
- Project updates: 1
- System jobs: 5
If you do not set a forks value on your job template, your job uses Ansible’s default forks value of five. However, it uses fewer if your job has fewer than five hosts. In general, setting a forks value higher than what the system is capable of can cause issues by running out of memory or over-committing CPU. The job template fork values that you use must fit on the system. If you have playbooks using 1000 forks but none of your systems individually has that much capacity, then your systems are undersized and at risk of performance or resource issues.
25.4.2.2. Selecting the correct capacity
Selecting a capacity out of the CPU-bound or the memory-bound capacity limits is selecting between the minimum or maximum number of forks. In the previous examples, the CPU capacity permits a maximum of 16 forks while the memory capacity permits 20. For some systems, the disparity between these can be large and you might want to have a balance between these two.
The instance field capacity_adjustment enables you to select how much you want to consider. It is represented as a value between 0.0 and 1.0. If set to a value of 1.0, then the largest value is used. The previous example involves memory capacity, so a value of 20 forks can be selected. If set to a value of 0.0 then the smallest value is used. A value of 0.5 is a 50/50 balance between the two algorithms, which is 18:
16 + (20 - 16) * 0.5 = 18
Procedure
View or edit the capacity:
- From the Instances Groups list view, select the desired instance.
Select the Instances tab and adjust the Capacity Adjustment slider.
NoteThe slider adjusts whether the instance capacity algorithm yields less forks (towards the left) or yields more forks (towards the right).
25.5. Job branch overriding
Projects specify the branch, tag, or reference to use from source control in the scm_branch field. These are represented by the values specified in the Type Details fields:
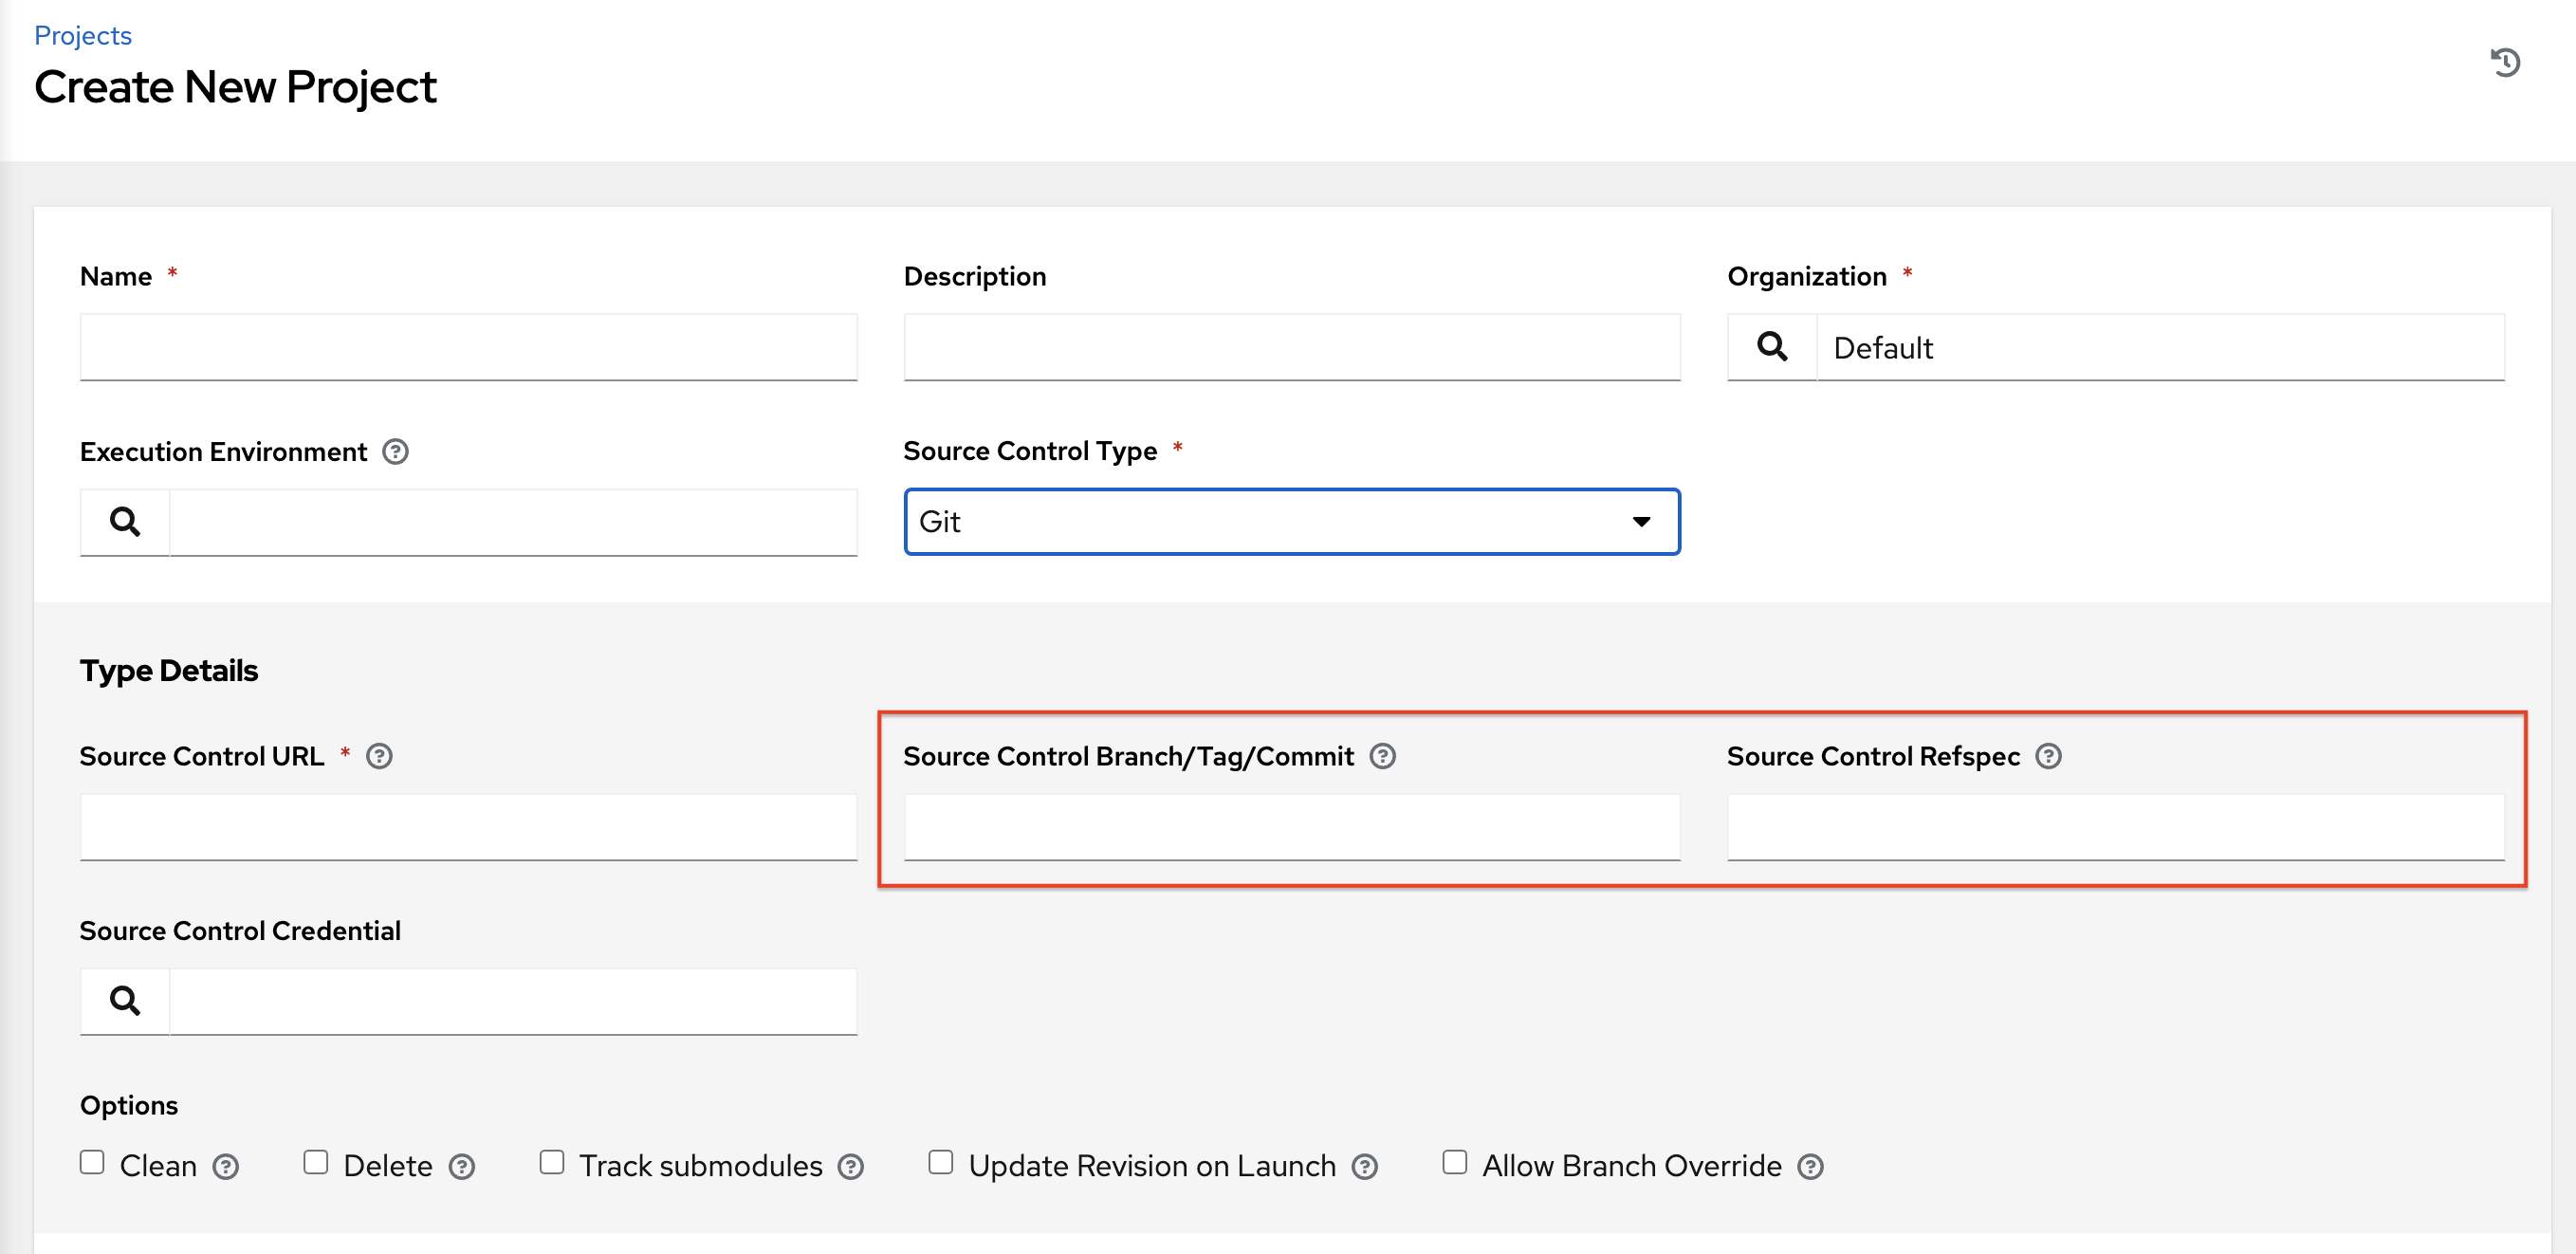
When creating or editing a job you have the option to Allow Branch Override. When this option is checked, project administrators can delegate branch selection to the job templates that use that project, requiring only project use_role.
25.5.1. Source tree copy behavior
Every job run has its own private data directory. This directory contains a copy of the project source tree for the given scm_branch that the job is running. Jobs are free to make changes to the project folder and make use of those changes while it is still running. This folder is temporary and is removed at the end of the job run.
If you check the Clean option, modified files are removed in automation controller’s local copy of the repository. This is done through use of the force parameter in its corresponding Ansible modules pertaining to git or Subversion.
Additional resources
For more information, see the Parameters section of the Ansible documentation.
25.5.2. Project revision behavior
During a project update, the revision of the default branch (specified in the SCM Branch field of the project) is stored when updated. If providing a non-default SCM Branch (not a commit hash or tag) in a job, the newest revision is pulled from the source control remote immediately before the job starts. This revision is shown in the Source Control Revision field of the job and its project update.
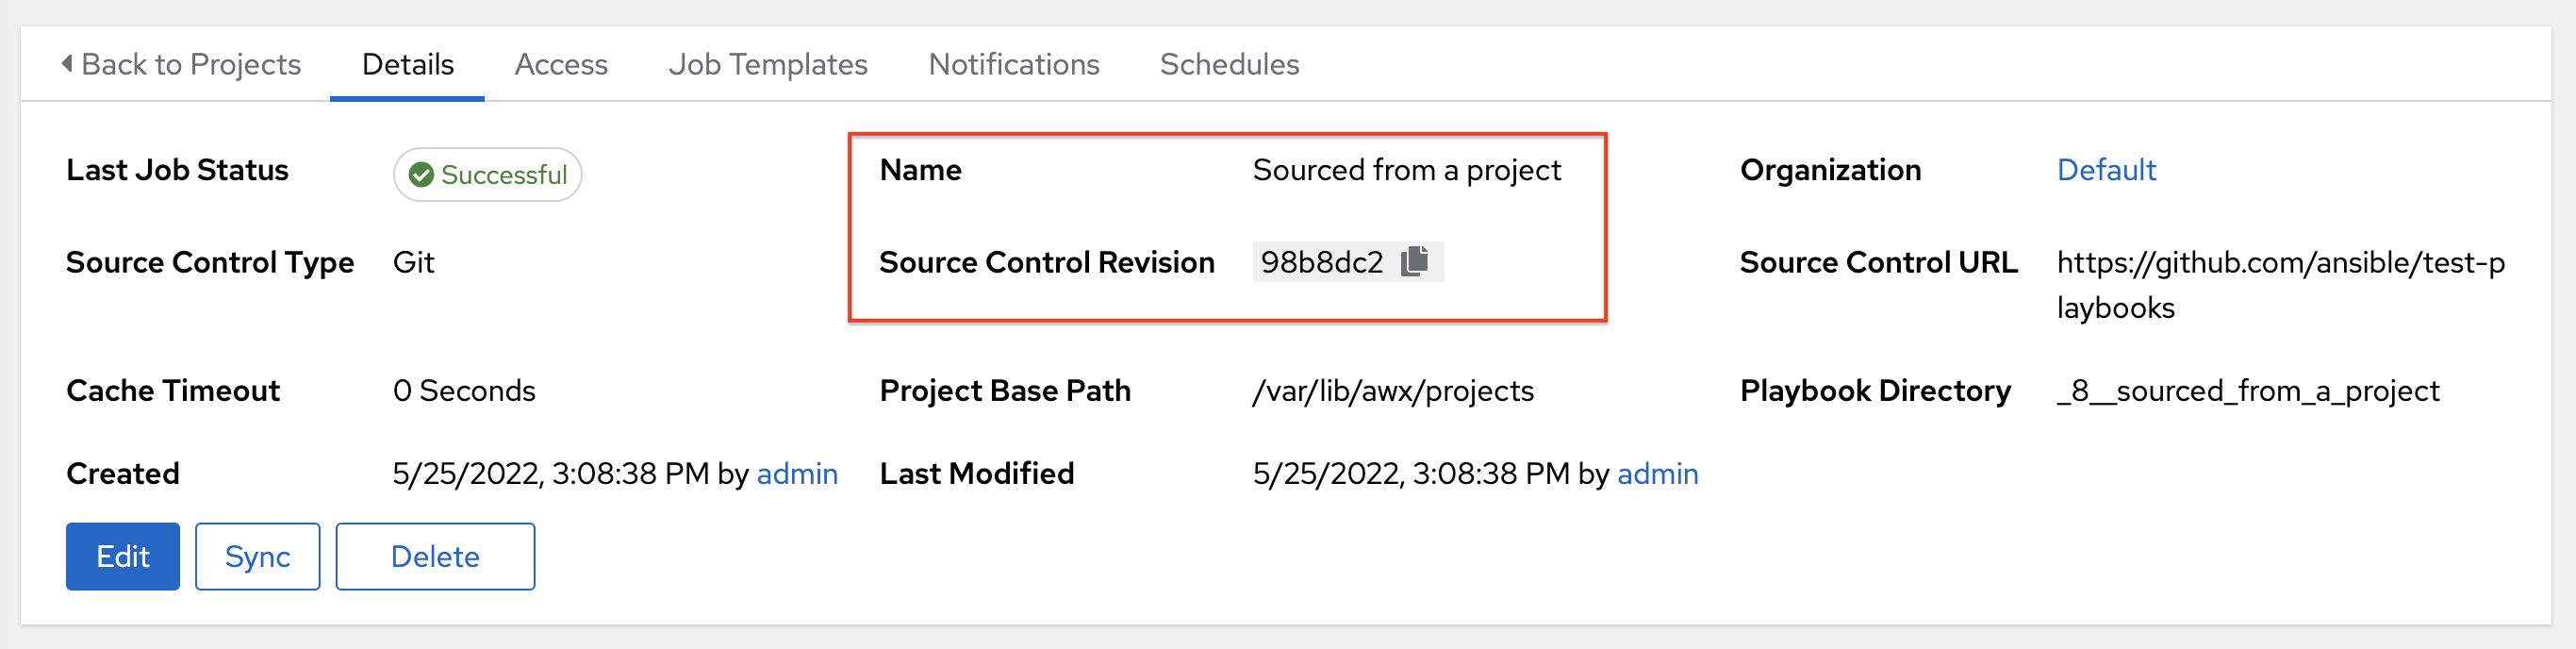
As a result, offline job runs are impossible for non-default branches. To ensure that a job is running a static version from source control, use tags or commit hashes. Project updates do not save all branches, only the project default branch.
The SCM Branch field is not validated, so the project must update to assure it is valid. If this field is provided or prompted for, the Playbook field of job templates is not validated, and you have to launch the job template in order to verify presence of the expected playbook.
25.5.3. Git Refspec
The SCM Refspec field specifies which extra references the update should download from the remote. Examples include the following:
-
refs/:refs/remotes/origin/: This fetches all references, including remotes of the remote -
refs/pull/:refs/remotes/origin/pull/(GitHub-specific): This fetches all refs for all pull requests -
refs/pull/62/head:refs/remotes/origin/pull/62/head: This fetches the ref for one GitHub pull request
For large projects, consider performance impact when using the first or second previous examples.
The SCM Refspec parameter affects the availability of the project branch, and can enable access to references not otherwise available. The previous examples enable you to supply a pull request from the SCM Branch, which is not possible without the SCM Refspec field.
The Ansible git module fetches refs/heads/ by default. This means that a project’s branches, tags and commit hashes, can be used as the SCM Branch if SCM Refspec is blank. The value specified in the SCM Refspec field affects which SCM Branch fields can be used as overrides. Project updates (of any type) perform an extra git fetch command to pull that refspec from the remote.
Example
You can set up a project that enables branch override with the first or second refspec example. Use this in a job template that prompts for the SCM Branch. A client can then launch the job template when a new pull request is created, providing the branch pull/N/head and the job template can run against the provided GitHub pull request reference.
Additional resources
For more information, see the Ansible git module.
Chapter 26. Working with Webhooks
A Webhook enables you to execute specified commands between applications over the web. Automation controller currently provides webhook integration with GitHub and GitLab.
Set up a webhook using the following services:
The webhook post-status-back functionality for GitHub and GitLab is designed to work only under certain CI events. Receiving another kind of event results in messages such as the following in the service log:
awx.main.models.mixins Webhook event did not have a status API endpoint associated, skipping.
26.1. Setting up a GitHub webhook
Automation controller has the ability to run jobs based on a triggered webhook event coming in. Job status information (pending, error, success) can be sent back only for pull request events. If you do not need automation controller to post job statuses back to the webhook service, go directly to step 3.
Procedure
Generate a Personal Access Token (PAT) for use with automation controller:
- In the profile settings of your GitHub account, select Settings.
- From the navigation panel, select .
- On the Developer Settings page, select Personal access tokens.
- From the Personal access tokens screen, click .
- When prompted, enter your GitHub account password to continue.
- In the Note field, enter a brief description about what this PAT is used for.
- In the Select scopes fields, check the boxes next to repo:status, repo_deployment, and public_repo. The automation webhook only needs repository scope access, with the exception of invites. For more information, see Scopes for OAuth apps documentation.
Click .
ImportantWhen the token is generated, ensure that you copy the PAT, as you need it in step 2. You cannot access this token again in GitHub.
Use the PAT to optionally create a GitHub credential:
- Go to your instance, and Create a new credential for the GitHub PAT using the generated token.
Make note of the name of this credential, as you use it in the job template that posts back to GitHub.
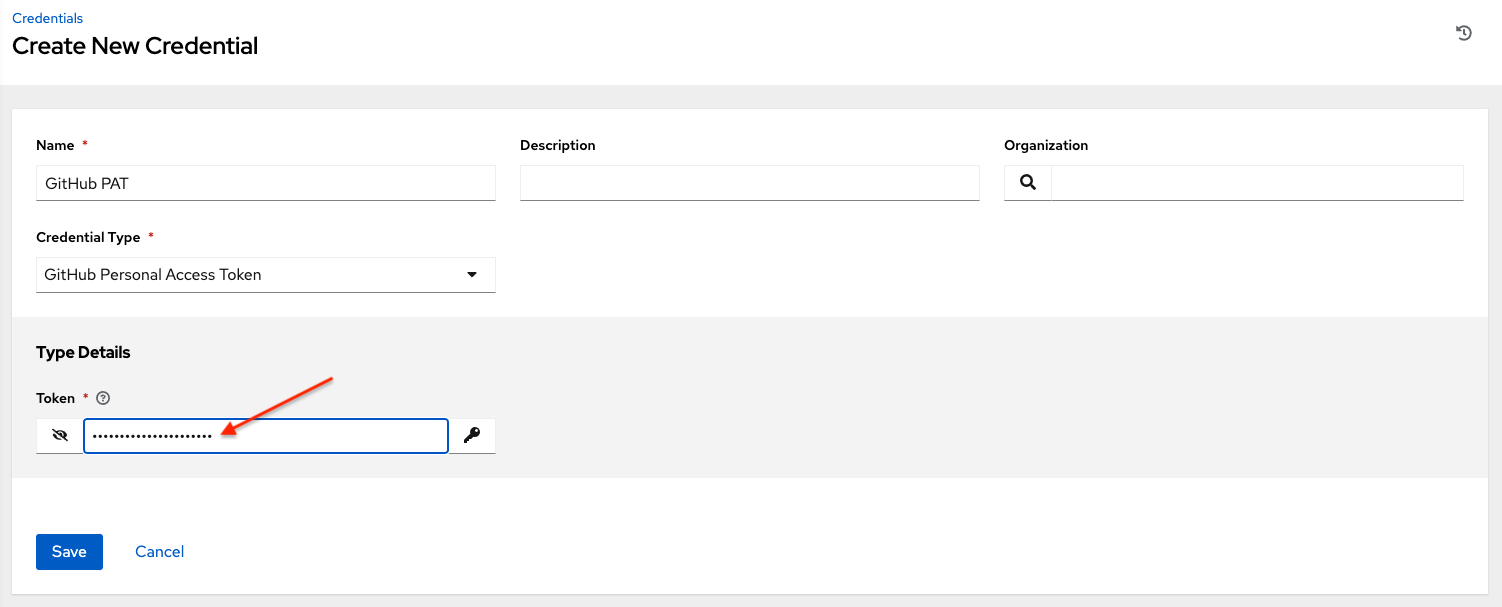
Go to the job template with which you want to enable webhooks, and select the webhook service and credential you created in the preceding step.

- Click . Your job template is set up to post back to GitHub.
- Go to a GitHub repository where you want to configure webhooks and select .
- From the navigation panel, select → .
- To complete the Add webhook page, you must check the Enable Webhook option in a job template or workflow job template. For more information, see step 3 in both Creating a job template and Creating a workflow template.
Complete the following fields:
- Payload URL: Copy the contents of the Webhook URL from the job template and paste it here. The results are sent to this address from GitHub.
- Content type: Set it to application/json.
- Secret: Copy the contents of the Webhook Key from the job template and paste it here.
Which events would you like to trigger this webhook?: Select the types of events you want to trigger a webhook. Any such event will trigger the job or workflow. To have the job status (pending, error, success) sent back to GitHub, you must select Pull requests in the Let me select individual events section.
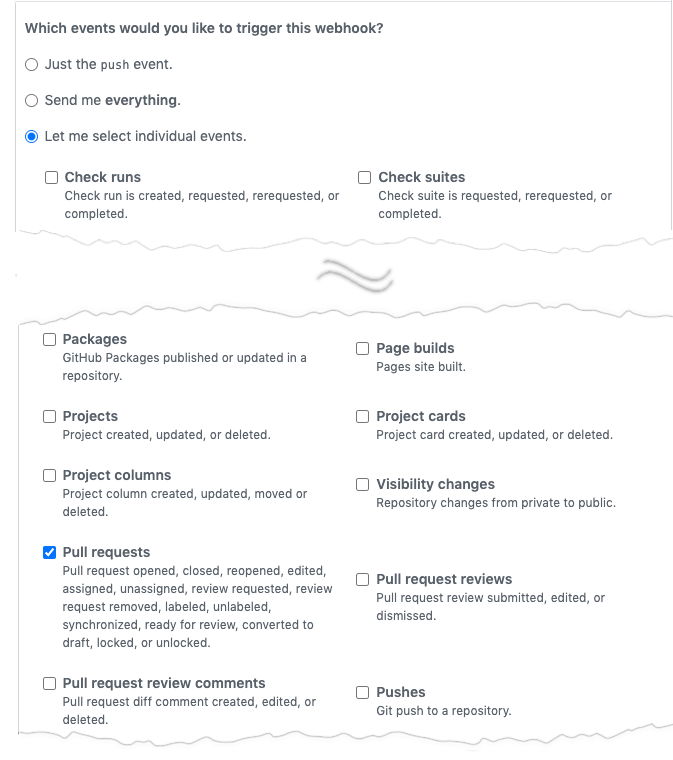
- Active: Leave this checked.
- Click .
- When your webhook is configured, it is displayed in the list of webhooks active for your repository, along with the ability to edit or delete it. Click on a webhook, to go to the Manage webhook screen.
- Scroll to view the delivery attempts made to your webhook and whether they succeeded or failed.
Additional resources
For more information, see the Webhooks documentation.
26.2. Setting up a GitLab webhook
Automation controller has the ability to run jobs based on a triggered webhook event coming in. Job status information (pending, error, success) can be sent back only for pull request events. If automation controller is not required to post job statuses back to the webhook service, go directly to step 3.
Procedure
Generate a Personal Access Token (PAT) for use with automation controller:
- From the navigation panel in GitLab, select your avatar and .
- From the navigation panel, select .
Complete the following fields:
- Token name: Enter a brief description about what this PAT is used for.
- Expiration date: Skip this field unless you want to set an expiration date for your webhook.
- Select scopes: Select those that are applicable to your integration. For automation controller, api is the only selection necessary.
Click .
ImportantWhen the token is generated, ensure that you copy the PAT, as you need it in step 2. You cannot access this token again in GitLab.
Use the PAT to optionally create a GitLab credential:
- Go to your instance, and create a new credential for the GitLab PAT using the generated token.
Make note of the name of this credential, as you use it in the job template that posts back to GitLab.

Go to the job template with which you want to enable webhooks, and select the webhook service and credential you created in the preceding step.
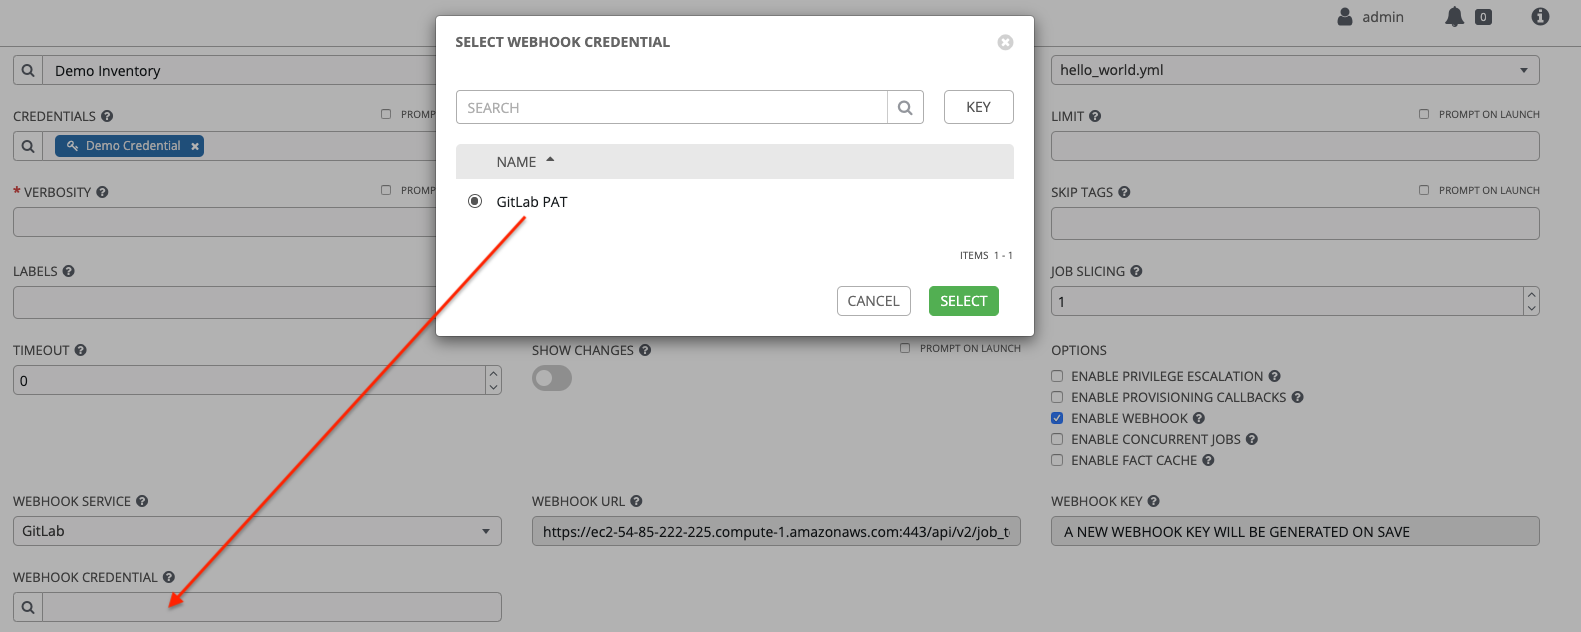
- Click . Your job template is set up to post back to GitLab.
- Go to a GitLab repository where you want to configure webhooks.
- From the navigation panel, select → .
- To complete the Add webhook page, you must check the Enable Webhook option in a job template or workflow job template. For more information, see step 3 in both Creating a job template and Creating a workflow template.
Complete the following fields:
- URL: Copy the contents of the Webhook URL from the job template and paste it here. The results are sent to this address from GitLab.
- Secret Token: Copy the contents of the Webhook Key from the job template and paste it here.
- Trigger: Select the types of events you want to trigger a webhook. Any such event will trigger the job or workflow. To have job status (pending, error, success) sent back to GitLab, you must select Merge request events in the Trigger section.
- SSL verification: Leave Enable SSL verification selected.
- Click .
- When your webhook is configured, it is displayed in the list Project Webhooks for your repository, along with the ability to test events, edit or delete the webhook. Testing a webhook event displays the results on each page whether it succeeded or failed.
Additional resources
For more information, see Webhooks.
26.3. Viewing the payload output
You can view the entire payload exposed as an extra variable.
Procedure
- From the navigation panel, select → .
- Select the job template with the webhook enabled.
- Select the Details tab.
-
In the Extra Variables field, view the payload output from the
awx_webhook_payloadvariable, as shown in the following example:
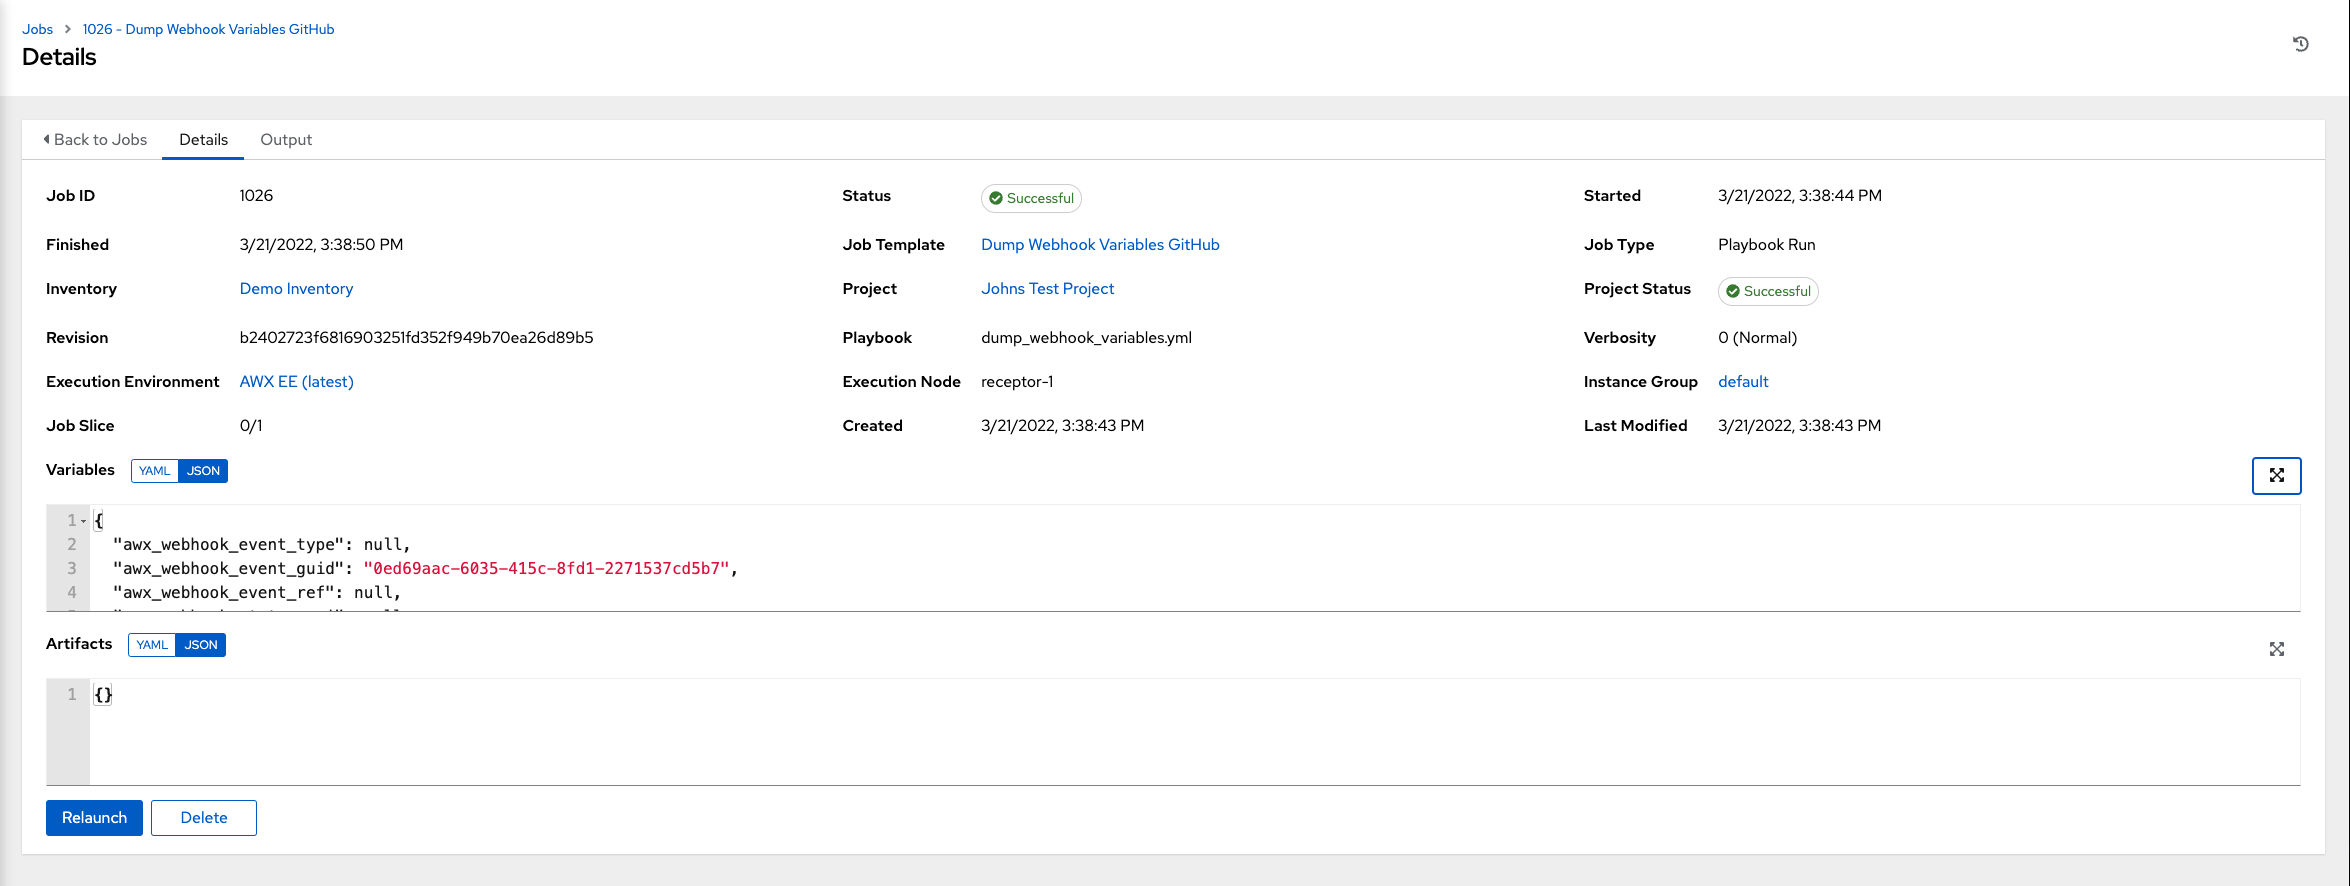
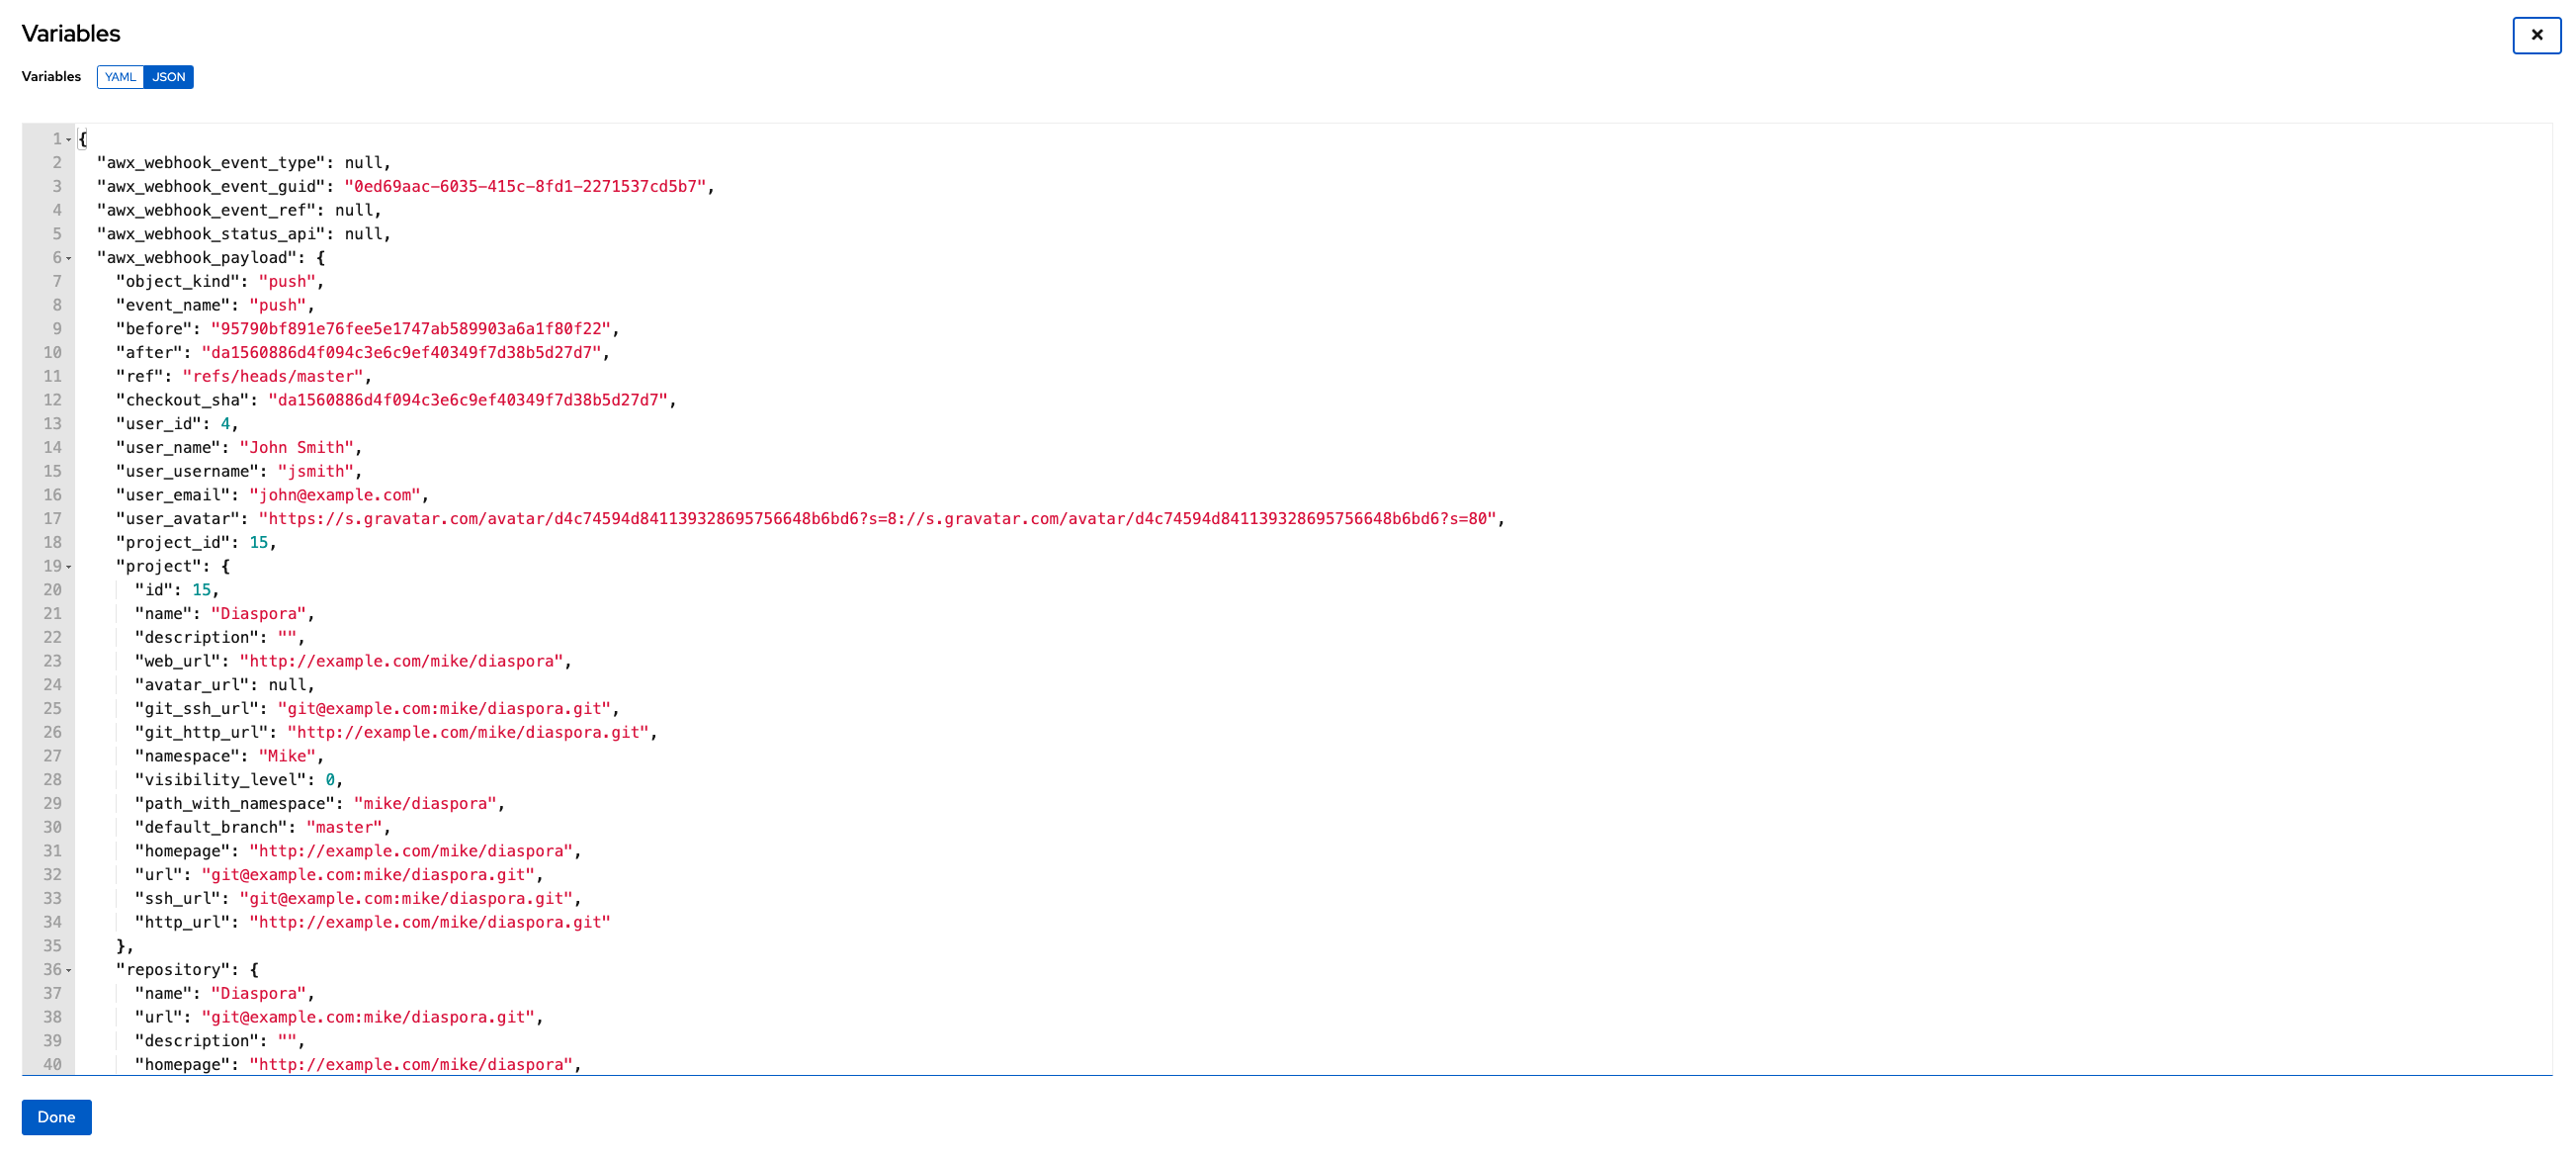
Chapter 27. Notifications
A Notification type such as Email, Slack or a Webhook, is an instance of a Notification Template, and has a name, description and configuration defined in the Notification template.
The following include examples of details needed to add a notification template:
- A username, password, server, and recipients are needed for an Email notification template
- The token and a list of channels are needed for a Slack notification template
- The URL and Headers are needed for a Webhook notification template
When a job fails, a notification is sent using the configuration that you define in the notification template.
The following shows the typical flow for the notification system:
-
You create a notification template to the
REST APIat the/api/v2/notification_templates endpoint, either through the API or through the UI. -
You assign the notification template to any of the various objects that support it (all variants of job templates as well as organizations and projects) and at the appropriate trigger level for which you want the notification (started, success, or error). For example, you might want to assign a particular notification template to trigger when Job Template 1 fails. In this case, you associate the notification template with the job template at
/api/v2/job_templates/n/notification_templates_errorAPI endpoint. - You can set notifications on job start and job end. Users and teams are also able to define their own notifications that can be attached to arbitrary jobs.
27.1. Notification hierarchy
Notification templates inherit templates defined on parent objects, such as the following:
- Job templates use notification templates defined for them. Additionally, they can inherit notification templates from the project used by the job template, and from the organization that it is listed under.
- Project updates use notification templates defined on the project and inherit notification templates from the organization associated with it.
- Inventory updates use notification templates defined on the organization that it is listed under.
- Ad hoc commands use notification templates defined on the organization that the inventory is associated with.
27.2. Notification workflow
When a job succeeds or fails, the error or success handler pulls a list of relevant notification templates using the procedure defined in the Notifications section.
It then creates a notification object for each one, containing relevant details about the job and sends it to the destination. These include email addresses, slack channels, and SMS numbers.
These notification objects are available as related resources on job types (jobs, inventory updates, project updates), and also at /api/v2/notifications. You can also see what notifications have been sent from a notification template by examining its related resources.
If a notification fails, it does not impact the job associated with it or cause it to fail. The status of the notification can be viewed at its detail endpoint /api/v2/notifications/<n>.
27.3. Creating a notification template
Use the following procedure to create a notification template.
Procedure
- From the navigation panel, select → .
- Click .
Complete the following fields:
- Name: Enter the name of the notification.
- Description: Enter a description for the notification. This field is optional.
- Organization: Specify the organization that the notification belongs to.
- Type: Choose a type of notification from the drop-down menu. For more information, see the Notification types section.
- Click .
27.4. Notification types
The following notification types are supported with automation controller:
Each notification type has its own configuration and behavioral semantics. You might need to test them in different ways. Additionally, you can customize each type of notification down to a specific detail or a set of criteria to trigger a notification.
Additional resources
For more information on configuring custom notifications, see Create custom notifications. The following sections give further details on each type of notification.
27.4.1. Email
The email notification type supports a wide variety of SMTP servers and has support for SSL/TLS connections.
Provide the following details to set up an email notification:
- Host
- Recipient list
- Sender e-mail
- Port
- Timeout (in seconds): Enables you to specify up to 120 seconds, the length of time that automation controller attempts to connect to the email server before failure.
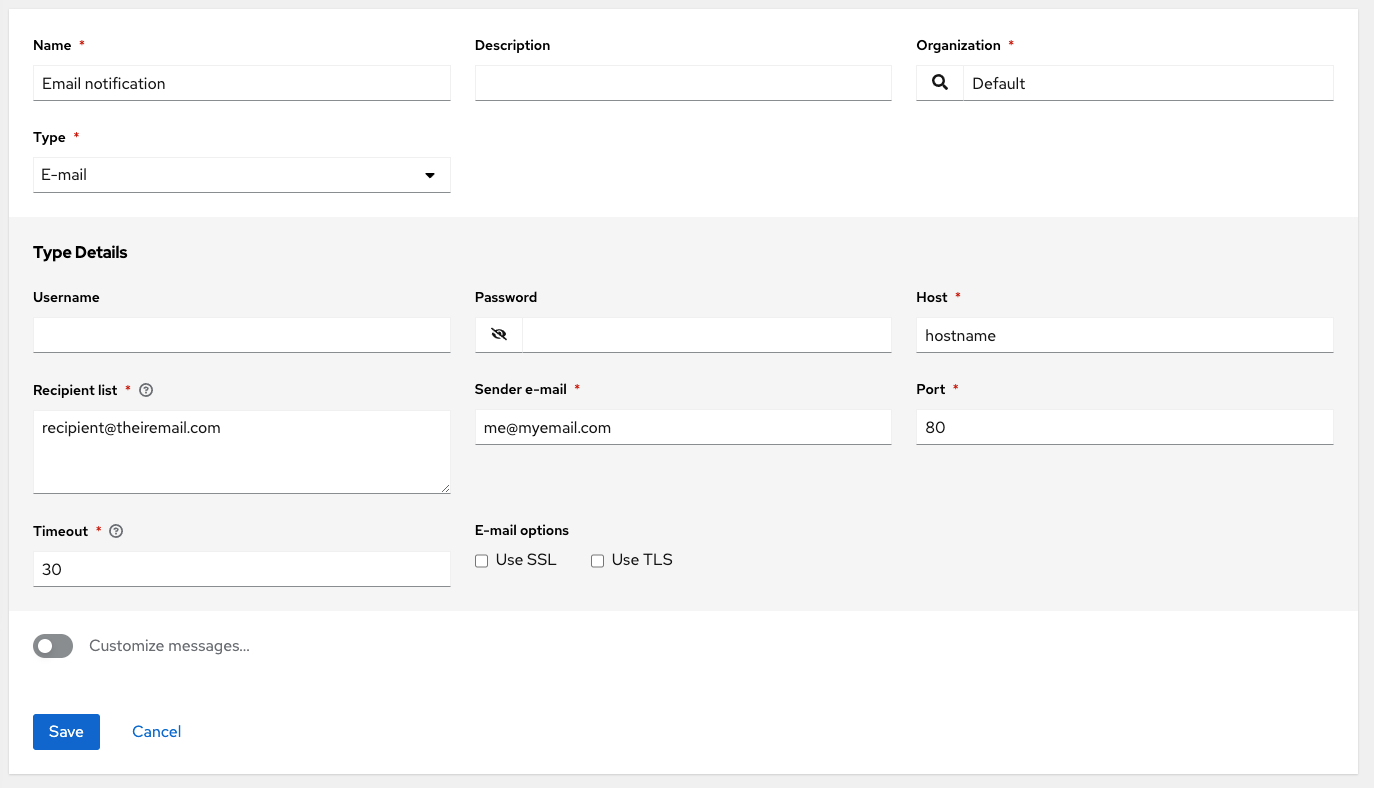
27.4.2. Grafana
To integrate Grafana, you must first create an API key in the Grafana system. This is the token that is given to automation controller.
Provide the following details to set up a Grafana notification:
- Grafana URL: The URL of the Grafana API service, such as: http://yourcompany.grafana.com.
- Grafana API key: You must first create an API key in the Grafana system.
- Optional: ID of the dashboard: When you create an API key for the Grafana account, you can set up a dashboard with its own unique ID.
- Optional: ID of the panel: If you added panels and graphs to your Grafana interface, you can specify its ID here.
- Optional: Tags for the annotation: Enter keywords that help identify the types of events of the notification that you are configuring.
- Disable SSL verification: SSL verification is on by default, but you can choose to turn off verification of the authenticity of the target’s certificate. Select this option to disable verification for environments that use internal or private CA’s.
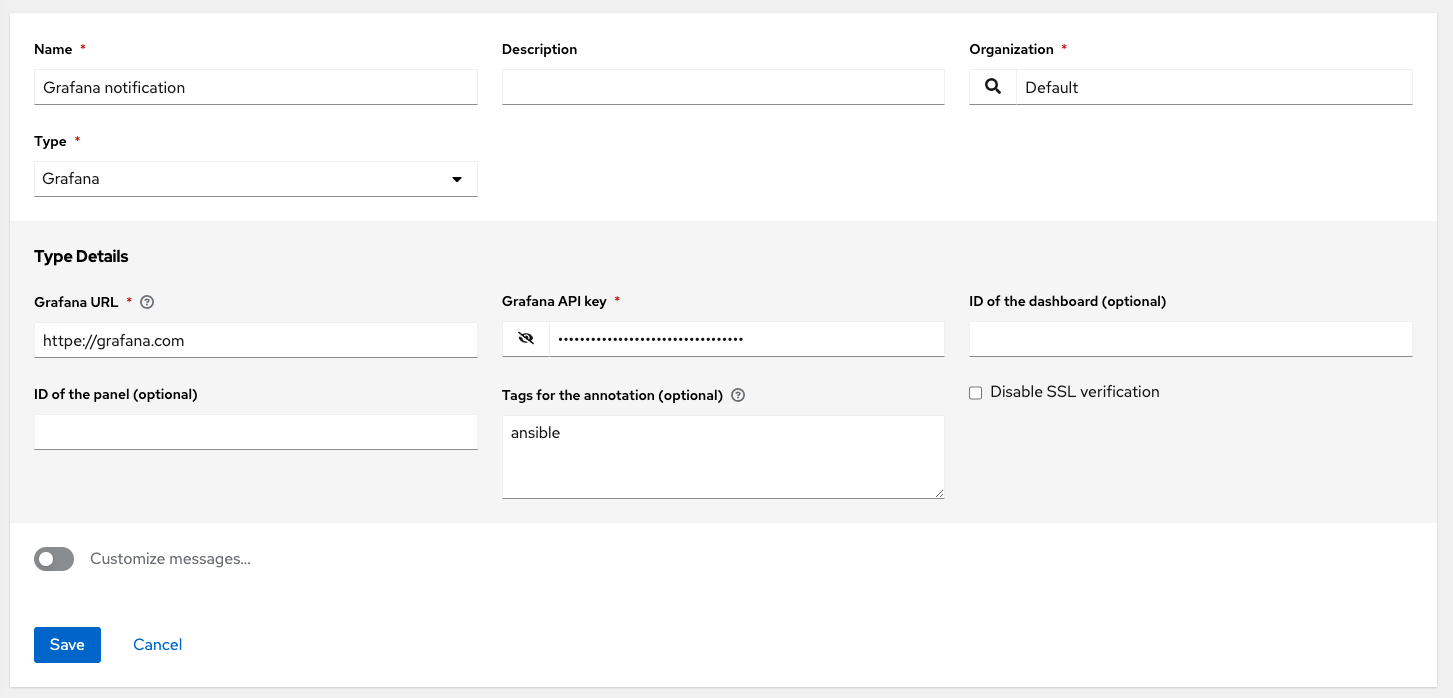
27.4.3. IRC
The IRC notification takes the form of an IRC bot that connects, delivers its messages to channels or individual users, and then disconnects. The notification bot also supports SSL authentication. The bot does not currently support Nickserv identification. If a channel or user does not exist or is not online then the notification fails. The failure scenario is reserved specifically for connectivity.
Provide the following details to set up an IRC notification:
- Optional: IRC server password: IRC servers can require a password to connect. If the server does not require one, leave it blank. IRC server port: The IRC server port. IRC server address: The host name or address of the IRC server. IRC nick: The bot’s nickname once it connects to the server. Destination channels or users: A list of users or channels to which the notification is sent.
- Optional: Disable SSL verification: Check if you want the bot to use SSL when connecting.
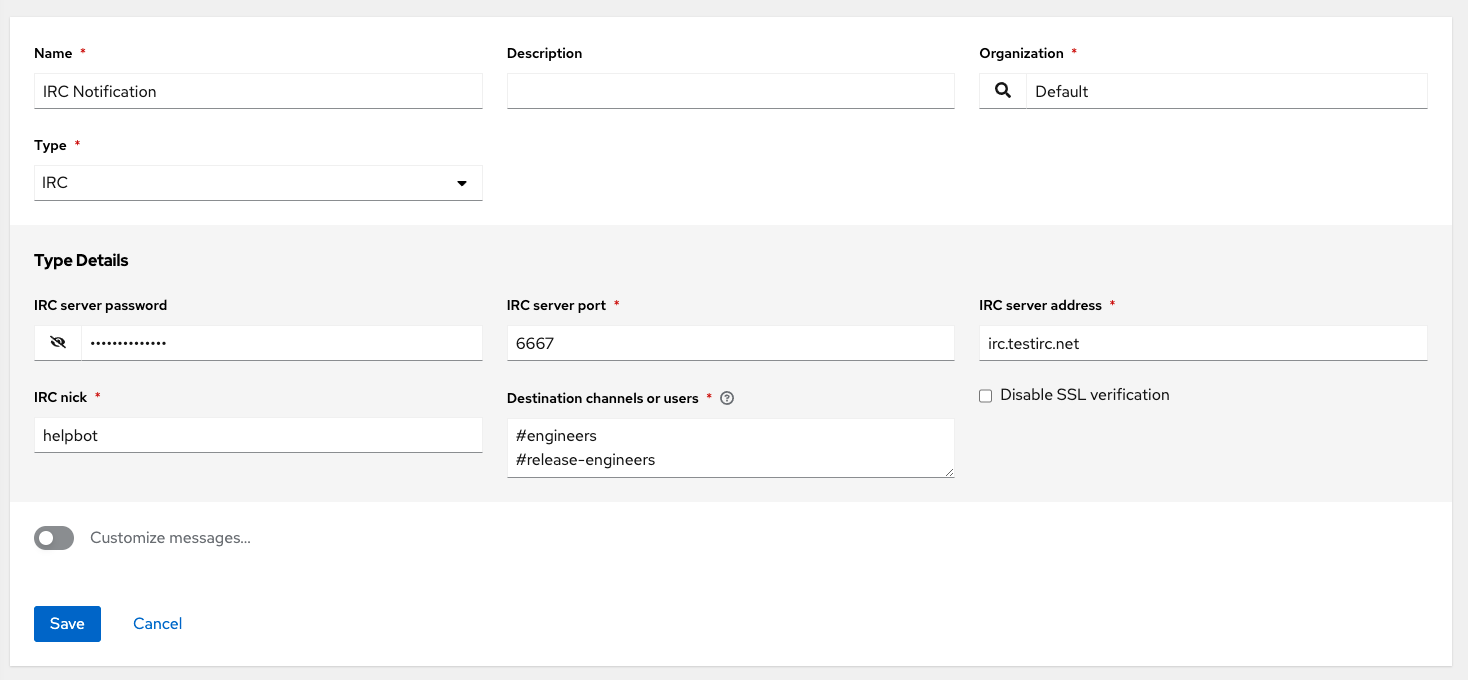
27.4.4. Mattermost
The Mattermost notification type provides a simple interface to Mattermost’s messaging and collaboration workspace.
Provide the following details to set up a Mattermost notification:
- Target URL: The full URL that is posted to.
- Optional: Username: Enter a username for the notification.
- Optional: Channel: Enter a channel for the notification.
- Icon URL: Specifies the icon to display for this notification.
- Disable SSL verification: Turns off verification of the authenticity of the target’s certificate. Select this option to disable verification for environments that use internal or private CA’s.
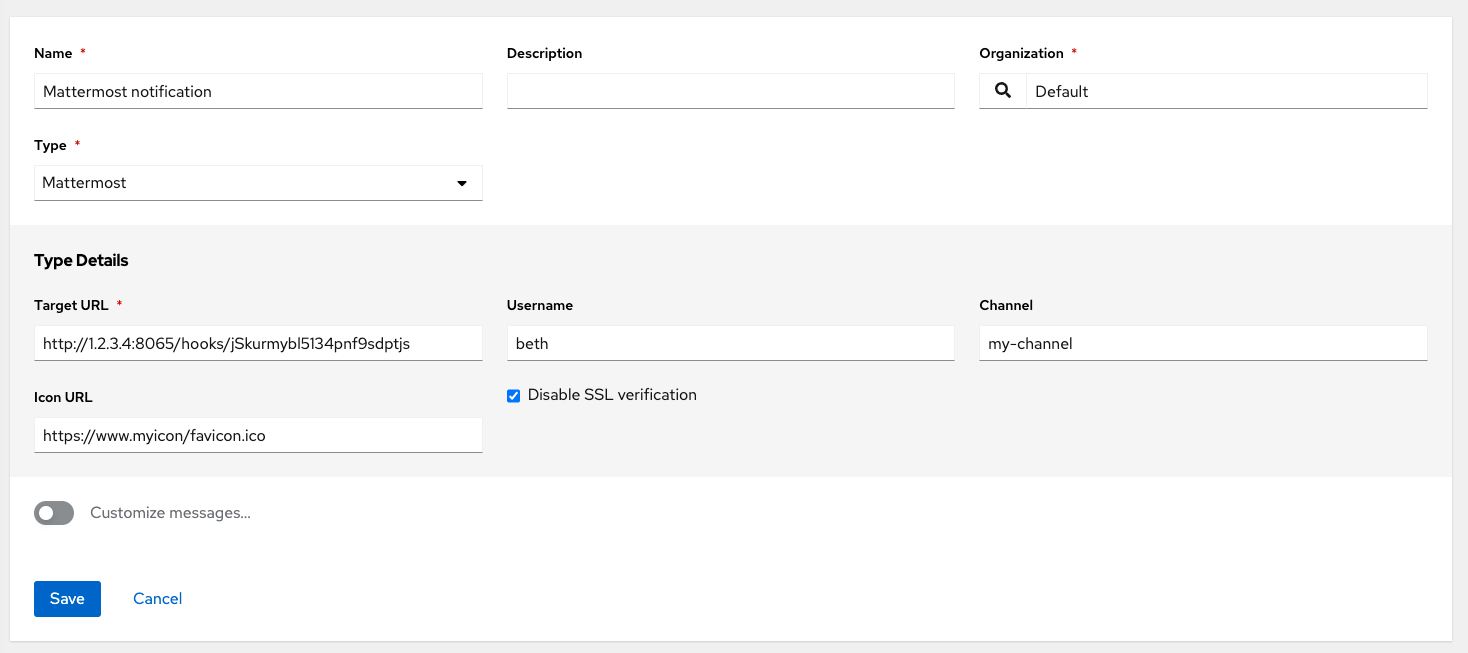
27.4.5. PagerDuty
To integrate PagerDuty, you must first create an API key in the PagerDuty system. This is the token that is given to automation controller. Then create a Service which provides an Integration Key that is also given to automation controller.
Provide the following details to set up a PagerDuty notification:
- API Token: You must first create an API key in the PagerDuty system. This is the token that is given to automation controller.
-
PagerDuty subdomain: When you sign up for the PagerDuty account, you receive a unique subdomain to communicate with. For example, if you signed up as "testuser", the web dashboard is at
testuser.pagerduty.comand you give the APItestuseras the subdomain, not the full domain. - API service/integration Key: Enter the API service/integration key created in PagerDuty.
- Client identifier: This is sent along with the alert content to the PagerDuty service to help identify the service that is using the API key and service. This is helpful if multiple integrations are using the same API key and service.
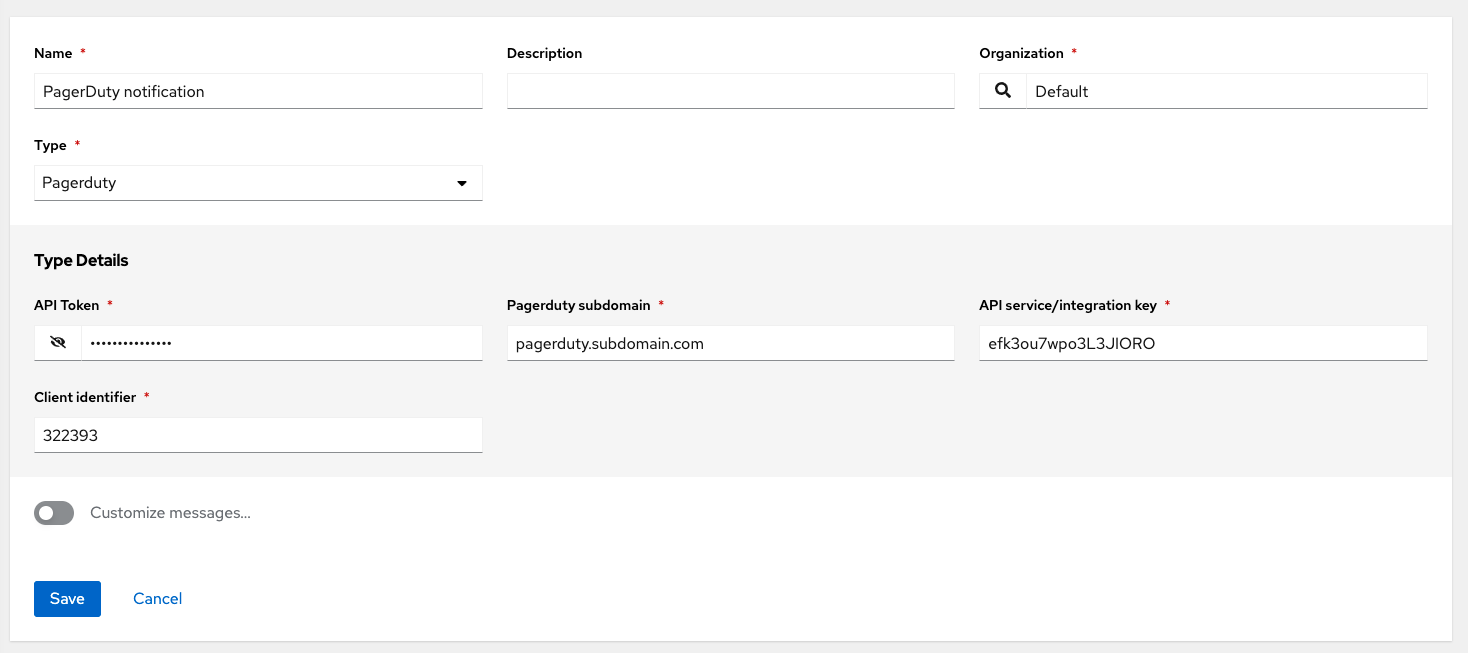
27.4.6. Rocket.Chat
The Rocket.Chat notification type provides an interface to Rocket.Chat’s collaboration and communication platform.
Provide the following details to set up a Rocket.Chat notification:
-
Target URL: The full URL that is
POSTedto. - Optional: Username: Enter a username.
- Optional: Icon URL: Specifies the icon to display for this notification
- Disable SSL Verification: Turns off verification of the authenticity of the target’s certificate. Select this option to disable verification for environments that use internal or private CA’s.
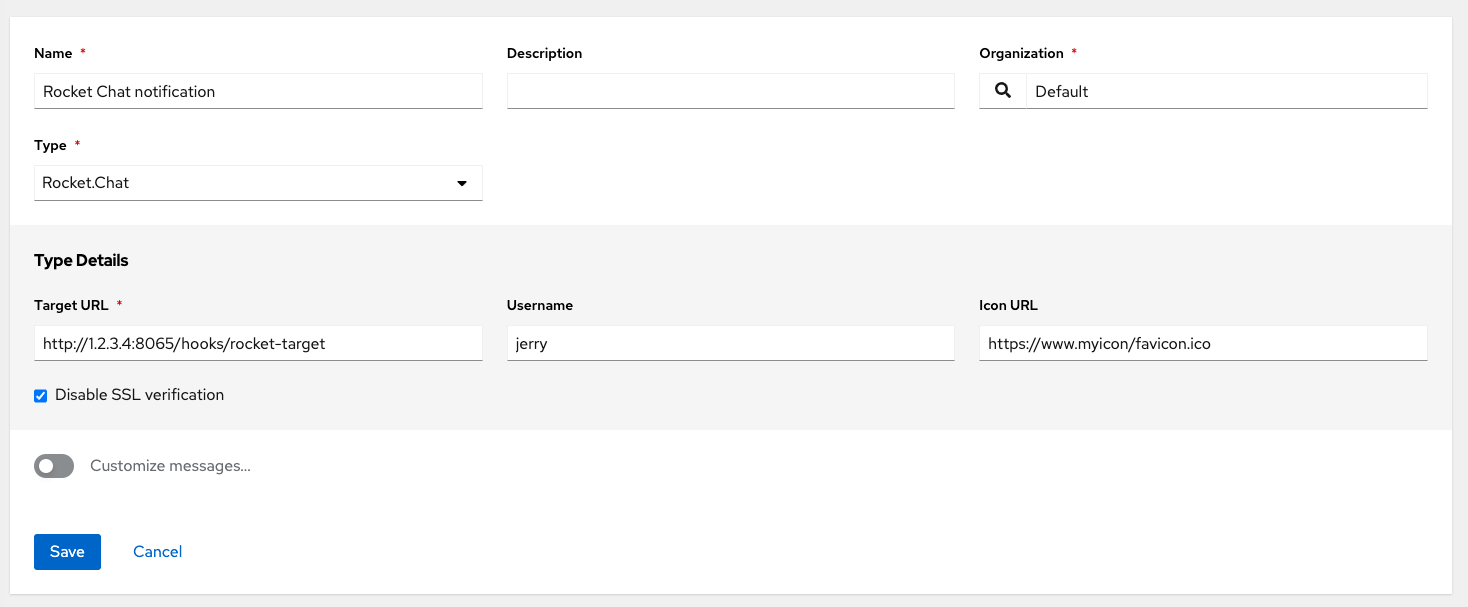
27.4.7. Slack
Slack is a collaborative team communication and messaging tool.
Provide the following details to set up a Slack notification:
- A Slack application. For more information, see the Quickstart page of the Slack documentation on how to create one.
- A token. For more information, see Legacy bots and specific details on bot tokens on the Current token types documentation page.
When you have a bot or app set up, you must complete the following steps:
- Navigate to Apps.
- Click the newly-created app and then go to Add features and functionality, which enables you to configure incoming webhooks, bots, and permissions, as well as Install your app to your workspace.
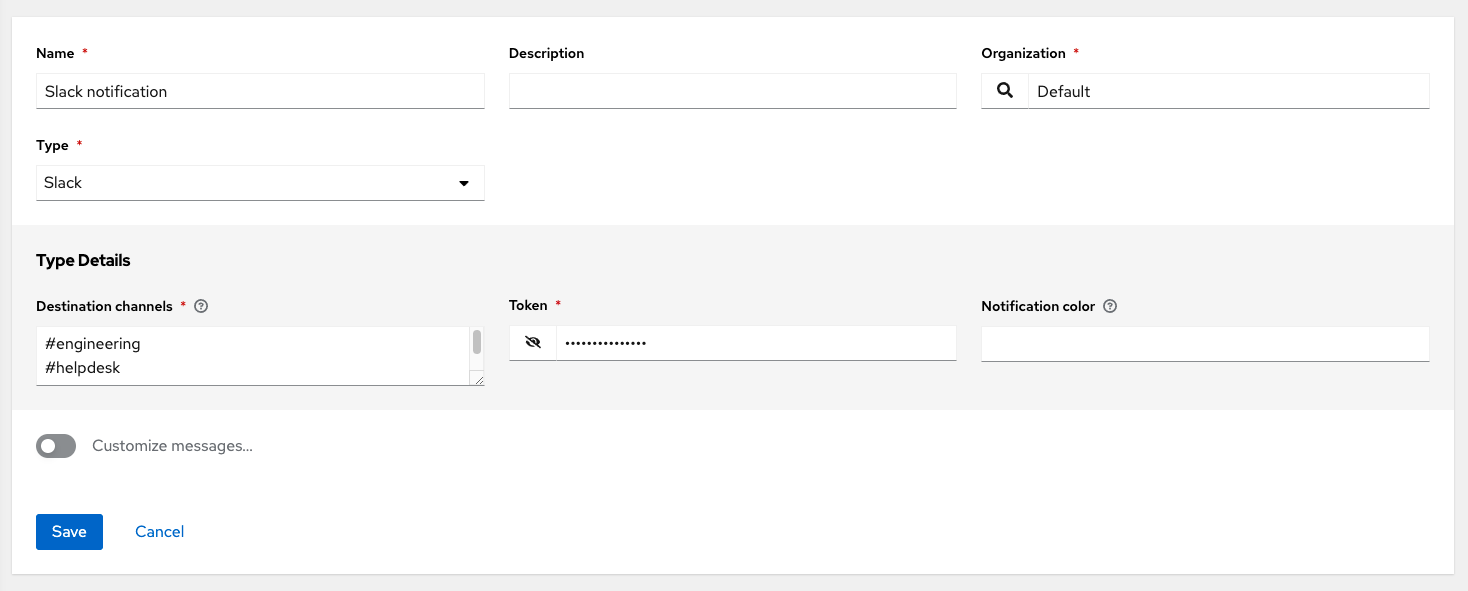
27.4.8. Twilio
Twilio is a voice and SMS automation service. When you are signed in, you must create a phone number from which the messages are sent. You can then define a Messaging Service under Programmable SMS and associate the number you previously created with it.
You might need to verify this number or some other information before you are permitted to use it to send to any numbers. The Messaging Service does not require a status callback URL and it does not need the ability to process inbound messages.
Under your individual (or sub) account settings, you have API credentials. Twilio uses two credentials to determine which account an API request is coming from. The Account SID, which acts as a username, and the Auth Token which acts as a password.
Provide the following details to set up a Twilio notification:
- Account token: Enter the account token.
- Source phone number: Enter the number associated with the messaging service in the form of "+15556667777".
- Destination SMS number(s): Enter the list of numbers you want to receive the SMS. It must be a 10 digit phone number.
- Account SID: Enter the account SID.
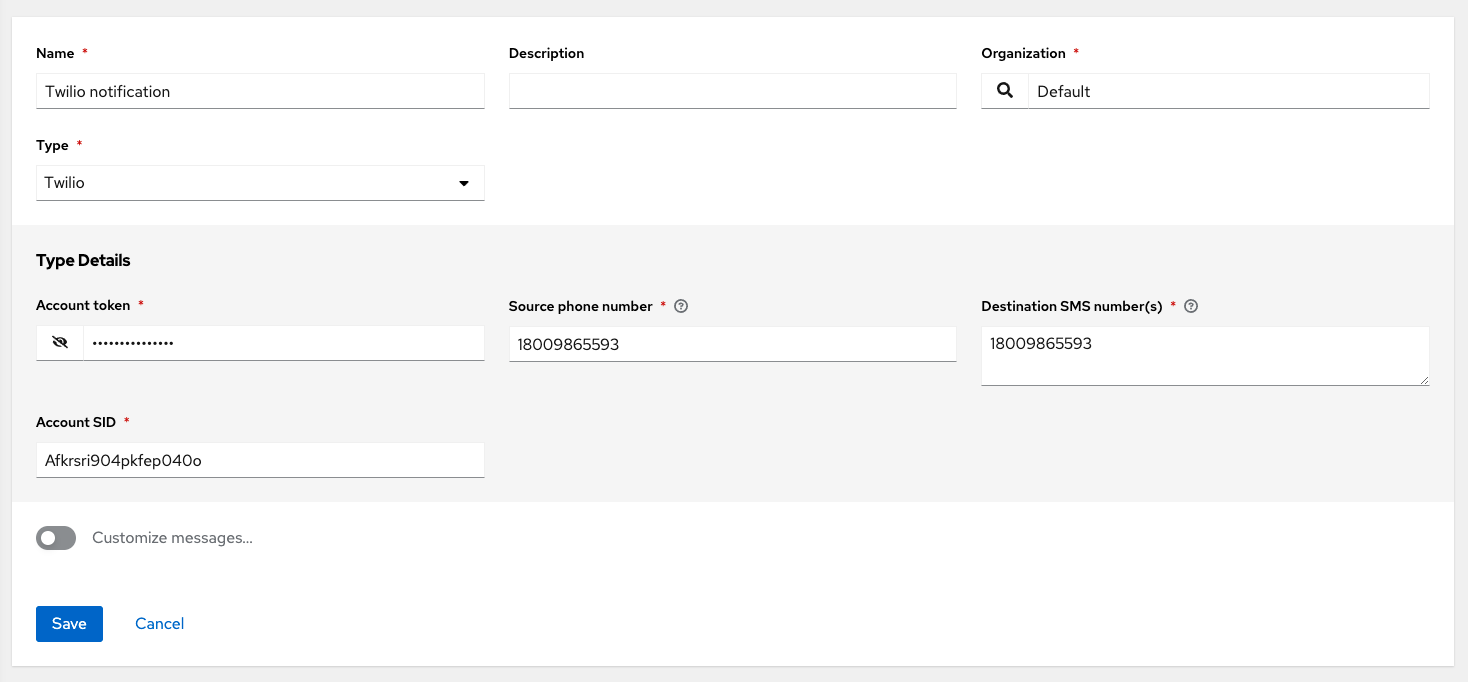
27.4.9. Webhook
The webhook notification type provides a simple interface for sending POSTs to a predefined web service. Automation controller POSTs to this address using application and JSON content type with the data payload containing the relevant details in JSON format. Some web service APIs expect HTTP requests to be in a certain format with certain fields.
Configure the webhook notification with the following:
-
Configure the HTTP method, using
POSTorPUT. - The body of the outgoing request.
- Configure authentication, using basic auth.
Provide the following details to set up a webhook notification:
- Optional: Username: Enter a username.
- Optional: Basic auth password:
-
Target URL: Enter the full URL to which the webhook notification is
PUTorPOSTed. - Disable SSL Verification: SSL verification is on by default, but you can choose to turn off verification of the authenticity of the target’s certificate. Select this option to disable verification for environments that use internal or private CA’s.
- HTTP Headers: Enter Headers in JSON format where the keys and values are strings. For example:
{"Authentication": "988881adc9fc3655077dc2d4d757d480b5ea0e11", "MessageType": "Test"}`.- HTTP Method: Select the method for your webhook:
- POST: Creates a new resource. It also acts as a catch-all for operations that do not fit into the other categories. It is likely that you need to POST unless you know your webhook service expects a PUT.
- PUT: Updates a specific resource (by an identifier) or a collection of resources. You can also use PUT to create a specific resource if the resource identifier is known beforehand.
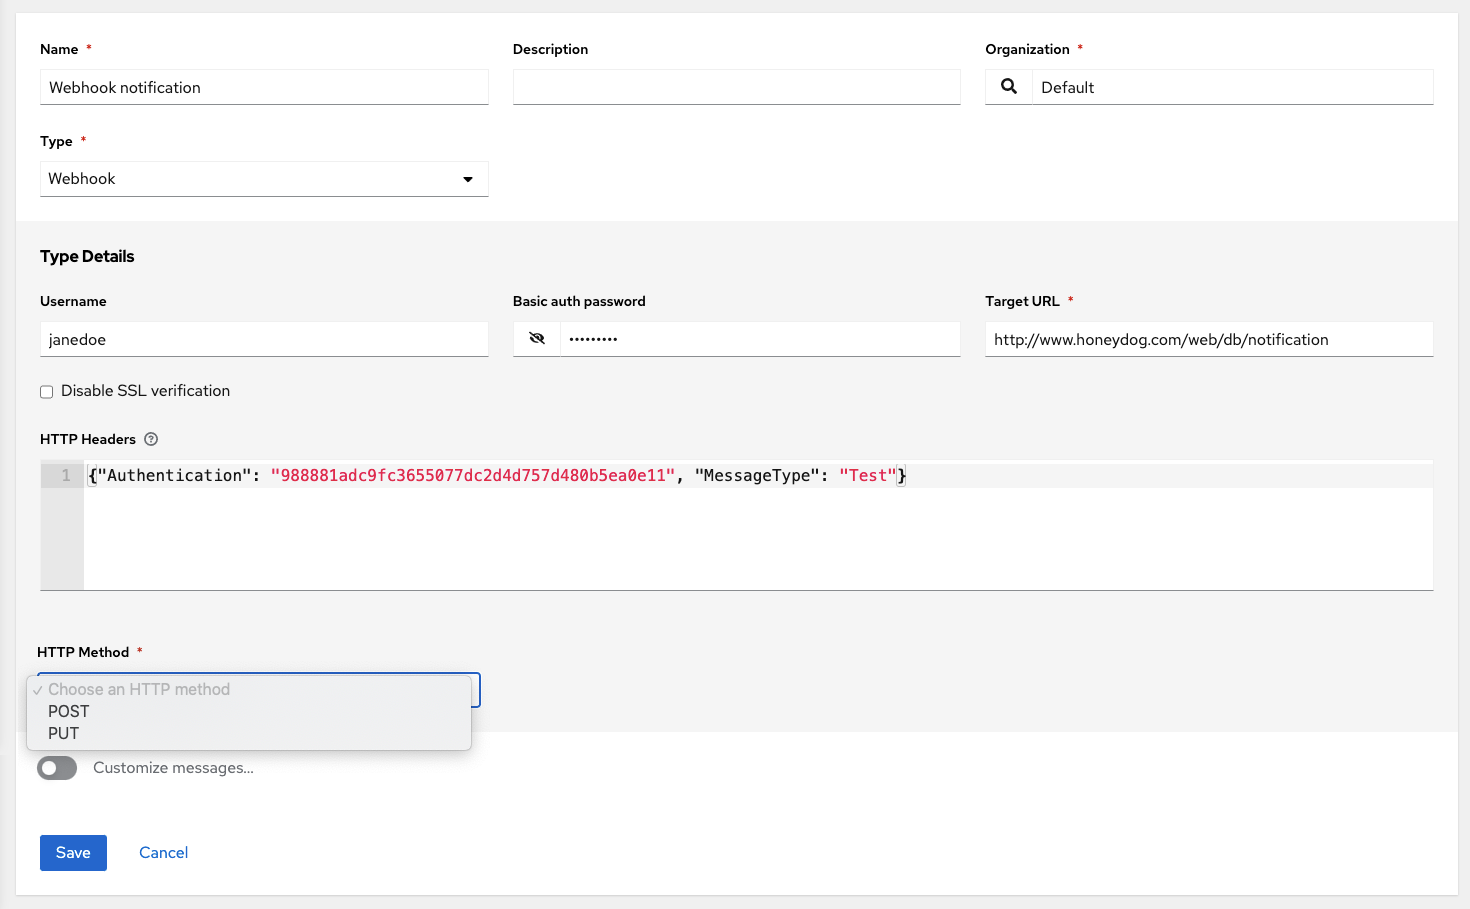
27.4.9.1. Webhook payloads
The following data is sent by automation controller at the webhook endpoint:
job id
name
url
created_by
started
finished
status
traceback
inventory
project
playbook
credential
limit
extra_vars
hosts
http method
The following is an example of a started notification through a webhook message as returned by automation controller:
{"id": 38, "name": "Demo Job Template", "url": "https://host/#/jobs/playbook/38", "created_by": "bianca", "started":
"2020-07-28T19:57:07.888193+00:00", "finished": null, "status": "running", "traceback": "", "inventory": "Demo Inventory",
"project": "Demo Project", "playbook": "hello_world.yml", "credential": "Demo Credential", "limit": "", "extra_vars": "{}",
"hosts": {}}POST / HTTP/1.1
The following data is returned by automation controller at the webhook endpoint for a success/fail status:
job id
name
url
created_by
started
finished
status
traceback
inventory
project
playbook
credential
limit
extra_vars
hosts
The following is an example of a success/fail notification as returned by automation controller through a webhook message:
{"id": 46, "name": "AWX-Collection-tests-awx_job_wait-long_running-XVFBGRSAvUUIrYKn", "url": "https://host/#/jobs/playbook/46",
"created_by": "bianca", "started": "2020-07-28T20:43:36.966686+00:00", "finished": "2020-07-28T20:43:44.936072+00:00", "status": "failed",
"traceback": "", "inventory": "Demo Inventory", "project": "AWX-Collection-tests-awx_job_wait-long_running-JJSlglnwtsRJyQmw", "playbook":
"fail.yml", "credential": null, "limit": "", "extra_vars": "{\"sleep_interval\": 300}", "hosts": {"localhost": {"failed": true, "changed": 0,
"dark": 0, "failures": 1, "ok": 1, "processed": 1, "skipped": 0, "rescued": 0, "ignored": 0}}}
27.5. Creating custom notifications
You can customize the text content of each Notification type on the notification form.
Procedure
- On the Notification Templates list view click .
- Choose a notification type from the Type list.
Enable Customize messages using the toggle.

You can provide a custom message for various job events, such as the following:
- Start message
- Success message body
- Error message
- Workflow approved message
- Workflow denied message
- Workflow running message
- Workflow pending message
- Workflow timed out message
The message forms vary depending on the type of notification that you are configuring. For example, messages for Email and PagerDuty notifications appear to be a typical email, with a body and a subject, in which case, automation controller displays the fields as Message and Message Body. Other notification types only expect a Message for each type of event.
The Message fields are pre-populated with a template containing a top-level variable, job coupled with an attribute, such as id or name. Templates are enclosed in curly brackets and can draw from a fixed set of fields provided by automation controller, as shown in the pre-populated message fields:

This pre-populated field suggests commonly displayed messages to a recipient who is notified of an event. You can customize these messages with different criteria by adding your own attributes for the job as needed. Custom notification messages are rendered using Jinja; the same templating engine used by Ansible playbooks.
Messages and message bodies have different types of content, as the following points outline:
- Messages are always just strings, one-liners only. New lines are not supported.
Message bodies are either a dictionary or a block of text:
-
The message body for Webhooks and PagerDuty uses dictionary definitions. The default message body for these is
{{ job_metadata }}, you can either leave that as it is or provide your own dictionary. The message body for email uses a block of text or a multi-line string. The default message body is:
{{ job_friendly_name }} #{{ job.id }} had status {{ job.status }}, view details at {{ url }} {{ job_metadata }}You can edit this text leaving
{{ job_metadata }}in, or drop{{ job_metadata }}. Since the body is a block of text, it can be any string you want.{{ job_metadata }}is rendered as a dictionary containing fields that describe the job being executed. In all cases,{{ job_metadata }}includes the following fields:-
id -
name -
url -
created_by -
started -
finished -
status tracebackNoteYou cannot query individual fields within
{{ job_metadata }}. When you use{{ job_metadata }}in a notification template, all data is returned.The resulting dictionary looks like the following:
{"id": 18,
 "name": "Project - Space Procedures",
 "url": "https://host/#/jobs/project/18",
 "created_by": "admin",
 "started": "2019-10-26T00:20:45.139356+00:00",
 "finished": "2019-10-26T00:20:55.769713+00:00",
 "status": "successful",
 "traceback": ""
}
If
{{ job_metadata }}is rendered in a job, it includes the following additional fields:-
inventory -
project -
playbook -
credential -
limit -
extra_vars hostsThe resulting dictionary looks like the following:
{"id": 12,
 "name": "JobTemplate - Launch Rockets",
 "url": "https://host/#/jobs/playbook/12",
 "created_by": "admin",
 "started": "2019-10-26T00:02:07.943774+00:00",
 "finished": null,
 "status": "running",
 "traceback": "",
 "inventory": "Inventory - Fleet",
 "project": "Project - Space Procedures",
 "playbook": "launch.yml",
 "credential": "Credential - Mission Control",
 "limit": "",
 "extra_vars": "{}",
 "hosts": {}
}
If
{{ job_metadata }}is rendered in a workflow job, it includes the following additional field:body(This enumerates the nodes in the workflow job and includes a description of the job associated with each node)The resulting dictionary looks like the following:
{"id": 14,
 "name": "Workflow Job Template - Launch Mars Mission",
 "url": "https://host/#/workflows/14",
 "created_by": "admin",
 "started": "2019-10-26T00:11:04.554468+00:00",
 "finished": "2019-10-26T00:11:24.249899+00:00",
 "status": "successful",
 "traceback": "",
 "body": "Workflow job summary:

         node #1 spawns job #15, \"Assemble Fleet JT\", which finished with status successful.
         node #2 spawns job #16, \"Mission Start approval node\", which finished with status successful.\n
         node #3 spawns job #17, \"Deploy Fleet\", which finished with status successful."
}
-
-
The message body for Webhooks and PagerDuty uses dictionary definitions. The default message body for these is
If you create a notification template that uses invalid syntax or references unusable fields, an error message displays indicating the nature of the error. If you delete a notification’s custom message, the default message is shown in its place.
If you save the notifications template without editing the custom message (or edit and revert back to the default values), the Details screen assumes the defaults and does not display the custom message tables. If you edit and save any of the values, the entire table displays in the Details screen.
Additional resources
- For more information, see Using variables with Jinja2.
- Automation controller requires valid syntax to retrieve the correct data to display the messages. For a list of supported attributes and the proper syntax construction, see the Supported Attributes for Custom Notifications section.
27.6. Enable and disable notifications
You can set up notifications to notify you when a specific job starts, as well as on the success or failure at the end of the job run. Note the following behaviors:
- If a workflow job template has notification on start enabled, and a job template within that workflow also has notification on start enabled, you receive notifications for both.
- You can enable notifications to run on many job templates within a workflow job template.
- You can enable notifications to run on a sliced job template start and each slice generates a notification.
- When you enable a notification to run on job start, and that notification gets deleted, the job template continues to run, but results in an error message.
You can enable notifications on job start, job success, and job failure, or a combination of these, from the Notifications tab of the following resources:
- Job Templates
- Workflow Templates
- Projects (shown in the following example)
- Inventory Sources
- Organizations
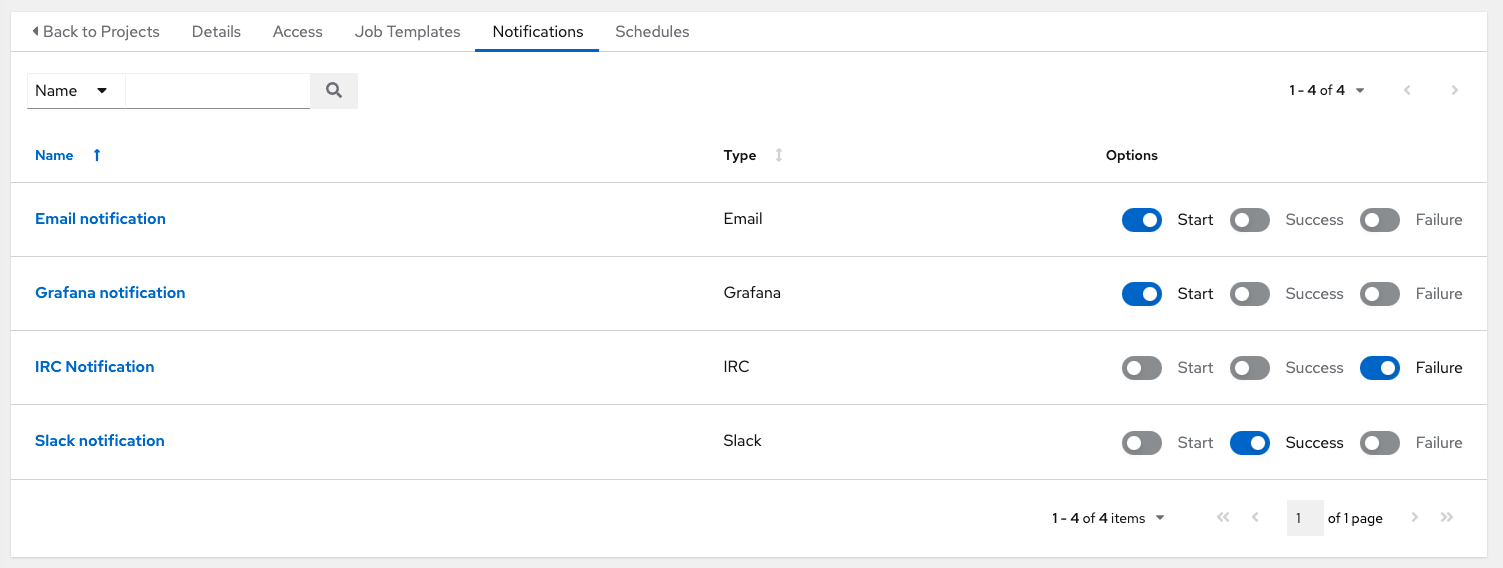
For workflow templates that have approval nodes, in addition to Start, Success, and Failure, you can enable or disable certain approval-related events:
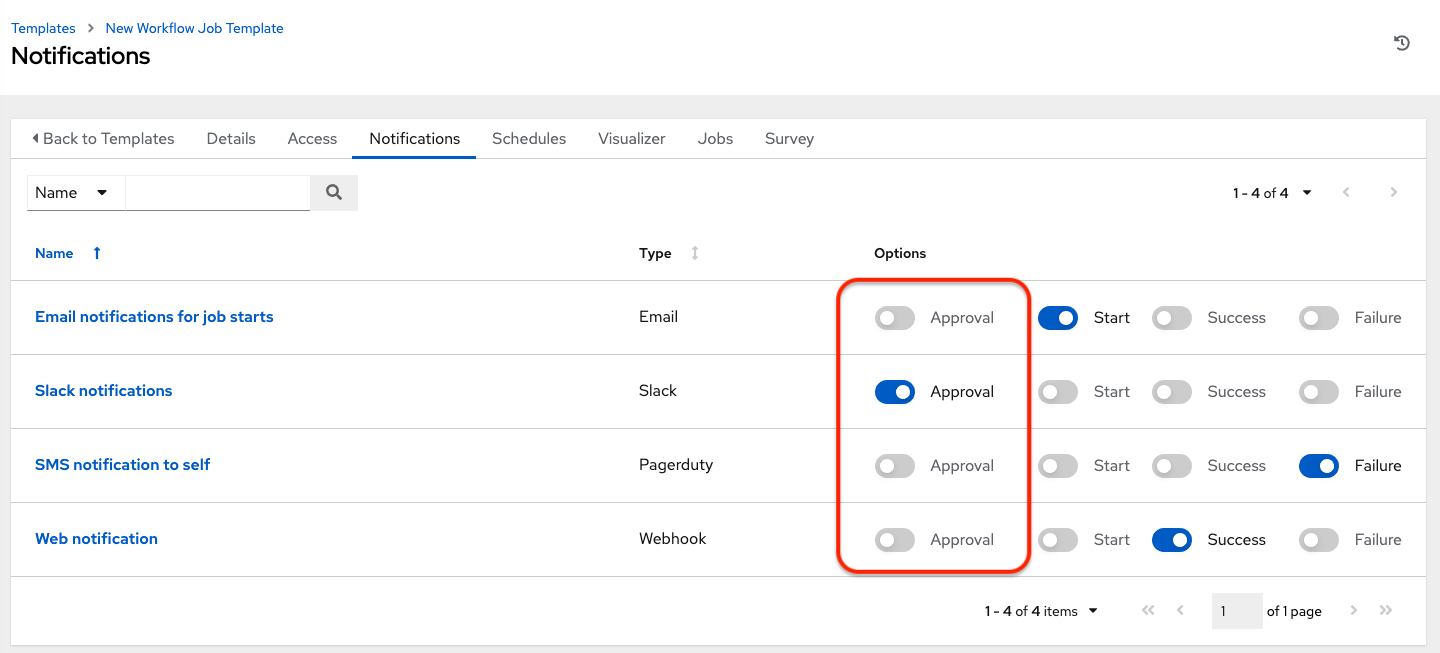
Additional resources
For more information on working with these types of nodes, see Approval nodes.
27.7. Configure the host hostname for notifications
In System settings, you can replace the default value in the Base URL of the service field with your preferred hostname to change the notification hostname.
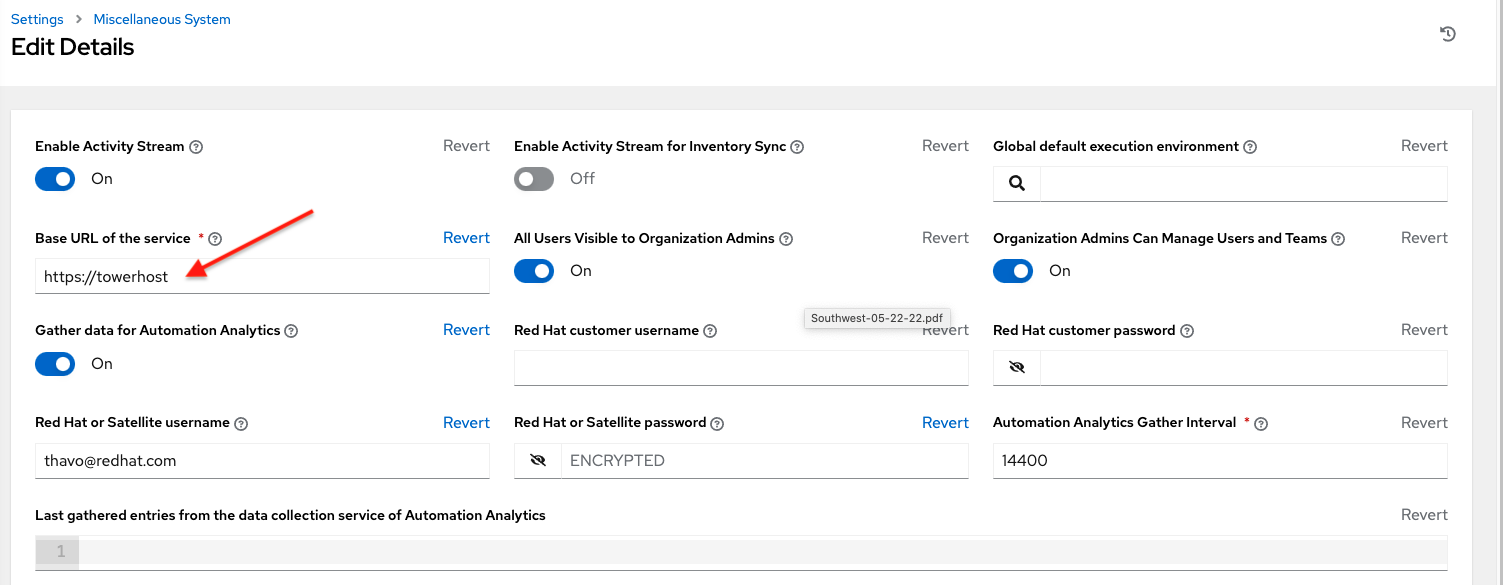
Refreshing your license also changes the notification hostname. New installations of automation controller do not have to set the hostname for notifications.
27.7.1. Resetting TOWER_URL_BASE
Automation controller determines how the base URL (TOWER_URL_BASE) is defined by looking at an incoming request and setting the server address based on that incoming request.
Automation controller takes settings values from the database first. If no settings values are found, it uses the values from the settings files. If you post a license by navigating to the automation controller host’s IP address, the posted license is written to the settings entry in the database.
Use the following procedure to reset TOWER_URL_BASE if the wrong address has been picked up:
Procedure
- From the navigation panel, select .
- Select Miscellaneous System settings from the System options.
- Click .
- Enter the address in the Base URL of the service field for the DNS entry you wish to appear in notifications.
- Re-add your license in → .
27.8. Notifications API
Use the started, success, or error endpoints:
/api/v2/organizations/N/notification_templates_started/
/api/v2/organizations/N/notification_templates_success/
/api/v2/organizations/N/notification_templates_error/
Additionally, the ../../../N/notification_templates_started endpoints have GET and POST actions for:
- Organizations
- Projects
- Inventory Sources
- Job Templates
- System Job Templates
- Workflow Job Templates
Chapter 28. Supported attributes for custom notifications
Learn about the list of supported job attributes and the proper syntax for constructing the message text for notifications.
The following are the supported job attributes:
-
allow_simultaneous- (boolean) Indicates if multiple jobs can run simultaneously from the job template associated with this job. -
controller_node- (string) The instance that manages the isolated execution environment. -
created- (datetime) The timestamp when this job was created. -
custom_virtualenv- (string) The custom virtual environment used to execute the job. -
description- (string) An optional description of the job. -
diff_mode- (boolean) If enabled, textual changes made to any templated files on the host are shown in the standard output. -
elapsed- (decimal) The elapsed time in seconds that the job has run. -
execution_node- (string) The node that the job executes on. -
failed- (boolean) True if the job failed. -
finished- (datetime) The date and time the job finished execution. -
force_handlers- (boolean) When handlers are forced, they run when notified even if a task fails on that host. Note that some conditions, such as unreachable hosts can still prevent handlers from running. -
forks- (int) The number of forks requested for this job. -
id- (int) The database ID for this job. -
job_explanation- (string) The status field to indicate the state of the job if it was not able to run and capturestdout. -
job_slice_count- (integer) If run as part of a sliced job, this is the total number of slices (if 1, job is not part of a sliced job). -
job_slice_number- (integer) If run as part of a sliced job, this is the ID of the inventory slice operated on (if not part of a sliced job, attribute is not used). -
job_tags- (string) Only tasks with specified tags execute. -
job_type- (choice) This can berun,check, orscan. -
launch_type- (choice) This can bemanual,relaunch,callback,scheduled,dependency,workflow,sync, orscm. -
limit- (string) The playbook execution limited to this set of hosts, if specified. -
modified- (datetime) The timestamp when this job was last modified. -
name- (string) The name of this job. -
playbook- (string) The playbook executed. -
scm_revision- (string) The scm revision from the project used for this job, if available. -
skip_tags- (string) The playbook execution skips over this set of tags, if specified. -
start_at_task- (string) The playbook execution begins at the task matching this name, if specified. -
started- (datetime) The date and time the job was queued for starting. -
status- (choice) This can benew,pending,waiting,running,successful,failed,error, orcanceled. -
timeout- (int) The amount of time, in seconds, to run before the task is canceled. -
type- (choice) The data type for this job. -
url- (string) The URL for this job. -
use_fact_cache- (boolean) If enabled for the job, automation controller acts as an Ansible Fact Cache Plugin at the end of a playbook run to the database and caches facts for use by Ansible. verbosity- (choice) 0 through 5 (corresponding to Normal through WinRM Debug).host_status_counts(The count of hosts uniquely assigned to each status)-
skipped(integer) -
ok(integer) -
changed(integer) -
failures(integer) -
dark(integer) -
processed(integer) -
rescued(integer) -
ignored(integer) -
failed(boolean)
-
summary_fields:inventory-
id- (integer) The database ID for the inventory. -
name- (string) The name of the inventory. -
description- (string) An optional description of the inventory. -
has_active_failures- (boolean) (deprecated) flag indicating whether any hosts in this inventory have failed. -
total_hosts- (deprecated) (int) The total number of hosts in this inventory. -
hosts_with_active_failures- (deprecated) (int) The number of hosts in this inventory with active failures. -
total_groups- (deprecated) (int) The total number of groups in this inventory. -
groups_with_active_failures- (deprecated) (int) The number of hosts in this inventory with active failures. -
has_inventory_sources- (deprecated) (boolean) The flag indicating whether this inventory has external inventory sources. -
total_inventory_sources- (int) The total number of external inventory sources configured within this inventory. -
inventory_sources_with_failures- (int) The number of external inventory sources in this inventory with failures. -
organization_id- (id) The organization containing this inventory. -
kind- (choice) (empty string) (indicating hosts have direct link with inventory) orsmart
-
project-
id- (int) The database ID for the project. -
name- (string) The name of the project. -
description(string) An optional description of the project. -
status- (choices) One ofnew,pending,waiting,running,successful,failed,error,canceled,never updated,ok, ormissing. -
scm_type(choice) One of (empty string),git,hg,svn,insights.
-
job_template-
id- (int) The database ID for the job template. -
description- (string) The optional description of the project. -
status- (choices) One ofnew,pending,waiting,running,successful,failed,error,canceled,never updated,ok, ormissing.
-
job_template-
id- (int) The database ID for the job template. -
name- (string) The name of the job template. -
description- (string) An optional description for the job template.
-
unified_job_template-
id- (int) The database ID for the unified job template. -
name- (string) The name of the unified job template. -
description- (string) An optional description for the unified job template. -
unified_job_type- (choice) The unified job type, such asjob,workflow_job, orproject_update.
-
instance_group-
id- (int) The database ID for the instance group. -
name- (string) The name of the instance group.
-
created_by-
id- (int) The database ID of the user that launched the operation. -
username- (string) The username that launched the operation. -
first_name- (string) The first name. -
last_name- (string) The last name.
-
labels-
count- (int) The number of labels. -
results- The list of dictionaries representing labels. For example, {"id": 5, "name": "database jobs"}.
-
You can reference information about a job in a custom notification message using grouped curly brackets {{ }}. Specific job attributes are accessed using dotted notation, for example, {{ job.summary_fields.inventory.name }}. You can add any characters used in front or around the braces, or plain text, for clarification, such as "#" for job ID and single-quotes to denote some descriptor. Custom messages can include a number of variables throughout the message:
{{ job_friendly_name }} {{ job.id }} ran on {{ job.execution_node }} in {{ job.elapsed }} seconds.The following are additional variables that can be added to the template:
-
approval_node_name- (string) The approval node name. -
approval_status- (choice) One ofapproved,denied, andtimed_out. -
url- (string) The URL of the job for which the notification is emitted (this applies tostart,success,fail, andapproval notifications). -
workflow_url- (string) The URL to the relevant approval node. This allows the notification recipient to go to the relevant workflow job page to examine the situation. For example,This node can be viewed at: {{workflow_url }}. In cases of approval-related notifications, bothurlandworkflow_urlare the same. -
job_friendly_name- (string) The friendly name of the job. job_metadata- (string) The job metadata as a JSON string, for example:{'url': 'https://towerhost/$/jobs/playbook/13', 'traceback': '', 'status': 'running', 'started': '2019-08-07T21:46:38.362630+00:00', 'project': 'Stub project', 'playbook': 'ping.yml', 'name': 'Stub Job Template', 'limit': '', 'inventory': 'Stub Inventory', 'id': 42, 'hosts': {}, 'friendly_name': 'Job', 'finished': False, 'credential': 'Stub credential', 'created_by': 'admin'}
Chapter 29. Schedules
From the navigation panel, click → to access your configured schedules. The schedules list can be sorted by any of the attributes from each column using the directional arrows. You can also search by name, date, or the name of the month in which a schedule runs.
Each schedule has a corresponding Actions column that has options to enable or disable that schedule using the On or Off toggle next to the schedule name. Click the Edit
![]() icon to edit a schedule.
icon to edit a schedule.
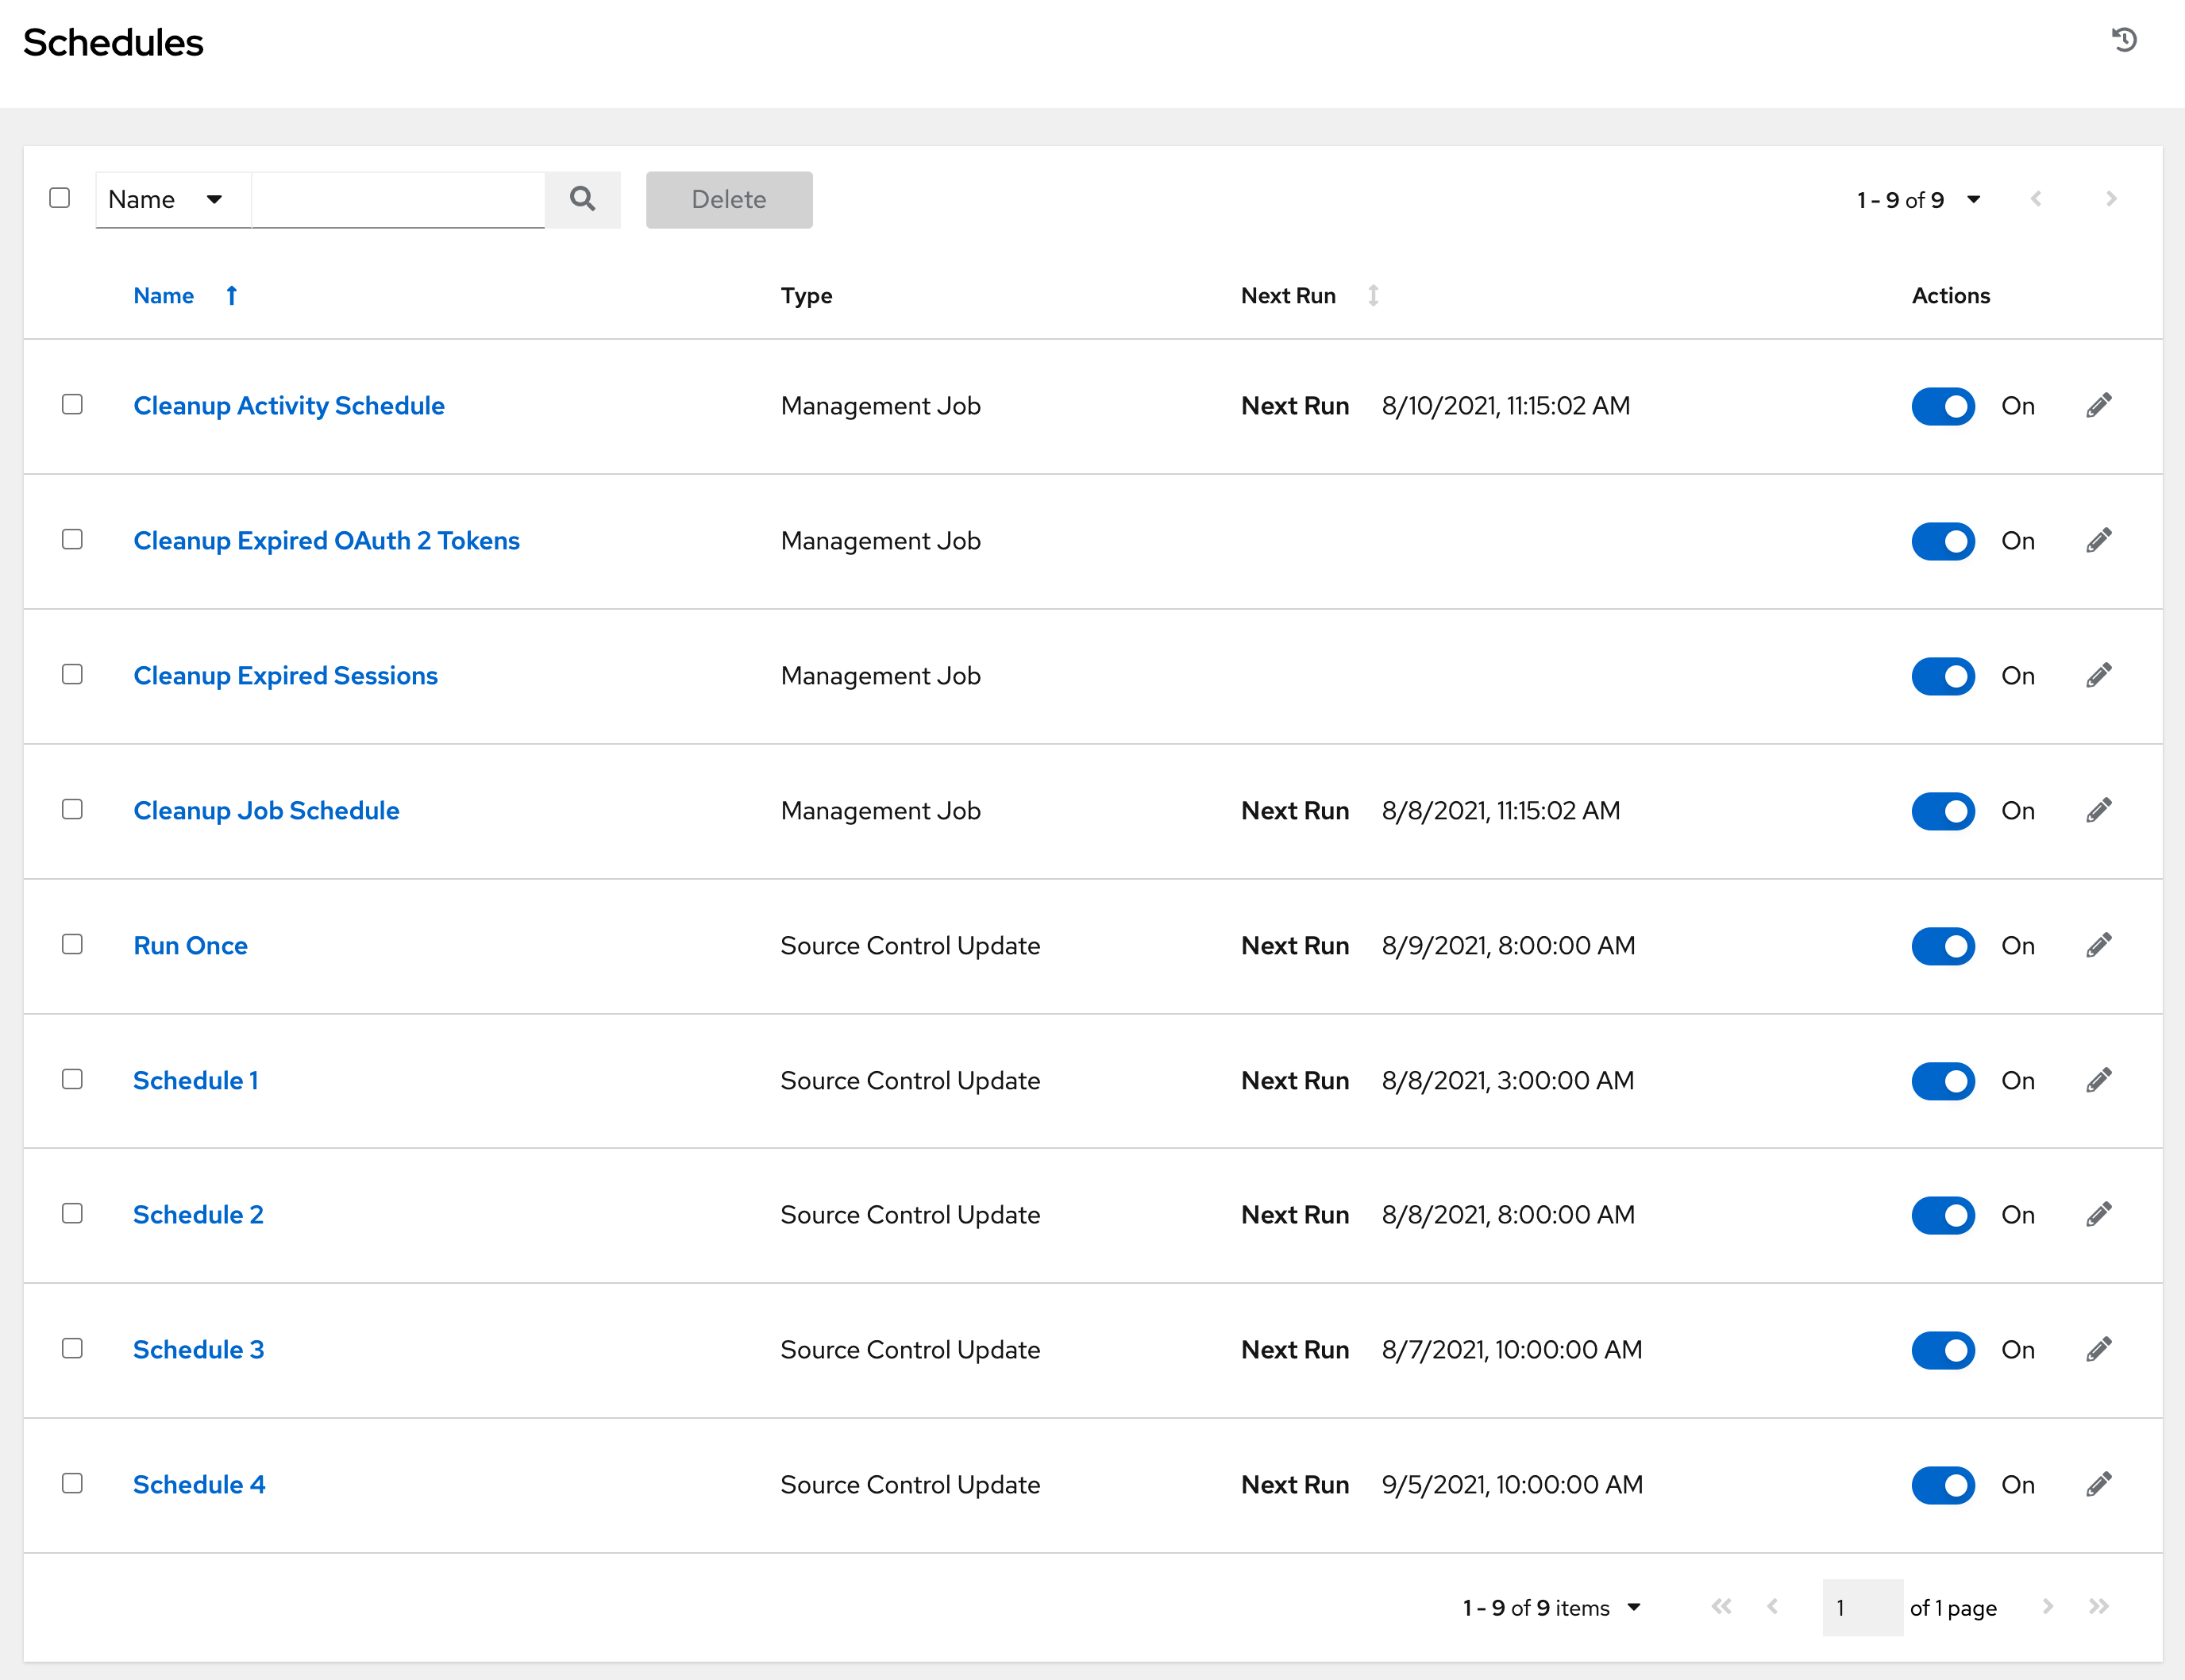
If you are setting up a template, a project, or an inventory source, click the Schedules tab to configure schedules for these resources. When you create a schedule, they are listed by the following:
- Name
- Click the schedule name to open its details.
- Type
- This identifies whether the schedule is associated with a source control update or a system-managed job schedule.
- Next run
- The next scheduled run of this task.
29.1. Adding a new schedule
You can only create schedules from a template, project, or inventory source, and not directly on the main Schedules screen.
To create a new schedule:
Procedure
- Click the Schedules tab of the resource that you are configuring. This can be a template, project, or inventory source.
Click . This opens the Create New Schedule window.

Enter the appropriate details into the following fields:
- Name: Enter the name.
- Optional: Description: Enter a description.
- Start date/time: Enter the date and time to start the schedule.
- Local time zone: The start time that you enter must be in this time zone.
Repeat frequency: Appropriate scheduling options display depending on the frequency you select.
The Schedule Details display when you establish a schedule, enabling you to review the schedule settings and a list of the scheduled occurrences in the selected Local Time Zone.
ImportantJobs are scheduled in UTC. Repeating jobs that run at a specific time of day can move relative to a local time zone when Daylight Savings Time shifts occur. The system resolves the local time zone based time to UTC when the schedule is saved. To ensure your schedules are correctly created, set your schedules in UTC time.
- Click .
Use the On or Off toggle to stop an active schedule or activate a stopped schedule.
Chapter 30. Setting up Red Hat Insights for Red Hat Ansible Automation Platform Remediations
Automation controller supports integration with Red Hat Insights.
When a host is registered with Red Hat Insights, it is scanned continually for vulnerabilities and known configuration conflicts. Each problem identified can have an associated fix in the form of an Ansible playbook.
Red Hat Insights users create a maintenance plan to group the fixes and can create a playbook to mitigate the problems. Automation controller tracks the maintenance plan playbooks through a Red Hat Insights project.
Authentication to Red Hat Insights through Basic Authorization is backed by a special credential, which must first be established in automation controller. To run a Red Hat Insights maintenance plan, you need a Red Hat Insights project and inventory.
30.1. Creating Red Hat Insights credentials
Use the following procedure to create a new credential for use with Red Hat Insights:
Procedure
- From the navigation panel, select → .
- Click .
Enter the appropriate details in the following fields:
- Name: Enter the name of the credential.
- Optional: Description: Enter a description for the credential.
-
Optional: Organization: Enter the name of the organization with which the credential is associated, or click the search
icon and select it from the Select organization window.
Credential Type: Enter Insights or select it from the list.
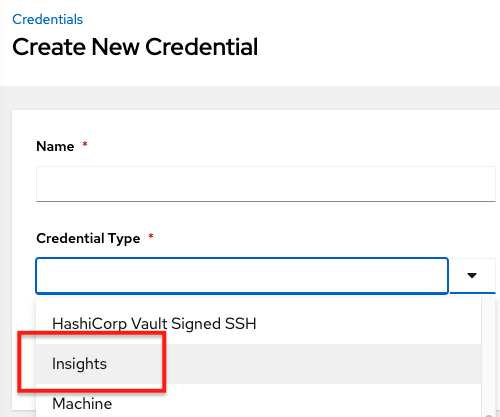
- Username: Enter a valid Red Hat Insights credential.
- Password: Enter a valid Red Hat Insights credential. The Red Hat Insights credentials are the user’s Red Hat Customer Portal account username and password.
- Click .
30.2. Creating a Red Hat Insights project
Use the following steps to create a new project for use with Red Hat Insights:
Procedure
- From the navigation panel, select → .
- Click .
Enter the appropriate details in the following fields. Note that the following fields require specific Red Hat Insights related entries:
- Name: Enter the name for your Red Hat Insights project.
- Optional: Description: Enter a description for the project.
-
Organization: Enter the name of the organization with which the credential is associated, or click the search (
 ) icon and select it from the Select organization window.
- Optional: Execution Environment: The execution environment that is used for jobs that use this project.
- Source Control Type: Select Red Hat Insights.
- Optional: Content Signature Validation Credential: Enable content signing to verify that the content has remained secure when a project is synced.
-
Insights Credential: This is pre-populated with the Red Hat Insights credential you previously created. If not, enter the credential, or click the search
icon and select it from the Select Insights Credential window.
Select the update options for this project from the Options field and provide any additional values, if applicable. For more information about each option click the tooltip
icon next to each one.
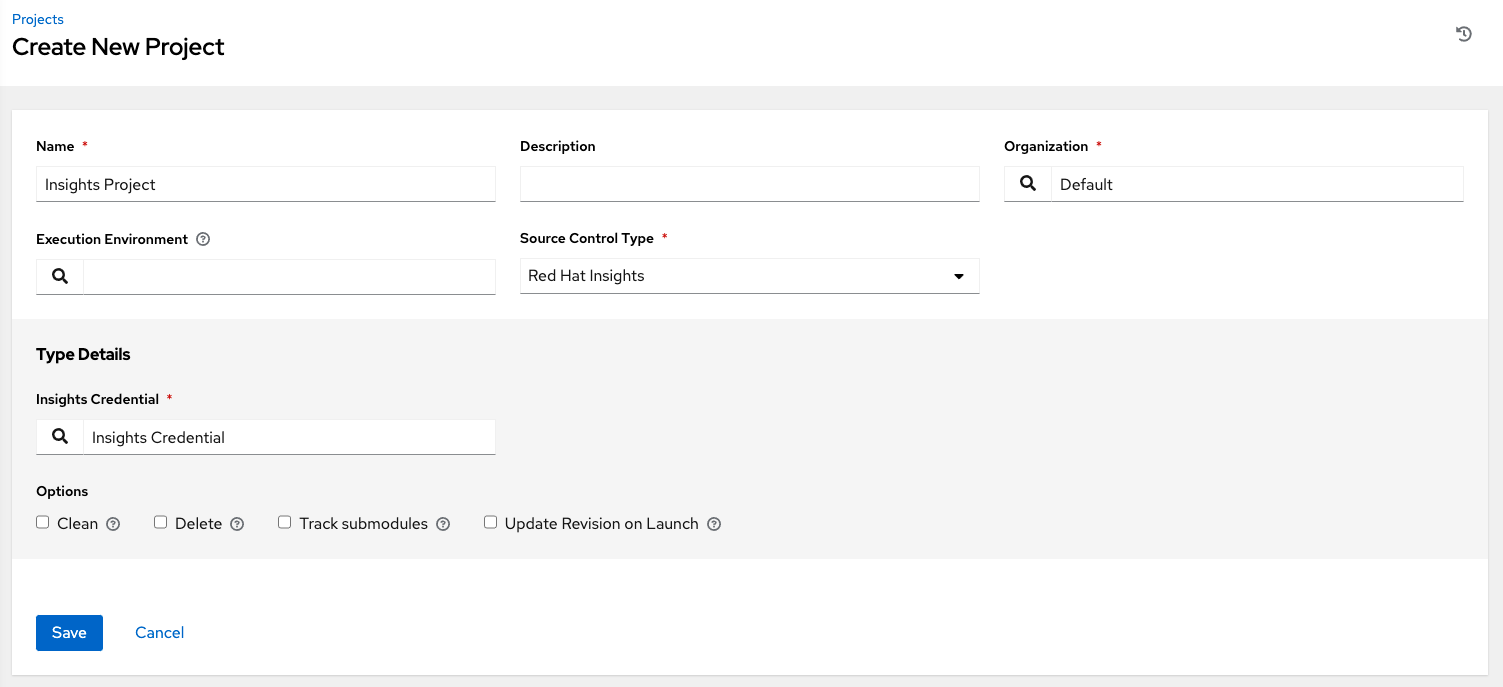
- Click .
All SCM and project synchronizations occur automatically the first time you save a new project. If you want them to be updated to what is current in Red Hat Insights, manually update the SCM-based project by clicking the update
![]() icon under the project’s available actions.
icon under the project’s available actions.
This process syncs your Red Hat Insights project with your Red Hat Insights account solution. Note that the status dot beside the name of the project updates once the sync has run.
30.3. Create an Insights inventory
The Insights playbook contains a hosts: line where the value is the host name supplied to red Hat insights, which can be different from the host name supplied to automation controller
To create a new inventory to use with Red Hat Insights, see Creating Insights credentials.
30.4. Remediating a Red Hat Insights inventory
Remediation of a Red Hat Insights inventory enables automation controller to run Red Hat Insights playbooks with a single click. You can do this by creating a job template to run the Red Hat Insights remediation.
Procedure
- From the navigation menu, select → .
- On the Templates list view, select Add from the Add job template list.
Enter the appropriate details in the following fields. Note that the following fields require specific Red Hat Insights related entries:
- Name: Enter the name of your Maintenance Plan.
- Optional: Description: Enter a description for the job template.
- Job Type: If not already populated, select Run from the job type list.
- Inventory: Select the Red Hat Insights inventory that you previously created.
- Project: Select the Red Hat Insights project that you previously created.
- Optional: Execution Environment: The container image to be used for execution.
- Playbook: Select a playbook associated with the Maintenance Plan that you want to run from the playbook list.
-
Optional: Credentials: Enter the credential to use for this project or click the search (
) icon and select it from the pop-up window. The credential does not have to be a Red Hat Insights credential.
Verbosity: Keep the default setting, or select the desired verbosity from the list.
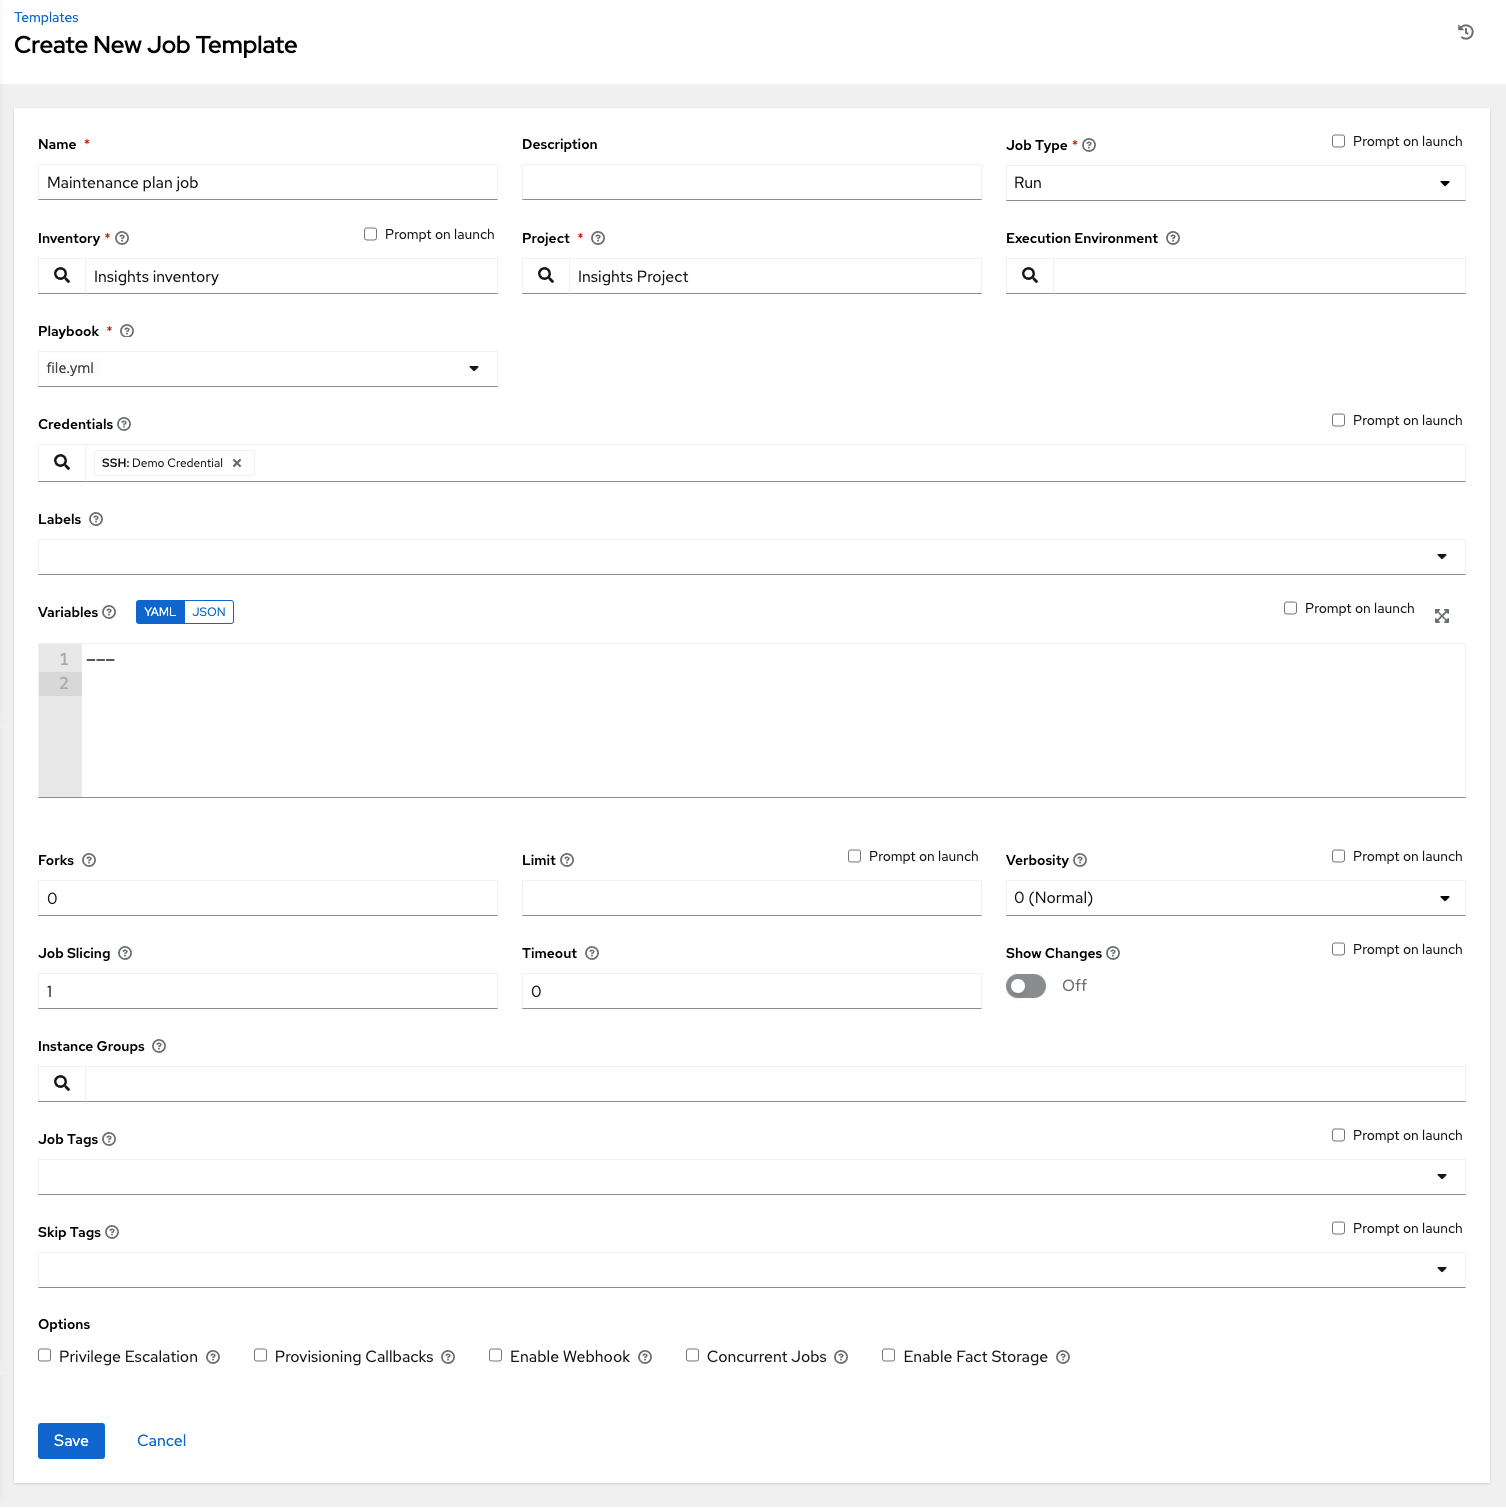
- Click .
-
Click the launch
icon to launch the job template.
When complete, the job results in the Job Details page.
Chapter 31. Best practices for automation controller
The following describes best practice for the use of automation controller:
31.1. Use Source Control
Automation controller supports playbooks stored directly on the server. Therefore, you must store your playbooks, roles, and any associated details in source control. This way you have an audit trail describing when and why you changed the rules that are automating your infrastructure. Additionally, it permits sharing of playbooks with other parts of your infrastructure or team.
31.2. Ansible file and directory structure
If you are creating a common set of roles to use across projects, these should be accessed through source control submodules, or a common location such as /opt. Projects should not expect to import roles or content from other projects.
For more information, see the link General tips from the Ansible documentation.
-
Avoid using the playbooks
vars_promptfeature, as automation controller does not interactively permitvars_promptquestions. If you cannot avoid usingvars_prompt, see the Surveys functionality. -
Avoid using the playbooks
pausefeature without a timeout, as automation controller does not permit canceling a pause interactively. If you cannot avoid usingpause, you must set a timeout.
Jobs use the playbook directory as the current working directory, although jobs must be coded to use the playbook_dir variable rather than relying on this.
31.3. Use Dynamic Inventory Sources
If you have an external source of truth for your infrastructure, whether it is a cloud provider or a local CMDB, it is best to define an inventory sync process and use the support for dynamic inventory (including cloud inventory sources). This ensures your inventory is always up to date.
Edits and additions to Inventory host variables persist beyond an inventory synchronization as long as --overwrite_vars is not set.
31.4. Variable Management for Inventory
Keep variable data with the hosts and groups definitions (see the inventory editor), rather than using group_vars/ and host_vars/. If you use dynamic inventory sources, automation controller can synchronize such variables with the database as long as the Overwrite Variables option is not set.
31.5. Autoscaling
Use the "callback" feature to permit newly booting instances to request configuration for auto-scaling scenarios or provisioning integration.
31.6. Larger Host Counts
Set "forks" on a job template to larger values to increase parallelism of execution runs. For more information on tuning Ansible, see the Ansible blog.
31.7. Continuous integration / Continuous Deployment
For a Continuous Integration system, such as Jenkins, to spawn a job, it must make a curl request to a job template. The credentials to the job template must not require prompting for any particular passwords. For configuration and use instructions, see Installation in the Ansible documentation.
Chapter 32. Security
The following sections describe how automation controller handles and enables you to control file system security.
All playbooks are executed through the awx file system user. For running jobs, automation controller offers job isolation through the use of Linux containers. This protection ensures that jobs can only access playbooks, roles, and data from the Project directory for that job template.
For credential security, you can choose to upload locked SSH keys and set the unlock password to "ask". You can also choose to have the system prompt for SSH credentials or sudo passwords rather than having the system store them in the database.
32.1. Playbook Access and Information Sharing
Automation controller’s use of automation execution environments and Linux containers prevents playbooks from reading files outside of their project directory.
By default, the only data exposed to the ansible-playbook process inside the container is the current project being used.
You can customize this in the Job Settings and expose additional directories from the host into the container.
32.1.1. Isolation functionality and variables
Automation controller uses container technology to isolate jobs from each other. By default, only the current project is exposed to the container running a job template.
If you need to expose additional directories, you must customize your playbook runs. To configure job isolation, you can set variables.
By default, automation controller uses the system’s tmp directory (/tmp by default) as its staging area. This can be changed in the Job Execution Path field of the Jobs settings page, or in the REST API at /api/v2/settings/jobs:
AWX_ISOLATION_BASE_PATH = "/opt/tmp"
If there are any additional directories that should specifically be exposed from the host to the container that playbooks run in, you can specify those in the Paths to Expose to Isolated Jobs field of the Jobs settings page, or in the REST API at /api/v2/settings/jobs:
AWX_ISOLATION_SHOW_PATHS = ['/list/of/', '/paths']
If your playbooks need to use keys or settings defined in AWX_ISOLATION_SHOW_PATHS, then add this file to /var/lib/awx/.ssh.
The fields described here can be found on the Jobs settings page:
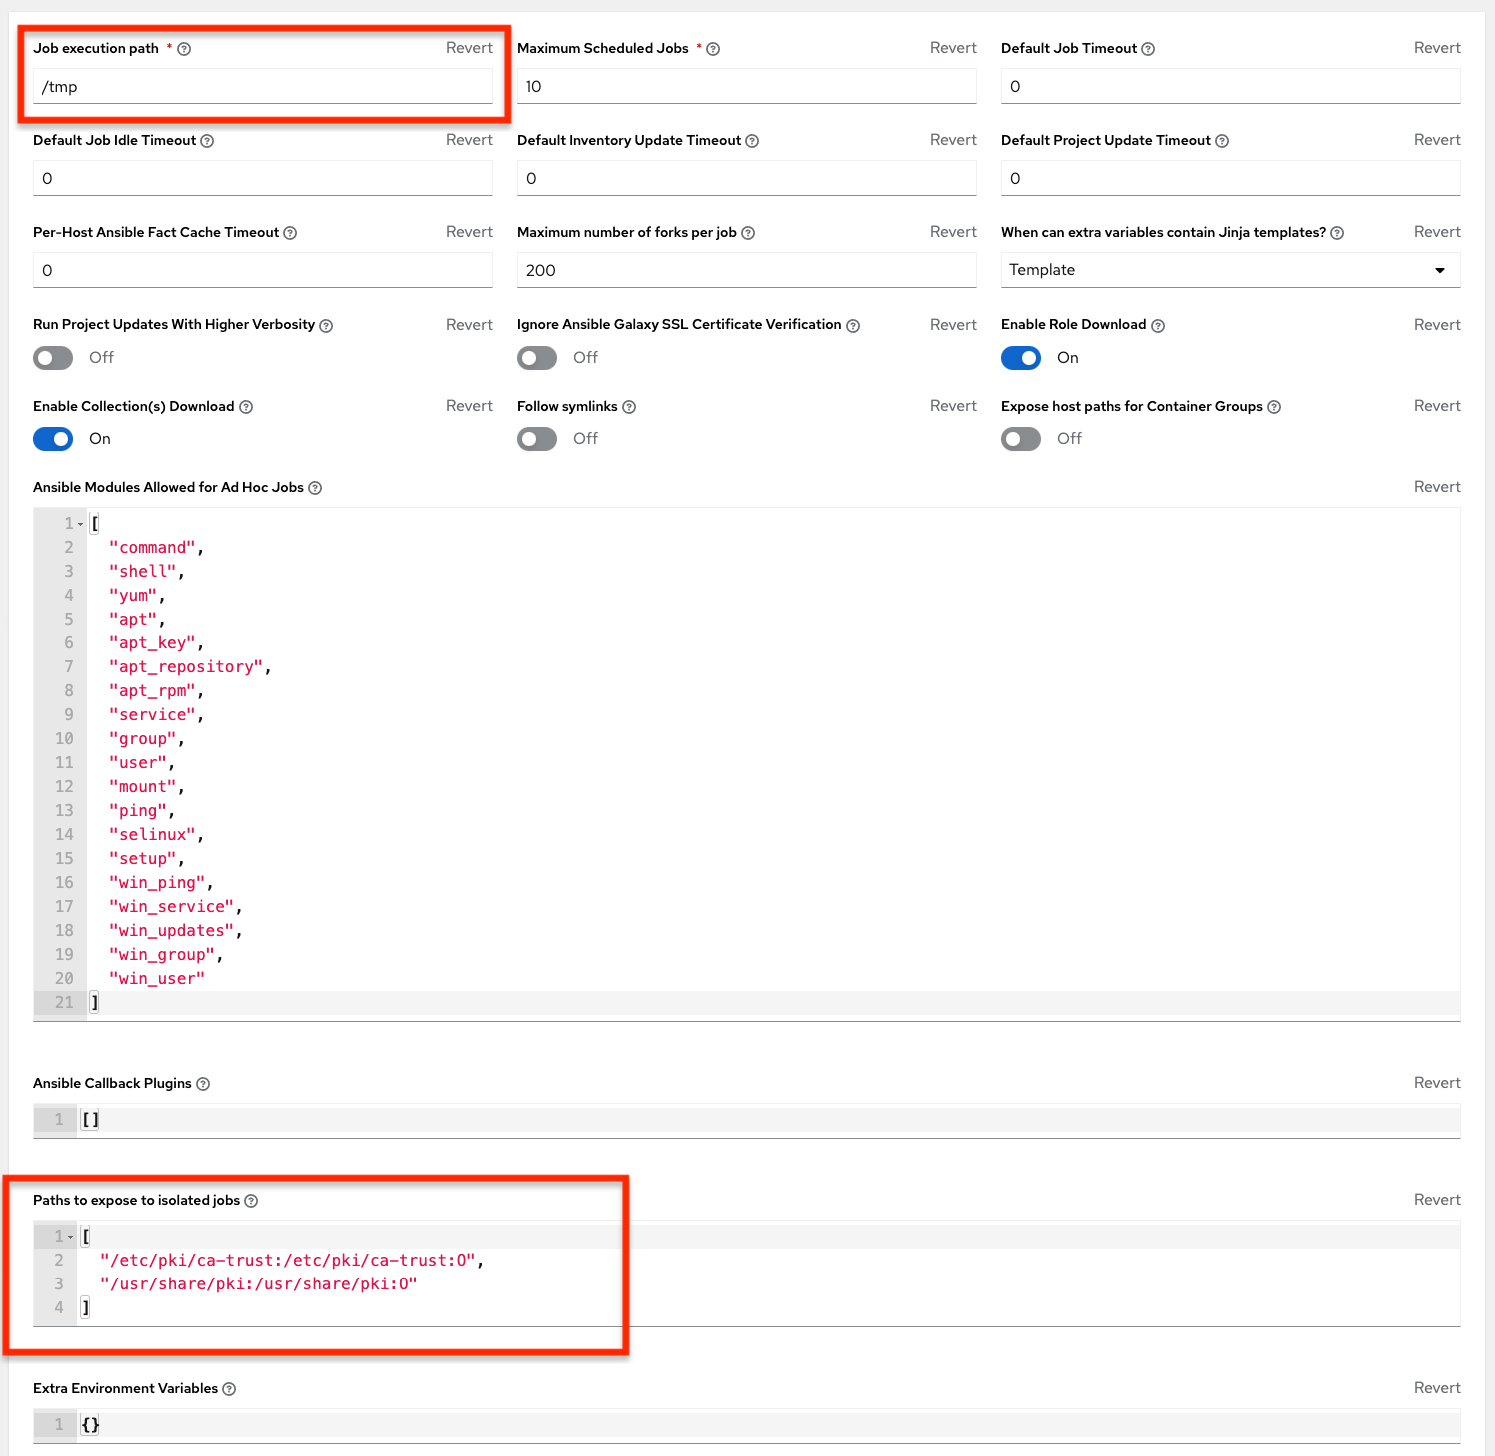
32.2. Role-Based Access Controls
Role-Based Access Controls (RBAC) are built into automation controller and enable administrators to delegate access to server inventories, organizations, and more. Administrators can also centralize the management of various credentials, enabling users to use a required secret without exposing that secret to the user. You can use RBAC to enable automation controller to increase security and streamline management.
RBAC is the practice of granting roles to users or teams. RBACs can be thought of in terms of Roles which define precisely who or what can see, change, or delete an "object" for which a specific capability is being set.
The main concepts of automation controller’s RBAC design roles, resources, and users are as follows:
- Users can be members of a role, which gives them certain access to any resources associated with that role, or any resources associated with "descendant" roles.
- A role is a collection of capabilities.
- Users are granted access to these capabilities and the automation controller’s resources through the roles to which they are assigned or through roles inherited through the role hierarchy.
- Roles associate a group of capabilities with a group of users. All capabilities are derived from membership within a role. Users receive capabilities only through the roles to which they are assigned or through roles they inherit through the role hierarchy. All members of a role have all capabilities granted to that role. Within an organization, roles are relatively stable, while users and capabilities are both numerous and may change rapidly.
- Users can have many roles.
32.2.1. Role hierarchy and access inheritance
Imagine that you have an organization named "SomeCompany" and want to give two people, "Josie" and "Carter", access to manage all the settings associated with that organization. To do this, you must make both people members of the organization’s admin_role.
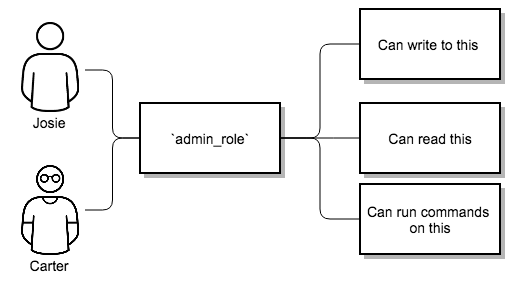
There are frequently many Roles in a system, some of which you want to include all of the capabilities of other roles. For example, you might want a System Administrator to have access to everything that an Organization Administrator has access to, who has everything that a Project Administrator has access to.
This concept is referred to as the "Role Hierarchy":
- Parent roles get all capabilities bestowed on any child roles.
- Members of roles automatically get all capabilities for the role they are a member of, as well as any child roles.
The Role Hierarchy is represented by permitting Roles to have "Parent Roles". Any capability that a Role has is implicitly granted to any parent roles (or parents of those parents).
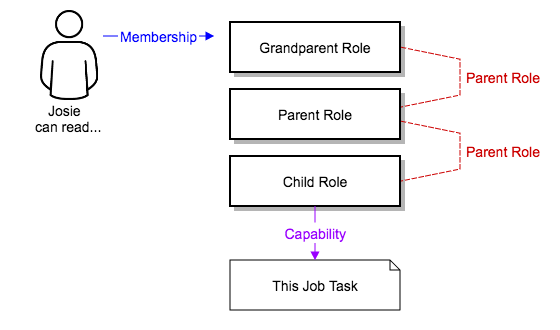
Roles can have more than one parent, and capabilities are implicitly granted to all parents.
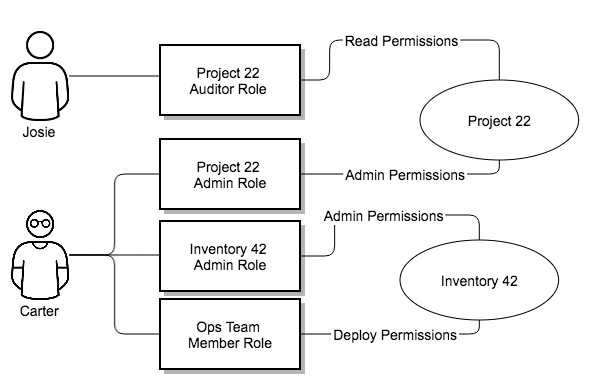
RBACs also enable you to explicitly permit Users and Teams of Users to run playbooks against certain sets of hosts. Users and teams are restricted to just the sets of playbooks and hosts to which they are granted capabilities. With automation controller, you can create or import as many Users and Teams as you require, create Users and Teams manually, or import them from LDAP or Active Directory.
32.2.1.1. Use of RBAC
The following describes how to apply automation controller’s RBAC system in your environment.
32.2.1.1.1. Edit Users
When editing a user, an automation controller system administrator can specify the user as being either a System Administrator (also referred to as the Superuser) or a System Auditor:
- System administrators implicitly inherit all capabilities (read/write/execute) for all objects within the environment.
- System Auditors implicitly inherit the read-only capability for all objects within the environment.
32.2.1.1.2. Edit Organizations
When editing an organization, system administrators can specify the following roles:
- One or more users as organization administrators
- One or more users as organization auditors
- One or more users (or teams) as organization members
Users and teams that are members of an organization can view their organization administrator.
Users who are organization administrators implicitly inherit all capabilities for all objects within that organization.
Users who are organization auditors implicitly inherit the read-only capability for all objects within that organization.
32.2.1.1.3. Edit Projects in an Organization
When editing a project in an organization for which they are the administrator, system administrators and organization administrators can specify:
- One or more users or teams that are project administrators
- One or more users or teams that are project members
- One or more users or teams that can update the project from SCM, from among the users and teams that are members of that organization.
Users who are members of a project can view their project administrators.
Project administrators implicitly inherit the capability to update the project from SCM.
Administrators can also specify one or more users or teams (from those that are members of that project) that can use that project in a job template.
32.2.1.1.4. Create Inventories and Credentials within an Organization
All access that is granted to use, read, or write credentials is handled through roles, which use automation controller’s RBAC system to grant ownership, auditor, or usage roles.
System administrators and organization administrators can create inventories and credentials within organizations under their administrative capabilities.
Whether editing an inventory or a credential, System administrators and organization administrators can specify one or more users or teams (from those that are members of that organization) to be granted the usage capability for that inventory or credential.
System administrators and organization administrators can specify one or more users or teams (from those that are members of that organization) that have the capabilities to update (dynamic or manually) an inventory. Administrators can also execute ad hoc commands for an inventory.
32.2.1.1.5. Edit Job Templates
System administrators, organization administrators, and project administrators, within a project under their administrative capabilities, can create and modify new job templates for that project.
When editing a job template, administrators (automation controller, organization, and project) can select inventory and credentials in the organization for which they have usage capabilities, or they can leave those fields blank so that they are selected at runtime.
Additionally, they can specify one or more users or teams (from those that are members of that project) that have execution capabilities for that job template. The execution capability is valid regardless of any explicit capabilities the user or team have been granted against the inventory or credential specified in the job template.
32.2.1.1.6. User View
A user can:
- See any organization or project for which they are a member
- Create their own credential objects which only belong to them
- See and execute any job template for which they have been granted execution capabilities
If a job template for which a user has been granted execution capabilities does not specify an inventory or credential, the user is prompted at run-time to select among the inventory and credentials in the organization they own or have been granted usage capabilities.
Users that are job template administrators can make changes to job templates. However, to change to the inventory, project, playbook, credentials, or instance groups used in the job template, the user must also have the "Use" role for the project and inventory currently being used or being set.
32.2.1.2. Roles
All access that is granted to use, read, or write credentials is handled through roles, and roles are defined for a resource.
32.2.1.2.1. Built-in roles
The following table lists the RBAC system roles with a brief description of how that role is defined with regard to privileges in automation controller:
| System Role | What it can do |
|---|---|
| System Administrator - System wide singleton | Manages all aspects of the system |
| System Auditor - System wide singleton | Views all aspects of the system |
| Ad Hoc Role - Inventory | Runs ad hoc commands on an Inventory |
| Admin Role - Organizations, Teams, Inventory, Projects, Job Templates | Manages all aspects of a defined Organization, Team, Inventory, Project, or Job Template |
| Auditor Role - All | Views all aspects of a defined Organization, Project, Inventory, or Job Template |
| Execute Role - Job Templates | Runs assigned Job Template |
| Member Role - Organization, Team | User is a member of a defined Organization or Team. |
| Read Role - Organizations, Teams, Inventory, Projects, Job Templates | Views all aspects of a defined Organization, Team, Inventory, Project, or Job Template |
| Update Role - Project | Updates the Project from the configured source control management system |
| Update Role - Inventory | Updates the Inventory using the cloud source update system |
| Owner Role - Credential | Owns and manages all aspects of this Credential |
| Use Role - Credential, Inventory, Project, IGs, CGs | Uses the Credential, Inventory, Project, IGs, or CGs in a Job Template |
A Singleton Role is a special role that grants system-wide permissions. Automation controller currently provides two built-in Singleton Roles but the ability to create or customize a Singleton Role is not supported at this time.
32.2.1.3. Common Team Roles - "Personas"
Automation controller support personnel typically works to ensure that automation controller is available, and manage it in a way as to balance supportability and ease-of-use for users. Automation controller support personnel often assign Organization Owner or Administrator roles to users to enable them to create a new Organization or add members from their team that the respective access requires. This minimizes the number of supporting individuals and focuses more on maintaining uptime of the service and assisting users who are using automation controller.
The following table lists some common roles managed by the automation controller Organization:
| System Role (for Organizations) | Common User Roles | Description |
|---|---|---|
| Owner | Team Lead - Technical Lead | This user can control access for other users in their organization. They can add, remove and grant users specific access to projects, inventories, and job templates. This type of user can also create, remove or modify any aspect of an organization’s projects, templates, inventories, teams, and credentials. |
| Auditor | Security Engineer - Project Manager | This account can view all aspects of the organization in read-only mode. This might be a good role for a user who checks in and maintains compliance. This might also be a good role for a service account who manages or ships job data from automation controller to some other data collector. |
| Member - Team | All other users | By default, these users as an organization member do not receive any access to any aspect of the organization. To grant them access the respective organization owner must add them to their respective team and grant them Administrator, Execute, Use, Update, and Ad-hoc permissions to each component of the organization’s projects, inventories, and job templates. |
| Member - Team "Owner" | Power users - Lead Developer | Organization Owners can provide "admin" through the team interface, over any component of their organization including projects, inventories, and job templates. These users are able to modify and use the respective component given access. |
| Member - Team "Execute" | Developers - Engineers | This is the most common role and enables the organization member to execute job templates and read permission to the specific components. This permission applies to templates. |
| Member - Team "Use" | Developers - Engineers | This permission applies to an organization’s credentials, inventories, and projects. This permission enables a user to use the respective component within their job template. |
| Member - Team "Update" | Developers - Engineers | This permission applies to projects. Enables the user to run an SCM update on a project. |
32.3. Function of roles: editing and creating
Organization "resource roles" functionality are specific to a certain resource type - such as workflows. Being a member of such a role usually provides two types of permissions. If a user is given a "workflow admin role" for the organization "Default", then they have the following permissions:
- This user can create new workflows in the organization "Default"
- This user can edit all workflows in the "Default" organization
One exception is job templates, where having the role is independent of creation permission. For more information, see Job Templates.
32.3.1. Independence of resource roles and organization membership roles
Resource-specific organization roles are independent of the organization roles of administrator and member. Having the "workflow administrator role" for the "Default" organization does not enable a user to view all users in the organization, but having a "member" role in the "Default" organization does. The two types of roles are delegated independently of each other.
32.3.1.1. Necessary permissions to edit job templates
Users can edit fields not impacting job runs (non-sensitive fields) with a Job Template administrator role alone. However, to edit fields that impact job runs in a job template, a user must have the following:
- An admin role for the job template and container groups
- A use role for related projects
- A use role for related inventories
- A use role for related instance groups
An "organization job template admin" role was introduced, but having this role is not sufficient by itself to edit a job template within the organization if the user does not have a use role for the project, inventory, or instance group, or an administrator role to the container group that a job template uses.
To delegate full job template control (within an organization) to a user or team, you must grant the team or user all three organization-level roles:
- job template administrator
- project administrator
- inventory administrator
This ensures that the user (or all users who are members of the team with these roles) has full access to modify job templates in the organization. If a job template uses an inventory or project from another organization, the user with these organization roles can still not have permission to modify that job template. For clarity of permission management, do not mix projects or inventories from different organizations.
32.3.1.2. RBAC permissions
Each role must have a content object, for instance, the organization administrator role has a content object of the organization. To delegate a role, you must have administrator permission for the content object, with some exceptions that would result in you being able to reset a user’s password.
Parent is the organization.
Allow is what this new permission will explicitly allow.
Scope is the parent resource that this new role is created on. For example: Organization.project_create_role.
It is assumed that the creator of the resource is given the administrator role for that resource. Instances where resource creation does not also imply resource administration are explicitly called out.
The rules associated with each administrator type are as follows:
Project Admin
- Allow: Create, read, update, delete any project
- Scope: Organization
- User Interface: Project Add Screen - Organizations
Inventory Admin
- Parent: Org admin
- Allow: Create, read, update, delete any inventory
- Scope: Organization
- User Interface: Inventory Add Screen - Organizations
As with the Use role, if you assign Project Administrator and Inventory Administrator roles to a user, it enables them to create Job Templates (not workflows) for your organization.
Credential Admin
- Parent: Org admin
- Allow: Create, read, update, delete shared credentials
- Scope: Organization
- User Interface: Credential Add Screen - Organizations
Notification Admin
- Parent: Org admin
- Allow: Assignment of notifications
- Scope: Organization
Workflow Admin
- Parent: Org admin
- Allow: Create a workflow
- Scope: Organization
Org Execute
- Parent: Org admin
- Allow: Executing job templates and workflow job templates
- Scope: Organization
The following is a sample scenario showing an organization with its roles and which resources each have access to:
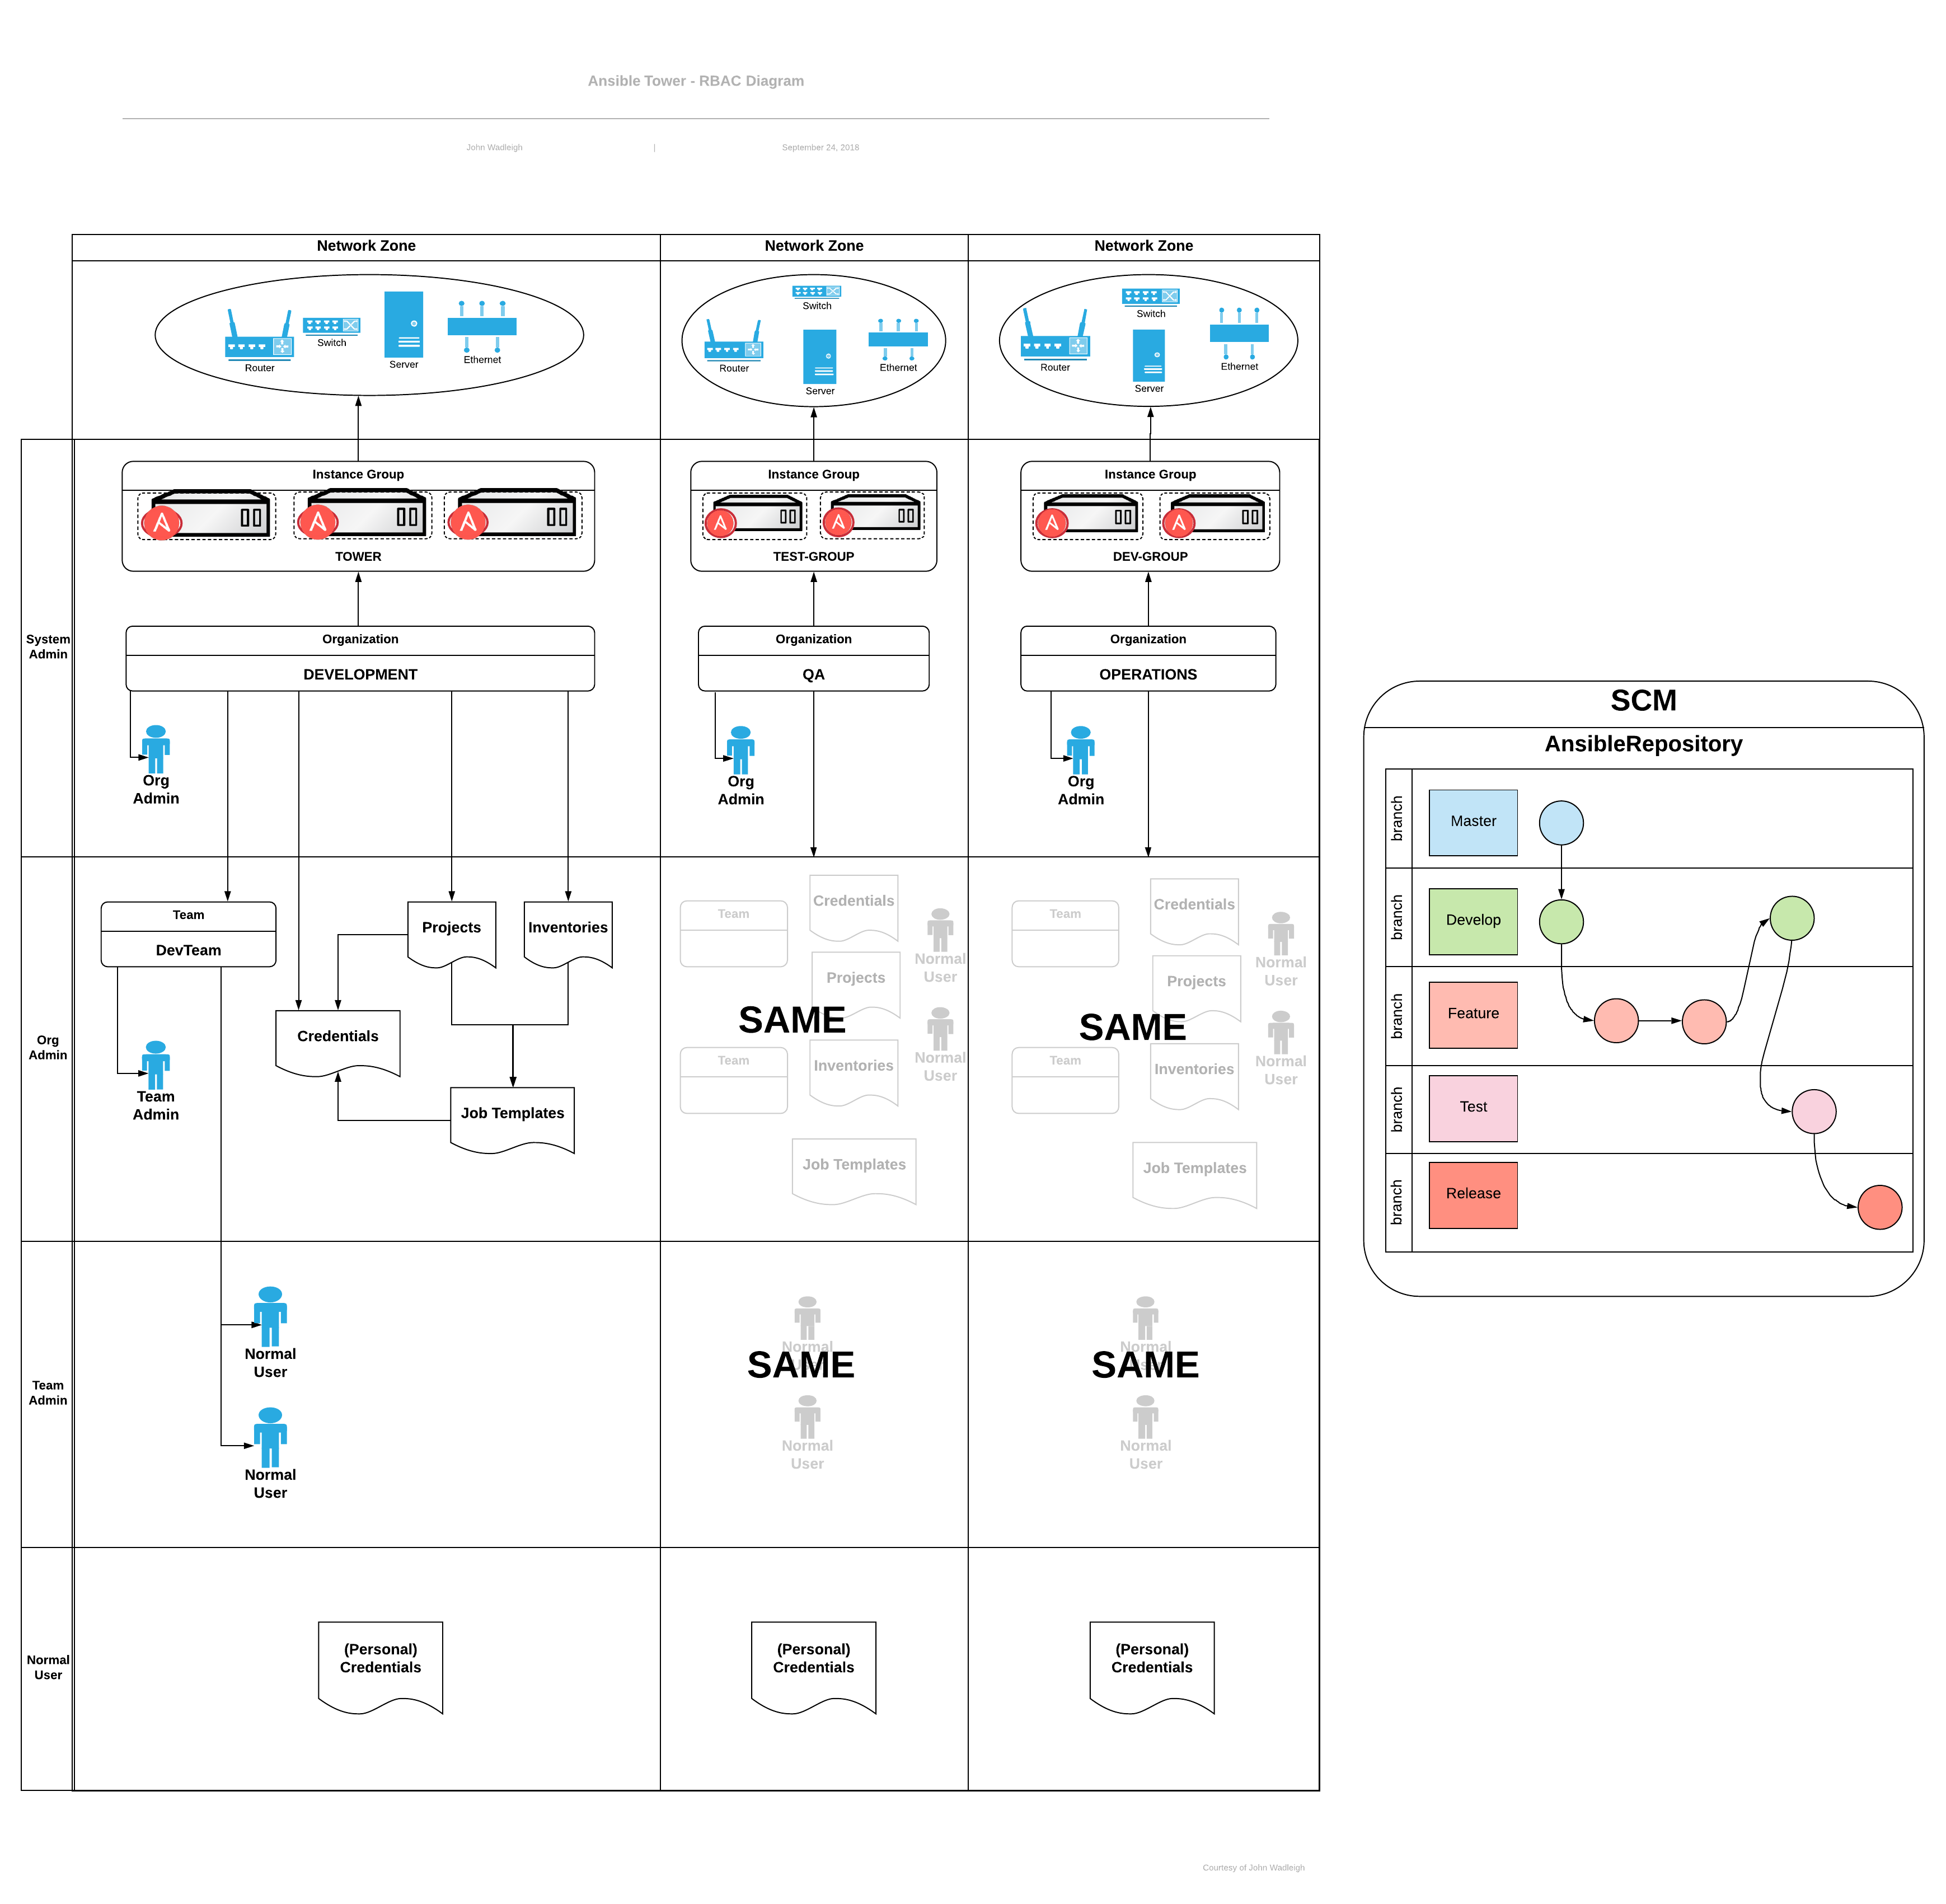
Chapter 33. Glossary
Ad Hoc
Ad hoc refers to using Ansible to perform a quick command, using /usr/bin/ansible, rather than the orchestration language, which is /usr/bin/ansible-playbook. An example of an ad hoc command might be rebooting 50 machines in your infrastructure. Anything you can do ad hoc can be accomplished by writing a Playbook. Playbooks can also glue lots of other operations together.
Callback Plugin
Refers to user-written code that can intercept results from Ansible and act on them. Some examples in the GitHub project perform custom logging, send email, or play sound effects.
Control Groups
Also known as 'cgroups', a control group is a feature in the Linux kernel that enables resources to be grouped and allocated to run processes. In addition to assigning resources to processes, cgroups can also report use of resources by all processes running inside of the cgroup.
Check Mode
Refers to running Ansible with the --check option, which does not make any changes on the remote systems, but only outputs the changes that might occur if the command ran without this flag. This is analogous to so-called "dry run" modes in other systems. However, this does not take into account unexpected command failures or cascade effects (which is true of similar modes in other systems). Use Check mode to get an idea of what might happen, but it is not a substitute for a good staging environment.
Container Groups
Container Groups are a type of Instance Group that specify a configuration for provisioning a pod in a Kubernetes or OpenShift cluster where a job is run. These pods are provisioned on-demand and exist only for the duration of the playbook run.
Credentials
Authentication details that can be used by automation controller to launch jobs against machines, to synchronize with inventory sources, and to import project content from a version control system. For more information, see Credentials.
Credential Plugin
Python code that contains definitions for an external credential type, its metadata fields, and the code needed for interacting with a secret management system.
Distributed Job
A job that consists of a job template, an inventory, and slice size. When executed, a distributed job slices each inventory into a number of "slice size" chunks, which are then used to run smaller job slices.
External Credential Type
A managed credential type used for authenticating with a secret management system.
Facts
Facts are things that are discovered about remote nodes. While they can be used in playbooks and templates just like variables, facts are things that are inferred, rather than set. Facts are automatically discovered when running plays by executing the internal setup module on the remote nodes. You never have to call the setup module explicitly: it just runs. It can be disabled to save time if it is not required. For the convenience of users who are switching from other configuration management systems, the fact module also pulls in facts from the ohai and facter tools if they are installed, which are fact libraries from Chef and Puppet, respectively.
Forks
Ansible and automation controller communicate with remote nodes in parallel. The level of parallelism can be set in several ways during the creation or editing of a Job Template, by passing --forks, or by editing the default in a configuration file. The default is a very conservative five forks, though if you have a lot of RAM, you can set this to a higher value, such as 50, for increased parallelism.
Group
A set of hosts in Ansible that can be addressed as a set, of which many can exist within a single Inventory.
Group Vars
The group_vars/ files are files that are stored in a directory with an inventory file, with an optional filename named after each group. This is a convenient place to put variables that are provided to a given group, especially complex data structures, so that these variables do not have to be embedded in the inventory file or playbook.
Handlers
Handlers are like regular tasks in an Ansible playbook (see Tasks), but are only run if the Task contains a "notify" directive and also indicates that it changed something. For example, if a configuration file is changed then the task referencing the configuration file templating operation might notify a service restart handler. This means services can be bounced only if they need to be restarted. Handlers can be used for things other than service restarts, but service restarts are the most common use.
Host
A system managed by automation controller, which may include a physical, virtual, or cloud-based server, or other device (typically an operating system instance). Hosts are contained in an Inventory. Sometimes referred to as a "node".
Host Specifier
Each Play in Ansible maps a series of tasks (which define the role, purpose, or orders of a system) to a set of systems. This "hosts:" directive in each play is often called the hosts specifier. It can select one system, many systems, one or more groups, or hosts that are in one group and explicitly not in another.
Instance Group
A group that contains instances for use in a clustered environment. An instance group provides the ability to group instances based on policy.
Inventory
A collection of hosts against which Jobs can be launched.
Inventory Script
A program that looks up hosts, group membership for hosts, and variable information from an external resource, whether that be a SQL database, a CMDB solution, or LDAP. This concept was adapted from Puppet (where it is called an "External Nodes Classifier") and works in a similar way.
Inventory Source
Information about a cloud or other script to be merged into the current inventory group, resulting in the automatic population of Groups, Hosts, and variables about those groups and hosts.
Job
One of many background tasks launched by automation controller, this is usually the instantiation of a Job Template, such as the launch of an Ansible playbook. Other types of jobs include inventory imports, project synchronizations from source control, or administrative cleanup actions.
Job Detail
The history of running a particular job, including its output and success/failure status.
Job Slice
See Distributed Job.
Job Template
The combination of an Ansible playbook and the set of parameters required to launch it. For more information, see Job templates.
JSON
JSON is a text-based format for representing structured data based on JavaScript object syntax. Ansible and automation controller use JSON for return data from remote modules. This enables modules to be written in any language, not just Python.
Mesh
Describes a network comprising of nodes. Communication between nodes is established at the transport layer by protocols such as TCP, UDP or Unix sockets.
See also, Node.
Metadata
Information for locating a secret in the external system once authenticated. The user provides this information when linking an external credential to a target credential field.
Node
A node corresponds to entries in the instance database model, or the /api/v2/instances/ endpoint, and is a machine participating in the cluster or mesh. The unified jobs API reports controller_node and execution_node fields. The execution node is where the job runs, and the controller node interfaces between the job and server functions.
| Node Type | Description |
|---|---|
| Control | Nodes that run persistent services, and delegate jobs to hybrid and execution nodes. |
| Hybrid | Nodes that run persistent services and execute jobs. |
| Hop | Used for relaying across the mesh only. |
| Execution | Nodes that run jobs delivered from control nodes (jobs submitted from the user’s Ansible automation) |
Notification Template
An instance of a notification type (Email, Slack, Webhook, etc.) with a name, description, and a defined configuration.
Notification
A Notification, such as Email, Slack or a Webhook, has a name, description and configuration defined in a Notification template. For example, when a job fails, a notification is sent using the configuration defined by the notification template.
Notify
The act of a task registering a change event and informing a handler task that another action needs to be run at the end of the play. If a handler is notified by multiple tasks, it is still only run once. Handlers are run in the order they are listed, not in the order that they are notified.
Organization
A logical collection of Users, Teams, Projects, and Inventories. Organization is the highest level in the object hierarchy.
Organization Administrator
An user with the rights to modify the Organization’s membership and settings, including making new users and projects within that organization. An organization administrator can also grant permissions to other users within the organization.
Permissions
The set of privileges assigned to Users and Teams that provide the ability to read, modify, and administer Projects, Inventories, and other objects.
Plays
A play is minimally a mapping between a set of hosts selected by a host specifier (usually chosen by groups, but sometimes by hostname globs) and the tasks which run on those hosts to define the role that those systems perform. A playbook is a list of plays. There can be one or many plays in a playbook.
Playbook
An Ansible playbook. For more information, see Ansible playbooks.
Policy
Policies dictate how instance groups behave and how jobs are executed.
Project
A logical collection of Ansible playbooks, represented in automation controller.
Roles
Roles are units of organization in Ansible and automation controller. Assigning a role to a group of hosts (or a set of groups, or host patterns, etc.) implies that they implement a specific behavior. A role can include applying variable values, tasks, and handlers, or a combination of these things. Because of the file structure associated with a role, roles become redistributable units that enable you to share behavior among playbooks, or with other users.
Secret Management System
A server or service for securely storing and controlling access to tokens, passwords, certificates, encryption keys, and other sensitive data.
Schedule
The calendar of dates and times for which a job should run automatically.
Sliced Job
See Distributed Job.
Source Credential
An external credential that is linked to the field of a target credential.
Sudo
Ansible does not require root logins and, since it is daemonless, does not require root level daemons (which can be a security concern in sensitive environments). Ansible can log in and perform many operations wrapped in a sudo command, and can work with both password-less and password-based sudo. Some operations that do not normally work with sudo (such as scp file transfer) can be achieved with Ansible’s copy, template, and fetch modules while running in sudo mode.
Superuser
An administrator of the server who has permission to edit any object in the system, whether or not it is associated with any organization. Superusers can create organizations and other superusers.
Survey
Questions asked by a job template at job launch time, configurable on the job template.
Target Credential
A non-external credential with an input field that is linked to an external credential.
Team
A sub-division of an Organization with associated Users, Projects, Credentials, and Permissions. Teams provide a means to implement role-based access control schemes and delegate responsibilities across Organizations.
User
An operator with associated permissions and credentials.
Webhook
Webhooks enable communication and information sharing between applications. They are used to respond to commits pushed to SCMs and launch job templates or workflow templates.
Workflow Job Template
A set consisting of any combination of job templates, project syncs, and inventory syncs, linked together in order to execute them as a single unit.
YAML
A human-readable language that is often used for writing configuration files. Ansible and automation controller use YAML to define playbook configuration languages and also variable files. YAML has a minimum of syntax, is very clean, and is easy for people to skim. It is a good data format for configuration files and humans, but is also machine readable. YAML is popular in the dynamic language community and the format has libraries available for serialization in many languages. Examples include Python, Perl, or Ruby.