
Automation Controller API Overview
Developer overview for the automation controller API
Abstract
Preface
Thank you for your interest in Red Hat Ansible Automation Platform. Ansible Automation Platform helps teams manage complex multitiered deployments by adding control, knowledge, and delegation to Ansible-powered environments.
The automation controller API Overview focuses on helping you understand the automation controller API.
Making open source more inclusive
Red Hat is committed to replacing problematic language in our code, documentation, and web properties. We are beginning with these four terms: master, slave, blacklist, and whitelist. Because of the enormity of this endeavor, these changes will be implemented gradually over several upcoming releases. For more details, see our CTO Chris Wright’s message.
Providing feedback on Red Hat documentation
If you have a suggestion to improve this documentation, or find an error, please contact technical support at https://access.redhat.com to create an issue on the Ansible Automation Platform Jira project using the docs-product component.
Chapter 1. Available tools with the API
Representational State Transfer (REST) relies on a stateless, client-server, and cacheable communications protocol, usually the HTTP protocol.
You might find it helpful to see which API calls the user interface makes in sequence. To do this, you can use the UI from Firebug or Chrome with developer plugins.
Another option is to use Charles Proxy. This offers a visualizer that you might find helpful. While it is commercial software, it can insert itself as an operating system X proxy and intercept both requests from web browsers, curl and other API consumers.
Further options include the following:
Chapter 2. Browsing with the API
REST APIs give access to resources (data entities) through URI paths.
Procedure
Go to the automation controller REST API in a web browser at:
https://<server name>/api/
- Click the "v2" link next to "current versions" or "available versions". Automation controller supports version 2 of the API.
-
Perform a
GETwith just the/api/endpoint to get thecurrent_version, which is the recommended version. -
Click the
 icon on the navigation menu, for documentation on the access methods for that particular API endpoint and what data is returned when using those methods.
-
Use the
PUTandPOSTverbs on the specific API pages by formatting JSON in the various text fields.
You can also view changed settings from factory defaults at /api/v2/settings/changed/ endpoint. It reflects changes you made in the API browser, not changed settings that come from static settings files.
Chapter 3. Use conventions in the API
Automation controller uses a standard REST API, rooted at /api/ on the server.
The API is versioned for compatibility reasons. You can see what API versions are available by querying /api/.
You might have to specify the content or type on POST or PUT requests:
-
PUT: Update a specific resource (by an identifier) or a collection of resources. You can also usePUTto create a specific resource if you know the resource identifier before-hand. -
POST: Create a new resource. Also acts as a catch-all verb for operations that do not fit into the other categories.
All URIs not ending with "/" receive a 301 redirect.
The formatting of extra_vars attached to Job Template records is preserved. YAML is returned as YAML with formatting and comments preserved, and JSON is returned as JSON.
Chapter 4. Sorting in the API
To give you examples that are easy to follow, we use the following URL throughout this guide:
https://<server name>/api/v2/groups/
Procedure
To specify that {{ model_verbose_name_plural }} are returned in a particular order, use the
order_byquery string parameter on theGETrequest:https://<server name>/api/v2/model_verbose_name_plural?order_by={{ order_field }}Prefix the field name with a dash (
-) to sort in reverse:https://<server name>/api/v2/model_verbose_name_plural?order_by=-{{ order_field }}You can specify the sorting fields by separating the field names with a comma (
,):https://<server name>/api/v2/model_verbose_name_plural?order_by={{ order_field }},some_other_field
Chapter 5. Using the search query string parameter
Procedure
- Use the search query string parameter to perform a non-case-sensitive search within all designated text fields of a model:
https://<server name>/api/v2/model_verbose_name?search=findme
- To search across related fields, use the following:
https://<server name>/api/v2/model_verbose_name?related__search=findme
Chapter 6. Filtering in the API
The system recognizes a collection as a "queryset". You can filter this by using various operators.
Procedure
To find groups that contain the name "foo", use the following:
http://<controller server name>/api/v2/groups/?name__contains=foo
To find an exact match, use the following:
http://<controller server name>/api/v2/groups/?name=foo
If a resource is of an integer type, you must add
\_\_intto the end to cast your string input value to an integer, such as the following:http://<controller server name>/api/v2/arbitrary_resource/?x__int=5
You can query related resources with the following:
http://<controller server name>/api/v2/users/?first_name__icontains=kim
This returns all users with names that include the string "Kim" in them.
You can also filter against many fields at once:
http://<controller server name>/api/v2/groups/?name__icontains=test&has_active_failures=false
This finds all groups containing the name "test" that have no active failures.
Additional resources
For more information about what types of operators are available, see QuerySet API reference.
You can also watch the API as the UI is being used to see how it is filtering on various criteria.
6.1. Advanced queries in the API
You can use additional query string parameters used to filter the list of results returned to those matching a given value. You can only use fields and relations that exist in the database for filtering. Ensure that any special characters in the specified value are URL-encoded. For example:
?field=value%20xyz
Fields can also span relations, only for fields and relationships defined in the database:
?other__field=value
To exclude results matching certain criteria, prefix the field parameter with not__:
?not__field=value
By default, all query string filters are AND’ed together, so only the results matching all filters are returned. To combine results matching any one of multiple criteria, prefix each query string parameter with or__:
?or__field=value&or__field=othervalue
?or__not__field=value&or__field=othervalue
The default AND filtering applies all filters simultaneously to each related object being filtered across database relationships. The chain filter instead applies filters separately for each related object. To use this, prefix the query string parameter with chain__:
?chain__related__field=value&chain__related__field2=othervalue
?chain__not__related__field=value&chain__related__field2=othervalue
If you write the first query as ?relatedfield=value&relatedfield2=othervalue, it returns only the primary objects where the same related object satisfied both conditions. As written by using the chain filter, it would return the intersection of primary objects matching each condition.
6.2. Field lookups
You can use field lookups for more advanced queries, by appending the lookup to the field name:
?field__lookup=value
The following field lookups are supported:
- exact: Exact match (default lookup if not specified).
- iexact: Case-insensitive version of exact.
- contains: Field contains value.
- icontains: Case-insensitive version of contains.
- startswith: Field starts with value.
- istartswith: Case-insensitive version of startswith.
- endswith: Field ends with value.
- iendswith: Case-insensitive version of endswith.
- regex: Field matches the given regular expression.
- iregex: Case-insensitive version of regular expression.
- gt: Greater than comparison.
- gte: Greater than or equal to comparison.
- lt: Less than comparison.
- lte: Less than or equal to comparison.
- isnull: Check whether the given field or related object is null; expects a boolean value.
- in: Check whether the given field’s value is present in the list provided; expects a list of items.
-
You can specify boolean values as
Trueor1for true,Falseor0for false (both case-insensitive).
For example, ?created__gte=2023-01-01 provides a list of items created after 1/1/2023.
You can specify null values as None or Null (both case-insensitive), though we recommend using the isnull lookup to explicitly check for null values.
You can specify lists (for the in lookup) as a comma-separated list of values. Filtering based on the requesting user’s level of access by query string parameter:
-
role_level: Level of role to filter on, such asadmin_role
Chapter 7. Using pagination in the API
The API paginates responses for collections. This means that while a collection might contain tens or hundreds of thousands of objects, in each web request, only a limited number of results are returned for API performance reasons.
When you receive the result for a collection, something similar to the following appears:
{'count': 25, 'next': 'http://testserver/api/v2/some_resource?page=2', 'previous': None, 'results': [ ... ] }Procedure
- Request the page given by the "next" sequential URL, to get to the next page.
Use the
page_size=XXquery string parameter to change the number of results returned for each request.-
The
page_sizehas a default maximum limit of 200, which is enforced when a user tries a value beyond it, for example,?page_size=1000. However, you can change this limit by setting the value in/etc/tower/conf.d/<some file>.pyto something higher. For example,MAX_PAGE_SIZE=1000.
-
The
Use the page query string parameter to retrieve a particular page of results:
http://<server name>/api/v2/model_verbose_name?page_size=100&page=2
The preceding and following links returned with the results set these query string parameters automatically.
Do not request page sizes greater than 200.
The user interface uses smaller values to avoid scrolling.
Chapter 8. Access resources
Automation controller uses a primary key to access individual resource objects. You can access automation controller resources by using resource-specific, human-readable identifiers through the named URL feature.
The following example shows the named URL path where you can access a resource object without an auxiliary query string:
/api/v2/hosts/host_name++inv_name++org_name/
8.1. Configuration settings
There are two named-URL-related configuration settings available under /api/v2/settings/named-url/: NAMED_URL_FORMATS and NAMED_URL_GRAPH_NODES.
NAMED_URL_FORMATS is a read only key-value pair list of all available named URL identifier formats. The following shows an example NAMED_URL_FORMATS:
"NAMED_URL_FORMATS": {
"organizations": "<name>",
"teams": "<name>++<organization.name>",
"credential_types": "<name>+<kind>",
"credentials": "<name>++<credential_type.name>+<credential_type.kind>++<organization.name>",
"notification_templates": "<name>++<organization.name>",
"job_templates": "<name>++<organization.name>",
"projects": "<name>++<organization.name>",
"inventories": "<name>++<organization.name>",
"hosts": "<name>++<inventory.name>++<organization.name>",
"groups": "<name>++<inventory.name>++<organization.name>",
"inventory_sources": "<name>++<inventory.name>++<organization.name>",
"inventory_scripts": "<name>++<organization.name>",
"instance_groups": "<name>",
"labels": "<name>++<organization.name>",
"workflow_job_templates": "<name>++<organization.name>",
"workflow_job_template_nodes": "<identifier>++<workflow_job_template.name>++<organization.name>",
"applications": "<name>++<organization.name>",
"users": "<username>",
"instances": "<hostname>"
}
For each item in NAMED_URL_FORMATS, the key is the API name of the resource to have named URL. The value is a string indicating how to form a human-readable unique identifier for that resource. NAMED_URL_FORMATS only lists the resources that can have named URL, any resource not listed there has no named URL. If a resource can have named URL, its objects must have a named_url field that represents the object-specific named URL. That field is only visible under detail view, not list view. You can access specified resource objects by using accurately generated named URL. This the object and its related URLs. For example, if /api/v2/res_name/obj_slug/ is valid, /api/v2/res_name/obj_slug/related_res_name/ is also valid.
NAMED_URL_FORMATS are instructive enough to compose human-readable unique identifiers and named URLs themselves. For ease-of-use, every object of a resource that can have named URL has a related field named_url that displays that object’s named URL. You can copy and paste that field for your own custom use. For more information, see the help text of the API browser if a resource object has named URL.
You can manually decide the named URL label, for example with ID 5. To compose a named URL for this specific resource object by using NAMED_URL_FORMATS, first look up the labels field of NAMED_URL_FORMATS to get the identifier format <name>++<organization.name>:
-
The first part of the URL format is
<name>, which indicates that you can find the label resource detail in/api/v2/labels/5/, and look fornamefield in returned JSON. If you have thenamefield with valueFoo, then the first part of the unique identifier isFoo. -
The second part of the format is double plus sign ++. That is the delimiter that separates different parts of a unique identifier. Append them to the unique identifier to get
Foo++. The third part of the format is
<organization.name>, which indicates that the field is not in the current label object under investigation, but in an organization that the label object points to. As the format indicates, look up the organization in the related field of the current returned JSON. That field might not exist. If it exists, follow the URL given in that field, for example,/api/v2/organizations/3/, to get the details of the specific organization, extract its name field, for example, "Default", and append it to the current unique identifier. Since<organizations.name>is the last part of the format, it generates the following named URL:/api/v2/labels/Foo++Default/.In the case where an organization does not exist in the related field of the label object detail, append an empty string instead. This does not alter the current identifier. Therefore,
Foo++becomes the final unique identifier and the resulting generated named URL becomes/api/v2/labels/Foo++/.
An important aspect of generating a unique identifier for named URL has to do with reserved characters. As the identifier is part of a URL, the following reserved characters by URL standard are encoded by percentage symbols: ;/?:@=&[]. For example, if an organization is named ;/?:@=&[], its unique identifier should be %3B%2F%3F%3A%40%3D%26%5B%5D. Another special reserved character is +, which is not reserved by URL standard but used by named URL to link different parts of an identifier. It is encoded by [+]. For example, if an organization is named [+], its unique identifier is %5B[+]%5D, where original [ and ] are percent encoded and + is converted to [+].
Although you cannot manually change NAMED_URL_FORMATS, modifications do occur automatically and expand over time, reflecting underlying resource modification and expansion. Consult the NAMED_URL_FORMATS on the same cluster where you want to use the named URL feature.
NAMED_URL_GRAPH_NODES is another read-only list of key-value pairs that exposes the internal graph data structure used to manage named URLs. This is not intended to be human-readable but must be used for programmatically generating named URLs. An example script for generating named URL given the primary key of arbitrary resource objects that can have a named URL, using info provided by NAMED_URL_GRAPH_NODES, can be found in GitHub.
8.2. Identifier format protocol
Resources are identifiable by their unique keys, which are tuples of resource fields. Every resource is guaranteed to have its primary key number alone as a unique key, but there might be many other unique keys. A resource can generate an identifier format and, therefore, have a named URL if it has at least one unique key that satisfies the following rules:
-
The key must contain only fields that are either the
namefield, or text fields with a finite number of possible choices (such as credential type resource’skindfield). - The only permitted exceptional field that breaks the preceding rule is a many-to-one related field relating to a resource other than itself, which is also allowed to have a slug.
If there are resources Foo and Bar, both Foo and Bar contain a name field and a choice field that can only have values "yes" or "no". Additionally, resource Foo has a many-to-one field (a foreign key) relating to Bar, for example fk. Foo has a unique key tuple (name, choice, fk) and Bar has a unique key tuple (name, choice). Bar can have named URL because it satisfies the preceding first rule. Foo can also have named URL, even though it breaks the first rule, the extra field breaking rule number one is the fk field, which is many-to-one-related to Bar and Bar can have named URL.
For resources satisfying the rule number one, their human-readable unique identifiers are combinations of foreign key fields, delimited by +. In specific, resource Bar in the preceding example has slug format <name>+<choice>. Note that the field order matters in slug format and the name field always comes first if present, followed by the remaining fields arranged in lexicographic order of field name. For example, if Bar also has an a_choice field satisfying rule one and the unique key becomes (name, choice, a_choice), its slug format becomes <name><a_choice><choice>.
For resources satisfying rule number two, if traced back through the extra foreign key fields, the result is a tree of resources that identify objects of that resource. To generate the identifier format, each resource in the traceback tree generates its own part of the standalone format, using all fields but the foreign keys. Finally, all parts are combined by ++ in the following order:
- Put standalone format as the first identifier part.
- Recursively generate unique identifiers for each resource. The underlying resource is pointing to using a foreign key (a child of a traceback tree node).
- Treat generated unique identifiers as the rest of the identifier components. Sort them in lexicographic order of corresponding foreign keys.
-
Combine all components together using
++to generate the final identifier format.
When generating an identifier format for resource Foo, automation controller generates the standalone formats, <name>+<choice> for Foo and <fk.name>+<fk.choice> for Bar, then combines them together to be <name><choice>+<fk.name>+<fk.choice>.
When generating identifiers according to the given identifier format, there are cases where a foreign key might point to nowhere. In this case, automation controller substitutes the part of the format corresponding to the resource the foreign key should point to with an empty string. For example, if a Foo object has the name ="alice", choice ="yes", but fk field = None, its resulting identifier is alice+yes++.
Chapter 9. Read-only fields
Certain fields in the REST API are marked read-only.
These usually include the URL of a resource, the ID, and occasionally some internal fields. For example, the 'created\_by' attribute of each object indicates which user created the resource, and you cannot edit this. If you post some values and notice that they are not changing, these fields might be read-only.
Chapter 10. Authenticating in the API
You can use the following authentication methods in the API:
Automation controller is designed for organizations to centralize and control their automation with a visual dashboard for out-of-the box control while providing a REST API to integrate with your other tools on a deeper level. Automation controller supports several authentication methods to make it easy to embed automation controller into existing tools and processes. This ensures that the right people can access its resources.
10.1. Using session authentication
You can use session authentication when logging in directly to the automation controller’s API or UI to manually create resources, such as inventories, projects, and job templates and start jobs in the browser. With this method, you can remain logged in for a prolonged period of time, not just for that HTTP request. For example, when browsing the API or UI in a browser such as Chrome or Mozilla Firefox. When a user logs in, a session cookie is created, this means that they can remain logged in when navigating to different pages within automation controller. The following image represents the communication that occurs between the client and server in a session:
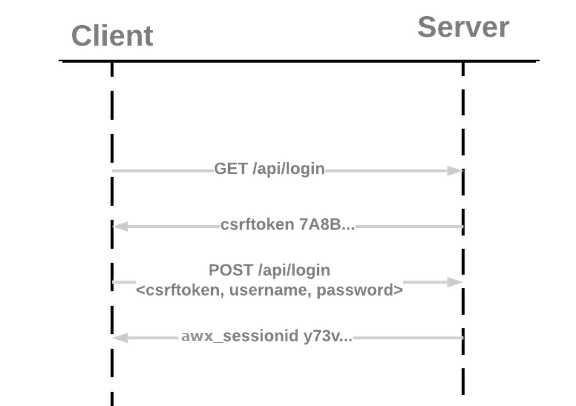
Use the curl tool to see the activity that occurs when you log in to automation controller.
Procedure
Use
GETto go to the/api/login/endpoint to get thecsrftokencookie:curl -k -c - https://<controller-host>/api/login/ localhost FALSE / FALSE 0 csrftoken AswSFn5p1qQvaX4KoRZN6A5yer0Pq0VG2cXMTzZnzuhaY0L4tiidYqwf5PXZckuj
POSTto the/api/login/endpoint with username, password, andX-CSRFToken=<token-value>:curl -X POST -H 'Content-Type: application/x-www-form-urlencoded' \ --referer https://<awx-host>/api/login/ \ -H 'X-CSRFToken: K580zVVm0rWX8pmNylz5ygTPamgUJxifrdJY0UDtMMoOis5Q1UOxRmV9918BUBIN' \ --data 'username=root&password=reverse' \ --cookie 'csrftoken=K580zVVm0rWX8pmNylz5ygTPamgUJxifrdJY0UDtMMoOis5Q1UOxRmV9918BUBIN' \ https://<awx-host>/api/login/ -k -D - -o /dev/null
All of this is done by automation controller when you log in to the UI or API in the browser, and you must only use it when authenticating in the browser. For programmatic integration with automation controller, see OAuth2 token authentication.
The following is an example of a typical response:
Server: nginx
Date: <current date>
Content-Type: text/html; charset=utf-8
Content-Length: 0
Connection: keep-alive
Location: /accounts/profile/
X-API-Session-Cookie-Name: awx_sessionid
Expires: <date>
Cache-Control: max-age=0, no-cache, no-store, must-revalidate, private
Vary: Cookie, Accept-Language, Origin
Session-Timeout: 1800
Content-Language: en
X-API-Total-Time: 0.377s
X-API-Request-Id: 700826696425433fb0c8807cd40c00a0
Access-Control-Expose-Headers: X-API-Request-Id
Set-Cookie: userLoggedIn=true; Path=/
Set-Cookie: current_user=<user cookie data>; Path=/
Set-Cookie: csrftoken=<csrftoken>; Path=/; SameSite=Lax
Set-Cookie: awx_sessionid=<your session id>; expires=<date>; HttpOnly; Max-Age=1800; Path=/; SameSite=Lax
Strict-Transport-Security: max-age=15768000
When a user is successfully authenticated with this method, the server responds with a header called X-API-Session-Cookie-Name, indicating the configured name of the session cookie. The default value is awx_session_id which you can see later in the Set-Cookie headers.
You can change the session expiration time by specifying it in the SESSION_COOKIE_AGE parameter. For more information, see Working with session limits.
10.2. Basic authentication
Basic authentication is stateless, therefore, you must send the base64-encoded username and password along with each request through the Authorization header. You can use this for API calls from curl requests, python scripts, or individual requests to the API. We recommend OAuth 2 Token Authentication for accessing the API when at all possible.
The following is an example of Basic authentication with curl:
# the --user flag adds this Authorization header for us
curl -X GET --user 'user:password' https://<controller-host>/api/v2/credentials -k -L
Additional resources
For more information about Basic authentication, see The 'Basic' HTTP Authentication Scheme.
Disabling Basic authentication
You can disable Basic authentication for security purposes.
Procedure
- From the navigation panel, select .
- Select Miscellaneous Authentication settings from the list of System options.
- Disable the option to Enable HTTP Basic Auth.
10.3. OAuth 2 token authentication
OAuth (Open Authorization) is an open standard for token-based authentication and authorization. OAuth 2 authentication is commonly used when interacting with the automation controller API programmatically. Similar to Basic authentication, you are given an OAuth 2 token with each API request through the Authorization header. Unlike Basic authentication, OAuth 2 tokens have a configurable timeout and are scopable. Tokens have a configurable expiration time and can be easily revoked for one user or for the entire automation controller system by an administrator if needed. You can do this with the revoke_oauth2_tokens management command, or by using the API as explained in Revoke an access token.
The different methods for obtaining OAuth2 access tokens in automation controller include the following:
- Personal access tokens (PAT)
- Application token: Password grant type
- Application token: Implicit grant type
- Application token: Authorization Code grant type
A user needs to create an OAuth 2 token in the API or in the Users > Tokens tab of the automation controller UI. For more information about creating tokens through the UI, see Users - Tokens.
For the purpose of this example, use the PAT method for creating a token in the API. After you create it, you can set the scope.
You can configure the expiration time of the token system-wide. For more information, see Using OAuth 2 Token System for Personal Access Tokens.
Token authentication is best used for any programmatic use of the automation controller API, such as Python scripts or tools such as curl.
Curl example
curl -u user:password -k -X POST https://<controller-host>/api/v2/tokens/
This call returns JSON data with the following:
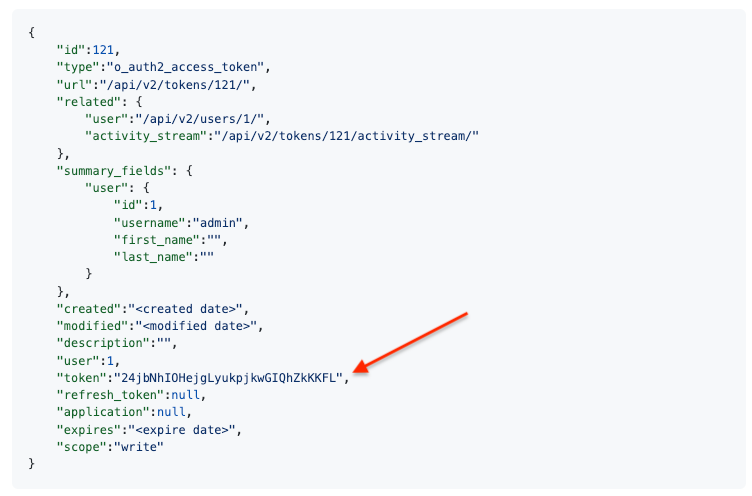
You can use the value of the token property to perform a GET request for an automation controller resource, such as Hosts:
curl -k -X POST \
  -H “Content-Type: application/json”
  -H “Authorization: Bearer <oauth2-token-value>” \
  https://<controller-host>/api/v2/hosts/
You can also run a job by making a POST to the job template that you want to start:
curl -k -X POST \
  -H "Authorization: Bearer <oauth2-token-value>" \
  -H "Content-Type: application/json" \
  --data '{"limit" : "ansible"}' \
  https://<controller-host>/api/v2/job_templates/14/launch/
Python example
awxkit is an open source tool that makes it easy to use HTTP requests to access the automation controller API. You can have awxkit get a PAT on your behalf by using the awxkit login command. For more information, see AWX Command Line Interface.
If you need to write custom requests, you can write a Python script by using Python library requests, such as the following example:
import requests
oauth2_token_value = 'y1Q8ye4hPvT61aQq63Da6N1C25jiA'   # your token value from controller
url = 'https://<controller-host>/api/v2/users/'
payload = {}
headers = {'Authorization': 'Bearer ' + oauth2_token_value,}

# makes request to controller user endpoint
response = requests.request('GET', url, headers=headers, data=payload,
allow_redirects=False, verify=False)

# prints json returned from controller with formatting
print(json.dumps(response.json(), indent=4, sort_keys=True))
Additional resources
For more information about obtaining OAuth2 access tokens and how to use OAuth 2 in the context of external applications, see Token-Based Authentication in the Automation controller Administration Guide.
Enabling external users to create OAuth 2 tokens
By default, external users such as those created by single sign-on are not able to generate OAuth tokens for security purposes.
Procedure
- From the navigation panel, select .
- Select Miscellaneous Authentication settings from the list of System options.
- Enable the option to Allow External Users to Create OAuth2 Tokens.
10.4. Single sign-on authentication
Single sign-on (SSO) authentication methods are different from other methods because the authentication of the user happens external to automation controller, such as Google SSO, Microsoft Azure SSO, SAML, or GitHub. For example, with GitHub SSO, GitHub is the single source of truth, which verifies your identity based on the username and password you gave automation controller.
You can configure SSO authentication by using automation controller inside a large organization with a central Identity Provider. Once you have configured an SSO method in automation controller, an option for that SSO is available on the login screen. If you click that option, it redirects you to the Identity Provider, in this case GitHub, where you present your credentials. If the Identity Provider verifies you successfully, automation controller makes a user linked to your GitHub user (if this is your first time logging in with this SSO method), and logs you in.
Additional resources
For the various types of supported SSO authentication methods, see Setting up social authentication and Setting up enterprise authentication in the Automation controller Administration Guide.