Installing OpenShift using AWS Marketplace
Red Hat OpenShift Container Platform is now available through the Amazon Web Services Marketplace. This allows you to create self-managed OpenShift Container Platform cluster deployments which are billed on pay-per-use basis (hourly, per core) with your AWS account while still being supported by Red Hat directly. Control plane nodes and infrastructure nodes run public RHCOS images and do not incur OpenShift subscription costs. This document explains how to install such a cluster and take advantage of this billing model.
Understanding the installation process
This guide assumes basic familiarity with the overall design concepts and installation procedure of Red Hat OpenShift Container Platform. For a general introduction, please refer to our product documentation.
The deployment of OpenShift Container Platform via the AWS Marketplace is conducted using the same utilities and procedures as a regular self-managed OpenShift Container Platform installation. Both installer-provisioned infrastructure and user-provisioned infrastructure scenarios are supported.
If you have never deployed OpenShift Container Platform on AWS before, you can explore the Install OpenShift on AWS quickly chapter in the installation guide. Customized installations are also supported; in fact, this guide requires that you customize installation parameters to take advantage of the billing integration/benefits.
Limitations
The following scenarios are not supported for installing OpenShift Container Platform using the AWS Marketplace:
- Single-node deployments
- Three-node deployments
- Applying patch versions that are not the
latestfor a given minor release
Subscribe to the Marketplace Offer
Visit the subscription offer page to subscribe or configure your subscription. The following offerings are available:
For customers based out of North America
- OpenShift Container Platform on x86
- OpenShift Kubernetes Engine on x86
- OpenShift Kubernetes Engine on Arm
- OpenShift Platform Plus on Arm
For customers based out of Europe, Middle East and Africa
- OpenShift Container Platform on x86
- OpenShift Kubernetes Engine on x86
- OpenShift Platform Plus on x86
From the subscription offer page, you then normally configure the terms for the instance types and quantity that will be used in a region.
NOTE: Currently an issue exists on the AWS Marketplace side where by clicking the Configure button you are redirect to the managed Red Hat OpenShift on AWS (ROSA) offering. AWS and Red Hat are working together to remediate this issue. In the meantime you can follow the below procedure to obtain the required AMI ID to continue with the installation of the cluster:
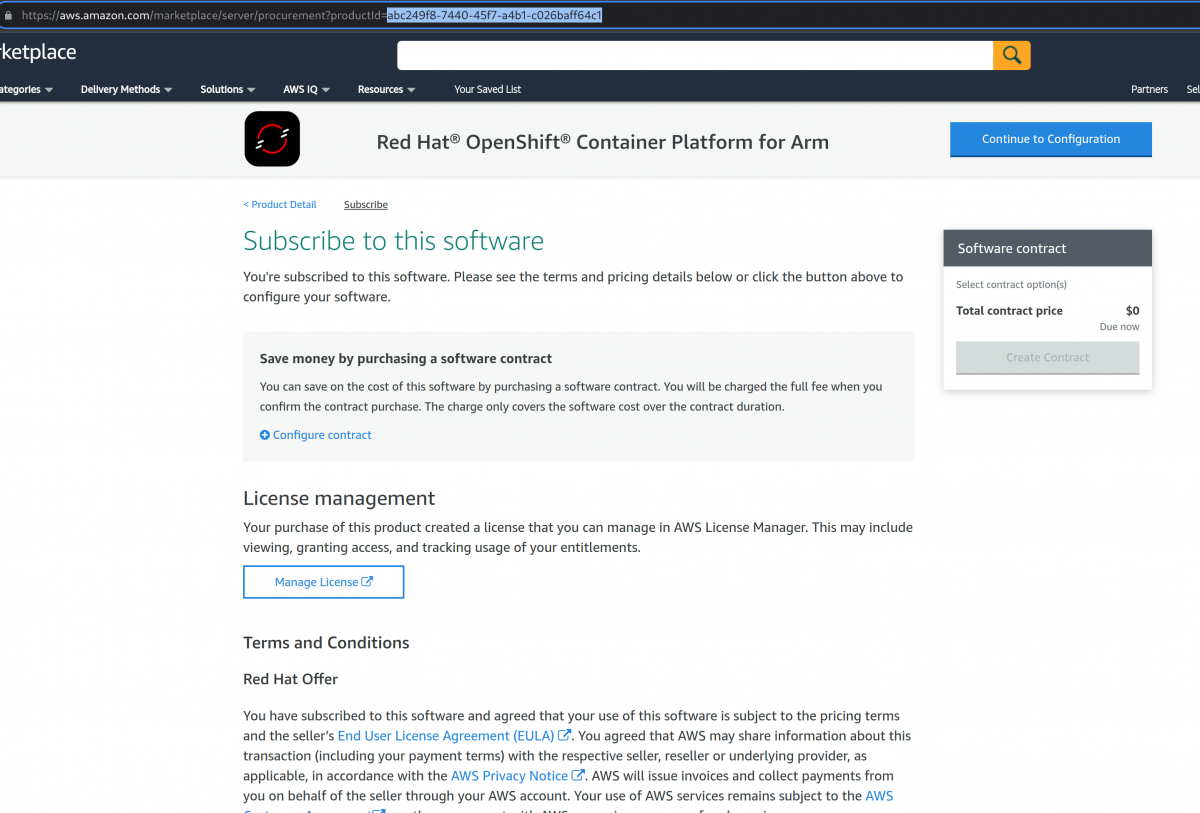
- Once you have accepted terms, and Continue to Configuration button becomes active, copy product ID from browser address bar (screenshot below).

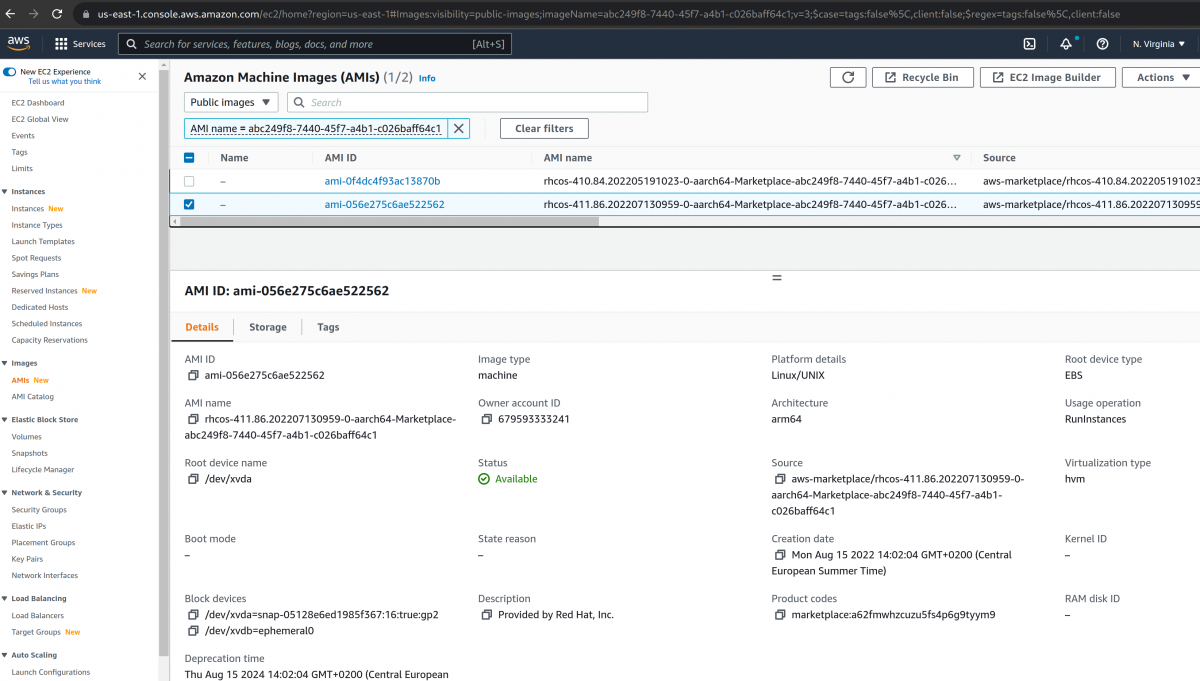
- Go to EC2 console and select the region to install the cluster in.
- Then switch to Images -> AMIs. Select Public images. Set AMI name to product ID that was copied from step #1 (screenshot below)

- AMIs of the product will appear, choose version by looking at AMI name. For OKE/OPP/OCP 4.11, AMI name will start with rhcos-411
Keep note of this AMI ID and region as it will need to be specified when installing your OpenShift cluster.
Setting up an OpenShift Container Platform cluster using AWS Marketplace
To create an OpenShift cluster using an AWS Marketplace image, follow the instructions for Install OpenShift on AWS with Customizations. In your install-config.yaml, set installConfig.compute.platform.aws.amiID to the AMI ID for the region specified in installConfig.platform.aws.region as configured in the previous step.
Here is an example install-config.yaml based on the values from the previous step:
apiVersion: v1
baseDomain: example.com
compute:
- hyperthreading: Enabled
  name: worker
  platform:
    aws:
      amiID: ami-06c4d345f7c207239
      type: m5.4xlarge
  replicas: 3
metadata:
  name: test-cluster
platform:
  aws:
    region: us-east-2
sshKey: ssh-ed25519 AAAA...
pullSecret: '{"auths": ...}'
Now that your install config has been created, you are ready to create your cluster as usual with openshift-install create cluster.
Post-cluster creation verification
When the deployment finishes, you have a cluster running with compute nodes using the AWS Marketplace images, and are thus now being billed as they are used through the AWS Marketplace via your AWS billing account.
Changing machine sets in a running cluster
To change the worker nodes in an existing cluster to use OpenShift images from the AWS Marketplace simply follow the steps for Modifying a machine set, and specify values for compute nodes similarly to when editing the install config.


Comments